JasperReport-レポートの表示と印刷
レポート入力プロセスのJasperPrintオブジェクトの出力は、組み込みのビューアコンポーネントを使用して表示したり、印刷したり、PDF、HTML、RTF、XLS、ODT、CSV、XMLなどのより一般的なドキュメント形式にエクスポートしたりできます。Jasperドキュメントの表示と印刷についてはこの章で説明し、エクスポートについては次の章、つまり「レポートのエクスポート」で説明します。
レポートの表示
JasperReportは、生成されたレポートを元の形式で表示するための組み込みのビューアーを提供します。これはスイングベースのコンポーネントであり、他のJavaアプリケーションは、表示または印刷するためにドキュメントを他の形式にエクスポートすることなく、このコンポーネントを統合できます。net.sf.jasperreports.view.JRViewerのクラスは、この視覚的なコンポーネントを表します。このクラスは、サブクラス化することにより、アプリケーションのニーズに応じてカスタマイズすることもできます。
JasperReportsには、レポートを表示するためにビジュアルコンポーネントを使用するSwingアプリケーションもあります。このアプリケーションは、*。jrprintが生成されるのと同じ形式でレポートを表示するのに役立ちます。このSwingアプリケーションは、クラスnet.sf.jasperreports.view.JasperViewerに実装されています。このクラスを使用してレポートを表示するには、レポートをANTターゲットにラップする必要があります。
生成されたレポートの表示
次の例は、-JasperViewerクラスを使用してレポートを表示する方法-を示しています。
レポートテンプレートを書いてみましょう。JRXMLファイル(C:\ tools \ jasperreports-5.0.1 \ test \ jasper_report_template.jrxml)の内容は次のとおりです。
<?xml version = "1.0" encoding = "UTF-8"?>
<!DOCTYPE jasperReport PUBLIC "//JasperReports//DTD Report Design//EN"
   "http://jasperreports.sourceforge.net/dtds/jasperreport.dtd">

<jasperReport xmlns = "http://jasperreports.sourceforge.net/jasperreports"
   xmlns:xsi = "http://www.w3.org/2001/XMLSchema-instance"
   xsi:schemaLocation = "http://jasperreports.sourceforge.net/jasperreports
   http://jasperreports.sourceforge.net/xsd/jasperreport.xsd"
   name = "jasper_report_template" language = "groovy" pageWidth = "595"
   pageHeight = "842" columnWidth = "555" leftMargin = "20" rightMargin = "20"
   topMargin = "20" bottomMargin = "20">

   <queryString>
      <![CDATA[]]>
   </queryString>

   <field name = "country" class = "java.lang.String">
      <fieldDescription><![CDATA[country]]></fieldDescription>
   </field>

   <field name = "name" class = "java.lang.String">
      <fieldDescription><![CDATA[name]]></fieldDescription>
   </field>

   <columnHeader>
      <band height = "23">

         <staticText>
            <reportElement mode = "Opaque" x = "0" y = "3"
               width = "535" height = "15" backcolor = "#70A9A9" />

            <box>
               <bottomPen lineWidth = "1.0" lineColor = "#CCCCCC" />
            </box>

            <textElement />
            <text><![CDATA[]]> </text>
         </staticText>

         <staticText>
            <reportElement x = "414" y = "3" width = "121" height = "15" />

            <textElement textAlignment = "Center" verticalAlignment = "Middle">
               <font isBold = "true" />
            </textElement>
            <text><![CDATA[Country]]></text>
         </staticText>

         <staticText>
            <reportElement x = "0" y = "3" width = "136" height = "15" />

            <textElement textAlignment = "Center" verticalAlignment = "Middle">
               <font isBold = "true" />
            </textElement>
            <text><![CDATA[Name]]></text>
         </staticText>

      </band>
   </columnHeader>

   <detail>
      <band height = "16">

         <staticText>
            <reportElement mode = "Opaque" x = "0" y = "0"
               width = "535" height = "14" backcolor = "#E5ECF9" />

            <box>
               <bottomPen lineWidth = "0.25" lineColor = "#CCCCCC" />
            </box>

            <textElement />
            <text><![CDATA[]]> </text>
         </staticText>

         <textField>
            <reportElement x = "414" y = "0" width = "121" height = "15" />

            <textElement textAlignment = "Center" verticalAlignment = "Middle">
               <font size = "9" />
            </textElement>

            <textFieldExpression class = "java.lang.String">
               <![CDATA[$F{country}]]>
            </textFieldExpression>
         </textField>

         <textField>
            <reportElement x = "0" y = "0" width = "136" height = "15" />
            <textElement textAlignment = "Center" verticalAlignment = "Middle" />

            <textFieldExpression class = "java.lang.String">
               <![CDATA[$F{name}]]>
            </textFieldExpression>
         </textField>

      </band>
   </detail>

</jasperReport>
次に、Javaデータオブジェクト(Java Bean)のコレクションをJasperReports Engineに渡して、このコンパイル済みレポートに入力します。
データオブジェクト(Java Bean)を表すPOJODataBean.javaを記述します。このクラスは、「name」と「country」という2つのStringオブジェクトを定義します。ディレクトリに保存しますC:\tools\jasperreports-5.0.1\test\src\com\tutorialspoint。
package com.tutorialspoint;

public class DataBean {
   private String name;
   private String country;

   public String getName() {
      return name;
   }

   public void setName(String name) {
      this.name = name;
   }

   public String getCountry() {
      return country;
   }

   public void setCountry(String country) {
      this.country = country;
   }
}JavaBeanオブジェクトのコレクションを生成するビジネスロジックを持つクラスDataBeanList.javaを記述します。これはさらにJasperReportsエンジンに渡され、レポートが生成されます。ここでは、リストに4つのDataBeanオブジェクトを追加しています。ディレクトリに保存しますC:\tools\jasperreports-5.0.1\test\src\com\tutorialspoint。
package com.tutorialspoint;

import java.util.ArrayList;

public class DataBeanList {
   public ArrayList<DataBean> getDataBeanList() {
      ArrayList<DataBean> dataBeanList = new ArrayList<DataBean>();

      dataBeanList.add(produce("Manisha", "India"));
      dataBeanList.add(produce("Dennis Ritchie", "USA"));
      dataBeanList.add(produce("V.Anand", "India"));
      dataBeanList.add(produce("Shrinath", "California"));

      return dataBeanList;
   }

   /**
    * This method returns a DataBean object,
    * with name and country set in it.
    */
   private DataBean produce(String name, String country) {
      DataBean dataBean = new DataBean();
      dataBean.setName(name);
      dataBean.setCountry(country);

      return dataBean;
   }
}
メインクラスファイルを作成する JasperReportFill.java、クラス(DataBeanList)からJava Beanコレクションを取得し、それをJasperReportsエンジンに渡して、レポートテンプレートに入力します。ディレクトリに保存しますC:\tools\jasperreports-5.0.1\test\src\com\tutorialspoint。
package com.tutorialspoint;

import java.util.ArrayList;
import java.util.HashMap;
import java.util.Map;

import net.sf.jasperreports.engine.JRException;
import net.sf.jasperreports.engine.JasperFillManager;
import net.sf.jasperreports.engine.data.JRBeanCollectionDataSource;

public class JasperReportFill {
   @SuppressWarnings("unchecked")
   public static void main(String[] args) {
      String sourceFileName =
         "c://tools/jasperreports-5.0.1/test/jasper_report_template.jasper";
      DataBeanList DataBeanList = new DataBeanList();
      ArrayList<DataBean> dataList = DataBeanList.getDataBeanList();

      JRBeanCollectionDataSource beanColDataSource = new
         JRBeanCollectionDataSource(dataList);

      Map parameters = new HashMap();
      try {
         JasperFillManager.fillReportToFile(
            sourceFileName, parameters, beanColDataSource);
      } catch (JRException e) {
         e.printStackTrace();
      }
   }
}
ターゲットを書いてみましょう viewFillReportbuild.xmlファイルに。build.xmlファイルは次のとおりです-
インポートファイル--baseBuild.xmlは、Environment Setupの章から選択され、build.xmlと同じディレクトリに配置する必要があります。
<?xml version = "1.0" encoding = "UTF-8"?>
<project name = "JasperReportTest" default = "viewFillReport" basedir = ".">
<import file = "baseBuild.xml"/>
<target name = "viewFillReport" depends = "compile,compilereportdesing,run"
description = "Launches the report viewer
to preview the report stored in the .JRprint file.">
<java classname = "net.sf.jasperreports.view.JasperViewer" fork = "true">
<arg value = "-F${file.name}.JRprint" />
<classpath refid = "classpath" />
</java>
</target>
<target name = "compilereportdesing" description = "Compiles the JXML file and
produces the .jasper file.">
<taskdef name = "jrc"
classname = "net.sf.jasperreports.ant.JRAntCompileTask">
<classpath refid = "classpath" />
</taskdef>
<jrc destdir = ".">
<src>
<fileset dir = ".">
<include name = "*.jrxml" />
</fileset>
</src>
<classpath refid = "classpath" />
</jrc>
</target>
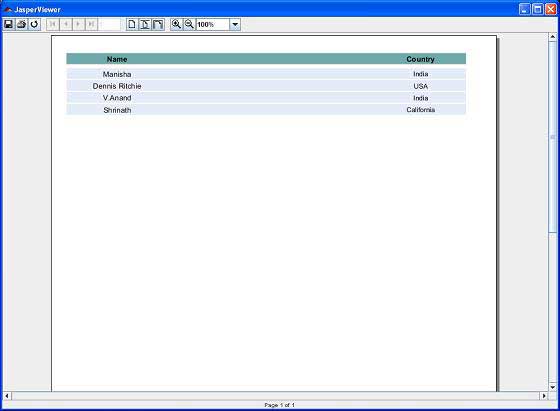
</project>次に、コマンドラインウィンドウを開いて、build.xmlが配置されているディレクトリに移動しましょう。最後に、コマンドを実行します ant -Dmain-class=com.tutorialspoint.JasperReportFill(viewFillReportがデフォルトのターゲットです)。その結果、以下の画面に示すようなJasperViewerウィンドウが表示されます。
レポートの印刷
net.sf.jasperreports.engine.JasperPrintManagerクラスを使用して、JasperReportsライブラリによって生成されたドキュメントを(独自の形式、つまりJasperPrintオブジェクトで)印刷できます。これは、Java 2 PrintingAPIに依存するファサードクラスです。JasperReportドキュメントがHTMLやPDFなどの他の形式にエクスポートされたら、ドキュメントを印刷することもできます。
生成されたレポートの印刷
次のコードは、レポートの印刷を示しています。既存のクラスJasperReportFillを更新しましょう。JasperPrintManager.printReport()メソッドを使用します。このメソッドは、最初のパラメーターとしてソースファイル名(ここでは、前のステップでメソッドJasperFillManager.fillReportToFile()を使用して生成した.jrprintファイルを渡します)を取ります。2番目のパラメーターは、標準の印刷ダイアログを表示するためのブール値です(true ここに)。
package com.tutorialspoint;

import java.util.ArrayList;
import java.util.HashMap;
import java.util.Map;

import net.sf.jasperreports.engine.JRException;
import net.sf.jasperreports.engine.JasperFillManager;
import net.sf.jasperreports.engine.JasperPrintManager;
import net.sf.jasperreports.engine.data.JRBeanCollectionDataSource;

public class JasperReportFill {
   @SuppressWarnings("unchecked")
   public static void main(String[] args) {
      String sourceFileName = "c://tools/jasperreports-5.0.1/" +
         "test/jasper_report_template.jasper";
      String printFileName = null;
      DataBeanList DataBeanList = new DataBeanList();
      ArrayList<DataBean> dataList = DataBeanList.getDataBeanList();

      JRBeanCollectionDataSource beanColDataSource = new
         JRBeanCollectionDataSource(dataList);

      Map parameters = new HashMap();
      try {
    	   printFileName = JasperFillManager.fillReportToFile(
            sourceFileName, parameters, beanColDataSource);
         if(printFileName != null){
            JasperPrintManager.printReport( printFileName, true);
         }
      } catch (JRException e) {
         e.printStackTrace();
      }
   }
}
それでは、このファイルをディレクトリに保存しましょう C:\tools\jasperreports-5.0.1\test\src\com\tutorialspoint。ANTを使用してこのファイルをコンパイルして実行します。build.xmlの内容は以下のとおりです-
<?xml version = "1.0" encoding = "UTF-8"?>
<project name = "JasperReportTest" default = "executereport" basedir = ".">
   <import file = "baseBuild.xml"/>

   <target name = "executereport" depends = "compile,compilereportdesing,run">
      <echo message = "Im here"/>
   </target>

   <target name = "compilereportdesing" description = "Compiles the JXML file and
      produces the .jasper file.">

      <taskdef name = "jrc"
         classname = "net.sf.jasperreports.ant.JRAntCompileTask">
         <classpath refid = "classpath" />
      </taskdef>

      <jrc destdir = ".">
         <src>
            <fileset dir = ".">
               <include name = "*.jrxml" />
            </fileset>
         </src>
         <classpath refid = "classpath" />
      </jrc>

   </target>

</project>次に、コマンドプロンプトを開き、build.xmlが配置されているディレクトリに移動します。最後に、コマンドを実行しますant -Dmain-class=com.tutorialspoint.JasperReportPrint。その結果、印刷ダイアログボックスが表示されます。[OK]をクリックしてドキュメントを印刷します。