Javaの同時実行性-クイックガイド
Javaはマルチスレッドプログラミング言語です。つまり、Javaを使用してマルチスレッドプログラムを開発できます。マルチスレッドプログラムには、同時に実行できる2つ以上のパーツが含まれており、各パーツは、特にコンピューターに複数のCPUがある場合に、使用可能なリソースを最適に利用して、異なるタスクを同時に処理できます。
定義上、マルチタスクとは、複数のプロセスがCPUなどの共通の処理リソースを共有する場合です。マルチスレッドは、マルチタスクの概念をアプリケーションに拡張し、単一のアプリケーション内の特定の操作を個々のスレッドに分割できます。各スレッドは並行して実行できます。OSは、処理時間を異なるアプリケーション間だけでなく、アプリケーション内の各スレッド間でも分割します。
マルチスレッドを使用すると、同じプログラムで複数のアクティビティを同時に進行できるように記述できます。
スレッドのライフサイクル
スレッドは、そのライフサイクルのさまざまな段階を通過します。たとえば、スレッドが作成され、開始され、実行されてから終了します。次の図は、スレッドの完全なライフサイクルを示しています。
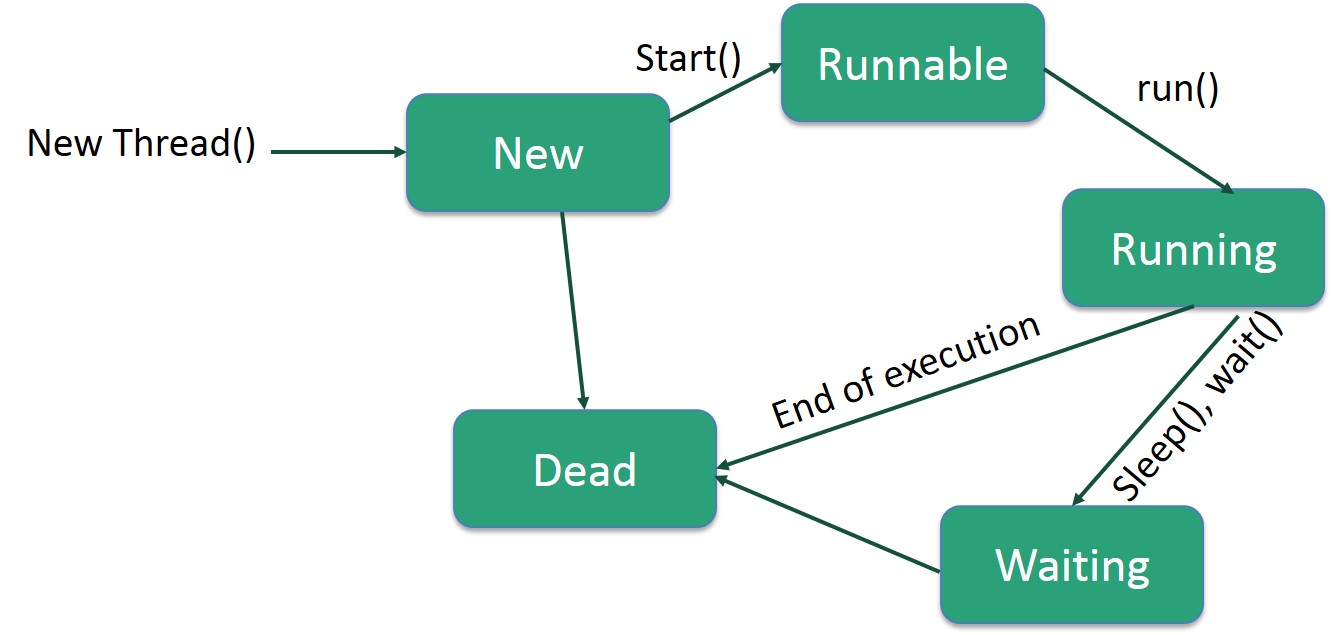
以下はライフサイクルの段階です-
New−新しいスレッドは、新しい状態でライフサイクルを開始します。プログラムがスレッドを開始するまで、この状態のままになります。とも呼ばれますborn thread。
Runnable−新しく生まれたスレッドが開始されると、スレッドは実行可能になります。この状態のスレッドは、そのタスクを実行していると見なされます。
Waiting−スレッドが別のスレッドがタスクを実行するのを待機している間に、スレッドが待機状態に移行する場合があります。別のスレッドが待機中のスレッドに実行を継続するように通知した場合にのみ、スレッドは実行可能状態に戻ります。
Timed Waiting−実行可能なスレッドは、指定された時間間隔で時間指定待機状態に入ることができます。この状態のスレッドは、その時間間隔が経過するか、待機中のイベントが発生すると、実行可能状態に戻ります。
Terminated (Dead) −実行可能なスレッドは、タスクを完了するか、その他の方法で終了すると、終了状態になります。
スレッドの優先順位
すべてのJavaスレッドには、オペレーティングシステムがスレッドがスケジュールされる順序を決定するのに役立つ優先順位があります。
Javaスレッドの優先順位は、MIN_PRIORITY(定数1)からMAX_PRIORITY(定数10)の間の範囲にあります。デフォルトでは、すべてのスレッドにNORM_PRIORITY(定数5)が優先されます。
優先度の高いスレッドはプログラムにとってより重要であり、優先度の低いスレッドの前にプロセッサ時間を割り当てる必要があります。ただし、スレッドの優先順位は、スレッドが実行される順序を保証することはできず、プラットフォームに大きく依存します。
実行可能なインターフェイスを実装してスレッドを作成する
クラスがスレッドとして実行されることを意図している場合は、実装することでこれを実現できます。 Runnableインターフェース。3つの基本的な手順に従う必要があります-
ステップ1
最初のステップとして、によって提供されるrun()メソッドを実装する必要があります。 Runnableインターフェース。このメソッドはスレッドのエントリポイントを提供し、完全なビジネスロジックをこのメソッド内に配置します。以下は、run()メソッドの簡単な構文です。
public void run( )ステップ2
2番目のステップとして、インスタンス化する Thread 次のコンストラクタを使用するオブジェクト-
Thread(Runnable threadObj, String threadName);ここで、threadObjは、を実装するクラスのインスタンスです。Runnable インターフェースと threadName 新しいスレッドに付けられた名前です。
ステップ3
スレッドオブジェクトが作成されたら、を呼び出すことで開始できます start()run()メソッドの呼び出しを実行するメソッド。以下はstart()メソッドの簡単な構文です-
void start();Example
これは、新しいスレッドを作成して実行を開始する例です-
class RunnableDemo implements Runnable {
   private Thread t;
   private String threadName;

   RunnableDemo(String name) {
      threadName = name;
      System.out.println("Creating " +  threadName );
   }

   public void run() {
      System.out.println("Running " +  threadName );

      try {

         for(int i = 4; i > 0; i--) {
            System.out.println("Thread: " + threadName + ", " + i);

            // Let the thread sleep for a while.
            Thread.sleep(50);
         }
      } catch (InterruptedException e) {
         System.out.println("Thread " +  threadName + " interrupted.");
      }
      System.out.println("Thread " +  threadName + " exiting.");
   }

   public void start () {
      System.out.println("Starting " +  threadName );

      if (t == null) {
         t = new Thread (this, threadName);
         t.start ();
      }
   }
}

public class TestThread {

   public static void main(String args[]) {
      RunnableDemo R1 = new RunnableDemo("Thread-1");
      R1.start();

      RunnableDemo R2 = new RunnableDemo("Thread-2");
      R2.start();
   }
}
これにより、次の結果が生成されます-
Output
Creating Thread-1
Starting Thread-1
Creating Thread-2
Starting Thread-2
Running Thread-1
Thread: Thread-1, 4
Running Thread-2
Thread: Thread-2, 4
Thread: Thread-1, 3
Thread: Thread-2, 3
Thread: Thread-1, 2
Thread: Thread-2, 2
Thread: Thread-1, 1
Thread: Thread-2, 1
Thread Thread-1 exiting.
Thread Thread-2 exiting.
スレッドクラスを拡張してスレッドを作成する
スレッドを作成する2番目の方法は、拡張する新しいクラスを作成することです。 Thread次の2つの簡単な手順を使用してクラスを作成します。このアプローチにより、Threadクラスで使用可能なメソッドを使用して作成された複数のスレッドをより柔軟に処理できます。
ステップ1
オーバーライドする必要があります run( )Threadクラスで使用可能なメソッド。このメソッドはスレッドのエントリポイントを提供し、完全なビジネスロジックをこのメソッド内に配置します。以下はrun()メソッドの簡単な構文です-
public void run( )ステップ2
スレッドオブジェクトが作成されたら、を呼び出すことで開始できます start()run()メソッドの呼び出しを実行するメソッド。以下はstart()メソッドの簡単な構文です-
void start( );Example
これは、スレッドを拡張するために書き直された前述のプログラムです-
class ThreadDemo extends Thread {
   private Thread t;
   private String threadName;

   ThreadDemo(String name) {
      threadName = name;
      System.out.println("Creating " +  threadName );
   }

   public void run() {
      System.out.println("Running " +  threadName );

      try {

         for(int i = 4; i > 0; i--) {
            System.out.println("Thread: " + threadName + ", " + i);

            // Let the thread sleep for a while.
            Thread.sleep(50);
         }
      } catch (InterruptedException e) {
         System.out.println("Thread " +  threadName + " interrupted.");
      }
      System.out.println("Thread " +  threadName + " exiting.");
   }

   public void start () {
      System.out.println("Starting " +  threadName );

      if (t == null) {
         t = new Thread (this, threadName);
         t.start ();
      }
   }
}

public class TestThread {

   public static void main(String args[]) {
      ThreadDemo T1 = new ThreadDemo("Thread-1");
      T1.start();

      ThreadDemo T2 = new ThreadDemo("Thread-2");
      T2.start();
   }
}
これにより、次の結果が生成されます-
Output
Creating Thread-1
Starting Thread-1
Creating Thread-2
Starting Thread-2
Running Thread-1
Thread: Thread-1, 4
Running Thread-2
Thread: Thread-2, 4
Thread: Thread-1, 3
Thread: Thread-2, 3
Thread: Thread-1, 2
Thread: Thread-2, 2
Thread: Thread-1, 1
Thread: Thread-2, 1
Thread Thread-1 exiting.
Thread Thread-2 exiting.
この章では、Javaに適した環境をセットアップするさまざまな側面について説明します。
ローカル環境のセットアップ
それでもJavaプログラミング言語用の環境をセットアップする場合は、このセクションで、マシンにJavaをダウンロードしてセットアップする方法について説明します。以下は、環境をセットアップするための手順です。
Java SEは、Javaのダウンロードリンクから無料で入手できます。オペレーティングシステムに基づいたバージョンをダウンロードできます。
指示に従ってJavaをダウンロードし、 .exeマシンにJavaをインストールします。マシンにJavaをインストールしたら、正しいインストールディレクトリを指すように環境変数を設定する必要があります-
Windowsのパスを設定する
Javaをc:\ Program Files \ java \ jdkディレクトリにインストールしたと仮定します-
「マイコンピュータ」を右クリックし、「プロパティ」を選択します。
[詳細設定]タブの下にある[環境変数]ボタンをクリックします。
ここで、「Path」変数を変更して、Java実行可能ファイルへのパスも含まれるようにします。たとえば、パスが現在「C:\ WINDOWS \ SYSTEM32」に設定されている場合は、パスを「C:\ WINDOWS \ SYSTEM32; c:\ ProgramFiles \ java \ jdk \ bin」に変更します。
Linux、UNIX、Solaris、FreeBSDのパスの設定
環境変数PATHは、Javaバイナリがインストールされている場所を指すように設定する必要があります。これを行うのに問題がある場合は、シェルのドキュメントを参照してください。
たとえば、シェルとしてbashを使用する場合は、 '。bashrcの末尾に次の行を追加します。exportPATH= / path / to / java:$ PATH'
人気のあるJavaエディター
Javaプログラムを作成するには、テキストエディタが必要です。市場にはさらに洗練されたIDEがあります。しかし今のところ、あなたは次のいずれかを考えることができます-
Notepad − Windowsマシンでは、メモ帳(このチュートリアルに推奨)、TextPadなどの単純なテキストエディターを使用できます。
Netbeans −オープンソースで無料のJava IDEで、からダウンロードできます。 https://netbeans.org/index.html。
Eclipse −Eclipseオープンソースコミュニティによって開発されたJavaIDEで、以下からダウンロードできます。 https://www.eclipse.org/。
Core Javaは、マルチスレッドプログラムを完全に制御します。要件に基づいて、一時停止、再開、または完全に停止できるマルチスレッドプログラムを開発できます。スレッドオブジェクトで使用して動作を制御できるさまざまな静的メソッドがあります。次の表に、これらのメソッドを示します-
| シニア番号 | 方法と説明 |
|---|---|
| 1 | public void suspend() このメソッドはスレッドを一時停止状態にし、resume()メソッドを使用して再開できます。 |
| 2 | public void stop() このメソッドはスレッドを完全に停止します。 |
| 3 | public void resume() このメソッドは、suspend()メソッドを使用して中断されたスレッドを再開します。 |
| 4 | public void wait() 別のスレッドがnotify()を呼び出すまで、現在のスレッドを待機させます。 |
| 5 | public void notify() このオブジェクトのモニターで待機している単一のスレッドをウェイクアップします。 |
Javaの最新バージョンでは、suspend()、resume()、およびstop()メソッドの使用が非推奨になっているため、使用可能な代替メソッドを使用する必要があることに注意してください。
例
class RunnableDemo implements Runnable {
   public Thread t;
   private String threadName;
   boolean suspended = false;

   RunnableDemo(String name) {
      threadName = name;
      System.out.println("Creating " +  threadName );
   }

   public void run() {
      System.out.println("Running " +  threadName );

      try {

         for(int i = 10; i > 0; i--) {
            System.out.println("Thread: " + threadName + ", " + i);

            // Let the thread sleep for a while.
            Thread.sleep(300);

            synchronized(this) {

               while(suspended) {
                  wait();
               }
            }
         }
      } catch (InterruptedException e) {
         System.out.println("Thread " +  threadName + " interrupted.");
      }
      System.out.println("Thread " +  threadName + " exiting.");
   }

   public void start () {
      System.out.println("Starting " +  threadName );

      if (t == null) {
         t = new Thread (this, threadName);
         t.start ();
      }
   }

   void suspend() {
      suspended = true;
   }

   synchronized void resume() {
      suspended = false;
      notify();
   }
}

public class TestThread {

   public static void main(String args[]) {
      RunnableDemo R1 = new RunnableDemo("Thread-1");
      R1.start();

      RunnableDemo R2 = new RunnableDemo("Thread-2");
      R2.start();

      try {
         Thread.sleep(1000);
         R1.suspend();
         System.out.println("Suspending First Thread");
         Thread.sleep(1000);
         R1.resume();
         System.out.println("Resuming First Thread");

         R2.suspend();
         System.out.println("Suspending thread Two");
         Thread.sleep(1000);
         R2.resume();
         System.out.println("Resuming thread Two");
      } catch (InterruptedException e) {
         System.out.println("Main thread Interrupted");
      } try {
         System.out.println("Waiting for threads to finish.");
         R1.t.join();
         R2.t.join();
      } catch (InterruptedException e) {
         System.out.println("Main thread Interrupted");
      }
      System.out.println("Main thread exiting.");
   }
}
上記のプログラムは次の出力を生成します-
出力
Creating Thread-1
Starting Thread-1
Creating Thread-2
Starting Thread-2
Running Thread-1
Thread: Thread-1, 10
Running Thread-2
Thread: Thread-2, 10
Thread: Thread-1, 9
Thread: Thread-2, 9
Thread: Thread-1, 8
Thread: Thread-2, 8
Thread: Thread-1, 7
Thread: Thread-2, 7
Suspending First Thread
Thread: Thread-2, 6
Thread: Thread-2, 5
Thread: Thread-2, 4
Resuming First Thread
Suspending thread Two
Thread: Thread-1, 6
Thread: Thread-1, 5
Thread: Thread-1, 4
Thread: Thread-1, 3
Resuming thread Two
Thread: Thread-2, 3
Waiting for threads to finish.
Thread: Thread-1, 2
Thread: Thread-2, 2
Thread: Thread-1, 1
Thread: Thread-2, 1
Thread Thread-1 exiting.
Thread Thread-2 exiting.
Main thread exiting.
プロセス間通信を知っている場合は、スレッド間通信を理解するのは簡単です。2つ以上のスレッドが情報を交換するアプリケーションを開発する場合、スレッド間通信は重要です。
スレッド通信を可能にする3つの簡単な方法とちょっとしたトリックがあります。3つの方法すべてを以下に示します-
| シニア番号 | 方法と説明 |
|---|---|
| 1 | public void wait() 別のスレッドがnotify()を呼び出すまで、現在のスレッドを待機させます。 |
| 2 | public void notify() このオブジェクトのモニターで待機している単一のスレッドをウェイクアップします。 |
| 3 | public void notifyAll() 同じオブジェクトでwait()を呼び出したすべてのスレッドをウェイクアップします。 |
これらのメソッドは次のように実装されています finalObjectのメソッドなので、すべてのクラスで使用できます。3つのメソッドはすべて、内からのみ呼び出すことができます。synchronized 環境。
例
この例は、2つのスレッドがを使用して通信する方法を示しています wait() そして notify()方法。同じ概念を使用して複雑なシステムを作成できます。
class Chat {
   boolean flag = false;

   public synchronized void Question(String msg) {

      if (flag) {

         try {
            wait();
         } catch (InterruptedException e) {
            e.printStackTrace();
         }
      }
      System.out.println(msg);
      flag = true;
      notify();
   }

   public synchronized void Answer(String msg) {

      if (!flag) {

         try {
            wait();
         } catch (InterruptedException e) {
            e.printStackTrace();
         }
      }
      System.out.println(msg);
      flag = false;
      notify();
   }
}

class T1 implements Runnable {
   Chat m;
   String[] s1 = { "Hi", "How are you ?", "I am also doing fine!" };

   public T1(Chat m1) {
      this.m = m1;
      new Thread(this, "Question").start();
   }

   public void run() {

      for (int i = 0; i < s1.length; i++) {
         m.Question(s1[i]);
      }
   }
}

class T2 implements Runnable {
   Chat m;
   String[] s2 = { "Hi", "I am good, what about you?", "Great!" };

   public T2(Chat m2) {
      this.m = m2;
      new Thread(this, "Answer").start();
   }

   public void run() {

      for (int i = 0; i < s2.length; i++) {
         m.Answer(s2[i]);
      }
   }
}

public class TestThread {

   public static void main(String[] args) {
      Chat m = new Chat();
      new T1(m);
      new T2(m);
   }
}
上記のプログラムをコンパイルして実行すると、次の結果が得られます。
出力
Hi
Hi
How are you ?
I am good, what about you?
I am also doing fine!
Great!
上記の例は、[https://stackoverflow.com/questions/2170520/inter-thread-communication-in-java]から取得され、変更されています。
同期を使用したマルチスレッドの例
これは、カウンター値を順番に出力する同じ例であり、実行するたびに同じ結果が生成されます。
例
class PrintDemo {

   public void printCount() {

      try {

         for(int i = 5; i > 0; i--) {
            System.out.println("Counter   ---   "  + i );
         }
      } catch (Exception e) {
         System.out.println("Thread  interrupted.");
      }
   }
}

class ThreadDemo extends Thread {
   private Thread t;
   private String threadName;
   PrintDemo  PD;

   ThreadDemo(String name,  PrintDemo pd) {
      threadName = name;
      PD = pd;
   }

   public void run() {

      synchronized(PD) {
         PD.printCount();
      }
      System.out.println("Thread " +  threadName + " exiting.");
   }

   public void start () {
      System.out.println("Starting " +  threadName );

      if (t == null) {
         t = new Thread (this, threadName);
         t.start ();
      }
   }
}

public class TestThread {

   public static void main(String args[]) {
      PrintDemo PD = new PrintDemo();

      ThreadDemo T1 = new ThreadDemo("Thread - 1 ", PD);
      ThreadDemo T2 = new ThreadDemo("Thread - 2 ", PD);

      T1.start();
      T2.start();

      // wait for threads to end
      try {
         T1.join();
         T2.join();
      } catch (Exception e) {
         System.out.println("Interrupted");
      }
   }
}
これにより、このプログラムを実行するたびに同じ結果が生成されます-
出力
Starting Thread - 1
Starting Thread - 2
Counter   ---   5
Counter   ---   4
Counter   ---   3
Counter   ---   2
Counter   ---   1
Thread Thread - 1  exiting.
Counter   ---   5
Counter   ---   4
Counter   ---   3
Counter   ---   2
Counter   ---   1
Thread Thread - 2 exiting.デッドロックは、2つ以上のスレッドが永久にブロックされ、互いに待機している状況を表します。デッドロックは、複数のスレッドが同じロックを必要としているが、それらを異なる順序で取得する場合に発生します。Javaマルチスレッドプログラムは、デッドロック状態に陥る可能性があります。synchronizedキーワードは、指定されたオブジェクトに関連付けられたロックまたはモニターを待機している間、実行中のスレッドをブロックします。これが例です。
例
public class TestThread {
   public static Object Lock1 = new Object();
   public static Object Lock2 = new Object();

   public static void main(String args[]) {
      ThreadDemo1 T1 = new ThreadDemo1();
      ThreadDemo2 T2 = new ThreadDemo2();
      T1.start();
      T2.start();
   }

   private static class ThreadDemo1 extends Thread {

      public void run() {

         synchronized (Lock1) {
            System.out.println("Thread 1: Holding lock 1...");

            try {
               Thread.sleep(10);
            } catch (InterruptedException e) {}
            System.out.println("Thread 1: Waiting for lock 2...");

            synchronized (Lock2) {
               System.out.println("Thread 1: Holding lock 1 & 2...");
            }
         }
      }
   }

   private static class ThreadDemo2 extends Thread {

      public void run() {

         synchronized (Lock2) {
            System.out.println("Thread 2: Holding lock 2...");

            try {
               Thread.sleep(10);
            } catch (InterruptedException e) {}
            System.out.println("Thread 2: Waiting for lock 1...");

            synchronized (Lock1) {
               System.out.println("Thread 2: Holding lock 1 & 2...");
            }
         }
      }
   }
}
上記のプログラムをコンパイルして実行すると、デッドロック状態が発生し、プログラムによって生成される出力は次のようになります。
出力
Thread 1: Holding lock 1...
Thread 2: Holding lock 2...
Thread 1: Waiting for lock 2...
Thread 2: Waiting for lock 1...
上記のプログラムは、どちらのスレッドも続行せず、互いがロックを解放するのを待っていないため、永久にハングします。そのため、CTRL + Cを押してプログラムを終了できます。
デッドロックソリューションの例
同じプログラムのロックと実行の順序を変更して、両方のスレッドがまだお互いを待機しているかどうかを確認しましょう-
例
public class TestThread {
   public static Object Lock1 = new Object();
   public static Object Lock2 = new Object();

   public static void main(String args[]) {
      ThreadDemo1 T1 = new ThreadDemo1();
      ThreadDemo2 T2 = new ThreadDemo2();
      T1.start();
      T2.start();
   }

   private static class ThreadDemo1 extends Thread {

      public void run() {

         synchronized (Lock1) {
            System.out.println("Thread 1: Holding lock 1...");

            try {
               Thread.sleep(10);
            } catch (InterruptedException e) {}
            System.out.println("Thread 1: Waiting for lock 2...");

            synchronized (Lock2) {
               System.out.println("Thread 1: Holding lock 1 & 2...");
            }
         }
      }
   }

   private static class ThreadDemo2 extends Thread {

      public void run() {

         synchronized (Lock1) {
            System.out.println("Thread 2: Holding lock 1...");

            try {
               Thread.sleep(10);
            } catch (InterruptedException e) {}
            System.out.println("Thread 2: Waiting for lock 2...");

            synchronized (Lock2) {
               System.out.println("Thread 2: Holding lock 1 & 2...");
            }
         }
      }
   }
}
したがって、ロックの順序を変更するだけで、プログラムがデッドロック状態になるのを防ぎ、次の結果で完了します。
出力
Thread 1: Holding lock 1...
Thread 1: Waiting for lock 2...
Thread 1: Holding lock 1 & 2...
Thread 2: Holding lock 1...
Thread 2: Waiting for lock 2...
Thread 2: Holding lock 1 & 2...
上記の例は、概念を明確にするためのものですが、これは複雑な概念であり、デッドロック状態に対処するアプリケーションを開発する前に、深く掘り下げる必要があります。
ThreadLocalクラスは、同じスレッドでのみ読み取りと書き込みができるスレッドローカル変数を作成するために使用されます。たとえば、2つのスレッドが同じthreadLocal変数を参照するコードにアクセスしている場合、各スレッドは他のスレッドによって行われたthreadLocal変数への変更を認識しません。
ThreadLocalメソッド
以下は、ThreadLocalクラスで使用可能な重要なメソッドのリストです。
| シニア番号 | 方法と説明 |
|---|---|
| 1 | public T get() このスレッドローカル変数の現在のスレッドのコピーの値を返します。 |
| 2 | protected T initialValue() このスレッドローカル変数の現在のスレッドの「初期値」を返します。 |
| 3 | public void remove() このスレッドローカル変数の現在のスレッドの値を削除します。 |
| 4 | public void set(T value) このスレッドローカル変数の現在のスレッドのコピーを指定された値に設定します。 |
例
次のTestThreadプログラムは、ThreadLocalクラスのこれらのメソッドのいくつかを示しています。ここでは、2つのカウンター変数を使用しました。1つは正規変数で、もう1つはThreadLocalです。
class RunnableDemo implements Runnable {
   int counter;
   ThreadLocal<Integer> threadLocalCounter = new ThreadLocal<Integer>();

   public void run() {
      counter++;

      if(threadLocalCounter.get() != null) {
         threadLocalCounter.set(threadLocalCounter.get().intValue() + 1);
      } else {
         threadLocalCounter.set(0);
      }
      System.out.println("Counter: " + counter);
      System.out.println("threadLocalCounter: " + threadLocalCounter.get());
   }
}

public class TestThread {

   public static void main(String args[]) {
      RunnableDemo commonInstance = new RunnableDemo();

      Thread t1 = new Thread(commonInstance);
      Thread t2 = new Thread(commonInstance);
      Thread t3 = new Thread(commonInstance);
      Thread t4 = new Thread(commonInstance);

      t1.start();
      t2.start();
      t3.start();
      t4.start();

      // wait for threads to end
      try {
         t1.join();
         t2.join();
         t3.join();
         t4.join();
      } catch (Exception e) {
         System.out.println("Interrupted");
      }
   }
}
これにより、次の結果が得られます。
出力
Counter: 1
threadLocalCounter: 0
Counter: 2
threadLocalCounter: 0
Counter: 3
threadLocalCounter: 0
Counter: 4
threadLocalCounter: 0
カウンターの値はスレッドごとに増加していることがわかりますが、threadLocalCounterはスレッドごとに0のままです。
java.util.concurrent.ThreadLocalRandomは、jdk 1.7以降で導入されたユーティリティクラスであり、乱数を生成するために複数のスレッドまたはForkJoinTasksが必要な場合に役立ちます。Math.random()メソッドよりもパフォーマンスが向上し、競合が少なくなります。
ThreadLocalRandomメソッド
以下は、ThreadLocalRandomクラスで使用可能な重要なメソッドのリストです。
| シニア番号 | 方法と説明 |
|---|---|
| 1 | public static ThreadLocalRandom current() 現在のスレッドのThreadLocalRandomを返します。 |
| 2 | protected int next(int bits) 次の疑似乱数を生成します。 |
| 3 | public double nextDouble(double n) 0(包括的)と指定された値(排他的)の間の疑似ランダムで均一に分散されたdouble値を返します。 |
| 4 | public double nextDouble(double least, double bound) 指定された最小値(包括的)と境界(排他的)の間で、疑似ランダムで均一に分散された値を返します。 |
| 5 | public int nextInt(int least, int bound) 指定された最小値(包括的)と境界(排他的)の間で、疑似ランダムで均一に分散された値を返します。 |
| 6 | public long nextLong(long n) 0(包括的)と指定された値(排他的)の間の疑似ランダムで均一に分散された値を返します。 |
| 7 | public long nextLong(long least, long bound) 指定された最小値(包括的)と境界(排他的)の間で、疑似ランダムで均一に分散された値を返します。 |
| 8 | public void setSeed(long seed) UnsupportedOperationExceptionをスローします。 |
例
次のTestThreadプログラムは、Lockインターフェイスのこれらのメソッドのいくつかを示しています。ここでは、lock()を使用してロックを取得し、unlock()を使用してロックを解放しました。
import java.util.Random;
import java.util.concurrent.locks.Condition;
import java.util.concurrent.locks.Lock;
import java.util.concurrent.locks.ReentrantLock;
import java.util.concurrent.ThreadLocalRandom;

public class TestThread {

   public static void main(final String[] arguments) {
      System.out.println("Random Integer: " + new Random().nextInt());
      System.out.println("Seeded Random Integer: " + new Random(15).nextInt());
      System.out.println(
         "Thread Local Random Integer: " + ThreadLocalRandom.current().nextInt());

      final ThreadLocalRandom random = ThreadLocalRandom.current();
      random.setSeed(15); //exception will come as seeding is not allowed in ThreadLocalRandom.
      System.out.println("Seeded Thread Local Random Integer: " + random.nextInt());
   }
}
これにより、次の結果が得られます。
出力
Random Integer: 1566889198
Seeded Random Integer: -1159716814
Thread Local Random Integer: 358693993
Exception in thread "main" java.lang.UnsupportedOperationException
        at java.util.concurrent.ThreadLocalRandom.setSeed(Unknown Source)
        at TestThread.main(TestThread.java:21)
ここでは、ThreadLocalRandomクラスとRandomクラスを使用して乱数を取得しました。
java.util.concurrent.locks.Lockインターフェースは、同期ブロックと同様のスレッド同期メカニズムとして使用されます。新しいロックメカニズムは、同期ブロックよりも柔軟性が高く、より多くのオプションを提供します。ロックと同期ブロックの主な違いは次のとおりです。
Guarantee of sequence−同期されたブロックは、待機中のスレッドにアクセスが許可される順序を保証するものではありません。ロックインターフェースがそれを処理します。
No timeout−ロックが付与されていない場合、同期ブロックにはタイムアウトのオプションがありません。ロックインターフェースはそのようなオプションを提供します。
Single method −同期されたブロックは単一のメソッド内に完全に含まれている必要がありますが、ロックインターフェイスのメソッドlock()とunlock()は異なるメソッドで呼び出すことができます。
ロック方法
以下は、Lockクラスで使用可能な重要なメソッドのリストです。
| シニア番号 | 方法と説明 |
|---|---|
| 1 | public void lock() ロックを取得します。 |
| 2 | public void lockInterruptibly() 現在のスレッドが中断されない限り、ロックを取得します。 |
| 3 | public Condition newCondition() このLockインスタンスにバインドされている新しいConditionインスタンスを返します。 |
| 4 | public boolean tryLock() 呼び出し時にロックが解放されている場合にのみ、ロックを取得します。 |
| 5 | public boolean tryLock() 呼び出し時にロックが解放されている場合にのみ、ロックを取得します。 |
| 6 | public boolean tryLock(long time, TimeUnit unit) 指定された待機時間内にロックが解放され、現在のスレッドが中断されていない場合、ロックを取得します。 |
| 7 | public void unlock() ロックを解除します。 |
例
次のTestThreadプログラムは、Lockインターフェイスのこれらのメソッドのいくつかを示しています。ここでは、lock()を使用してロックを取得し、unlock()を使用してロックを解放しました。
import java.util.concurrent.locks.Lock;
import java.util.concurrent.locks.ReentrantLock;

class PrintDemo {
   private final Lock queueLock = new ReentrantLock();

   public void print() {
      queueLock.lock();

      try {
         Long duration = (long) (Math.random() * 10000);
         System.out.println(Thread.currentThread().getName()
            + "  Time Taken " + (duration / 1000) + " seconds.");
         Thread.sleep(duration);
      } catch (InterruptedException e) {
         e.printStackTrace();
      } finally {
         System.out.printf(
            "%s printed the document successfully.\n", Thread.currentThread().getName());
         queueLock.unlock();
      }
   }
}

class ThreadDemo extends Thread {
   PrintDemo  printDemo;

   ThreadDemo(String name,  PrintDemo printDemo) {
      super(name);
      this.printDemo = printDemo;
   }

   @Override
   public void run() {
      System.out.printf(
         "%s starts printing a document\n", Thread.currentThread().getName());
      printDemo.print();
   }
}

public class TestThread {

   public static void main(String args[]) {
      PrintDemo PD = new PrintDemo();

      ThreadDemo t1 = new ThreadDemo("Thread - 1 ", PD);
      ThreadDemo t2 = new ThreadDemo("Thread - 2 ", PD);
      ThreadDemo t3 = new ThreadDemo("Thread - 3 ", PD);
      ThreadDemo t4 = new ThreadDemo("Thread - 4 ", PD);

      t1.start();
      t2.start();
      t3.start();
      t4.start();
   }
}
これにより、次の結果が得られます。
出力
Thread - 1  starts printing a document
Thread - 4  starts printing a document
Thread - 3  starts printing a document
Thread - 2  starts printing a document
Thread - 1   Time Taken 4 seconds.
Thread - 1  printed the document successfully.
Thread - 4   Time Taken 3 seconds.
Thread - 4  printed the document successfully.
Thread - 3   Time Taken 5 seconds.
Thread - 3  printed the document successfully.
Thread - 2   Time Taken 4 seconds.
Thread - 2  printed the document successfully.
ここでは、ロックインターフェイスの実装としてReentrantLockクラスを使用しています。ReentrantLockクラスを使用すると、スレッドが他のメソッドをすでにロックしている場合でも、そのメソッドをロックできます。
java.util.concurrent.locks.ReadWriteLockインターフェースを使用すると、一度に複数のスレッドを読み取ることができますが、一度に書き込むことができるのは1つのスレッドのみです。
Read Lock −書き込み用にReadWriteLockをロックしているスレッドがない場合、複数のスレッドが読み取りロックにアクセスできます。
Write Lock −読み取りまたは書き込みを行っているスレッドがない場合、1つのスレッドが書き込みロックにアクセスできます。
ロック方法
以下は、Lockクラスで使用可能な重要なメソッドのリストです。
| シニア番号 | 方法と説明 |
|---|---|
| 1 | public Lock readLock() 読み取りに使用されるロックを返します。 |
| 2 | public Lock writeLock() 書き込みに使用されたロックを返します。 |
例
import java.util.concurrent.locks.ReentrantReadWriteLock;

public class TestThread {
   private static final ReentrantReadWriteLock lock = new ReentrantReadWriteLock(true);
   private static String message = "a";

   public static void main(String[] args) throws InterruptedException {
      Thread t1 = new Thread(new WriterA());
      t1.setName("Writer A");

      Thread t2 = new Thread(new WriterB());
      t2.setName("Writer B");

      Thread t3 = new Thread(new Reader());
      t3.setName("Reader");
      t1.start();
      t2.start();
      t3.start();
      t1.join();
      t2.join();
      t3.join();
   }

   static class Reader implements Runnable {

      public void run() {

         if(lock.isWriteLocked()) {
            System.out.println("Write Lock Present.");
         }
         lock.readLock().lock();

         try {
            Long duration = (long) (Math.random() * 10000);
            System.out.println(Thread.currentThread().getName()
               + "  Time Taken " + (duration / 1000) + " seconds.");
            Thread.sleep(duration);
         } catch (InterruptedException e) {
            e.printStackTrace();
         } finally {
            System.out.println(Thread.currentThread().getName() +": "+ message );
            lock.readLock().unlock();
         }
      }
   }

   static class WriterA implements Runnable {

      public void run() {
         lock.writeLock().lock();

         try {
            Long duration = (long) (Math.random() * 10000);
            System.out.println(Thread.currentThread().getName()
               + "  Time Taken " + (duration / 1000) + " seconds.");
            Thread.sleep(duration);
         } catch (InterruptedException e) {
            e.printStackTrace();
         } finally {
            message = message.concat("a");
            lock.writeLock().unlock();
         }
      }
   }

   static class WriterB implements Runnable {

      public void run() {
         lock.writeLock().lock();

         try {
            Long duration = (long) (Math.random() * 10000);
            System.out.println(Thread.currentThread().getName()
               + "  Time Taken " + (duration / 1000) + " seconds.");
            Thread.sleep(duration);
         } catch (InterruptedException e) {
            e.printStackTrace();
         } finally {
            message = message.concat("b");
            lock.writeLock().unlock();
         }
      }
   }
}
これにより、次の結果が得られます。
出力
Writer A  Time Taken 6 seconds.
Write Lock Present.
Writer B  Time Taken 2 seconds.
Reader  Time Taken 0 seconds.
Reader: aab
java.util.concurrent.locks.Conditionインターフェースは、指定された条件が真になるまで、その実行を一時停止するスレッド機能を提供します。Conditionオブジェクトは、必ずLockにバインドされ、newCondition()メソッドを使用して取得されます。
条件メソッド
以下は、Conditionクラスで使用可能な重要なメソッドのリストです。
| シニア番号 | 方法と説明 |
|---|---|
| 1 | public void await() 現在のスレッドがシグナルまたは割り込みを受けるまで待機します。 |
| 2 | public boolean await(long time, TimeUnit unit) 現在のスレッドを、通知または中断されるか、指定された待機時間が経過するまで待機させます。 |
| 3 | public long awaitNanos(long nanosTimeout) 現在のスレッドを、通知または中断されるか、指定された待機時間が経過するまで待機させます。 |
| 4 | public long awaitUninterruptibly() 現在のスレッドが通知されるまで待機します。 |
| 5 | public long awaitUntil() 現在のスレッドが、通知または中断されるか、指定された期限が経過するまで待機します。 |
| 6 | public void signal() 1つの待機中のスレッドを起こします。 |
| 7 | public void signalAll() 待機中のすべてのスレッドをウェイクアップします。 |
例
import java.util.concurrent.locks.Condition;
import java.util.concurrent.locks.Lock;
import java.util.concurrent.locks.ReentrantLock;

public class TestThread {

   public static void main(String[] args) throws InterruptedException {
      ItemQueue itemQueue = new ItemQueue(10);

      //Create a producer and a consumer.
      Thread producer = new Producer(itemQueue);
      Thread consumer = new Consumer(itemQueue);

      //Start both threads.
      producer.start();
      consumer.start();

      //Wait for both threads to terminate.
      producer.join();
      consumer.join();
   }

   static class ItemQueue {
      private Object[] items = null;
      private int current = 0;
      private int placeIndex = 0;
      private int removeIndex = 0;

      private final Lock lock;
      private final Condition isEmpty;
      private final Condition isFull;

      public ItemQueue(int capacity) {
         this.items = new Object[capacity];
         lock = new ReentrantLock();
         isEmpty = lock.newCondition();
         isFull = lock.newCondition();
      }

      public void add(Object item) throws InterruptedException {
         lock.lock();

         while(current >= items.length)
            isFull.await();

         items[placeIndex] = item;
         placeIndex = (placeIndex + 1) % items.length;
         ++current;

         //Notify the consumer that there is data available.
         isEmpty.signal();
         lock.unlock();
      }

      public Object remove() throws InterruptedException {
         Object item = null;

         lock.lock();

         while(current <= 0) {
            isEmpty.await();
         }
         item = items[removeIndex];
         removeIndex = (removeIndex + 1) % items.length;
         --current;

         //Notify the producer that there is space available.
         isFull.signal();
         lock.unlock();

         return item;
      }

      public boolean isEmpty() {
         return (items.length == 0);
      }
   }

   static class Producer extends Thread {
      private final ItemQueue queue;

      public Producer(ItemQueue queue) {
         this.queue = queue;
      }

      @Override
      public void run() {
         String[] numbers =
            {"1", "2", "3", "4", "5", "6", "7", "8", "9", "10", "11", "12"};

         try {

            for(String number: numbers) {
               System.out.println("[Producer]: " + number);
            }
            queue.add(null);
         } catch (InterruptedException ex) {
            ex.printStackTrace();
         }
      }
   }

   static class Consumer extends Thread {
      private final ItemQueue queue;

      public Consumer(ItemQueue queue) {
         this.queue = queue;
      }

      @Override
      public void run() {

         try {

            do {
               Object number = queue.remove();
               System.out.println("[Consumer]: " + number);

               if(number == null) {
                  return;
               }
            } while(!queue.isEmpty());
         } catch (InterruptedException ex) {
            ex.printStackTrace();
         }
      }
   }
}
これにより、次の結果が得られます。
出力
[Producer]: 1
[Producer]: 2
[Producer]: 3
[Producer]: 4
[Producer]: 5
[Producer]: 6
[Producer]: 7
[Producer]: 8
[Producer]: 9
[Producer]: 10
[Producer]: 11
[Producer]: 12
[Consumer]: null
java.util.concurrent.atomic.AtomicIntegerクラスは、アトミックに読み書きできる基礎となるint値に対する操作を提供し、高度なアトミック操作も含みます。AtomicIntegerは、基になるint変数に対するアトミック操作をサポートします。揮発性変数の読み取りと書き込みのように機能するgetメソッドとsetメソッドがあります。つまり、セットには、同じ変数に対する後続のgetとの発生前の関係があります。アトミックcompareAndSetメソッドには、これらのメモリ整合性機能もあります。
AtomicIntegerメソッド
以下は、AtomicIntegerクラスで使用可能な重要なメソッドのリストです。
| シニア番号 | 方法と説明 |
|---|---|
| 1 | public int addAndGet(int delta) 指定された値を現在の値に原子的に追加します。 |
| 2 | public boolean compareAndSet(int expect, int update) 現在の値が期待値と同じである場合、原子的に値を指定された更新値に設定します。 |
| 3 | public int decrementAndGet() 原子的に現在の値を1つ減らします。 |
| 4 | public double doubleValue() 指定された数値の値をdoubleとして返します。 |
| 5 | public float floatValue() 指定された数値の値をfloatとして返します。 |
| 6 | public int get() 現在の値を取得します。 |
| 7 | public int getAndAdd(int delta) 指定された値を現在の値にアトミックに追加します。 |
| 8 | public int getAndDecrement() 原子的に現在の値を1つ減らします。 |
| 9 | public int getAndIncrement() 現在の値を1つ原子的にインクリメントします。 |
| 10 | public int getAndSet(int newValue) 原子的に指定された値に設定され、古い値を返します。 |
| 11 | public int incrementAndGet() 現在の値を1つ原子的にインクリメントします。 |
| 12 | public int intValue() 指定された数値の値をintとして返します。 |
| 13 | public void lazySet(int newValue) 最終的には指定された値に設定されます。 |
| 14 | public long longValue() 指定された数値の値をlongとして返します。 |
| 15 | public void set(int newValue) 指定された値に設定します。 |
| 16 | public String toString() 現在の値の文字列表現を返します。 |
| 17 | public boolean weakCompareAndSet(int expect, int update) 現在の値が期待値と同じである場合、原子的に値を指定された更新値に設定します。 |
例
次のTestThreadプログラムは、スレッドベースの環境でのカウンターの安全でない実装を示しています。
public class TestThread {

   static class Counter {
      private int c = 0;

      public void increment() {
         c++;
      }

      public int value() {
         return c;
      }
   }

   public static void main(final String[] arguments) throws InterruptedException {
      final Counter counter = new Counter();

      //1000 threads
      for(int i = 0; i < 1000 ; i++) {

         new Thread(new Runnable() {

            public void run() {
               counter.increment();
            }
         }).start();
      }
      Thread.sleep(6000);
      System.out.println("Final number (should be 1000): " + counter.value());
   }
}
これにより、コンピューターの速度とスレッドのインターリーブによっては、次の結果が生じる場合があります。
出力
Final number (should be 1000): 1000例
import java.util.concurrent.atomic.AtomicInteger;

public class TestThread {

   static class Counter {
      private AtomicInteger c = new AtomicInteger(0);

      public void increment() {
         c.getAndIncrement();
      }

      public int value() {
         return c.get();
      }
   }

   public static void main(final String[] arguments) throws InterruptedException {
      final Counter counter = new Counter();

      //1000 threads
      for(int i = 0; i < 1000 ; i++) {

         new Thread(new Runnable() {
            public void run() {
               counter.increment();
            }
         }).start();
      }
      Thread.sleep(6000);
      System.out.println("Final number (should be 1000): " + counter.value());
   }
}
これにより、次の結果が得られます。
出力
Final number (should be 1000): 1000java.util.concurrent.atomic.AtomicLongクラスは、アトミックに読み書きできる基になるlong値に対する操作を提供し、高度なアトミック操作も含みます。AtomicLongは、基になるlong変数に対するアトミック操作をサポートします。揮発性変数の読み取りと書き込みのように機能するgetメソッドとsetメソッドがあります。つまり、セットには、同じ変数に対する後続のgetとの発生前の関係があります。アトミックcompareAndSetメソッドには、これらのメモリ整合性機能もあります。
AtomicLongメソッド
以下は、AtomicLongクラスで使用可能な重要なメソッドのリストです。
| シニア番号 | 方法と説明 |
|---|---|
| 1 | public long addAndGet(long delta) 指定された値を現在の値に原子的に追加します。 |
| 2 | public boolean compareAndSet(long expect, long update) 現在の値が期待値と同じである場合、原子的に値を指定された更新値に設定します。 |
| 3 | public long decrementAndGet() 原子的に現在の値を1つ減らします。 |
| 4 | public double doubleValue() 指定された数値の値をdoubleとして返します。 |
| 5 | public float floatValue() 指定された数値の値をfloatとして返します。 |
| 6 | public long get() 現在の値を取得します。 |
| 7 | public long getAndAdd(long delta) 指定された値を現在の値にアトミックに追加します。 |
| 8 | public long getAndDecrement() 原子的に現在の値を1つ減らします。 |
| 9 | public long getAndIncrement() 現在の値を1つ原子的にインクリメントします。 |
| 10 | public long getAndSet(long newValue) 原子的に指定された値に設定され、古い値を返します。 |
| 11 | public long incrementAndGet() 現在の値を1つ原子的にインクリメントします。 |
| 12 | public int intValue() 指定された数値の値をintとして返します。 |
| 13 | public void lazySet(long newValue) 最終的には指定された値に設定されます。 |
| 14 | public long longValue() 指定された数値の値をlongとして返します。 |
| 15 | public void set(long newValue) 指定された値に設定します。 |
| 16 | public String toString() 現在の値の文字列表現を返します。 |
| 17 | public boolean weakCompareAndSet(long expect, long update) 現在の値が期待値と同じである場合、原子的に値を指定された更新値に設定します。 |
例
次のTestThreadプログラムは、スレッドベースの環境でAtomicLongを使用したカウンターの安全な実装を示しています。
import java.util.concurrent.atomic.AtomicLong;

public class TestThread {

   static class Counter {
      private AtomicLong c = new AtomicLong(0);

      public void increment() {
         c.getAndIncrement();
      }

      public long value() {
         return c.get();
      }
   }

   public static void main(final String[] arguments) throws InterruptedException {
      final Counter counter = new Counter();

      //1000 threads
      for(int i = 0; i < 1000 ; i++) {

         new Thread(new Runnable() {

            public void run() {
               counter.increment();
            }
         }).start();
      }
      Thread.sleep(6000);
      System.out.println("Final number (should be 1000): " + counter.value());
   }
}
これにより、次の結果が得られます。
出力
Final number (should be 1000): 1000java.util.concurrent.atomic.AtomicBooleanクラスは、アトミックに読み書きできる基になるブール値に対する操作を提供し、高度なアトミック操作も含みます。AtomicBooleanは、基になるブール変数に対するアトミック操作をサポートします。揮発性変数の読み取りと書き込みのように機能するgetメソッドとsetメソッドがあります。つまり、セットには、同じ変数に対する後続のgetとの発生前の関係があります。アトミックcompareAndSetメソッドには、これらのメモリ整合性機能もあります。
AtomicBooleanメソッド
以下は、AtomicBooleanクラスで使用可能な重要なメソッドのリストです。
| シニア番号 | 方法と説明 |
|---|---|
| 1 | public boolean compareAndSet(boolean expect, boolean update) 現在の値==期待値の場合、原子的に値を指定された更新値に設定します。 |
| 2 | public boolean get() 現在の値を返します。 |
| 3 | public boolean getAndSet(boolean newValue) 原子的に指定された値に設定され、前の値を返します。 |
| 4 | public void lazySet(boolean newValue) 最終的には指定された値に設定されます。 |
| 5 | public void set(boolean newValue) 無条件に指定された値に設定します。 |
| 6 | public String toString() 現在の値の文字列表現を返します。 |
| 7 | public boolean weakCompareAndSet(boolean expect, boolean update) 現在の値==期待値の場合、原子的に値を指定された更新値に設定します。 |
例
次のTestThreadプログラムは、スレッドベースの環境でのAtomicBoolean変数の使用法を示しています。
import java.util.concurrent.atomic.AtomicBoolean;

public class TestThread {

   public static void main(final String[] arguments) throws InterruptedException {
      final AtomicBoolean atomicBoolean = new AtomicBoolean(false);

      new Thread("Thread 1") {

         public void run() {

            while(true) {
               System.out.println(Thread.currentThread().getName()
                  +" Waiting for Thread 2 to set Atomic variable to true. Current value is "
                  + atomicBoolean.get());

               if(atomicBoolean.compareAndSet(true, false)) {
                  System.out.println("Done!");
                  break;
               }
            }
         };
      }.start();

      new Thread("Thread 2") {

         public void run() {
            System.out.println(Thread.currentThread().getName() +
               ", Atomic Variable: " +atomicBoolean.get());
            System.out.println(Thread.currentThread().getName() +
               " is setting the variable to true ");
            atomicBoolean.set(true);
            System.out.println(Thread.currentThread().getName() +
               ", Atomic Variable: " +atomicBoolean.get());
         };
      }.start();
   }
}
これにより、次の結果が得られます。
出力
Thread 1 Waiting for Thread 2 to set Atomic variable to true. Current value is false
Thread 1 Waiting for Thread 2 to set Atomic variable to true. Current value is false
Thread 1 Waiting for Thread 2 to set Atomic variable to true. Current value is false
Thread 2, Atomic Variable: false
Thread 1 Waiting for Thread 2 to set Atomic variable to true. Current value is false
Thread 2 is setting the variable to true
Thread 2, Atomic Variable: true
Thread 1 Waiting for Thread 2 to set Atomic variable to true. Current value is false
Done!
java.util.concurrent.atomic.AtomicReferenceクラスは、アトミックに読み書きできる基礎となるオブジェクト参照に対する操作を提供し、高度なアトミック操作も含みます。AtomicReferenceは、基になるオブジェクト参照変数に対するアトミック操作をサポートします。揮発性変数の読み取りと書き込みのように機能するgetメソッドとsetメソッドがあります。つまり、セットには、同じ変数に対する後続のgetとの発生前の関係があります。アトミックcompareAndSetメソッドには、これらのメモリ整合性機能もあります。
AtomicReferenceメソッド
以下は、AtomicReferenceクラスで使用可能な重要なメソッドのリストです。
| シニア番号 | 方法と説明 |
|---|---|
| 1 | public boolean compareAndSet(V expect, V update) 現在の値==期待値の場合、原子的に値を指定された更新値に設定します。 |
| 2 | public boolean get() 現在の値を返します。 |
| 3 | public boolean getAndSet(V newValue) 原子的に指定された値に設定され、前の値を返します。 |
| 4 | public void lazySet(V newValue) 最終的には指定された値に設定されます。 |
| 5 | public void set(V newValue) 無条件に指定された値に設定します。 |
| 6 | public String toString() 現在の値の文字列表現を返します。 |
| 7 | public boolean weakCompareAndSet(V expect, V update) 現在の値==期待値の場合、原子的に値を指定された更新値に設定します。 |
例
次のTestThreadプログラムは、スレッドベースの環境でのAtomicReference変数の使用法を示しています。
import java.util.concurrent.atomic.AtomicReference;

public class TestThread {
   private static String message = "hello";
   private static AtomicReference<String> atomicReference;

   public static void main(final String[] arguments) throws InterruptedException {
      atomicReference = new AtomicReference<String>(message);

      new Thread("Thread 1") {

         public void run() {
            atomicReference.compareAndSet(message, "Thread 1");
            message = message.concat("-Thread 1!");
         };
      }.start();

      System.out.println("Message is: " + message);
      System.out.println("Atomic Reference of Message is: " + atomicReference.get());
   }
}
これにより、次の結果が得られます。
出力
Message is: hello
Atomic Reference of Message is: Thread 1
java.util.concurrent.atomic.AtomicIntegerArrayクラスは、アトミックに読み書きできる基礎となるint配列に対する操作を提供し、高度なアトミック操作も含みます。AtomicIntegerArrayは、基になるint配列変数に対するアトミック操作をサポートします。揮発性変数の読み取りと書き込みのように機能するgetメソッドとsetメソッドがあります。つまり、セットには、同じ変数に対する後続のgetとの発生前の関係があります。アトミックcompareAndSetメソッドには、これらのメモリ整合性機能もあります。
AtomicIntegerArrayメソッド
以下は、AtomicIntegerArrayクラスで使用可能な重要なメソッドのリストです。
| シニア番号 | 方法と説明 |
|---|---|
| 1 | public int addAndGet(int i, int delta) 与えられた値をインデックスiの要素に原子的に追加します。 |
| 2 | public boolean compareAndSet(int i, int expect, int update) 現在の値==期待値の場合、位置iの要素を指定された更新値に原子的に設定します。 |
| 3 | public int decrementAndGet(int i) 原子的にインデックスiの要素を1つ減らします。 |
| 4 | public int get(int i) 位置iの現在の値を取得します。 |
| 5 | public int getAndAdd(int i, int delta) 与えられた値をインデックスiの要素に原子的に追加します。 |
| 6 | public int getAndDecrement(int i) 原子的にインデックスiの要素を1つ減らします。 |
| 7 | public int getAndIncrement(int i) インデックスiの要素を1つ原子的にインクリメントします。 |
| 8 | public int getAndSet(int i, int newValue) 位置iの要素を指定された値に原子的に設定し、古い値を返します。 |
| 9 | public int incrementAndGet(int i) インデックスiの要素を1つ原子的にインクリメントします。 |
| 10 | public void lazySet(int i, int newValue) 最終的に、位置iの要素を指定された値に設定します。 |
| 11 | public int length() 配列の長さを返します。 |
| 12 | public void set(int i, int newValue) 位置iの要素を指定された値に設定します。 |
| 13 | public String toString() 配列の現在の値の文字列表現を返します。 |
| 14 | public boolean weakCompareAndSet(int i, int expect, int update) 現在の値==期待値の場合、位置iの要素を指定された更新値に原子的に設定します。 |
例
次のTestThreadプログラムは、スレッドベースの環境でのAtomicIntegerArray変数の使用法を示しています。
import java.util.concurrent.atomic.AtomicIntegerArray;

public class TestThread {
   private static AtomicIntegerArray atomicIntegerArray = new AtomicIntegerArray(10);

   public static void main(final String[] arguments) throws InterruptedException {

      for (int i = 0; i<atomicIntegerArray.length(); i++) {
         atomicIntegerArray.set(i, 1);
      }

      Thread t1 = new Thread(new Increment());
      Thread t2 = new Thread(new Compare());
      t1.start();
      t2.start();

      t1.join();
      t2.join();

      System.out.println("Values: ");

      for (int i = 0; i<atomicIntegerArray.length(); i++) {
         System.out.print(atomicIntegerArray.get(i) + " ");
      }
   }

   static class Increment implements Runnable {

      public void run() {

         for(int i = 0; i<atomicIntegerArray.length(); i++) {
            int add = atomicIntegerArray.incrementAndGet(i);
            System.out.println("Thread " + Thread.currentThread().getId()
               + ", index " +i + ", value: "+ add);
         }
      }
   }

   static class Compare implements Runnable {

      public void run() {

         for(int i = 0; i<atomicIntegerArray.length(); i++) {
            boolean swapped = atomicIntegerArray.compareAndSet(i, 2, 3);

            if(swapped) {
               System.out.println("Thread " + Thread.currentThread().getId()
                  + ", index " +i + ", value: 3");
            }
         }
      }
   }
}
これにより、次の結果が得られます。
出力
Thread 10, index 0, value: 2
Thread 10, index 1, value: 2
Thread 10, index 2, value: 2
Thread 11, index 0, value: 3
Thread 10, index 3, value: 2
Thread 11, index 1, value: 3
Thread 11, index 2, value: 3
Thread 10, index 4, value: 2
Thread 11, index 3, value: 3
Thread 10, index 5, value: 2
Thread 10, index 6, value: 2
Thread 11, index 4, value: 3
Thread 10, index 7, value: 2
Thread 11, index 5, value: 3
Thread 10, index 8, value: 2
Thread 11, index 6, value: 3
Thread 10, index 9, value: 2
Thread 11, index 7, value: 3
Thread 11, index 8, value: 3
Thread 11, index 9, value: 3
Values:
3 3 3 3 3 3 3 3 3 3
java.util.concurrent.atomic.AtomicLongArrayクラスは、アトミックに読み書きできる基になる長い配列に対する操作を提供し、高度なアトミック操作も含みます。AtomicLongArrayは、基になる長い配列変数に対するアトミック操作をサポートします。揮発性変数の読み取りと書き込みのように機能するgetメソッドとsetメソッドがあります。つまり、セットには、同じ変数に対する後続のgetとの発生前の関係があります。アトミックcompareAndSetメソッドには、これらのメモリ整合性機能もあります。
AtomicLongArrayメソッド
以下は、AtomicLongArrayクラスで使用可能な重要なメソッドのリストです。
| シニア番号 | 方法と説明 |
|---|---|
| 1 | public long addAndGet(int i, long delta) 与えられた値をインデックスiの要素に原子的に追加します。 |
| 2 | public boolean compareAndSet(int i, long expect, long update) 現在の値==期待値の場合、位置iの要素を指定された更新値に原子的に設定します。 |
| 3 | public long decrementAndGet(int i) 原子的にインデックスiの要素を1つ減らします。 |
| 4 | public long get(int i) 位置iの現在の値を取得します。 |
| 5 | public long getAndAdd(int i, long delta) 与えられた値をインデックスiの要素に原子的に追加します。 |
| 6 | public long getAndDecrement(int i) 原子的にインデックスiの要素を1つ減らします。 |
| 7 | public long getAndIncrement(int i) インデックスiの要素を1つ原子的にインクリメントします。 |
| 8 | public long getAndSet(int i, long newValue) 位置iの要素を指定された値に原子的に設定し、古い値を返します。 |
| 9 | public long incrementAndGet(int i) インデックスiの要素を1つ原子的にインクリメントします。 |
| 10 | public void lazySet(int i, long newValue) 最終的に、位置iの要素を指定された値に設定します。 |
| 11 | public int length() 配列の長さを返します。 |
| 12 | public void set(int i, long newValue) 位置iの要素を指定された値に設定します。 |
| 13 | public String toString() 配列の現在の値の文字列表現を返します。 |
| 14 | public boolean weakCompareAndSet(int i, long expect, long update) 現在の値==期待値の場合、位置iの要素を指定された更新値に原子的に設定します。 |
例
次のTestThreadプログラムは、スレッドベースの環境でのAtomicIntegerArray変数の使用法を示しています。
import java.util.concurrent.atomic.AtomicLongArray;

public class TestThread {
   private static AtomicLongArray atomicLongArray = new AtomicLongArray(10);

   public static void main(final String[] arguments) throws InterruptedException {

      for (int i = 0; i<atomicLongArray.length(); i++) {
         atomicLongArray.set(i, 1);
      }

      Thread t1 = new Thread(new Increment());
      Thread t2 = new Thread(new Compare());
      t1.start();
      t2.start();

      t1.join();
      t2.join();

      System.out.println("Values: ");

      for (int i = 0; i<atomicLongArray.length(); i++) {
         System.out.print(atomicLongArray.get(i) + " ");
      }
   }

   static class Increment implements Runnable {

      public void run() {

         for(int i = 0; i<atomicLongArray.length(); i++) {
            long add = atomicLongArray.incrementAndGet(i);
            System.out.println("Thread " + Thread.currentThread().getId()
               + ", index " +i + ", value: "+ add);
         }
      }
   }

   static class Compare implements Runnable {

      public void run() {

         for(int i = 0; i<atomicLongArray.length(); i++) {
            boolean swapped = atomicLongArray.compareAndSet(i, 2, 3);

            if(swapped) {
               System.out.println("Thread " + Thread.currentThread().getId()
                  + ", index " +i + ", value: 3");
            }
         }
      }
   }
}
これにより、次の結果が得られます。
出力
Thread 9, index 0, value: 2
Thread 10, index 0, value: 3
Thread 9, index 1, value: 2
Thread 9, index 2, value: 2
Thread 9, index 3, value: 2
Thread 9, index 4, value: 2
Thread 10, index 1, value: 3
Thread 9, index 5, value: 2
Thread 10, index 2, value: 3
Thread 9, index 6, value: 2
Thread 10, index 3, value: 3
Thread 9, index 7, value: 2
Thread 10, index 4, value: 3
Thread 9, index 8, value: 2
Thread 9, index 9, value: 2
Thread 10, index 5, value: 3
Thread 10, index 6, value: 3
Thread 10, index 7, value: 3
Thread 10, index 8, value: 3
Thread 10, index 9, value: 3
Values:
3 3 3 3 3 3 3 3 3 3
java.util.concurrent.atomic.AtomicReferenceArrayクラスは、アトミックに読み取りおよび書き込みが可能な基になる参照配列に対する操作を提供し、高度なアトミック操作も含みます。AtomicReferenceArrayは、基になる参照配列変数に対するアトミック操作をサポートします。揮発性変数の読み取りと書き込みのように機能するgetメソッドとsetメソッドがあります。つまり、セットには、同じ変数に対する後続のgetとの発生前の関係があります。アトミックcompareAndSetメソッドには、これらのメモリ整合性機能もあります。
AtomicReferenceArrayメソッド
以下は、AtomicReferenceArrayクラスで使用可能な重要なメソッドのリストです。
| シニア番号 | 方法と説明 |
|---|---|
| 1 | public boolean compareAndSet(int i, E expect, E update) 現在の値==期待値の場合、位置iの要素を指定された更新値に原子的に設定します。 |
| 2 | public E get(int i) 位置iの現在の値を取得します。 |
| 3 | public E getAndSet(int i, E newValue) 位置iの要素を指定された値に原子的に設定し、古い値を返します。 |
| 4 | public void lazySet(int i, E newValue) 最終的に、位置iの要素を指定された値に設定します。 |
| 5 | public int length() 配列の長さを返します。 |
| 6 | public void set(int i, E newValue) 位置iの要素を指定された値に設定します。 |
| 7 | public String toString() 配列の現在の値の文字列表現を返します。 |
| 8 | public boolean weakCompareAndSet(int i, E expect, E update) 現在の値==期待値の場合、位置iの要素を指定された更新値に原子的に設定します。 |
例
次のTestThreadプログラムは、スレッドベースの環境でのAtomicReferenceArray変数の使用法を示しています。
import java.util.concurrent.atomic.AtomicReferenceArray;

public class TestThread {
   private static String[] source = new String[10];
   private static AtomicReferenceArray<String> atomicReferenceArray
      = new AtomicReferenceArray<String>(source);

   public static void main(final String[] arguments) throws InterruptedException {

      for (int i = 0; i<atomicReferenceArray.length(); i++) {
         atomicReferenceArray.set(i, "item-2");
      }

      Thread t1 = new Thread(new Increment());
      Thread t2 = new Thread(new Compare());
      t1.start();
      t2.start();

      t1.join();
      t2.join();
   }

   static class Increment implements Runnable {

      public void run() {

         for(int i = 0; i<atomicReferenceArray.length(); i++) {
            String add = atomicReferenceArray.getAndSet(i,"item-"+ (i+1));
            System.out.println("Thread " + Thread.currentThread().getId()
               + ", index " +i + ", value: "+ add);
         }
      }
   }

   static class Compare implements Runnable {

      public void run() {

         for(int i = 0; i<atomicReferenceArray.length(); i++) {
            System.out.println("Thread " + Thread.currentThread().getId()
               + ", index " +i + ", value: "+ atomicReferenceArray.get(i));
            boolean swapped = atomicReferenceArray.compareAndSet(i, "item-2", "updated-item-2");
            System.out.println("Item swapped: " + swapped);

            if(swapped) {
               System.out.println("Thread " + Thread.currentThread().getId()
                  + ", index " +i + ", updated-item-2");
            }
         }
      }
   }
}
これにより、次の結果が得られます。
出力
Thread 9, index 0, value: item-2
Thread 10, index 0, value: item-1
Item swapped: false
Thread 10, index 1, value: item-2
Item swapped: true
Thread 9, index 1, value: updated-item-2
Thread 10, index 1, updated-item-2
Thread 10, index 2, value: item-3
Item swapped: false
Thread 10, index 3, value: item-2
Item swapped: true
Thread 10, index 3, updated-item-2
Thread 10, index 4, value: item-2
Item swapped: true
Thread 10, index 4, updated-item-2
Thread 10, index 5, value: item-2
Item swapped: true
Thread 10, index 5, updated-item-2
Thread 10, index 6, value: item-2
Thread 9, index 2, value: item-2
Item swapped: true
Thread 9, index 3, value: updated-item-2
Thread 10, index 6, updated-item-2
Thread 10, index 7, value: item-2
Thread 9, index 4, value: updated-item-2
Item swapped: true
Thread 9, index 5, value: updated-item-2
Thread 10, index 7, updated-item-2
Thread 9, index 6, value: updated-item-2
Thread 10, index 8, value: item-2
Thread 9, index 7, value: updated-item-2
Item swapped: true
Thread 9, index 8, value: updated-item-2
Thread 10, index 8, updated-item-2
Thread 9, index 9, value: item-2
Thread 10, index 9, value: item-10
Item swapped: false
java.util.concurrent.Executorインターフェースは、新しいタスクの起動をサポートするためのシンプルなインターフェースです。
ExecutorServiceメソッド
| シニア番号 | 方法と説明 |
|---|---|
| 1 | void execute(Runnable command) 将来のある時点で、指定されたコマンドを実行します。 |
例
次のTestThreadプログラムは、スレッドベースの環境でのExecutorインターフェイスの使用法を示しています。
import java.util.concurrent.Executor;
import java.util.concurrent.Executors;
import java.util.concurrent.ThreadPoolExecutor;
import java.util.concurrent.TimeUnit;

public class TestThread {

   public static void main(final String[] arguments) throws InterruptedException {
      Executor executor = Executors.newCachedThreadPool();
      executor.execute(new Task());
      ThreadPoolExecutor pool = (ThreadPoolExecutor)executor;
      pool.shutdown();
   }

   static class Task implements Runnable {

      public void run() {

         try {
            Long duration = (long) (Math.random() * 5);
            System.out.println("Running Task!");
            TimeUnit.SECONDS.sleep(duration);
            System.out.println("Task Completed");
         } catch (InterruptedException e) {
            e.printStackTrace();
         }
      }
   }
}
これにより、次の結果が得られます。
出力
Running Task!
Task Completed
java.util.concurrent.ExecutorServiceインターフェースは、Executorインターフェースのサブインターフェースであり、個々のタスクとエグゼキューター自体の両方のライフサイクルを管理する機能を追加します。
ExecutorServiceメソッド
| シニア番号 | 方法と説明 |
|---|---|
| 1 | boolean awaitTermination(long timeout, TimeUnit unit) シャットダウン要求後にすべてのタスクの実行が完了するか、タイムアウトが発生するか、現在のスレッドが中断されるまで、どちらか早い方でブロックします。 |
| 2 | <T> List<Future<T>> invokeAll(Collection<? extends Callable<T>> tasks) 指定されたタスクを実行し、すべてが完了すると、ステータスと結果を保持する先物のリストを返します。 |
| 3 | <T> List<Future<T>> invokeAll(Collection<? extends Callable<T>> tasks, long timeout, TimeUnit unit) 指定されたタスクを実行し、すべてが完了したとき、またはタイムアウトが期限切れになったときのいずれか早い方で、ステータスと結果を保持する先物のリストを返します。 |
| 4 | <T> T invokeAny(Collection<? extends Callable<T>> tasks) 指定されたタスクを実行し、正常に完了したタスクの結果を返します(つまり、例外をスローしません)。 |
| 5 | <T> T invokeAny(Collection<? extends Callable<T>> tasks, long timeout, TimeUnit unit) 指定されたタスクを実行し、正常に完了したタスクの結果を返します(つまり、例外をスローせずに)。指定されたタイムアウトが経過する前に実行した場合。 |
| 6 | boolean isShutdown() このエグゼキュータがシャットダウンされている場合はtrueを返します。 |
| 7 | boolean isTerminated() シャットダウン後にすべてのタスクが完了した場合はtrueを返します。 |
| 8 | void shutdown() 以前に送信されたタスクが実行される正常なシャットダウンを開始しますが、新しいタスクは受け入れられません。 |
| 9 | List<Runnable> shutdownNow() アクティブに実行されているすべてのタスクの停止を試み、待機中のタスクの処理を停止し、実行を待機していたタスクのリストを返します。 |
| 10 | <T> Future<T> submit(Callable<T> task) 実行のために値を返すタスクを送信し、タスクの保留中の結果を表すFutureを返します。 |
| 11 | Future<?> submit(Runnable task) 実行可能なタスクを実行のために送信し、そのタスクを表すFutureを返します。 |
| 12 | <T> Future<T> submit(Runnable task, T result) 実行可能なタスクを実行のために送信し、そのタスクを表すFutureを返します。 |
例
次のTestThreadプログラムは、スレッドベースの環境でのExecutorServiceインターフェイスの使用法を示しています。
import java.util.concurrent.ExecutorService;
import java.util.concurrent.Executors;
import java.util.concurrent.TimeUnit;

public class TestThread {

   public static void main(final String[] arguments) throws InterruptedException {
      ExecutorService executor = Executors.newSingleThreadExecutor();

      try {
         executor.submit(new Task());
         System.out.println("Shutdown executor");
         executor.shutdown();
         executor.awaitTermination(5, TimeUnit.SECONDS);
      } catch (InterruptedException e) {
         System.err.println("tasks interrupted");
      } finally {

         if (!executor.isTerminated()) {
            System.err.println("cancel non-finished tasks");
         }
         executor.shutdownNow();
         System.out.println("shutdown finished");
      }
   }

   static class Task implements Runnable {

      public void run() {

         try {
            Long duration = (long) (Math.random() * 20);
            System.out.println("Running Task!");
            TimeUnit.SECONDS.sleep(duration);
         } catch (InterruptedException e) {
            e.printStackTrace();
         }
      }
   }
}
これにより、次の結果が得られます。
出力
Shutdown executor
Running Task!
shutdown finished
cancel non-finished tasks
java.lang.InterruptedException: sleep interrupted
	at java.lang.Thread.sleep(Native Method)
	at java.lang.Thread.sleep(Thread.java:302)
	at java.util.concurrent.TimeUnit.sleep(TimeUnit.java:328)
	at TestThread$Task.run(TestThread.java:39)
	at java.util.concurrent.Executors$RunnableAdapter.call(Executors.java:439) at java.util.concurrent.FutureTask$Sync.innerRun(FutureTask.java:303)
	at java.util.concurrent.FutureTask.run(FutureTask.java:138)
	at java.util.concurrent.ThreadPoolExecutor$Worker.runTask(ThreadPoolExecutor.java:895) at java.util.concurrent.ThreadPoolExecutor$Worker.run(ThreadPoolExecutor.java:918)
	at java.lang.Thread.run(Thread.java:662)
java.util.concurrent.ScheduledExecutorServiceインターフェースは、ExecutorServiceインターフェースのサブインターフェースであり、タスクの将来および/または定期的な実行をサポートします。
ScheduledExecutorServiceメソッド
| シニア番号 | 方法と説明 |
|---|---|
| 1 | <V> ScheduledFuture<V> schedule(Callable<V> callable, long delay, TimeUnit unit) 指定された遅延後に有効になるScheduledFutureを作成して実行します。 |
| 2 | ScheduledFuture<?> schedule(Runnable command, long delay, TimeUnit unit) 指定された遅延後に有効になるワンショットアクションを作成して実行します。 |
| 3 | ScheduledFuture<?> scheduleAtFixedRate(Runnable command, long initialDelay, long period, TimeUnit unit) 指定された初期遅延の後に最初に有効になり、その後指定された期間で有効になる定期的なアクションを作成して実行します。つまり、実行は、initialDelay、initialDelay + period、initialDelay + 2 *期間のように開始されます。 |
| 4 | ScheduledFuture<?> scheduleWithFixedDelay(Runnable command, long initialDelay, long delay, TimeUnit unit) 指定された初期遅延の後に最初に有効になり、その後、ある実行の終了から次の実行の開始までの間に指定された遅延が発生する定期的なアクションを作成して実行します。 |
例
次のTestThreadプログラムは、スレッドベースの環境でのScheduledExecutorServiceインターフェイスの使用法を示しています。
import java.util.concurrent.Executors;
import java.util.concurrent.ScheduledExecutorService;
import java.util.concurrent.ScheduledFuture;
import java.util.concurrent.TimeUnit;

public class TestThread {

   public static void main(final String[] arguments) throws InterruptedException {
      final ScheduledExecutorService scheduler = Executors.newScheduledThreadPool(1);

      final ScheduledFuture<?> beepHandler =
         scheduler.scheduleAtFixedRate(new BeepTask(), 2, 2, TimeUnit.SECONDS);

      scheduler.schedule(new Runnable() {

         @Override
         public void run() {
            beepHandler.cancel(true);
            scheduler.shutdown();
         }
      }, 10, TimeUnit.SECONDS);
   }

   static class BeepTask implements Runnable {

      public void run() {
         System.out.println("beep");
      }
   }
}
これにより、次の結果が得られます。
出力
beep
beep
beep
beep
固定スレッドプールは、Executorsクラスの静的なnewFixedThreadPool()メソッドを呼び出すことで取得できます。
構文
ExecutorService fixedPool = Executors.newFixedThreadPool(2);どこ
タスクを処理するために最大2つのスレッドがアクティブになります。
3つ以上のスレッドが送信された場合、スレッドが使用可能になるまでそれらはキューに保持されます。
エグゼキュータの実行シャットダウン中に失敗したためにスレッドが終了した場合に代わりとなる新しいスレッドが作成されます。
プールがシャットダウンされるまで、任意のスレッドが存在します。
例
次のTestThreadプログラムは、スレッドベースの環境でのnewFixedThreadPoolメソッドの使用法を示しています。
import java.util.concurrent.ExecutorService;
import java.util.concurrent.Executors;
import java.util.concurrent.ThreadPoolExecutor;
import java.util.concurrent.TimeUnit;

public class TestThread {

   public static void main(final String[] arguments) throws InterruptedException {
      ExecutorService executor = Executors.newFixedThreadPool(2);

      // Cast the object to its class type
      ThreadPoolExecutor pool = (ThreadPoolExecutor) executor;

      //Stats before tasks execution
      System.out.println("Largest executions: "
         + pool.getLargestPoolSize());
      System.out.println("Maximum allowed threads: "
         + pool.getMaximumPoolSize());
      System.out.println("Current threads in pool: "
         + pool.getPoolSize());
      System.out.println("Currently executing threads: "
         + pool.getActiveCount());
      System.out.println("Total number of threads(ever scheduled): "
         + pool.getTaskCount());

      executor.submit(new Task());
      executor.submit(new Task());

      //Stats after tasks execution
      System.out.println("Core threads: " + pool.getCorePoolSize());
      System.out.println("Largest executions: "
         + pool.getLargestPoolSize());
      System.out.println("Maximum allowed threads: "
         + pool.getMaximumPoolSize());
      System.out.println("Current threads in pool: "
         + pool.getPoolSize());
      System.out.println("Currently executing threads: "
         + pool.getActiveCount());
      System.out.println("Total number of threads(ever scheduled): "
         + pool.getTaskCount());

      executor.shutdown();
   }

   static class Task implements Runnable {

      public void run() {

         try {
            Long duration = (long) (Math.random() * 5);
            System.out.println("Running Task! Thread Name: " +
               Thread.currentThread().getName());
               TimeUnit.SECONDS.sleep(duration);

            System.out.println("Task Completed! Thread Name: " +
               Thread.currentThread().getName());
         } catch (InterruptedException e) {
            e.printStackTrace();
         }
      }
   }
}
これにより、次の結果が得られます。
出力
Largest executions: 0
Maximum allowed threads: 2
Current threads in pool: 0
Currently executing threads: 0
Total number of threads(ever scheduled): 0
Core threads: 2
Largest executions: 2
Maximum allowed threads: 2
Current threads in pool: 2
Currently executing threads: 1
Total number of threads(ever scheduled): 2
Running Task! Thread Name: pool-1-thread-1
Running Task! Thread Name: pool-1-thread-2
Task Completed! Thread Name: pool-1-thread-2
Task Completed! Thread Name: pool-1-thread-1
キャッシュされたスレッドプールは、Executorsクラスの静的なnewCachedThreadPool()メソッドを呼び出すことで取得できます。
構文
ExecutorService executor = Executors.newCachedThreadPool();どこ
newCachedThreadPoolメソッドは、拡張可能なスレッドプールを持つエグゼキュータを作成します。
このようなエグゼキュータは、多くの短期間のタスクを起動するアプリケーションに適しています。
例
次のTestThreadプログラムは、スレッドベースの環境でのnewCachedThreadPoolメソッドの使用法を示しています。
import java.util.concurrent.ExecutorService;
import java.util.concurrent.Executors;
import java.util.concurrent.ThreadPoolExecutor;
import java.util.concurrent.TimeUnit;

public class TestThread {

   public static void main(final String[] arguments) throws InterruptedException {
      ExecutorService executor = Executors.newCachedThreadPool();

      // Cast the object to its class type
      ThreadPoolExecutor pool = (ThreadPoolExecutor) executor;

      //Stats before tasks execution
      System.out.println("Largest executions: "
         + pool.getLargestPoolSize());
      System.out.println("Maximum allowed threads: "
         + pool.getMaximumPoolSize());
      System.out.println("Current threads in pool: "
         + pool.getPoolSize());
      System.out.println("Currently executing threads: "
         + pool.getActiveCount());
      System.out.println("Total number of threads(ever scheduled): "
         + pool.getTaskCount());

      executor.submit(new Task());
      executor.submit(new Task());

      //Stats after tasks execution
      System.out.println("Core threads: " + pool.getCorePoolSize());
      System.out.println("Largest executions: "
         + pool.getLargestPoolSize());
      System.out.println("Maximum allowed threads: "
         + pool.getMaximumPoolSize());
      System.out.println("Current threads in pool: "
         + pool.getPoolSize());
      System.out.println("Currently executing threads: "
         + pool.getActiveCount());
      System.out.println("Total number of threads(ever scheduled): "
         + pool.getTaskCount());

      executor.shutdown();
   }

   static class Task implements Runnable {

      public void run() {

         try {
            Long duration = (long) (Math.random() * 5);
            System.out.println("Running Task! Thread Name: " +
               Thread.currentThread().getName());
               TimeUnit.SECONDS.sleep(duration);
            System.out.println("Task Completed! Thread Name: " +
               Thread.currentThread().getName());
         } catch (InterruptedException e) {
            e.printStackTrace();
         }
      }
   }
}
これにより、次の結果が得られます。
出力
Largest executions: 0
Maximum allowed threads: 2147483647
Current threads in pool: 0
Currently executing threads: 0
Total number of threads(ever scheduled): 0
Core threads: 0
Largest executions: 2
Maximum allowed threads: 2147483647
Current threads in pool: 2
Currently executing threads: 2
Total number of threads(ever scheduled): 2
Running Task! Thread Name: pool-1-thread-1
Running Task! Thread Name: pool-1-thread-2
Task Completed! Thread Name: pool-1-thread-2
Task Completed! Thread Name: pool-1-thread-1
スケジュールされたスレッドプールは、Executorsクラスの静的なnewScheduledThreadPool()メソッドを呼び出すことで取得できます。
構文
ExecutorService executor = Executors.newScheduledThreadPool(1);例
次のTestThreadプログラムは、スレッドベースの環境でのnewScheduledThreadPoolメソッドの使用法を示しています。
import java.util.concurrent.Executors;
import java.util.concurrent.ScheduledExecutorService;
import java.util.concurrent.ScheduledFuture;
import java.util.concurrent.TimeUnit;

public class TestThread {

   public static void main(final String[] arguments) throws InterruptedException {
      final ScheduledExecutorService scheduler = Executors.newScheduledThreadPool(1);

      final ScheduledFuture<?> beepHandler =
         scheduler.scheduleAtFixedRate(new BeepTask(), 2, 2, TimeUnit.SECONDS);

      scheduler.schedule(new Runnable() {

         @Override
         public void run() {
            beepHandler.cancel(true);
            scheduler.shutdown();
         }
      }, 10, TimeUnit.SECONDS);
   }

   static class BeepTask implements Runnable {

      public void run() {
         System.out.println("beep");
      }
   }
}
これにより、次の結果が得られます。
出力
beep
beep
beep
beep
シングルスレッドプールは、Executorsクラスの静的なnewSingleThreadExecutor()メソッドを呼び出すことで取得できます。
構文
ExecutorService executor = Executors.newSingleThreadExecutor();newSingleThreadExecutorメソッドは、一度に1つのタスクを実行するエグゼキューターを作成します。
例
次のTestThreadプログラムは、スレッドベースの環境でのnewSingleThreadExecutorメソッドの使用法を示しています。
import java.util.concurrent.ExecutorService;
import java.util.concurrent.Executors;
import java.util.concurrent.TimeUnit;

public class TestThread {

   public static void main(final String[] arguments) throws InterruptedException {
      ExecutorService executor = Executors.newSingleThreadExecutor();

      try {
         executor.submit(new Task());
         System.out.println("Shutdown executor");
         executor.shutdown();
         executor.awaitTermination(5, TimeUnit.SECONDS);
      } catch (InterruptedException e) {
         System.err.println("tasks interrupted");
      } finally {

         if (!executor.isTerminated()) {
            System.err.println("cancel non-finished tasks");
         }
         executor.shutdownNow();
         System.out.println("shutdown finished");
      }
   }

   static class Task implements Runnable {

      public void run() {

         try {
            Long duration = (long) (Math.random() * 20);
            System.out.println("Running Task!");
            TimeUnit.SECONDS.sleep(duration);
         } catch (InterruptedException e) {
            e.printStackTrace();
         }
      }
   }
}
これにより、次の結果が得られます。
出力
Shutdown executor
Running Task!
shutdown finished
cancel non-finished tasks
java.lang.InterruptedException: sleep interrupted
	at java.lang.Thread.sleep(Native Method)
	at java.lang.Thread.sleep(Thread.java:302)
	at java.util.concurrent.TimeUnit.sleep(TimeUnit.java:328)
	at TestThread$Task.run(TestThread.java:39) at java.util.concurrent.Executors$RunnableAdapter.call(Executors.java:439)
	at java.util.concurrent.FutureTask$Sync.innerRun(FutureTask.java:303) at java.util.concurrent.FutureTask.run(FutureTask.java:138) at java.util.concurrent.ThreadPoolExecutor$Worker.runTask(ThreadPoolExecutor.java:895)
	at java.util.concurrent.ThreadPoolExecutor$Worker.run(ThreadPoolExecutor.java:918)
	at java.lang.Thread.run(Thread.java:662)
java.util.concurrent.ThreadPoolExecutorは、通常はExecutorsファクトリメソッドを使用して構成された、場合によっては複数のプールされたスレッドの1つを使用して、送信された各タスクを実行するExecutorServiceです。また、現在のスレッドの統計をチェックして制御するためのさまざまなユーティリティメソッドも提供します。
ThreadPoolExecutorメソッド
| シニア番号 | 方法と説明 |
|---|---|
| 1 | protected void afterExecute(Runnable r, Throwable t) 指定されたRunnableの実行の完了時に呼び出されるメソッド。 |
| 2 | void allowCoreThreadTimeOut(boolean value) キープアライブ時間内にタスクが到着しない場合にコアスレッドがタイムアウトして終了し、新しいタスクが到着したときに必要に応じて置き換えられるかどうかを管理するポリシーを設定します。 |
| 3 | boolean allowsCoreThreadTimeOut() このプールでコアスレッドがタイムアウトし、keepAlive時間内にタスクが到着しない場合は終了し、必要に応じて新しいタスクが到着したときに置き換えられる場合はtrueを返します。 |
| 4 | boolean awaitTermination(long timeout, TimeUnit unit) シャットダウン要求後にすべてのタスクの実行が完了するか、タイムアウトが発生するか、現在のスレッドが中断されるまで、どちらか早い方でブロックします。 |
| 5 | protected void beforeExecute(Thread t, Runnable r) 指定されたスレッドで指定されたRunnableを実行する前に呼び出されるメソッド。 |
| 6 | void execute(Runnable command) 将来、指定されたタスクを実行します。 |
| 7 | protected void finalize() このエグゼキュータが参照されなくなり、スレッドがなくなると、シャットダウンが呼び出されます。 |
| 8 | int getActiveCount() タスクをアクティブに実行しているスレッドのおおよその数を返します。 |
| 9 | long getCompletedTaskCount() 実行を完了したタスクのおおよその総数を返します。 |
| 10 | int getCorePoolSize() スレッドのコア数を返します。 |
| 11 | long getKeepAliveTime(TimeUnit unit) スレッドのキープアライブ時間を返します。これは、コアプールサイズを超えるスレッドが終了する前にアイドル状態を維持できる時間です。 |
| 12 | int getLargestPoolSize() プールに同時に存在したスレッドの最大数を返します。 |
| 13 | int getMaximumPoolSize() スレッドの最大許容数を返します。 |
| 14 | int getPoolSize() プール内の現在のスレッド数を返します。 |
| 15 | BlockingQueue
このエグゼキュータが使用するタスクキューを返します。 |
| 15 | RejectedExecutionHandler getRejectedExecutionHandler() 実行不可能なタスクの現在のハンドラーを返します。 |
| 16 | long getTaskCount() これまでに実行がスケジュールされたタスクのおおよその総数を返します。 |
| 17 | ThreadFactory getThreadFactory() 新しいスレッドの作成に使用されたスレッドファクトリを返します。 |
| 18 | boolean isShutdown() このエグゼキュータがシャットダウンされている場合はtrueを返します。 |
| 19 | boolean isTerminated() シャットダウン後にすべてのタスクが完了した場合はtrueを返します。 |
| 20 | boolean isTerminating() このエグゼキュータがshutdown()またはshutdownNow()の後で終了するプロセスにあるが、完全に終了していない場合はtrueを返します。 |
| 21 | int prestartAllCoreThreads() すべてのコアスレッドを開始し、アイドル状態で作業を待機させます。 |
| 22 | boolean prestartCoreThread() コアスレッドを開始し、アイドル状態で作業を待機させます。 |
| 23 | void purge() キャンセルされたすべての将来のタスクをワークキューから削除しようとします。 |
| 24 | boolean remove(Runnable task) このタスクが存在する場合は、エグゼキュータの内部キューから削除します。これにより、まだ開始されていない場合は実行されません。 |
| 25 | void setCorePoolSize(int corePoolSize) スレッドのコア数を設定します。 |
| 26 | void setKeepAliveTime(long time, TimeUnit unit) スレッドが終了する前にアイドル状態を維持できる時間制限を設定します。 |
| 27 | void setMaximumPoolSize(int maximumPoolSize) スレッドの最大許容数を設定します。 |
| 28 | void setRejectedExecutionHandler(RejectedExecutionHandler handler) 実行不可能なタスクの新しいハンドラーを設定します。 |
| 29 | void setThreadFactory(ThreadFactory threadFactory) 新しいスレッドの作成に使用されるスレッドファクトリを設定します。 |
| 30 | void shutdown() 以前に送信されたタスクが実行される正常なシャットダウンを開始しますが、新しいタスクは受け入れられません。 |
| 31 | List<Runnable> shutdownNow() アクティブに実行されているすべてのタスクの停止を試み、待機中のタスクの処理を停止し、実行を待機していたタスクのリストを返します。 |
| 32 | protected void terminated() エグゼキュータが終了したときに呼び出されるメソッド。 |
| 33 | String toString() このプールとその状態を識別する文字列を返します。これには、実行状態、推定されるワーカー数とタスク数が含まれます。 |
例
次のTestThreadプログラムは、スレッドベースの環境でのThreadPoolExecutorインターフェイスの使用法を示しています。
import java.util.concurrent.Executors;
import java.util.concurrent.ThreadPoolExecutor;
import java.util.concurrent.TimeUnit;

public class TestThread {

   public static void main(final String[] arguments) throws InterruptedException {
      ThreadPoolExecutor executor = (ThreadPoolExecutor)Executors.newCachedThreadPool();

      //Stats before tasks execution
      System.out.println("Largest executions: "
         + executor.getLargestPoolSize());
      System.out.println("Maximum allowed threads: "
         + executor.getMaximumPoolSize());
      System.out.println("Current threads in pool: "
         + executor.getPoolSize());
      System.out.println("Currently executing threads: "
         + executor.getActiveCount());
      System.out.println("Total number of threads(ever scheduled): "
         + executor.getTaskCount());

      executor.submit(new Task());
      executor.submit(new Task());

      //Stats after tasks execution
      System.out.println("Core threads: " + executor.getCorePoolSize());
      System.out.println("Largest executions: "
         + executor.getLargestPoolSize());
      System.out.println("Maximum allowed threads: "
         + executor.getMaximumPoolSize());
      System.out.println("Current threads in pool: "
         + executor.getPoolSize());
      System.out.println("Currently executing threads: "
         + executor.getActiveCount());
      System.out.println("Total number of threads(ever scheduled): "
         + executor.getTaskCount());

      executor.shutdown();
   }

   static class Task implements Runnable {

      public void run() {

         try {
            Long duration = (long) (Math.random() * 5);
            System.out.println("Running Task! Thread Name: " +
               Thread.currentThread().getName());
            TimeUnit.SECONDS.sleep(duration);
            System.out.println("Task Completed! Thread Name: " +
               Thread.currentThread().getName());
         } catch (InterruptedException e) {
            e.printStackTrace();
         }
      }
   }
}
これにより、次の結果が得られます。
出力
Largest executions: 0
Maximum allowed threads: 2147483647
Current threads in pool: 0
Currently executing threads: 0
Total number of threads(ever scheduled): 0
Core threads: 0
Largest executions: 2
Maximum allowed threads: 2147483647
Current threads in pool: 2
Currently executing threads: 2
Total number of threads(ever scheduled): 2
Running Task! Thread Name: pool-1-thread-2
Running Task! Thread Name: pool-1-thread-1
Task Completed! Thread Name: pool-1-thread-1
Task Completed! Thread Name: pool-1-thread-2
java.util.concurrent.ScheduledThreadPoolExecutorは、ThreadPoolExecutorのサブクラスであり、指定された遅延後に実行するコマンド、または定期的に実行するコマンドを追加でスケジュールできます。
ScheduledThreadPoolExecutorメソッド
| シニア番号 | 方法と説明 |
|---|---|
| 1 | protected <V> RunnableScheduledFuture<V> decorateTask(Callable<V> callable, RunnableScheduledFuture<V> task) 呼び出し可能オブジェクトの実行に使用されるタスクを変更または置換します。 |
| 2 | protected <V> RunnableScheduledFuture<V> decorateTask(Runnable runnable, RunnableScheduledFuture<V> task) ランナブルの実行に使用されるタスクを変更または置換します。 |
| 3 | void execute(Runnable command) 必要な遅延なしでコマンドを実行します。 |
| 4 | boolean getContinueExistingPeriodicTasksAfterShutdownPolicy() このエグゼキュータがシャットダウンされた場合でも、既存の定期的なタスクを実行し続けるかどうかに関するポリシーを取得します。 |
| 5 | boolean getExecuteExistingDelayedTasksAfterShutdownPolicy() このエグゼキュータがシャットダウンされている場合でも、既存の遅延タスクを実行するかどうかに関するポリシーを取得します。 |
| 6 | BlockingQueue<Runnable> getQueue() このエグゼキュータが使用するタスクキューを返します。 |
| 7 | boolean getRemoveOnCancelPolicy() キャンセルされたタスクをキャンセル時にワークキューからすぐに削除するかどうかに関するポリシーを取得します。 |
| 8 | <V> ScheduledFuture<V> schedule(Callable<V> callable, long delay, TimeUnit unit) 指定された遅延後に有効になるScheduledFutureを作成して実行します。 |
| 9 | ScheduledFuture<?> schedule(Runnable command, long delay, TimeUnit unit) 指定された遅延後に有効になるワンショットアクションを作成して実行します。 |
| 10 | ScheduledFuture<?> scheduleAtFixedRate(Runnable command, long initialDelay, long period, TimeUnit unit) 指定された初期遅延の後に最初に有効になり、その後指定された期間で有効になる定期的なアクションを作成して実行します。つまり、実行は、initialDelay、initialDelay + period、initialDelay + 2 *期間のように開始されます。 |
| 11 | ScheduledFuture<?> scheduleWithFixedDelay(Runnable command, long initialDelay, long delay, TimeUnit unit) 指定された初期遅延の後に最初に有効になり、その後、ある実行の終了から次の実行の開始までの間に指定された遅延が発生する定期的なアクションを作成して実行します。 |
| 12 | void setContinueExistingPeriodicTasksAfterShutdownPolicy (boolean value) このエグゼキュータがシャットダウンされた場合でも、既存の定期的なタスクを実行し続けるかどうかに関するポリシーを設定します。 |
| 13 | void setExecuteExistingDelayedTasksAfterShutdownPolicy (boolean value) このエグゼキュータがシャットダウンされている場合でも、既存の遅延タスクを実行するかどうかに関するポリシーを設定します。 |
| 14 | void setRemoveOnCancelPolicy(boolean value) キャンセルされたタスクをキャンセル時にワークキューからすぐに削除するかどうかに関するポリシーを設定します。 |
| 15 | void shutdown() 以前に送信されたタスクが実行される正常なシャットダウンを開始しますが、新しいタスクは受け入れられません。 |
| 16 | List<Runnable> shutdownNow() アクティブに実行されているすべてのタスクの停止を試み、待機中のタスクの処理を停止し、実行を待機していたタスクのリストを返します。 |
| 17 | <T> Future<T> submit(Callable<T> task) 実行のために値を返すタスクを送信し、タスクの保留中の結果を表すFutureを返します。 |
| 18 | Future<?> submit(Runnable task) 実行可能なタスクを実行のために送信し、そのタスクを表すFutureを返します。 |
| 19 | <T> Future<T> submit(Runnable task, T result) 実行可能なタスクを実行のために送信し、そのタスクを表すFutureを返します。 |
例
次のTestThreadプログラムは、スレッドベースの環境でのScheduledThreadPoolExecutorインターフェイスの使用法を示しています。
import java.util.concurrent.Executors;
import java.util.concurrent.ScheduledThreadPoolExecutor;
import java.util.concurrent.ScheduledFuture;
import java.util.concurrent.TimeUnit;

public class TestThread {

   public static void main(final String[] arguments) throws InterruptedException {
      final ScheduledThreadPoolExecutor scheduler =
         (ScheduledThreadPoolExecutor)Executors.newScheduledThreadPool(1);

      final ScheduledFuture<?> beepHandler =
         scheduler.scheduleAtFixedRate(new BeepTask(), 2, 2, TimeUnit.SECONDS);

      scheduler.schedule(new Runnable() {

         @Override
         public void run() {
            beepHandler.cancel(true);
            scheduler.shutdown();
         }
      }, 10, TimeUnit.SECONDS);
   }

   static class BeepTask implements Runnable {

      public void run() {
         System.out.println("beep");
      }
   }
}
これにより、次の結果が得られます。
出力
beep
beep
beep
beep
java.util.concurrent.Callableオブジェクトは、スレッドのみを実行できる実行可能なインターフェースとは対照的に、スレッドによって実行された計算結果を返すことができます。Callableオブジェクトは、スレッドによって実行されているタスクの進行状況を監視するメソッドを提供するFutureオブジェクトを返します。Futureオブジェクトを使用して、Callableのステータスを確認し、スレッドが完了したらCallableから結果を取得できます。また、タイムアウト機能も提供します。
構文
//submit the callable using ThreadExecutor
//and get the result as a Future object
Future<Long> result10 = executor.submit(new FactorialService(10));

//get the result using get method of the Future object
//get method waits till the thread execution and then return the result of the execution.
Long factorial10 = result10.get();
例
次のTestThreadプログラムは、スレッドベースの環境でのFuturesとCallablesの使用法を示しています。
import java.util.concurrent.Callable;
import java.util.concurrent.ExecutionException;
import java.util.concurrent.ExecutorService;
import java.util.concurrent.Executors;
import java.util.concurrent.Future;

public class TestThread {

   public static void main(final String[] arguments) throws InterruptedException,
      ExecutionException {

      ExecutorService executor = Executors.newSingleThreadExecutor();

      System.out.println("Factorial Service called for 10!");
      Future<Long> result10 = executor.submit(new FactorialService(10));

      System.out.println("Factorial Service called for 20!");
      Future<Long> result20 = executor.submit(new FactorialService(20));

      Long factorial10 = result10.get();
      System.out.println("10! = " + factorial10);

      Long factorial20 = result20.get();
      System.out.println("20! = " + factorial20);

      executor.shutdown();
   }

   static class FactorialService implements Callable<Long> {
      private int number;

      public FactorialService(int number) {
         this.number = number;
      }

      @Override
      public Long call() throws Exception {
         return factorial();
      }

      private Long factorial() throws InterruptedException {
         long result = 1;

         while (number != 0) {
            result = number * result;
            number--;
            Thread.sleep(100);
         }
         return result;
      }
   }
}
これにより、次の結果が得られます。
出力
Factorial Service called for 10!
Factorial Service called for 20!
10! = 3628800
20! = 2432902008176640000
フォーク結合フレームワークを使用すると、複数のワーカーで特定のタスクを中断し、結果がそれらを結合するのを待つことができます。マルチプロセッサマシンの容量を大幅に活用します。以下は、フォーク結合フレームワークで使用されるコアコンセプトとオブジェクトです。
フォーク
フォークは、タスクがそれ自体を、同時に実行できるより小さく独立したサブタスクに分割するプロセスです。
構文
Sum left  = new Sum(array, low, mid);
left.fork();
ここで、SumはRecursiveTaskのサブクラスであり、left.fork()はタスクをサブタスクに分割します。
参加する
結合は、サブタスクの実行が終了すると、タスクがサブタスクのすべての結果を結合するプロセスです。それ以外の場合は、待機し続けます。
構文
left.join();左はSumクラスのオブジェクトです。
ForkJoinPool
これは、フォークアンドジョインタスク分割で機能するように設計された特別なスレッドプールです。
構文
ForkJoinPool forkJoinPool = new ForkJoinPool(4);ここでは、4CPUの並列処理レベルを備えた新しいForkJoinPoolを紹介します。
RecursiveAction
RecursiveActionは、値を返さないタスクを表します。
構文
class Writer extends RecursiveAction {
   @Override
   protected void compute() { }
}
RecursiveTask
RecursiveTaskは、値を返すタスクを表します。
構文
class Sum extends RecursiveTask<Long> {
   @Override
   protected Long compute() { return null; }
}
例
次のTestThreadプログラムは、スレッドベースの環境でのFork-Joinフレームワークの使用法を示しています。
import java.util.concurrent.ExecutionException;
import java.util.concurrent.ForkJoinPool;
import java.util.concurrent.RecursiveTask;

public class TestThread {

   public static void main(final String[] arguments) throws InterruptedException,
      ExecutionException {

      int nThreads = Runtime.getRuntime().availableProcessors();
      System.out.println(nThreads);

      int[] numbers = new int[1000];

      for(int i = 0; i < numbers.length; i++) {
         numbers[i] = i;
      }

      ForkJoinPool forkJoinPool = new ForkJoinPool(nThreads);
      Long result = forkJoinPool.invoke(new Sum(numbers,0,numbers.length));
      System.out.println(result);
   }

   static class Sum extends RecursiveTask<Long> {
      int low;
      int high;
      int[] array;

      Sum(int[] array, int low, int high) {
         this.array = array;
         this.low   = low;
         this.high  = high;
      }

      protected Long compute() {

         if(high - low <= 10) {
            long sum = 0;

            for(int i = low; i < high; ++i)
               sum += array[i];
               return sum;
         } else {
            int mid = low + (high - low) / 2;
            Sum left  = new Sum(array, low, mid);
            Sum right = new Sum(array, mid, high);
            left.fork();
            long rightResult = right.compute();
            long leftResult  = left.join();
            return leftResult + rightResult;
         }
      }
   }
}
これにより、次の結果が得られます。
出力
32
499500
java.util.concurrent.BlockingQueueインターフェースは、キューインターフェースのサブインターフェースであり、要素を取得する前にキューが空でなくなるのを待つ、要素を格納する前にキューでスペースが使用可能になるのを待つなどの操作を追加でサポートします。 。
BlockingQueueメソッド
| シニア番号 | 方法と説明 |
|---|---|
| 1 | boolean add(E e) 容量制限に違反せずにすぐに実行できる場合は、指定された要素をこのキューに挿入します。成功するとtrueを返し、現在使用可能なスペースがない場合はIllegalStateExceptionをスローします。 |
| 2 | boolean contains(Object o) このキューに指定された要素が含まれている場合はtrueを返します。 |
| 3 | int drainTo(Collection<? super E> c) このキューから使用可能なすべての要素を削除し、それらを指定されたコレクションに追加します。 |
| 4 | int drainTo(Collection<? super E> c, int maxElements) このキューから最大で指定された数の使用可能な要素を削除し、それらを指定されたコレクションに追加します。 |
| 5 | boolean offer(E e) 容量制限に違反せずにすぐに実行できる場合は、指定された要素をこのキューに挿入します。成功するとtrueを返し、現在使用可能なスペースがない場合はfalseを返します。 |
| 6 | boolean offer(E e, long timeout, TimeUnit unit) 指定された要素をこのキューに挿入し、必要に応じてスペースが使用可能になるまで指定された待機時間まで待機します。 |
| 7 | E poll(long timeout, TimeUnit unit) このキューの先頭を取得して削除し、必要に応じて要素が使用可能になるまで指定された待機時間まで待機します。 |
| 8 | void put(E e) 指定された要素をこのキューに挿入し、必要に応じてスペースが使用可能になるのを待ちます。 |
| 9 | int remainingCapacity() このキューが理想的に(メモリまたはリソースの制約がない場合に)ブロックせずに受け入れることができる追加要素の数を返します。固有の制限がない場合はInteger.MAX_VALUEを返します。 |
| 10 | boolean remove(Object o) 指定された要素の単一のインスタンスが存在する場合は、このキューから削除します。 |
| 11 | E take() このキューの先頭を取得して削除し、必要に応じて要素が使用可能になるまで待機します。 |
例
次のTestThreadプログラムは、スレッドベースの環境でのBlockingQueueインターフェイスの使用法を示しています。
import java.util.Random;
import java.util.concurrent.ArrayBlockingQueue;
import java.util.concurrent.BlockingQueue;

public class TestThread {

   public static void main(final String[] arguments) throws InterruptedException {
      BlockingQueue<Integer> queue = new ArrayBlockingQueue<Integer>(10);

      Producer producer = new Producer(queue);
      Consumer consumer = new Consumer(queue);

      new Thread(producer).start();
      new Thread(consumer).start();

      Thread.sleep(4000);
   }


   static class Producer implements Runnable {
      private BlockingQueue<Integer> queue;

      public Producer(BlockingQueue queue) {
         this.queue = queue;
      }

      @Override
      public void run() {
         Random random = new Random();

         try {
            int result = random.nextInt(100);
            Thread.sleep(1000);
            queue.put(result);
            System.out.println("Added: " + result);

            result = random.nextInt(100);
            Thread.sleep(1000);
            queue.put(result);
            System.out.println("Added: " + result);

            result = random.nextInt(100);
            Thread.sleep(1000);
            queue.put(result);
            System.out.println("Added: " + result);
         } catch (InterruptedException e) {
            e.printStackTrace();
         }
      }
   }

   static class Consumer implements Runnable {
      private BlockingQueue<Integer> queue;

      public Consumer(BlockingQueue queue) {
         this.queue = queue;
      }

      @Override
      public void run() {

         try {
            System.out.println("Removed: " + queue.take());
            System.out.println("Removed: " + queue.take());
            System.out.println("Removed: " + queue.take());
         } catch (InterruptedException e) {
            e.printStackTrace();
         }
      }
   }
}
これにより、次の結果が得られます。
出力
Added: 52
Removed: 52
Added: 70
Removed: 70
Added: 27
Removed: 27
java.util.concurrent.ConcurrentMapインターフェースは、Mapインターフェースのサブインターフェースであり、基礎となるマップ変数に対するアトミック操作をサポートします。揮発性変数の読み取りと書き込みのように機能するgetメソッドとsetメソッドがあります。つまり、セットには、同じ変数に対する後続のgetとの発生前の関係があります。このインターフェースは、スレッドセーフとアトミック性の保証を保証します。
ConcurrentMapメソッド
| シニア番号 | 方法と説明 |
|---|---|
| 1 | default V compute(K key, BiFunction<? super K,? super V,? extends V> remappingFunction) 指定されたキーとその現在のマップ値(または現在のマッピングがない場合はnull)のマッピングを計算しようとします。 |
| 2 | default V computeIfAbsent(K key, Function<? super K,? extends V> mappingFunction) 指定されたキーがまだ値に関連付けられていない(またはnullにマップされている)場合、指定されたマッピング関数を使用してその値を計算し、nullでない限りこのマップに入力しようとします。 |
| 3 | default V computeIfPresent(K key, BiFunction<? super K,? super V,? extends V> remappingFunction) 指定されたキーの値が存在し、null以外の場合、キーとその現在のマップされた値を指定して、新しいマッピングの計算を試みます。 |
| 4 | default void forEach(BiConsumer<? super K,? super V> action) すべてのエントリが処理されるか、アクションが例外をスローするまで、このマップの各エントリに対して指定されたアクションを実行します。 |
| 5 | default V getOrDefault(Object key, V defaultValue) 指定されたキーがマップされている値を返します。このマップにキーのマッピングが含まれていない場合はdefaultValueを返します。 |
| 6 | default V merge(K key, V value, BiFunction<? super V,? super V,? extends V> remappingFunction) 指定されたキーがまだ値に関連付けられていないか、nullに関連付けられている場合は、指定されたnull以外の値に関連付けます。 |
| 7 | V putIfAbsent(K key, V value) 指定されたキーがまだ値に関連付けられていない場合は、指定された値に関連付けます。 |
| 8 | boolean remove(Object key, Object value) 現在特定の値にマップされている場合にのみ、キーのエントリを削除します。 |
| 9 | V replace(K key, V value) 現在何らかの値にマップされている場合にのみ、キーのエントリを置き換えます。 |
| 10 | boolean replace(K key, V oldValue, V newValue) 現在指定された値にマップされている場合にのみ、キーのエントリを置き換えます。 |
| 11 | default void replaceAll(BiFunction<? super K,? super V,? extends V> function) すべてのエントリが処理されるか、関数が例外をスローするまで、各エントリの値をそのエントリで指定された関数を呼び出した結果に置き換えます。 |
例
次のTestThreadプログラムは、ConcurrentMapとHashMapの使用法を示しています。
import java.util.ConcurrentModificationException;
import java.util.HashMap;
import java.util.Iterator;
import java.util.Map;
import java.util.concurrent.ConcurrentHashMap;

public class TestThread {

   public static void main(final String[] arguments) {
      Map<String,String> map = new ConcurrentHashMap<String, String>();

      map.put("1", "One");
      map.put("2", "Two");
      map.put("3", "Three");
      map.put("5", "Five");
      map.put("6", "Six");

      System.out.println("Initial ConcurrentHashMap: " + map);
      Iterator<String> iterator = map.keySet().iterator();

      try {

         while(iterator.hasNext()) {
            String key = iterator.next();

            if(key.equals("3")) {
               map.put("4", "Four");
            }
         }
      } catch(ConcurrentModificationException cme) {
         cme.printStackTrace();
      }
      System.out.println("ConcurrentHashMap after modification: " + map);

      map = new HashMap<String, String>();

      map.put("1", "One");
      map.put("2", "Two");
      map.put("3", "Three");
      map.put("5", "Five");
      map.put("6", "Six");

      System.out.println("Initial HashMap: " + map);
      iterator = map.keySet().iterator();

      try {

         while(iterator.hasNext()) {
            String key = iterator.next();

            if(key.equals("3")) {
               map.put("4", "Four");
            }
         }
         System.out.println("HashMap after modification: " + map);
      } catch(ConcurrentModificationException cme) {
         cme.printStackTrace();
      }
   }
}
これにより、次の結果が得られます。
出力
Initial ConcurrentHashMap: {1 = One, 2 = Two, 3 = Three, 5 = Five, 6 = Six}
ConcurrentHashMap after modification: {1 = One, 2 = Two, 3 = Three, 4 = Four, 5 = Five, 6 = Six}
Initial HashMap: {1 = One, 2 = Two, 3 = Three, 5 = Five, 6 = Six}
java.util.ConcurrentModificationException
	at java.util.HashMap$HashIterator.nextNode(Unknown Source)
	at java.util.HashMap$KeyIterator.next(Unknown Source)
	at TestThread.main(TestThread.java:48)
java.util.concurrent.ConcurrentNavigableMapインターフェースは、ConcurrentMapインターフェースのサブインターフェースであり、NavigableMap操作をサポートし、そのナビゲート可能なサブマップと近似一致に対して再帰的にサポートします。
ConcurrentMapメソッド
| シニア番号 | 方法と説明 |
|---|---|
| 1 | NavigableSet<K> descendingKeySet() このマップに含まれるキーの逆順のNavigableSetビューを返します。 |
| 2 | ConcurrentNavigableMap<K,V> descendingMap() このマップに含まれるマッピングの逆順ビューを返します。 |
| 3 | ConcurrentNavigableMap<K,V> headMap(K toKey) キーがtoKeyよりも厳密に小さいこのマップの部分のビューを返します。 |
| 4 | ConcurrentNavigableMap<K,V> headMap(K toKey, boolean inclusive) キーがtoKeyよりも小さい(または、包括的である場合は等しい)このマップの部分のビューを返します。 |
| 5 | NavigableSet<K> keySet() このマップに含まれるキーのNavigableSetビューを返します。 |
| 6 | NavigableSet<K> navigableKeySet() このマップに含まれるキーのNavigableSetビューを返します。 |
| 7 | ConcurrentNavigableMap<K,V> subMap(K fromKey, boolean fromInclusive, K toKey, boolean toInclusive) キーの範囲がKeyからtoKeyまでのこのマップの部分のビューを返します。 |
| 8 | ConcurrentNavigableMap<K,V> subMap(K fromKey, K toKey) キーがfromKey(包括的)からtoKey(排他的)の範囲であるこのマップの部分のビューを返します。 |
| 9 | ConcurrentNavigableMap<K,V> tailMap(K fromKey) キーがfromKey以上であるこのマップの部分のビューを返します。 |
| 10 | ConcurrentNavigableMap<K,V> tailMap(K fromKey, boolean inclusive) キーがfromKeyより大きい(または、包括的である場合は等しい)このマップの部分のビューを返します。 |
例
次のTestThreadプログラムは、ConcurrentNavigableMapの使用法を示しています。
import java.util.concurrent.ConcurrentNavigableMap;
import java.util.concurrent.ConcurrentSkipListMap;

public class TestThread {

   public static void main(final String[] arguments) {
      ConcurrentNavigableMap<String,String> map =
         new ConcurrentSkipListMap<String, String>();

      map.put("1", "One");
      map.put("2", "Two");
      map.put("3", "Three");
      map.put("5", "Five");
      map.put("6", "Six");

      System.out.println("Initial ConcurrentHashMap: "+map);
      System.out.println("HeadMap(\"2\") of ConcurrentHashMap: "+map.headMap("2"));
      System.out.println("TailMap(\"2\") of ConcurrentHashMap: "+map.tailMap("2"));
      System.out.println(
         "SubMap(\"2\", \"4\") of ConcurrentHashMap: "+map.subMap("2","4"));
   }
}
これにより、次の結果が得られます。
出力
Initial ConcurrentHashMap: {1 = One, 2 = Two, 3 = Three, 5 = Five, 6 = Six}
HeadMap("2") of ConcurrentHashMap: {1 = One}
TailMap("2") of ConcurrentHashMap: {2 = Two, 3 = Three, 5 = Five, 6 = Six}
SubMap("2", "4") of ConcurrentHashMap: {2 = Two, 3 = Three}