JavaRMI-クイックガイド
RMIは Remote Method Invocation。これは、あるシステム(JVM)にあるオブジェクトが、別のJVMで実行されているオブジェクトにアクセス/呼び出すことを可能にするメカニズムです。
RMIは、分散アプリケーションを構築するために使用されます。Javaプログラム間のリモート通信を提供します。パッケージで提供されますjava.rmi。
RMIアプリケーションのアーキテクチャ
RMIアプリケーションでは、2つのプログラムを記述します。 server program (サーバー上にあります)および client program (クライアントに常駐)。
サーバープログラム内で、リモートオブジェクトが作成され、そのオブジェクトの参照がクライアントで利用できるようになります(レジストリを使用)。
クライアントプログラムは、サーバー上のリモートオブジェクトを要求し、そのメソッドを呼び出そうとします。
次の図は、RMIアプリケーションのアーキテクチャーを示しています。
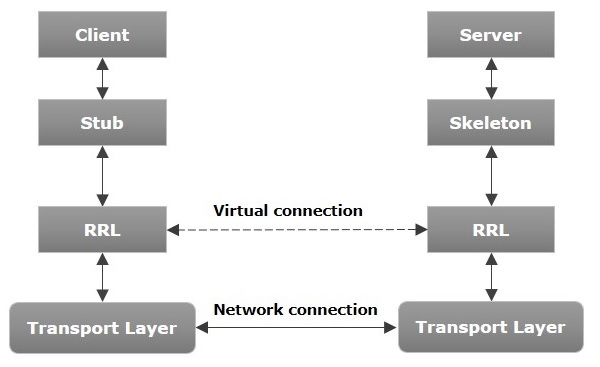
ここで、このアーキテクチャのコンポーネントについて説明します。
Transport Layer−この層は、クライアントとサーバーを接続します。既存の接続を管理し、新しい接続を設定します。
Stub−スタブは、クライアントでのリモートオブジェクトの表現(プロキシ)です。これはクライアントシステムにあります。クライアントプログラムのゲートウェイとして機能します。
Skeleton −これはサーバー側にあるオブジェクトです。 stub このスケルトンと通信して、リモートオブジェクトにリクエストを渡します。
RRL(Remote Reference Layer) −クライアントがリモートオブジェクトに対して行った参照を管理するレイヤーです。
RMIアプリケーションの動作
以下のポイントは、RMIアプリケーションがどのように機能するかをまとめたものです。
クライアントがリモートオブジェクトを呼び出すと、スタブによって受信され、最終的にこの要求がRRLに渡されます。
クライアント側のRRLはリクエストを受信すると、次のメソッドを呼び出します。 invoke() オブジェクトの remoteRef。サーバー側のRRLにリクエストを渡します。
サーバー側のRRLは、要求をスケルトン(サーバー上のプロキシ)に渡し、スケルトンは最終的にサーバー上の必要なオブジェクトを呼び出します。
結果はクライアントに返されます。
マーシャリングとアンマーシャリング
クライアントがリモートオブジェクトのパラメータを受け入れるメソッドを呼び出すたびに、パラメータはネットワーク経由で送信される前にメッセージにバンドルされます。これらのパラメーターは、プリミティブ型またはオブジェクトの場合があります。プリミティブ型の場合、パラメータがまとめられ、ヘッダーが付加されます。パラメータがオブジェクトの場合、それらはシリアル化されます。このプロセスは、marshalling。
サーバー側では、パックされたパラメーターがバンドル解除されてから、必要なメソッドが呼び出されます。このプロセスは、unmarshalling。
RMIレジストリ
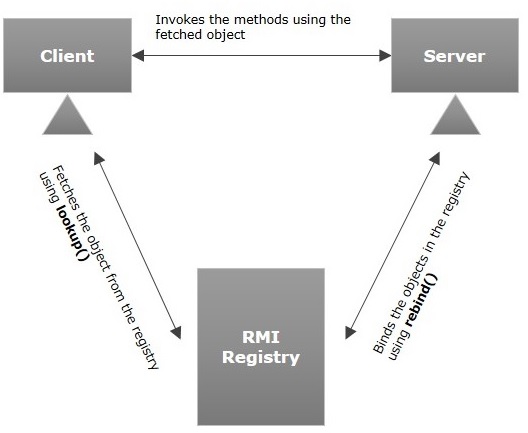
RMIレジストリは、すべてのサーバーオブジェクトが配置される名前空間です。サーバーがオブジェクトを作成するたびに、サーバーはこのオブジェクトをRMIregistryに登録します(bind() または reBind()メソッド)。これらは、として知られている一意の名前を使用して登録されますbind name。
リモートオブジェクトを呼び出すには、クライアントはそのオブジェクトの参照を必要とします。その時点で、クライアントはバインド名を使用してレジストリからオブジェクトをフェッチします(lookup() 方法)。
次の図は、プロセス全体を説明しています-
RMIの目標
RMIの目標は次のとおりです-
- アプリケーションの複雑さを最小限に抑えるため。
- 型安全性を維持するため。
- 分散ガベージコレクション。
- ローカルオブジェクトとリモートオブジェクトの操作の違いを最小限に抑えます。
RMI Javaアプリケーションを作成するには、以下の手順に従う必要があります。
- リモートインターフェースを定義する
- 実装クラス(リモートオブジェクト)を開発する
- サーバープログラムを開発する
- クライアントプログラムを開発する
- アプリケーションをコンパイルします
- アプリケーションを実行します
リモートインターフェースの定義
リモートインターフェイスは、特定のリモートオブジェクトのすべてのメソッドの説明を提供します。クライアントはこのリモートインターフェイスと通信します。
リモートインターフェースを作成するには-
事前定義されたインターフェースを拡張するインターフェースを作成する Remote パッケージに属します。
このインターフェイスでクライアントが呼び出すことができるすべてのビジネスメソッドを宣言します。
リモート呼び出し中にネットワークの問題が発生する可能性があるため、 RemoteException発生する可能性があります。投げて。
以下は、リモートインターフェイスの例です。ここでは、名前でインターフェイスを定義しましたHello そしてそれはと呼ばれるメソッドを持っています printMsg()。
import java.rmi.Remote;
import java.rmi.RemoteException;

// Creating Remote interface for our application
public interface Hello extends Remote {
   void printMsg() throws RemoteException;
}
実装クラスの開発(リモートオブジェクト)
前の手順で作成したリモートインターフェイスを実装する必要があります。(実装クラスを個別に作成することも、サーバープログラムにこのインターフェイスを直接実装させることもできます。)
実装クラスを開発するには-
- 前の手順で作成したインターフェースを実装します。
- リモートインターフェイスのすべての抽象メソッドに実装を提供します。
以下は実装クラスです。ここでは、という名前のクラスを作成しましたImplExample インターフェースを実装しました Hello 前のステップで作成され、提供された body メッセージを出力するこのメソッドの場合。
// Implementing the remote interface
public class ImplExample implements Hello {

   // Implementing the interface method
   public void printMsg() {
      System.out.println("This is an example RMI program");
   }
}
サーバープログラムの開発
RMIサーバープログラムは、リモートインターフェイスを実装するか、実装クラスを拡張する必要があります。ここでは、リモートオブジェクトを作成し、それをにバインドする必要がありますRMIregistry。
サーバープログラムを開発するには-
リモートオブジェクトを呼び出す場所からクライアントクラスを作成します。
Create a remote object 以下に示すように、実装クラスをインスタンス化します。
メソッドを使用してリモートオブジェクトをエクスポートします exportObject() 名前の付いたクラスの UnicastRemoteObject パッケージに属する java.rmi.server。
を使用してRMIレジストリを取得します getRegistry() の方法 LocateRegistry パッケージに属するクラス java.rmi.registry。
を使用して、作成されたリモートオブジェクトをレジストリにバインドします。 bind() 名前の付いたクラスのメソッド Registry。このメソッドに、バインド名とエクスポートされたオブジェクトを表す文字列をパラメーターとして渡します。
以下は、RMIサーバープログラムの例です。
import java.rmi.registry.Registry;
import java.rmi.registry.LocateRegistry;
import java.rmi.RemoteException;
import java.rmi.server.UnicastRemoteObject;

public class Server extends ImplExample {
   public Server() {}
   public static void main(String args[]) {
      try {
         // Instantiating the implementation class
         ImplExample obj = new ImplExample();

         // Exporting the object of implementation class
         // (here we are exporting the remote object to the stub)
         Hello stub = (Hello) UnicastRemoteObject.exportObject(obj, 0);

         // Binding the remote object (stub) in the registry
         Registry registry = LocateRegistry.getRegistry();

         registry.bind("Hello", stub);
         System.err.println("Server ready");
      } catch (Exception e) {
         System.err.println("Server exception: " + e.toString());
         e.printStackTrace();
      }
   }
}
クライアントプログラムの開発
その中にクライアントプログラムを記述し、リモートオブジェクトをフェッチして、このオブジェクトを使用して必要なメソッドを呼び出します。
クライアントプログラムを開発するには-
リモートオブジェクトを呼び出す目的の場所からクライアントクラスを作成します。
を使用してRMIレジストリを取得します getRegistry() の方法 LocateRegistry パッケージに属するクラス java.rmi.registry。
メソッドを使用してレジストリからオブジェクトをフェッチします lookup() クラスの Registry パッケージに属する java.rmi.registry。
このメソッドには、バインド名を表す文字列値をパラメーターとして渡す必要があります。これにより、リモートオブジェクトが返されます。
lookup()は、remoteタイプのオブジェクトを返し、Helloタイプにダウンキャストします。
最後に、取得したリモートオブジェクトを使用して必要なメソッドを呼び出します。
以下は、RMIクライアントプログラムの例です。
import java.rmi.registry.LocateRegistry;
import java.rmi.registry.Registry;

public class Client {
   private Client() {}
   public static void main(String[] args) {
      try {
         // Getting the registry
         Registry registry = LocateRegistry.getRegistry(null);

         // Looking up the registry for the remote object
         Hello stub = (Hello) registry.lookup("Hello");

         // Calling the remote method using the obtained object
         stub.printMsg();

         // System.out.println("Remote method invoked");
      } catch (Exception e) {
         System.err.println("Client exception: " + e.toString());
         e.printStackTrace();
      }
   }
}
アプリケーションのコンパイル
アプリケーションをコンパイルするには-
- リモートインターフェイスをコンパイルします。
- 実装クラスをコンパイルします。
- サーバープログラムをコンパイルします。
- クライアントプログラムをコンパイルします。
または、
以下に示すように、すべてのプログラムを保存したフォルダーを開き、すべてのJavaファイルをコンパイルします。
Javac *.java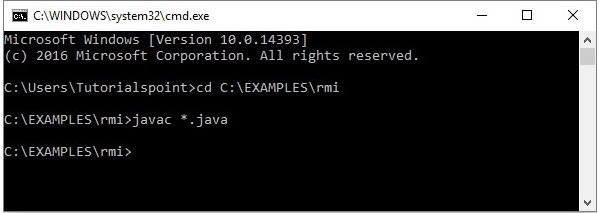
アプリケーションの実行
Step 1 −開始 rmi 次のコマンドを使用してレジストリを作成します。
start rmiregistry
これにより、 rmi 以下に示すように、別のウィンドウでレジストリを作成します。

Step 2 −以下に示すようにサーバークラスファイルを実行します。
Java Server
Step 3 −以下に示すようにクライアントクラスファイルを実行します。
java Client
Verification −クライアントを起動するとすぐに、サーバーに次の出力が表示されます。

前の章では、サンプルのRMIアプリケーションを作成しました。この章では、クライアントがGUIウィンドウ(JavaFX)を表示するメソッドを呼び出すRMIアプリケーションを作成する方法について説明します。
リモートインターフェースの定義
ここでは、という名前のリモートインターフェイスを定義しています Hello 名前の付いたメソッドで animation() 初期化。
import java.rmi.Remote;
import java.rmi.RemoteException;

// Creating Remote interface for our application
public interface Hello extends Remote {
   void animation() throws RemoteException;
}
実装クラスの開発
このアプリケーションのImplementationクラス(リモートオブジェクト)では、JavaFXを使用してGUIコンテンツを表示するウィンドウを作成しようとしています。
import javafx.animation.RotateTransition;
import javafx.application.Application;
import javafx.event.EventHandler;

import javafx.scene.Group;
import javafx.scene.PerspectiveCamera;
import javafx.scene.Scene;
import javafx.scene.control.TextField;
import javafx.scene.input.KeyEvent;
import javafx.scene.paint.Color;
import javafx.scene.paint.PhongMaterial;

import javafx.scene.shape.Box;
import javafx.scene.text.Font;
import javafx.scene.text.FontWeight;
import javafx.scene.text.Text;
import javafx.scene.transform.Rotate;

import javafx.stage.Stage;
import javafx.util.Duration;

// Implementing the remote interface
public class FxSample extends Application implements Hello {
   @Override
   public void start(Stage stage) {
      // Drawing a Box
      Box box = new Box();

      // Setting the properties of the Box
      box.setWidth(150.0);
      box.setHeight(150.0);
      box.setDepth(100.0);

      // Setting the position of the box
      box.setTranslateX(350);
      box.setTranslateY(150);
      box.setTranslateZ(50);

      // Setting the text
      Text text = new Text(
         "Type any letter to rotate the box, and click on the box to stop the rotation");

      // Setting the font of the text
      text.setFont(Font.font(null, FontWeight.BOLD, 15));

      // Setting the color of the text
      text.setFill(Color.CRIMSON);

      // Setting the position of the text
      text.setX(20);
      text.setY(50);

      // Setting the material of the box
      PhongMaterial material = new PhongMaterial();
      material.setDiffuseColor(Color.DARKSLATEBLUE);

      // Setting the diffuse color material to box
      box.setMaterial(material);

      // Setting the rotation animation to the box
      RotateTransition rotateTransition = new RotateTransition();

      // Setting the duration for the transition
      rotateTransition.setDuration(Duration.millis(1000));

      // Setting the node for the transition
      rotateTransition.setNode(box);

      // Setting the axis of the rotation
      rotateTransition.setAxis(Rotate.Y_AXIS);

      // Setting the angle of the rotation
      rotateTransition.setByAngle(360);

      // Setting the cycle count for the transition
      rotateTransition.setCycleCount(50);

      // Setting auto reverse value to false
      rotateTransition.setAutoReverse(false);

      // Creating a text filed
      TextField textField = new TextField();

      // Setting the position of the text field
      textField.setLayoutX(50);
      textField.setLayoutY(100);

      // Handling the key typed event
      EventHandler<KeyEvent> eventHandlerTextField = new EventHandler<KeyEvent>() {
         @Override
         public void handle(KeyEvent event) {
            // Playing the animation
            rotateTransition.play();
         }
      };

      // Adding an event handler to the text feld
      textField.addEventHandler(KeyEvent.KEY_TYPED, eventHandlerTextField);

      // Handling the mouse clicked event(on box)
      EventHandler<javafx.scene.input.MouseEvent> eventHandlerBox =
         new EventHandler<javafx.scene.input.MouseEvent>() {
         @Override
         public void handle(javafx.scene.input.MouseEvent e) {
            rotateTransition.stop();
         }
      };

      // Adding the event handler to the box
      box.addEventHandler(javafx.scene.input.MouseEvent.MOUSE_CLICKED, eventHandlerBox);

      // Creating a Group object
      Group root = new Group(box, textField, text);

      // Creating a scene object
      Scene scene = new Scene(root, 600, 300);

      // Setting camera
      PerspectiveCamera camera = new PerspectiveCamera(false);
      camera.setTranslateX(0);
      camera.setTranslateY(0);
      camera.setTranslateZ(0);
      scene.setCamera(camera);

      // Setting title to the Stage
      stage.setTitle("Event Handlers Example");

      // Adding scene to the stage
      stage.setScene(scene);

      // Displaying the contents of the stage
      stage.show();
   }

   // Implementing the interface method
   public void animation() {
      launch();
   }
}
サーバープログラム
RMIサーバープログラムは、リモートインターフェイスを実装するか、実装クラスを拡張する必要があります。ここでは、リモートオブジェクトを作成し、それをにバインドする必要がありますRMIregistry。
以下は、このアプリケーションのサーバープログラムです。ここでは、上記で作成したクラスを拡張し、リモートオブジェクトを作成して、バインド名でRMIレジストリに登録します。hello。
import java.rmi.registry.Registry;
import java.rmi.registry.LocateRegistry;
import java.rmi.RemoteException;
import java.rmi.server.UnicastRemoteObject;

public class Server extends FxSample {
   public Server() {}
   public static void main(String args[]) {
      try {
         // Instantiating the implementation class
         FxSample obj = new FxSample();

         // Exporting the object of implementation class
         // (here we are exporting the remote object to the stub)
         Hello stub = (Hello) UnicastRemoteObject.exportObject(obj, 0);

         // Binding the remote object (stub) in the registry
         Registry registry = LocateRegistry.getRegistry();

         registry.bind("Hello", stub);
         System.err.println("Server ready");
      } catch (Exception e) {
         System.err.println("Server exception: " + e.toString());
         e.printStackTrace();
      }
   }
}
クライアントプログラム
以下は、このアプリケーションのクライアントプログラムです。ここでは、リモートオブジェクトをフェッチし、そのメソッドを呼び出しています。animation()。
import java.rmi.registry.LocateRegistry;
import java.rmi.registry.Registry;

public class Client {
   private Client() {}
   public static void main(String[] args) {
      try {
         // Getting the registry
         Registry registry = LocateRegistry.getRegistry(null);

         // Looking up the registry for the remote object
         Hello stub = (Hello) registry.lookup("Hello");

         // Calling the remote method using the obtained object
         stub.animation();

         System.out.println("Remote method invoked");
      } catch (Exception e) {
         System.err.println("Client exception: " + e.toString());
         e.printStackTrace();
      }
   }
}
例を実行する手順
以下は、RMIの例を実行する手順です。
Step 1 −以下に示すように、すべてのプログラムを保存したフォルダを開き、すべてのJavaファイルをコンパイルします。
Javac *.java
Step 2 −開始 rmi 次のコマンドを使用してレジストリを作成します。
start rmiregistry
これにより、 rmi 以下に示すように、別のウィンドウでレジストリを作成します。

Step 3 −以下に示すようにサーバークラスファイルを実行します。
Java Server
Step 4 −以下に示すようにクライアントクラスファイルを実行します。
java Client
Verification −クライアントを起動するとすぐに、サーバーに次の出力が表示されます。
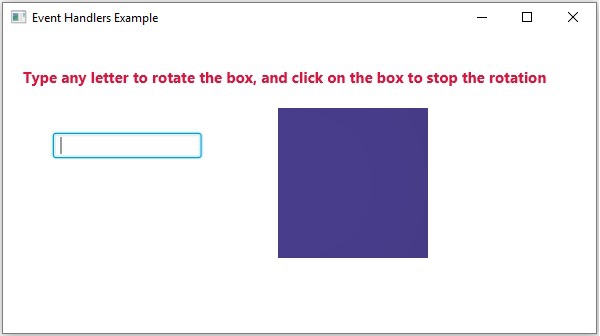
前の章では、クライアントがGUIウィンドウ(JavaFX)を表示するメソッドを呼び出すサンプルRMIアプリケーションを作成しました。
この章では、クライアントプログラムがサーバー上にあるMySQLデータベースのテーブルのレコードを取得する方法を示す例を取り上げます。
名前の付いたテーブルがあると仮定します student_data データベース内 details 以下に示すように。
+----+--------+--------+------------+---------------------+
| ID | NAME   | BRANCH | PERCENTAGE | EMAIL               |
+----+--------+--------+------------+---------------------+
|  1 | Ram    | IT     |         85 | [email protected]    |
|  2 | Rahim  | EEE    |         95 | [email protected]  |
|  3 | Robert | ECE    |         90 | [email protected] |
+----+--------+--------+------------+---------------------+
ユーザーの名前が myuser そのパスワードは password。
学生クラスの作成
作成する Student とのクラス setter そして getter 以下に示す方法。
public class Student implements java.io.Serializable {
   private int id, percent;
   private String name, branch, email;

   public int getId() {
      return id;
   }
   public String getName() {
      return name;
   }
   public String getBranch() {
      return branch;
   }
   public int getPercent() {
      return percent;
   }
   public String getEmail() {
      return email;
   }
   public void setID(int id) {
      this.id = id;
   }
   public void setName(String name) {
      this.name = name;
   }
   public void setBranch(String branch) {
      this.branch = branch;
   }
   public void setPercent(int percent) {
      this.percent = percent;
   }
   public void setEmail(String email) {
      this.email = email;
   }
}
リモートインターフェースの定義
リモートインターフェイスを定義します。ここでは、という名前のリモートインターフェイスを定義していますHello 名前の付いたメソッドで getStudents ()初期化。このメソッドは、クラスのオブジェクトを含むリストを返しますStudent。
import java.rmi.Remote;
import java.rmi.RemoteException;
import java.util.*;

// Creating Remote interface for our application
public interface Hello extends Remote {
   public List<Student> getStudents() throws Exception;
}
実装クラスの開発
クラスを作成し、上記で作成したものを実装します interface.
ここでは、 getStudents() の方法 Remote interface。このメソッドを呼び出すと、次の名前のテーブルのレコードが取得されます。student_data。セッターメソッドを使用してこれらの値をStudentクラスに設定し、リストオブジェクトに追加して、そのリストを返します。
import java.sql.*;
import java.util.*;

// Implementing the remote interface
public class ImplExample implements Hello {

   // Implementing the interface method
   public List<Student> getStudents() throws Exception {
      List<Student> list = new ArrayList<Student>();

      // JDBC driver name and database URL
      String JDBC_DRIVER = "com.mysql.jdbc.Driver";
      String DB_URL = "jdbc:mysql://localhost:3306/details";

      // Database credentials
      String USER = "myuser";
      String PASS = "password";

      Connection conn = null;
      Statement stmt = null;

      //Register JDBC driver
      Class.forName("com.mysql.jdbc.Driver");

      //Open a connection
      System.out.println("Connecting to a selected database...");
      conn = DriverManager.getConnection(DB_URL, USER, PASS);
      System.out.println("Connected database successfully...");

      //Execute a query
      System.out.println("Creating statement...");

      stmt = conn.createStatement();
      String sql = "SELECT * FROM student_data";
      ResultSet rs = stmt.executeQuery(sql);

      //Extract data from result set
      while(rs.next()) {
         // Retrieve by column name
         int id  = rs.getInt("id");

         String name = rs.getString("name");
         String branch = rs.getString("branch");

         int percent = rs.getInt("percentage");
         String email = rs.getString("email");

         // Setting the values
         Student student = new Student();
         student.setID(id);
         student.setName(name);
         student.setBranch(branch);
         student.setPercent(percent);
         student.setEmail(email);
         list.add(student);
      }
      rs.close();
      return list;
   }
}
サーバープログラム
RMIサーバープログラムは、リモートインターフェイスを実装するか、実装クラスを拡張する必要があります。ここでは、リモートオブジェクトを作成し、それをにバインドする必要がありますRMI registry。
以下は、このアプリケーションのサーバープログラムです。ここでは、上記で作成したクラスを拡張し、リモートオブジェクトを作成して、バインド名を使用してRMIレジストリに登録します。hello。
import java.rmi.registry.Registry;
import java.rmi.registry.LocateRegistry;
import java.rmi.RemoteException;
import java.rmi.server.UnicastRemoteObject;

public class Server extends ImplExample {
   public Server() {}
   public static void main(String args[]) {
      try {
         // Instantiating the implementation class
         ImplExample obj = new ImplExample();

         // Exporting the object of implementation class (
            here we are exporting the remote object to the stub)
         Hello stub = (Hello) UnicastRemoteObject.exportObject(obj, 0);

         // Binding the remote object (stub) in the registry
         Registry registry = LocateRegistry.getRegistry();

         registry.bind("Hello", stub);
         System.err.println("Server ready");
      } catch (Exception e) {
         System.err.println("Server exception: " + e.toString());
         e.printStackTrace();
      }
   }
}
クライアントプログラム
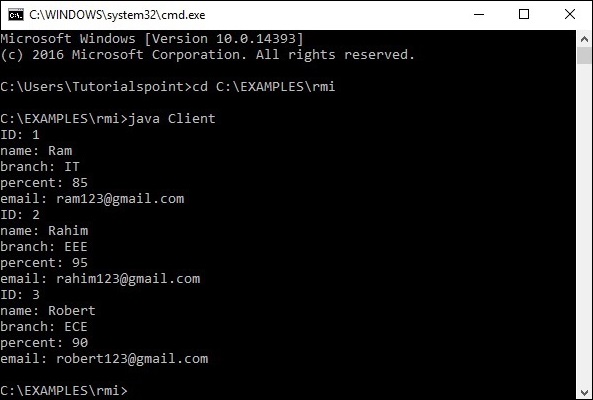
以下は、このアプリケーションのクライアントプログラムです。ここでは、リモートオブジェクトをフェッチし、という名前のメソッドを呼び出しています。getStudents()。リストオブジェクトからテーブルのレコードを取得して表示します。
import java.rmi.registry.LocateRegistry;
import java.rmi.registry.Registry;
import java.util.*;

public class Client {
   private Client() {}
   public static void main(String[] args)throws Exception {
      try {
         // Getting the registry
         Registry registry = LocateRegistry.getRegistry(null);

         // Looking up the registry for the remote object
         Hello stub = (Hello) registry.lookup("Hello");

         // Calling the remote method using the obtained object
         List<Student> list = (List)stub.getStudents();
         for (Student s:list)v {

            // System.out.println("bc "+s.getBranch());
            System.out.println("ID: " + s.getId());
            System.out.println("name: " + s.getName());
            System.out.println("branch: " + s.getBranch());
            System.out.println("percent: " + s.getPercent());
            System.out.println("email: " + s.getEmail());
         }
      // System.out.println(list);
      } catch (Exception e) {
         System.err.println("Client exception: " + e.toString());
         e.printStackTrace();
      }
   }
}
例を実行する手順
以下は、RMIの例を実行する手順です。
Step 1 −以下に示すように、すべてのプログラムを保存したフォルダを開き、すべてのJavaファイルをコンパイルします。
Javac *.java
Step 2 −開始 rmi 次のコマンドを使用してレジストリを作成します。
start rmiregistry
これにより、 rmi 以下に示すように、別のウィンドウでレジストリを作成します。

Step 3 −以下に示すようにサーバークラスファイルを実行します。
Java Server
Step 4 −以下に示すようにクライアントクラスファイルを実行します。
java Client