TypeORM-クイックガイド
TypeORMフレームワークは Object Relational Mapping (ORM)フレームワーク。一般に、Object 一部は、アプリケーションのドメイン/モデルを指します。 Relational 一部は、リレーショナルデータベース管理システム(Oracle、MySQL、MS-SQL、PostgreSQLなど)のテーブル間の関係を指し、最後に Mapping 一部は、モデルとテーブルをブリッジする行為を指します。
ORMは、エンティティをデータベーステーブルにマップするツールの一種です。ORMは、オブジェクトからテーブルへの変換およびテーブルからオブジェクトへの変換を自動化することにより、開発プロセスを簡素化します。データモデルを1か所に記述できるようになると、コードの更新、保守、および再利用が容易になります。
モデルはアプリケーションの他の部分に弱くバインドされているため、アプリケーションの他の部分との強い依存関係なしにモデルを変更でき、アプリケーション内のどこでも簡単に使用できます。TypeORMは非常に柔軟性があり、DBシステムをアプリケーションから抽象化し、OOPSの概念を使用することでメリットを得ることができます。
概要概要
TypeORMは、node.jsで実行され、TypeScriptで記述されたオブジェクトリレーショナルマッパーライブラリです。TypeScriptは、オプションの入力機能を備えたJavaScriptの改良版です。TypeScriptはコンパイルされた言語です。実行時には解釈されません。TypeScriptコンパイラはTypeScriptファイル(.ts)を受け取り、JavaScriptファイル(.js)にコンパイルします。
TypeORMは、MySQL、PostgreSQL、MariaDB、SQLite、MS SQL Server、Oracle、SAP Hana、WebSQLなどの複数のデータベースをサポートしています。TypeORMは、データベースに接続する新しいアプリの足場を作るための使いやすいORMです。TypeORM機能は、RDBMS固有の概念です。
新しいプロジェクトやマイクロサービスをすばやく作成できます。これは、他のプログラミング言語のHibernate、Doctrine、EntityFrameworkなどの同様のツールから着想を得ています。
TypeORMの特徴
TypeORMには次の機能があります-
- モデルに基づいてデータベーステーブルスキームを自動的に作成します。
- データベース内のオブジェクトを簡単に挿入、更新、削除します。
- テーブル間にマッピング(1対1、1対多、多対多)を作成します。
- 簡単なCLIコマンドを提供します。
TypeORMの利点
TypeORMは、簡単なコーディングで使いやすいORMフレームワークです。以下のメリットがあります-
- 高品質で疎結合のアプリケーション。
- スケーラブルなアプリケーション。
- 他のモジュールと簡単に統合できます。
- 小規模なアプリからエンタープライズなアプリまで、あらゆるアーキテクチャに完全に適合します。
この章では、TypeORMをマシンにインストールする方法について説明します。インストールに移る前に、npmがインストールされていることを確認してください。npmがあることを確認するには、ターミナルで次のコマンドを実行します。
npm -vバージョンが表示されます。インストールされていない場合は、最新バージョンをダウンロードしてマシンにインストールしてください。
TypeORMをインストールします
npmモジュールを使用してTypeORMをローカルにインストールしましょう-
npm install typeorm --save上記のコマンドを実行すると、次のような応答が返されます。
+ [email protected]
+
added 1 package and audited 1236 packages in 4.729s
または、TypeORMをグローバルにインストールするには、次のコマンドを使用します-
npm install typeorm -gその後、npm −を使用してオプションのパッケージreflect-metadataをインストールします
npm install reflect-metadata --save次の応答を見ることができます-
+ [email protected]

added 1 package and audited 1236 packages in 2.426s
次に、別のオプションパッケージをインストールします。以下のコマンドを使用したノード入力-
npm install @types/node --save次の応答を見ることができます-
+ @types/[email protected]

added 1 package and audited 1236 packages in 2.167s
データベースドライバをインストールする
このセクションでは、データベースに必要なノードパッケージをインストールしましょう。
インストールするには MySQL または MariaDB パッケージの場合、以下のコマンドを使用します-
npm install mysql --save次の応答を見ることができます-
+ [email protected]

added 1 package and audited 1236 packages in 4.36s
インストールするには PostgreSQL パッケージの場合、以下のコマンドを使用します-
npm install pg --save次の応答を見ることができます-
+ [email protected]

added 1 package and audited 1236 packages in 2.863s
インストールするには SQLite パッケージの場合、以下のコマンドを使用します-
npm install sqlite3 --save次の応答を見ることができます-
+ [email protected]
added 48 packages from 45 contributors and audited 1396 packages in 7.31s
インストールするには Microsoft SQL Server パッケージの場合、以下のコマンドを使用します-
npm install mssql --save画面は次のようになりますが、
+ [email protected]

added 1 package and audited 1655 packages in 2.378s
インストールするには sql.js パッケージの場合、以下のコマンドを使用します-
npm install sql.js --save次の応答を見ることができます-
+ [email protected]

added 1 package and audited 1655 packages in 6.462s
インストールするには Oracle server パッケージの場合、以下のコマンドを使用します-
npm install oracledb --save次の応答を見ることができます-
+ [email protected]

added 1 package and audited 1655 packages in 2.265s
インストールするには mongodb パッケージの場合、以下のコマンドを使用します-
npm install mongodb --save次の応答を見ることができます-
+ [email protected]

added 1 package and audited 1655 packages in 3.716s
この章では、簡単なTypeORMアプリケーションを作成する方法について説明します。'TypeORM'という名前の新しいディレクトリを作成し、そのディレクトリに移動しましょう。
cd /path/to/TypeORM/構文
以下のコマンドを使用して、新しいプロジェクトを作成します-
typeorm init --name <project-name> --database <database-name>例
typeorm init --name FirstProject --database mysqlここに、
FirstProject あなたのプロジェクト名は sqlite3データベース名です。上記のコマンドを実行すると、次の応答が表示されます。
Project created inside /path/to/TypeORM/FirstProject directory次に、プロジェクトディレクトリに移動し、を使用してプロジェクトの依存関係をインストールします npm モジュール、
$ cd FirstProject $ npm installプロジェクト構造
新しく作成したプロジェクトのプロジェクト構造を理解しましょう。 FirstProject。
FirstProject
├──> src
│ ├──> entity
│ │ └──> User.ts
│ ├──> migration
│ └──> index.ts
├──> node_modules
├──> ormconfig.json
├──> package.json
├──> package-lock.json
└──> tsconfig.json
ここに、
- src −アプリケーションのソースコードが含まれています TypeScript言語。ファイルがありますindex.ts および2つのサブディレクトリ entity そして migration。
- index.ts −アプリケーションへのエントリポイント。
- entity −データベースモデルが含まれています。
- migration −データベース移行コードが含まれています。
- node_modules −ローカルに保存されたnpmモジュール。
- ormconfig.json−アプリケーションのメイン構成ファイル。データベース構成の詳細とエンティティ構成が含まれています。
- package.json −ノードモジュールの依存関係が含まれます。
- package-lock.json −自動生成されたファイルと関連 package.json。
- tsconfig.json −TypeScript固有のコンパイラオプションが含まれています。
ormconfig.jsonファイル
アプリケーションで使用可能な構成オプションを確認しましょう。ormconfig.jsonファイルを開くと、次のようになります-
{
   "type": "mysql",
   "host": "localhost",
   "port": 3306,
   "username": "test",
   "password": "test",
   "database": "test",
   "synchronize": true,
   "logging": false,
   "entities": [
      "src/entity/**/*.ts" ],
   "migrations": [ "src/migration/**/*.ts"
   ],
   "subscribers": [ "src/subscriber/**/*.ts"
   ],
   "cli": {
      "entitiesDir":"src/entity", "migrationsDir":"src/migration", "subscribersDir":"src/subscriber
   }
 }
ここに、
type、 host、 username、 password、 database およびポートオプションは、データベース設定に関連しています。 mysql 以下の構成を使用して構成できます-
{
   "type": "mysql",
   "host": "localhost",
   "port": 3306,
   "username": "db_username", "password": "db_password", "database": "db_name"
}- entities −エンティティクラスの場所を参照します。
- migrations −移行クラスの場所を示します。
- subscribers −サブスクライバークラスの場所を示します。
- cli −によって使用されるオプションを参照します TypeORM CLI コードを自動生成するには
MySqlサーバーを起動します
アプリケーションを起動する前に、 MySQL サーバーまたはユーザーが使用するデータベースサーバーを使用して、正しく実行されていることを確認します。
アプリケーションを実行する
すべてが構成されたら、以下のコマンドを使用してアプリケーションを実行できます-
npm start次の応答を見ることができます-
> [email protected] start /Users/../../TypeORM/FirstProject

> ts-node src/index.ts

Inserting a new user into the database... Saved a new user with id: 1 Loading users from the database... Loaded users: [ User { id: 1, firstName: 'Timber', lastName: 'Saw', age: 25 }]

Here you can setup and run express/koa/any other framework.アプリケーションは新しいユーザーをデータベースに挿入し、データベースから逆ロードして、ロードされたユーザーをコンソールに表示します。新しいものを作成しましたTypeORM アプリケーションを構成し、アプリケーションを実行します。
次の章では、データがどのように実行されるかについて詳しく説明します。
データベースと対話するには、データベースへの接続オブジェクトが必要です。データベース操作を実行する前に接続オブジェクトを作成する必要があり、データベース操作が完了したらそれを終了する必要があります。このセクションでは、TypeORMが提供するConnectionAPIについて学習しましょう。
新しい接続の作成
新しい接続を作成する前に、データベース接続の詳細を構成する必要があります。 ormconfig.json構成ファイル。接続の詳細の例を以下に示します-
ormconfig.json
{
   name: "firstconnection",
   type: "mysql",
   host: "localhost",
   port: 3306,
   username: "root",
   password: "root",
   database: "firstDB"
}
ここに、
- name −データベース接続の名前。
- type −データベースタイプ。
- host −データベースサーバーのホスト名。
- port −データベースサーバーのポート。
- username −データベースにアクセスできるアカウント名。
- password −上記のアカウントのパスワード。
- database −接続するデータベースの名前。
createConnection
CreateConnection新しい接続を作成するためのメソッドがTypeORMによって提供されます。それは以下のように定義されます、
import { createConnection, Connection } from "typeorm";

const connection = await createConnection({

});
ここに、 createConnection ormconfig.jsonファイルで指定された構成の詳細を使用します。
または、次のように指定して、接続URLをcreateConnectionメソッドの引数として定義することもできます。
const connection = createConnection({ type: 'mysql',
     url: 'localhost:8888/firstDB'
})
ここに、
createConnection データベースへの接続を開閉するために使用できるオブジェクトを返します。
複数の接続
TypeORMには、複数のデータベース接続を作成するオプションもあります。まず、構成ファイルormconfig.jsonを使用して、複数のデータベース接続の詳細を指定できます。次のように、ormconfig.jsonで複数のデータベースを構成しましょう。
ormconfig.json
{  name: "firstconnection",
   type: "mysql",
   host: "localhost",
   port: 3306,
   username: "root",
   password: "root",
   database: "firstDB"
},
{  name: "secondconnection",
   type: "mysql",
   host: "localhost",
   port: 3306,
   username: "root",
   password: "root",
   database: "secondDB"
},
{  name: "thirdconnection",
   type: "mysql",
   host: "localhost",
   port: 3306,
   username: "root",
   password: "root",
   database: "thirdDB"
}
これで、createConnectionメソッドによって提供される引数を使用して、以下に説明するように接続オブジェクトを作成するための接続の名前を指定できます。
const firstconnection: Connection = await createConnection("firstconnection");ここに、
createConnection の構成の詳細を使用します firstconnection で指定された ormconfig.json 接続オブジェクトを作成するファイル。
TypeORMは、さらに別のAPIであるcreateConnectionsも提供して、複数の接続を一度に作成し、必要に応じて以下に指定して使用します。
import { createConnections, Connection } from "typeorm";

const connections: Connection[] = await createConnections([

]);
ここに、
connections すべての接続オブジェクトを配列として保持します。
ConnectionManager
TypeORMは、接続を作成するための別のAPIであるconnectionManagerも提供します。以下に定義されています-
import {getConnectionManager, ConnectionManager, Connection} from "typeorm";

const connectionManager = getConnectionManager();

const connection = connectionManager.create({

});
await connection.connect();
TypeORMはの使用を好みます createConnection 以上 ConnectionManager 接続オブジェクトを作成します。
エンティティは、フィールドと関連するデータベース操作のコレクションです。これは、データベーステーブルとそのフィールドをエンティティとその属性にマップするために使用されます。この章では、TypeORMエンティティについて詳しく説明します。
前書き
コードで単純なEntityクラスを作成しましょう。プロジェクトのルートの場所に移動し、srcフォルダー内に移動して、エンティティフォルダーに移動します。次に、TypeScriptファイルStudent.tsを作成し、以下のコードを入力します-
Student.ts
import {Entity, PrimaryGeneratedColumn, Column} from "typeorm";

@Entity()
export class Student {

   @PrimaryGeneratedColumn()
   id: number;

   @Column()
   Name: string;

   @Column()
   age: number;
}
ここに、
- Entity() デコレータクラスは、 Student クラスはエンティティです。
- PrimaryGeneratedColumn() デコレータクラスは、id列がの主キー列であることを表すために使用されます。 Student エンティティ。
- Column() デコレータクラスは、次のような他の列を表すために使用されます。 Name そして Age の Student エンティティ。
さて、エンティティクラス Student創造された。TypeORMは、に対応するテーブルを自動生成します。Student データベース内のエンティティであり、次のように名前が付けられます。 student。今、に移動しますsrc/index.ts ファイルを作成し、次のコードを追加します-
index.ts
import "reflect-metadata";
import {createConnection} from "typeorm";
import {Student} from "./entity/Student"; //import Student entity

createConnection().then(async connection => {

   console.log("Inserting a new record into the student database...");

   //create student object const stud = new Student();

   //Assign student name and age here stud.Name = "student1";
   stud.age = 12;

    //save student object in connection await connection.manager.save(stud); console.log("Saved a new user with id: " + stud.id);

    console.log("Loading users from the database...");

    //Display student saved records const students = await connection.manager.find(Student); console.log("Loaded users: ", students);

    console.log("Here you can setup and run express/koa/any other framework.");
}).catch(error => console.log(error));
ここに、
- 1〜3行目は、関連するクラスをインポートします。 createConnection そして Student
- 5行目は、を使用してデータベースへの新しい接続を作成します createConnection 接続が確立されると、内部のコードが実行されます。 then ブロック。
- 10行目では、新しいStudentオブジェクトであるスタッドを作成します。
- 13〜14行目では、新しく作成したスタッドオブジェクトの属性を設定しています。
- 17行目では、で使用可能なsaveメソッドを使用してエンティティをデータベースに保存します。 connection.manager オブジェクト。
- 23行目は、で使用可能なfindメソッドを使用してデータベースから学生の詳細をフェッチします。 connection.manager オブジェクト。
Mysqlサーバーを起動し、アプリケーションを実行します
Studentエンティティを作成し、index.tsに接続を作成しました。MySqlサーバーとアプリケーションの両方を起動しましょう。
npm startこれにより、画面に次の出力が返されます-
出力

開いた mysql サーバーフォロー中 student テーブルがデータベース内に追加されます。

列
前に学習したように、エンティティは実際には属性のコレクションです。エンティティオブジェクトはデータベーステーブルを参照します。その属性/メンバー変数は、対応するデータベーステーブルのフィールド/列を参照します。TypeORMは、Columnクラスを介してすべてのタイプのデータベースフィールドをサポートします。この章では、TypeORMでサポートされているさまざまなタイプの列について学習しましょう。
@Column() デコレータクラスは、エンティティ内の列とそのタイプを表すために使用されます。
たとえば、学生エンティティの年齢属性と年齢属性のタイプは、次のように定義できます。
@Column("int") age: integer; // OR @Column({ type: "int" }) age: integer;ここに、
- ageエンティティの属性です。つまり、年齢はデータベースの学生テーブルのフィールド/列です。
- int データベースの年齢列のタイプを表します。
TypeORMは、一般的なデータベースエンジンで利用可能なほぼすべてのタイプをサポートします。実際、TypeORMは、データベースエンジンごとに異なるタイプのセットを有効にします。データベースエンジンでサポートされている任意のデータベースタイプを問題なく使用できます。
たとえば、postgresqlデータベースエンジンのTypeORMでサポートされているタイプは次のとおりです。
int, int2, int4, int8, smallint, integer, bigint, decimal, numeric, real, float, float4, float8, double precision, money, character varying,

varchar, character, char, text, citext, hstore, bytea, bit, varbit, bit

varying, timetz, timestamptz, timestamp, timestamp without time zone, timestamp with time zone, date, time, time without time zone, time with time zone, interval, bool, boolean, enum, point, line, lseg, box, path, polygon, circle, cidr, inet, macaddr, tsvector, tsquery, uuid, xml, json, jsonb, int4range, int8range, numrange, tsrange, tstzrange, daterange, geometry, geography, cube
同様に、TypeORMはMySQLの異なるデータ型のセットをサポートします。
列オプション
TypeORMは、列を記述するためのタイプ以外の幅広いオプションのセットを提供します。たとえば、lengthオプションはデータベースフィールドの長さを参照し、次のように指定できます。
@Column("varchar", { length: 100 })最も一般的な列オプションのいくつかは次のとおりです-
- name −データベースのフィールド/列の名前。
- length −データベースのフィールド/列の長さ。
- nullable −データベースのフィールド/列でnullを許可するかどうかを指定します。
- default −データベースのフィールド/列のデフォルト値。
- primary −データベースのフィールド/列がテーブルの主キーであるかどうかを指定します。
- unique −データベースのフィールド/列が一意であるかどうかを指定します
- *precision** −データベースフィールド/列の精度
- scale −データベースフィールド/列のスケール
- comment −データベースのフィールド/列のコメントまたは説明
@Generatedデコレータ
TypeORMは、列値を自動生成するための追加のデコレータ@Generatedを提供します。たとえば、Universally Unique Identifier(UUID)は、データベースで一意の値を列に格納するために使用するのが非常に一般的です。UUIDを生成するためのサンプルコードは次のとおりです-
@Entity()
export class Student {

   @PrimaryColumn()
   id: number;

   @Column()
   @Generated("uuid")
   uuid: string;
}
ここに、
uuid 自動的に生成され、データベース内に保存されます。
一次列
データベース内のエンティティには、少なくとも1つのプライマリ列フィールドが必須です。これは、さまざまなタイプのデコレータに分類されます。一つ一つ議論していきます。
@PrimaryColumn()
@PrimaryColumn()デコレータは、あらゆるタイプのデータのプライマリ列を作成するために使用されます。簡単な例を以下に示します。
import {Entity, PrimaryColumn} from "typeorm";

@Entity()
export class Student {
@PrimaryColumn()
   id: number;
}
ここに、
id は整数であり、重複する値を受け入れませんが、値を割り当てる必要があります。
状況に応じて、1つ以上のフィールドにプライマリ列を割り当てることもできます。
例
import {Entity, PrimaryColumn} from "typeorm";

@Entity()
export class Student {

   @PrimaryColumn()
   id: number;

   @PrimaryColumn()
   email: string;

   @PrimaryColumn()
   phone: number;
}
@PrimaryGeneratedColumn()
@PrimaryGeneratedColumn()フィールドは、プライマリ列を指定するため、およびデータベースで列値を自動生成するために使用されます。以下に示します-
import {Entity, PrimaryGeneratedColumn} from "typeorm";

@Entity()
export class Student {

   @PrimaryGeneratedColumn()
   id: number;
}
ここに、
id値を割り当てる必要はありません。これは、データベーステーブルのTypeORMによって自動的に生成されます。
@PrimaryGeneratedColumn(“ uuid”)
@PrimaryGeneratedColumnは、ジェネレーターのタイプを指定する引数も受け入れます。主な用途の1つは、UUIDに基づいて一意のIDを生成することです。
import {Entity, PrimaryGeneratedColumn} from "typeorm";

@Entity()
export class Student {
   @PrimaryGeneratedColumn("uuid") id: string;
}
単純配列の列タイプ
高度なリレーショナルデータベースは、配列データ型をサポートしています。配列データ型をサポートするために、TypeORMは、プリミティブ配列値を格納するための特別な列型* simple-array "を提供します。これを使用するサンプルコードは次のとおりです。
@Entity()
export class Student {

   @PrimaryGeneratedColumn()
   id: number;

   @Column("simple-array")
   names: string[];
}
simple-json列タイプ
最新のデータベースエンジンの多くはJSONデータベースをサポートしています。JSONデータ型を使用するために、TypeORMは特別な型であるsingle-jsonを提供します。使用するサンプルコードは以下の通りです−
@Entity()
export class Student {

   @PrimaryGeneratedColumn()
   id: number;

   @Column("simple-json")
   info: { firstName: string, middleName: string, lastName: string };
}
この値は、index.tsで次のように定義できます。
index.ts
const stud = new Student();
stud.info = { firstName: "John", middleName: "peter", lastName: "Michael" };
特別なコラム
TypeORMは、次の特別な列をサポートします
- @CreateDateColumn −エンティティの挿入日を自動的に設定するための特別な列です。
- @UpdateDateColumn −エンティティの更新時間を自動的に設定するために使用されます。
- @VersionColumn −エンティティのバージョン番号を自動的に設定します。
エンティティの継承
エンティティの継承は、エンティティの重複を減らすために使用されます。以下のエンティティを検討してください-
Result.ts
@Entity()
export class Result {

   @PrimaryGeneratedColumn()
   id: number;

   @Column()
   title: string;

   @Column()
   description: string;

   @Column()
   eligible: string
}
Grade.ts
grade.tsのコードは次のとおりです-
@Entity()
export class Grade {

   @PrimaryGeneratedColumn()
   id: number;

   @Column()
   name: string;

   @Column()
   title: string;

   @Column()
   description: string;


   @Column()
   grading : string;
}
ここに、
上記の2つのエンティティには、id、title、descriptionの列があります。エンティティの継承を使用して、1つの基本クラスDetailsを作成し、以下に指定するように上記の2つのエンティティを結合します。
Details.ts
export abstract class Details {

   @PrimaryGeneratedColumn()
   id: number;

   @Column()
   title: string;

   @Column()
   description: string;
}
@Entity()
export class Result extends Details{

   @Column()
   eligible: string
}
@Entity()
export class Grade extends Details{

   @Column()
   name : string;

   @Column()
   grading : string;
}
サーバーを起動すると、次の応答が表示されます。

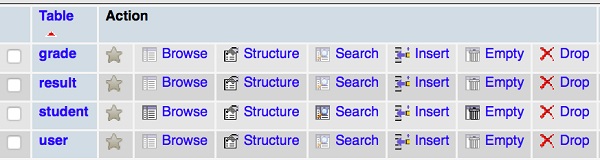
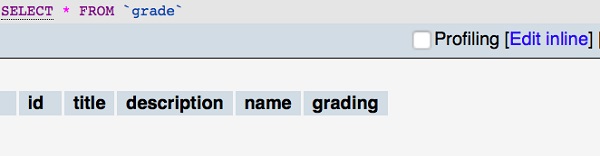
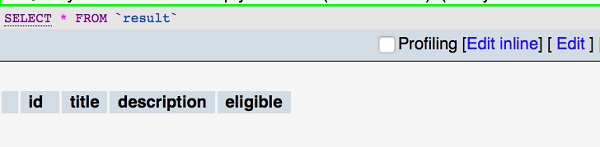
次に、mysqlサーバーを開いてデータベースに移動すると、次の表が表示されます。
成績表
結果表
リレーションは、データベース内のテーブル間のリレーションを参照するために使用されます。一般に、一方が他方のテーブルの主キーを参照する外部キーを持っている場合、2つのテーブル間に関係が存在します。この機能により、リレーショナルデータベースがより強力になり、情報を効率的に保存できます。
TypeORMを使用すると、エンティティを相互に関連付け、続いてデータベーステーブルに関連付けることができます。一般に、関係は4つの大きなカテゴリに分類できます。それらは次のとおりです、
one-to-one−指定されたエンティティの1つのオブジェクトは、ターゲットエンティティの1つのオブジェクトのみに関連し、その逆も同様です。たとえば、国の首都は1つだけであり、同様に、都市は1つの国の首都になります。
many-to-one−指定されたエンティティの複数のオブジェクトは、ターゲットエンティティの1つのオブジェクトに関連しています。たとえば、都市は1つの国にのみ分類されますが、国には複数の都市を含めることができます。
one-to-many −関係が逆になることを除いて、多対1と同じです。
many-to-many−指定されたエンティティの複数のオブジェクトは、ターゲットエンティティの複数のオブジェクトに関連しています。たとえば、記事はプログラミング言語、財務などの複数のトピックの下でタグ付けされる場合があり、同時に特定のタグにも複数の記事が含まれる場合があります。
TypeORMは、エンティティの関係を強化するためのオプションも提供します。それらは次のとおりです-
- eager −ソースエンティティオブジェクトは、ターゲットエンティティオブジェクトもロードします。
- cascade −ソースエンティティオブジェクトが挿入または更新されている間に、ターゲットエンティティオブジェクトが挿入または更新されます。
- onDelete −ソースエンティティオブジェクトが削除されている間、ターゲットエンティティオブジェクトも削除されます。
- primary −リレーション列が主キーであるかどうかを指定するために使用されます。
- nullable −リレーション列がNULL可能かどうかを指定するために使用されます。
さまざまなタイプの関係マッピングについて詳しく見ていきましょう。
1対1
前に学習したように、あるテーブルフィールドのインスタンスには別のテーブルフィールドのインスタンスが含まれ、その逆も同様です。作成しましょうDetails テーブル-
Details.ts
import {Entity, PrimaryGeneratedColumn, Column} from "typeorm";

@Entity()
export class Details {
   @PrimaryGeneratedColumn()
   id: number;

   @Column()
   gender: string;

   @Column()
   country: string;
}
次のように別のエンティティCustomerを作成しましょう-
Customer.ts
import {Entity, PrimaryGeneratedColumn, Column, OneToOne, JoinColumn} from "typeorm";

import {Details} from "./Details";

@Entity()
export class Customer {

   @PrimaryGeneratedColumn()
   id: number;

   @Column()
   name: string;

   @OneToOne(type => Details) @JoinColumn()
   details: Details;
}
ここに、
マッピングを追加しました OneToOne に Details テーブル。 @JoinColumn() 「関係ID」と外部キーを含む Customerテーブル。関係を保存できますindex.ts 次のように-
const details = new Details(); details.gender = "female"; details.country = "india" await connection.manager.save(details);

const customer = new Customer(); customer.name = 'customer1'; customer.details = Details; await connection.manager.save(Customer);
1対多および多対1
前に学習したように、最初のテーブルフィールドのインスタンスによって参照され、2番目のテーブルフィールドの複数のインスタンスが含まれています。 One-to-Many マッピングと最初のテーブルの複数のインスタンスには、2番目のテーブルのインスタンスが1つだけ含まれています Many-to-One マッピング。
の例を考えてみましょう Student そして project 一方、学生は複数のプロジェクトに取り組むことができますが、各プロジェクトは1人の学生によってのみ処理されます。
を作成しましょう Project 次のようなエンティティ-
事業
import {Entity, PrimaryGeneratedColumn, Column, ManyToOne} from "typeorm"; import {Student} from "./Student";
@Entity()
export class Project {

   @PrimaryGeneratedColumn()
   id: number;

   @Column()
   projects: string;

   @ManyToOne(type => Student, student => student.projects) student: Student;
}
今、私たちは作成します Student 以下のエンティティ-
import {Entity, PrimaryGeneratedColumn, Column, OneToMany} from "typeorm"; import {Project} from "./Project";

@Entity()
export class User {

   @PrimaryGeneratedColumn()
   id: number;

   @Column()
   name: string;

   @OneToMany(type => Project, project => project.student) projects: Project[];
}
ここに、
@OneToMany マップされたプロパティ Project そして @ManyToOne にマップされたプロパティ Student。しかしながら、@OneToMany なしでは存在できません @ManyToOne そして @ManyToOne プロパティには「関係ID」と外部キーが含まれています。
接続を保存できます index.ts 次のように-
const proj1 = new Project(); proj1.projects = "database management"; await connection.manager.save(proj1);

const proj2 = new Project(); proj2.projects = "web application"; await connection.manager.save(proj2);

const stud = new Student(); stud.name = "Student1"; stud.projects = [proj1, proj2]; await connection.manager.save(stud);
多対多
前に学習したように、1つのテーブル内の複数のレコードによって参照され、別のテーブル内の複数のレコードに関連付けられています。例を考えてみましょう。大学生は一度に複数のクラスに登録できます。つまり、学生は学期ごとに4つまたは5つのクラスを持ち、クラスには多くの学生を含めることができます。
簡単に言えば、生徒には多くのクラスがあり、クラスには多くの生徒がいます。のエンティティを作成しましょうClasses 次のように-
import {Entity, PrimaryGeneratedColumn, Column} from "typeorm";

@Entity()
export class Classes {

   @PrimaryGeneratedColumn()
   id: number;

   @Column()
   name: string;
}
今、私たちは作成します Student 以下のエンティティ-
import {Entity, PrimaryGeneratedColumn, Column, ManyToMany, JoinTable} from "typeorm";
import {Classes} from "./Classes";

@Entity()
export class Student {

   @PrimaryGeneratedColumn()
   id: number;

   @Column()
   name: string;

   @Column()
   subjects: string;

   @ManyToMany(type => Classes) @JoinTable()
   classes: Classes[];
}
リポジトリはエンティティに固有です。つまり、各エンティティには独自の組み込みリポジトリがあり、以下に指定するように、接続オブジェクトのgetRepository()メソッドを使用してアクセスできます。
const studRepository = manager.getRepository(Student);学生リポジトリオブジェクトが作成されると、それを使用して学生オブジェクトのすべてのデータベース操作を実行できます。
リポジトリタイプ
Repository4つのカテゴリに分類されます。それらは次のとおりです-
リポジトリ
エンティティのデフォルトリポジトリであり、を使用してアクセスできます getRepository() 以下に指定する方法-
const studRepository = manager.getRepository(Student);さて、 studRepository 学生テーブルのクエリに使用できます
TreeRepository
ツリーのような構造エンティティに使用され、を使用してアクセスできます getTreeRepository() 以下に指定する方法-
const studcaRepository = manager.getTreeRepository(Student);MongoRepository
mongoDB操作エンティティ内で使用され、を使用してアクセスできます getMongoRepository() 以下に指定する方法-
const detailsRepository = manager.getMongoRepository(Details);CustomRepository
リポジトリをカスタマイズするために使用され、を使用してアクセスできます getCustomRepository() 以下に指定する方法、
const myUserRepository = manager.getCustomRepository(UserRepository);リポジトリAPI
この章では、EntityManagerの最も重要な方法を学びましょう。
マネージャー
アクセスできます EntityManager 以下に指定するマネージャーメソッドを使用する-
const manager = repository.manager;queryRunner
queryRunnerメソッドはカスタムクエリランナーオブジェクトを返し、リポジトリによるデータベース操作に使用されます。サンプルコードは次のとおりです-
const queryRunner = repository.queryRunner;メタデータ
metadataリポジトリのメタデータを返します。サンプルコードは次のとおりです-
const metadata = repository.metadata;クエリ
queryメソッドはSQLクエリを実行します。以下に示す単純な選択クエリ-
const qur = await repository.query(`select * from students`);インサート
insertメソッドは、新しいエンティティまたはエンティティの配列をデータベースに挿入するために使用されます。サンプルコードは次のとおりです-
await repository.insert({
   Name: "Student3",
   Age: 14
});
上記のクエリは、と同等です。
insert into student(Name,age) values("Student3",14)更新
update データベース内の既存のレコードを更新するために使用されます。
await repository.update(1, { Name: "Adam" });このクエリは、以下のクエリと同様に機能します-
update student SET Name = "Adam" where id = 1削除
delete メソッドは、指定されたレコードをテーブルから削除します。
await repository.delete(Student, 1);これにより、IDを持つ学生が削除されます 1 から studentテーブル。と同等です、
delete from student where id=1;名前で削除する場合は、以下のクエリを使用してください。
await repository.delete({ Name: "Student1" });このクエリは、名前を持つすべての学生を削除します。 Student1
** softDeleteと復元**
データをソフト削除するために使用され、学生のIDに基づいてレコードを復元できます。サンプルコードは次のとおりです-
await repository.softDelete(1);以下のコマンドを使用して、学生の記録を復元できます-
await repository.restore(1);削除して復元する別のオプションは、 softRemove そして recoverメソッド。サンプルコードは次のとおりです-
//find the entities const enty = await repository.find();

//soft removed entity const entySoftRemove = await repository.softRemove(enty);
そして、あなたは以下に指定された回復方法を使用してそれらを回復することができます、
await repository.recover(entySoftRemove);保存する
save指定されたエンティティをデータベースに保存するために使用されます。単純なStudentエンティティは次のように保存できます-
import {Student} from "./entity/Student";

createConnection().then(async connection => {
   console.log("Inserting a new record into the student database...");
   const stud = new Student();
   stud.Name = "student1";
   stud.age = 12;
   await repository.save(stud);
これにより、新しい学生レコードがデータベースに追加されます。
削除する
remove指定されたエンティティをデータベースから削除するために使用されます。単純な学生エンティティは、以下に示すように削除できます-
await repository.remove(stud);カウント
countメソッドは、テーブルで使用可能なレコードの数を返し、ページ付けの目的で使用できます。サンプルコードは次のとおりです-
const cnt = await repository.count(Student, { age: 12 });見つける
findメソッドは検索目的で使用されます。以下に示すように、データベースからすべてのレコードをフェッチします-
const result = await repository.find({ id: 1 });findOne
に似ている findメソッドですが、最初に一致したレコードを返します。サンプルコードは次のとおりです-
const result = await repository.findOne({ id: 1 });晴れ
clearメソッドは、テーブルからすべてのデータをクリアします。サンプルコードは次のとおりです-
await repository.clear();EntityManager と類似しています Repositoryデータの挿入、更新、削除、ロードなどのデータベース操作を管理するために使用されます。一方Repository 単一のエンティティを処理し、 EntityManager すべてのエンティティに共通であり、すべてのエンティティで操作を実行できます。
エンティティマネージャーAPI
アクセスできます EntityManager を使用して getManager() 以下に指定する方法-
import { getManager } from "typeorm"; const entityManager = getManager();この章では、EntityManagerの最も重要な方法を学びましょう。
接続
connectionメソッドは、特定のデータベースへのデータベースORM接続を返します。サンプルコードは次のとおりです-
const connection = manager.connection;QueryRunner
queryRunnerメソッドはカスタムクエリランナーオブジェクトを返し、エンティティマネージャーによるデータベース操作に使用されます。サンプルコードは次のとおりです-
const queryRunner = manager.queryRunner;トランザクション
複数のデータベース要求が呼び出された場合、トランザクションは単一のデータベーストランザクションで実行されます。トランザクションを取得するためのサンプルコードは次のとおりです-
await manager.transaction(async manager => {
});
クエリ
queryメソッドはSQLクエリを実行します。以下に示す単純な挿入クエリ-
const qur = await manager.query(`insert into student(name,age) values('stud2',13)`);インサート
insertメソッドは、新しいエンティティまたはエンティティの配列をデータベースに挿入するために使用されます。サンプルコードは次のとおりです-
await manager.insert(Student, {
   Name: "Student3",
   Age: 14
});
更新
update データベース内の既存のレコードを更新するために使用されます。
await manager.update(User, 1, { Name: "Adam" });このクエリは、以下のSQLクエリと同様に機能します。
UPDATE student SET Name = "Adam" WHERE id = 1削除
deleteメソッドは、指定されたレコードをテーブルから削除します。
await manager.delete(Student, 1);これにより、学生レコードのID1で削除されます。
保存する
save指定されたエンティティをデータベースに保存するために使用されます。単純なStudentエンティティは次のように保存できます-
import {Student} from "./entity/Student";

createConnection().then(async connection => {
   console.log("Inserting a new record into the student database...");
   const stud = new Student(); stud.Name = "student1";
   stud.age = 12;
   await connection.manager.save(stud);
}
これにより、新しい学生レコードがデータベースに追加されます。指定された学生がデータベースに存在しない場合、saveメソッドは学生を挿入します。それ以外の場合、保存するとデータベース内の既存の学生レコードが更新されます。
削除する
remove指定されたエンティティをデータベースから削除するために使用されます。単純な学生エンティティは、以下に示すように削除できます-
await manager.remove(stud);カウント
countメソッドは、テーブルで使用可能なレコードの数を返し、ページ付けの目的で使用できます。サンプルコードは次のとおりです-
const cnt = await manager.count(Student, { age: 12 });見つける
findメソッドは検索目的で使用されます。以下に示すように、データベースからすべてのレコードをフェッチします-
console.log("Loading users from the database...");
const students = await connection.manager.find(Student); console.log("Loaded users: ", students);
findOne
に似ている findメソッドですが、最初に一致したレコードを返します。サンプルコードは次のとおりです-
const stud = await manager.findOne(Student, 1);晴れ
clearメソッドは、テーブルからすべてのデータをクリアします。サンプルコードは次のとおりです-
await manager.clear(Student);クエリビルダーは、複雑なSQLクエリを簡単な方法で構築するために使用されます。これは、ConnectionメソッドおよびQueryRunnerオブジェクトから初期化されます。
QueryBuilderは3つの方法で作成できます。
接続
接続方法を使用してQueryBuilderを使用する方法の簡単な例を考えてみましょう。
import {getConnection} from "typeorm";

const user = await getConnection() .createQueryBuilder()
.select("user")
.from(User, "user")
.where("user.id = :id", { id: 1 }) .getOne();
エンティティマネージャー
次のようにエンティティマネージャを使用してクエリビルダーを作成しましょう-
import {getManager} from "typeorm";

const user = await getManager() .createQueryBuilder(User, "user") .where("user.id = :id", { id: 1 })    .getOne();
リポジトリ
リポジトリを使用してクエリビルダーを作成できます。以下に説明します、
import {getRepository} from "typeorm";

const user = await getRepository(User) .createQueryBuilder("user") .where("user.id = :id", { id: 1 }) .getOne();
エイリアス
エイリアスはSQLエイリアスと同じです。以下に説明するように、QueryBuilderを使用してStudentテーブルのエイリアスを作成します-
import {getConnection} from "typeorm";

const user = await getConnection() .createQueryBuilder()
.select("stud")
.from(Student, "stud")
このクエリは、と同等です。
select * from students as studパラメーター
Parametersクエリの動的な値のプレースホルダーとして使用されます。多くの場合、異なるエンティティオブジェクトを検索するクエリは、値を除いて同じです。たとえば、別の学生を見つけるためのクエリは、Student IDデータ。この場合、パラメータを使用できますStudent ID 次に、パラメータを変更して、さまざまな学生オブジェクトを取得します。
パラメータのもう1つの重要な使用法は、SQLインジェクションを防ぐことです。これは、最新のWebアプリケーションにおける重要なセキュリティ違反の1つです。クエリでパラメータを使用することで、SQLインジェクション攻撃に耐えることができます。
パラメータのもう1つの重要な使用法は、SQLインジェクションを防ぐことです。これは、最新のWebアプリケーションにおける重要なセキュリティ違反の1つです。クエリでパラメータを使用することで、SQLインジェクション攻撃に耐えることができます。
例えば
"student.id = :id", { id: 1 }ここに、
:id-パラメータ名。
{id:1}-パラメータの値
式の追加
このセクションでは、式の使用方法について説明します。
どこ
where 条件が一致した場合にレコードをフィルタリングするために使用されます。
createQueryBuilder("student") .where("student.id = :id", { id: 1 })このクエリは、と同等です。
select * from students student where student.id=1;内部でAND、OR、NOT、IN条件を使用することもできます。
持っている
単純な表現は以下のように定義されます-
createQueryBuilder("student") .having("student.id = :id", { id: 1 })このクエリは、と同等です。
select * from students student having student.id=1;orderBy
orderbyは、フィールドに基づいてレコードをソートするために使用されます。
createQueryBuilder("student") .orderBy("student.name")このクエリは、と同等です。
select * from students student order by student.name;groupBy
指定された列に基づいてレコードをグループ化するために使用されます。
createQueryBuilder("student") .groupBy("student.id")このクエリは、と同等です。
select * from students student group by student.id;制限
行の選択を制限するために使用されます。以下の例は、クエリビルダーで制限を使用する方法を示しています。
createQueryBuilder("student") .limit(5)このクエリは、と同等です。
select * from students student limit 5;オフセット
オフセットは、結果をスキップする行数を指定するために使用されます。以下に定義されています-
createQueryBuilder("student") .offset(5)このクエリは、と同等です。
select * from students student offset 5;参加する
join句は、関連する列に基づいて、2つ以上のテーブルの行を結合するために使用されます。2つのエンティティを検討してください-
Student.ts
import {Entity, PrimaryGeneratedColumn, Column, OneToMany} from "typeorm";
import {Project} from "./Project";

@Entity()
export class User {

   @PrimaryGeneratedColumn()
   id: number;

   @Column()
   name: string;

   @OneToMany(type => Project, project => project.student) projects: project[];
}
Project.ts
import {Entity, PrimaryGeneratedColumn, Column, ManyToOne} from "typeorm";
import {Student} from "./Student";

@Entity()
export class Project {

   @PrimaryGeneratedColumn()
   id: number;

   @Column()
   title: string;

   @ManyToOne(type => Student, student => student.projects) student: Student;
}
以下のクエリを使用して単純な左結合を実行しましょう-
const student = await createQueryBuilder("student") .leftJoinAndSelect("student.projects", "project")
.where("student.name = :name", { name: "Student1" })
.getOne();
このクエリは、と同等です。
SELECT student.*, project.* FROM students student
   LEFT JOIN projects project ON project.student = student.id
   WHERE student.name = 'Student1'
同様に、内部結合も試すことができます。
選択せずに参加する
selectを使用せずにデータを結合できます。次のように内部結合を使用してこの例を試してみましょう-
const student = await createQueryBuilder("student") .innerJoin("student.projects", "project")
   .where("student.name = :name", { name: "student1" })
   .getOne();
上記のクエリは-と同等です
SELECT student.* FROM students student
   INNER JOIN projects project ON project.student = student.id
   WHERE student.name = 'Student1';
ページネーション
アプリケーションにさらにデータがある場合は、ページ付け、ページスライダー、またはスクロール機能が必要です。
たとえば、アプリケーションで最初の5人の学生のプロジェクトを表示する場合は、
const students = await getRepository(Student) .createQueryBuilder("student") .leftJoinAndSelect("student.projects", "project")
   .take(5)
   .getMany();
サブクエリ
これは、別のクエリまたはネストされたクエリ内のクエリと呼ばれます。FROM、WHERE、およびJOIN式でサブクエリを使用します。
簡単な例を以下に示します-
const projects = await connection .createQueryBuilder() .select("project.id", "id")
.addSelect(subQuery => {
   return subQuery
      .select("student.name", "name") .from(Student, "student")
      .limit(1);
}, "name")
.from(Project, "project") .getMany();
隠しフィールド
列フィールドのいずれかが{select:false}としてマークされている場合、その列は非表示の列と見なされます。以下のエンティティを検討してください-
import {Entity, PrimaryGeneratedColumn, Column} from "typeorm";

@Entity()
export class Student {

   @PrimaryGeneratedColumn()
   id: number;

   @Column()
   name: string;

   @Column({select: false})
   address: string;
}
ここに、
address フィールドはとしてマークされます hidden。使用できますaddSelect列から情報を取得するメソッド。それは以下に定義されています、
const student = await connection.getRepository(Student) .createQueryBuilder() .select("student.id", "student") .addSelect("student.address") .getMany();getSql()
このメソッドは、クエリビルダーによって生成されたSQLクエリを取得するために使用されます。以下に定義されています-
const sql = createQueryBuilder("student") .where("student.name = :name", { name: "Student1" })  .orWhere("student.age = :age", { age: 14 })
.getSql();
データ操作は、データの管理と表示に使用されます。このセクションでは、QueryBuilderを使用して、クエリの挿入、更新、選択、削除などのデータベースクエリにアクセスする方法について説明します。一つ一つ詳しく見ていきましょう。
挿入クエリを作成する
次のようにCustomerエンティティを作成しましょう-
Customer.ts
import {Entity, PrimaryGeneratedColumn, Column} from "typeorm";
@Entity()
export class Customer {

   @PrimaryGeneratedColumn()
   id: number;

   @Column()
   name: string;

   @Column()
   age: number;
}
次のようにindex.tsに次の変更を追加しましょう-
index.ts
import "reflect-metadata";
import {createConnection} from "typeorm";
import {Customer} from "./entity/Customer";
import {getConnection} from "typeorm";
createConnection().then(async connection => {
await getConnection().createQueryBuilder() .insert()
.into(Customer)
.values([ { name: "Adam",age:11},
{ name: "David",age:12} ]) .execute();
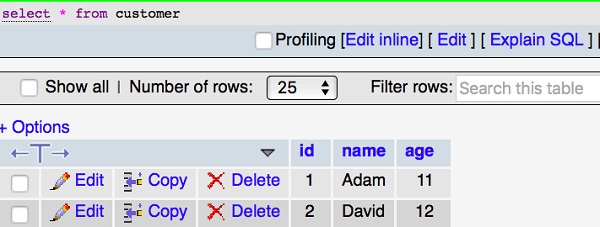
}).catch(error => console.log(error));次に、以下のコマンドを使用してアプリケーションを起動します-
npm start出力
画面に次の出力が表示されます-

次に、mysqlサーバーを開き、以下に示すように2つのフィールドが挿入されたテーブルを作成します-
ビルド更新クエリ
最後のセクションでは、2行のデータを挿入しました。更新クエリがどのように機能するかを確認しましょう。次のようにindex.tsに次の変更を追加します-
import "reflect-metadata";
import {createConnection} from "typeorm";
import {Customer} from "./entity/Customer";
import {getConnection} from "typeorm";

createConnection().then(async connection => {

await getConnection()
   .createQueryBuilder() .update(Customer)
   .set({ name: "Michael" }) .where("id = :id", { id: 1 }) .execute();
   console.log("data updated");

}).catch(error => console.log(error));
次に、以下のコマンドを使用してアプリケーションを起動します-
npm start画面に次の出力が表示されます-

Mysqlテーブルは次のように変更されます-
選択クエリを作成する
selectクエリは、テーブルのレコードを表示するために使用されます。次のコードをに追加しましょうindex.ts 次のように-
index.ts
import "reflect-metadata";
import {createConnection} from "typeorm";
import {Customer} from "./entity/Customer";

createConnection().then(async connection => {

   console.log("Display records from Customer table...");
   const cus = new Customer();

   console.log("Loading customers from the database...");
   const customers = await connection.manager.find(Customer); console.log("Loaded users: ", customers);
}).catch(error => console.log(error));
画面に次の出力が表示されます-

ここで式
クエリにwhere式を追加して、顧客をフィルタリングしましょう。サンプルコードは次のとおりです-
import "reflect-metadata";
import {createConnection} from "typeorm";
import {Customer} from "./entity/Customer";
import {getConnection} from "typeorm";

createConnection().then(async connection => {
   const customer = await getConnection() .createQueryBuilder() .select("cus")
   .from(Customer, "cus") .where("cus.id = :id", { id: 1 }) .getOne();

   console.log(customer);
})
.catch(error => console.log(error));
上記のプログラムは、最初のIDレコードを返します。画面に次の出力が表示されます。

同様に、他の式も試すことができます。
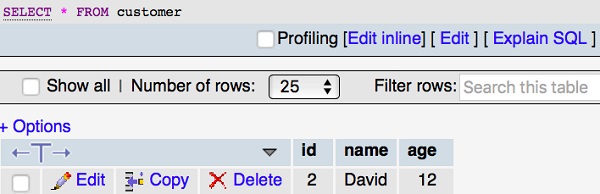
ビルド削除クエリ
最後のセクションでは、データを挿入、更新、および選択しました。削除クエリがどのように機能するかを確認しましょう。次のようにindex.tsに次の変更を追加します-
import "reflect-metadata";
import {createConnection} from "typeorm";
import {Customer} from "./entity/Customer";
import {getConnection} from "typeorm";

createConnection().then(async connection => {
   await getConnection() .createQueryBuilder()
   .delete()
   .from(Customer)
   .where("id = :id", { id: 1 }) .execute();
console.log("data deleted"); }).catch(error => console.log(error));
画面に次の出力が表示されます-

そして、mysqlテーブルは次のように変更されます-
一般に、トランザクションは、データの取得と更新の実行を担当する論理ユニットです。このセクションでは、トランザクションについて詳しく説明します。
トランザクションの作成
接続またはEntityManageのいずれかを使用してトランザクションを作成できます。以下の例は、接続の作成を指定し、その中にデータを保存するために使用されます。
import {getConnection} from "typeorm";

await getConnection().transaction(async transactionalEntityManager => {

   await connection.manager.save(students);

});
EntityManager 以下に示します-
import {getManager} from "typeorm";

await getManager().transaction(async transactionalEntityManager => {
   await transactionalEntityManager.save(students);
});
デコレータ
TypeORMには、3種類のトランザクション関連のデコレータがあります。
- @Transaction -すべての実行を単一のデータベーストランザクションでラップします。
- @TransactionManager-トランザクション内でクエリを実行するために使用されます。それは以下に定義されています、
@Transaction({ isolation: "SERIALIZABLE" })

save(@TransactionManager() manager: EntityManager, student: Student) {
   return manager.save(student);
}
ここに、
使用しました SERIALIZABLE トランザクションの分離レベル。
- @TransactionRepository-リポジトリにトランザクションを挿入するために使用されます。それは以下に定義されています、
@Transaction() save(student: Student, @TransactionRepository(Student) studentRepository:
Repository<Student>) {
   return studentRepository.save(student);
}QueryRunnerでのトランザクション
QueryRunnerは、すべてのデータベースクエリを実行するために使用されます。単一のデータベース接続があります。データベーストランザクションは、QueryRunnerを使用して整理できます。QueryRunnerを使用して単一のトランザクションを実行してみましょう。
import {getConnection} from "typeorm";

// get a connection and create a new query runner
const connection = getConnection(); const queryRunner = connection.createQueryRunner();

// establish real database connection using our new query runner
await queryRunner.connect();

// now we can execute any queries on a query runner, for example: await queryRunner.query("SELECT * FROM students");
ここで、以下のステートメントを使用してトランザクションを開始します-
await queryRunner.startTransaction();次に、以下のステートメントを使用してトランザクションをコミットおよびロールバックします。
try {
   await queryRunner.commitTransaction();
}
エラーがある場合は、catch()によって処理されます。
catch (err) {

   // since we have errors lets rollback changes we made await queryRunner.rollbackTransaction();
}
ここで、以下のようにqueryRunnerをリリースします-
finally {

   // you need to release query runner which is manually created: await queryRunner.release();
}
一般に、 Indexingは、データストレージを最適化することによってデータベースのパフォーマンスを最適化するプロセスです。これは、データベース内のデータをすばやく見つけてアクセスするために使用されます。このセクションでは、TypeORMでインデックスを使用する方法について説明します。インデックスはさまざまなタイプに分類されます。一つ一つ詳しく見ていきましょう。
列インデックス
を使用して特定の列のインデックスを作成できます @Index。以下に示す顧客エンティティの例と、firstName カラム、
import {Entity, PrimaryGeneratedColumn, Column} from "typeorm";

@Entity()
export class Student {

   @PrimaryGeneratedColumn()
   id: number;

   @Index()
   @Column()
   firstName: string;

   @Column()
   lastName: string;

   @Column()
   age: number;

   @Column()
   address: string;
}
@Index インデックスの名前も指定できます-
@Index("Name-idx")
@Column()
firstName: string;
一意のインデックス
列に一意の制約を指定するには、以下のプロパティを使用します-
{ unique: true }たとえば、以下は名前列の一意のインデックスを指定するコードです-
@Index({ unique: true })
@Column()
firstName: string;
複数の列にインデックスを適用するには、@ Entity()の後に直接指定できます。サンプルコードは次のとおりです-
@Entity()
@Index(["firstName", "lastName"]) @Index(["firstName", "lastName"], { unique: true })
空間インデックス
空間インデックスを使用すると、空間オブジェクトにアクセスできます。MySQLとPostgreSQLは空間インデックスをサポートしています。列で空間インデックスを有効にするには、次のプロパティを追加します-
{ spatial: true }空間タイプには、ジオメトリ、ポイント、ラインストリング、ポリゴンなどの複数のサブタイプがあります。たとえば、列にポイント空間タイプを追加する場合は、以下のコードを使用します-
@Column("point")
@Index({ spatial: true })
point: string;
同期を無効にする
同期を無効にするには、以下のオプションを使用します @Index デコレータ-
{ synchronize: false }エンティティリスナーは、カスタムメソッドをサポートし、特定のイベントをリッスンするエンティティで使用されます。デコレータを使用して、任意のエンティティカスタムメソッドを定義できます。デコレータについて簡単に理解しましょう。
- @AfterLoad − QueryBuilderまたはリポジトリ/マネージャを使用してエンティティがロードされると、このメソッドが呼び出されます。
- @BeforeInsert −このメソッドは、リポジトリ/マネージャを使用してエンティティが挿入される前に呼び出します。
- @AfterInsert −このメソッドは、リポジトリ/マネージャを使用してエンティティが挿入された後に呼び出されます。
- @BeforeUpdate −このメソッドは、リポジトリ/マネージャーを使用して既存のエンティティが更新される前に呼び出します。
- @AfterUpdate −エンティティが更新された後に呼び出します。
- @BeforeRemove −エンティティが削除される前に呼び出します。
- @AfterRemove −エンティティが削除された後に呼び出します。
サブスクライバー
サブスクライバーは、特定のエンティティイベントをリッスンするために使用されます。それはから実装されますEntitySubscriberInterface。サブスクライバーでエンティティリスナーを使用する方法の簡単な例を理解しましょう。Studentエンティティが以下に示されていると考えてください-
Student.ts
import {Entity, PrimaryGeneratedColumn, Column} from "typeorm";

@Entity()
export class Student {

   @PrimaryGeneratedColumn()
   id: number;

   @Column()
   Name: string;

   @Column()
   age: number;
}
学生購読者を作成する
サブスクライバーは、以下のコマンドを使用して作成されます-
typeorm subscriber:create -n StudentSubscriber上記のコマンドは、プロジェクトsrc内にサブスクライバーディレクトリを作成します。次に、StudentSubscriber.tsファイルがサブスクライバー内に作成されます。次の応答が表示されます。
Subscriber /Users/workspace/TypeORM/FirstProject/src/subscriber/StudentSubscriber.ts has been created successfully.ここでファイルに移動すると、以下のコーディングが表示されます-
StudentSubscriber.ts
import {EventSubscriber, EntitySubscriberInterface} from "typeorm";

@EventSubscriber()
export class StudentSubscriber implements EntitySubscriberInterface<any> {
}
ここで、ファイルに次の変更を追加します。
import {EventSubscriber, EntitySubscriberInterface,InsertEvent} from "typeorm";
import {Student} from "../entity/Student";

@EventSubscriber()
export class StudentSubscriber implements EntitySubscriberInterface<any> {
   listenTo()
   {
      return Student;
   }

   afterInsert(event: InsertEvent<Student>) {
      console.log(event);
   }
}
ここに、
使用しました afterInsert()エンティティイベントを呼び出すメソッド。同様に、他のイベントも使用できます。ormconfig.jsonファイルはすでに構成されています。ここで、以下の変更をに追加しますindex.ts 次のようにファイル-
index.ts
import "reflect-metadata"; import {createConnection} from "typeorm"; import {Student} from "./entity/Student";

createConnection().then(async connection => {

   console.log('connection established');
}).catch(error => console.log(error));
アプリケーションを実行した後、画面に以下の出力が表示されます。

ロギング
データベースログは、障害からの回復を可能にし、プライマリデータベースとセカンダリデータベースの同期を可能にするため、高可用性データベースソリューション設計の重要な部分です。
すべてのデータベースには、ログが関連付けられています。これらのログは、データベースの変更の記録を保持します。データベースを最後の完全なオフラインバックアップを超えるポイントに復元する必要がある場合は、データを障害ポイントにロールフォワードするためにログが必要です。
ロギングオプション
データベース接続に{logging:true}を追加すると、ロギングが有効になります。ロギングオプションは、さまざまなタイプに分類されます。それらは次のとおりです-
query−すべてのログクエリを返します。それは以下のように定義されます-
{
   host: "localhost",
   ...
   logging: ["query"]
}error−失敗したすべてのクエリとエラーのログを返します。以下に定義されています-
{
   host: "localhost",
   ...
   logging: ["error"]
}
schema −スキーマのログを返します。
warn −内部ORM警告を返します。
info −内部ORM情報メッセージをログに返します。
log −内部ORMログメッセージを返します。
カスタムロガー
カスタムロギングはシンプルで高度にカスタマイズ可能なロギングオプションです。以下のコードを使用して、独自のロガークラスを作成できます-
import {Logger} from "typeorm";

export class MyCustomLogger implements Logger {

   // implement all methods from logger class
}
接続オプションは、ormconfig.jsonで次のように指定されます-
name: "mysql",
type: "mysql",
host: "localhost",
port: 3306,
username: "root",
password: "root",
database: "test",
logger: new MyCustomLogger()
でサポートされているデフォルトの言語 TypeORM です TypeScript。TypeScriptは静的型付け、クラス、デコレータをサポートしているため、エンティティとその属性を簡単に定義できます。同時に、JavaScript 優先言語がJavaScriptである特定のプロジェクトでも必要です。 TypeORMJavaScript言語も完全にサポートします。TypeORMは、JavaScriptのes5フレーバーとes6フレーバーの両方をサポートします。
この章では、JavaScript ES5(ECMAScript 5)でTypeORMアプリケーションを作成する方法を学びましょう。
コマンドプロンプトを開き、ワークスペースに移動します。
cd /path/to/workspace/以下のコマンドを実行して、TypeORMプロジェクトを作成します。
typeorm init --name typeorm-javascript-student-app --database mysql開いた package.json typescipt参照を削除するファイル。
元の
{
   "name": "typeorm-javascript-student-app", "version": "0.0.1",
   "description": "Awesome project developed with TypeORM.", "devDependencies": {
      "ts-node": "3.3.0", "@types/node": "^8.0.29", "typescript": "3.3.3333"
   },
   "dependencies": {
      "typeorm": "0.2.24", "reflect-metadata": "^0.1.10", "mysql": "^2.14.1"
   },
   "scripts": {
      "start": "ts-node src/index.ts" }
}
更新しました
{
   "name": "typeorm-javascript-student-app", "version": "0.0.1",
   "description": "Awesome project developed with TypeORM.", "dependencies": {
      "typeorm": "0.2.24",
      "mysql": "^2.14.1"
   },
   "scripts": {
   "start": "node src/index.js"
   }
}
ここに、
- を削除しました devDependencies セクションとtypescript関連のパッケージ dependences セクション。
- 開始スクリプトを、typescriptコードではなくjavascriptコードを指すように変更しました。
以下のコマンドを実行して、必要なパッケージをインストールします。
npm install削除する tsconfig.json およびindex.tsファイル。
エンティティフォルダー内のUser.tsファイルを削除してから、json形式で学生エンティティを作成します。 student.json 以下に指定されているように-
{
   "name": "Student",
   "columns": {
      "id": {
         "primary": true,
         "type": "int",
         "generated": true
      },
      "name": {
         "type": "varchar"
      },
      "age": {
         "type": "integer"
      }
   }
}
新しいファイルsrc / index.jsを作成し、以下のコードを入力します-
var typeorm = require("typeorm"); var EntitySchema = typeorm.EntitySchema;

typeorm.createConnection({
   "type": "mysql",
   "host": "localhost",
   "port": 3306,
   "username": "root",
   "password": "123456",
   "database": "typeorm_test_db",
   "synchronize": true,
   "logging": false,
   entities: [ new EntitySchema(require("./entity/student.json"))
   ]
})
.then(function(connection) {
   return connection.getRepository("Student"); }) .then(function(studentRepository) {
   var student = {
      name: "Student1",
      age: 18
   };
   return studentRepository.save(student) .then(function(savedStudent) { console.log("Student has been successfully saved: ", savedStudent);
   return studentRepository.find(); })
   .then(function(students) { console.log("All students: ", students);
   return;
   })
   .catch(function(error) { console.log("Error: ", error); return;
   })
})
.catch(function(error) { console.log("Error: ", error)
   return; });
ここに、
以下の変更を除いて、同じtypeORMメソッドを使用しました。
- 中古 EntitySchema 学生エンティティを構成します。
- JavaScript Promiseの概念(次に/キャッチ/最後に)ブロックを使用しました。
次に、以下のコマンドを使用してアプリケーションを実行します-
npm startアプリケーションは、学生情報をデータベースに挿入してから、データベース内のすべての学生をフェッチし、以下に示すようにコンソールに表示します。
> [email protected] start /path/to/workspace/typeorm-javascript-student-app

> node src/index.js

Student has been successfully saved: { name: 'Student1', age: 18, id: 1 } All students: [ { id: 1, name: 'Student1', age: 18 } ]
この章では、TypeORMが提供する広範なMongoDBデータベースのサポートについて説明します。うまくいけば、npmを使用してmongodbをインストールしました。インストールされていない場合は、以下のコマンドを使用してMongoDBドライバーをインストールします。
npm install mongodb --saveプロジェクトの作成
次のようにMongoDBを使用して新しいプロジェクトを作成しましょう-
typeorm init --name MyProject --database mongodbormconfig.jsonを構成します
以下に指定するように、ormconfig.jsonファイルでMongoDBホスト、ポート、およびデータベースのオプションを構成しましょう-
ormconfig.json
{
   "type": "mongodb",
   "host": "localhost",
   "port": 27017,
   "database": "test",
   "synchronize": true,
   "logging": false,
   "entities": [
      "src/entity/**/*.ts"
   ],
   "migrations": [ "src/migration/**/*.ts"
   ],
   "subscribers": [ "src/subscriber/**/*.ts"
   ],
   "cli": {
      "entitiesDir": "src/entity", "migrationsDir": "src/migration", "subscribersDir": "src/subscriber"
   }
}
エンティティと列を定義する
srcディレクトリ内にStudentという名前の新しいエンティティを作成しましょう。エンティティと列は同じです。主キー列を生成するには、@PrimaryColumn または
@PrimaryGeneratedColumn. これは次のように定義できます @ObjectIdColumn. 簡単な例を以下に示します-
Student.ts
import {Entity, ObjectID, ObjectIdColumn, Column} from "typeorm";

@Entity()
export class Student {

   @ObjectIdColumn()
   id: ObjectID;

   @Column()
   Name: string;

   @Column()
   Country: string;
}
このエンティティを保存するには、index.tsファイルを開き、次の変更を追加します-
index.ts
import "reflect-metadata";
import {createConnection} from "typeorm";
import {Student} from "./entity/Student";

createConnection().then(async connection => {

   console.log("Inserting a new Student into the database..."); const std = new Student(); std.Name = "Student1";
   std.Country = "India";
   await connection.manager.save(std); console.log("Saved a new user with id: " + std.id);

   console.log("Loading users from the database...");
   const stds = await connection.manager.find(Student); console.log("Loaded users: ", stds);

   console.log("TypeORM with MongoDB");
}).catch(error => console.log(error));
ここでサーバーを起動すると、次の応答が返されます-
npm start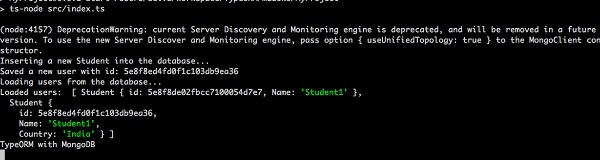
MongoDB EntityManager
EntityManagerを使用してデータをフェッチすることもできます。簡単な例を以下に示します-
import {getManager} from "typeorm";

const manager = getManager();
const result = await manager.findOne(Student, { id:1 });
同様に、リポジトリを使用してデータにアクセスすることもできます。
import {getMongoRepository} from "typeorm";

const studentRepository = getMongoRepository(Student);
const result = await studentRepository.findOne({ id:1 });
次のようにequalオプションを使用してデータをフィルタリングする場合-
import {getMongoRepository} from "typeorm";

const studentRepository = getMongoRepository(Student);
const result = await studentRepository.find({
   where: {
      Name: {$eq: "Student1"},
   }
});
この章で見たように、TypeORMを使用するとMongoDBデータベースエンジンを簡単に操作できます。
Expressは、Webアプリケーションを作成するための人気のあるJavaScriptフレームワークの1つです。使い方を学びましょうTypeORM この章のエクスプレスフレームワークとともに。
簡単なアプリケーションの作成
TypeORM CLIは、と統合された完全に機能するExpress Webアプリケーション(Restful APIアプリケーション)を作成するための簡単なオプションを提供します。 TypeORM。アプリケーションを作成するためのCLIコマンドは次のとおりです。
cd /path/to/workspace typeorm init --express --name typeorm-express-sample --database mysql上記のコマンドは、typeorm-express-sampleフォルダーの下に新しいWebアプリケーションを作成します。アプリケーションの構造は次のとおりです-
│ .gitignore
│ ormconfig.json
│ package.json
│ README.md
│ tsconfig.json
│ └───src
      │ index.ts
      │ routes.ts
      │
      ├───controller
      │      UserController.ts
      │
      ├───entity
      │      User.ts
      │
      └───migration
ここに、
みなさんご存じのとおり、 ormconfig.json それは TypeORM構成ファイル。コードは次のとおりです。
{
   "type": "mysql",
   "host": "localhost",
   "port": 3306,
   "username": "test",
   "password": "test",
   "database": "test",
   "synchronize": true,
   "logging": false,
   "entities": [
      "src/entity/**/*.ts"
   ],
   "migrations": [ "src/migration/**/*.ts"
   ],
   "subscribers": [ "src/subscriber/**/*.ts"
   ],
   "cli": {
      "entitiesDir": "src/entity", "migrationsDir": "src/migration", "subscribersDir": "src/subscriber"
   }
}
ここで、ローカルデータベース設定と一致するようにデータベース設定を変更します。
package.json ファイルは、アプリケーションの主な構成です。
tsconfig.json ファイルには、TypeScriptに関連する構成が含まれています。
entity フォルダには、 TypeORMモデル。デフォルトのユーザーモデルはCLIによって作成され、次のようになります。
import {Entity, PrimaryGeneratedColumn, Column} from "typeorm";

@Entity()
export class User {

   @PrimaryGeneratedColumn()
   id: number;

   @Column()
   firstName: string;

   @Column()
   lastName: string;

   @Column()
   age: number;
}controllerフォルダにはエクスプレスコントローラが含まれています。CLIは、ユーザーの詳細を追加/一覧表示/削除して、デフォルトのユーザーAPIコントローラーを作成します。コードは次のとおりです-
import {getRepository} from "typeorm"; import {NextFunction, Request, Response} from "express"; import {User} from "../entity/User";

export class UserController {

   private userRepository = getRepository(User);

   async all(request: Request, response: Response, next: NextFunction) {
      return this.userRepository.find();
   }

   async one(request: Request, response: Response, next: NextFunction) {
      return this.userRepository.findOne(request.params.id);
   }

   async save(request: Request, response: Response, next: NextFunction) {
      return this.userRepository.save(request.body);
   }

   async remove(request: Request, response: Response, next: NextFunction) {
      let userToRemove = await this.userRepository.findOne(request.params.id);
      await this.userRepository.remove(userToRemove);
   }
}
ここに、
all メソッドは、データベースからすべてのユーザーをフェッチするために使用されます。
one メソッドは、を使用してデータベースから単一のユーザーをフェッチするために使用されます user id
save メソッドは、ユーザー情報をデータベースに保存するために使用されます。
delete メソッドは、を使用してデータベースからユーザーを削除するために使用されます user id
routes.ts ファイルはユーザーコントローラーメソッドを適切なURLにマップし、コードは次のとおりです。
import {UserController} from "./controller/UserController";

export const Routes = [{
      method: "get",
      route: "/users",
      controller: UserController, action: "all"
   }, {
      method: "get",
      route: "/users/:id", controller: UserController, action: "one"
   }, {
      method: "post",
      route: "/users",
      controller: UserController, action: "save"
   }, {
      method: "delete", route: "/users/:id", controller: UserController,
      action: "remove"
}];
ここに、
/ usersurlはユーザーコントローラーにマップされます。各動詞post、get、およびdeleteは、異なるメソッドにマップされます。
最終的に、 index.tsは、メインのWebアプリケーションのエントリポイントです。ソースコードは次のとおりです-
import "reflect-metadata";
import {createConnection} from "typeorm";
import * as express from "express"; import * as bodyParser from "body-parser";
import {Request, Response} from "express";
import {Routes} from "./routes"; import {User} from "./entity/User";

createConnection().then(async connection => {

   // create express app const app = express(); app.use(bodyParser.json());

   // register express routes from defined application routes Routes.forEach(route => {
      (app as any)[route.method](route.route, (req:   Request, res: Response, next: Function) => {
         const result = (new (route.controller as any))[route.action](req, res, next);
         if (result instanceof Promise) {
            result.then(result => result !== null && result !== undefined ? res.send(result) : undefined);
         } else if (result !== null && result !== undefined) {
            .json(result);
         }
      });
   });

   // setup express app here
   // ...

   // start express server app.listen(3000);

   // insert new users for test await connection.manager.save(connection.manager.create(User, {
      firstName: "Timber",
      lastName: "Saw",
      age: 27
   }));
   await connection.manager.save(connection.manager.create(User, {
      firstName: "Phantom",
      lastName: "Assassin",
      age: 24
   }));

   console.log("Express server has started on port 3000. Open http://localhost:3000/users to see results");
}).catch(error => console.log(error));ここで、アプリケーションはルートを構成し、2人のユーザーを挿入してから、ポート3000でWebアプリケーションを起動します。私たちはでアプリケーションにアクセスすることができますhttp://localhost:3000
アプリケーションを実行するには、以下の手順に従います-
以下のコマンドを使用して、必要なパッケージをインストールしましょう-
npm install出力
npm notice created a lockfile as package-lock.json. You should commit this file.
npm WARN [email protected] No repository field.
npm WARN [email protected] No license field.

added 176 packages from 472 contributors and audited 351 packages in 11.965s

3 packages are looking for funding  run `npm fund` for details

found 0 vulnerabilities
以下のコマンドを実行して、アプリケーションを起動します。
npm start出力
> [email protected] start /path/to/workspace/typeorm-express-sample
> ts-node src/index.ts

Express server has started on port 3000. Open http://localhost:3000/users to see results
以下のようにcurlコマンドを使用してWebアプリケーションAPIにアクセスしましょう-
curl http://localhost:3000/usersここに、
curlは、コマンドプロンプトからWebアプリケーションにアクセスするためのコマンドラインアプリケーションです。get、post、deleteなどのすべてのHTTP動詞をサポートします。
出力
[{"id":1,"firstName":"Timber","lastName":"Saw","age":27},{"id":2,"firstName":"Phantom","lastName":"Assassin","age":24}]最初のレコードをフェッチするには、以下のコマンドを使用できます-
curl http://localhost:3000/users/1出力
{"id":1,"firstName":"Timber","lastName":"Saw","age":27}ユーザーレコードを削除するには、以下のコマンドを使用できます-
curl -X DELETE http://localhost:3000/users/1この章で見たように、 TypeORM エクスプレスアプリケーションに簡単に統合できます。
移行は、データベースのバージョン管理のようなものです。これは、アプリケーションのデータベーススキーマを変更および共有するために使用されます。このセクションでは、TypeORMでの移行の仕組みについて説明します。
新しい移行の作成
新しい移行を作成するには、最初にormconfig.jsonで接続を設定する必要があります。以下に定義されています-
ormconfig.json
"type": "mysql",
"host": "localhost",
"port": 8889,
"username": "root",
"password": "root",
"database": "Library",
"entities": ["entity/*.js"], "migrationsTableName": "student_migration_table", "migrations": ["migration/*.js"], "cli": {
   "migrationsDir": "migration"
}
ここに、
- migrationsTableName −移行テーブル名を参照します。
- migrations − TypeORMは、指定されたディレクトリから移行をロードします。
- cli −特定のディレクトリ内に移行が作成されることを示します。
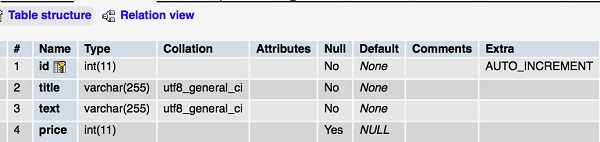
Bookエンティティを作成する
という名前のエンティティを作成しましょう Book 内部のエンティティ src/entity/Book.ts 次のように-
import { Entity, Column, PrimaryGeneratedColumn } from 'typeorm';
@Entity()
export class Book {

   @PrimaryGeneratedColumn()
   id: number;

   @Column()
   title: string;

   @Column()
   text: string;
}
CLIを実行して新しい移行を作成します
これで、次のようにCLIを使用して新しい移行を実行できます。
構文
typeorm migration:create -n <migration-name>例
typeorm migration:create -n myMigration上記のコマンドを実行すると、次の応答が表示されます-
Migration /path/to/project/src/migration/1587101104904-myMigration.ts has been generated successfully.さあ、中に入って src/migration/1587101104904-myMigration.ts ファイルは次のようになります。
import {MigrationInterface, QueryRunner} from "typeorm";

export class myMigration1587101104904 implements MigrationInterface {

   public async up(queryRunner: QueryRunner): Promise<any> {
   }

   public async down(queryRunner: QueryRunner): Promise<any> {
   }
}
ここに、
2つの方法があります up そして down。 up メソッドは、移行に変更を追加するために使用され、 down メソッドは、移行の変更を元に戻すために使用されます。
追加しましょう up 内部のメソッド myMigration.ts 以下に指定されているファイル-
import {MigrationInterface, QueryRunner} from "typeorm";

export class Book1587131893261 implements MigrationInterface {

   public async up(queryRunner: QueryRunner): Promise<any> {
      await queryRunner.query(`ALTER TABLE book ADD COLUMN price int`);
   }
   public async down(queryRunner: QueryRunner): Promise<any> { }
}
ここに、
新しい列を追加しました price 内部 bookテーブル。次に、CLIを実行して、上記の変更を追加します。
ts-node ./node_modules/typeorm/cli.js migration:run上記のコマンドは、移行を実行し、それらを順番に実行します。これで、画面に次の変更が表示されます-
出力

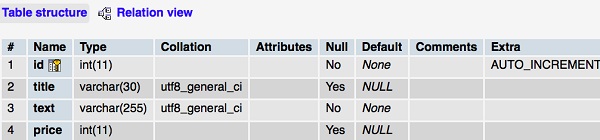
次に、mysqlサーバーを開き、新しい列を追加します。以下に示します-
同様に、次のように列タイトルのデータ型をvarchar(30)に変更できます。
import {MigrationInterface, QueryRunner} from "typeorm";

export class Book1587131893261 implements MigrationInterface {

   public async up(queryRunner: QueryRunner): Promise<any> {
   await queryRunner.query(`ALTER TABLE book MODIFY COLUMN title varchar(30)`);
      }
   public async down(queryRunner: QueryRunner): Promise<any> {
   }
}
ここで、同じコマンドを実行すると、以下の変更が可能になります-
ts-node ./node_modules/typeorm/cli.js migration:run出力

Book テーブルは次のように変更されます。
移行を元に戻す
以下のコードを中に追加しましょう down 移行を元に戻す方法-
import {MigrationInterface, QueryRunner} from "typeorm";

export class Book1587131893261 implements MigrationInterface {

   public async up(queryRunner: QueryRunner): Promise<any> {

   }
   public async down(queryRunner: QueryRunner): Promise<any> {

      await queryRunner.query(`ALTER TABLE book drop column price`); // reverts things made in "up" method
   }
}
次に、以下のコマンドを実行して、すべての変更を元に戻します-
ts-node ./node_modules/typeorm/cli.js migration:revert次の応答を見ることができます-
出力

Book テーブルは次のように変更されます。
出力

この章で見たように、 TypeORM データベース移行スクリプトを簡単に作成できます。
このセクションでは、TypeORMCLIコマンドについて詳しく説明します。
TypeORMプロジェクトを作成する
typeorm initTypeORMプロジェクトをセットアップする最も簡単で最速の方法です。次のように新しいプロジェクトを作成できます。
typeorm init --name Demoproject --database mysqlコマンドを実行すると、画面に次の出力が表示されます-
Project created inside /Users/workspace/TypeORM/Demoproject directory.エンティティを作成する
CLIを使用して新しいエンティティを作成するには、
typeorm entity:create -n Personこれで、Personエンティティがプロジェクトのsrcディレクトリ内に作成されます。
Entity /Users/workspace/TypeORM/Demoproject/src/entity/Person.ts has been created successfully.異なるディレクトリに複数のエンティティがあるマルチモジュールプロジェクト構造がある場合は、次のコマンドを使用できます。
typeorm entity:create -n Person -d src/Person/entity新しいサブスクライバーを作成します
次のようにCLIを使用して新しいサブスクライバーを作成するには-
typeorm subscriber:create -n PersonSubscriber次の応答を見ることができます-
Subscriber /path/to/TypeORM/Demoproject/src/subscriber/PersonSubscriber.ts has been created successfully.移行を作成する
以下に説明するように、CLIを使用して新しい移行を作成できます-
typeorm migration:create -n PersonMigration上記のコマンドは、プロジェクトsrc内に移行ディレクトリを作成しました。移行ファイルはその中に保存されます。
Migration /path/to/TypeORM/Demoproject/src/migration/1587395030750-PersonMigration.ts has been generated successfully.データベーススキーマ
データベーススキーマを同期するには、次のコマンドを使用します-
typeorm schema:syncデータベーススキーマを完全に削除するには、次のコマンドを使用します-
typeorm schema:dropSQLクエリ
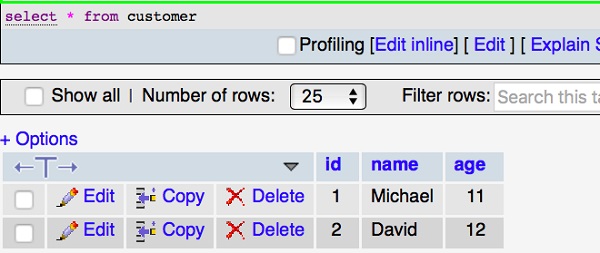
SQLクエリを実行する場合は、ここから直接実行できます。たとえば、顧客のすべてのレコードを表示するには、次のクエリを使用します-
typeorm query "select * from customers"キャッシュに保存されているすべてのものをクリアしたい場合。次のコマンドを使用してそれを行うことができます-
typeorm cache:clear結論
TypeORMは、小規模なアプリケーションから複数のデータベースを備えた大規模なエンタープライズアプリケーションまで、高品質でスケーラブルなアプリケーションを作成するための優れたオープンソースORMフレームワークです。