Apache POI – 셀
스프레드 시트에 입력하는 모든 데이터는 항상 셀에 저장됩니다. 행과 열의 레이블을 사용하여 셀을 식별합니다. 이 장에서는 Java 프로그래밍을 사용하여 스프레드 시트에서 셀의 데이터를 조작하는 방법에 대해 설명합니다.
셀 생성
셀을 만들기 전에 행을 만들어야합니다. 행은 셀 모음 일뿐입니다.
다음 코드 조각은 셀을 만드는 데 사용됩니다.
//create new workbook
XSSFWorkbook workbook = new XSSFWorkbook();

//create spreadsheet with a name
XSSFSheet spreadsheet = workbook.createSheet("new sheet");

//create first row on a created spreadsheet
XSSFRow row = spreadsheet.createRow(0);

//create first cell on created row
XSSFCell cell = row.createCell(0);
세포의 유형
셀 유형은 셀에 문자열, 숫자 값 또는 수식이 포함될 수 있는지 여부를 지정합니다. 문자열 셀에는 숫자 값이 포함될 수없고 숫자 셀에는 문자열이 포함될 수 없습니다. 다음은 셀 유형, 해당 값 및 유형 구문입니다.
| 셀 값 유형 | 유형 구문 |
|---|---|
| 빈 셀 값 | XSSFCell.CELL_TYPE_BLANK |
| 부울 셀 값 | XSSFCell.CELL.TYPE_BOOLEAN |
| 오류 셀 값 | XSSFCell.CELL_TYPE_ERROR |
| 숫자 셀 값 | XSSFCell.CELL_TYPE_NUMERIC |
| 문자열 셀 값 | XSSFCell.CELL_TYPE_STRING |
다음 코드는 스프레드 시트에서 다양한 유형의 셀을 만드는 데 사용됩니다.
import java.io.File;
import java.io.FileOutputStream;

import java.util.Date;

import org.apache.poi.xssf.usermodel.XSSFCell;
import org.apache.poi.xssf.usermodel.XSSFRow;
import org.apache.poi.xssf.usermodel.XSSFSheet;
import org.apache.poi.xssf.usermodel.XSSFWorkbook;

public class TypesofCells {
   public static void main(String[] args)throws Exception {
      XSSFWorkbook workbook = new XSSFWorkbook();
      XSSFSheet spreadsheet = workbook.createSheet("cell types");

      XSSFRow row = spreadsheet.createRow((short) 2);
      row.createCell(0).setCellValue("Type of Cell");
      row.createCell(1).setCellValue("cell value");

      row = spreadsheet.createRow((short) 3);
      row.createCell(0).setCellValue("set cell type BLANK");
      row.createCell(1);

      row = spreadsheet.createRow((short) 4);
      row.createCell(0).setCellValue("set cell type BOOLEAN");
      row.createCell(1).setCellValue(true);

      row = spreadsheet.createRow((short) 5);
      row.createCell(0).setCellValue("set cell type ERROR");
      row.createCell(1).setCellValue(XSSFCell.CELL_TYPE_ERROR );

      row = spreadsheet.createRow((short) 6);
      row.createCell(0).setCellValue("set cell type date");
      row.createCell(1).setCellValue(new Date());

      row = spreadsheet.createRow((short) 7);
      row.createCell(0).setCellValue("set cell type numeric");
      row.createCell(1).setCellValue(20 );

      row = spreadsheet.createRow((short) 8);
      row.createCell(0).setCellValue("set cell type string");
      row.createCell(1).setCellValue("A String");

      FileOutputStream out = new FileOutputStream(new File("typesofcells.xlsx"));
      workbook.write(out);
      out.close();
      System.out.println("typesofcells.xlsx written successfully");
   }
}
위의 코드를 이름이 지정된 파일에 저장하십시오. TypesofCells.java, 다음과 같이 명령 프롬프트에서 컴파일하고 실행하십시오.
$javac TypesofCells.java
$java TypesofCells
시스템이 POI 라이브러리로 구성된 경우 컴파일 및 실행되어 이름이 지정된 Excel 파일을 생성합니다. typesofcells.xlsx 현재 디렉토리에서 다음 출력을 표시합니다.
typesofcells.xlsx written successfully그만큼 typesofcells.xlsx 파일은 다음과 같습니다.

셀 스타일
여기에서 셀 서식을 지정하고 인접한 셀 병합, 테두리 추가, 셀 정렬 설정 및 색상 채우기와 같은 다양한 스타일을 적용하는 방법을 배울 수 있습니다.
다음 코드는 Java 프로그래밍을 사용하여 셀에 다른 스타일을 적용하는 데 사용됩니다.
import java.io.File;
import java.io.FileOutputStream;

import org.apache.poi.hssf.util.HSSFColor;
import org.apache.poi.ss.usermodel.IndexedColors;
import org.apache.poi.ss.util.CellRangeAddress;
import org.apache.poi.xssf.usermodel.XSSFCell;
import org.apache.poi.xssf.usermodel.XSSFCellStyle;
import org.apache.poi.xssf.usermodel.XSSFRow;
import org.apache.poi.xssf.usermodel.XSSFSheet;
import org.apache.poi.xssf.usermodel.XSSFWorkbook;

public class CellStyle {
   public static void main(String[] args)throws Exception {
      XSSFWorkbook workbook = new XSSFWorkbook();
      XSSFSheet spreadsheet = workbook.createSheet("cellstyle");
      XSSFRow row = spreadsheet.createRow((short) 1);
      row.setHeight((short) 800);
      XSSFCell cell = (XSSFCell) row.createCell((short) 1);
      cell.setCellValue("test of merging");

      //MEARGING CELLS
      //this statement for merging cells

      spreadsheet.addMergedRegion(
         new CellRangeAddress(
            1, //first row (0-based)
            1, //last row (0-based)
            1, //first column (0-based)
            4 //last column (0-based)
         )
      );

      //CELL Alignment
      row = spreadsheet.createRow(5);
      cell = (XSSFCell) row.createCell(0);
      row.setHeight((short) 800);

      // Top Left alignment
      XSSFCellStyle style1 = workbook.createCellStyle();
      spreadsheet.setColumnWidth(0, 8000);
      style1.setAlignment(XSSFCellStyle.ALIGN_LEFT);
      style1.setVerticalAlignment(XSSFCellStyle.VERTICAL_TOP);
      cell.setCellValue("Top Left");
      cell.setCellStyle(style1);
      row = spreadsheet.createRow(6);
      cell = (XSSFCell) row.createCell(1);
      row.setHeight((short) 800);

      // Center Align Cell Contents
      XSSFCellStyle style2 = workbook.createCellStyle();
      style2.setAlignment(XSSFCellStyle.ALIGN_CENTER);
      style2.setVerticalAlignment(XSSFCellStyle.VERTICAL_CENTER);
      cell.setCellValue("Center Aligned");
      cell.setCellStyle(style2);
      row = spreadsheet.createRow(7);
      cell = (XSSFCell) row.createCell(2);
      row.setHeight((short) 800);

      // Bottom Right alignment
      XSSFCellStyle style3 = workbook.createCellStyle();
      style3.setAlignment(XSSFCellStyle.ALIGN_RIGHT);
      style3.setVerticalAlignment(XSSFCellStyle.VERTICAL_BOTTOM);
      cell.setCellValue("Bottom Right");
      cell.setCellStyle(style3);
      row = spreadsheet.createRow(8);
      cell = (XSSFCell) row.createCell(3);

      // Justified Alignment
      XSSFCellStyle style4 = workbook.createCellStyle();
      style4.setAlignment(XSSFCellStyle.ALIGN_JUSTIFY);
      style4.setVerticalAlignment(XSSFCellStyle.VERTICAL_JUSTIFY);
      cell.setCellValue("Contents are Justified in Alignment");
      cell.setCellStyle(style4);

      //CELL BORDER
      row = spreadsheet.createRow((short) 10);
      row.setHeight((short) 800);
      cell = (XSSFCell) row.createCell((short) 1);
      cell.setCellValue("BORDER");

      XSSFCellStyle style5 = workbook.createCellStyle();
      style5.setBorderBottom(XSSFCellStyle.BORDER_THICK);
      style5.setBottomBorderColor(IndexedColors.BLUE.getIndex());
      style5.setBorderLeft(XSSFCellStyle.BORDER_DOUBLE);
      style5.setLeftBorderColor(IndexedColors.GREEN.getIndex());
      style5.setBorderRight(XSSFCellStyle.BORDER_HAIR);
      style5.setRightBorderColor(IndexedColors.RED.getIndex());
      style5.setBorderTop(XSSFCellStyle.BIG_SPOTS);
      style5.setTopBorderColor(IndexedColors.CORAL.getIndex());
      cell.setCellStyle(style5);

      //Fill Colors
      //background color
      row = spreadsheet.createRow((short) 10 );
      cell = (XSSFCell) row.createCell((short) 1);

      XSSFCellStyle style6 = workbook.createCellStyle();
      style6.setFillBackgroundColor(HSSFColor.LEMON_CHIFFON.index );
      style6.setFillPattern(XSSFCellStyle.LESS_DOTS);
      style6.setAlignment(XSSFCellStyle.ALIGN_FILL);
      spreadsheet.setColumnWidth(1,8000);
      cell.setCellValue("FILL BACKGROUNG/FILL PATTERN");
      cell.setCellStyle(style6);

      //Foreground color
      row = spreadsheet.createRow((short) 12);
      cell = (XSSFCell) row.createCell((short) 1);

      XSSFCellStyle style7 = workbook.createCellStyle();
      style7.setFillForegroundColor(HSSFColor.BLUE.index);
      style7.setFillPattern( XSSFCellStyle.LESS_DOTS);
      style7.setAlignment(XSSFCellStyle.ALIGN_FILL);
      cell.setCellValue("FILL FOREGROUND/FILL PATTERN");
      cell.setCellStyle(style7);

      FileOutputStream out = new FileOutputStream(new File("cellstyle.xlsx"));
      workbook.write(out);
      out.close();
      System.out.println("cellstyle.xlsx written successfully");
   }
}
위의 코드를 이름이 지정된 파일에 저장하십시오. CellStyle.java, 다음과 같이 명령 프롬프트에서 컴파일하고 실행하십시오.
$javac CellStyle.java
$java CellStyle
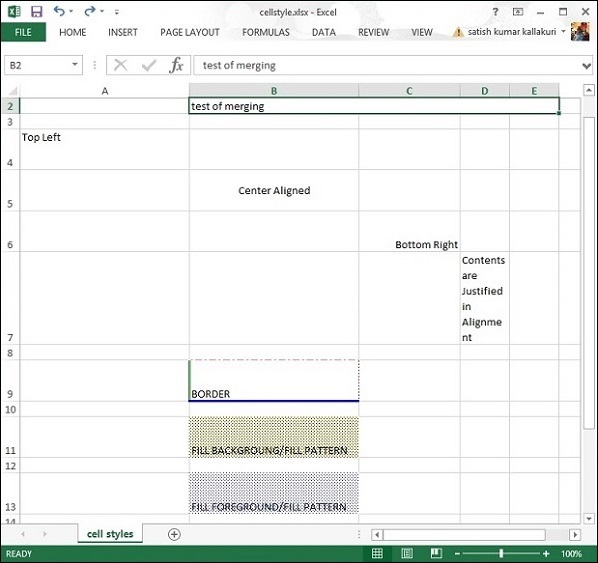
이름이 Excel 파일을 생성합니다. cellstyle.xlsx 현재 디렉토리에서 다음 출력을 표시합니다.
cellstyle.xlsx written successfullycellstyle.xlsx 파일은 다음과 같습니다.
