자바 암호화-빠른 가이드
암호화는 정보 보안을 제공 할 수있는 암호화 시스템을 만드는 기술이자 과학입니다.
암호화는 디지털 데이터의 실제 보안을 다룹니다. 기본적인 정보 보안 서비스를 제공하는 수학적 알고리즘에 기반한 메커니즘 설계를 말합니다. 암호화는 보안 애플리케이션에서 다양한 기술을 포함하는 대규모 툴킷의 설정으로 생각할 수 있습니다.
암호 분석이란 무엇입니까?
암호문을 해독하는 기술과 과학을 암호화 분석이라고합니다.
암호 해독은 암호화의 자매 분기이며 둘 다 공존합니다. 암호화 프로세스는 전송 또는 저장을위한 암호 텍스트를 생성합니다. 이를 깨기위한 의도로 암호화 메커니즘에 대한 연구가 포함됩니다. 암호 분석은 보안 강점을 테스트하기 위해 새로운 암호화 기술을 설계하는 동안에도 사용됩니다.
암호화 프리미티브
암호화 프리미티브는 원하는 보안 서비스 세트를 제공하기 위해 선택적으로 사용할 수있는 Cryptography의 도구 및 기술 일뿐입니다.
- Encryption
- 해시 함수
- 메시지 인증 코드 (MAC)
- 디지털 서명
자바의 암호화
JCA (Java Cryptography Architecture)는 디지털 서명, 메시지 다이제스트, 인증서, 암호화, 키 생성 및 관리, 보안 난수 생성 등과 같은 최신 암호화 개념을 구현하기위한 API 집합입니다.
JCA 개발자를 사용하면 보안을 통합하는 애플리케이션을 구축 할 수 있습니다.
복잡한 보안 알고리즘에 의존하지 않고 애플리케이션에 보안을 통합하기 위해 필요한 서비스에 대해 JCA에서 제공되는 각 API를 쉽게 호출 할 수 있습니다.
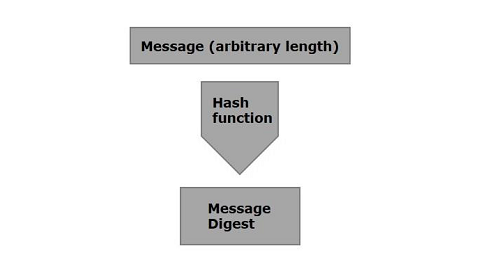
해시 함수는 매우 유용하며 거의 모든 정보 보안 응용 프로그램에 나타납니다.
해시 함수는 숫자 입력 값을 다른 압축 숫자 값으로 변환하는 수학 함수입니다. 해시 함수에 대한 입력은 임의 길이이지만 출력은 항상 고정 길이입니다.
해시 함수에 의해 반환 된 값이 호출됩니다. message digest 또는 간단히 hash values. 다음 그림은 해시 함수를 보여줍니다.
Java는 MessageDigest패키지 java.security에 속합니다. 이 클래스는 임의 길이 메시지를 메시지 다이제스트로 변환하는 SHA-1, SHA 256, MD5 알고리즘과 같은 알고리즘을 지원합니다.
주어진 메시지를 메시지 다이제스트로 변환하려면 다음 단계를 따르십시오.
1 단계 : MessageDigest 객체 생성
MessageDigest 클래스는 getInstance(). 이 메서드는 사용할 알고리즘의 이름을 지정하는 String 변수를 받아들이고 지정된 알고리즘을 구현하는 MessageDigest 개체를 반환합니다.
다음을 사용하여 MessageDigest 객체를 만듭니다. getInstance() 방법은 아래와 같습니다.
MessageDigest md = MessageDigest.getInstance("SHA-256");2 단계 : 생성 된 MessageDigest 개체에 데이터 전달
메시지 다이제스트 객체를 생성 한 후 메시지 / 데이터를 전달해야합니다. 다음을 사용하여 그렇게 할 수 있습니다.update() 의 방법 MessageDigest 클래스에서이 메서드는 메시지를 나타내는 바이트 배열을 받아 위에서 만든 MessageDigest 객체에 추가 / 전달합니다.
md.update(msg.getBytes());3 단계 : 메시지 요약 생성
다음을 사용하여 메시지 요약을 생성 할 수 있습니다. digest() MessageDigest 클래스의 메소드이 메소드는 현재 객체의 해시 함수를 계산하고 바이트 배열 형식으로 메시지 요약을 반환합니다.
digest 메소드를 사용하여 메시지 다이제스트를 생성합니다.
byte[] digest = md.digest();예
다음은 파일에서 데이터를 읽고 메시지 다이제스트를 생성하여 인쇄하는 예입니다.
import java.security.MessageDigest;
import java.util.Scanner;

public class MessageDigestExample {
   public static void main(String args[]) throws Exception{
      //Reading data from user
      Scanner sc = new Scanner(System.in);
      System.out.println("Enter the message");
      String message = sc.nextLine();

      //Creating the MessageDigest object
      MessageDigest md = MessageDigest.getInstance("SHA-256");

      //Passing data to the created MessageDigest Object
      md.update(message.getBytes());

      //Compute the message digest
      byte[] digest = md.digest();
      System.out.println(digest);

      //Converting the byte array in to HexString format
      StringBuffer hexString = new StringBuffer();

      for (int i = 0;i<digest.length;i++) {
         hexString.append(Integer.toHexString(0xFF & digest[i]));
      }
      System.out.println("Hex format : " + hexString.toString());
   }
}
산출
위의 프로그램은 다음과 같은 출력을 생성합니다-
Enter the message
Hello how are you
[B@55f96302
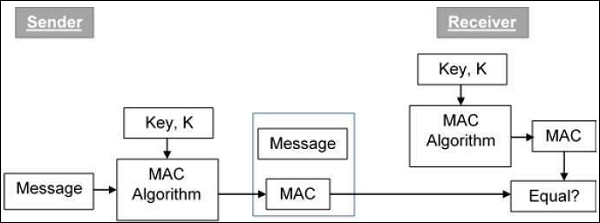
Hex format: 2953d33828c395aebe8225236ba4e23fa75e6f13bd881b9056a3295cbd64d3맥 (M에세이 지 A인증 Code) 알고리즘은 메시지 인증을 제공하는 대칭 키 암호화 기술입니다. MAC 프로세스를 설정하기 위해 발신자와 수신자는 대칭 키 K를 공유합니다.
기본적으로 MAC은 메시지 인증을 보장하기 위해 메시지와 함께 전송되는 기본 메시지에서 생성 된 암호화 된 체크섬입니다.
인증을 위해 MAC을 사용하는 프로세스는 다음 그림에 설명되어 있습니다.
자바에서 Mac 클래스 javax.crypto패키지는 메시지 인증 코드의 기능을 제공합니다. 이 클래스를 사용하여 메시지 인증 코드를 생성하려면 아래 단계를 따르십시오.
1 단계 : KeyGenerator 개체 만들기
그만큼 KeyGenerator 수업 제공 getInstance() 필요한 키 생성 알고리즘을 나타내는 String 변수를 받아들이고 KeyGenerator 비밀 키를 생성하는 객체.
창조하다 KeyGenerator 개체를 사용하여 getInstance() 방법은 아래와 같습니다.
//Creating a KeyGenerator object
KeyGenerator keyGen = KeyGenerator.getInstance("DES");
2 단계 : SecureRandom 개체 만들기
그만큼 SecureRandom 클래스 java.Security패키지는 Java에서 난수를 생성하는 데 사용되는 강력한 난수 생성기를 제공합니다. 아래와 같이이 클래스를 인스턴스화합니다.
//Creating a SecureRandom object
SecureRandom secRandom = new SecureRandom();
3 단계 : KeyGenerator 초기화
그만큼 KeyGenerator 클래스는 init() 이 방법은 SecureRandom 개체 및 현재 초기화 KeyGenerator.
이 메서드를 사용하여 이전 단계에서 만든 KeyGenerator 개체를 초기화합니다.
//Initializing the KeyGenerator
keyGen.init(secRandom);
4 단계 : 키 생성
다음을 사용하여 키 생성 generateKey() 의 방법 KeyGenerator 아래와 같이 클래스.
//Creating/Generating a key
Key key = keyGen.generateKey();
5 단계 : Mac 개체 초기화
그만큼 init() Mac 클래스의 메서드는 Key 객체를 받아들이고 주어진 키를 사용하여 현재 Mac 객체를 초기화합니다.
//Initializing the Mac object
mac.init(key);
6 단계 : Mac 작업 완료
그만큼 doFinal()Mac 클래스의 메서드는 Mac 작업을 완료하는 데 사용됩니다. 필요한 데이터를 바이트 배열 형식으로이 메서드에 전달하고 아래와 같이 작업을 완료합니다.
//Computing the Mac
String msg = new String("Hi how are you");
byte[] bytes = msg.getBytes();
byte[] macResult = mac.doFinal(bytes);
예
다음 예제는 JCA를 사용한 메시지 인증 코드 (MAC) 생성을 보여줍니다. 여기에서 "Hi how are you"라는 간단한 메시지를 받고 해당 메시지에 대한 Mac을 생성합니다.
import java.security.Key;
import java.security.SecureRandom;

import javax.crypto.KeyGenerator;
import javax.crypto.Mac;

public class MacSample {
   public static void main(String args[]) throws Exception{
      //Creating a KeyGenerator object
      KeyGenerator keyGen = KeyGenerator.getInstance("DES");

      //Creating a SecureRandom object
      SecureRandom secRandom = new SecureRandom();

      //Initializing the KeyGenerator
      keyGen.init(secRandom);

      //Creating/Generating a key
      Key key = keyGen.generateKey();

      //Creating a Mac object
      Mac mac = Mac.getInstance("HmacSHA256");

      //Initializing the Mac object
      mac.init(key);

      //Computing the Mac
      String msg = new String("Hi how are you");
      byte[] bytes = msg.getBytes();
      byte[] macResult = mac.doFinal(bytes);

      System.out.println("Mac result:");
      System.out.println(new String(macResult));
   }
}
산출
위의 프로그램은 다음 출력을 생성합니다-
Mac result:
HÖ„^ǃÎ_Utbh…?š_üzØSSÜh_ž_œa0ŽV?
암호화 시스템은 정보 보안 서비스를 제공하기 위해 암호화 기술과 그에 수반되는 인프라의 구현입니다. 암호화 시스템은cipher system.
기본 암호 시스템의 다양한 구성 요소는 다음과 같습니다. Plaintext, Encryption Algorithm, Ciphertext, Decryption Algorithm, 암호화 키 및 암호 해독 키.
어디,
Encryption Key보낸 사람에게 알려진 값입니다. 발신자는 암호화 텍스트를 계산하기 위해 일반 텍스트와 함께 암호화 알고리즘에 암호화 키를 입력합니다.
Decryption Key수신자에게 알려진 값입니다. 암호 해독 키는 암호화 키와 관련이 있지만 항상 동일하지는 않습니다. 수신자는 일반 텍스트를 계산하기 위해 암호 텍스트와 함께 암호 해독 알고리즘에 암호 해독 키를 입력합니다.
기본적으로 암호화-복호화 알고리즘 유형에 따라 두 가지 유형의 키 / 암호화 시스템이 있습니다.
대칭 키 암호화
암호화 프로세스 same keys are used for encrypting and decrypting 이 정보를 대칭 키 암호화라고합니다.
대칭 암호 시스템에 대한 연구는 symmetric cryptography. 대칭 암호 시스템은 때때로secret key cryptosystems.
다음은 대칭 키 암호화의 몇 가지 일반적인 예입니다.
- 디지털 암호화 표준 (DES)
- 삼중 DES (3DES)
- IDEA
- BLOWFISH
비대칭 키 암호화
암호화 프로세스 different keys are used for encrypting and decrypting the information비대칭 키 암호화라고합니다. 키는 다르지만 수학적으로 관련되어 있으므로 암호 텍스트를 해독하여 일반 텍스트를 검색 할 수 있습니다.
사용 / 생성 된 키 및 인증서는 키 저장소라는 데이터베이스에 저장됩니다. 기본적으로이 데이터베이스는 다음과 같은 파일에 저장됩니다..keystore.
다음을 사용하여이 데이터베이스의 내용에 액세스 할 수 있습니다. KeyStore 클래스 java.security꾸러미. 이것은 PrivateKeyEntry, SecretKeyEntry, TrustedCertificateEntry의 세 가지 항목을 관리합니다.
- PrivateKeyEntry
- SecretKeyEntry
- TrustedCertificateEntry
키 저장소에 키 저장
이 섹션에서는 키 저장소에 키를 저장하는 방법을 배웁니다. 키 저장소에 키를 저장하려면 아래 단계를 따르십시오.
1 단계 : KeyStore 객체 생성
그만큼 getInstance() 의 방법 KeyStore 클래스 java.security package는 키 저장소의 유형을 나타내는 문자열 값을 허용하고 KeyStore 객체를 반환합니다.
다음을 사용하여 KeyStore 클래스의 객체를 만듭니다. getInstance() 방법은 아래와 같습니다.
//Creating the KeyStore object
KeyStore keyStore = KeyStore.getInstance("JCEKS");
2 단계 : 키 저장소 개체로드
그만큼 load() KeyStore 클래스의 메소드는 키 저장소 파일을 나타내는 FileInputStream 객체와 KeyStore의 암호를 지정하는 String 매개 변수를받습니다.
일반적으로 키 저장소는 다음과 같은 파일에 저장됩니다. cacerts, 위치 C:/Program Files/Java/jre1.8.0_101/lib/security/ 기본 비밀번호는 changeit, load() 방법은 아래와 같습니다.
//Loading the KeyStore object
char[] password = "changeit".toCharArray();
String path = "C:/Program Files/Java/jre1.8.0_101/lib/security/cacerts";
java.io.FileInputStream fis = new FileInputStream(path);
keyStore.load(fis, password);
3 단계 : KeyStore.ProtectionParameter 개체 만들기
아래와 같이 KeyStore.ProtectionParameter를 인스턴스화합니다.
//Creating the KeyStore.ProtectionParameter object
KeyStore.ProtectionParameter protectionParam = new KeyStore.PasswordProtection(password);
4 단계 : SecretKey 객체 생성
만들기 SecretKey (인터페이스) Sub 클래스를 인스턴스화하여 개체 SecretKeySpec. 인스턴스화하는 동안 아래와 같이 생성자에 매개 변수로 암호와 알고리즘을 전달해야합니다.
//Creating SecretKey object
SecretKey mySecretKey = new SecretKeySpec(new String(keyPassword).getBytes(), "DSA");
5 단계 : SecretKeyEntry 객체 생성
개체 만들기 SecretKeyEntry 클래스를 전달하여 SecretKey 위의 단계에서 생성 된 객체는 아래와 같습니다.
//Creating SecretKeyEntry object
KeyStore.SecretKeyEntry secretKeyEntry = new KeyStore.SecretKeyEntry(mySecretKey);
6 단계 : 키 저장소에 항목 설정
그만큼 setEntry() 의 방법 KeyStore 클래스는 키 저장소 항목 별칭을 나타내는 String 매개 변수를받습니다. SecretKeyEntry 개체, ProtectionParameter 개체 및 지정된 별칭 아래에 항목을 저장합니다.
다음을 사용하여 항목을 키 저장소로 설정하십시오. setEntry() 방법은 아래와 같습니다.
//Set the entry to the keystore
keyStore.setEntry("secretKeyAlias", secretKeyEntry, protectionParam);
Example
다음 예에서는 "cacerts"파일 (Windows 10 운영 체제)에있는 키 저장소에 키를 저장합니다.
import java.io.FileInputStream;
import java.security.KeyStore;

import javax.crypto.SecretKey;
import javax.crypto.spec.SecretKeySpec;

public class StoringIntoKeyStore{
   public static void main(String args[]) throws Exception {
      //Creating the KeyStore object
      KeyStore keyStore = KeyStore.getInstance("JCEKS");

      //Loading the KeyStore object
      char[] password = "changeit".toCharArray();
      String path = "C:/Program Files/Java/jre1.8.0_101/lib/security/cacerts";
      java.io.FileInputStream fis = new FileInputStream(path);
      keyStore.load(fis, password);

      //Creating the KeyStore.ProtectionParameter object
      KeyStore.ProtectionParameter protectionParam = new KeyStore.PasswordProtection(password);

      //Creating SecretKey object
      SecretKey mySecretKey = new SecretKeySpec("myPassword".getBytes(), "DSA");

      //Creating SecretKeyEntry object
      KeyStore.SecretKeyEntry secretKeyEntry = new KeyStore.SecretKeyEntry(mySecretKey);
      keyStore.setEntry("secretKeyAlias", secretKeyEntry, protectionParam);

      //Storing the KeyStore object
      java.io.FileOutputStream fos = null;
      fos = new java.io.FileOutputStream("newKeyStoreName");
      keyStore.store(fos, password);
      System.out.println("data stored");
   }
}
Output
위의 프로그램은 다음과 같은 출력을 생성합니다-
System.out.println("data stored");이 장에서는 Java Cryptography를 사용하여 키 저장소에서 키를 검색하는 방법을 배웁니다.
키 저장소에서 키를 검색하려면 아래 단계를 따르십시오.
1 단계 : KeyStore 객체 생성
그만큼 getInstance() 의 방법 KeyStore 클래스 java.security package는 키 저장소의 유형을 나타내는 문자열 값을 허용하고 KeyStore 객체를 반환합니다.
아래와 같이이 메서드를 사용하여 KeyStore 클래스의 개체를 만듭니다.
//Creating the KeyStore object
KeyStore keyStore = KeyStore.getInstance("JCEKS");
2 단계 : 키 저장소 개체로드
그만큼 load() KeyStore 클래스의 메소드는 FileInputStream 키 저장소 파일을 나타내는 개체와 키 저장소의 암호를 지정하는 String 매개 변수입니다.
일반적으로 키 저장소는 다음과 같은 파일에 저장됩니다. cacerts, 위치 C:/Program Files/Java/jre1.8.0_101/lib/security/ 기본 비밀번호는 changeit, load() 방법은 아래와 같습니다.
//Loading the KeyStore object
char[] password = "changeit".toCharArray();
String path = "C:/Program Files/Java/jre1.8.0_101/lib/security/cacerts";
java.io.FileInputStream fis = new FileInputStream(path);
keyStore.load(fis, password);
3 단계 : KeyStore.ProtectionParameter 개체 만들기
아래와 같이 KeyStore.ProtectionParameter를 인스턴스화합니다.
//Creating the KeyStore.ProtectionParameter object
KeyStore.ProtectionParameter protectionParam = new KeyStore.PasswordProtection(password);
4 단계 : SecretKey 객체 생성
만들기 SecretKey (인터페이스) Sub 클래스를 인스턴스화하여 개체 SecretKeySpec. 인스턴스화하는 동안 아래와 같이 생성자에 매개 변수로 암호와 알고리즘을 전달해야합니다.
//Creating SecretKey object
SecretKey mySecretKey = new SecretKeySpec(new String(keyPassword).getBytes(), "DSA");
5 단계 : SecretKeyEntry 객체 생성
개체 만들기 SecretKeyEntry 클래스를 전달하여 SecretKey 위의 단계에서 생성 된 객체는 아래와 같습니다.
//Creating SecretKeyEntry object
KeyStore.SecretKeyEntry secretKeyEntry = new KeyStore.SecretKeyEntry(mySecretKey);
6 단계 : 키 저장소에 항목 설정
그만큼 setEntry() 의 방법 KeyStore 클래스는 키 저장소 항목 별칭을 나타내는 String 매개 변수를받습니다. SecretKeyEntry 개체, ProtectionParameter 개체 및 지정된 별칭 아래에 항목을 저장합니다.
다음을 사용하여 항목을 키 저장소로 설정하십시오. setEntry() 방법은 아래와 같습니다.
//Set the entry to the keystore
keyStore.setEntry("secretKeyAlias", secretKeyEntry, protectionParam);
7 단계 : KeyStore.SecretKeyEntry 개체 만들기
그만큼 getEntry() KeyStore 클래스의 메서드는 별칭 (String 매개 변수)과 ProtectionParameter 클래스의 개체를 매개 변수로 받아들이고 KeyStoreEntry 개체를 다음으로 캐스팅 할 수 있습니다. KeyStore.SecretKeyEntry 목적.
필수 키의 별칭과 이전 단계에서 만든 보호 매개 변수 개체를 다음 위치에 전달하여 KeyStore.SecretKeyEntry 클래스의 개체를 만듭니다. getEntry() 방법은 아래와 같습니다.
//Creating the KeyStore.SecretKeyEntry object
KeyStore.SecretKeyEntry secretKeyEnt = (KeyStore.SecretKeyEntry)keyStore.getEntry("secretKeyAlias", protectionParam);
8 단계 : 검색된 항목의 키 개체 만들기
그만큼 getSecretKey() 의 방법 SecretKeyEntry클래스는 SecretKey 객체를 반환합니다. 이 메서드를 사용하여 아래와 같이 SecretKey 개체를 만듭니다.
//Creating SecretKey object
SecretKey mysecretKey = secretKeyEnt.getSecretKey();
System.out.println(mysecretKey);
예
다음 예제는 키 저장소에서 키를 검색하는 방법을 보여줍니다. 여기서는 "cacerts"파일 (Windows 10 운영 체제)에있는 키 저장소에 키를 저장하고 검색 한 다음 키를 생성하는 데 사용 된 알고리즘 및 형식과 같은 일부 속성을 표시합니다. 검색된 키
import java.io.FileInputStream;
import java.security.KeyStore;
import java.security.KeyStore.ProtectionParameter;
import java.security.KeyStore.SecretKeyEntry;

import javax.crypto.SecretKey;
import javax.crypto.spec.SecretKeySpec;

public class RetrievingFromKeyStore{
   public static void main(String args[]) throws Exception{
      //Creating the KeyStore object
      KeyStore keyStore = KeyStore.getInstance("JCEKS");

      //Loading the the KeyStore object
      char[] password = "changeit".toCharArray();
      java.io.FileInputStream fis = new FileInputStream(
         "C:/Program Files/Java/jre1.8.0_101/lib/security/cacerts");

      keyStore.load(fis, password);

      //Creating the KeyStore.ProtectionParameter object
      ProtectionParameter protectionParam = new KeyStore.PasswordProtection(password);

      //Creating SecretKey object
      SecretKey mySecretKey = new SecretKeySpec("myPassword".getBytes(), "DSA");

      //Creating SecretKeyEntry object
      SecretKeyEntry secretKeyEntry = new SecretKeyEntry(mySecretKey);
      keyStore.setEntry("secretKeyAlias", secretKeyEntry, protectionParam);

      //Storing the KeyStore object
      java.io.FileOutputStream fos = null;
      fos = new java.io.FileOutputStream("newKeyStoreName");
      keyStore.store(fos, password);

      //Creating the KeyStore.SecretKeyEntry object
      SecretKeyEntry secretKeyEnt = (SecretKeyEntry)keyStore.getEntry("secretKeyAlias", protectionParam);

      //Creating SecretKey object
      SecretKey mysecretKey = secretKeyEnt.getSecretKey();
      System.out.println("Algorithm used to generate key : "+mysecretKey.getAlgorithm());
      System.out.println("Format used for the key: "+mysecretKey.getFormat());
   }
}
산출
위의 프로그램은 다음과 같은 출력을 생성합니다-
Algorithm used to generate key: DSA
Format of the key: RAW
Java는 KeyGenerator 이 클래스는 비밀 키를 생성하는 데 사용되며이 클래스의 객체는 재사용이 가능합니다.
KeyGenerator 클래스를 사용하여 키를 생성하려면 다음 단계를 따르십시오.
1 단계 : KeyGenerator 개체 만들기
그만큼 KeyGenerator 수업 제공 getInstance() 필요한 키 생성 알고리즘을 나타내는 String 변수를 받아들이고 비밀 키를 생성하는 KeyGenerator 객체를 반환하는 메서드입니다.
창조하다 KeyGenerator 개체를 사용하여 getInstance() 방법은 아래와 같습니다.
//Creating a KeyGenerator object
KeyGenerator keyGen = KeyGenerator.getInstance("DES");
2 단계 : SecureRandom 개체 만들기
그만큼 SecureRandom 클래스 java.Security패키지는 Java에서 난수를 생성하는 데 사용되는 강력한 난수 생성기를 제공합니다. 아래와 같이이 클래스를 인스턴스화합니다.
//Creating a SecureRandom object
SecureRandom secRandom = new SecureRandom();
3 단계 : KeyGenerator 초기화
그만큼 KeyGenerator 클래스는 init() 이 메서드는 SecureRandom 개체를 받아들이고 현재 KeyGenerator.
다음을 사용하여 이전 단계에서 만든 KeyGenerator 개체를 초기화합니다. init() 방법.
//Initializing the KeyGenerator
keyGen.init(secRandom);
예
다음 예제는 KeyGenerator 클래스를 사용하여 비밀 키의 키 생성을 보여줍니다. javax.crypto 꾸러미.
import javax.crypto.Cipher;
import javax.crypto.KeyGenerator;

import java.security.Key;
import java.security.SecureRandom;

public class KeyGeneratorExample {
   public static void main(String args[]) throws Exception{
      //Creating a KeyGenerator object
      KeyGenerator keyGen = KeyGenerator.getInstance("DES");

      //Creating a SecureRandom object
      SecureRandom secRandom = new SecureRandom();

      //Initializing the KeyGenerator
      keyGen.init(secRandom);

      //Creating/Generating a key
      Key key = keyGen.generateKey();

      System.out.println(key);
      Cipher cipher = Cipher.getInstance("DES/ECB/PKCS5Padding");
      cipher.init(cipher.ENCRYPT_MODE, key);

      String msg = new String("Hi how are you");
      byte[] bytes = cipher.doFinal(msg.getBytes());
      System.out.println(bytes);
   }
}
산출
위의 프로그램은 다음과 같은 출력을 생성합니다-
com.sun.crypto.provider.DESKey@18629
[B@2ac1fdc4
Java는 KeyPairGenerator수업. 이 클래스는 공개 및 개인 키 쌍을 생성하는 데 사용됩니다. 다음을 사용하여 키를 생성하려면KeyPairGenerator 아래 단계를 따르십시오.
1 단계 : KeyPairGenerator 개체 만들기
그만큼 KeyPairGenerator 수업 제공 getInstance() 필요한 키 생성 알고리즘을 나타내는 String 변수를 받아들이고 키를 생성하는 KeyPairGenerator 객체를 반환하는 메서드입니다.
창조하다 KeyPairGenerator 개체를 사용하여 getInstance() 방법은 아래와 같습니다.
//Creating KeyPair generator object
KeyPairGenerator keyPairGen = KeyPairGenerator.getInstance("DSA");
2 단계 : KeyPairGenerator 개체 초기화
그만큼 KeyPairGenerator 클래스는 initialize()이 메서드는 키 쌍 생성기를 초기화하는 데 사용됩니다. 이 메서드는 키 크기를 나타내는 정수 값을받습니다.
아래와 같이이 메서드를 사용하여 이전 단계에서 만든 KeyPairGenerator 개체를 초기화합니다.
//Initializing the KeyPairGenerator
keyPairGen.initialize(2048);
3 단계 : KeyPairGenerator 생성
당신은 생성 할 수 있습니다 KeyPair 사용하여 generateKeyPair() 의 방법 KeyPairGenerator수업. 아래와 같이이 방법을 사용하여 키 쌍을 생성합니다.
//Generate the pair of keys
KeyPair pair = keyPairGen.generateKeyPair();
4 단계 : 개인 키 / 공개 키 얻기
생성 된 KeyPair 객체에서 개인 키를 가져올 수 있습니다. getPrivate() 방법은 아래와 같습니다.
//Getting the private key from the key pair
PrivateKey privKey = pair.getPrivate();
다음을 사용하여 생성 된 KeyPair 객체에서 공개 키를 가져올 수 있습니다. getPublic() 방법은 아래와 같습니다.
//Getting the public key from the key pair
PublicKey publicKey = pair.getPublic();
예
다음 예제는 KeyPairGenerator 클래스를 사용하여 비밀 키의 키 생성을 보여줍니다. javax.crypto 꾸러미.
import java.security.KeyPair;
import java.security.KeyPairGenerator;
import java.security.PrivateKey;
import java.security.PublicKey;

public class KeyPairGenertor {
   public static void main(String args[]) throws Exception{
      //Creating KeyPair generator object
      KeyPairGenerator keyPairGen = KeyPairGenerator.getInstance("DSA");

      //Initializing the KeyPairGenerator
      keyPairGen.initialize(2048);

      //Generating the pair of keys
      KeyPair pair = keyPairGen.generateKeyPair();

      //Getting the private key from the key pair
      PrivateKey privKey = pair.getPrivate();

      //Getting the public key from the key pair
      PublicKey publicKey = pair.getPublic();
      System.out.println("Keys generated");
   }
}
산출
위의 프로그램은 다음과 같은 출력을 생성합니다-
Keys generated디지털 서명을 사용하면 작성자, 서명 날짜 및 시간을 확인하고 메시지 내용을 인증 할 수 있습니다. 추가 기능을위한 인증 기능도 포함되어 있습니다.

디지털 서명의 장점
이 섹션에서는 디지털 서명을 사용해야하는 여러 가지 이유에 대해 알아 봅니다. 통신에 디지털 서명을 구현하는 데는 몇 가지 이유가 있습니다.
입증
디지털 서명은 메시지 소스를 인증하는 데 도움이됩니다. 예를 들어 은행 지점이 중앙 사무실에 계정 잔액 변경을 요청하는 메시지를 보내는 경우입니다. 중앙 사무실에서 인증 된 소스에서 보낸 메시지를 인증 할 수없는 경우 이러한 요청을 수행하는 것은 심각한 실수가 될 수 있습니다.
청렴
메시지에 서명 한 후 메시지를 변경하면 서명이 무효화됩니다.
부인 방지
이 속성에 따라 일부 정보에 서명 한 법인은 나중에 서명을 거부 할 수 없습니다.
디지털 서명 생성
이제 디지털 서명을 만드는 방법을 알아 보겠습니다. 아래 단계에 따라 Java를 사용하여 디지털 서명을 만들 수 있습니다.
1 단계 : KeyPairGenerator 개체 만들기
그만큼 KeyPairGenerator 수업 제공 getInstance() 필요한 키 생성 알고리즘을 나타내는 String 변수를 받아들이고 키를 생성하는 KeyPairGenerator 객체를 반환하는 메서드입니다.
창조하다 KeyPairGenerator 개체를 사용하여 getInstance() 방법은 아래와 같습니다.
//Creating KeyPair generator object
KeyPairGenerator keyPairGen = KeyPairGenerator.getInstance("DSA");
2 단계 : KeyPairGenerator 개체 초기화
그만큼 KeyPairGenerator 클래스는 initialize()이 메서드는 키 쌍 생성기를 초기화하는 데 사용됩니다. 이 메서드는 키 크기를 나타내는 정수 값을받습니다.
다음을 사용하여 이전 단계에서 만든 KeyPairGenerator 개체를 초기화합니다. initialize() 방법은 아래와 같습니다.
//Initializing the KeyPairGenerator
keyPairGen.initialize(2048);
3 단계 : KeyPairGenerator 생성
당신은 생성 할 수 있습니다 KeyPair 사용하여 generateKeyPair()방법. 다음을 사용하여 키 쌍을 생성합니다.generateKeyPair() 방법은 아래와 같습니다.
//Generate the pair of keys
KeyPair pair = keyPairGen.generateKeyPair();
4 단계 : 쌍에서 개인 키 가져 오기
생성 된 KeyPair 객체에서 개인 키를 가져올 수 있습니다. getPrivate() 방법.
다음을 사용하여 개인 키를 가져옵니다. getPrivate() 방법은 아래와 같습니다.
//Getting the private key from the key pair
PrivateKey privKey = pair.getPrivate();
5 단계 : 서명 개체 만들기
그만큼 getInstance() 의 방법 Signature 클래스는 필요한 서명 알고리즘을 나타내는 문자열 매개 변수를 받아들이고 각각의 Signature 객체를 반환합니다.
다음을 사용하여 Signature 클래스의 객체를 만듭니다. getInstance() 방법.
//Creating a Signature object
Signature sign = Signature.getInstance("SHA256withDSA");
6 단계 : 서명 개체 초기화
그만큼 initSign() Signature 클래스의 메서드는 PrivateKey 현재 Signature 객체를 초기화합니다.
다음을 사용하여 이전 단계에서 만든 서명 개체를 초기화합니다. initSign() 방법은 아래와 같습니다.
//Initialize the signature
sign.initSign(privKey);
7 단계 : 서명 개체에 데이터 추가
그만큼 update() Signature 클래스의 메소드는 서명 또는 검증 할 데이터를 나타내는 바이트 배열을 받아들이고 주어진 데이터로 현재 객체를 업데이트합니다.
서명 할 데이터를 전달하여 초기화 된 Signature 객체를 update() 아래와 같이 바이트 배열 형태의 메서드.
byte[] bytes = "Hello how are you".getBytes();

//Adding data to the signature
sign.update(bytes);
8 단계 : 서명 계산
그만큼 sign() 의 방법 Signature 클래스는 업데이트 된 데이터의 서명 바이트를 반환합니다.
다음을 사용하여 서명을 계산합니다. sign() 방법은 아래와 같습니다.
//Calculating the signature
byte[] signature = sign.sign();
Example
다음 Java 프로그램은 사용자의 메시지를 수락하고 주어진 메시지에 대한 디지털 서명을 생성합니다.
import java.security.KeyPair;
import java.security.KeyPairGenerator;
import java.security.PrivateKey;
import java.security.Signature;
import java.util.Scanner;

public class CreatingDigitalSignature {
   public static void main(String args[]) throws Exception {
      //Accepting text from user
      Scanner sc = new Scanner(System.in);
      System.out.println("Enter some text");
      String msg = sc.nextLine();

      //Creating KeyPair generator object
      KeyPairGenerator keyPairGen = KeyPairGenerator.getInstance("DSA");

      //Initializing the key pair generator
      keyPairGen.initialize(2048);

      //Generate the pair of keys
      KeyPair pair = keyPairGen.generateKeyPair();

      //Getting the private key from the key pair
      PrivateKey privKey = pair.getPrivate();

      //Creating a Signature object
      Signature sign = Signature.getInstance("SHA256withDSA");

      //Initialize the signature
      sign.initSign(privKey);
      byte[] bytes = "msg".getBytes();

      //Adding data to the signature
      sign.update(bytes);

      //Calculating the signature
      byte[] signature = sign.sign();

      //Printing the signature
      System.out.println("Digital signature for given text: "+new String(signature, "UTF8"));
   }
}
Output
위의 프로그램은 다음과 같은 출력을 생성합니다-
Enter some text
Hi how are you
Digital signature for given text: 0=@gRD???-?.???? /yGL?i??a!?
Java를 사용하여 디지털 서명을 만들고 아래 단계에 따라 확인할 수 있습니다.
1 단계 : KeyPairGenerator 개체 만들기
그만큼 KeyPairGenerator 수업 제공 getInstance() 필요한 키 생성 알고리즘을 나타내는 String 변수를 받아들이고 키를 생성하는 KeyPairGenerator 객체를 반환하는 메서드입니다.
창조하다 KeyPairGenerator 개체를 사용하여 getInstance() 방법은 아래와 같습니다.
//Creating KeyPair generator object
KeyPairGenerator keyPairGen = KeyPairGenerator.getInstance("DSA");
2 단계 : KeyPairGenerator 개체 초기화
그만큼 KeyPairGenerator 클래스는 initialize()방법. 이 메서드는 키 쌍 생성기를 초기화하는 데 사용됩니다. 이 메서드는 키 크기를 나타내는 정수 값을받습니다.
다음을 사용하여 이전 단계에서 만든 KeyPairGenerator 개체를 초기화합니다. initialize() 방법은 아래와 같습니다.
//Initializing the KeyPairGenerator
keyPairGen.initialize(2048);
3 단계 : KeyPairGenerator 생성
당신은 생성 할 수 있습니다 KeyPair 사용하여 generateKeyPair()방법. 아래와 같이이 방법을 사용하여 키 쌍을 생성합니다.
//Generate the pair of keys
KeyPair pair = keyPairGen.generateKeyPair();
4 단계 : 쌍에서 개인 키 가져 오기
생성 된 KeyPair 객체에서 개인 키를 가져올 수 있습니다. getPrivate() 방법.
다음을 사용하여 개인 키를 가져옵니다. getPrivate() 방법은 아래와 같습니다.
//Getting the private key from the key pair
PrivateKey privKey = pair.getPrivate();
5 단계 : 서명 개체 만들기
그만큼 getInstance() 의 방법 Signature 클래스는 필요한 서명 알고리즘을 나타내는 문자열 매개 변수를 받아들이고 각각의 Signature 객체를 반환합니다.
다음을 사용하여 Signature 클래스의 객체를 만듭니다. getInstance() 방법.
//Creating a Signature object
Signature sign = Signature.getInstance("SHA256withDSA");
6 단계 : 서명 개체 초기화
그만큼 initSign() Signature 클래스의 메서드는 PrivateKey 현재 Signature 객체를 초기화합니다.
다음을 사용하여 이전 단계에서 만든 서명 개체를 초기화합니다. initSign() 방법은 아래와 같습니다.
//Initialize the signature
sign.initSign(privKey);
7 단계 : 서명 개체에 데이터 추가
그만큼 update() Signature 클래스의 메소드는 서명 또는 검증 할 데이터를 나타내는 바이트 배열을 받아들이고 주어진 데이터로 현재 객체를 업데이트합니다.
서명 할 데이터를 전달하여 초기화 된 Signature 객체를 update() 아래와 같이 바이트 배열 형태의 메서드.
byte[] bytes = "Hello how are you".getBytes();

//Adding data to the signature
sign.update(bytes);
8 단계 : 서명 계산
그만큼 sign() 의 방법 Signature 클래스는 업데이트 된 데이터의 서명 바이트를 반환합니다.
아래와 같이 sign () 메서드를 사용하여 서명을 계산합니다.
//Calculating the signature
byte[] signature = sign.sign();
9 단계 : 확인을 위해 서명 개체 초기화
서명 개체를 확인하려면 먼저 다음을 사용하여 초기화해야합니다. initVerify() 방법 it 메서드는 PublicKey 목적.
따라서 확인을 위해 Signature 객체를 초기화하십시오. initVerify() 방법은 아래와 같습니다.
//Initializing the signature
sign.initVerify(pair.getPublic());
10 단계 : 확인할 데이터 업데이트
초기화 된 (검증 용) 객체를 아래와 같이 업데이트 방법을 사용하여 검증 할 데이터로 업데이트합니다.
//Update the data to be verified
sign.update(bytes);
11 단계 : 서명 확인
그만큼 verify()Signature 클래스의 메소드는 다른 서명 객체를 받아 현재 객체로 확인합니다. 일치가 발생하면 true를 반환하고 그렇지 않으면 false를 반환합니다.
아래와 같이이 방법을 사용하여 서명을 확인하십시오.
//Verify the signature
boolean bool = sign.verify(signature);
예
다음 Java 프로그램은 사용자의 메시지를 수락하고 지정된 메시지에 대한 디지털 서명을 생성하고 확인합니다.
import java.security.KeyPair;
import java.security.KeyPairGenerator;
import java.security.PrivateKey;
import java.security.Signature;

import java.util.Scanner;

public class SignatureVerification {
   public static void main(String args[]) throws Exception{
      //Creating KeyPair generator object
      KeyPairGenerator keyPairGen = KeyPairGenerator.getInstance("DSA");

      //Initializing the key pair generator
      keyPairGen.initialize(2048);

      //Generate the pair of keys
      KeyPair pair = keyPairGen.generateKeyPair();

      //Getting the privatekey from the key pair
      PrivateKey privKey = pair.getPrivate();

      //Creating a Signature object
      Signature sign = Signature.getInstance("SHA256withDSA");

      //Initializing the signature
      sign.initSign(privKey);
      byte[] bytes = "Hello how are you".getBytes();

      //Adding data to the signature
      sign.update(bytes);

      //Calculating the signature
      byte[] signature = sign.sign();

      //Initializing the signature
      sign.initVerify(pair.getPublic());
      sign.update(bytes);

      //Verifying the signature
      boolean bool = sign.verify(signature);

      if(bool) {
         System.out.println("Signature verified");
      } else {
         System.out.println("Signature failed");
      }
   }
}
산출
위의 프로그램은 다음과 같은 출력을 생성합니다-
Signature verifiedCipher 클래스를 사용하여 주어진 데이터를 암호화 할 수 있습니다. javax.crypto꾸러미. Java를 사용하여 주어진 데이터를 암호화하려면 아래 단계를 따르십시오.
1 단계 : KeyPairGenerator 개체 만들기
그만큼 KeyPairGenerator 수업 제공 getInstance() 필요한 키 생성 알고리즘을 나타내는 String 변수를 받아들이고 키를 생성하는 KeyPairGenerator 객체를 반환하는 메서드입니다.
창조하다 KeyPairGenerator 개체를 사용하여 getInstance() 방법은 아래와 같습니다.
//Creating KeyPair generator object
KeyPairGenerator keyPairGen = KeyPairGenerator.getInstance("DSA");
2 단계 : KeyPairGenerator 개체 초기화
그만큼 KeyPairGenerator 클래스는 initialize()이 메서드는 키 쌍 생성기를 초기화하는 데 사용됩니다. 이 메서드는 키 크기를 나타내는 정수 값을받습니다.
다음을 사용하여 이전 단계에서 만든 KeyPairGenerator 개체를 초기화합니다. initialize() 방법은 아래와 같습니다.
//Initializing the KeyPairGenerator
keyPairGen.initialize(2048);
3 단계 : KeyPairGenerator 생성
당신은 생성 할 수 있습니다 KeyPair 사용하여 generateKeyPair() 의 방법 KeyPairGenerator수업. 아래와 같이이 방법을 사용하여 키 쌍을 생성합니다.
//Generate the pair of keys
KeyPair pair = keyPairGen.generateKeyPair();
4 단계 : 공개 키 얻기
생성 된 공개 키를 얻을 수 있습니다. KeyPair 개체를 사용하여 getPublic() 방법은 아래와 같습니다.
아래와 같이이 방법을 사용하여 공개 키를 가져옵니다.
//Getting the public key from the key pair
PublicKey publicKey = pair.getPublic();
5 단계 : Cipher 객체 생성
그만큼 getInstance() 의 방법 Cipher 클래스는 필요한 변환을 나타내는 String 변수를 받아들이고 주어진 변환을 구현하는 Cipher 객체를 반환합니다.
다음을 사용하여 Cipher 객체를 만듭니다. getInstance() 방법은 아래와 같습니다.
//Creating a Cipher object
Cipher cipher = Cipher.getInstance("RSA/ECB/PKCS1Padding");
6 단계 : Cipher 개체 초기화
그만큼 init() 의 방법 Cipher 클래스는 작동 모드 (암호화 / 복호화)를 나타내는 정수 매개 변수와 공개 키를 나타내는 Key 객체의 두 매개 변수를받습니다.
다음을 사용하여 Cypher 개체를 초기화합니다. init() 방법은 아래와 같습니다.
//Initializing a Cipher object
cipher.init(Cipher.ENCRYPT_MODE, publicKey);
7 단계 : Cipher 개체에 데이터 추가
그만큼 update() Cipher 클래스의 메소드는 암호화 할 데이터를 나타내는 바이트 배열을 받아들이고 주어진 데이터로 현재 객체를 업데이트합니다.
데이터를 다음으로 전달하여 초기화 된 Cipher 객체를 업데이트합니다. update() 아래와 같이 바이트 배열 형태의 메서드.
//Adding data to the cipher
byte[] input = "Welcome to Tutorialspoint".getBytes();
cipher.update(input);
8 단계 : 데이터 암호화
그만큼 doFinal()Cipher 클래스의 메소드는 암호화 작업을 완료합니다. 따라서 아래와 같이이 방법을 사용하여 암호화를 완료하십시오.
//Encrypting the data
byte[] cipherText = cipher.doFinal();
예
다음 Java 프로그램은 사용자로부터 텍스트를 받아 RSA 알고리즘을 사용하여 암호화하고 주어진 텍스트의 암호화 된 형식을 인쇄합니다.
import java.security.KeyPair;
import java.security.KeyPairGenerator;
import java.security.Signature;

import javax.crypto.BadPaddingException;
import javax.crypto.Cipher;

public class CipherSample {
   public static void main(String args[]) throws Exception{
      //Creating a Signature object
      Signature sign = Signature.getInstance("SHA256withRSA");

      //Creating KeyPair generator object
      KeyPairGenerator keyPairGen = KeyPairGenerator.getInstance("RSA");

      //Initializing the key pair generator
      keyPairGen.initialize(2048);

      //Generating the pair of keys
      KeyPair pair = keyPairGen.generateKeyPair();

      //Creating a Cipher object
      Cipher cipher = Cipher.getInstance("RSA/ECB/PKCS1Padding");

      //Initializing a Cipher object
      cipher.init(Cipher.ENCRYPT_MODE, pair.getPublic());

      //Adding data to the cipher
      byte[] input = "Welcome to Tutorialspoint".getBytes();
      cipher.update(input);

      //encrypting the data
      byte[] cipherText = cipher.doFinal();
      System.out.println(new String(cipherText, "UTF8"));
   }
}
산출
위의 프로그램은 다음과 같은 출력을 생성합니다-
Encrypted Text:
"???:]J_?]???;Xl??????*@??u???r??=T&???_?_??.??i?????(?$_f?zD??????ZGH??g??? g?E:_??bz^??f?~o???t?}??u=uzp\UI????Z??l[?G?3??Y?UAEfKT?f?O??N_?d__?????a_?15%?^? 'p?_?$,9"{??^??y??_?t???,?W?PCW??~??[?$??????e????f?Y-Zi__??_??w?_?&QT??`?`~?[?K_??_???
암호화 된 데이터는 암호 클래스를 사용하여 해독 할 수 있습니다. javax.crypto꾸러미. Java를 사용하여 주어진 데이터를 해독하려면 아래 단계를 따르십시오.
1 단계 : KeyPairGenerator 개체 만들기
그만큼 KeyPairGenerator 수업 제공 getInstance() 필요한 키 생성 알고리즘을 나타내는 String 변수를 받아들이고 키를 생성하는 KeyPairGenerator 객체를 반환하는 메서드입니다.
창조하다 KeyPairGenerator 개체를 사용하여 getInstance() 방법은 아래와 같습니다.
//Creating KeyPair generator object
KeyPairGenerator keyPairGen = KeyPairGenerator.getInstance("DSA");
2 단계 : KeyPairGenerator 개체 초기화
그만큼 KeyPairGenerator 클래스는 initialize()이 메서드는 키 쌍 생성기를 초기화하는 데 사용됩니다. 이 메서드는 키 크기를 나타내는 정수 값을받습니다.
다음을 사용하여 이전 단계에서 만든 KeyPairGenerator 개체를 초기화합니다. initialize() 방법은 아래와 같습니다.
//Initializing the KeyPairGenerator
keyPairGen.initialize(2048);
3 단계 : KeyPairGenerator 생성
당신은 생성 할 수 있습니다 KeyPair 사용하여 generateKeyPair() 의 방법 KeyPairGenerator수업. 아래와 같이이 방법을 사용하여 키 쌍을 생성합니다.
//Generate the pair of keys
KeyPair pair = keyPairGen.generateKeyPair();
4 단계 : 공개 키 얻기
다음을 사용하여 생성 된 KeyPair 객체에서 공개 키를 가져올 수 있습니다. getPublic() 방법은 아래와 같습니다.
//Getting the public key from the key pair
PublicKey publicKey = pair.getPublic();
5 단계 : Cipher 객체 생성
그만큼 getInstance() 의 방법 Cipher 클래스는 필요한 변환을 나타내는 String 변수를 받아들이고 주어진 변환을 구현하는 Cipher 객체를 반환합니다.
다음을 사용하여 Cipher 객체를 만듭니다. getInstance() 방법은 아래와 같습니다.
//Creating a Cipher object
Cipher cipher = Cipher.getInstance("RSA/ECB/PKCS1Padding");
6 단계 : Cipher 개체 초기화
그만큼 init() Cipher 클래스의 메소드는 두 개의 매개 변수를 허용합니다.
- 작동 모드 (암호화 / 복호화)를 나타내는 정수 매개 변수
- 공개 키를 나타내는 키 개체
다음을 사용하여 Cypher 개체를 초기화합니다. init() 방법은 아래와 같습니다.
//Initializing a Cipher object
cipher.init(Cipher.ENCRYPT_MODE, publicKey);
7 단계 : Cipher 개체에 데이터 추가
그만큼 update() Cipher 클래스의 메소드는 암호화 할 데이터를 나타내는 바이트 배열을 받아들이고 주어진 데이터로 현재 객체를 업데이트합니다.
데이터를 다음으로 전달하여 초기화 된 Cipher 객체를 업데이트합니다. update() 아래와 같이 바이트 배열 형태의 메서드.
//Adding data to the cipher
byte[] input = "Welcome to Tutorialspoint".getBytes();
cipher.update(input);
8 단계 : 데이터 암호화
그만큼 doFinal()Cipher 클래스의 메소드는 암호화 작업을 완료합니다. 따라서 아래와 같이이 방법을 사용하여 암호화를 완료하십시오.
//Encrypting the data
byte[] cipherText = cipher.doFinal();
9 단계 : 암호 해독을 위해 Cipher 개체 초기화
이전 단계에서 암호화 된 암호를 해독하려면 암호 해독을 위해 초기화해야합니다.
따라서 아래와 같이 Cipher.DECRYPT_MODE 및 PrivateKey 개체 매개 변수를 전달하여 암호 개체를 초기화하십시오.
//Initializing the same cipher for decryption
cipher.init(Cipher.DECRYPT_MODE, pair.getPrivate());
10 단계 : 데이터 해독
마지막으로 다음을 사용하여 암호화 된 텍스트를 해독합니다. doFinal() 방법은 아래와 같습니다.
//Decrypting the text
byte[] decipheredText = cipher.doFinal(cipherText);
예
다음 Java 프로그램은 사용자로부터 텍스트를 받아 RSA 알고리즘을 사용하여 암호화하고, 주어진 텍스트의 암호를 인쇄하고, 암호를 해독하고, 해독 된 텍스트를 다시 인쇄합니다.
import java.security.KeyPair;
import java.security.KeyPairGenerator;
import java.security.Signature;

import javax.crypto.Cipher;

public class CipherDecrypt {
   public static void main(String args[]) throws Exception{
	   //Creating a Signature object
      Signature sign = Signature.getInstance("SHA256withRSA");

      //Creating KeyPair generator object
      KeyPairGenerator keyPairGen = KeyPairGenerator.getInstance("RSA");

      //Initializing the key pair generator
      keyPairGen.initialize(2048);

      //Generate the pair of keys
      KeyPair pair = keyPairGen.generateKeyPair();

      //Getting the public key from the key pair
      PublicKey publicKey = pair.getPublic();

      //Creating a Cipher object
      Cipher cipher = Cipher.getInstance("RSA/ECB/PKCS1Padding");

      //Initializing a Cipher object
      cipher.init(Cipher.ENCRYPT_MODE, publicKey);

      //Add data to the cipher
      byte[] input = "Welcome to Tutorialspoint".getBytes();
      cipher.update(input);

      //encrypting the data
      byte[] cipherText = cipher.doFinal();
      System.out.println( new String(cipherText, "UTF8"));

      //Initializing the same cipher for decryption
      cipher.init(Cipher.DECRYPT_MODE, pair.getPrivate());

      //Decrypting the text
      byte[] decipheredText = cipher.doFinal(cipherText);
      System.out.println(new String(decipheredText));
   }
}
산출
위의 프로그램은 다음과 같은 출력을 생성합니다-
Encrypted Text:
]/[?F3?D?p
v?w?!?H???^?A??????P?u??FA?
?
???_?? ???_jMH-??>??OP?'?j?_?n`
?_??'`????o??_GL??g???g_f?????f|???LT?|?Vz_TDu#??\?<b,,?$C2???Bq?#?lDB`??g,^??K?_?v???`}
?;LX?a?_5e???#???_?6?/B&B_???^?__Ap^#_?q?IEh????_?,??*??]~_?_?D?
_y???lp??a?P_U{

Decrypted Text:
Welcome to Tutorialspoint