JPA-고급 매핑
JPA는 Java 사양으로 출시 된 라이브러리입니다. 따라서 엔터티 지속성을위한 모든 개체 지향 개념을 지원합니다. 지금까지 우리는 객체 관계형 매핑의 기초를 마쳤습니다. 이 장에서는 개체와 관계형 엔터티 간의 고급 매핑에 대해 설명합니다.
상속 전략
상속은 객체 지향 언어의 핵심 개념이므로 엔티티 간의 상속 관계 또는 전략을 사용할 수 있습니다. JPA는 SINGLE_TABLE, JOINED_TABLE 및 TABLE_PER_CONCRETE_CLASS와 같은 세 가지 유형의 상속 전략을 지원합니다.
Staff, TeachingStaff, NonTeachingStaff 클래스와 그 관계의 예를 다음과 같이 고려해 보겠습니다.
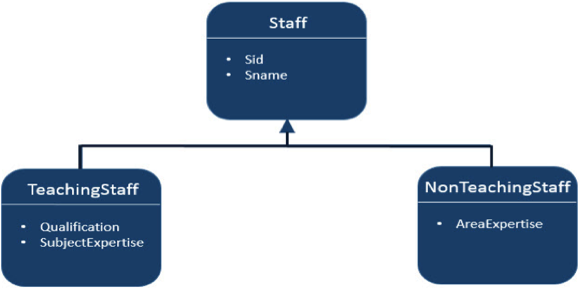
위의 다이어그램에서 Staff는 엔티티이고 TeachingStaff 및 NonTeachingStaff는 Staff의 하위 엔티티입니다. 여기에서는 세 가지 상속 전략 모두에서 위의 예를 논의 할 것입니다.
단일 테이블 전략
단일 테이블 전략은 모든 클래스 필드 (수퍼 및 하위 클래스 모두)를 가져와 SINGLE_TABLE 전략이라는 단일 테이블로 매핑합니다. 여기서 판별 자 값은 하나의 테이블에서 세 항목의 값을 차별화하는 데 핵심적인 역할을합니다.
위의 예를 살펴 보겠습니다. TeachingStaff 및 NonTeachingStaff는 Staff 클래스의 하위 클래스입니다. 상속의 개념 (하위 클래스별로 수퍼 클래스의 속성을 상속하는 메커니즘)을 상기 시키십시오. 따라서 sid, sname은 TeachingStaff 및 NonTeachingStaff 모두에 속하는 필드입니다. JPA 프로젝트를 만듭니다. 이 프로젝트의 모든 모듈은 다음과 같습니다.
엔티티 생성
이름이 지정된 패키지 만들기 ‘com.tutorialspoint.eclipselink.entity’ 아래에 ‘src’꾸러미. 새 Java 클래스를 작성하십시오.Staff.java주어진 패키지에서. Staff 엔터티 클래스는 다음과 같이 표시됩니다.
package com.tutorialspoint.eclipselink.entity;

import java.io.Serializable;

import javax.persistence.DiscriminatorColumn;
import javax.persistence.Entity;
import javax.persistence.GeneratedValue;
import javax.persistence.GenerationType;
import javax.persistence.Id;
import javax.persistence.Inheritance;
import javax.persistence.InheritanceType;
import javax.persistence.Table;

@Entity
@Table
@Inheritance( strategy = InheritanceType.SINGLE_TABLE )
@DiscriminatorColumn( name = "type" )

public class Staff implements Serializable {
   @Id
   @GeneratedValue( strategy = GenerationType.AUTO )

   private int sid;
   private String sname;

   public Staff( int sid, String sname ) {
      super( );
      this.sid = sid;
      this.sname = sname;
   }

   public Staff( ) {
      super( );
   }

   public int getSid( ) {
      return sid;
   }

   public void setSid( int sid ) {
      this.sid = sid;
   }

   public String getSname( ) {
      return sname;
   }

   public void setSname( String sname ) {
      this.sname = sname;
   }
}
위의 코드에서 @DescriminatorColumn 필드 이름을 지정합니다. (type) 그 값은 나머지 (Teaching 및 NonTeachingStaff) 필드를 표시합니다.
Staff 클래스에 대한 하위 클래스 (클래스) 만들기 TeachingStaff.java 아래의 com.tutorialspoint.eclipselink.entity꾸러미. TeachingStaff Entity 클래스는 다음과 같이 표시됩니다.
package com.tutorialspoint.eclipselink.entity;

import javax.persistence.DiscriminatorValue;
import javax.persistence.Entity;

@Entity
@DiscriminatorValue( value="TS" )
public class TeachingStaff extends Staff {

   private String qualification;
   private String subjectexpertise;

   public TeachingStaff( int sid, String sname,

   String qualification,String subjectexpertise ) {
      super( sid, sname );
      this.qualification = qualification;
      this.subjectexpertise = subjectexpertise;
   }

   public TeachingStaff( ) {
      super( );
   }

   public String getQualification( ){
      return qualification;
   }

   public void setQualification( String qualification ){
      this.qualification = qualification;
   }

   public String getSubjectexpertise( ) {
      return subjectexpertise;
   }

   public void setSubjectexpertise( String subjectexpertise ){
      this.subjectexpertise = subjectexpertise;
   }
}
Staff 클래스에 대한 하위 클래스 (클래스) 만들기 NonTeachingStaff.java 아래의 com.tutorialspoint.eclipselink.entity꾸러미. NonTeachingStaff Entity 클래스는 다음과 같이 표시됩니다.
package com.tutorialspoint.eclipselink.entity;

import javax.persistence.DiscriminatorValue;
import javax.persistence.Entity;

@Entity
@DiscriminatorValue( value = "NS" )

public class NonTeachingStaff extends Staff {
   private String areaexpertise;

   public NonTeachingStaff( int sid, String sname, String areaexpertise ) {
      super( sid, sname );
      this.areaexpertise = areaexpertise;
   }

   public NonTeachingStaff( ) {
      super( );
   }

   public String getAreaexpertise( ) {
      return areaexpertise;
   }

   public void setAreaexpertise( String areaexpertise ){
      this.areaexpertise = areaexpertise;
   }
}
Persistence.xml
Persistence.xml 파일에는 데이터베이스의 구성 정보와 엔티티 클래스의 등록 정보가 포함되어 있습니다. xml 파일은 다음과 같이 표시됩니다.
<?xml version="1.0" encoding="UTF-8"?>

<persistence version="2.0" xmlns="http://java.sun.com/xml/ns/persistence"
   xmlns:xsi="http://www.w3.org/2001/XMLSchema-instance"
   xsi:schemaLocation="http://java.sun.com/xml/ns/persistence
   http://java.sun.com/xml/ns/persistence/persistence_2_0.xsd">

   <persistence-unit name="Eclipselink_JPA" transaction-type="RESOURCE_LOCAL">

      <class>com.tutorialspoint.eclipselink.entity.Staff</class>
      <class>com.tutorialspoint.eclipselink.entity.NonTeachingStaff</class>
      <class>com.tutorialspoint.eclipselink.entity.TeachingStaff</class>

      <properties>
         <property name="javax.persistence.jdbc.url" value="jdbc:mysql://localhost:3306/jpadb"/>
         <property name="javax.persistence.jdbc.user" value="root"/>
         <property name="javax.persistence.jdbc.password" value="root"/>
         <property name="javax.persistence.jdbc.driver" value="com.mysql.jdbc.Driver"/>
         <property name="eclipselink.logging.level" value="FINE"/>
         <property name="eclipselink.ddl-generation" value="create-tables"/>
      </properties>

   </persistence-unit>
</persistence>
서비스 등급
서비스 클래스는 비즈니스 구성 요소의 구현 부분입니다. 아래에 패키지 만들기‘src’ 패키지 이름 ‘com.tutorialspoint.eclipselink.service’.
Staff, TeachingStaff 및 NonTeachingStaff 클래스 필드를 저장하기 위해 지정된 패키지 아래에 SaveClient.java라는 클래스를 작성하십시오. SaveClient 클래스는 다음과 같이 표시됩니다.
package com.tutorialspoint.eclipselink.service;

import javax.persistence.EntityManager;
import javax.persistence.EntityManagerFactory;
import javax.persistence.Persistence;
import com.tutorialspoint.eclipselink.entity.NonTeachingStaff;
import com.tutorialspoint.eclipselink.entity.TeachingStaff;

public class SaveClient {

   public static void main( String[ ] args ) {

      EntityManagerFactory emfactory = Persistence.createEntityManagerFactory( "Eclipselink_JPA" );
      EntityManager entitymanager = emfactory.createEntityManager( );
      entitymanager.getTransaction( ).begin( );

      //Teaching staff entity
      TeachingStaff ts1=new TeachingStaff(1,"Gopal","MSc MEd","Maths");
      TeachingStaff ts2=new TeachingStaff(2, "Manisha", "BSc BEd", "English");

      //Non-Teaching Staff entity
      NonTeachingStaff nts1=new NonTeachingStaff(3, "Satish", "Accounts");
      NonTeachingStaff nts2=new NonTeachingStaff(4, "Krishna", "Office Admin");

      //storing all entities
      entitymanager.persist(ts1);
      entitymanager.persist(ts2);
      entitymanager.persist(nts1);
      entitymanager.persist(nts2);

      entitymanager.getTransaction().commit();

      entitymanager.close();
      emfactory.close();
   }
}
위 프로그램을 컴파일하고 실행하면 Eclipse IDE의 콘솔 패널에 알림이 표시됩니다. MySQL 워크 벤치에서 출력을 확인하십시오. 표 형식의 출력은 다음과 같이 표시됩니다.
| 시드 | 유형 | 이름 | 분야 전문성 | 자격 | 과목 전문성 |
|---|---|---|---|---|---|
| 1 | TS | 고팔 | MSC MED | 수학 | |
| 2 | TS | 마니 샤 | BSC 침대 | 영어 | |
| 삼 | NS | Satish | 계정 | ||
| 4 | NS | 크리슈나 | 사무실 관리자 |
마지막으로 세 개의 클래스 필드를 모두 포함하고 이름이 지정된 판별 자 열과 다른 단일 테이블을 얻게됩니다. ‘Type’ (들).
조인 테이블 전략
조인 된 테이블 전략은 테이블을 조인하고 쉽게 트랜잭션을 수행하기 위해 고유 한 값을 포함하는 참조 된 열을 공유하는 것입니다. 위와 같은 예를 살펴 보겠습니다.
JPA 프로젝트를 만듭니다. 다음과 같이 표시된 모든 프로젝트 모듈 :
엔티티 생성
이름이 지정된 패키지 만들기 ‘com.tutorialspoint.eclipselink.entity’ 아래에 ‘src’꾸러미. 새 Java 클래스를 작성하십시오.Staff.java주어진 패키지에서. Staff 엔터티 클래스는 다음과 같이 표시됩니다.
package com.tutorialspoint.eclipselink.entity;

import java.io.Serializable;

import javax.persistence.Entity;
import javax.persistence.GeneratedValue;
import javax.persistence.GenerationType;
import javax.persistence.Id;
import javax.persistence.Inheritance;
import javax.persistence.InheritanceType;
import javax.persistence.Table;

@Entity
@Table
@Inheritance( strategy = InheritanceType.JOINED )

public class Staff implements Serializable {

   @Id
   @GeneratedValue( strategy = GenerationType.AUTO )

   private int sid;
   private String sname;

   public Staff( int sid, String sname ) {
      super( );
      this.sid = sid;
      this.sname = sname;
   }

   public Staff( ) {
      super( );
   }

   public int getSid( ) {
      return sid;
   }

   public void setSid( int sid ) {
      this.sid = sid;
   }

   public String getSname( ) {
      return sname;
   }

   public void setSname( String sname ) {
      this.sname = sname;
   }
}
Staff 클래스에 대한 하위 클래스 (클래스) 만들기 TeachingStaff.java 아래의 com.tutorialspoint.eclipselink.entity꾸러미. TeachingStaff Entity 클래스는 다음과 같이 표시됩니다.
package com.tutorialspoint.eclipselink.entity;

import javax.persistence.DiscriminatorValue;
import javax.persistence.Entity;

@Entity
@PrimaryKeyJoinColumn(referencedColumnName="sid")

public class TeachingStaff extends Staff {
   private String qualification;
   private String subjectexpertise;

   public TeachingStaff( int sid, String sname,

   String qualification,String subjectexpertise ) {
      super( sid, sname );
      this.qualification = qualification;
      this.subjectexpertise = subjectexpertise;
   }

   public TeachingStaff( ) {
      super( );
   }

   public String getQualification( ){
      return qualification;
   }

   public void setQualification( String qualification ){
      this.qualification = qualification;
   }

   public String getSubjectexpertise( ) {
      return subjectexpertise;
   }

   public void setSubjectexpertise( String subjectexpertise ){
      this.subjectexpertise = subjectexpertise;
   }
}
Staff 클래스에 대한 하위 클래스 (클래스) 만들기 NonTeachingStaff.java 아래의 com.tutorialspoint.eclipselink.entity꾸러미. NonTeachingStaff Entity 클래스는 다음과 같이 표시됩니다.
package com.tutorialspoint.eclipselink.entity;

import javax.persistence.DiscriminatorValue;
import javax.persistence.Entity;

@Entity
@PrimaryKeyJoinColumn(referencedColumnName="sid")

public class NonTeachingStaff extends Staff {
   private String areaexpertise;

   public NonTeachingStaff( int sid, String sname, String areaexpertise ) {
      super( sid, sname );
      this.areaexpertise = areaexpertise;
   }

   public NonTeachingStaff( ) {
      super( );
   }

   public String getAreaexpertise( ) {
      return areaexpertise;
   }

   public void setAreaexpertise( String areaexpertise ) {
      this.areaexpertise = areaexpertise;
   }
}
Persistence.xml
Persistence.xml 파일에는 데이터베이스의 구성 정보와 엔티티 클래스의 등록 정보가 포함되어 있습니다. xml 파일은 다음과 같이 표시됩니다.
<?xml version = "1.0" encoding = "UTF-8"?>

<persistence version = "2.0" xmlns = "http://java.sun.com/xml/ns/persistence"
   xmlns:xsi = "http://www.w3.org/2001/XMLSchema-instance"
   xsi:schemaLocation = "http://java.sun.com/xml/ns/persistence
   http://java.sun.com/xml/ns/persistence/persistence_2_0.xsd">

   <persistence-unit name = "Eclipselink_JPA" transaction-type = "RESOURCE_LOCAL">
      <class>com.tutorialspoint.eclipselink.entity.Staff</class>
      <class>com.tutorialspoint.eclipselink.entity.NonTeachingStaff</class>
      <class>com.tutorialspoint.eclipselink.entity.TeachingStaff</class>

      <properties>
         <property name = "javax.persistence.jdbc.url" value = "jdbc:mysql://localhost:3306/jpadb"/>
         <property name = "javax.persistence.jdbc.user" value = "root"/>
         <property name = "javax.persistence.jdbc.password" value = "root"/>
         <property name = "javax.persistence.jdbc.driver" value = "com.mysql.jdbc.Driver"/>
         <property name = "eclipselink.logging.level" value = "FINE"/>
         <property name = "eclipselink.ddl-generation" value = "create-tables"/>
      </properties>

   </persistence-unit>
</persistence>
서비스 등급
서비스 클래스는 비즈니스 구성 요소의 구현 부분입니다. 아래에 패키지 만들기‘src’ 패키지 이름 ‘com.tutorialspoint.eclipselink.service’.
Staff, TeachingStaff 및 NonTeachingStaff 클래스 필드를 저장하기 위해 지정된 패키지 아래에 SaveClient.java라는 클래스를 작성하십시오. 그런 다음 SaveClient 클래스는 다음과 같습니다.
package com.tutorialspoint.eclipselink.service;

import javax.persistence.EntityManager;
import javax.persistence.EntityManagerFactory;
import javax.persistence.Persistence;
import com.tutorialspoint.eclipselink.entity.NonTeachingStaff;
import com.tutorialspoint.eclipselink.entity.TeachingStaff;

public class SaveClient {
   public static void main( String[ ] args ) {
      EntityManagerFactory emfactory = Persistence.createEntityManagerFactory( "Eclipselink_JPA" );
      EntityManager entitymanager = emfactory.createEntityManager( );
      entitymanager.getTransaction( ).begin( );

      //Teaching staff entity
      TeachingStaff ts1 = new TeachingStaff(1,"Gopal","MSc MEd","Maths");
      TeachingStaff ts2 = new TeachingStaff(2, "Manisha", "BSc BEd", "English");

      //Non-Teaching Staff entity
      NonTeachingStaff nts1 = new NonTeachingStaff(3, "Satish", "Accounts");
      NonTeachingStaff nts2 = new NonTeachingStaff(4, "Krishna", "Office Admin");

      //storing all entities
      entitymanager.persist(ts1);
      entitymanager.persist(ts2);
      entitymanager.persist(nts1);
      entitymanager.persist(nts2);

      entitymanager.getTransaction().commit();
      entitymanager.close();
      emfactory.close();
   }
}
위 프로그램을 컴파일하고 실행하면 Eclipse IDE의 콘솔 패널에 알림이 표시됩니다. 출력을 위해 다음과 같이 MySQL 워크 벤치를 확인하십시오.
여기에 세 개의 테이블이 생성되고 staff 표 형식의 표는 다음과 같이 표시됩니다.
| 시드 | D 타입 | 이름 |
|---|---|---|
| 1 | 교원 | 고팔 |
| 2 | 교원 | 마니 샤 |
| 삼 | 비 교육 직원 | Satish |
| 4 | 비 교육 직원 | 크리슈나 |
결과 TeachingStaff 표 형식의 표는 다음과 같이 표시됩니다.
| 시드 | 자격 | 과목 전문성 |
|---|---|---|
| 1 | MSC MED | 수학 |
| 2 | BSC 침대 | 영어 |
위의 표에서 sid는 외래 키 (참조 필드 양식 staff table)의 결과입니다. NonTeachingStaff 표 형식의 표는 다음과 같이 표시됩니다.
| 시드 | 분야 전문성 |
|---|---|
| 삼 | 계정 |
| 4 | 사무실 관리자 |
마지막으로 세 테이블은 각각 해당 필드를 사용하여 생성되고 SID 필드는 세 테이블 모두에서 공유됩니다. 직원 테이블에서 SID는 기본 키이고 나머지 (TeachingStaff 및 NonTeachingStaff) 테이블에서는 SID가 외래 키입니다.
클래스 전략 별 테이블
클래스 별 테이블 전략은 각 하위 엔터티에 대한 테이블을 만드는 것입니다. 직원 테이블이 생성되지만 null 레코드가 포함됩니다. Staff 테이블의 필드 값은 TeachingStaff 및 NonTeachingStaff 테이블에서 공유해야합니다.
위와 같은 예를 살펴 보겠습니다. 이 프로젝트의 모든 모듈은 다음과 같이 표시됩니다.
엔티티 생성
이름이 지정된 패키지 만들기 ‘com.tutorialspoint.eclipselink.entity’ 아래에 ‘src’꾸러미. 새 Java 클래스를 작성하십시오.Staff.java주어진 패키지에서. Staff 엔터티 클래스는 다음과 같이 표시됩니다.
package com.tutorialspoint.eclipselink.entity;

import java.io.Serializable;

import javax.persistence.Entity;
import javax.persistence.GeneratedValue;
import javax.persistence.GenerationType;
import javax.persistence.Id;
import javax.persistence.Inheritance;
import javax.persistence.InheritanceType;
import javax.persistence.Table;

@Entity
@Table
@Inheritance( strategy = InheritanceType.TABLE_PER_CLASS )

public class Staff implements Serializable {

   @Id
   @GeneratedValue( strategy = GenerationType.AUTO )

   private int sid;
   private String sname;

   public Staff( int sid, String sname ) {
      super( );
      this.sid = sid;
      this.sname = sname;
   }

   public Staff( ) {
      super( );
   }

   public int getSid( ) {
      return sid;
   }

   public void setSid( int sid ) {
      this.sid = sid;
   }

   public String getSname( ) {
      return sname;
   }

   public void setSname( String sname ) {
      this.sname = sname;
   }
}
Staff 클래스에 대한 하위 클래스 (클래스) 만들기 TeachingStaff.java 아래의 com.tutorialspoint.eclipselink.entity꾸러미. TeachingStaff Entity 클래스는 다음과 같이 표시됩니다.
package com.tutorialspoint.eclipselink.entity;

import javax.persistence.DiscriminatorValue;
import javax.persistence.Entity;

@Entity
public class TeachingStaff extends Staff {
   private String qualification;
   private String subjectexpertise;

   public TeachingStaff( int sid, String sname, String qualification, String subjectexpertise ) {
      super( sid, sname );
      this.qualification = qualification;
      this.subjectexpertise = subjectexpertise;
   }

   public TeachingStaff( ) {
      super( );
   }

   public String getQualification( ){
      return qualification;
   }

   public void setQualification( String qualification ) {
      this.qualification = qualification;
   }

   public String getSubjectexpertise( ) {
      return subjectexpertise;
   }

   public void setSubjectexpertise( String subjectexpertise ){
      this.subjectexpertise = subjectexpertise;
   }
}
Staff 클래스에 대한 하위 클래스 (클래스) 만들기 NonTeachingStaff.java 아래의 com.tutorialspoint.eclipselink.entity꾸러미. NonTeachingStaff Entity 클래스는 다음과 같이 표시됩니다.
package com.tutorialspoint.eclipselink.entity;

import javax.persistence.DiscriminatorValue;
import javax.persistence.Entity;

@Entity
public class NonTeachingStaff extends Staff {
   private String areaexpertise;

   public NonTeachingStaff( int sid, String sname, String areaexpertise ) {
      super( sid, sname );
      this.areaexpertise = areaexpertise;
   }

   public NonTeachingStaff( ) {
      super( );
   }

   public String getAreaexpertise( ) {
      return areaexpertise;
   }

   public void setAreaexpertise( String areaexpertise ) {
      this.areaexpertise = areaexpertise;
   }
}
Persistence.xml
Persistence.xml 파일에는 데이터베이스의 구성 정보와 엔티티 클래스의 등록 정보가 포함되어 있습니다. xml 파일은 다음과 같이 표시됩니다.
<?xml version="1.0" encoding = "UTF-8"?>
<persistence version = "2.0" xmlns = "http://java.sun.com/xml/ns/persistence"
   xmlns:xsi = "http://www.w3.org/2001/XMLSchema-instance"
   xsi:schemaLocation = "http://java.sun.com/xml/ns/persistence
   http://java.sun.com/xml/ns/persistence/persistence_2_0.xsd">

   <persistence-unit name = "Eclipselink_JPA" transaction-type = "RESOURCE_LOCAL">
      <class>com.tutorialspoint.eclipselink.entity.Staff</class>
      <class>com.tutorialspoint.eclipselink.entity.NonTeachingStaff</class>
      <class>com.tutorialspoint.eclipselink.entity.TeachingStaff</class>

      <properties>
         <property name = "javax.persistence.jdbc.url" value = "jdbc:mysql://localhost:3306/jpadb"/>
         <property name = "javax.persistence.jdbc.user" value = "root"/>
         <property name = "javax.persistence.jdbc.password" value = "root"/>
         <property name = "javax.persistence.jdbc.driver" value = "com.mysql.jdbc.Driver"/>
         <property name = "eclipselink.logging.level" value = "FINE"/>
         <property name = "eclipselink.ddl-generation" value="create-tables"/>
      </properties>

   </persistence-unit>
</persistence>
서비스 등급
서비스 클래스는 비즈니스 구성 요소의 구현 부분입니다. 아래에 패키지 만들기‘src’ 패키지 이름 ‘com.tutorialspoint.eclipselink.service’.
이름이 지정된 클래스 만들기 SaveClient.java지정된 패키지 아래에 Staff, TeachingStaff 및 NonTeachingStaff 클래스 필드를 저장합니다. SaveClient 클래스는 다음과 같이 표시됩니다.
package com.tutorialspoint.eclipselink.service;

import javax.persistence.EntityManager;
import javax.persistence.EntityManagerFactory;
import javax.persistence.Persistence;

import com.tutorialspoint.eclipselink.entity.NonTeachingStaff;
import com.tutorialspoint.eclipselink.entity.TeachingStaff;

public class SaveClient {
   public static void main( String[ ] args ) {
      EntityManagerFactory emfactory = Persistence.createEntityManagerFactory( "Eclipselink_JPA" );
      EntityManager entitymanager = emfactory.createEntityManager( );
      entitymanager.getTransaction( ).begin( );

      //Teaching staff entity
      TeachingStaff ts1 = new TeachingStaff(1,"Gopal","MSc MEd","Maths");
      TeachingStaff ts2 = new TeachingStaff(2, "Manisha", "BSc BEd", "English");

      //Non-Teaching Staff entity
      NonTeachingStaff nts1 = new NonTeachingStaff(3, "Satish", "Accounts");
      NonTeachingStaff nts2 = new NonTeachingStaff(4, "Krishna", "Office Admin");

      //storing all entities
      entitymanager.persist(ts1);
      entitymanager.persist(ts2);
      entitymanager.persist(nts1);
      entitymanager.persist(nts2);

      entitymanager.getTransaction().commit();
      entitymanager.close();
      emfactory.close();
   }
}
위 프로그램을 컴파일하고 실행하면 Eclipse IDE의 콘솔 패널에 알림이 표시됩니다. 출력의 경우 다음과 같이 MySQL 워크 벤치를 확인하십시오.
여기에 세 개의 테이블이 생성되고 Staff 테이블에 널 레코드가 있습니다.
결과 TeachingStaff 표 형식은 다음과 같이 표시됩니다.
| 시드 | 자격 | 이름 | 과목 전문성 |
|---|---|---|---|
| 1 | MSC MED | 고팔 | 수학 |
| 2 | BSC 침대 | 마니 샤 | 영어 |
위의 TeachingStaff 테이블에는 Staff 및 TeachingStaff 엔티티의 필드가 모두 포함되어 있습니다.
결과 NonTeachingStaff 표 형식은 다음과 같이 표시됩니다.
| 시드 | 분야 전문성 | 이름 |
|---|---|---|
| 삼 | 계정 | Satish |
| 4 | 사무실 관리자 | 크리슈나 |
위의 NonTeachingStaff 테이블에는 Staff 및 NonTeachingStaff 엔터티의 필드가 모두 포함되어 있습니다.