Node.js-이벤트 루프
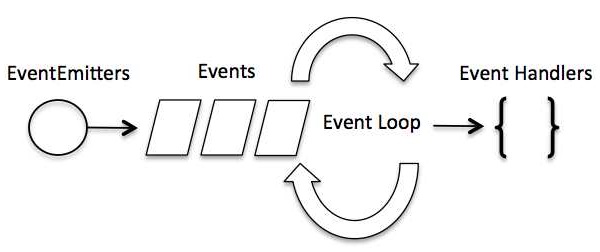
Node.js는 단일 스레드 애플리케이션이지만 개념을 통해 동시성을 지원할 수 있습니다. event 과 callbacks. Node.js의 모든 API는 비동기식이며 단일 스레드이므로async function calls동시성을 유지합니다. 노드는 관찰자 패턴을 사용합니다. 노드 스레드는 이벤트 루프를 유지하고 작업이 완료 될 때마다 해당 이벤트를 발생시켜 이벤트 리스너 함수를 실행하라는 신호를 보냅니다.
이벤트 기반 프로그래밍
Node.js는 이벤트를 많이 사용하며 Node.js가 다른 유사한 기술에 비해 매우 빠른 이유 중 하나이기도합니다. Node가 서버를 시작하자마자 변수를 시작하고 함수를 선언 한 다음 이벤트가 발생하기를 기다립니다.
이벤트 기반 애플리케이션에는 일반적으로 이벤트를 수신 한 다음 해당 이벤트 중 하나가 감지되면 콜백 함수를 트리거하는 메인 루프가 있습니다.

이벤트는 콜백과 매우 비슷해 보이지만 비동기 함수가 결과를 반환 할 때 콜백 함수가 호출되는 반면 이벤트 처리는 관찰자 패턴에서 작동한다는 점이 다릅니다. 이벤트를 수신하는 기능은 다음과 같이 작동합니다.Observers. 이벤트가 시작될 때마다 리스너 함수가 실행되기 시작합니다. Node.js에는 다음과 같이 이벤트 및 이벤트 수신기를 바인딩하는 데 사용되는 이벤트 모듈 및 EventEmitter 클래스를 통해 사용할 수있는 여러 내장 이벤트가 있습니다.
// Import events module
var events = require('events');

// Create an eventEmitter object
var eventEmitter = new events.EventEmitter();
다음은 이벤트 핸들러를 이벤트와 바인딩하는 구문입니다-
// Bind event and event  handler as follows
eventEmitter.on('eventName', eventHandler);
다음과 같이 프로그래밍 방식으로 이벤트를 발생시킬 수 있습니다.
// Fire an event
eventEmitter.emit('eventName');
예
다음 코드로 main.js라는 js 파일을 만듭니다.
// Import events module
var events = require('events');

// Create an eventEmitter object
var eventEmitter = new events.EventEmitter();

// Create an event handler as follows
var connectHandler = function connected() {
   console.log('connection succesful.');

   // Fire the data_received event
   eventEmitter.emit('data_received');
}

// Bind the connection event with the handler
eventEmitter.on('connection', connectHandler);

// Bind the data_received event with the anonymous function
eventEmitter.on('data_received', function() {
   console.log('data received succesfully.');
});

// Fire the connection event
eventEmitter.emit('connection');

console.log("Program Ended.");
이제 위의 프로그램을 실행하고 출력을 확인해 봅시다.
$ node main.jsIT는 다음과 같은 결과를 생성해야합니다.
connection successful.
data received successfully.
Program Ended.
노드 애플리케이션은 어떻게 작동합니까?
Node Application에서 모든 비동기 함수는 마지막 매개 변수로 콜백을 받아들이고 콜백 함수는 첫 번째 매개 변수로 오류를 받아들입니다. 이전 예를 다시 살펴 보겠습니다. 다음 내용으로 input.txt라는 텍스트 파일을 만듭니다.
Tutorials Point is giving self learning content
to teach the world in simple and easy way!!!!!
다음 코드가있는 main.js라는 js 파일을 만듭니다.
var fs = require("fs");

fs.readFile('input.txt', function (err, data) {
   if (err) {
      console.log(err.stack);
      return;
   }
   console.log(data.toString());
});
console.log("Program Ended");
여기서 fs.readFile ()은 파일 읽기를 목적으로하는 비동기 함수입니다. 읽기 작업 중에 오류가 발생하면err object 해당 오류가 포함되고 그렇지 않으면 데이터에 파일 내용이 포함됩니다. readFile 읽기 작업이 완료된 후 err 및 데이터를 콜백 함수에 전달하여 마지막으로 콘텐츠를 인쇄합니다.
Program Ended
Tutorials Point is giving self learning content
to teach the world in simple and easy way!!!!!