MFC - Ведомости недвижимости
А property sheet, также известное как диалоговое окно вкладок, представляет собой диалоговое окно, содержащее страницы свойств. Каждая страница свойств основана на ресурсе шаблона диалога и содержит элементы управления. Он находится на странице с вкладкой вверху. Вкладка называет страницу и указывает ее назначение. Пользователи щелкают вкладку на странице свойств, чтобы выбрать набор элементов управления.
Чтобы создать страницы свойств, давайте рассмотрим простой пример, создав проект MFC на основе диалогового окна.

После создания проекта нам нужно добавить несколько страниц свойств.
Visual Studio упрощает создание ресурсов для страниц свойств, отображая диалоговое окно «Добавить ресурс», раскрывая узел «Диалог» и выбирая один из элементов IDD_PROPPAGE_X.
Step 1 - Щелкните правой кнопкой мыши свой проект в проводнике решений и выберите Добавить → Ресурсы.

Step 2 - Выберите IDD_PROPPAGE_LARGE и нажмите NEW.
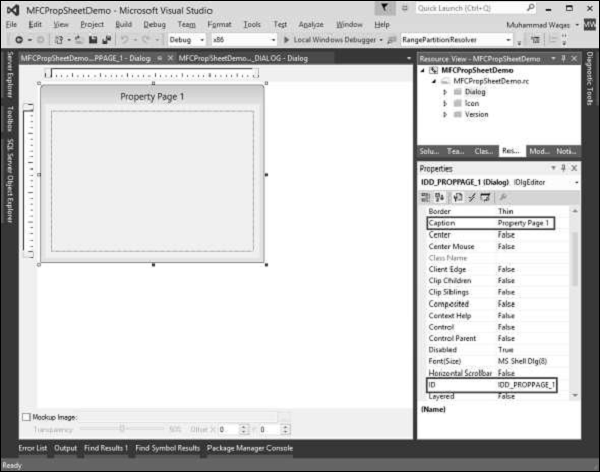
Step 3 - Давайте изменим ID и заголовок этой страницы свойств на IDD_PROPPAGE_1 и Property Page 1 соответственно, как показано выше.
Step 4 - Щелкните правой кнопкой мыши страницу свойств в окне дизайнера.

Step 5 - Выберите опцию Добавить класс.
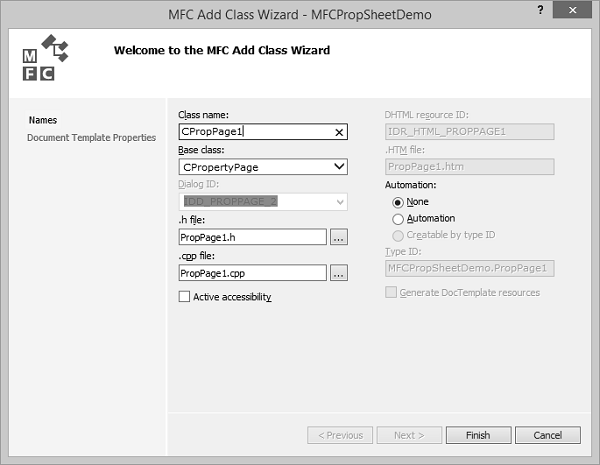
Step 6 - Введите имя класса и выберите CPropertyPage из раскрывающегося списка базового класса.
Step 7 - Нажмите «Готово», чтобы продолжить.
Step 8 - Добавьте еще одну страницу свойств с идентификатором IDD_PROPPAGE_2 и Caption Property Page 2, выполнив указанные выше действия.
Step 9- Теперь вы можете увидеть две созданные страницы свойств. Для реализации его функциональности нам понадобится страница свойств.
Лист свойств группирует страницы свойств вместе и сохраняет их как сущность.
Чтобы создать лист свойств, выполните следующие действия:
Step 1 - Щелкните проект правой кнопкой мыши и выберите «Добавить»> «Параметры меню класса».

Step 2 - Выберите Visual C ++ → MFC на левой панели и Класс MFC на панели шаблонов и нажмите Добавить.

Step 3 - Введите имя класса и выберите CPropertySheet из раскрывающегося списка базового класса.
Step 4 - Нажмите «Готово», чтобы продолжить.
Step 5 - Чтобы запустить эту страницу свойств, нам потребуются следующие изменения в нашем основном классе проекта.
Step 6 - Добавьте следующие ссылки в файл CMFCPropSheetDemo.cpp.
#include "MySheet.h"
#include "PropPage1.h"
#include "PropPage2.h"
Step 7 - Измените метод CMFCPropSheetDemoApp :: InitInstance (), как показано в следующем коде.
CMySheet mySheet(L"Property Sheet Demo");
CPropPage1 page1;
CPropPage2 page2;

mySheet.AddPage(&page1);
mySheet.AddPage(&page2);

m_pMainWnd = &mySheet;
INT_PTR nResponse = mySheet.DoModal();
Step 8 - Вот полная реализация файла CMFCPropSheetDemo.cpp.
// MFCPropSheetDemo.cpp : Defines the class behaviors for the application.
//
#include "stdafx.h"
#include "MFCPropSheetDemo.h"
#include "MFCPropSheetDemoDlg.h"
#include "MySheet.h"
#include "PropPage1.h"
#include "PropPage2.h"

#ifdef _DEBUG
#define new DEBUG_NEW
#endif


// CMFCPropSheetDemoApp
BEGIN_MESSAGE_MAP(CMFCPropSheetDemoApp, CWinApp)
   ON_COMMAND(ID_HELP, &CWinApp::OnHelp)
END_MESSAGE_MAP()


// CMFCPropSheetDemoApp construction

CMFCPropSheetDemoApp::CMFCPropSheetDemoApp() {

   // support Restart Manager
   m_dwRestartManagerSupportFlags = AFX_RESTART_MANAGER_SUPPORT_RESTART;
   // TODO: add construction code here,
   // Place all significant initialization in InitInstance
}


// The one and only CMFCPropSheetDemoApp object

CMFCPropSheetDemoApp theApp;


// CMFCPropSheetDemoApp initialization

BOOL CMFCPropSheetDemoApp::InitInstance() {

   // InitCommonControlsEx() is required on Windows XP if an application
   // manifest specifies use of ComCtl32.dll version 6 or later to enable
   // visual styles. Otherwise, any window creation will fail.
   INITCOMMONCONTROLSEX InitCtrls;
   InitCtrls.dwSize = sizeof(InitCtrls);
   // Set this to include all the common control classes you want to use
   // in your application.
   InitCtrls.dwICC = ICC_WIN95_CLASSES;
   InitCommonControlsEx(&InitCtrls);

   CWinApp::InitInstance();


   AfxEnableControlContainer();

   // Create the shell manager, in case the dialog contains
   // any shell tree view or shell list view controls.
   CShellManager *pShellManager = new CShellManager;

   // Activate "Windows Native" visual manager for enabling themes in MFC controls
   CMFCVisualManager::SetDefaultManager(RUNTIME_CLASS(CMFCVisualManagerWindows));
   // Standard initialization
   // If you are not using these features and wish to reduce the size
   // of your final executable, you should remove from the following
   // the specific initialization routines you do not need
   // Change the registry key under which our settings are stored
   // TODO: You should modify this string to be something appropriate
   // such as the name of your company or organization
   SetRegistryKey(_T("Local AppWizard-Generated Applications"));

   CMySheet mySheet(L"Property Sheet Demo");
   CPropPage1 page1;
   CPropPage2 page2;

   mySheet.AddPage(&page1);
   mySheet.AddPage(&page2);

   m_pMainWnd = &mySheet;
   INT_PTR nResponse = mySheet.DoModal();
   if (nResponse == IDOK) {
      // TODO: Place code here to handle when the dialog is
      // dismissed with OK
   }else if (nResponse == IDCANCEL) {
      // TODO: Place code here to handle when the dialog is
      // dismissed with Cancel
   }else if (nResponse == -1) {
      TRACE(traceAppMsg, 0, "Warning: dialog creation failed,
        so application is terminating unexpectedly.\n");
      TRACE(traceAppMsg, 0, "Warning: if you are using MFC controls on the dialog,
        you cannot #define _AFX_NO_MFC_CONTROLS_IN_DIALOGS.\n");
   }

   // Delete the shell manager created above.
   if (pShellManager != NULL) {
      delete pShellManager;
   }

   // Since the dialog has been closed, return FALSE so that we exit the
   // application, rather than start the application's message pump.
   return FALSE;
}
Step 9- Когда приведенный выше код скомпилирован и выполнен, вы увидите следующее диалоговое окно. Это диалоговое окно содержит две страницы свойств.
