Joomla - สร้างโมดูล
ในบทนี้เราจะศึกษาเกี่ยวกับ Creating Modulesใน Joomla โมดูลคือส่วนขยายที่ยืดหยุ่นและมีน้ำหนักเบาและมีประโยชน์สำหรับการแสดงผลหน้า
สร้างโมดูล
ต่อไปนี้เป็นขั้นตอนง่ายๆในการสร้างโมดูลใน Joomla
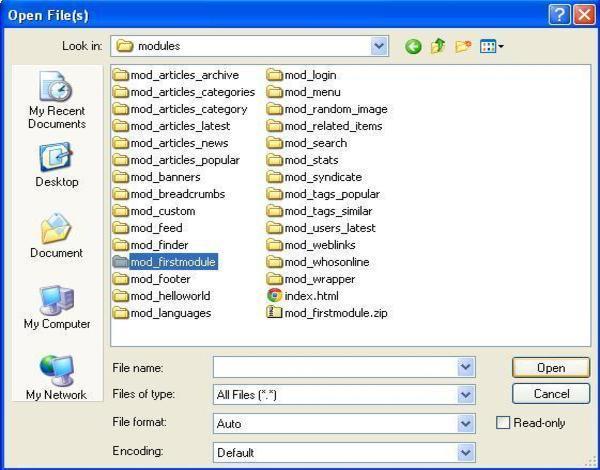
Step 1 - สร้างโฟลเดอร์ชื่อ mod_firstmodule ในไฟล์ Joomla → modules โฟลเดอร์

Step 2 - ในไฟล์ mod_firstmoduleโฟลเดอร์สร้างไฟล์ชื่อ "helper.php" ไฟล์นี้มีชื่อคลาสเป็นตัวช่วยซึ่งช่วยในการแสดงข้อมูลที่ดึงมาในเอาต์พุตโมดูล
helper.php
<?php
   /**
      * Helper class for Hello World! module
      *
      * @package    Joomla.Tutorials
      * @subpackage Modules
      * @link http://docs.joomla.org/J3.x:Creating_a_simple_module/Developing_a_Basic_Module
      * @license        GNU/GPL, see LICENSE.php
      * mod_helloworld is free software. This version may have been modified pursuant
      * to the GNU General Public License, and as distributed it includes or
      * is derivative of works licensed under the GNU General Public License or
      * other free or open source software licenses.
   */

   class ModHelloWorldHelper {
      /**
         * Retrieves the hello message
         *
         * @param   array  $params An object containing the module parameters
         *
        * @access public
      */

      public static function getHello($params) {
         return 'Hello, World!';
      }
   }

?>
Step 3 - สร้างไฟล์ชื่อ mod_helloworld.php. เป็นจุดเริ่มต้นสำหรับโมดูลที่ดำเนินการรูทีนการเริ่มต้นรวบรวมข้อมูลที่จำเป็นและแสดงเอาต์พุตโมดูลโดยใช้เทมเพลต
mod_helloworld.php
<?php
   /**
      * Hello World! Module Entry Point
      *
      * @package    Joomla.Tutorials
      * @subpackage Modules
      * @license    GNU/GPL, see LICENSE.php
      * @link       http://docs.joomla.org/J3.x:Creating_a_simple_module/Developing_a_Basic_Module
      * mod_helloworld is free software. This version may have been modified pursuant
      * to the GNU General Public License, and as distributed it includes or
      * is derivative of works licensed under the GNU General Public License or
      * other free or open source software licenses.
   */

   // No direct access
   defined('_JEXEC') or die;

   // Include the syndicate functions only once
   require_once dirname(__FILE__) . '/helper.php';

   $hello = modHelloWorldHelper::getHello($params);
   require JModuleHelper::getLayoutPath('mod_helloworld');
?>
Step 4 - สร้างไฟล์ mod_helloworld.xml file. ไฟล์นี้มีข้อมูลเกี่ยวกับโมดูล ไฟล์ xml นี้มีข้อมูลของไฟล์ที่จะติดตั้งใน Joomla สำหรับโมดูล
mod_helloworld.xml ไฟล์
<?xml version = "1.0" encoding = "utf-8"?>

<extension type = "module" version = "3.1.0" client = "site" method="upgrade">

   <name>Hello, World!</name>
   <author>Tutorials Point</author>
   <version>1.0.0</version>
   <description>A simple Hello World! module.</description>

   <files>
      <filename>mod_helloworld.xml</filename>
      <filename module = "mod_helloworld">mod_helloworld.php</filename>
      <filename>index.html</filename>
      <filename>helper.php</filename>
      <filename>tmpl/default.php</filename>
      <filename>tmpl/index.html</filename>
   </files>

   <config>
   </config>

</extension>
Step 5 - สร้างไฟล์ html ง่ายๆที่เรียกว่า index.html. จุดประสงค์ของการเขียนไฟล์นี้คือไม่ควรเรียกดูไดเร็กทอรีที่สร้างขึ้น เมื่อผู้ใช้เรียกดูไดเร็กทอรีเหล่านี้ไฟล์ index.html จะปรากฏขึ้น คุณยังสามารถทำให้ไฟล์นี้ว่างเปล่า
index.html
<html>
   <body> Welcome to Tutorials Point!!!!! </body>
</html>
Step 6 - สร้างโฟลเดอร์ชื่อ as tmpl. สถานที่default.php ตามที่แสดงด้านล่างและ index.html (สร้างในขั้นตอนที่ (5)) ภายใต้ tmplโฟลเดอร์ ไฟล์ default.php เป็นเทมเพลตที่แสดงเอาต์พุตโมดูล
default.php
<?php
   /**
      * @package Joomla.Site
      * @subpackage mod_firstmodule
      * @copyright Copyright (C) 2005 - 2012 Open Source Matters, Inc. All rights reserved.
      * @license GNU General Public License version 2 or later; see LICENSE.txt
   */
defined('_JEXEC') or die;
>

<p>Hello World!!!!!!</p>
หลังจากคุณสร้างไฟล์เหล่านี้เสร็จแล้วให้บีบอัดโฟลเดอร์ทั้งหมด mod_firstmodule.
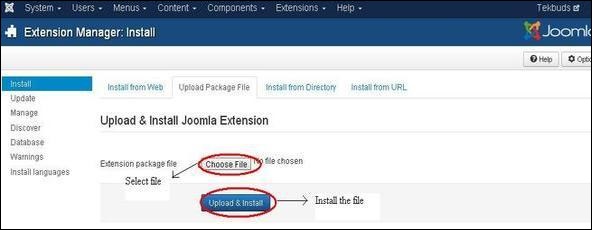
Step 7 - ไปที่ Extension → Extension Managerในผู้ดูแลระบบ Joomla และคุณจะได้รับหน้าจอต่อไปนี้ ที่นี่คุณสามารถอัปโหลดและติดตั้งไฟล์โมดูลที่คุณสร้างขึ้นเช่นmod_firstmoduleโฟลเดอร์ คลิกที่Choose Fileและเลือกไฟล์โมดูลที่สร้างขึ้น (บีบอัดหนึ่งไฟล์) คลิกที่Upload & Install เพื่ออัพโหลดไฟล์โมดูล

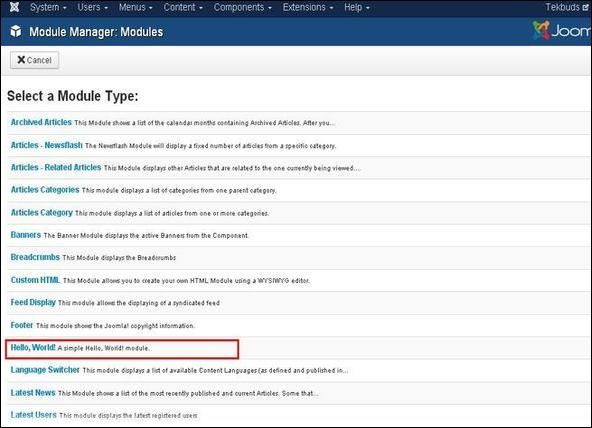
Step 8 - หลังจากอัปโหลดและติดตั้งแล้วให้ไปที่ Module Manager และคลิกที่ New. คุณสามารถดูไฟล์โมดูลที่สร้างขึ้นได้ดังที่แสดงด้านล่าง

Step 9 - คุณสามารถกำหนดโมดูลนี้ให้คล้ายกับโมดูลอื่น ๆ แล้วเผยแพร่ได้