Apache Derby - Hızlı Kılavuz
Apache Derby bir Rneşeli Databaz Management STamamen Java programlama diline (yazılı / uygulanmış) dayalı olan ystem. Apache Software Foundation tarafından geliştirilmiş açık kaynaklı bir veritabanıdır.
Oracle, JavaDB adıyla Apache Derby'nin eşdeğerini yayınladı.
Apache Derby'nin Özellikleri
Derby veritabanının dikkate değer özellikleri aşağıdadır -
Platform independent - Derby, içindeki veritabanlarının, veritabanıyla aynı adı taşıyan dizin içindeki diskteki bir dosyada depolandığı disk üzerinde veritabanı biçimini kullanır.
No modifying data - Bu nedenle, derbi veritabanlarını verileri değiştirmeden diğer makinelere taşıyabilirsiniz.
Transactional support - Derby, veri bütünlüğünü sağlayan işlemler için tam destek sağlar.
Including databases - Önceden oluşturulmuş / mevcut veritabanlarını mevcut derbi uygulamalarınıza dahil edebilirsiniz.
Less space - Derby veri tabanı az yer kaplar, yani daha az yer kaplar ve kullanımı ve dağıtımı kolaydır.
Embed with Java Application- Derby, Java uygulamalarına gömülebilen gömülü bir veritabanı motoru sağlar ve uygulama ile aynı JVM'de çalıştırılır. Sadece sürücünün yüklenmesi, veritabanını başlatır ve uygulamalarla birlikte durur.
Apache Derby'nin Sınırlamaları
Apache Derby'nin sınırlamaları şunlardır:
Derby, BLOB ve LONGVARCHAR gibi veri türleri için dizinleri desteklemez.
Derby'de yeterli disk alanı yoksa, hemen kapanacaktır.
Veri depolama
Verileri depolarken Apache Derby, conglomerate. Bunda, bir tablonun verileri ayrı bir dosyada saklanacaktır. Aynı şekilde, bir tablonun her bir dizini de ayrı bir dosyada saklanır. Böylece, veritabanındaki her tablo veya indeks için ayrı bir dosya olacaktır.
Apache Derby Kitaplığı / Bileşenleri
Apache Derby dağıtımı çeşitli bileşenler sağlar. İndirdiğiniz apache dağıtımının lib klasöründe, çeşitli bileşenleri temsil eden jar dosyalarını görebilirsiniz.
| Jar dosyası | Bileşen | Açıklama |
|---|---|---|
| derby.jar | Veritabanı Motoru ve JDBC sürücüsü | Apache Derby'nin Veritabanı motoru, JDBC ve SQL API'lerini destekleyen yerleşik bir ilişkisel veritabanı motorudur. Bu aynı zamanda Java uygulamalarını kullanarak Derby ile iletişim kurabileceğiniz yerleşik Sürücü görevi görür. |
| derbynet.jar derbyrun.jar | Ağ sunucusu | Apache Derby'nin Ağ Sunucusu, istemcilerin bir ağ üzerinden Derby sunucusuna bağlanabildikleri istemci sunucu işlevselliğini sağlar. |
| derbyclient.jar | Ağ istemcisi JDBC sürücüsü | |
| derbytools.jar | Komut satırı araçları | Bu jar dosyası aşağıdaki gibi araçları içerir: sysinfo, ij, ve dblook. |
| derbyoptionaltools.jar | İsteğe bağlı komut satırı yardımcı programları (araçlar) | Bu jar dosyası isteğe bağlı araçlar sağlar: databaseMetaData isteğe bağlı araç, foreignViews isteğe bağlı araç, luceneSupport isteğe bağlı araç, rawDBReader isteğe bağlı araç, basitJson isteğe bağlı araç, vb. |
| derbyLocale_XX.jar | İletileri yerelleştirmek için jar dosyaları | Yukarıda bahsedilen jar dosyalarına ek olarak birkaç derbyLocale_XX.jar (es, fr, hu, it, ja, vb.) Görebilirsiniz. Bunları kullanarak Apache Derby'nin mesajlarını yerelleştirebilirsiniz. |
Apache derbisini gömülü mod ve sunucu modu olmak üzere iki modda dağıtabilirsiniz.
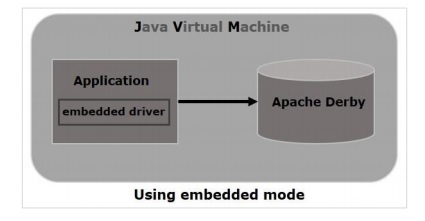
Gömülü mod
Java uygulamasını kullanarak (tümleşik sürücü kullanarak) gömülü modda derbi çalıştırabilirsiniz. Derby'yi gömülü modda dağıtırsanız, veritabanı motoru Java uygulamasıyla aynı JVM'de çalışacaktır. Uygulama ile başlar ve durur. Veritabanına sadece bu uygulama ile erişebilirsiniz.
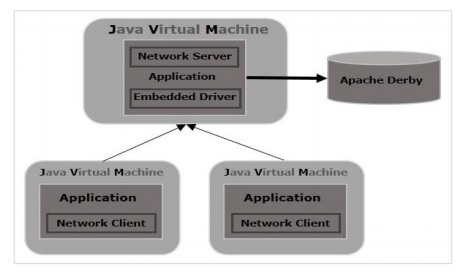
Sunucu modu
Sunucu modunda derbi, sunucuya erişmek için bir istek gönderebileceğiniz bir uygulama sunucusunun JVM'sinde çalıştırılır. Gömülü modun aksine, birden çok uygulama (java) sunucuya bir istek gönderebilir ve veritabanına erişebilir.
Aşağıdaki bölüm Apache Derby'nin nasıl indirilip kurulacağını açıklamaktadır.
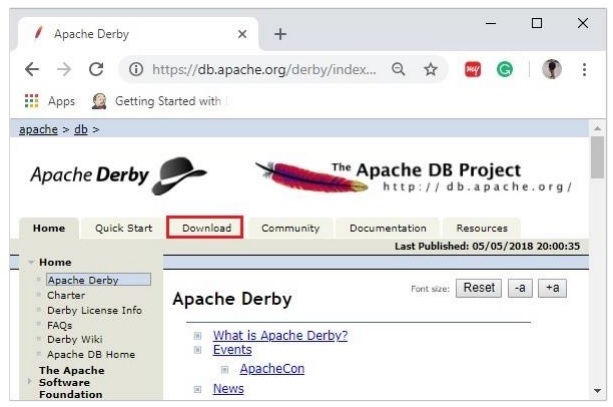
Apache Derby'yi İndirme
Apache Derby ana sayfasının ana sayfasını ziyaret edin https://db.apache.org/derby/. İndir sekmesine tıklayın.
Apache Derby'nin en son sürümünün bağlantısını seçin ve tıklayın.
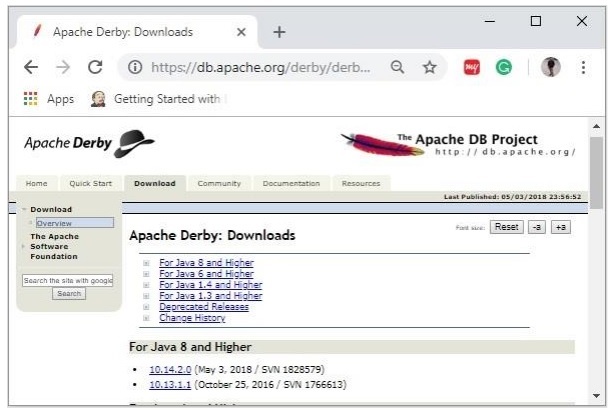
Seçilen bağlantıya tıkladığınızda, şuraya yönlendirileceksiniz: Distributionsapache derbi sayfası. Burada gözlemlerseniz, derby db-derby-bin, db-derbylib.zip, db-derby-lib-debug.zip ve db-derby-src.zip gibi dağıtımlar sağlar.
İndir db-derby-binKlasör. İçeriğini Apache Derby'yi kurmak istediğiniz ayrı bir klasöre kopyalayın. (örneğin, söyleC:\Derby)
Şimdi Derby ile çalışmak için,
Zaten ayarladığınızdan emin olun. JAVA_HOME değişkeni, Java Kurulum klasörünün bin klasörünün konumunu ileterek ve JAVA_HOME/bin PATH değişkeninde.
Yeni bir ortam değişkeni oluşturun, DERBY_HOME C: \ Derby değeriyle.
Db-derby-bin dağıtımlarının bin klasörü (onu C: \ Derby \ bin olarak değiştirdik) gerekli tüm jar dosyalarını içerir.
Bahsedildiği gibi, Apache Derby aşağıdaki gibi iki şekilde kurulabilir / dağıtılabilir -
Embedded mode- Bu durumda, Veritabanına Gömülü Derby JDBC sürücüsünü kullanarak erişmeniz gerekir. Java uygulaması üzerinden derbiyi başlatıp durdurabilirsiniz. Hem Veritabanı motoru hem de uygulamanız aynı JVM üzerinde çalışacaktır.
Network Server mode- Bu modda, Derby'ye tipik bir istemci sunucusu tarzında erişebilirsiniz, burada Derby sunucu sistemine gömülüdür. Daha sonra, farklı JVM'lerde (Sunucununki) çalışan istemci makineler sunucuya istek gönderecek ve sunucu bu isteklere yanıt verecektir.
İstemci, sunucunun aynı sistem makinesindeki başka bir JVM veya uzak bir sistemden bir Java uygulaması olabilir.
Derby'yi Gömülü Modda Kurmak
Apache Derby'yi gömülü modda kurmak için jar dosyasını dahil edin derby.jar CLASSPATH'ınızda.
Veya, gerekli jar dosyaları için sınıf yolunu, setEmbeddedCPkomut. Göz atınbin Apache Derby dizinine gidin ve bu dosyayı aşağıda gösterildiği gibi çalıştırın -
C:\Users\MYUSER>cd %DERBY_HOME%/bin
C:\Derby\bin>setEmbeddedCP.bat
C:\Derby\bin>SET DERBY_HOME=C:\Derby
C:\Derby\bin>set
CLASSPATH=C:\Derby\lib\derby.jar;C:\Derby\lib\derbytools.jar;C:\Derby/lib/derby
optionaltools.jar;C:\Users\Tutorialspoint\Google
Drive\Office\Derby\derby_zip\New folder\db-derby-10.12.1.1-
bin\lib;C:\EXAMPLES_\Task\jars\*;C:\EXAMPLES\jars\mysql-connector-java-5.1.40-
bin.jar;C:\Users\Tutorialspoint\Google Drive\Office\37.Junit
Update\jars;C:\Program Files\Apache Software Foundation\Tomcat
8.5\lib\*;C:\Derby\lib\*;
Apache Derby'yi kurduktan sonra, erişmek için gömülü sürücüyü kullanarak Java programlarını çalıştırın.
Doğrulama
Kurulumu kullanarak doğrulayabilirsiniz. ij araç aşağıda gösterildiği gibi -
C:\Derby\bin>ij
ij version 10.14
ij> connect 'jdbc:derby:SampleDB;create=true';
ij>
Ağ Sunucusu Modunda Derby Kurulumu
Apache Derby'yi ağ sunucusu modunda kurmak için şunları eklemeniz gerekir: derbynet.jar ve derbytools.jar dosyaları CLASSPATH'a.
Veya, gerekli jar dosyaları için sınıf yolunu ayarlayabilirsiniz. setNetworkServerCPkomut. Göz atınbin Apache Derby dizinine gidin ve bu dosyayı aşağıda gösterildiği gibi çalıştırın -
C:\Users\MYUSER>cd %DERBY_HOME%/bin
C:\Derby\bin>setNetworkServerCP.bat
C:\Derby\bin>SET DERBY_INSTALL=C:\Derby
C:\Derby\bin>set
CLASSPATH=C:\Derby\lib\derbynet.jar;C:\Derby\lib\derbytools.jar;C:\Derby/lib/de
rbyoptionaltools.jar;C:\Users\Tutorialspoint\Google
Drive\Office\Derby\derby_zip\New folder\db-derby-10.12.1.1-
bin\lib;C:\EXAMPLES_\Task\jars\*;C:\EXAMPLES\jars\mysql-connector-java-5.1.40-
bin.jar;C:\Users\Tutorialspoint\Google Drive\Office\37.Junit
Update\jars;C:\Program Files\Apache Software Foundation\Tomcat
8.5\lib\*;C:\Derby\lib\*;
Derbiyi Sunucu Modunda Başlatma
Ağ Sunucusunu şu komutu çalıştırarak başlatabilirsiniz: startNetworkServer. Göz atınbin Apache Derby dizinine gidin ve bu komutu aşağıda gösterildiği gibi çalıştırın -
C:\Derby\bin>startNetworkServer
Fri Jan 04 11:20:30 IST 2019 : Security manager installed using the Basic
server security policy.
Fri Jan 04 11:20:30 IST 2019 : Apache Derby Network Server - 10.14.2.0 -
(1828579) started and ready to accept connections on port 1527
Veya sunucuyu kullanarak başlatabilirsiniz. derbyrun.jar aşağıda gösterildiği gibi -
C:\Users\MYUSER>cd %DERBY_HOME%/lib
C:\Derby\lib>java -jar derbyrun.jar server start
Fri Jan 04 11:27:20 IST 2019: Security manager installed using the Basic server
security policy.
Fri Jan 04 11:27:21 IST 2019: Apache Derby Network Server - 10.14.2.0 -
(1828579) started and ready to accept connections on port 1527
Ağ İstemcisi
İstemcide jar dosyalarını ekleyin derbyclient.jar ve derbytools.jarCLASSPATH'a. Veya çalıştırınsetNetworkClientCP komut aşağıda gösterildiği gibi -
C:\Users\MYUSER>cd %DERBY_HOME%/bin
C:\Derby\bin>setNetworkClientCP
C:\Derby\bin>SET DERBY_HOME=C:\Derby
C:\Derby\bin>set
CLASSPATH=C:\Derby\lib\derbyclient.jar;C:\Derby\lib\derbytools.jar;C:\Derby/lib
/derbyoptionaltools.jar;C:\Derby\lib\derby.jar;C:\Derby\lib\derbytools.jar;C:\D
erby/lib/derbyoptionaltools.jar;C:\Users\Tutorialspoint\Google
Drive\Office\Derby\derby_zip\New folder\db-derby-10.12.1.1-
bin\lib;C:\EXAMPLES_\Task\jars\*;C:\EXAMPLES\jars\mysql-connector-java-5.1.40-
bin.jar;C:\Users\Tutorialspoint\Google Drive\Office\37.Junit
Update\jars;C:\Program Files\Apache Software Foundation\Tomcat
8.5\lib\*;C:\Derby\lib\*;
Daha sonra bu istemciden sunucuya istek gönderebilirsiniz.
Doğrulama
Kurulumu kullanarak doğrulayabilirsiniz. ij araç aşağıda gösterildiği gibi -
C:\Derby\bin>ij
ij version 10.14
ij> connect 'jdbc:derby://localhost:1527/SampleDB;create=true';
ij>
Apache Derby Eclipse Ortamı
Eclipse ile çalışırken, gerekli tüm jar dosyaları için derleme yolunu ayarlamanız gerekir.
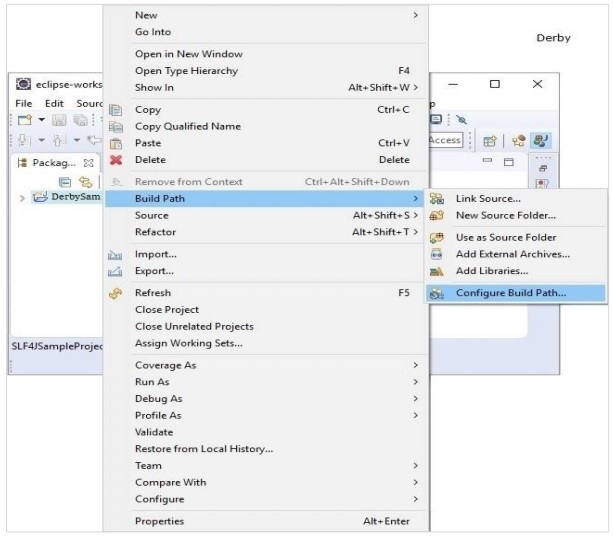
Adım 1: Bir proje oluşturun ve derleme yolunu ayarlayın
Tutulmayı açın ve örnek bir proje oluşturun. Projeye sağ tıklayın ve seçeneği seçinBuild Path -> Configure Build Aşağıda gösterildiği gibi yol -
İçinde Java Build Path çerçeve içinde Libraries sekmesine tıklayın Add External JARs.
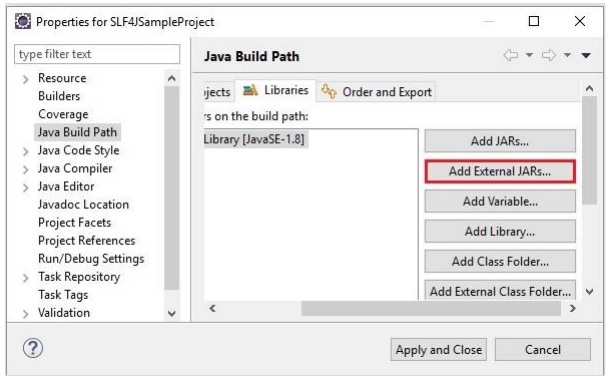
Ve gerekli olanı seçin jar Derby kurulum klasörünün lib klasöründeki dosyaları ve tıklayın Apply and Close.
Apache Derby size aşağıdaki gibi araçlar sağlar: sysinfo, ij ve, dblook.
sysinfo aracı
Bu aracı kullanarak Java ve Derby ortamı hakkında bilgi alabilirsiniz.
Derby kurulum dizininin bin klasörüne göz atın ve sysinfo komutunu aşağıda gösterildiği gibi çalıştırın -
C:\Users\MY_USER>cd %DERBY_HOME%/bin
C:\Derby\bin>sysinfo
Yürütüldüğünde, size aşağıda verilen java ve derbi hakkında sistem bilgisi verir -
------------------ Java Information ------------------
Java Version: 1.8.0_101
Java Vendor: Oracle Corporation
Java home: C:\Program Files\Java\jdk1.8.0_101\jre
Java classpath: C:\Users\Tutorialspoint\Google
Drive\Office\Derby\derby_zip\New folder\db-derby-10.12.1.1-
bin\lib;C:\EXAMPLES_\Task\jars\*;C:\EXAMPLES\jars\mysql-connector-java-5.1.40-
bin.jar;C:\Users\Tutorialspoint\Google Drive\Office\37.Junit
Update\jars;C:\Program Files\Apache Software Foundation\Tomcat
8.5\lib\*;C:\Derby\lib\derby.jar;C:\Derby\lib\derbyclient.jar;C:\Derby\lib\derb
yLocale_cs.jar;C:\Derby\lib\derbyLocale_de_DE.jar;C:\Derby\lib\derbyLocale_es.j
ar;C:\Derby\lib\derbyLocale_fr.jar;C:\Derby\lib\derbyLocale_hu.jar;C:\Derby\lib
\derbyLocale_it.jar;C:\Derby\lib\derbyLocale_ja_JP.jar;C:\Derby\lib\derbyLocale
_ko_KR.jar;C:\Derby\lib\derbyLocale_pl.jar;C:\Derby\lib\derbyLocale_pt_BR.jar;C
:\Derby\lib\derbyLocale_ru.jar;C:\Derby\lib\derbyLocale_zh_CN.jar;C:\Derby\lib\
derbyLocale_zh_TW.jar;C:\Derby\lib\derbynet.jar;C:\Derby\lib\derbyoptionaltools
.jar;C:\Derby\lib\derbyrun.jar;C:\Derby\lib\derbytools.jar;;C:\Derby/lib/derby.
jar;C:\Derby/lib/derbynet.jar;C:\Derby/lib/derbyclient.jar;C:\Derby/lib/derbyto
ols.jar;C:\Derby/lib/derbyoptionaltools.jar
OS name: Windows 10
OS architecture: amd64
OS version: 10.0
Java user name: Tutorialspoint
Java user home: C:\Users\Tutorialspoint
Java user dir: C:\Derby\bin
java.specification.name: Java Platform API Specification
java.specification.version: 1.8
java.runtime.version: 1.8.0_101-b13
--------- Derby Information --------
[C:\Derby\lib\derby.jar] 10.14.2.0 - (1828579)
[C:\Derby\lib\derbytools.jar] 10.14.2.0 - (1828579)
[C:\Derby\lib\derbynet.jar] 10.14.2.0 - (1828579)
[C:\Derby\lib\derbyclient.jar] 10.14.2.0 - (1828579)
[C:\Derby\lib\derbyoptionaltools.jar] 10.14.2.0 - (1828579)
------------------------------------------------------
----------------- Locale Information -----------------
Current Locale : [English/United States [en_US]]
Found support for locale: [cs]
 version: 10.14.2.0 - (1828579)
Found support for locale: [de_DE]
 version: 10.14.2.0 - (1828579)
Found support for locale: [es]
 version: 10.14.2.0 - (1828579)
Found support for locale: [fr]
 version: 10.14.2.0 - (1828579)
Found support for locale: [hu]
 version: 10.14.2.0 - (1828579)
Found support for locale: [it]
 version: 10.14.2.0 - (1828579)
Found support for locale: [ja_JP]
 version: 10.14.2.0 - (1828579)
Found support for locale: [ko_KR]
 version: 10.14.2.0 - (1828579)
Found support for locale: [pl]
 version: 10.14.2.0 - (1828579)
Found support for locale: [pt_BR]
 version: 10.14.2.0 - (1828579)
Found support for locale: [ru]
 version: 10.14.2.0 - (1828579)
Found support for locale: [zh_CN]
 version: 10.14.2.0 - (1828579)
Found support for locale: [zh_TW]
 version: 10.14.2.0 - (1828579)
------------------------------------------------------
------------------------------------------------------
Ijtool
Bu aracı kullanarak apache Derby'nin betiklerini ve sorgularını çalıştırabilirsiniz.
Derby kurulum dizininin bin klasörüne göz atın ve aşağıda gösterildiği gibi ij komutunu çalıştırın -
C:\Users\MY_USER>cd %DERBY_HOME%/bin
C:\Derby\bin>ij
Bu sana verecek ij shell aşağıda gösterildiği gibi derbi komutlarını ve komut dosyalarını çalıştırabileceğiniz yer -
ij version 10.14
ij>
Kullanma help komut, bu kabuk tarafından desteklenen komutların listesini alabilirsiniz.
C:\Derby\bin>cd %DERBY_HOME%/bin
C:\Derby\bin>ij
ij version 10.14
ij> help;
Supported commands include:
 PROTOCOL 'JDBC protocol' [ AS ident ];
 -- sets a default or named protocol
 DRIVER 'class for driver'; -- loads the named class
 CONNECT 'url for database' [ PROTOCOL namedProtocol ] [ AS connectionName ];
 -- connects to database URL
 -- and may assign identifier
 SET CONNECTION connectionName; -- switches to the specified connection
 SHOW CONNECTIONS; -- lists all connections
 AUTOCOMMIT [ ON | OFF ]; -- sets autocommit mode for the connection
 DISCONNECT [ CURRENT | connectionName | ALL ];
 -- drop current, named, or all connections;
-- the default is CURRENT
 SHOW SCHEMAS; -- lists all schemas in the current database
 SHOW [ TABLES | VIEWS | PROCEDURES | FUNCTIONS | SYNONYMS ] { IN schema };
 -- lists tables, views, procedures, functions or
synonyms
 SHOW INDEXES { IN schema | FROM table };
 -- lists indexes in a schema, or for a table
 SHOW ROLES; -- lists all defined roles in the database,
sorted
 SHOW ENABLED_ROLES; -- lists the enabled roles for the current
 -- connection (to see current role use
 -- VALUES CURRENT_ROLE), sorted
 SHOW SETTABLE_ROLES; -- lists the roles which can be set for the
 -- current connection, sorted
 DESCRIBE name; -- lists columns in the named table
 COMMIT; -- commits the current transaction
 ROLLBACK; -- rolls back the current transaction
 PREPARE name AS 'SQL-J text'; -- prepares the SQL-J text
 EXECUTE { name | 'SQL-J text' } [ USING { name | 'SQL-J text' } ] ;
 -- executes the statement with parameter
-- values from the USING result set row
 REMOVE name; -- removes the named previously prepared
statement
 RUN 'filename'; -- run commands from the named file
 ELAPSEDTIME [ ON | OFF ]; -- sets elapsed time mode for ij
 MAXIMUMDISPLAYWIDTH integerValue;
 -- sets the maximum display width for
-- each column to integerValue
 ASYNC name 'SQL-J text'; -- run the command in another thread
 WAIT FOR name; -- wait for result of ASYNC'd command
 HOLDFORCONNECTION; -- sets holdability for a connection to HOLD
 -- (i.e. ResultSet.HOLD_CURSORS_OVER_COMMIT)
 NOHOLDFORCONNECTION; -- sets holdability for a connection to NO HOLD
 -- (i.e. ResultSet.CLOSE_CURSORS_AT_COMMIT)
 GET [SCROLL INSENSITIVE] [WITH { HOLD | NOHOLD }] CURSOR name AS 'SQL-J
query';
 -- gets a cursor (JDBC result set) on the query
-- the default is a forward-only cursor with
holdability
 NEXT name; -- gets the next row from the named cursor
 FIRST name; -- gets the first row from the named scroll
cursor
 LAST name; -- gets the last row from the named scroll
cursor
 PREVIOUS name; -- gets the previous row from the named scroll
cursor
 ABSOLUTE integer name; -- positions the named scroll cursor at the
absolute row number
 -- (A negative number denotes position from the
last row.)
 RELATIVE integer name; -- positions the named scroll cursor relative to
the current row
 -- (integer is number of rows)
 AFTER LAST name; -- positions the named scroll cursor after the
last row
 BEFORE FIRST name; -- positions the named scroll cursor before the
first row
 GETCURRENTROWNUMBER name; -- returns the row number for the current
position of the named scroll cursor
 -- (0 is returned when the cursor is not
positioned on a row.)
 CLOSE name; -- closes the named cursor
 LOCALIZEDDISPLAY [ ON | OFF ];
 -- controls locale sensitive data representation
 EXIT; -- exits ij
 HELP; -- shows this message
Any unrecognized commands are treated as potential SQL-J commands and executed
directly.
dblooktool
Bu araç, Veri Tanımlama Dili oluşturmak için kullanılır.
Derby kurulum dizininin bin klasörüne göz atın ve dblook komut aşağıda gösterildiği gibi -
C:\Users\MY_USER>cd %DERBY_HOME%/bin
C:\Derby\bin>dblook -d myURL
Nerede, myURL DDL oluşturmanız gereken veritabanının bağlantı URL'sidir.
Bu bölüm size tüm Apache Derby SQL deyimlerinin sözdizimini verir.
Tüm ifadeler SELECT, INSERT, UPDATE, DELETE, ALTER, DROP, CREATE, USE, SHOW gibi anahtar kelimelerle başlar ve tüm ifadeler noktalı virgül (;) ile biter.
Apache Derby'nin SQL ifadeleri, tablo adları dahil duyarlı ifadelerde büyük / küçük harf olarak kullanılır.
CREATE İfadesi
CREATE TABLE table_name (
   column_name1 column_data_type1 constraint (optional),
   column_name2 column_data_type2 constraint (optional),
   column_name3 column_data_type3 constraint (optional)
);
DAMLA TABLOSU
DROP TABLE table_name;INSERT İfadesi
INSERT INTO table_name VALUES (column_name1, column_name2, ...);SELECT İfadesi
SELECT column_name, column_name, ... FROM table_name;UPDATE İfadesi
UPDATE table_name
   SET column_name = value, column_name = value, ...
   WHERE conditions;
DELETE İfadesi
DELETE FROM table_name WHERE condition;DESCRIBE İfadesi
Describe table_nameSQL TRUNCATE TABLE İfadesi
TRUNCATE TABLE table_name;ALTER Statement - Sütun ekleniyor
ALTER TABLE table_name ADD COLUMN column_name column_type;ALTER İfadesi - Kısıtlama ekleme
ALTER TABLE table_name ADD CONSTRAINT constraint_name constraint (column_name);ALTER İfadesi - Sütun düşüyor
ALTER TABLE table_name DROP COLUMN column_name;ALTER İfadesi - kısıtlama kaldırılıyor
ALTER TABLE table_name DROP CONSTRAINT constraint_name;NEREDE Fıkra
SELECT * from table_name WHERE condition;
or,
DELETE from table_name WHERE condition;
or,
UPDATE table_name SET column_name = value WHERE condition;
GRUPLAMA MADDESİ
SELECT column1, column2, . . . table_name GROUP BY column1, column2, . . .;Maddeye Göre SİPARİŞ
SELECT * FROM table_name ORDER BY column_name ASC|DESC.Maddeye Sahip Olmak
SELECT column1, column2 . . . from table_name GROUP BY column having
condition;
Dizin Oluşturuluyor
CTREATE INDEX index_name on table_name (column_name);EŞSİZ bir dizin oluşturma
CREATE UNIQUE INDEX index_name on table_name (column_name);COMPOSITE indeksi oluşturma
CREATE INDEX index_name on table_name (column_name1, column_name2);Dizinlerin Görüntülenmesi
SHOW INDEXES FROM table_name;Dizinleri düşürme
DROP INDEX index_name;Veri Türü, herhangi bir nesnenin veri türünü belirten bir özniteliktir. Her sütun, değişken ve ifadenin ilgili bir veri türü vardır. Tablolarınızı oluştururken bu veri türlerini kullanabilirsiniz. Gereksiniminize göre bir tablo sütunu için bir veri türü seçebilirsiniz.
Derby Server, aşağıda listelendiği gibi kullanımınız için çeşitli veri türleri kategorileri sunar -
Tamsayı Sayısal Veri Türleri
Tamsayı sayısal veri türlerinin listesi aşağıdadır -
| VERİ TİPİ | BOYUT | FROM | KİME |
|---|---|---|---|
| SMALLINT | 2 bayt | -32768 | 32767 |
| TAM | 4 bayt | -2.147.483.648 | 2.147.483.647 |
| BÜYÜK | 8 bayt | -9223372036854775808 | 9223372036854775808 |
Yaklaşık Sayısal Veri Türleri
Yaklaşık sayısal veri türlerinin listesi aşağıdadır -
| VERİ TİPİ | BOYUT | FROM | KİME |
|---|---|---|---|
| GERÇEK | 4 bayt | -3.40E + 38 | 3.40E + 38 |
| ÇİFT HASSAS | 8 bayt | -1.79E + 308 | 1.79E + 308 |
| YÜZER | -1.79E + 308 | 1.79E + 308 |
Tam Sayısal Veri Türleri
Tam sayısal veri türlerinin listesi aşağıdadır -
| VERİ TİPİ | FROM | KİME |
|---|---|---|
| ONDALIK | -10 ^ 38 +1 | 10 ^ 38 -1 |
| SAYISAL | -10 ^ 38 +1 | 10 ^ 38 -1 |
CREATE TABLE deyimi Derby veritabanında yeni bir tablo oluşturmak için kullanılır.
Sözdizimi
CREATE ifadesinin sözdizimi aşağıdadır.
CREATE TABLE table_name (
   column_name1 column_data_type1 constraint (optional),
   column_name2 column_data_type2 constraint (optional),
   column_name3 column_data_type3 constraint (optional)
);
Apache Derby'de bir tablo oluşturmanın başka bir yolu, bir sorgu kullanarak sütun adlarını ve veri türlerini belirtebilmenizdir. Bunun sözdizimi aşağıda verilmiştir -
CREATE TABLE table_name AS SELECT * FROM desired_table WITH NO DATA;Misal
Aşağıdaki SQL ifadesi, adında bir tablo oluşturur Student dört sütunlu, burada id birincil anahtar ve otomatik olarak oluşturulur.
ij> CREATE TABLE Student (
   Id INT NOT NULL GENERATED ALWAYS AS IDENTITY,
   Age INT NOT NULL,
   First_Name VARCHAR(255),
   last_name VARCHAR(255),
   PRIMARY KEY (Id)
);
> > > > > > > 0 rows inserted/updated/deleted
DESCRIBE komutu, tablo varsa, sütunları ve ayrıntılarını listeleyerek belirtilen tabloyu açıklar. Tablonun oluşturulup oluşturulmadığını doğrulamak için bu komutu kullanabilirsiniz.
ij> DESCRIBE Student;
COLUMN_NAME |TYPE_NAME |DEC&|NUM&|COLUM&|COLUMN_DEF|CHAR_OCTE&|IS_NULL&
------------------------------------------------------------------------------
ID |INTEGER |0 |10 |10 |AUTOINCRE&|NULL |NO
AGE |INTEGER |0 |10 |10 |NULL |NULL |NO
FIRST_NAME |VARCHAR |NULL|NULL|255 |NULL |510 |YES
LAST_NAME |VARCHAR |NULL|NULL|255 |NULL |510 |YES
4 rows selected
JDBC Programını Kullanarak Tablo Oluşturun
Bu bölüm, JDBC uygulamasını kullanarak Apache Derby veritabanında nasıl tablo oluşturacağınızı öğretir.
Ağ istemcisini kullanarak Derby ağ sunucusunu talep etmek istiyorsanız, sunucunun çalışır durumda olduğundan emin olun. Ağ istemci sürücüsünün sınıf adı şöyledir:org.apache.derby.jdbc.ClientDriver ve URL jdbc: derby: // localhost: 1527 / DATABASE_NAME; create = true; user = USER_NAME; passw ord = PASSWORD "şeklindedir.
Apache Derby'de bir tablo oluşturmak için aşağıdaki adımları izleyin -
Adım 1: Sürücüyü kaydedin
Veritabanıyla iletişim kurmak için öncelikle sürücüyü kaydetmeniz gerekir. forName() sınıfın yöntemi, Classbir sınıf adını temsil eden bir String değerini kabul eder, onu otomatik olarak kaydeden belleğe yükler. Bu yöntemi kullanarak sürücüyü kaydedin.
2. Adım: Bağlantıyı alın
Genel olarak, veri tabanı ile iletişim kurmak için yaptığımız ilk adım, onunla bağlantı kurmaktır. Connectionclass, bir veritabanı sunucusuyla fiziksel bağlantıyı temsil eder. Çağırarak bir bağlantı nesnesi oluşturabilirsiniz.getConnection() yöntemi DriverManagersınıf. Bu yöntemi kullanarak bir bağlantı oluşturun.
Adım 3: Bir ifade nesnesi oluşturun
Bir yaratmanız gerekiyor Statement veya PreparedStatement or, CallableStatementveritabanına SQL ifadeleri göndermek için nesneler. Yöntemleri kullanarak bunları oluşturabilirsinizcreateStatement(), prepareStatement() and, prepareCall()sırasıyla. Uygun yöntemi kullanarak bu nesnelerden birini oluşturun.
4. Adım: Sorguyu yürütün
Bir ifade oluşturduktan sonra, onu yürütmeniz gerekir. Statement sınıfı, bir sorguyu yürütmek için çeşitli yöntemler sağlar. execute()Birden fazla sonuç kümesi döndüren bir ifadeyi yürütme yöntemi. executeUpdate()yöntem INSERT, UPDATE, DELETE gibi sorguları yürütür. executeQuery() veri vb. döndüren sonuçlar için yöntem. Bu yöntemlerden birini kullanın ve önceden oluşturulan ifadeyi yürütün.
Misal
Aşağıdaki JDBC örneği, JDBC programını kullanarak Apache Derby'de bir tablonun nasıl oluşturulacağını göstermektedir. Burada, gömülü sürücüyü kullanarak sampleDB (yoksa yaratacaktır) adlı bir veritabanına bağlanıyoruz.
import java.sql.Connection;
import java.sql.DriverManager;
import java.sql.SQLException;
import java.sql.Statement;
public class CreateTable {
   public static void main(String args[]) throws Exception {
      //Registering the driver
      Class.forName("org.apache.derby.jdbc.EmbeddedDriver");
      //Getting the Connection object
      String URL = "jdbc:derby:sampleDB;create=true";
      Connection conn = DriverManager.getConnection(URL);

      //Creating the Statement object
      Statement stmt = conn.createStatement();

      //Executing the query
      String query = "CREATE TABLE Employees( "
         + "Id INT NOT NULL GENERATED ALWAYS AS IDENTITY, "
         + "Name VARCHAR(255), "
         + "Salary INT NOT NULL, "
         + "Location VARCHAR(255), "
         + "PRIMARY KEY (Id))";
         stmt.execute(query);
         System.out.println("Table created");
   }
}
Çıktı
Yukarıdaki programı çalıştırırken aşağıdaki çıktıyı alacaksınız
Table createdDROP TABLE deyimi, tüm tetikleyicileri, kısıtlamaları ve izinleri dahil olmak üzere mevcut bir tabloyu kaldırmak için kullanılır.
Sözdizimi
DROP TABLE ifadesinin Sözdizimi aşağıdadır.
ij> DROP TABLE table_name;Misal
Veritabanında Student adında bir tablonuz olduğunu varsayalım. Aşağıdaki SQL ifadesi Student adlı bir tabloyu siler.
ij> DROP TABLE Student;
0 rows inserted/updated/deleted
Tabloyu çıkardığımız için tarif etmeye çalışırsak aşağıdaki gibi bir hata alacağız
ij> DESCRIBE Student;
IJ ERROR: No table exists with the name STUDENT
JDBC programını kullanarak Tabloyu Bırak
Bu bölüm, JDBC uygulamasını kullanarak Apache Derby veritabanına bir tabloyu nasıl bırakacağınızı öğretir.
Ağ istemcisini kullanarak Derby ağ sunucusunu talep etmek istiyorsanız, sunucunun çalışır durumda olduğundan emin olun. Ağ istemci sürücüsünün sınıf adı org.apache.derby.jdbc.ClientDriver ve URL jdbc: derby: // localhost: 1527'dir./DATABASE_NAME;create = true; user =USER_NAME; passw ord =PASSWORD"
Apache Derby'de bir tablo düşürmek için aşağıdaki adımları izleyin.
Adım 1: Sürücüyü kaydedin
Veritabanıyla iletişim kurmak için öncelikle sürücüyü kaydetmeniz gerekir. forName() sınıfın yöntemi Classbir sınıf adını temsil eden bir String değerini kabul eder, onu otomatik olarak kaydeden belleğe yükler. Bu yöntemi kullanarak sürücüyü kaydedin.
2. Adım: Bağlantıyı alın
Genel olarak, veri tabanı ile iletişim kurmak için yaptığımız ilk adım, onunla bağlantı kurmaktır. Connectionclass, bir veritabanı sunucusuyla fiziksel bağlantıyı temsil eder. Çağırarak bir bağlantı nesnesi oluşturabilirsiniz.getConnection() yöntemi DriverManagersınıf. Bu yöntemi kullanarak bir bağlantı oluşturun.
Adım 3: Bir ifade nesnesi oluşturun
Bir yaratmanız gerekiyor Statement veya PreparedStatement veya, CallableStatementveritabanına SQL ifadeleri göndermek için nesneler. Yöntemleri kullanarak bunları oluşturabilirsinizcreateStatement(), prepareStatement() and, prepareCall()sırasıyla. Uygun yöntemi kullanarak bu nesnelerden birini oluşturun.
4. Adım: Sorguyu yürütün
Bir ifade oluşturduktan sonra, onu yürütmeniz gerekir. Statement sınıfı, bir sorguyu yürütmek için çeşitli yöntemler sağlar. execute()Birden fazla sonuç kümesi döndüren bir ifadeyi yürütme yöntemi. executeUpdate()yöntem INSERT, UPDATE, DELETE gibi sorguları yürütür. executeQuery() veri vb. döndüren sonuçlar için yöntem. Bu yöntemlerden birini kullanın ve önceden oluşturulan ifadeyi yürütün.
Misal
Aşağıdaki JDBC örneği, JDBC programını kullanarak Apache Derby'de bir tablonun nasıl bırakılacağını göstermektedir. Burada, gömülü sürücüyü kullanarak sampleDB (yoksa yaratacaktır) adlı bir veritabanına bağlanıyoruz.
import java.sql.Connection;
import java.sql.DriverManager;
import java.sql.Statement;
public class DropTable {
   public static void main(String args[]) throws Exception {
      //Registering the driver
      Class.forName("org.apache.derby.jdbc.EmbeddedDriver");

      //Getting the Connection object
      String URL = "jdbc:derby:sampleDB;create=true";
      Connection conn = DriverManager.getConnection(URL);

      //Creating the Statement object
      Statement stmt = conn.createStatement();

      //Executing the query
      String query = "DROP TABLE Employees";
      stmt.execute(query);
      System.out.println("Table dropped");
   }
}
Çıktı
Yukarıdaki programı çalıştırırken, aşağıdaki çıktıyı alacaksınız -
Table droppedApache Derby - Veri Ekle
Ekleme sorgusu verileri ekler: new records, masaya.
Sözdizimi
INSERT ifadesinin temel sözdizimi aşağıdadır -
ij>INSERT INTO table_name VALUES (column_name1, column_name2, ...);burada sütun1, sütun2, eklenecek satırdaki sütun değerleridir.
Misal
Aşağıdaki SQL INSERT ifadesi, Öğrenci tablosuna sütunlara değerler eklediği yeni bir satır ekler id, age, first name ve, last name.
SQL> INSERT INTO Student VALUES (101, 20, 'Zara', 'Ali');Sözdizimi 2
Veya, aşağıda verildiği gibi, sütun adlarından bahsederek iki belirli sütun ekleyebilirsiniz -
ij>INSERT INTO table_name VALUES (column_name1, column_name2, ...) VALUES
(value1, value2, ...);Note- Apache Derby, oluşturulan sütunların değerlerini otomatik olarak hesaplar. Örneğin, bu öğreticide daha önce oluşturulan öğrenci tablosundaki id sütunu için değerlerin aktarılmasına gerek yoktur. Tablonuzun sütun oluşturması durumunda şunu kullanın:syntax2.
Misal
ij> INSERT INTO Student(Age, First_Name, Last_Name) VALUES (21, 'Sucharitha' , 'Tyagi');
1 row inserted/updated/deleted
Ayrıca, bir ifadeyi kullanarak aşağıdaki gibi iki satır da ekleyebilirsiniz -
ij>INSERT INTO Student(Age, First_Name, Last_Name) VALUES (20, 'Amit',
'Bhattacharya'), (22, 'Rahul', 'Desai');
2 rows inserted/updated/deleted
SELECT komutunu kullanarak tablonun içeriğini doğrulayabilirsiniz (bu komutu bu öğreticide daha sonra tartışacağız).
Sözdizimi 3
İnsert deyiminde başka bir sorguyu şu şekilde kullanabilirsiniz:
INSERT INTO table_Name QueryMisal
Diyelim ki, adında bir tablomuz var First_Year Veritabanında aşağıda gösterildiği gibi Öğrenci tablosundaki benzer sütunlarla -
ID |AGE |FIRST_NAME |LAST_NAME
-----------------------------------------------------------------
1 |20 |Raju |Pendyala
2 |21 |Bhargav |Prayaga
3 |22 |Deepthi |Yerramilli
Yukarıdaki sözdizimini kullanarak bu tablodaki değerleri öğrenci tablosuna ekleyebilirsiniz -
ij> INSERT INTO Student (Age, First_Name, Last_Name)
 SELECT Age, First_Name, Last_Name FROM First_Year;
> 3 rows inserted/updated/deleted
Yukarıdaki tüm ek ifadeleri yürüttükten sonra Öğrenci tablosu aşağıdaki gibi olacaktır -
ID |AGE |FIRST_NAME |LAST_NAME
-------------------------------------------------------------
1 |21 |Sucharitha |Tyagi
2 |20 |Amit |Bhattacharya
3 |22 |Rahul |Desai
4 |20 |Raju |Pendyala
5 |21 |Bhargav |Prayaga
6 |22 |Deepthi |Yerramilli
JDBC programını kullanarak Veri girin
Bu bölüm, JDBC uygulamasını kullanarak Apache Derby veritabanındaki bir tabloya nasıl veri ekleneceğini öğretir.
Ağ istemcisini kullanarak Derby ağ sunucusunu talep etmek istiyorsanız, sunucunun çalışır durumda olduğundan emin olun. Ağ istemci sürücüsünün sınıf adı org.apache.derby.jdbc.ClientDriver ve URL jdbc: derby: // localhost: 1527 / şeklindedir.DATABASE_NAME;create = true; user =USER_NAME;passw ord =PASSWORD"
Apache Derby'de bir tabloya veri eklemek için aşağıdaki adımları izleyin -
Adım 1: Sürücüyü kaydedin
Veritabanıyla iletişim kurmak için öncelikle sürücüyü kaydetmeniz gerekir. forName() sınıfın yöntemi, Classbir sınıf adını temsil eden bir String değerini kabul eder, onu otomatik olarak kaydeden belleğe yükler. Bu yöntemi kullanarak sürücüyü kaydedin.
2. Adım: Bağlantıyı alın
Genel olarak, veri tabanı ile iletişim kurmak için yaptığımız ilk adım, onunla bağlantı kurmaktır. Connectionclass, bir veritabanı sunucusuyla fiziksel bağlantıyı temsil eder. Çağırarak bir bağlantı nesnesi oluşturabilirsiniz.getConnection() yöntemi DriverManagersınıf. Bu yöntemi kullanarak bir bağlantı oluşturun.
Adım 3: Bir ifade nesnesi oluşturun
Bir yaratmanız gerekiyor Statement veya PreparedStatement or, CallableStatementveritabanına SQL ifadeleri göndermek için nesneler. Yöntemleri kullanarak bunları oluşturabilirsinizcreateStatement(), prepareStatement() ve, prepareCall()sırasıyla. Uygun yöntemi kullanarak bu nesnelerden herhangi birini oluşturun.
4. Adım: Sorguyu yürütün
Bir ifade oluşturduktan sonra, onu yürütmeniz gerekir. Statement sınıfı, bir sorguyu yürütmek için çeşitli yöntemler sağlar. execute() Birden fazla sonuç kümesi döndüren bir ifadeyi yürütme yöntemi.
executeUpdate()yöntem INSERT, UPDATE, DELETE gibi sorguları yürütür. executeQuery() veri vb. döndüren sonuçlar için yöntem. Bu yöntemlerden birini kullanın ve önceden oluşturulan ifadeyi yürütün.
Misal
Aşağıdaki JDBC örneği, JDBC programını kullanarak Apache Derby'de bir tabloya nasıl veri ekleneceğini gösterir. Burada, gömülü sürücüyü kullanarak sampleDB (yoksa yaratacaktır) adlı bir veritabanına bağlanıyoruz.
import java.sql.Connection;
import java.sql.DriverManager;
import java.sql.SQLException;
import java.sql.Statement;
public class InsertData {
   public static void main(String args[]) throws Exception {
      //Registering the driver
      Class.forName("org.apache.derby.jdbc.EmbeddedDriver");
      //Getting the Connection object
      String URL = "jdbc:derby:SampleDB;create=true";
      Connection conn = DriverManager.getConnection(URL);

      //Creating the Statement object
      Statement stmt = conn.createStatement();

      //Creating a table and populating
      String query = "CREATE TABLE Employees("
         + "Id INT NOT NULL GENERATED ALWAYS AS IDENTITY, "
         + "Name VARCHAR(255), Salary INT NOT NULL, "
         + "Location VARCHAR(255), "
         + "PRIMARY KEY (Id))";
      //Executing the query
      String query = "INSERT INTO Employees("
         + "Name, Salary, Location) VALUES "
         + "('Amit', 30000, 'Hyderabad'), "
         + "('Kalyan', 40000, 'Vishakhapatnam'), "
         + "('Renuka', 50000, 'Delhi'), "
         + "('Archana', 15000, 'Mumbai'), "
         + "('Trupthi', 45000, 'Kochin'), "
         + "('Suchatra', 33000, 'Pune'), "
         + "('Rahul', 39000, 'Lucknow'), "
         + "('Trupti', 45000, 'Kochin')";
      stmt.execute(query);
      System.out.println("Values inserted");
   }
}
Çıktı
Yukarıdaki programı çalıştırırken, aşağıdaki çıktıyı alacaksınız -
Values insertedApache Derby - Verileri Al
SELECT ifadesi, bir tablodan veri almak için kullanılır. Bu, verileri sonuç kümesi olarak bilinen bir tablo biçiminde döndürür.
Sözdizimi
Aşağıda, SELECT ifadesinin sözdizimi verilmiştir -
ij> SELECT column_name, column_name, ... FROM table_name;
Or,
Ij>SELECT * from table_name
Misal
Veritabanında aşağıda gösterildiği gibi Çalışanlar adlı bir tablomuz olduğunu varsayalım -
ij> CREATE TABLE Employees (
   Id INT NOT NULL GENERATED ALWAYS AS IDENTITY,
   Name VARCHAR(255),
   Salary INT NOT NULL,
   Location VARCHAR(255),
   PRIMARY KEY (Id)
);
> > > > > > > 0 rows inserted/updated/deleted
Ve içine aşağıda gösterildiği gibi dört kayıt eklendi -
ij> INSERT INTO Employees (Name, Salary, Location) VALUES
 ('Amit', 30000, 'Hyderabad'),
 ('Kalyan', 40000, 'Vishakhapatnam'),
 ('Renuka', 50000, 'Delhi'),
 ('Archana', 15000, 'Mumbai');
> > > > 4 rows inserted/updated/deleted
Aşağıdaki SQL ifadesi tablodaki tüm çalışanların isim, yaş ve maaş detaylarını alır;
ij> SELECT Id, Name, Salary FROM Employees;Bu sorgunun çıktısı -
ID |NAME |SALARY
------------------------------------------------------------------------
1 |Amit |30000
2 |Kalyan |40000
3 |Renuka |50000
4 |Archana |15000
4 rows selected
Bu tablonun tüm kayıtlarını bir defada almak istiyorsanız, sütunların adları yerine * kullanın.
ij> select * from Employees;Bu, aşağıdaki sonucu verecektir -
ID |NAME |SALARY |LOCATION
------------------------------------------------------------------
1 |Amit |30000 |Hyderabad
2 |Kalyan |40000 |Vishakhapatnam
3 |Renuka |50000 |Delhi
4 |Archana |15000 |Mumbai
4 rows selected
Verileri JDBC programını kullanarak alın
Bu bölüm, JDBC uygulamasını kullanarak Apache Derby veritabanındaki bir tablodan verileri nasıl alacağınızı öğretir.
Ağ istemcisini kullanarak Derby ağ sunucusunu talep etmek istiyorsanız, sunucunun çalışır durumda olduğundan emin olun. Ağ istemci sürücüsünün sınıf adı org.apache.derby.jdbc.ClientDriver ve URL jdbc: derby: // localhost: 1527 / şeklindedir.DATABASE_NAME; oluştur = doğru; kullanıcı =USER_NAME; passw ord =PASSWORD"
Apache Derby'de bir tablodan veri almak için aşağıdaki adımları izleyin -
Adım 1: Sürücüyü kaydedin
Veritabanıyla iletişim kurmak için öncelikle sürücüyü kaydetmeniz gerekir. forName() sınıfın yöntemi Classbir sınıf adını temsil eden bir String değerini kabul eder, onu otomatik olarak kaydeden belleğe yükler. Bu yöntemi kullanarak sürücüyü kaydedin.
2. Adım: Bağlantıyı alın
Genel olarak, veri tabanı ile iletişim kurmak için yaptığımız ilk adım, onunla bağlantı kurmaktır. Connectionclass, bir veritabanı sunucusuyla fiziksel bağlantıyı temsil eder. Çağırarak bir bağlantı nesnesi oluşturabilirsiniz.getConnection() yöntemi DriverManagersınıf. Bu yöntemi kullanarak bir bağlantı oluşturun.
Adım 3: Bir ifade nesnesi oluşturun
Bir yaratmanız gerekiyor Statement veya PreparedStatement veya, CallableStatementveritabanına SQL ifadeleri göndermek için nesneler. Yöntemleri kullanarak bunları oluşturabilirsinizcreateStatement(), prepareStatement() ve, prepareCall()sırasıyla. Uygun yöntemi kullanarak bu nesnelerden birini oluşturun.
4. Adım: Sorguyu yürütün
After creating a statement, you need to execute it. The Statement class provides various methods to execute a query like the execute() method to execute a statement that returns more than one result set. The executeUpdate() method executes queries like INSERT, UPDATE, DELETE. The executeQuery() method to results that returns data etc. Use either of these methods and execute the statement created previously.
Example
Following JDBC example demonstrates how to Retrieve data from a table in Apache Derby using JDBC program. Here, we are connecting to a database named sampleDB (will create if it does not exist) using the embedded driver.
The executeQuery() method returns a ResultSet object which holds the result of the statement. Initially the result set pointer will be at the first record, you can print the contents of the ResultSet object using its next() and getXXX() methods.
import java.sql.Connection;
import java.sql.DriverManager;
import java.sql.ResultSet;
import java.sql.SQLException;
import java.sql.Statement;
public class RetrieveData {
   public static void main(String args[]) throws SQLException,
      ClassNotFoundException {
      //Registering the driver
      Class.forName("org.apache.derby.jdbc.EmbeddedDriver");
      //Getting the Connection object
      String URL = "jdbc:derby:sampleDB;create=true";
      Connection conn = DriverManager.getConnection(URL);

      //Creating the Statement object
      4Statement stmt = conn.createStatement();

      //Creating a table and populating it
      String query = "CREATE TABLE Employees("
         + "Id INT NOT NULL GENERATED ALWAYS AS IDENTITY, "
         + "Name VARCHAR(255), Salary INT NOT NULL, "
         + "Location VARCHAR(255), "
         + "PRIMARY KEY (Id))";
      String query = "INSERT INTO Employees("
         + "Name, Salary, Location) VALUES "
         + "('Amit', 30000, 'Hyderabad'), "
         + "('Kalyan', 40000, 'Vishakhapatnam'), "
         + "('Renuka', 50000, 'Delhi'), "
         + "('Archana', 15000, 'Mumbai'), "
         + "('Trupthi', 45000, 'Kochin'), "
         + "('Suchatra', 33000, 'Pune'), "
         + "('Rahul', 39000, 'Lucknow'), "
         + "('Trupti', 45000, 'Kochin')";
      //Executing the query
      String query = "SELECT Id, Name, Salary FROM Employees";
      ResultSet rs = stmt.executeQuery(query);
      while(rs.next()) {
         System.out.println("Id: "+rs.getString("Id"));
         System.out.println("Name: "+rs.getString("Name"));
         System.out.println("Salary: "+rs.getString("Salary"));
         System.out.println(" ");
      }
   }
}
Output
On executing the above program, you will get the following output
Id: 1
Name: Amit
Salary: 30000

Id: 2
Name: Kalyan
Salary: 43000

Id: 3
Name: Renuka
Salary: 50000

Id: 4
Name: Archana
Salary: 15000

Id: 5
Name: Trupthi
Salary: 45000

Id: 6
Name: Suchatra
Salary: 33000

Id: 7
Name: Rahul
Salary: 39000
Apache Derby - Update Data
The UPDATE statement is used to update data in a table. Apache Derby provides two types of updates (syntax) namely searched update and positioned update.
The searched UPDATE statement updates all the specified columns of a table.
Syntax
Following is the syntax of the UPDATE query −
ij> UPDATE table_name
 SET column_name = value, column_name = value, ...
 WHERE conditions;
The WHERE clause can use the comparison operators such as =, !=, <, >, <=, and >=, as well as the BETWEEN and LIKE operators.
Example
Suppose you have a table Employee in the database with the 4 records as shown below −
ID |NAME |SALARY |LOCATION
----------------------------------------------------------
1 |Amit |30000 |Hyderabad
2 |Kalyan |40000 |Vishakhapatnam
3 |Renuka |50000 |Delhi
4 |Archana |15000 |Mumbai
The following SQL UPDATE statement updates the location and salary of an employee whose name is Kaylan.
ij> UPDATE Employees SET Location = 'Chennai', Salary = 43000 WHERE Name =
'Kalyan';
1 rows inserted/updated/deleted
If you get the contents of the Employees table, you can observe the changes done by the UPDATE query.
ij> select * from Employees;
ID |NAME |SALARY |LOCATION
----------------------------------------------------------
1 |Amit |30000 |Hyderabad
2 |Kalyan |43000 |Chennai
3 |Renuka |50000 |Delhi
4 |Archana |15000 |Mumbai
4 rows selected
Update Data using JDBC program
This section explains how to update the existing records of a table in the Apache Derby database using JDBC application.
If you want to request the Derby network server using network client, make sure that the server is up and running. The class name for the Network client driver is org.apache.derby.jdbc.ClientDriver and the URL is jdbc:derby://localhost:1527/DATABASE_NAME;create=true;user=USER_NAME;passw ord=PASSWORD"
Follow the steps given below to update the existing records of a table in Apache Derby.
Step 1: Register the driver
To communicate with the database, first of all, you need to register the driver. The forName() method of the class Class accepts a String value representing a class name loads it in to the memory, which automatically registers it. Register the driver using this method.
Step 2: Get the connection
In general, the first step we do to communicate to the database is to connect with it. The Connection class represents the physical connection with a database server. You can create a connection object by invoking the getConnection() method of the DriverManager class. Create a connection using this method.
Step 3: Create a statement object
You need to create a Statement or PreparedStatement or, CallableStatement objects to send SQL statements to the database. You can create these using the methods createStatement(), prepareStatement() and, prepareCall() respectively. Create either of these objects using the appropriate method.
Step 4: Execute the query
After creating a statement, you need to execute it. The Statement class provides various methods to execute a query like the execute() method to execute a statement that returns more than one result set. The executeUpdate() method executes queries like INSERT, UPDATE, DELETE. The executeQuery() method returns data. Use either of these methods and execute the statement created previously.
Example
Following JDBC example demonstrates how to update the existing records of a table in Apache Derby using JDBC program. Here, we are connecting to a database named sampleDB (will create if it does not exist) using the embedded driver.
import java.sql.Connection;
import java.sql.DriverManager;
import java.sql.SQLException;
import java.sql.Statement;
public class UpdateData {
   public static void main(String args[]) throws Exception {
      //Registering the driver
      Class.forName("org.apache.derby.jdbc.EmbeddedDriver");
      //Getting the Connection object
      String URL = "jdbc:derby:sampleDB;create=true";
      Connection conn = DriverManager.getConnection(URL);

      //Creating the Statement object
      Statement stmt = conn.createStatement();

      //Creating a table and populating it
      String query = "CREATE TABLE Employees("
         + "Id INT NOT NULL GENERATED ALWAYS AS IDENTITY, "
         + "Name VARCHAR(255), Salary INT NOT NULL, "
         + "Location VARCHAR(255), "
         + "PRIMARY KEY (Id))";
      String query = "INSERT INTO Employees("
         + "Name, Salary, Location) VALUES "
         + "('Amit', 30000, 'Hyderabad'), "
         + "('Kalyan', 40000, 'Vishakhapatnam'), "
         + "('Renuka', 50000, 'Delhi'), "
         + "('Archana', 15000, 'Mumbai'), "
         + "('Trupthi', 45000, 'Kochin'), "
         + "('Suchatra', 33000, 'Pune'), "
         + "('Rahul', 39000, 'Lucknow'), "
         + "('Trupti', 45000, 'Kochin')";
      //Executing the query
      String query = "UPDATE Employees SET Location = 'Chennai', Salary = 43000 WHERE
         Name = 'Kalyan'";
      int num = stmt.executeUpdate(query);
      System.out.println("Number of records updated are: "+num);
   }
}
Output
On executing the above program, you will get the following output −
Number of records updated are: 1Apache Derby - Delete Data
The DELETE statement is used to delete rows of a table. Just like the UPDATE statement, Apache Derby provides two types of Delete (syntax): searched delete and positioned delete.
The searched delete statement deletes all the specified columns of a table.
Syntax
The syntax of the DELETE statement is as follows −
ij> DELETE FROM table_name WHERE condition;Example
Let us suppose we have a table named employee with 5 records as shown below −
ID |NAME |SALARY |LOCATION
----------------------------------------------------------------------------
1 |Amit |30000 |Hyderabad
2 |Kalyan |40000 |Vishakhapatnam
3 |Renuka |50000 |Delhi
4 |Archana |15000 |Mumbai
5 |Trupti |45000 |Kochin
5 rows selected
The following SQL DELETE statement deletes the record with name Trupti.
ij> DELETE FROM Employees WHERE Name = 'Trupti';
1 row inserted/updated/deleted
If you get the contents of the Employees table, you can see only four records as shown below −
ID |NAME |SALARY |LOCATION
----------------------------------------------------------------------------
1 |Amit |30000 |Hyderabad
2 |Kalyan |40000 |Vishakhapatnam
3 |Renuka |50000 |Delhi
4 |Archana |15000 |Mumbai
4 rows selected
To delete all the records in the table, execute the same query without where clause.
ij> DELETE FROM Employees;
4 rows inserted/updated/deleted
Now, if you try to get the contents of the Employee table, you will get an empty table as given below −
ij> select * from employees;
ID |NAME |SALARY |LOCATION
--------------------------------------------------------
0 rows selected
Delete Data using JDBC program
This section explains how to delete the existing records of a table in Apache Derby database using JDBC application.
If you want to request the Derby network server using network client, make sure that the server is up and running. The class name for the Network client driver is org.apache.derby.jdbc.ClientDriver and the URL is jdbc:derby://localhost:1527/DATABASE_NAME;create=true;user=USER_NAME;passw ord=PASSWORD".
Follow the steps given below to delete the existing records of a table in Apache Derby:/p>
Step 1: Register the driver
Firstly, you need to register the driver to communicate with the database. The forName() method of the class Class accepts a String value representing a class name loads it in to the memory, which automatically registers it. Register the driver using this method.
Step 2: Get the connection
In general, the first step we do to communicate to the database is to connect with it. The Connection class represents physical connection with a database server. You can create a connection object by invoking the getConnection() method of the DriverManager class. Create a connection using this method.
Step 3: Create a statement object
You need to create a Statement or PreparedStatement or, CallableStatement objects to send SQL statements to the database. You can create these using the methods createStatement(), prepareStatement() and, prepareCall() respectively. Create either of these objects using the appropriate method.
Step 4: Execute the query
After creating a statement, you need to execute it. The Statement class provides various methods to execute a query like the execute() method to execute a statement that returns more than one result set. The executeUpdate() method executes queries like INSERT, UPDATE, DELETE. The executeQuery() method results that returns data. Use either of these methods and execute the statement created previously.
Example
Following JDBC example demonstrates how to delete the existing records of a table in Apache Derby using JDBC program. Here, we are connecting to a database named sampleDB (will create if it does not exist) using the embedded driver.
import java.sql.Connection;
import java.sql.DriverManager;
import java.sql.SQLException;
import java.sql.Statement;
public class DeleteData {
   public static void main(String args[]) throws Exception {
      //Registering the driver
      Class.forName("org.apache.derby.jdbc.EmbeddedDriver");
      //Getting the Connection object
      String URL = "jdbc:derby:sampleDB;create=true";
      Connection conn = DriverManager.getConnection(URL);

      //Creating the Statement object
      Statement stmt = conn.createStatement();
      //Creating a table and populating it
      String query = "CREATE TABLE Employees("
         + "Id INT NOT NULL GENERATED ALWAYS AS IDENTITY, "
         + "Name VARCHAR(255), Salary INT NOT NULL, "
         + "Location VARCHAR(255), "
         + "PRIMARY KEY (Id))";
      String query = "INSERT INTO Employees("
         + "Name, Salary, Location) VALUES "
         + "('Amit', 30000, 'Hyderabad'), "
         + "('Kalyan', 40000, 'Vishakhapatnam'), "
         + "('Renuka', 50000, 'Delhi'), "
         + "('Archana', 15000, 'Mumbai'), "
         + "('Trupthi', 45000, 'Kochin'), "
         + "('Suchatra', 33000, 'Pune'), "
         + "('Rahul', 39000, 'Lucknow'), "
         + "('Trupthi', 45000, 'Kochin')";
      //Executing the query
      String query = "DELETE FROM Employees WHERE Name = 'Trupthi'";
      int num = stmt.executeUpdate(query);
      System.out.println("Number of records deleted are: "+num);
   }
}
Output
On executing the above program, you will get the following output −
Number of records deleted are: 1Apache Derby - Where Clause
The WHERE clause is used in the SELECT, DELETE or, UPDATE statements to specify the rows on which the operation needs to be carried out. Usually, this clause is followed by a condition or expression which returns a Boolean value, the Select, delete or, update operations are performed only on the rows which satisfy the given condition.
ij> SELECT * from table_name WHERE condition;
or,
ij> DELETE from table_name WHERE condition;
or,
ij> UPDATE table_name SET column_name = value WHERE condition;
The WHERE clause can use the comparison operators such as =,!=, <, >, <=, and >=, as well as the BETWEEN and LIKE operators.
Example
Let us assume we have a table named Employees in the database with 7 records as shown below −
ID |NAME |SALARY |LOCATION
-----------------------------------------------------------------------------
1 |Amit |30000 |Hyderabad
2 |Kalyan |40000 |Vishakhapatnam
3 |Renuka |50000 |Delhi
4 |Archana |15000 |Mumbai
5 |Trupthi |45000 |Kochin
6 |Suchatra |33000 |Pune
7 |Rahul |39000 |Lucknow
The following SQL DELETE statement fetches the records of the employees whose salary is more than 35000 −
ij> SELECT * FROM Employees WHERE Salary>35000;This will produce the following output −
ID |NAME |SALARY |LOCATION
---------------------------------------------------
2 |Kalyan |40000 |Vishakhapatnam
3 |Renuka |50000 |Delhi
5 |Trupthi |45000 |Kochin
7 |Rahul |39000 |Lucknow
4 rows selected
Similarly, you can also delete and update records using this clause.
Following example updates the location of those whose salary is less than 30000.
ij> UPDATE Employees SET Location = 'Vijayawada' WHERE Salary<35000;
3 rows inserted/updated/deleted
If you verify the contents of the table, you can see the updated table as shown below −
ij> SELECT * FROM Employees;
ID |NAME |SALARY |LOCATION
------------------------------------------------------------------------------
1 |Amit |30000 |Vijayawada
2 |Kalyan |40000 |Vishakhapatnam
3 |Renuka |50000 |Delhi
4 |Archana |15000 |Vijayawada
5 |Trupthi |45000 |Kochin
6 |Suchatra |33000 |Vijayawada
7 |Rahul |39000 |Lucknow
7 rows selected
Where clause JDBC example
This section teaches you how to use WHERE clause and perform CURD operations on a table in Apache Derby database using JDBC application.
If you want to request the Derby network server using network client, make sure that the server is up and running. The class name for the Network client driver is org.apache.derby.jdbc.ClientDriver and the URL is jdbc:derby://localhost:1527/DATABASE_NAME;create=true;user=USER_NAME;passw ord=PASSWORD".
Follow the steps given below to use WHERE clause and perform CURD operations on a table in Apache Derby
Step 1: Register the driver
To communicate with the database, first of all, you need to register the driver. The forName() method of the class Class accepts a String value representing a class name loads it in to the memory, which automatically registers it. Register the driver using this method
Step 2: Get the connection
In general, the first step we do to communicate to the database is to connect with it. The Connection class represents the physical connection with a database server. You can create a connection object by invoking the getConnection() method of the DriverManager class. Create a connection using this method.
Step 3: Create a statement object
You need to create a Statement or PreparedStatement or, CallableStatement objects to send SQL statements to the database. You can create these using the methods createStatement(), prepareStatement() and, prepareCall() respectively. Create either of these objects using the appropriate method.
Step 4: Execute the query
After creating a statement, you need to execute it. The Statement class provides various methods to execute a query like the execute() method to execute a statement that returns more than one result set. The executeUpdate() method executes queries like INSERT, UPDATE, DELETE. The executeQuery() method results that returns data. Use either of these methods and execute the statement created previously.
Example
Following JDBC example demonstrates how to use WHERE clause and perform CURD operations on a table in Apache Derby using JDBC program. Here, we are connecting to a database named sampleDB (will create if it does not exist) using the embedded driver.
import java.sql.Connection;
import java.sql.DriverManager;
import java.sql.Statement;
import java.sql.ResultSet;
public class WhereClauseExample {
   public static void main(String args[]) throws Exception {
      //Registering the driver
      Class.forName("org.apache.derby.jdbc.EmbeddedDriver");
      //Getting the Connection object
      String URL = "jdbc:derby:sampleDB;create=true";
      Connection conn = DriverManager.getConnection(URL);

      //Creating the Statement object
      Statement stmt = conn.createStatement();

      //Creating a table and populating it
      String query = "CREATE TABLE Employees("
         + "Id INT NOT NULL GENERATED ALWAYS AS IDENTITY, "
         + "Name VARCHAR(255), Salary INT NOT NULL, "
         + "Location VARCHAR(255), "
         + "PRIMARY KEY (Id))";
      String query = "INSERT INTO Employees("
         + "Name, Salary, Location) VALUES "
         + "('Amit', 30000, 'Hyderabad'), "
         + "('Kalyan', 40000, 'Vishakhapatnam'), "
         + "('Renuka', 50000, 'Delhi'), "
         + "('Archana', 15000, 'Mumbai'), "
         + "('Trupthi', 45000, 'Kochin'), "
         + "('Suchatra', 33000, 'Pune'), "
         + "('Rahul', 39000, 'Lucknow'), "
         + "('Trupti', 45000, 'Kochin')";
      //Executing the query
      String query = "SELECT * FROM Employees WHERE Salary>35000";
      ResultSet rs = stmt.executeQuery(query);
      while(rs.next()) {
         System.out.println("Id: "+rs.getString("Id"));
         System.out.println("Name: "+rs.getString("Name"));
         System.out.println("Salary: "+rs.getString("Salary"));
         System.out.println("Location: "+rs.getString("Location"));
         System.out.println(" ");
      }
   }
}
Output
On executing the above program, you will get the following output −
Id: 2
Name: Kalyan
Salary: 43000
Location: Chennai

Id: 3
Name: Renuka
Salary: 50000
Location: Delhi

Id: 5
Name: Trupthi
Salary: 45000
Location: Kochin

Id: 7
Name: Rahul
Salary: 39000
Location: Lucknow
Apache Derby - GROUP BY Clause
The GROUP BY clause is used with SELECT statements. It is used to form subsets in case of identical data. Usually, this clause is followed by ORDER BY clause and placed after the WHERE clause.
Syntax
Following is the syntax of GROUP BY clause −
ij>SELECT column1, column2, . . . table_name GROUP BY column1, column2, . . .;Example
Suppose we have a table named Employees in the database with the following records −
ID |NAME |SALARY |LOCATION
------------------------------------------------------------------
1 |Amit |30000 |Hyderabad
2 |Rahul |39000 |Lucknow
3 |Renuka |50000 |Hyderabad
4 |Archana |15000 |Vishakhapatnam
5 |Kalyan |40000 |Hyderabad
6 |Trupthi |45000 |Vishakhapatnam
7 |Raghav |12000 |Lucknow
8 |Suchatra |33000 |Vishakhapatnam
9 |Rizwan |20000 |Lucknow
The following SELECT statement with GROUP BY clause groups the table based on location. It displays the total amount of salary given to employees at a location.
ij> SELECT Location, SUM(Salary) from Employees GROUP BY Location;This will generate the following output −
LOCATION |2
-------------------------------------------------------
Hyderabad |120000
Lucknow |71000
Vishakhapatnam |93000
3 rows selected
In the same way, following query finds the average amount spent on the employees as salary in a location.
ij> SELECT Location, AVG(Salary) from Employees GROUP BY Location;This will generate the following output −
LOCATION |2
-----------------------------------------------------
Hyderabad |40000
Lucknow |23666
Vishakhapatnam |31000
3 rows selected
Group By clause JDBC example
This section teaches you how to use Group By clause and perform CURD operations on a table in Apache Derby database using JDBC application.
If you want to request the Derby network server using network client, make sure that the server is up and running. The class name for the Network client driver is org.apache.derby.jdbc.ClientDriver and the URL is jdbc:derby://localhost:1527/DATABASE_NAME;create=true;user=USER_NAME;passw ord=PASSWORD"
Follow the steps given below to use Group By clause and perform CURD operations on a table in Apache Derby
Step 1: Register the driver
To communicate with the database, first of all, you need to register the driver. The forName() method of the class Class accepts a String value representing a class name loads it in to the memory, which automatically registers it. Register the driver using this method.
Step 2: Get the connection
In general, the first step we do to communicate to the database is to connect with it. The Connection class represents the physical connection with a database server. You can create a connection object by invoking the getConnection() method of the DriverManager class. Create a connection using this method.
Step 3: Create a statement object
You need to create a Statement or PreparedStatement or, CallableStatement objects to send SQL statements to the database. You can create these using the methods createStatement(), prepareStatement() and, prepareCall() respectively. Create either of these objects using the appropriate method.
Step 4: Execute the query
After creating a statement, you need to execute it. The Statement class provides various methods to execute a query like the execute() method to execute a statement that returns more than one result set. The executeUpdate() method is used to execute queries like INSERT, UPDATE, DELETE. The executeQuery() method returns data. Use either of these methods and execute the statement created previously.
Example
Following JDBC example demonstrates how to use Group By clause and perform CURD operations on a table in Apache Derby using JDBC program. Here, we are connecting to a database named sampleDB (will create if it does not exist) using the embedded driver.
import java.sql.Connection;
import java.sql.DriverManager;
import java.sql.Statement;
import java.sql.ResultSet;
public class GroupByClauseExample {
   public static void main(String args[]) throws Exception {
      //Registering the driver
      Class.forName("org.apache.derby.jdbc.EmbeddedDriver");

      //Getting the Connection object
      String URL = "jdbc:derby:sampleDB;create=true";
      Connection conn = DriverManager.getConnection(URL);

      //Creating the Statement object
      Statement stmt = conn.createStatement();

      //Creating a table and populating it
      stmt.execute("CREATE TABLE EmployeesData( "
         + "Id INT NOT NULL GENERATED ALWAYS AS IDENTITY, "
         + "Name VARCHAR(255), "
         + "Salary INT NOT NULL, "
         + "Location VARCHAR(255), "
         + "PRIMARY KEY (Id))");
      stmt.execute("INSERT INTO EmployeesData(Name, Salary, Location) "
         + "VALUES ('Amit', 30000, 'Hyderabad'), "
         + "('Rahul', 39000, 'Lucknow'), "
         + "('Renuka', 50000, 'Hyderabad'), "
         + "('Archana', 15000, 'Vishakhapatnam'), "
         + "('Kalyan', 40000, 'Hyderabad'), "
         + "('Trupthi', 45000, 'Vishakhapatnam'), "
         + "('Raghav', 12000, 'Lucknow'), "
         + "('Suchatra', 33000, 'Vishakhapatnam'), "
         + "('Rizwan', 20000, 'Lucknow')");

      //Executing the query
      String query = "SELECT Location, SUM(Salary) from EmployeesData GROUP BY Location";
      ResultSet rs = stmt.executeQuery(query);
      while(rs.next()) {
         System.out.println("Location: "+rs.getString(1));
         System.out.println("Sum of salary: "+rs.getString(2));
         System.out.println(" ");
      }
   }
}
Output
On executing the above program, you will get the following output −
Location: Hyderabad
Sum of salary: 120000

Location: Lucknow
Sum of salary: 71000

Location: Vishakhapatnam
Sum of salary: 93000
Apache Derby - Order By Clause
The ORDER BY clause is used to arrange the contents of the result set in the order it uses the keywords, ASC representing ascending order and DESC representing descending order. If you do not mention either of these, the contents will be arranged in ascending order by default.
Syntax
Following is the syntax of the ORDER BY clause −
SELECT * FROM table_name ORDER BY column_name ASC|DESC.Example
Suppose we have a table named Employees in the database with the following records −
ID |NAME |SALARY |LOCATION
------------------------------------------------------------------------------
1 |Amit |30000 |Vijayawada
2 |Kalyan |40000 |Vishakhapatnam
3 |Renuka |50000 |Delhi
4 |Archana |15000 |Vijayawada
5 |Trupthi |45000 |Kochin
6 |Suchatra |33000 |Vijayawada
7 |Rahul |39000 |Lucknow
The following query arranges the contents of the table in ascending order based on the name of the Employee.
ij> SELECT * FROM Employees ORDER BY Name;This will generate the following output −
ID |NAME |SALARY |LOCATION
---------------------------------------------------------------
1 |Amit |30000 |Hyderabad
4 |Archana |15000 |Mumbai
2 |Kalyan |40000 |Vishakhapatnam
7 |Rahul |39000 |Lucknow
3 |Renuka |50000 |Delhi
6 |Suchatra |33000 |Pune
5 |Trupthi |45000 |Kochin
7 rows selected
Similarly, following query arranges the contents of the table in descending order based on the salary of the Employee −
ij> SELECT * FROM Employees ORDER BY Salary DESC;This will generate the following output −
ID |NAME |SALARY |LOCATION
---------------------------------------------------------------
3 |Renuka |50000 |Delhi
5 |Trupthi |45000 |Kochin
2 |Kalyan |40000 |Vishakhapatnam
7 |Rahul |39000 |Lucknow
6 |Suchatra |33000 |Pune
1 |Amit |30000 |Hyderabad
4 |Archana |15000 |Mumbai
7 rows selected
Sorting Data using JDBC program
This section teaches you how to sort the contents of a table in Derby using JDBC. You can arrange records in order using the ORDER BY clause and the keywords ASC (denoting ascending order), and DSC (denoting descending order).
If you want to request the Derby network server using network client, make sure that the server is up and running. The class name for the Network client driver is org.apache.derby.jdbc.ClientDriver and the URL is jdbc:derby://localhost:1527/DATABASE_NAME;create=true;user=USER_NAME;passw ord=PASSWORD".
Follow the steps given below to sort the records of a table in Apache Derby −
Step 1: Register the driver
To communicate with the database, first of all, you need to register the driver. The forName() method of the class Class accepts a String value representing a class name loads it in to the memory, which automatically registers it. Register the driver using this method.
Step 2: Get the connection
In general, the first step we do to communicate to the database is to connect with it. The Connection class represents the physical connection with a database server. You can create a connection object by invoking the getConnection() method of the DriverManager class. Create a connection using this method.Step 3: Create a statement object
You need to create a Statement or PreparedStatement or, CallableStatement objects to send SQL statements to the database. You can create these using the methods createStatement(), prepareStatement() and, prepareCall() respectively. Create either of these objects using the appropriate method.
Step 4: Execute the query
After creating a statement, you need to execute it. The Statement class provides various methods to execute a query like the execute() method to execute a statement that returns more than one result set. The executeUpdate() method executes queries like INSERT, UPDATE, DELETE. The executeQuery() method returns data. Use either of these methods and execute the statement created previously.
Example
Following JDBC example demonstrates how to sort the records of a table in Apache Derby using JDBC program. Here, we are connecting to a database named sampleDB (will create if it does not exist) using the embedded driver.
import java.sql.Connection;
import java.sql.DriverManager;
import java.sql.ResultSet;
import java.sql.SQLException;
import java.sql.Statement;
public class SortData {
   public static void main(String args[]) throws SQLException, ClassNotFoundException {
      //Registering the driver
      Class.forName("org.apache.derby.jdbc.EmbeddedDriver");

      //Getting the Connection object
      String URL = "jdbc:derby:SampleDB;create=true";
      Connection conn = DriverManager.getConnection(URL);

      //Creating the Statement object
      Statement stmt = conn.createStatement();

      //Creating a table and populating it
      String query = "CREATE TABLE Employees("
         + "Id INT NOT NULL GENERATED ALWAYS AS IDENTITY, "
         + "Name VARCHAR(255), Salary INT NOT NULL, "
         + "Location VARCHAR(255), "
         + "PRIMARY KEY (Id))";
      String query = "INSERT INTO Employees("
         + "Name, Salary, Location) VALUES "
         + "('Amit', 30000, 'Hyderabad'), "
         + "('Kalyan', 40000, 'Vishakhapatnam'), "
         + "('Renuka', 50000, 'Delhi'), "
         + "('Archana', 15000, 'Mumbai'), "
         + "('Trupthi', 45000, 'Kochin'), "
         + "('Suchatra', 33000, 'Pune'), "
         + "('Rahul', 39000, 'Lucknow'), "
         + "('Trupti', 45000, 'Kochin')";
      //Executing the query
      String query = "SELECT Location, SUM(Salary) " + "from Employees GROUP BY Location";
      ResultSet rs = stmt.executeQuery(query);
      while(rs.next()) {
         System.out.println("Salary: "+rs.getString(1));
         System.out.println("Location: "+rs.getString(2));
         System.out.println(" ");
      }
   }
}
Output
On executing the above program, you will get the following output −
Salary: Chennai
Location: 43000

Salary: Delhi
Location: 50000

Salary: Hyderabad
Location: 30000

Salary: Kochin
Location: 45000

Salary: Lucknow
Location: 39000

Salary: Mumbai
Location: 15000

Salary: Pune
Location: 33000
Apache Derby - Having Clause
The HAVING Clause enables you to specify conditions that filter which group results appear in the results.
The WHERE clause places conditions on the selected columns, whereas the HAVING clause places conditions on groups created by the GROUP BY clause.
Syntax
Following is the syntax of the HAVING clause −
ij> SELECT column1, column2 . . . from table_name GROUP BY column having
condition;
Example
Suppose, we have a table named Employees in the database with the 13 records as shown below −
ID |NAME |SALARY |LOCATION
------------------------------------------------------------------
1 |Amit |30000 |Hyderabad
2 |Rahul |39000 |Lucknow
3 |Kalyan |40000 |Vishakhapatnam
4 |Renuka |50000 |Hyderabad
5 |Archana |15000 |Vishakhapatnam
6 |Krishna |40000 |Hyderabad
7 |Trupthi |45000 |Vishakhapatnam
8 |Raghav |12000 |Lucknow
9 |Radha |50000 |Delhi
10 |Anirudh |15000 |Mumbai
11 |Tara |45000 |Kochin
12 |Sucharita |44000 |Kochin
13 |Rizwan |20000 |Lucknow
The following query displays maximum salaries of the employees in the location which have at least 3 employees −
ij> SELECT Location, MAX(Salary) from Employees GROUP BY Location having
count(Location)>=3;
This generates the following output −
LOCATION |2
------------------------------------------------------------
Hyderabad |50000
Lucknow |39000
Vishakhapatnam |45000
3 rows selected
Sorting Data using JDBC program
This section teaches you how to use Having a clause in the Apache Derby database using JDBC application.
If you want to request the Derby network server using network client, make sure that the server is up and running. The class name for the Network client driver is org.apache.derby.jdbc.ClientDriver and the URL is jdbc:derby://localhost:1527/DATABASE_NAME;create=true;user=USER_NAME;passw ord=PASSWORD"
Follow the steps given below to sort the records of a table in Apache Derby
Step 1: Register the driver
To communicate with the database, first of all, you need to register the driver. The forName() method of the class Class accepts a String value representing a class name, and loads it in to the memory, which automatically registers it. Register the driver using this method.
Step 2: Get the connection
In general, the first step we do to communicate to the database is to connect with it. The Connection class represents the physical connection with a database server. You can create a connection object by invoking the getConnection() method of the DriverManager class. Create a connection using this method.
Step 3: Create a statement object
You need to create a Statement or PreparedStatement or, CallableStatement objects to send SQL statements to the database. You can create these using the methods createStatement(), prepareStatement() and, prepareCall() respectively. Create either of these objects using the appropriate method.
Step 4: Execute the query
After creating a statement, you need to execute it. The Statement class provides various methods to execute a query like the execute() method to execute a statement that returns more than one result set. The executeUpdate() method executes queries like INSERT, UPDATE, DELETE. The executeQuery() method returns data. Use either of these methods and execute the statement created previously.
Example
Following JDBC example demonstrates how to use Group By clause and perform CURD operations on a table in Apache Derby using JDBC program. Here, we are connecting to a database named sampleDB (will create if it does not exist) using the embedded driver.
import java.sql.Connection;
import java.sql.DriverManager;
import java.sql.Statement;
import java.sql.ResultSet;
public class HavingClauseExample {
   public static void main(String args[]) throws Exception {
      //Registering the driver
      Class.forName("org.apache.derby.jdbc.EmbeddedDriver");

      //Getting the Connection object
      String URL = "jdbc:derby:sampleDB;create=true";
      Connection conn = DriverManager.getConnection(URL);

      //Creating the Statement object
      Statement stmt = conn.createStatement();

      //Creating a table and populating it
      stmt.execute("CREATE TABLE EmployeesData( "
         + "Id INT NOT NULL GENERATED ALWAYS AS IDENTITY, "
         + "Name VARCHAR(255), "
         + "Salary INT NOT NULL, "
         + "Location VARCHAR(255), "
         + "PRIMARY KEY (Id))");
      stmt.execute("INSERT INTO EmployeesData(Name, Salary, Location) "
         + "VALUES ('Amit', 30000, 'Hyderabad'), "
         + "('Rahul', 39000, 'Lucknow'), "
         + "('Renuka', 50000, 'Hyderabad'), "
         + "('Archana', 15000, 'Vishakhapatnam'), "
         + "('Kalyan', 40000, 'Hyderabad'), "
         + "('Trupthi', 45000, 'Vishakhapatnam'), "
         + "('Raghav', 12000, 'Lucknow'), "
         + "('Suchatra', 33000, 'Vishakhapatnam'), "
         + "('Rizwan', 20000, 'Lucknow')");
      //Executing the query
      String query = "SELECT Location, MAX(Salary) "
         + "from EmployeesData GROUP BY Location having "
         + "count(Location)>=3";
      ResultSet rs = stmt.executeQuery(query);
      while(rs.next()) {
         System.out.println(rs.getString(1));
         System.out.println(rs.getString(2));
         System.out.println(" ");
      }
   }
}
Output
On executing the above program, you will get the following output −
Hyderabad
50000

Lucknow
39000

Vishakhapatnam
45000
Apache Derby - Alter Table Statement
The ALTER TABLE statement, allows you to alter an existing table. Using this you can do the following −
Add a column, add a constraint
Drop a column, drop a constraint
Change the row level locking of a table
Let us assume we have created a table named Employees as shown below −
ij> CREATE TABLE Employees (
   Id INT NOT NULL GENERATED ALWAYS AS IDENTITY,
   Name VARCHAR(255),
   Salary INT NOT NULL,
   Location VARCHAR(255),
   PRIMARY KEY (Id)
);
And, inserted four records using the insert statement as −
ij> INSERT INTO Employees (Name, Salary, Location) VALUES
 ('Amit', 30000, 'Hyderabad'),
 ('Kalyan', 40000, 'Vishakhapatnam'),
 ('Renuka', 50000, 'Delhi'),
 ('Archana', 15000, 'Mumbai');
Adding a column to a Table
Following is the syntax to add a column to a table using ALTER statement.
ALTER TABLE table_name ADD COLUMN column_name column_type;Example
Using ALTER statement, we are trying to add a new column named Age with the type integer.
ALTER TABLE Employees ADD COLUMN Age INT;
0 rows inserted/updated/deleted
Add another column named Phone_No with the type integer.
ALTER TABLE Employees ADD COLUMN Phone_No BIGINT;
0 rows inserted/updated/deleted
The DESCRIBE command describes specified table by listing the columns and their details, if the table exists. If you DESCRIBE, the table Employees you can observe the newly added columns as shown below −
ij> DESCRIBE Employees;
COLUMN_NAME |TYPE_NAME|DEC&|NUM&|COLUM&|COLUMN_DEF|CHAR_OCTE&|IS_NULL&
------------------------------------------------------------------------------
ID |INTEGER |0 |10 |10 |AUTOINCRE&|NULL |NO
NAME |VARCHAR |NULL|NULL|255 |NULL |510 |YES
SALARY |INTEGER |0 |10 |10 |NULL |NULL |NO
LOCATION |VARCHAR |NULL|NULL|255 |NULL |510 |YES
AGE |INTEGER |0 |10 |10 |NULL |NULL |YES
PHONE_NO |INTEGER |0 |10 |10 |NULL |NULL |YES
6 rows selected
Adding a constraint to a table
Following is the syntax to add a constraint to a column of a table using ALTER statement.
ALTER TABLE table_name ADD CONSTRAINT constraint_name constraint (column_name);Where constraint can be NOT NULL, NULL, PRIMARY KEY, UNIQUE, FOREIGN KEY, CHECK.
Example
Using ALTER statement, we are trying to add constraint UNIQUE to the Phone_No column.
ij> ALTER TABLE Employees ADD CONSTRAINT New_Constraint UNIQUE(Phone_No);
0 rows inserted/updated/deleted
Once, you add a UNIQUE constraint to a column, it cannot have the same values for two rows, i.e., phone number should be unique for each employee.
If you try to add two columns with a same phone number, you will get an exception as shown below.
ij> INSERT INTO Employees (Name, Salary, Location, Age, Phone_No) VALUES
('Amit', 30000, 'Hyderabad', 30, 9848022338);
1 row inserted/updated/deleted
ij> INSERT INTO Employees (Name, Salary, Location, Age, Phone_No) VALUES
('Sumit', 35000, 'Chennai', 25, 9848022338);
ERROR 23505: The statement was aborted because it would have caused a duplicate
key value in a unique or primary key constraint or unique index identified by
'NEW_CONSTRAINT' defined on 'EMPLOYEES'.
Dropping a constraint from a table
Following is the syntax to drop a constraint of a column −
ALTER TABLE table_name DROP CONSTRAINT constraint_name;Example
The following query deletes the constraint name New_Constraint on the column Phone_No created above.
ij> ALTER TABLE Employees DROP CONSTRAINT New_Constraint;
0 rows inserted/updated/deleted
Since we have removed the UNIQUE constraint on the column Phone_No, you can add columns with the same phone number.
ij> INSERT INTO Employees (Name, Salary, Location, Age, Phone_No) VALUES
('Sumit', 35000, 'Chennai', 25, 9848022338);
1 row inserted/updated/deleted
You can verify the contents of the table ij> select * from Employees as follows −
ID |NAME |SALARY |LOCATION |AGE |PHONE_NO
-------------------------------------------------------------------------
1 |Amit |30000 |Hyderabad |30 |9848022338
2 |Sumit |35000 |Chennai |25 |9848022338
2 rows selected
Dropping a column from a table
Following is the syntax to drop a column of a column.
ALTER TABLE table_name DROP COLUMN column_name;Example
Following query deletes the column named age of the employee −
ij> ALTER TABLE Employees DROP COLUMN Age;
0 rows inserted/updated/deleted
If you describe the table, you can see only 4 columns.
ij> DESCRIBE Employees;
COLUMN_NAME |TYPE_NAME|DEC&|NUM&|COLUM&|COLUMN_DEF|CHAR_OCTE&|IS_NULL&
------------------------------------------------------------------------------
ID |INTEGER |0 |10 |10 |AUTOINCRE&|NULL |NO
NAME |VARCHAR |NULL|NULL|255 |NULL |510 |YES
SALARY |INTEGER |0 |10 |10 |NULL |NULL |NO
LOCATION |VARCHAR |NULL|NULL|255 |NULL |510 |YES
PHONE_NO |BIGINT |0 |10 |19 |NULL |NULL |YES
Altering table using JDBC program
Following is the JDBC program to alter a table using the ALTER query −
import java.sql.Connection;
import java.sql.DriverManager;
import java.sql.ResultSet;
import java.sql.SQLException;
import java.sql.Statement;
public class AlterTableExample {
   public static void main(String args[]) throws Exception {
      //Registering the driver
      Class.forName("org.apache.derby.jdbc.EmbeddedDriver");
      //Getting the Connection object
      String URL = "jdbc:derby:sampleDB;create=true";
      Connection conn = DriverManager.getConnection(URL);

      //Creating the Statement object
      Statement stmt = conn.createStatement();

      //Executing the query
      String createQuery = "CREATE TABLE Employees( "
         + "Id INT NOT NULL GENERATED ALWAYS AS IDENTITY, "
         + "Name VARCHAR(255), "
         + "Salary INT NOT NULL, "
         + "Location VARCHAR(255), "
         + "PRIMARY KEY (Id))";

      stmt.execute(createQuery);
      System.out.println("Table created");
      System.out.println(" ");

      //Executing the query
      String insertQuery = "INSERT INTO Employees("
         + "Name, Salary, Location) VALUES "
         + "('Amit', 30000, 'Hyderabad'), "
         + "('Kalyan', 40000, 'Vishakhapatnam'), "
         + "('Renuka', 50000, 'Delhi'), "
         + "('Archana', 15000, 'Mumbai'), "
         + "('Trupti', 45000, 'Kochin')";

      stmt.execute(insertQuery);
      System.out.println("Values inserted");
      System.out.println(" ");

      //Executing the query
      String selectQuery = "SELECT * FROM Employees";
      ResultSet rs = stmt.executeQuery(selectQuery);
      System.out.println("Contents of the table after inserting the table");
      while(rs.next()) {
         System.out.println("Id: "+rs.getString("Id"));
         System.out.println("Name: "+rs.getString("Name"));
         System.out.println("Salary: "+rs.getString("Salary"));
         System.out.println("Location: "+rs.getString("Location"));
      }
      System.out.println(" ");

      //Altering the table
      stmt.execute("ALTER TABLE Employees ADD COLUMN Age INT");
      stmt.execute("ALTER TABLE Employees ADD COLUMN Phone_No BigINT");
      stmt.execute("ALTER TABLE Employees " + "ADD CONSTRAINT New_Constraint UNIQUE(Phone_No)");

      stmt.execute("INSERT INTO Employees "
         + "(Name, Salary, Location, Age, Phone_No) "
         + "VALUES ('Amit', 30000, 'Hyderabad', 30, 9848022338)");
      ResultSet alterResult = stmt.executeQuery("Select * from Employees");
      System.out.println("Contents of the table after altering "
         + "the table and inserting values to it: ");
      while(alterResult.next()) {
         System.out.println("Id: "+alterResult.getString("Id"));
         System.out.println("Name: "+alterResult.getString("Name"));
         System.out.println("Salary: "+alterResult.getString("Salary"));
         System.out.println("Location: "+alterResult.getString("Location"));
         System.out.println("Age: "+alterResult.getString("Age"));
         System.out.println("Phone_No: "+alterResult.getString("Phone_No"));
      }
   }
}
Output
On executing the above program, the following output will be generated −
Table created

Values inserted

Contents of the table after inserting the table
Id: 1
Name: Amit
Salary: 30000
Location: Hyderabad
Id: 2
Name: Kalyan
Salary: 40000
Location: Vishakhapatnam
Id: 3
Name: Renuka
Salary: 50000
Location: Delhi
Id: 4
Name: Archana
Salary: 15000
Location: Mumbai
Id: 5
Name: Trupti
Salary: 45000
Location: Kochin

Contents of the table after altering the table and inserting values to it:
Id: 1
Name: Amit
Salary: 30000
Location: Hyderabad
Age: null
Phone_No: null
Id: 2
Name: Kalyan
Salary: 40000
Location: Vishakhapatnam
Age: null
Phone_No: null
Id: 3
Name: Renuka
Salary: 50000
Location: Delhi
Age: null
Phone_No: null
Id: 4
Name: Archana
Salary: 15000
Location: Mumbai
Age: null
Phone_No: null
Id: 5
Name: Trupti
Salary: 45000
Location: Kochin
Age: null
Phone_No: null
Id: 6
Name: Amit
Salary: 30000
Location: Hyderabad
Age: 30
Phone_No: 9848022338
Apache Derby - Derby Indexes
An index in a table is nothing but a pointer to its data. These are used to speed up the data retrieval from a table.
If we use indexes, the INSERT and UPDATE statements get executed in a slower phase. Whereas SELECT and WHERE get executed with in lesser time.
Creating an Index
The CREATE INDEX statement is used for creating a new Index in a table in Derby database.
Syntax
Following is the syntax of the CREATE INDEX statement −
CTREATE INDEX index_name on table_name (column_name);Example
Suppose we have created a table named Employees in Apache Derby as shown below.
CREATE TABLE Emp ( Id INT NOT NULL GENERATED ALWAYS AS IDENTITY,
   Name VARCHAR(255),
   Salary INT NOT NULL,
   Location VARCHAR(255),
   Phone_Number BIGINT
);
The following SQL statement creates an index on the column named Salary in the table Employees.
ij> CREATE INDEX example_index on Emp (Salary);
0 rows inserted/updated/deleted
Creating a UNIQUE index
In Apache Derby, UNIQUE indexes are used for data integration. Once you create a UNIQUE index on a column in a table, it does not allow duplicate values.
Syntax
Following is the syntax of creating a unique index.
CREATE UNIQUE INDEX index_name on table_name (column_name);Example
Following example creates a UNIQUE index on the column Id of the table Employee.
ij> CREATE UNIQUE INDEX unique_index on Emp (Phone_Number);
0 rows inserted/updated/deleted
Once you have created a unique index on a column, you cannot enter same values for that column in another row. In short, a column which is has a UNIQE index will not allow duplicate values.
Insert a row in the Emp table as shown below
ij> INSERT INTO Emp(Name, Salary, Location, Phone_Number) VALUES ('Amit',
45000, 'Hyderabad', 9848022338);
1 row inserted/updated/deleted
Since we have created a unique index on the column Phone_No, if you ty to enter the same value as in the previous record, it shows an error.
ij> INSERT INTO Emp(Name, Salary, Location, Phone_Number) VALUES ('Sumit',
35000, 'Chennai', 9848022338);
ERROR 23505: The statement was aborted because it would have caused a duplicate
key value in a unique or primary key constraint or unique index identified by
'UNIQUE_INDEX' defined on 'EMP'.
Creating a COMPOSITE index
You can create a single index on two rows and it is called Composite index.
Syntax
Following is the syntax of the composite index.
CREATE INDEX index_name on table_name (column_name1, column_name2);Example
Following index creates a composite index on the columns Name and Location.
ij> CREATE INDEX composite_index on Emp (Name, Location);
0 rows inserted/updated/deleted
Displaying the Indexes
The SHOW INDEXES query displays the list of indexes on a table.
Syntax
Following is the syntax of the SHOW INDEXES statement −
SHOW INDEXES FROM table_name;Example
Following example, i displays the indexes on the table Employees.
ij> SHOW INDEXES FROM Emp;This produces the following result.
ij> SHOW INDEXES FROM Emp;
TABLE_NAME |COLUMN_NAME |NON_U&|TYPE|ASC&|CARDINA&|PAGES
----------------------------------------------------------------------------
EMP |PHONE_NUMBER |false |3 |A |NULL |NULL
EMP |NAME |true |3 |A |NULL |NULL
EMP |LOCATION |true |3 |A |NULL |NULL
EMP |SALARY |true |3 |A |NULL |NULL
4 rows selected
Dropping Indexes
The Drop Index statement deletes/drops the given index on a column.
Syntax
Following is the syntax of the DROP INDEX statement.
DROP INDEX index_name;Example
Following example drops an indexes named composite_index and unique_index created above.
ij> DROP INDEX composite_index;
0 rows inserted/updated/deleted
ij>Drop INDEX unique_index;
0 rows inserted/updated/deleted
Now, if you verify the list of indexes you can see index on one column since we have deleted the remaining.
ij> SHOW INDEXES FROM Emp;
TABLE_NAME |COLUMN_NAME |NON_U&|TYPE|ASC&|CARDINA&|PAGES
----------------------------------------------------------------------------
EMP |SALARY |true |3 |A |NULL |NULL
1 row selected
Handling Indexes using JDBC program
Following JDBC program demonstrates how to create drop indexes on a column in a table.
import java.sql.Connection;
import java.sql.DriverManager;
import java.sql.SQLException;
import java.sql.Statement;
public class IndexesExample {
   public static void main(String args[]) throws Exception {

      //Registering the driver
      Class.forName("org.apache.derby.jdbc.EmbeddedDriver");
      //Getting the Connection object
      String URL = "jdbc:derby:MYDATABASE;create=true";
      Connection conn = DriverManager.getConnection(URL);

      //Creating the Statement object
      Statement stmt = conn.createStatement();

      //Creating the Emp table
      String createQuery = "CREATE TABLE Emp( "
         + "Id INT NOT NULL GENERATED ALWAYS AS IDENTITY, "
         + "Name VARCHAR(255), "
         + "Salary INT NOT NULL, "
         + "Location VARCHAR(255), "
         + "Phone_Number BIGINT )";
      stmt.execute(createQuery);
      System.out.println("Table created");
      System.out.println(" ");

      //Creating an Index on the column Salary
      stmt.execute("CREATE INDEX example_index on Emp (Salary)");
      System.out.println("Index example_index inserted");
      System.out.println(" ");

      //Creating an Unique index on the column Phone_Number
      stmt.execute("CREATE UNIQUE INDEX unique_index on Emp (Phone_Number)");
      System.out.println("Index unique_index inserted");
      System.out.println(" ");

      //Creating a Composite Index on the columns Name and Location
      stmt.execute("CREATE INDEX composite_index on Emp (Name, Location)");
      System.out.println("Index composite_index inserted");
      System.out.println(" ");

      //listing all the indexes
      System.out.println("Listing all the columns with indexes");

      //Dropping indexes
      System.out.println("Dropping indexes unique_index and, composite_index ");
      stmt.execute("Drop INDEX unique_index");
      stmt.execute("DROP INDEX composite_index");
   }
}
Output
On executing, this generates the following result
Table created
Index example_index inserted

Index unique_index inserted

Index composite_index inserted

Listing all the columns with indexes
Dropping indexes unique_index and, composite_index
Apache Derby - Procedures
This chapter teaches you how to create and drop procedures in Derby.
Creating a procedure
You can create a procedure using the CREATE PROCEDURE statement.
Syntax
Following is the syntax of the CREATE PROCEDURE statement.
CREATE PROCEDURE procedure_name (parameter_type parameter_name1, parameter_type
parameter_name2 . . . .) parameter_style;
Example
Suppose, we have created a table in Derby as shown below.
CREATE TABLE Emp ( Id INT NOT NULL GENERATED ALWAYS AS IDENTITY,
   Name VARCHAR(255),
   Salary INT NOT NULL,
   Location VARCHAR(255),
   Phone_Number BIGINT
);
And inserted values in it as follows −
INSERT INTO Employees(Name, Salary, Location) VALUES
('Amit', 30000, 'Hyderabad'),
('Kalyan', 40000, 'Vishakhapatnam'),
('Renuka', 50000, 'Delhi'),
('Archana', 15000, 'Mumbai'),
('Trupthi', 45000, 'Kochin')";
Following example creates a procedure named Update_Procedure which accepts JAVA parameters.
ij> CREATE PROCEDURE Update_Procedure(IN id INTEGER, IN name VARCHAR(10))
PARAMETER STYLE JAVA READS SQL DATA LANGUAGE JAVA EXTERNAL NAME
'ProcedureExample.testProc';
> 0 rows inserted/updated/deleted
Where ProcedureExample class looks like −
import java.sql.Connection;
import java.sql.DriverManager;
import java.sql.PreparedStatement;
public class ProcedureExample {
   public static void testProc(int salary, String name) throws Exception {
      String connectionURL = "jdbc:derby:MYDATABASE;create=true";
      Connection conn = DriverManager.getConnection(connectionURL);
      String query = "UPDATE Employees SET SALARY = ? WHERE NAME = ?";
      PreparedStatement pstmt = conn.prepareStatement(query);
      pstmt.setInt(1, salary);
      pstmt.setString (2, name);
      pstmt.executeUpdate();
   }
}
You can verify the list of procedures using SHOW PROCEDURES query.
ij> SHOW PROCEDURES;
PROCEDURE_SCHEM |PROCEDURE_NAME |REMARKS
------------------------------------------------------------------------
APP |UPDATE_PROCEDURE |ProcedureExample.te&
SALES |EXAMPLE_ PROCEDURE |com.example.sales.c&
SQLJ |INSTALL_JAR |org.apache.derby.ca&
SQLJ |REMOVE_JAR |org.apache.derby.ca&
SQLJ |REPLACE_JAR |org.apache.derby.ca&
SYSCS_UTIL |SYSCS_BACKUP_DATABASE |org.apache.derby.ca&
. . . . . . . . . . . . . . . . . . . . . . . . . . . . . . . . . . .
. . . . . . . . . . . . . . . . . . . . . . . . . . . . . . . . . . .
. . . . . . . . . . . . . . . . . . . . . . . . . . . . . . . . . . .
Here you can observe the newly created procedure.
Dropping a procedure
You can drop a procedure using the DROP PROCEDURE statement.
Syntax
Following is the syntax of the DROP PROCEDURE statement.
DROP PROCEDURE procedure_name;Example
Following example drops a procedure named Update_Procedure created above.
ij> DROP PROCEDURE Update_Procedure;
> 0 rows inserted/updated/deleted
Apache Derby - Schemas
A database schema is the skeleton structure that represents the logical view of the entire database. It defines how the data is organized and how the relations among them are associated. It formulates all the constraints that are to be applied to the data.
Creating a Schema
You can create a schema in Apache Derby using the CREATE SCHEMA statement.
Syntax
Following is the syntax to the CREATE SCHEMA statement.
CREATE SCHEMA schema_name AUTHORIZATION idExample
Following example creates a schema named my_schema in Derby database.
ij> CREATE SCHEMA AUTHORIZATION my_schema;
0 rows inserted/updated/deleted
Then, you can create a table in this schema as shown below.
ij> CREATE TABLE my_schema.Emp ( Id INT NOT NULL GENERATED ALWAYS AS IDENTITY,
   Name VARCHAR(255),
   Salary INT NOT NULL,
   Location VARCHAR(255),
   Phone_Number BIGINT
);
> > > > > 0 rows inserted/updated/deleted
You can verify the list of schemas using the SHOW SCHEMAS query here you can find the list of schemas created.
ij> show schemas;
TABLE_SCHEM
------------------------------
APP
MY_SCHEMA
NULLID
SQLJ
SYS
SYSCAT
SYSCS_DIAG
SYSCS_UTIL
SYSFUN
SYSIBM
SYSPROC
SYSSTAT
12 rows selected
Dropping a Schema
You can drop an existing schema using the DROP SCHEMA statement.
Syntax
Following is the syntax of DROPS SCHEMA statement.
DROP SCHEMA my_schema RESTRICT;Example
You can delete a schema only if does not have any objects in it. To delete the schema, delete all the tables in it and delete the schema.
ij> DROP TABLE my_schema.Emp;
0 rows inserted/updated/deleted
Following example drops the above created schema.
ij> DROP SCHEMA my_schema RESTRICT;
0 rows inserted/updated/deleted
JDBC Example
Following JDBC example creates and drops a schema named my_schema.
import java.sql.Connection;
import java.sql.DriverManager;
import java.sql.SQLException;
import java.sql.Statement;
public class CreateSchemaExample {
   public static void main(String args[]) throws Exception {
      //Registering the driver
      Class.forName("org.apache.derby.jdbc.EmbeddedDriver");
      //Getting the Connection object
      String URL = "jdbc:derby:sampleDB;create=true";
      Connection conn = DriverManager.getConnection(URL);

      //Creating the Statement object
      Statement stmt = conn.createStatement();

      stmt.execute("CREATE SCHEMA AUTHORIZATION my_schema");
      //Executing the query
      String query = "CREATE TABLE my_schema.Employees( "
         + "Id INT NOT NULL GENERATED ALWAYS AS IDENTITY, "
         + "Name VARCHAR(255), "
         + "Salary INT NOT NULL, "
         + "Location VARCHAR(255), "
         + "PRIMARY KEY (Id))";
      stmt.execute(query);
      System.out.println("Table created in schema");
      stmt.execute("DROP TABLE my_schema.Employees");
      stmt.execute("DROP SCHEMA my_schema RESTRICT");
      System.out.println("Schema dropped");
   }
}
Output
On executing, the above program generates the following example.
Table created in schema
Schema dropped
Apache Derby - Triggers
In databases, triggers are the statements/code which gets executed whenever an event occurred. Once you create a trigger to a particular event on a table, the code specified in the trigger gets executed each time the event occurs. You can create multiple triggers on a single table.
This chapter teaches you how to create and drop triggers using Apache Derby.
Creating a trigger
You can create a trigger in Derby using the CREATE TRIGGER statement.
Syntax
Following is the syntax of the CREATE TRIGGER query.
CREATE TRIGGER trigger_name
{ NO CASCADE BEFORE | AFTER }
{INSERT [OR] | UPDATE [OR] | DELETE}[OF col_name]
ON table_name
[REFERENCING OLD AS o NEW AS n]
[FOR EACH ROW]
Statement
Example
Suppose, we have created a table named Emp in Derby as shown below.
CREATE TABLE Emp (
   Id INT NOT NULL,
   Name VARCHAR(255),
   Salary INT NOT NULL,
   Location VARCHAR(255) );
And inserted 5 rows in it.
INSERT INTO Emp(Id, Name, Salary, Location) VALUES
(1, 'Amit', 30000, 'Hyderabad'), (2, 'Kalyan', 40000, 'Vishakhapatnam'),
(3,'Renuka', 50000, 'Delhi'), (4, 'Archana', 15000, 'Mumbai'), (5, 'Trupthi',
45000, 'Kochin');
If we have another table named BackUp and our intention is to store deleted rows from Emp table in this.
CREATE TABLE BackUp (
   Id INT NOT NULL,
   Name VARCHAR(255),
   Salary INT NOT NULL,
   Location VARCHAR(255)
);
The following query creates a trigger on the DELETE query table named Emp. It stores the deleted rows of Emp to the table Backup.
ij> CREATE TRIGGER my_trigger
AFTER DELETE ON Emp
REFERENCING OLD AS oldRow
FOR EACH ROW MODE DB2SQL
INSERT INTO BackUp
VALUES (oldRow.Id, oldRow.Name, oldRow.Salary, oldRow.Location);
Now, delete a row from Emp table as −
ij> Delete From Emp where Name = 'Kalyan';
1 row inserted/updated/deleted
ij> Delete From Emp where Name = 'Amit';
1 row inserted/updated/deleted
If you verify the BackUp table, you can observe the deleted rows in it.
ij> select * from BackUp;
ID |NAME |SALARY |LOCATION
-------------------------------------------------------------------------
2 |Kalyan |40000 |Vishakhapatnam
1 |Amit |30000 |Hyderabad

2 rows selected
Deleting a trigger
You can delete a trigger in Derby using the DROP TRIGGER statement.
Syntax
Following is the syntax of the DROP TRIGGER query −
ij> Drop trigger tigger_name;Example
Following example deletes the trigger my_trigger created above −
ij> Drop trigger my_trigger;
0 rows inserted/updated/deleted
JDBC example
Following JDBC program creates and deletes triggers in Derby.
import java.sql.Connection;
import java.sql.DriverManager;
import java.sql.ResultSet;
import java.sql.SQLException;
import java.sql.Statement;
public class Triggers_Example {
   public static void main(String args[]) throws SQLException, ClassNotFoundException {
      //Registering the driver
      Class.forName("org.apache.derby.jdbc.EmbeddedDriver");
      //Getting the Connection object
      String URL = "jdbc:derby:TestDataBase;create=true";
      Connection conn = DriverManager.getConnection(URL);

      //Creating the Statement object
      Statement stmt = conn.createStatement();

      //Creating the Emp table
      stmt.execute("CREATE TABLE Emp ( "
         + "Id INT NOT NULL, "
         + "Name VARCHAR(255), "
         + "Salary INT NOT NULL, "
         + "Location VARCHAR(255))");

      //Insert values in to the EMp table
      String query = "INSERT INTO Emp(Id, Name, Salary, Location) VALUES \r\n"
         +"(1, 'Amit', 30000, 'Hyderabad'), "
         + "(2, 'Kalyan', 40000, 'Vishakhapatnam'), "
         + "(3,'Renuka', 50000, 'Delhi'), "
         + "(4, 'Archana', 15000, 'Mumbai'), "
         + "(5, 'Trupthi', 45000, 'Kochin')";
         stmt.execute(query);

      //Creating the BackUp table
      stmt.execute("CREATE TABLE BackUp ( "
         + "Id INT NOT NULL, "
         + "Name VARCHAR(255), "
         + "Salary INT NOT NULL, "
         + "Location VARCHAR(255))");

      //Creating a trigger
      String createTrigger = "CREATE TRIGGER my_trigger "
         + "AFTER DELETE ON Emp "
         + "REFERENCING OLD AS oldRow "
         + "FOR EACH ROW MODE DB2SQL "
         + "INSERT INTO BackUp "
         + "VALUES (oldRow.Id, oldRow.Name, oldRow.Salary, oldRow.Location)";
      stmt.execute(createTrigger);
      System.out.println("Trigger created");

      //Deleting records from Emp table
      stmt.executeUpdate("Delete From Emp where Name = 'Kalyan'");
      stmt.executeUpdate("Delete From Emp where Name = 'Amit'");
      //Getting the contents of BackUp table
      ResultSet rs = stmt.executeQuery("SELECT * from BackUp");
      while(rs.next()){
         System.out.println(rs.getInt("Id"));
         System.out.println(rs.getString("Name"));
         System.out.println(rs.getString("Salary"));
         System.out.println(rs.getString("Location"));
         System.out.println(" ");
      }
   }
}
Output
On executing the above program, the following output is generated −
Trigger created
2
Kalyan
40000
Vishakhapatnam
1
Amit
30000
Hyderabad