Java RMI - GUI Uygulaması
Önceki bölümde, örnek bir RMI uygulaması oluşturduk. Bu bölümde, bir istemcinin GUI penceresi (JavaFX) görüntüleyen bir yöntemi çağırdığı bir RMI uygulamasının nasıl oluşturulacağını açıklayacağız.
Uzak Arayüzü Tanımlama
Burada, adında bir uzak arabirim tanımlıyoruz Hello adlı bir yöntemle animation() içinde.
import java.rmi.Remote;
import java.rmi.RemoteException;

// Creating Remote interface for our application
public interface Hello extends Remote {
   void animation() throws RemoteException;
}
Uygulama Sınıfının Geliştirilmesi
Bu uygulamanın Implementation sınıfında (Remote Object) JavaFX kullanarak GUI içeriğini görüntüleyen bir pencere oluşturmaya çalışıyoruz.
import javafx.animation.RotateTransition;
import javafx.application.Application;
import javafx.event.EventHandler;

import javafx.scene.Group;
import javafx.scene.PerspectiveCamera;
import javafx.scene.Scene;
import javafx.scene.control.TextField;
import javafx.scene.input.KeyEvent;
import javafx.scene.paint.Color;
import javafx.scene.paint.PhongMaterial;

import javafx.scene.shape.Box;
import javafx.scene.text.Font;
import javafx.scene.text.FontWeight;
import javafx.scene.text.Text;
import javafx.scene.transform.Rotate;

import javafx.stage.Stage;
import javafx.util.Duration;

// Implementing the remote interface
public class FxSample extends Application implements Hello {
   @Override
   public void start(Stage stage) {
      // Drawing a Box
      Box box = new Box();

      // Setting the properties of the Box
      box.setWidth(150.0);
      box.setHeight(150.0);
      box.setDepth(100.0);

      // Setting the position of the box
      box.setTranslateX(350);
      box.setTranslateY(150);
      box.setTranslateZ(50);

      // Setting the text
      Text text = new Text(
         "Type any letter to rotate the box, and click on the box to stop the rotation");

      // Setting the font of the text
      text.setFont(Font.font(null, FontWeight.BOLD, 15));

      // Setting the color of the text
      text.setFill(Color.CRIMSON);

      // Setting the position of the text
      text.setX(20);
      text.setY(50);

      // Setting the material of the box
      PhongMaterial material = new PhongMaterial();
      material.setDiffuseColor(Color.DARKSLATEBLUE);

      // Setting the diffuse color material to box
      box.setMaterial(material);

      // Setting the rotation animation to the box
      RotateTransition rotateTransition = new RotateTransition();

      // Setting the duration for the transition
      rotateTransition.setDuration(Duration.millis(1000));

      // Setting the node for the transition
      rotateTransition.setNode(box);

      // Setting the axis of the rotation
      rotateTransition.setAxis(Rotate.Y_AXIS);

      // Setting the angle of the rotation
      rotateTransition.setByAngle(360);

      // Setting the cycle count for the transition
      rotateTransition.setCycleCount(50);

      // Setting auto reverse value to false
      rotateTransition.setAutoReverse(false);

      // Creating a text filed
      TextField textField = new TextField();

      // Setting the position of the text field
      textField.setLayoutX(50);
      textField.setLayoutY(100);

      // Handling the key typed event
      EventHandler<KeyEvent> eventHandlerTextField = new EventHandler<KeyEvent>() {
         @Override
         public void handle(KeyEvent event) {
            // Playing the animation
            rotateTransition.play();
         }
      };

      // Adding an event handler to the text feld
      textField.addEventHandler(KeyEvent.KEY_TYPED, eventHandlerTextField);

      // Handling the mouse clicked event(on box)
      EventHandler<javafx.scene.input.MouseEvent> eventHandlerBox =
         new EventHandler<javafx.scene.input.MouseEvent>() {
         @Override
         public void handle(javafx.scene.input.MouseEvent e) {
            rotateTransition.stop();
         }
      };

      // Adding the event handler to the box
      box.addEventHandler(javafx.scene.input.MouseEvent.MOUSE_CLICKED, eventHandlerBox);

      // Creating a Group object
      Group root = new Group(box, textField, text);

      // Creating a scene object
      Scene scene = new Scene(root, 600, 300);

      // Setting camera
      PerspectiveCamera camera = new PerspectiveCamera(false);
      camera.setTranslateX(0);
      camera.setTranslateY(0);
      camera.setTranslateZ(0);
      scene.setCamera(camera);

      // Setting title to the Stage
      stage.setTitle("Event Handlers Example");

      // Adding scene to the stage
      stage.setScene(scene);

      // Displaying the contents of the stage
      stage.show();
   }

   // Implementing the interface method
   public void animation() {
      launch();
   }
}
Sunucu Programı
Bir RMI sunucu programı uzak arabirimi uygulamalı veya uygulama sınıfını genişletmelidir. Burada, uzak bir nesne oluşturmalı ve onuRMIregistry.
Bu uygulamanın sunucu programı aşağıdadır. Burada, yukarıda oluşturulan sınıfı genişleteceğiz, uzak bir nesne oluşturacağız ve onu bağlama adıyla RMI kayıt defterine kaydedeceğiz.hello.
import java.rmi.registry.Registry;
import java.rmi.registry.LocateRegistry;
import java.rmi.RemoteException;
import java.rmi.server.UnicastRemoteObject;

public class Server extends FxSample {
   public Server() {}
   public static void main(String args[]) {
      try {
         // Instantiating the implementation class
         FxSample obj = new FxSample();

         // Exporting the object of implementation class
         // (here we are exporting the remote object to the stub)
         Hello stub = (Hello) UnicastRemoteObject.exportObject(obj, 0);

         // Binding the remote object (stub) in the registry
         Registry registry = LocateRegistry.getRegistry();

         registry.bind("Hello", stub);
         System.err.println("Server ready");
      } catch (Exception e) {
         System.err.println("Server exception: " + e.toString());
         e.printStackTrace();
      }
   }
}
Müşteri Programı
Bu uygulamanın istemci programı aşağıdadır. Burada uzak nesneyi getiriyoruz ve onun isimli metodunu çağırıyoruzanimation().
import java.rmi.registry.LocateRegistry;
import java.rmi.registry.Registry;

public class Client {
   private Client() {}
   public static void main(String[] args) {
      try {
         // Getting the registry
         Registry registry = LocateRegistry.getRegistry(null);

         // Looking up the registry for the remote object
         Hello stub = (Hello) registry.lookup("Hello");

         // Calling the remote method using the obtained object
         stub.animation();

         System.out.println("Remote method invoked");
      } catch (Exception e) {
         System.err.println("Client exception: " + e.toString());
         e.printStackTrace();
      }
   }
}
Örneği Çalıştırmak için Adımlar
RMI Örneğimizi çalıştırmak için gereken adımlar aşağıdadır.
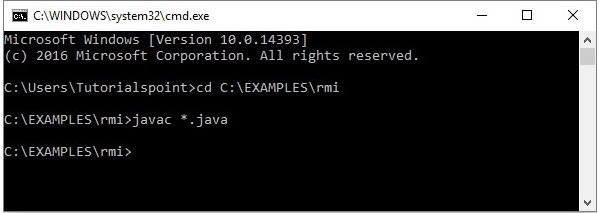
Step 1 - Tüm programları kaydettiğiniz klasörü açın ve tüm Java dosyalarını aşağıda gösterildiği gibi derleyin.
Javac *.java
Step 2 - Başlat rmi aşağıdaki komutu kullanarak kayıt defteri.
start rmiregistry
Bu bir başlayacak rmi aşağıda gösterildiği gibi ayrı bir pencerede kayıt.

Step 3 - Sunucu sınıfı dosyasını aşağıda gösterildiği gibi çalıştırın.
Java Server
Step 4 - İstemci sınıfı dosyasını aşağıda gösterildiği gibi çalıştırın.
java Client
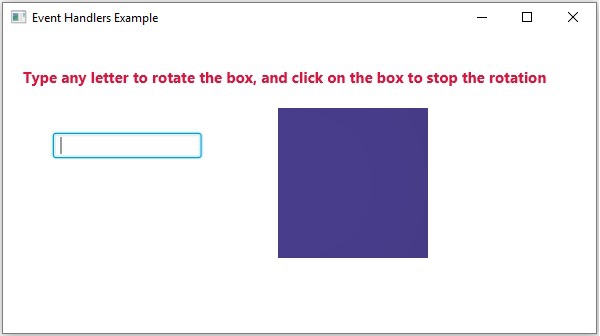
Verification - İstemciyi başlatır başlatmaz, sunucuda aşağıdaki çıktıyı görürsünüz.
