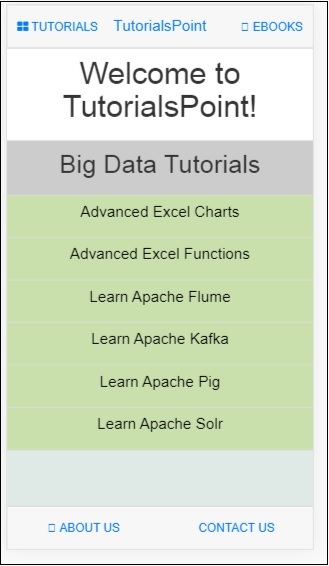
Giao diện người dùng di động Angular - Hướng dẫn nhanh
Mobile Angular UI là một khung mã nguồn mở để phát triển các ứng dụng di động kết hợp. Mobile Angular UI sử dụng Twitter Bootstrap và AngularJS để giúp tạo các ứng dụng máy tính và di động lai HTML5 hấp dẫn.
Các tính năng của Mobile Angular UI
Mobile Angular UI có một số thành phần thú vị được liệt kê bên dưới:
Navbars- Navbars sử dụng phần trên và dưới của màn hình thiết bị. Chúng ta có thể sử dụng thanh điều hướng trên cùng để hiển thị các mục menu hoặc phần tiêu đề. Thanh điều hướng dưới cùng có thể được sử dụng để hiển thị phần chân trang.
Scrollable Areas- Tính năng này làm cho ứng dụng thân thiện hơn với người dùng. Thêm các lớp css. scrollable-header / .scrollable-footer , sẽ thêm đầu trang / chân trang cố định vào vùng có thể cuộn mà bạn muốn. Bạn không phải lo lắng về chiều cao và vị trí, css sẽ lo mọi thứ.
Accordion- Accordions chủ yếu được sử dụng khi nội dung được cho là ở dạng xem phần và bất kỳ, một phần được hiển thị tại một thời điểm. Bạn có thể ẩn và mở phần tiếp theo để xem nội dung trong đó.
Dropdowns - Để làm việc với trình đơn thả xuống, hãy thêm menu css .dropdown vào vùng chứa để phục vụ mục đích.
Modals and Overlays- Chế độ và Lớp phủ sẽ hiển thị cửa sổ loại bật lên trên màn hình của bạn. Lớp phủ chỉ khác với phương thức ở cách vùng chứa được hiển thị cho nó.
Sections- Phần là vùng chứa được hiển thị bên trong cơ thể. Bạn có thể sửa đổi bố cục của màn hình trong thiết bị với các lớp có sẵn với các phần. Bạn có thể sử dụng các lớp như.section-default, .section-primary, .section-success, .section-info, .section-warning or .section-danger để thay đổi bố cục.
Sidebars- Các thanh bên chiếm bên trái và bên phải của màn hình. Chúng luôn ẩn và được kích hoạt khi mục được kết nối với bên trái hoặc bên phải được nhấp vào. Đó là cách tốt nhất để tận dụng không gian trên màn hình.
Toggle Switch - Giao diện người dùng Angular trên thiết bị di động cung cấp các yếu tố chuyển đổi bằng cách sử dụng ui-switchchỉ thị. Lệnh ui-switch thực hiện chuyển đổi khi được áp dụng cho giá trị ngModel boolean.
Tabs- Tab là thành phần hữu ích có sẵn trong ui di động góc cạnh. Các tab có sẵn trong cùng một trình bao bọc và hiển thị nội dung của bạn trong ngăn riêng biệt giống như cách các tab được mở trong trình duyệt. Chỉ một tab được hiển thị cho người dùng tại một thời điểm.
Ưu điểm của Mobile Angular UI
Sau đây là những ưu điểm của Mobile Angular UI:
Mobile Angular UI cung cấp các thành phần giao diện người dùng di động thú vị như thanh điều hướng, thanh bên, phương thức và lớp phủ, công tắc, v.v.
Dễ dàng tạo các ứng dụng kết hợp vì nó sử dụng AngularJS và Twitter Bootstrap, rất dễ học và bắt đầu. Ngoài ra, nó là một khung mã nguồn mở miễn phí.
Có thể sử dụng các thành phần ion cùng với các thành phần Mobile Angular UI.
Nhược điểm của Mobile Angular UI
Sau đây là những nhược điểm của Mobile Angular UI -
Là một khung công tác chỉ sử dụng JavaScript, các ứng dụng được viết bằng AngularJS không an toàn. Xác thực và ủy quyền phía máy chủ phải để giữ an toàn cho ứng dụng.
Khi các chỉ thị AngularJS được thêm vào việc gỡ lỗi đánh dấu HTML sẽ trở nên khó khăn một chút khi lỗi xuất hiện.
Trong chương này, chúng tôi sẽ cài đặt Mobile Angular UI để chúng tôi có thể sử dụng nó trong dự án của mình.
Có hai cách để cài đặt Mobile Angular UI -
- Tải xuống từ Github
- Sử dụng Npm
Tải xuống từ Github
Truy cập liên kết github sau:https://github.com/mcasimir/mobile-angular-ui/releasesvà bạn có thể tải xuống giao diện người dùng di động góc cạnh mới nhất. Liên kết github cho ui góc di động như sau
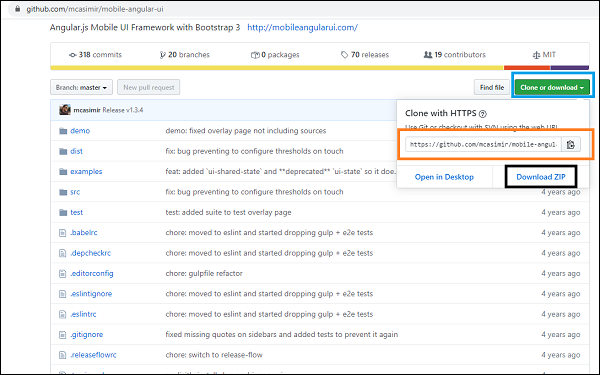
Nhấp vào nút Sao chép hoặc tải xuống (được đánh dấu màu xanh lam) và nó hiển thị cho bạn liên kết GitHub (được đánh dấu màu cam) có thể được sao chép và tệp ZIP Tải xuống (được đánh dấu màu đen) trong đó bạn có thể tải xuống mã đầy đủ của Angular Mobile UI.
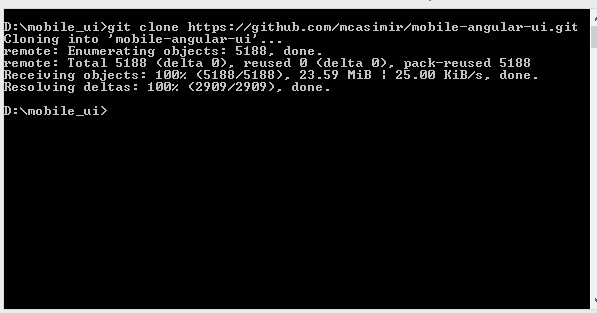
Để sao chép liên kết GitHub, bạn cần cài đặt git. Đảm bảo rằng bạn đã cài đặt git trên hệ thống của mình nếu bạn không phải theo liên kết này để cài đặt GIT .
Đầu tiên sẽ sao chép liên kết github - https://github.com/mcasimir/mobile-angular-ui.git.
Để tải các tệp giao diện người dùng góc cạnh trên thiết bị di động - cd mobile-angle-ui / src / js.
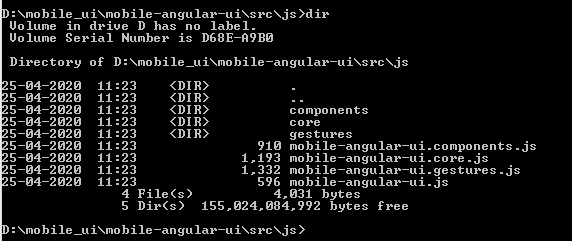
Các tệp mà bạn cần có như được hiển thị ở trên.
Sử dụng Npm
Sử dụng npm là cách dễ nhất để cài đặt. Đảm bảo rằng bạn đã cài đặt nodejs và npm. Nếu không, hãy nhấp vào liên kết này để cài đặt nodejs trên hệ thống của bạn.
Mở dấu nhắc lệnh của bạn và tạo một thư mục có tên uiformobile / . Vào bên trong lệnh uiformobile / using cd.
Bây giờ hãy thực hiện lệnh sau:
npm initLệnh npm init sẽ khởi tạo dự án -
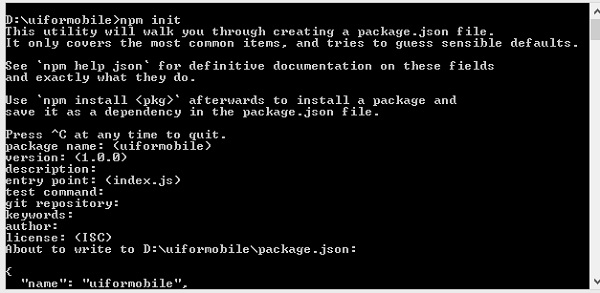
Nó sẽ tạo package.json như hình dưới đây:
{
   "name": "uiformobile",
   "version": "1.0.0",
   "description": "",
   "main": "index.js",
   "scripts": {
      "test": "echo \"Error: no test specified\" && exit 1"
   },
   "author": "",
   "license": "ISC"
}
Bây giờ hãy chạy lệnh sau để cài đặt UI góc di động.
npm install --save mobile-angular-ui
Bạn đã hoàn tất việc cài đặt giao diện người dùng góc cạnh trên thiết bị di động, bây giờ chúng ta hãy xem cách sử dụng nó để tạo ứng dụng di động.
Chương này sẽ làm việc về thiết lập dự án. Chúng tôi sẽ sử dụng thiết lập này để làm việc với các ví dụ trong phần còn lại của các chương.
Quá trình thiết lập dự án sẽ được thực hiện bằng npm, vì có thể dễ dàng cài đặt bất kỳ gói nào được yêu cầu.
Mở dấu nhắc lệnh của bạn và tạo một thư mục có tên uiformobile / và nhập thư mục bằng lệnh cd.
Bây giờ hãy thực hiện lệnh sau:
npm initLệnh npm init sẽ khởi tạo proect -

Nó sẽ tạo package.json như hình dưới đây:
{
   "name": "uiformobile",
   "version": "1.0.0",
   "description": "",
   "main": "index.js",
   "scripts": {
      "test": "echo \"Error: no test specified\" && exit 1"
   },
   "author": "",
   "license": "ISC"
}
Bây giờ chạy lệnh sau để cài đặt ui góc di động.
npm install --save mobile-angular-ui
Để làm việc với Mobile Angular UI, chúng ta cần AngularJS. Hãy để chúng tôi cài đặt điều đó bằng lệnh sau:
npm install --save-dev angular
Chúng tôi cũng cần đường góc để làm việc với định tuyến. Để cài đặt nó, lệnh là -
npm install --save-dev angular-route
Chúng tôi sẽ cần một máy chủ chạy ứng dụng của chúng tôi trong trình duyệt. Chúng tôi sẽ sử dụng nhanh.
Lệnh để cài đặt express là -
npm install --save-dev expressTạo một tệp server.js bên trong thư mục gốc. Tệp này sẽ có lệnh express để khởi động máy chủ.
Đây là chi tiết của server.js -
const express=require('express')
const app=express();
const port=3000;
var path=require("path");
app.use("/node_modules", express.static("D:/uiformobile/node_modules"));
app.use("/src", express.static("D:/uiformobile/src/"));
app.use("/src/js", express.static("D:/uiformobile/src/js"));
app.all("/*", function (req, res, next) {
   res.sendFile("index.html", { root: "D:/uiformobile/" });
});
app.listen(port, () => console.log('Starting your Mobile Angular App on port ${port}!'))
Để khởi động máy chủ, hãy sử dụng lệnh sau:
node server.js.Máy chủ sẽ bắt đầu ở cổng 3000. Bạn có thể sử dụng http://localhost:3000/ để xem giao diện người dùng trong trình duyệt của bạn.
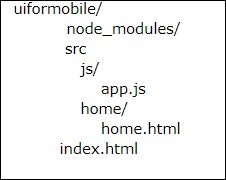
Cấu trúc thư mục cuối cùng như hình dưới đây:

Thư mục node_modules / có tất cả các gói được cài đặt cho mobile_angular_ui, anglejs và angle-route.
Các src/thư mục sẽ có các tệp HTML và js cần thiết để phát triển giao diện người dùng. Index.html là điểm bắt đầu sẽ được nhìn thấy khi bạn nhấnhttp://localhost:3000/.
Bây giờ các gói yêu cầu đã được cài đặt. Bây giờ chúng ta hãy nói về các tệp css và js quan trọng mà chúng ta cần. Mặc dù khuôn khổ dành cho Ứng dụng di động, nó cũng có thể được sử dụng cho các ứng dụng dành cho máy tính để bàn.
Sau đây là các tệp css quan trọng bắt buộc phải có trong tệp .html của bạn.
| Sr.No | Mô tả tập tin |
|---|---|
| 1 | mobile-angular-ui-base.css Tệp css này dành cho thiết bị di động và máy tính bảng. |
| 2 | mobile-angular-ui-desktop.css Tệp css đáp ứng có nghĩa là được sử dụng trên máy tính để bàn và thiết bị di động. |
| 3 | mobile-angular-ui-hover.css Điều này có quy tắc css cho di chuột. |
| 4 | angular.min.js Tập tin AngularJS mà chúng ta cần để bắt đầu với dự án. |
| 5 | mobile-angular-ui.min.js Đây là tệp js UI góc cạnh di động mà chúng ta cần sử dụng trong mô-đun phụ thuộc trong mô-đun AngularJS. Đây là mô-đun cốt lõi. |
| 6 | angular-route.min.js Đây là tệp AngularJS Route được sử dụng để Định tuyến. |
Tất cả các tệp trên đều có bên trong node_modules/. Chúng tôi đã hoàn tất việc thiết lập dự án, bây giờ chúng tôi sẽ sử dụng dự án này trong chương tiếp theo để phát triển ứng dụng đầu tiên của chúng tôi.
Trong chương này, chúng tôi sẽ tạo ứng dụng đầu tiên chạy trên thiết bị di động cũng như trên máy tính để bàn.
Thiết lập dự án mà chúng ta đã tạo trong chương trước có cấu trúc như sau:
uiformobile/
   node_modules/
   src/
   package.json
   index.html
Làm theo các bước để tạo giao diện người dùng đơn giản bằng Giao diện người dùng góc di động.
Bước 1
Thêm các tệp css sau vào phần đầu html như hình dưới đây -
<!-- Required for desktop -->
<link rel="stylesheet" href="/node_modules/mobile-angular-ui/dist/css/mobile-angular-ui-hover.min.css" />

<!-- Mandatory CSS -->
<link rel="stylesheet" href="/node_modules/mobile-angular-ui/dist/css/mobile-angular-ui-base.min.css" />

<!-- Required for desktop -->
<link rel="stylesheet" href="/node_modules/mobile-angular-ui/dist/css/mobile-angular-ui-desktop.min.css" />
Tiếp theo, thêm các tệp js -
<script src="/node_modules/angular/angular.min.js"></script>
<script src="/node_modules/angular-route/angular-route.min.js"></script>
<script src="/node_modules/mobile-angular-ui/dist/js/mobile-angular-ui.min.js"></script>
Tệp index.html sẽ trông như sau:
<!DOCTYPE html>
<html>
   <head>
      <meta charset="utf-8">
      <title>My App</title>
      <!-- Required for desktop -->
      <link rel="stylesheet" href="/node_modules/mobile-angular-ui/dist/css/mobile-angular-ui-hover.min.css" />

      <!-- Mandatory CSS -->
      <link rel="stylesheet" href="/node_modules/mobile-angular-ui/dist/css/mobile-angular-ui-base.min.css" />

      <!-- Required for desktop -->
      <link rel="stylesheet" href="/node_modules/mobile-angular-ui/dist/css/mobile-angular-ui-desktop.min.css" />
      <script src="/node_modules/angular/angular.min.js"></script>
      <script src="/node_modules/angular-route/angular-route.min.js"></script>
      <script src="/node_modules/mobile-angular-ui/dist/js/mobile-angular-ui.min.js"></script>
   </head>
   <body>
   </body>
</html>
Bước 2
Chúng ta sẽ thấy bố cục cơ bản của giao diện người dùng góc trên thiết bị di động như bên dưới:
<body ng-app="myFirstApp">

   <!-- Sidebars -->
   <div class="sidebar sidebar-left"><!-- ... --></div>
   <div class="sidebar sidebar-right"><!-- ... --></div>

   <div class="app">
   <div class="navbar navbar-app navbar-absolute-top"><!-- Top Navbar --></div>
   <div class="navbar navbar-app navbar-absolute-bottom"><!-- Bottom Navbar --></div>

      <!-- App body -->
         <div class='app-body'>
            <div class='app-content'>
               <ng-view></ng-view>
            </div>
         </div>
      </div><!-- ~ .app -->

   <!-- Modals and Overlays -->
   <div ui-yield-to="modals"></div>

</body>
Bước 3
Tạo một js/ folder in src/ và thêm vào app.js với nó.
Xác định mô-đun và thêm Giao diện người dùng góc cạnh trên thiết bị di động và Tuyến đường góc làm phụ thuộc như hình dưới đây -
<script type="text/javascript">
   'ngRoute',
      angular.module('myFirstApp', [
      'mobile-angular-ui'
   ]);
</script>
Thêm ng-app = ”myFirstApp” vào thẻ <body> -
<body ng-app="myFirstApp">Mô-đun mobile-angle-ui có danh sách các mô-đun sau:
angular.module('mobile-angular-ui', [
   'mobile-angular-ui.core.activeLinks',      /* adds .active class to current links */
   'mobile-angular-ui.core.fastclick',        /* polyfills overflow: auto */
   'mobile-angular-ui.core.sharedState',      /* SharedState service and directives */
   'mobile-angular-ui.core.outerClick',       /* outerClick directives */
   'mobile-angular-ui.components.modals',     /* modals and overlays */
   'mobile-angular-ui.components.switch',     /* switch form input */
   'mobile-angular-ui.components.sidebars',   /* sidebars */
   'mobile-angular-ui.components.scrollable', /* uiScrollable directives */
   'mobile-angular-ui.components.capture',    /* uiYieldTo and uiContentFor directives */
   'mobile-angular-ui.components.navbars'     /* navbars */
]);
Mobile-angle-ui.min.js, có tất cả các mô-đun lõi và thành phần ở trên. Bạn cũng có thể tải các thành phần cần thiết theo yêu cầu của mình thay vì tải toàn bộ mobile-angle-ui.min.js.
Bước 4
Thêm bộ điều khiển vào thẻ body của bạn như hình dưới đây -
<body ng-app="myFirstApp" ng-controller="MainController">Bước 5
Trong bố cục cơ bản, chúng tôi đã thêm <ng-view></ng-view>, điều đó sẽ tải các lượt xem cho chúng tôi.
Hãy để chúng tôi xác định các tuyến đường trong app.js bằng cách sử dụng ngRoute. Các tệp cần thiết cho định tuyến đã được thêm vào phần đầu.
Tạo một thư mục home / trong src /. Thêm home.html vào nó với các chi tiết sau:
<div class="list-group text-center">
   <div class="list-group-item list-group-item-home">
      <h1>{{msg}}</h1>
   </div>
</div>
Bây giờ khi chúng tôi khởi động ứng dụng, theo mặc định, chúng tôi muốn home.html được hiển thị bên trong <ng-view> </ng-view>.
Định tuyến được cấu hình bên trong app.config () như hình dưới đây:
app.config(function($routeProvider, $locationProvider) {
   $routeProvider
   .when("/", {
      templateUrl : "src/home/home.html"
   });
   $locationProvider.html5Mode({enabled:true, requireBase:false});
});
Bước 6
Chúng tôi đã thêm {{msg}} bên trong home.html như được hiển thị bên dưới -
<div class="list-group text-center">
   <div class="list-group-item list-group-item-home">
      <h1>{{msg}}</h1>
   </div>
</div>
Hãy để chúng tôi xác định tương tự trong bộ điều khiển như hình dưới đây:
app.controller('MainController', function($rootScope, $scope, $routeParams) {
   $scope.msg="Welcome to Tutorialspoint!"
});
Bước 7
Bây giờ hãy chạy lệnh để khởi động ứng dụng bằng lệnh dưới đây:
node server.js
Bước 8
Tải ứng dụng của bạn tại http://localhost:3000 trong trình duyệt -
Bạn sẽ thấy màn hình sau ở chế độ di động -

Bạn sẽ thấy màn hình sau ở chế độ Máy tính để bàn -
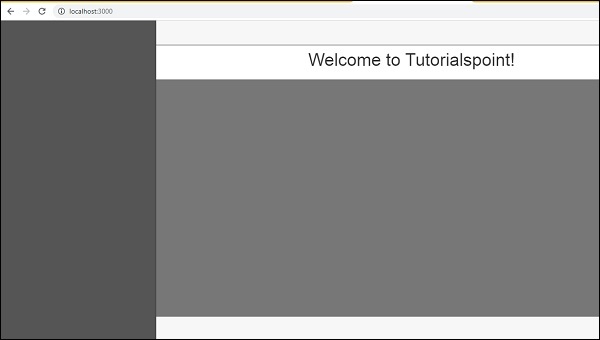
Hãy để chúng tôi hiểu chi tiết về từng thành phần trong Mobile Angular UI trong các chương tiếp theo.
Đây là mã cuối cùng cho màn hình trên. Cấu trúc thư mục cho đến nay như sau:
index.html
<!DOCTYPE html>
<html>
   <head>
      <meta charset="utf-8" />
      <title>Mobile Angular UI Demo</title>
      <meta http-equiv="X-UA-Compatible" content="IE=edge,chrome=1" />
      <meta name="apple-mobile-web-app-capable" content="yes" />
      <meta name="viewport" content="user-scalable=no, initial-scale=1.0, maximum-scale=1.0, minimal-ui" />

      <meta name="apple-mobile-web-app-status-bar-style" content="yes" />
      <link rel="shortcut icon" href="/assets/img/favicon.png" type="image/x-icon" />
      <link rel="stylesheet" href="node_modules/mobile-angular-ui/dist/css/mobile-angular-ui-hover.min.css" />
      <link rel="stylesheet" href="node_modules/mobile-angular-ui/dist/css/mobile-angular-ui-base.min.css" />
      <link rel="stylesheet" href="node_modules/mobile-angular-ui/dist/css/mobile-angular-ui-desktop.min.css" />
      <script src="node_modules/angular/angular.min.js"></script>
      <script src="node_modules/angular-route/angular-route.min.js"></script>
      <script src="node_modules/mobile-angular-ui/dist/js/mobile-angular-ui.min.js"></script>
      <script src="src/js/app.js"></script>
   </head>

   <body ng-app="myFirstApp" ng-controller="MainController">

      <!-- Sidebars -->
      <div class="sidebar sidebar-left"><!-- ... --></div>
      <div class="sidebar sidebar-right"><!-- ... --></div>

      <div class="app">
         <div class="navbar navbar-app navbar-absolute-top"><!-- Top Navbar --></div>
         <div class="navbar navbar-app navbar-absolute-bottom"><!-- Bottom Navbar --></div>

         <!-- App body -->

         <div class='app-body'>
            <div class='app-content'>
               <ng-view></ng-view>
            </div>
         </div>
      </div><!-- ~ .app -->

      <!-- Modals and Overlays -->
      <div ui-yield-to="modals"></div>
   </body>

</html>
js/app.js
/* eslint no-alert: 0 */

'use strict';
//
// Here is how to define your module
// has dependent on mobile-angular-ui
//
var app=angular.module('myFirstApp', [
   'ngRoute',
   'mobile-angular-ui'
]);
app.config(function($routeProvider, $locationProvider) {
   $routeProvider
   .when("/", {
      templateUrl : "src/home/home.html"
   });
   $locationProvider.html5Mode({enabled:true, requireBase:false});
});
app.controller('MainController', function($rootScope, $scope, $routeParams) {
   $scope.msg="Welcome to Tutorialspoint!"
});
home/home.html
<div class="list-group text-center">
   <div class="list-group-item list-group-item-home">
      <h1>{{msg}}</h1>
   </div>
</div>
Trong chương này, chúng ta sẽ hiểu về cách hiển thị bố cục cơ bản có sẵn trong Mobile Angular UI.
Cấu trúc của bố cục cơ bản như sau
<body ng-app="myFirstApp" ng-controller="MainController">

   <!-- Sidebars -->
   <div class="sidebar sidebar-left"><!-- ... --></div>
   <div class="sidebar sidebar-right"><!-- ... --></div>

   <div class="app">
      <div class="navbar navbar-app navbar-absolute-top"><!-- Top Navbar --></div>
      <div class="navbar navbar-app navbar-absolute-bottom"><!-- Bottom Navbar --></div>

      <!-- App body -->
      <div class='app-body'>
         <div class='app-content'>
            <ng-view></ng-view>
         </div>
      </div>
   </div><!-- ~ .app -->

   <!-- Modals and Overlays -->
   <div ui-yield-to="modals"></div>

</body>
Màn hình điện thoại di động hoặc máy tính để bàn của bạn được chia thành nhiều phần.
Thanh bên
Phần nội dung bắt đầu với các vùng chứa div của thanh bên, một cho bên trái và một cho bên phải -
<!-- Sidebars -->
<div class="sidebar sidebar-left"><!-- ... --></div>
<div class="sidebar sidebar-right"><!-- ... --></div>
Thanh bên giúp tận dụng không gian hiệu quả, đặc biệt trên thiết bị di động và điều đó làm cho giao diện người dùng rất tương tác và gọn gàng. Theo sidebar, các cửa sổ mở ra từ bên trái và bên phải.
Navbars
Phần tiếp theo là thanh điều hướng. Sau đây là các vùng chứa div cho các thanh điều hướng được hiển thị:
<div class="navbar navbar-app navbar-absolute-top"><!-- Top Navbar --></div>
<div class="navbar navbar-app navbar-absolute-bottom"><!-- Bottom Navbar --></div>
Chúng được hiển thị ở trên cùng và ở dưới cùng.
Phần nội dung ứng dụng
Phần này là nơi chính hiển thị nội dung của bạn để người dùng tương tác hoặc đọc.
<div class='app-body'>
   <div class='app-content'>
      <ng-view></ng-view>
   </div>
</div>
Nó sử dụng <ng-view></ng-view>chỉ thị sẽ được thay thế bằng nội dung thực tế dựa trên tương tác của người dùng trên giao diện người dùng. AngularJS NgRoute được sử dụng ở đây để thay thế các khung nhìn.
Chế độ và Lớp phủ
Phần cuối cùng là phần phương thức và lớp phủ. Vùng chứa div để hiển thị các phương thức và lớp phủ như sau:
<!-- Modals and Overlays -->
<div ui-yield-to="modals"></div>
Trong chương này, chúng ta sẽ hiểu các thành phần quan trọng trong giao diện người dùng góc cạnh trên thiết bị di động. Chúng như sau:
- Navbars
- Sidebars
- Modals
- Overlays
Navbars
Các thanh điều hướng sử dụng phần trên và dưới của màn hình thiết bị. Chúng ta có thể sử dụng thanh điều hướng trên cùng để hiển thị các mục menu hoặc phần tiêu đề. Thanh điều hướng dưới cùng có thể được sử dụng để hiển thị phần chân trang.
Một cách hiển thị đơn giản của thanh điều hướng trên màn hình như sau:
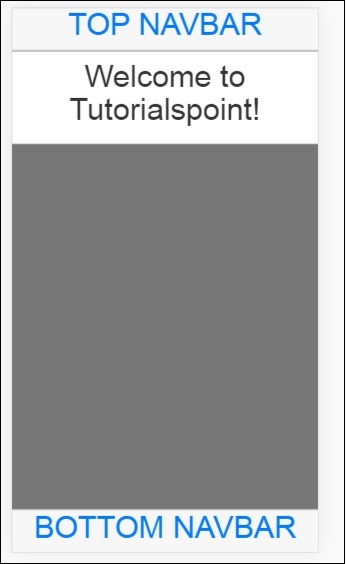
Navbar có thể được hiển thị theo hai cách: cách tiếp cận cố định và cách tiếp cận tràn.
Các lớp CSS quan trọng
Trong Mobile Angular UI để hiển thị thanh điều hướng, bạn phải sử dụng các lớp css - navbar, .navbar-app .
Các lớp cho phương pháp Tiếp cận Tràn Trên / Dưới
Đối với thanh điều hướng trên cùng, lớp css - .navbar-Absol-top .
Đối với thanh điều hướng dưới cùng, lớp css - .navbar-tuyệt đối-bottom .
Các lớp cho phương pháp tiếp cận cố định Trên / Dưới
Đối với thanh điều hướng trên cùng, lớp css - .navbar-fixed-top .
Đối với thanh điều hướng dưới cùng, lớp css - .navbar-fixed-bottom .
Hãy để chúng tôi làm việc trên Thanh điều hướng tràn trên giao diện người dùng.
Sau đây là mã HTML cho cùng một mã:
Navbar-Top
<div class="navbar navbar-app navbar-absolute-top">
   <div class="btn-group pull-left">
      <div class="btn">
         <i class="fa fa-th-large "></i> Library
      </div>
   </div>
   <div class="navbar-brand navbar-brand-center" ui-yield-to="title">
      TutorialsPoint
   </div>
   <div class="btn-group pull-right" ui-yield-to="navbarAction">
      <div class="btn">
         <i class="fal fa-search"></i> eBooks
      </div>
   </div>
</div>
Navbar-Bottom
<div class="navbar navbar-app navbar-absolute-bottom">
   <div class="btn-group justified">
      <a href="https://www.tutorialspoint.com/about/index.htm" class="btn btn-navbar"><i class="fal fa-globe"></i> About us</a>
      <a href="https://www.tutorialspoint.com/about/contact_us.htm" class="btn btn-navbar"><i class="fal fa-map-marker-alt"></i> Contact us</a>
   </div>
</div>
Đây là cách màn hình trông như thế này -

Sidebars
Các thanh bên chiếm bên trái và bên phải của màn hình. Chúng luôn ẩn và được kích hoạt khi mục được kết nối với bên trái hoặc bên phải được nhấp vào. Đó là cách tốt nhất để tận dụng không gian trên màn hình.
Cho đến nay chúng ta đã thấy sự hoạt động của các thanh điều hướng. Bây giờ chúng ta hãy sử dụng mục điều hướng ở bên trái và bên phải để mở thanh bên.
Bạn có thể đặt thanh bên ở bên trái hoặc bên phải.
Các lớp CSS quan trọng
Các lớp css cho sidebar bên trái - sidebar sidebar-left .
Các lớp css cho sidebar bên phải - sidebar sidebar-right .
Vùng chứa div cho thanh bên như sau:
<!-- Sidebars -->
<div class="sidebar sidebar-left"><!-- ... --></div>
<div class="sidebar sidebar-right"><!-- ... --></div>
Tương tác với Sidebars
Để mở và đóng các thanh bên được thêm vào bên trái và bên phải, bạn cần thêm phần sau vào thẻ html sẽ mở các thanh bên.
Ví dụ: để mở thanh bên trái khi nhấp vào một liên kết, bạn có thể thêm những thứ sau:
Thanh bên sử dụng sharedstate uiSidebarLeft và uiSidebarRight để chuyển đổi các mục của thanh bên.
Chúng tôi sẽ sử dụng thanh điều hướng trên cùng mà chúng tôi đã thêm trước đó. Thêm ui-toggle = ”uiSidebarLeft” và ui-toggle = "uiSidebarRight" và cả sidebar-toggle và sidebar-right-toggle của lớp.
<div ui-toggle="uiSidebarLeft" class="btn sidebar-toggle"><i class="fa fa-th-large "></i> Library</div><div ui-toggle="uiSidebarRight" class="btn sidebar-right-toggle"><i class="fal fa-search"></i> Search</div>Bây giờ chúng ta hãy thêm một vùng chứa div cho thanh bên trái và thanh bên phải.
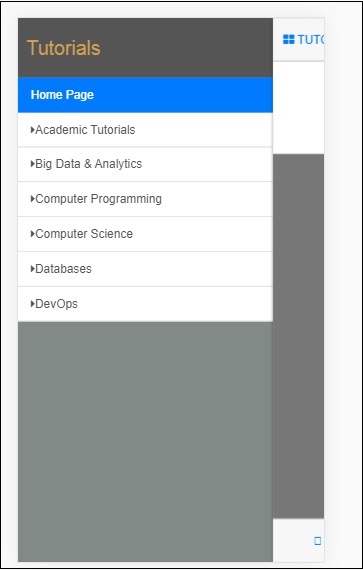
Thanh bên trái
<div class="sidebar sidebar-left">
   <div class="scrollable">
      <h1 class="scrollable-header app-name">Tutorials</h1>
      <div class="scrollable-content">
         <div class="list-group" ui-turn-off='uiSidebarLeft'>
            <a class="list-group-item" href="/">Home Page </a>
            <a class="list-group-item" href="#/academic"><i class="fa fa-caret-right"></i>Academic Tutorials </a>
            <a class="list-group-item" href="#/bigdata"><i class="fa fa-caret-right"></i>Big Data & Analytics </a>
            <a class="list-group-item" href="#/computerProg"><i class="fa fa-caret-right"></i>Computer Programming </a>
            <a class="list-group-item" href="#/computerscience"><i class="fa fa-caret-right"></i>Computer Science </a>
            <a class="list-group-item" href="#/databases"><i class="fa fa-caret-right"></i>Databases </a>
            <a class="list-group-item" href="#/devops"><i class="fa fa-caret-right"></i>DevOps </a>
         </div>
      </div>
   </div>
</div>
Bạn có thể tận dụng ui-turn-off='uiSidebarLeft' or ui-turn-off='uiSidebarRight'trong mẫu thanh bên của bạn để đóng thanh bên khi được nhấp vào bất kỳ đâu bên trong thanh bên. Thanh bên sẽ bị đóng theo mặc định khi được nhấp vào bất kỳ đâu bên ngoài mẫu thanh bên.
Trong thanh bên trái khi người dùng nhấp vào các liên kết, thanh bên sẽ bị đóng lại như chúng tôi đã thêm ui-turn-off='uiSidebarLeft' sang mẫu thanh bên trái.
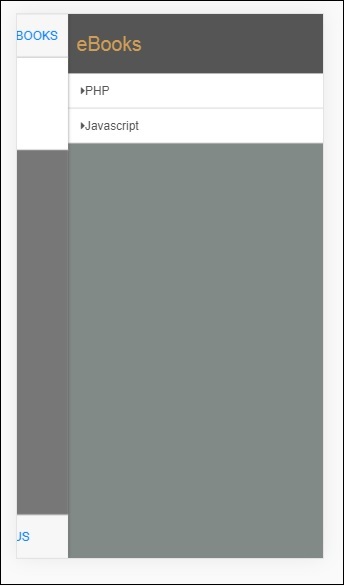
quyền bổ sung
<div class="sidebar sidebar-right">
   <div class="scrollable">
      <h1 class="scrollable-header app-name">eBooks</h1>
      <div class="scrollable-content">
         <div class="list-group" ui-toggle="uiSidebarRight">
            <a class="list-group-item" href="#/php"><i class="fa fa-caret-right"></i>PHP </a>
            <a class="list-group-item" href="#/Javascript"><i class="fa fa-caret-right"></i>Javascript </a>
         </div>
      </div>
   </div>
</div>
Cách hiển thị thanh bên trong trình duyệt như sau:
Nhấp vào Hướng dẫn để có menu thanh bên trái như hình dưới đây -
Nhấp vào Ebooks để xem menu bên phải như hình dưới đây -
Chế độ và Lớp phủ
Chế độ và Lớp phủ sẽ hiển thị một cửa sổ loại bật lên trên màn hình của bạn. Lớp phủ chỉ khác với phương thức ở cách vùng chứa được hiển thị cho nó.
Bạn cần tận dụng ngIf/uiIf hoặc là ngHide/uiHide cùng với uiState để kích hoạt / loại bỏ lớp phủ hoặc phương thức.
Css cho modal sẽ là .modalvà đối với lớp phủ, nó sẽ là .modal-overlay.
Để hiển thị phương thức và lớp phủ, hãy thêm vùng chứa div sau vào bên trong index.html của bạn.
<div ui-yield-to="modals"></div>Hãy để chúng tôi gán một phương thức cho chân trang điều hướng mà chúng tôi đã thực hiện trước đó.
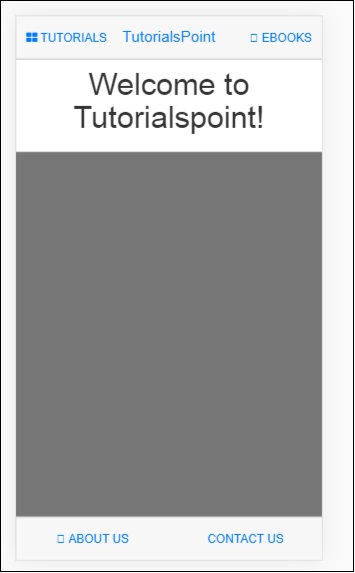
Ở đây GIỚI THIỆU CHÚNG TÔI sẽ hoạt động như một phương thức và LIÊN HỆ VỚI CHÚNG TÔI sẽ hoạt động như một lớp phủ.
Thêm các thay đổi sau vào liên kết GIỚI THIỆU CHÚNG TÔI và LIÊN HỆ VỚI CHÚNG TÔI -
<div class="navbar navbar-app navbar-absolute-bottom">
   <div class="btn-group justified">
      <a ui-turn-on="aboutus_modal" class="btn btn-navbar"><i class="fal fa-globe"></i> About us</a>
      <a ui-turn-on="contactus_overlayl" class="btn btn-navbar"><i class="fal fa-map-marker-alt"></i> Contact us</a>
   </div>
</div>
Nếu chúng ta nhấp vào liên kết này, phương thức và lớp phủ sẽ mở ra.
Nội dung cho phương thức và lớp phủ được thêm vào inside src/home/home.html tập tin.
Nội dung chính cho phương thức và lớp phủ phải được bao bọc bên trong vùng chứa div sau:
<div ui-content-for="modals">
   <div class="modal"><!-- ... --></div>
</div>
Hãy để chúng tôi thêm nội dung vào chế độ xem phương thức và lớp phủ. Tên chúng tôi đã sử dụng trên các liên kết, tức là,ui-turn-on="aboutus_modal" and ui-turn-on="contactus_overlay", những thứ tương tự được sử dụng bên trong aboutus nội dung phương thức và contactus nội dung lớp phủ.
<div ui-content-for="modals">
   <div class="modal" ui-if="aboutus_modal" ui-shared-state="aboutus_modal">
      <div class="modal-backdrop in"></div>
      <div class="modal-dialog">
         <div class="modal-content">
            <div class="modal-header">
               <button class="close"
                  ui-turn-off="aboutus_modal">×</button>
               <h4 class="modal-title">Modal</h4>
            </div>
            <div class="modal-body">
               <p>Testing Modal</p>
            </div>
            <div class="modal-footer">
               <button ui-turn-off="aboutus_modal" class="btn btn-default">Close</button>
               <button ui-turn-off="aboutus_modal" class="btn btn-primary">Save</button>
            </div>
         </div>
      </div>
   </div>
   <div class="modal modal-overlay" ui-if="contactus_overlay" ui-shared-state="contactus_overlay">
      <div class="modal-dialog">
         <div class="modal-content">
            <div class="modal-header">
               <button class="close"
                  ui-turn-off="contactus_overlay">×</button>
               <h4 class="modal-title">Overlay</h4>
            </div>
            <div class="modal-body">
               <p>Testing Overlay</p>
            </div>
            <div class="modal-footer">
               <button ui-turn-off="contactus_overlay" class="btn btn-default">Close</button>
               <button ui-turn-off="contactus_overlay" class="btn btn-primary">Save</button>
            </div>
         </div>
      </div>
   </div>
</div>
Màn hình hiển thị cho phương thức và lớp phủ như sau:
Nhấp vào GIỚI THIỆU VỀ CHÚNG TÔI nó sẽ hiển thị phương thức như hình dưới đây -
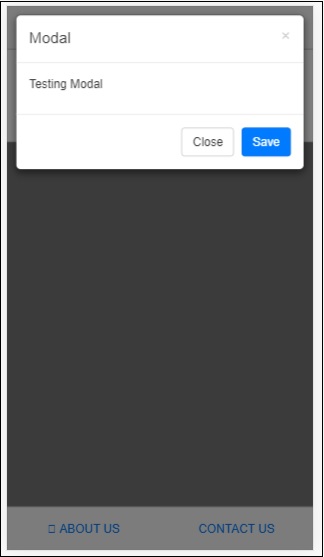
Nhấp vào LIÊN HỆ VỚI CHÚNG TÔI, nó sẽ hiển thị lớp phủ như hình dưới đây -

Nhấp vào nút đóng để đóng cửa sổ phương thức.
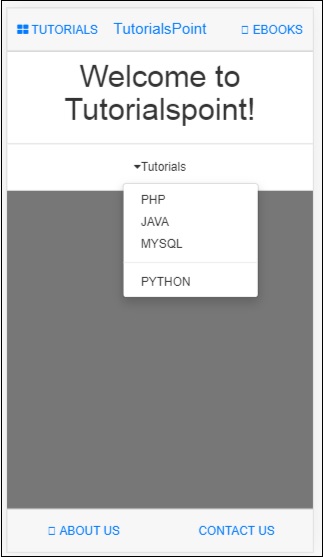
Để làm việc với trình đơn thả xuống trong ui góc di động, bạn cần sử dụng trình đơn .dropdown của lớp .
Đây là một ví dụ hiển thị danh sách thả xuống.
Chúng tôi sẽ thêm các thay đổi trong src/home/home.html.
<div class="list-group text-center">
   <div class="list-group-item list-group-item-home">
      <h1>{{msg}}</h1>
   </div>
   <div class="list-group-item list-group-item-home">
      <div class="btn-group">
         <a ui-turn-on='testDropdown' class='btn'>
            <i class="fa fa-caret-down" aria-hidden="true"></i>Tutorials
         </a>
         <ul
            class="dropdown-menu"
            ui-outer-click="Ui.turnOff('testDropdown')"
            ui-outer-click-if="Ui.active('testDropdown')"
            role="menu"
            ui-show="testDropdown"
            ui-state="testDropdown"
            ui-turn-off="testDropdown">
            <li><a>PHP</a></li>
            <li><a>JAVA</a></li>
            <li><a>MYSQL</a></li>
            <li class="divider"></li>
            <li><a>PYTHON</a></li>
         </ul>
      </div>
   </div>
</div>
Chúng tôi đang có một danh sách các Hướng dẫn được hiển thị trong menu thả xuống. Kết quả trên màn hình như sau:
Accordions chủ yếu được sử dụng khi nội dung được cho là ở dạng xem phần và bất kỳ một phần nào cũng hiển thị tại một thời điểm. Bạn có thể ẩn và mở phần tiếp theo để xem nội dung trong đó.
Hãy cùng chúng tôi làm một ví dụ để xem hoạt động của Accordion trong Mobile Angular UI.
index.html
<!DOCTYPE html>
<html>
   <head>
      <meta charset="utf-8" />
      <title>Mobile Angular UI Demo</title>
      <meta http-equiv="X-UA-Compatible" content="IE=edge,chrome=1" />
      <meta name="apple-mobile-web-app-capable"  content="yes" />
      <meta name="viewport" content="user-scalable=no, initial-scale=1.0, maximum-scale=1.0, minimal-ui" />
      <meta name="apple-mobile-web-app-status-bar-style" content="yes" />
      <link rel="shortcut icon" href="/assets/img/favicon.png" type="image/x-icon" />
      <link rel="stylesheet" href="node_modules/mobile-angular-ui/dist/css/mobile-angular-ui-hover.min.css" />
      <link rel="stylesheet" href="node_modules/mobile-angular-ui/dist/css/mobile-angular-ui-base.min.css" />
      <link rel="stylesheet" href="node_modules/mobile-angular-ui/dist/css/mobile-angular-ui-desktop.min.css" />
      <script src="node_modules/angular/angular.min.js"></script>
      <script src="node_modules/angular-route/angular-route.min.js"></script>
      <script src="node_modules/mobile-angular-ui/dist/js/mobile-angular-ui.min.js"></script>
      <script src="node_modules/angular-route/angular-route.min.js"></script>
      <link rel="stylesheet" href="src/css/app.css" />
      <script src="src/js/app.js"></script>
   </head>
   <body ng-app="myFirstApp" ng-controller="MainController">
      <!-- Sidebars -->
      <div class="sidebar sidebar-left">
         <div class="scrollable">
            <h1 class="scrollable-header app-name">Tutorials</h1>
            <div class="scrollable-content">
               <div class="list-group" ui-turn-off='uiSidebarLeft'>
                  <a class="list-group-item" href="/">Home Page </a>
                  <a class="list-group-item" href="#/academic"><i class="fa fa-caret-right"></i>Academic Tutorials </a>
                  <a class="list-group-item" href="#/bigdata"><i class="fa fa-caret-right"></i>Big Data & Analytics </a>
                  <a class="list-group-item" href="#/computerProg"><i class="fa fa-caret-right"></i>Computer Programming </a>
                  <a class="list-group-item" href="#/computerscience"><i class="fa fa-caret-right"></i>Computer Science </a>
                  <a class="list-group-item" href="#/databases"><i class="fa fa-caret-right"></i>Databases </a>
                  <a class="list-group-item" href="#/devops"><i class="fa fa-caret-right"></i>DevOps </a>
               </div>
            </div>
         </div>
      </div>
      <div class="sidebar sidebar-right">
         <div class="scrollable">
            <h1 class="scrollable-header app-name">eBooks</h1>
            <div class="scrollable-content">
               <div class="list-group" ui-toggle="uiSidebarRight">
                  <a class="list-group-item" href="#/php"><i class="fa fa-caret-right"></i>PHP </a>
                  <a class="list-group-item" href="#/Javascript"><i class="fa fa-caret-right"></i>Javascript </a>
               </div>
            </div>
         </div>
      </div>

      <div class="app">
         <div class="navbar navbar-app navbar-absolute-top">
            <div class="navbar-brand navbar-brand-center" ui-yield-to="title">
               TutorialsPoint
            </div>
            <div class="btn-group pull-left">
               <div ui-toggle="uiSidebarLeft" class="btn sidebar-left-toggle">
                  <i class="fa fa-th-large "></i> Tutorials
               </div>
            </div>
            <div class="btn-group pull-right" ui-yield-to="navbarAction">
               <div ui-toggle="uiSidebarRight" class="btn sidebar-right-toggle">
                  <i class="fal fa-search"></i> eBooks
               </div>
            </div>
         </div>
         <div class="navbar navbar-app navbar-absolute-bottom">
            <div class="btn-group justified">
               <a ui-turn-on="aboutus_modal" class="btn btn-navbar"><i class="fal fa-globe"></i> About us</a>
               <a ui-turn-on="contactus_overlay" class="btn btn-navbar"><i class="fal fa-map-marker-alt"></i> Contact us</a>
            </div>
         </div>

         <!-- App body -->
         <div class='app-body'>
            <div class='app-content'>
               <ng-view></ng-view>
            </div>
         </div>
      </div><!-- ~ .app -->

      <!-- Modals and Overlays -->
      <div ui-yield-to="modals"></div>
   </body>
</html>
src / js / app.js
/* eslint no-alert: 0 */

'use strict';

//
// Here is how to define your module
// has dependent on mobile-angular-ui
//
var app=angular.module('myFirstApp', [
   'ngRoute',
   'mobile-angular-ui'
]);
app.config(function($routeProvider, $locationProvider) {
   $routeProvider
   .when("/", {
      templateUrl : "src/home/home.html"
   });
   $locationProvider.html5Mode({enabled:true, requireBase:false});
});

app.controller('MainController', function($rootScope, $scope, $routeParams) {
   $scope.msg="Welcome to Tutorialspoint!"
   $scope.sections="Testing of Accordion using
   Mobile Angular UI!Testing of Accordion using
   Mobile Angular UI!Testing of Accordion using
   Mobile Angular UI!";
});
Mẫu đàn accordion được thêm vào bên trong src / home / home.html.
<div class="scrollable">
   <div class="scrollable-content">
      <div class="section">
      <div class="panel-group"
         ui-shared-state="testAccordion"
         ui-default='2'>

         <div class="panel panel-default" ng-repeat="i in [1,2,3,4,5]">
         <div class="panel-heading" ui-set="{'testAccordion': i}">

            <h4 class="panel-title">
               Accordion Group Item #{{i}}
            </h4>
         </div>

         <div ui-if="testAccordion == {{i}}">
            <div class="panel-body">
               {{sections}}
            </div>
         </div>
         </div>
      </div>
   </div>
</div>
</div>
Sau đây là hiển thị trong trình duyệt -

Tab là thành phần hữu ích có sẵn trong ui di động góc cạnh. Các tab có sẵn trong cùng một trình bao bọc và hiển thị nội dung của bạn trong ngăn riêng biệt giống như cách các tab được mở trong trình duyệt. Chỉ một tab được hiển thị cho người dùng tại một thời điểm.
Đây là một ví dụ làm việc của thành phần Tab.
index.html
<!DOCTYPE html>
<html>
   <head>
      <meta charset="utf-8" />
      <title>Mobile Angular UI Demo</title>
      <meta http-equiv="X-UA-Compatible" content="IE=edge,chrome=1" />
      <meta name="apple-mobile-web-app-capable" content="yes" />
      <meta name="viewport" content="user-scalable=no, initial-scale=1.0, maximum-scale=1.0, minimal-ui" />
      <meta name="apple-mobile-web-app-status-bar-style" content="yes" />
      <link rel="shortcut icon" href="/assets/img/favicon.png" type="image/x-icon" />
      <link rel="stylesheet" href="node_modules/mobile-angular-ui/dist/css/mobile-angular-ui-hover.min.css" />
      <link rel="stylesheet" href="node_modules/mobile-angular-ui/dist/css/mobile-angular-ui-base.min.css" />
      <link rel="stylesheet" href="node_modules/mobile-angular-ui/dist/css/mobile-angular-ui-desktop.min.css" />
      <script src="node_modules/angular/angular.min.js"></script>
      <script src="node_modules/angular-route/angular-route.min.js"></script>
      <script src="node_modules/mobile-angular-ui/dist/js/mobile-angular-ui.min.js"></script>
      <script src="node_modules/angular-route/angular-route.min.js"></script>
      <link rel="stylesheet" href="src/css/app.css" />
      <script src="src/js/app.js"></script>
   </head>
   <body ng-app="myFirstApp" ng-controller="MainController">
      <!-- Sidebars -->
      <div class="sidebar sidebar-left">
         <div class="scrollable">
            <h1 class="scrollable-header app-name">Tutorials</h1>
            <div class="scrollable-content">
               <div class="list-group" ui-turn-off='uiSidebarLeft'>
                  <a class="list-group-item" href="/">Home Page </a>
                  <a class="list-group-item" href="#/academic"><i class="fa fa-caret-right"></i>Academic Tutorials </a>
                  <a class="list-group-item" href="#/bigdata"><i class="fa fa-caret-right"></i>Big Data & Analytics </a>
                  <a class="list-group-item" href="#/computerProg"><i class="fa fa-caret-right"></i>Computer Programming </a>
                  <a class="list-group-item" href="#/computerscience"><i class="fa fa-caret-right"></i>Computer Science </a>
                  <a class="list-group-item" href="#/databases"><i class="fa fa-caret-right"></i>Databases </a>
                  <a class="list-group-item" href="#/devops"><i class="fa fa-caret-right"></i>DevOps </a>
               </div>
            </div>
         </div>
      </div>
      <div class="sidebar sidebar-right">
         <div class="scrollable">
            <h1 class="scrollable-header app-name">eBooks</h1>
            <div class="scrollable-content">
               <div class="list-group" ui-toggle="uiSidebarRight">
                  <a class="list-group-item" href="#/php"><i class="fa fa-caret-right"></i>PHP </a>
                  <a class="list-group-item" href="#/Javascript"><i class="fa fa-caret-right"></i>Javascript </a>
               </div>
            </div>
         </div>
      </div>

      <div class="app">
         <div class="navbar navbar-app navbar-absolute-top">
            <div class="navbar-brand navbar-brand-center" ui-yield-to="title">
               TutorialsPoint
            </div>
            <div class="btn-group pull-left">
               <div ui-toggle="uiSidebarLeft" class="btn sidebar-left-toggle">
                  <i class="fa fa-th-large "></i> Tutorials
               </div>
            </div>
            <div class="btn-group pull-right" ui-yield-to="navbarAction">
               <div ui-toggle="uiSidebarRight" class="btn sidebar-right-toggle">
                  <i class="fal fa-search"></i> eBooks
               </div>
            </div>
         </div>
         <div class="navbar navbar-app navbar-absolute-bottom">
            <div class="btn-group justified">
               <a ui-turn-on="aboutus_modal" class="btn btn-navbar"><i class="fal fa-globe"></i> About us</a>
               <a ui-turn-on="contactus_overlay" class="btn btn-navbar"><i class="fal fa-map-marker-alt"></i> Contact us</a>
            </div>
         </div>

         <!-- App body -->
         <div class='app-body'>
            <div class='app-content'>
               <ng-view></ng-view>
            </div>
         </div>
      </div><!-- ~ .app -->

      <!-- Modals and Overlays -->
      <div ui-yield-to="modals"></div>
      </body>
</html>
src / js / app.js
/* eslint no-alert: 0 */

'use strict';

//
// Here is how to define your module
// has dependent on mobile-angular-ui
//
var app=angular.module('myFirstApp', [
   'ngRoute',
   'mobile-angular-ui'
]);
app.config(function($routeProvider, $locationProvider) {
   $routeProvider
   .when("/", {
      templateUrl : "src/home/home.html"
   });
   $locationProvider.html5Mode({enabled:true, requireBase:false});
});

app.controller('MainController', function($rootScope, $scope, $routeParams) {
   $scope.msg="Welcome to Tutorialspoint!"
   $scope.js="JavaScript is a lightweight, interpreted programming language. It is designed
   for creating network-centric applications. It is
   complimentary to and integrated with Java.
   JavaScript is very easy to implement because it is integrated with HTML. It is open and
   cross-platform.";
   $scope.angularjs="AngularJS is a very powerful
   JavaScript Framework. It is used in Single Page Application (SPA) projects. It extends HTML DOM
   with additional attributes and makes it more responsive to user actions. AngularJS is open
   source, completely free, and used by thousands of
   developers around the world. It is licensed under the Apache license version 2.0.";
   $scope.reactjs="React is a front-end library
   developed by Facebook. It is used for handling
   the view layer for web and mobile apps. ReactJS allows us to create reusable UI components. It is
   currently one of the most popular JavaScript
   libraries and has a strong foundation and large community behind it.";
});
src / home / home.html
<div class="scrollable">
   <div class="scrollable-content">
      <div class="section">
         <ui-shared-state id="activeTab" default="1"></ui-shared-state>

         <ul class="nav nav-tabs">
            <li ui-class="{'active': activeTab == 1}">
               <a ui-set="{'activeTab': 1}">Javascript</a>
            </li>
            <li ui-class="{'active': activeTab == 2}">
               <a ui-set="{'activeTab': 2}">AngularJS</a>
            </li>
            <li ui-class="{'active': activeTab == 3}">
               <a ui-set="{'activeTab': 3}">ReactJS</a>
            </li>
         </ul>

         <div ui-if="activeTab == 1">
            <h3 class="page-header">Javascript</h3>
            <p>{{js}}</p>
         </div>

         <div ui-if="activeTab == 2">
            <h3 class="page-header">AngularJS</h3>
            <p>{{angularjs}}</p>
         </div>

         <div ui-if="activeTab == 3">
            <h3 class="page-header">ReactJS</h3>
            <p>{{reactjs}}</p>
         </div>
            <div class="btn-group justified nav-tabs">
            <a ui-set="{'activeTab': 1}"
               ui-class="{'active': activeTab == 1}" class="btn btn-default">Javascript</a>
            <a ui-set="{'activeTab': 2}"
               ui-class="{'active': activeTab == 2}" class="btn btn-default">AngularJS</a>
            <a ui-set="{'activeTab': 3}"
               ui-class="{'active': activeTab == 3}" class="btn btn-default">ReactJS</a>
         </div>
      </div>
   </div>
</div>
Sau đây là hiển thị trong trình duyệt -

Tính năng kéo và thả cho phép bạn kiểm soát một phần tử html bằng cách nắm lấy nó và kéo và đặt phần tử đó đến một vị trí khác.
Để làm việc với các tính năng kéo và thả trong Mobile Angular UI, bạn cần thêm mô-đun cử chỉ.
Đầu tiên hãy thêm tệp JavaScript vào bên trong index.html như được hiển thị bên dưới -
<script src="node_modules/mobile-angular-ui/dist/js/mobile-angular-ui.gestures.min.js"></script>Sau đó, thêm mô-đun cử chỉ làm phụ thuộc trong app.js như hình dưới đây -
var app=angular.module('myFirstApp', [
   'ngRoute',
   'mobile-angular-ui',
   'mobile-angular-ui.gestures'
]);
Chúng ta cần tạo một chỉ thị tùy chỉnh để kéo mục, sử dụng mô-đun $ drag.
Cú pháp để sử dụng mô-đun kéo $ như sau:
$drag.bind(element, dragOptions, touchOptions);Thông số
element - Phần tử html bạn muốn kéo.
dragOptions - Đó là một đối tượng có các chi tiết sau -
var dragOptions= {
   transform: $drag.TRANSLATE_BOTH,
   start: function(dragInfo, event){},
   end: function(dragInfo, event){},
   move: function(dragInfo, event){},
   cancel: function(dragInfo, event){}
};
Để chuyển đổi , bạn có thể sử dụng các tùy chọn sau:
$ drag.NULL_TRANSFORM - không có chuyển động biến đổi cho phần tử.
$ drag.TRANSLATE_BOTH - Phần tử sẽ di chuyển trên cả trục x và y.
$ drag.TRANSLATE_HORIZONTAL - Phần tử sẽ di chuyển trên trục x.
$ drag.TRANSLATE_UP - Phần tử sẽ di chuyển trên trục âm y.
$ drag.TRANSLATE_DOWN - Phần tử sẽ di chuyển trên trục y dương.
$ drag.TRANSLATE_LEFT - Phần tử sẽ di chuyển trên trục x âm.
$ drag.TRANSLATE_RIGHT - Phần tử sẽ di chuyển trên trục x dương.
$ drag.TRANSLATE_VERTICAL - Phần tử sẽ di chuyển trên trục y.
$ drag.TRANSLATE_INSIDE - Nó sử dụng một chức năng như hình dưới đây -
{
   transform: $drag.TRANSLATE_INSIDE(myElement)
}
Bắt đầu, kết thúc, di chuyển, hủy bỏ là một hàm với draginfo và chi tiết sự kiện dưới dạng tham số.
draginfo- Đây là phiên bản mở rộng của mô-đun $ touch. Nó có các chi tiết sau -
originalTransform- Đối tượng $ biến đổi liên quan đến biến đổi CSS trước khi $ drag bị ràng buộc.
originalRect - Biểu tượng Khách hàng Giới hạn cho phần tử bị ràng buộc trước bất kỳ hành động kéo nào.
startRect - Biểu thức khách hàng ràng buộc cho phần tử ràng buộc được đăng ký tại sự kiện bắt đầu.
startTransform- Biến đổi $ khi bắt đầu sự kiện.
rect - Biểu tượng khách hàng giới hạn hiện tại cho phần tử liên kết.
transform- Biến đổi $ hiện tại .
reset - Một phần tử khôi phục chức năng thành originalTransform.
undo - Một phần tử khôi phục chức năng để startTransform.
touchOptions - là một đối tượng tùy chọn được chuyển tới dịch vụ $ touch bên dưới.
Tạo một chỉ thị bằng cách sử dụng $ drag module bên trong src / js / app.js như hình dưới đây -
app.directive('dragItem', ['$drag', function($drag) {
   return {
      controller: function($scope, $element) {
         $drag.bind($element,
            {
               transform: $drag.TRANSLATE_BOTH,
               end: function(drag) {
                  drag.reset();
               }
            },
            {
               sensitiveArea: $element.parent()
            }
         );
      }
   };
}]);
Hãy để chúng tôi xem một ví dụ hoạt động của việc kéo một phần tử -
Index.html
<!DOCTYPE html>
<html>
   <head>
      <meta charset="utf-8" />
      <title>Mobile Angular UI Demo</title>
      <meta http-equiv="X-UA-Compatible" content="IE=edge,chrome=1" />
      <meta name="apple-mobile-web-app-capable" content="yes" />
      <meta name="viewport" content="user-scalable=no, initial-scale=1.0, maximum-scale=1.0, minimal-ui" />
      <meta name="apple-mobile-web-app-status-bar-style" content="yes" />
      <link rel="shortcut icon" href="/assets/img/favicon.png" type="image/x-icon" />
      <link rel="stylesheet" href="node_modules/mobile-angular-ui/dist/css/mobile-angular-ui-hover.min.css" />
      <link rel="stylesheet" href="node_modules/mobile-angular-ui/dist/css/mobile-angular-ui-base.min.css" />
      <link rel="stylesheet" href="node_modules/mobile-angular-ui/dist/css/mobile-angular-ui-desktop.min.css" />
      <script src="node_modules/angular/angular.min.js"></script>
      <script src="node_modules/angular-route/angular-route.min.js"></script>
      <script src="node_modules/mobile-angular-ui/dist/js/mobile-angular-ui.min.js"></script>
      <script src="node_modules/angular-route/angular-route.min.js"></script>
      <script src="node_modules/mobile-angular-ui/dist/js/mobile-angular-ui.gestures.min.js"></script>
      <link rel="stylesheet" href="src/css/app.css" />
      <script src="src/js/app.js"></script>
   </head>
   <body ng-app="myFirstApp" ng-controller="MainController">

      <!-- Sidebars -->
      <div class="sidebar sidebar-left">
         <div class="scrollable">
            <h1 class="scrollable-header app-name">Tutorials</h1>
            <div class="scrollable-content">
               <div class="list-group" ui-turn-off='uiSidebarLeft'>
                  <a class="list-group-item" href="/">Home Page </a>
                     <a class="list-group-item" href="#/academic"><i class="fa fa-caret-right"></i>Academic Tutorials </a>
                     <a class="list-group-item" href="#/bigdata"><i class="fa fa-caret-right"></i>Big Data & Analytics </a>
                     <a class="list-group-item" href="#/computerProg"><i class="fa fa-caret-right"></i>Computer Programming </a>
                     <a class="list-group-item" href="#/computerscience"><i class="fa fa-caret-right"></i>Computer Science </a>
                     <a class="list-group-item" href="#/databases"><i class="fa fa-caret-right"></i>Databases </a>
                     <a class="list-group-item" href="#/devops"><i class="fa fa-caret-right"></i>DevOps </a>
                  </div>
               </div>
            </div>
         </div>
         <div class="sidebar sidebar-right">
            <div class="scrollable">
               <h1 class="scrollable-header app-name">eBooks</h1>
               <div class="scrollable-content">
                  <div class="list-group" ui-toggle="uiSidebarRight">
                     <a class="list-group-item" href="#/php"><i class="fa fa-caret-right"></i>PHP </a>
                     <a class="list-group-item" href="#/Javascript"><i class="fa fa-caret-right"></i>Javascript </a>
                  </div>
               </div>
            </div>
      </div>
      <div class="app">
         <div class="navbar navbar-app navbar-absolute-top">
            <div class="navbar-brand navbar-brand-center" ui-yield-to="title">
               TutorialsPoint
            </div>
            <div class="btn-group pull-left">
               <div ui-toggle="uiSidebarLeft" class="btn sidebar-left-toggle">
                  <i class="fa fa-th-large "></i> Tutorials
               </div>
            </div>
            <div class="btn-group pull-right" ui-yield-to="navbarAction">
               <div ui-toggle="uiSidebarRight" class="btn sidebar-right-toggle">
                  <i class="fal fa-search"></i> eBooks
               </div>
            </div>
         </div>
         <div class="navbar navbar-app navbar-absolute-bottom">
            <div class="btn-group justified">
               <a ui-turn-on="aboutus_modal" class="btn btn-navbar"><i class="fal fa-globe"></i> About us</a>
               <a ui-turn-on="contactus_overlay" class="btn btn-navbar"><i class="fal fa-map-marker-alt"></i> Contact us</a>
            </div>
         </div>

         <!-- App body -->
         <div class='app-body'>
            <div class='app-content'>
               <ng-view></ng-view>
            </div>
         </div>
      </div><!-- ~ .app -->
      <!-- Modals and Overlays -->
      <div ui-yield-to="modals"></div>
   </body>
</html>
src / js / app.js
/* eslint no-alert: 0 */

'use strict';
//
// Here is how to define your module
// has dependent on mobile-angular-ui
//
var app=angular.module('myFirstApp', [
   'ngRoute',
   'mobile-angular-ui',
   'mobile-angular-ui.gestures'
]);
app.config(function($routeProvider, $locationProvider) {
   $routeProvider
   .when("/", {
      templateUrl : "src/home/home.html"
   });
   $locationProvider.html5Mode({enabled:true, requireBase:false});
});
app.directive('dragItem', ['$drag', function($drag) {
   return {
      controller: function($scope, $element) {
         $drag.bind($element,
            {
               transform: $drag.TRANSLATE_BOTH,end: function(drag) {
                  drag.reset();
               }
            },
            {
               sensitiveArea: $element.parent()
            }
         );
      }
   };
}]);
app.controller('MainController', function($rootScope, $scope, $routeParams) {
   $scope.msg="Welcome to Tutorialspoint!"
   $scope.js="JavaScript is a lightweight, interpreted programming language. It is designed
   for creating network-centric applications. It is
   complimentary to and integrated with Java.
   JavaScript is very easy to implement because it
   is integrated with HTML. It is open and cross-platform.";
   $scope.angularjs="AngularJS is a very powerful
   JavaScript Framework. It is used in Single Page
   Application (SPA) projects. It extends HTML DOM
   with additional attributes and makes it more
   responsive to user actions. AngularJS is open
   source, completely free, and used by thousands of
   developers around the world. It is licensed under the Apache license version 2.0.";
   $scope.reactjs="React is a front-end library
   developed by Facebook. It is used for handling
   the view layer for web and mobile apps. ReactJS
   allows us to create reusable UI components. It is
   currently one of the most popular JavaScript
   libraries and has a strong foundation and large community behind it.";
});
Phần tử kéo được thêm vào bên trong src / home / home.html -
<div style="height: 100%; width: 100%; padding: 40px;">
   <div style="height: 100%; width: 100%; border: 1px solid #444; position: relative;">
      <div drag-Item>
         <img src="src/img/test.png" width="100" height="100" />
      </div>
   </div>
</div>
Một hình ảnh được sử dụng để kéo như hình dưới đây -

Màn hình hiển thị trong trình duyệt như sau:
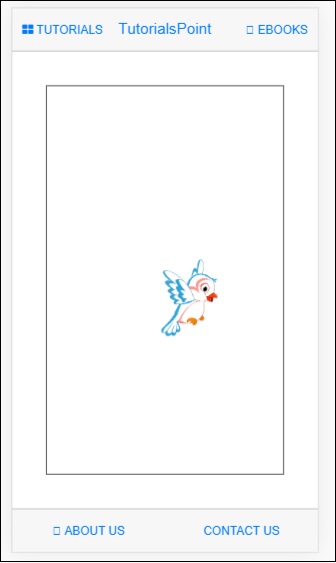
Bạn có thể kéo hình ảnh trong giao diện người dùng và sau khi thả chuột, nó sẽ đặt lại về vị trí ban đầu như chúng ta đã sử dụng drag.reset () bên trong hàm end .
$drag.bind($element, {
      transform: $drag.TRANSLATE_BOTH,
      end: function(drag) {
         drag.reset();
      }
   },
   {
      sensitiveArea: $element.parent()
   }
);
Có một số vấn đề gặp phải trên một số thiết bị đối với các phần tử được định vị cố định. Để làm việc với các khu vực có thể cuộn Mobile Angular UI hãy sử dụng tràn: auto .
Mẫu cho vùng có thể cuộn như sau:
<div class="scrollable">
   <div class="scrollable-content">...</div>
</div>
Thêm đầu trang và chân trang trong các vùng có thể cuộn
Thêm các lớp css .scrollable-header / .scrollable-footer , chúng tôi sẽ thêm đầu trang / chân trang cố định vào vùng có thể cuộn mà bạn muốn. Bạn không phải lo lắng về chiều cao và vị trí, css sẽ lo mọi thứ.
Mẫu cho đầu trang / chân trang được hiển thị bên dưới -
<div class="scrollable">
   <div class="scrollable-header"><!-- ... --></div>
   <div class="scrollable-content"><!-- ... --></div>
   <div class="scrollable-footer"><!-- ... --></div>
</div>
Chỉ đường trong các khu vực có thể cuộn
Sau đây là các lệnh rất hữu ích khi làm việc với các vùng có thể cuộn -
uiScrollTop- Được sử dụng khi bạn muốn làm điều gì đó khi cuộn lên trên cùng. Ví dụ: ui-scroll-top = "callyourfunc ()".
uiScrollBottom- Được sử dụng khi bạn muốn làm điều gì đó khi cuộn xuống dưới cùng. Ví dụ: ui-scroll-bottom = "callyourfunc ()".
uiScrollableHeader- Được sử dụng khi bạn muốn làm điều gì đó khi cuộn đến đầu trang. Ví dụ: ui-scroll-header = "callyourfunc ()".
uiScrollableFooter- Được sử dụng khi bạn muốn làm điều gì đó khi cuộn đến chân trang. Ví dụ: ui-scroll-footer = "callyourfunc ()".
Ví dụ về chỉ thị uiScrollBottom -
<div class="scrollable">
   <div class="scrollable-content section" ui-scroll-bottom="callyourfunc()">
      <ul>
         <li ng-repeat="a in lists">
            {{a.name}}
         </li>
      </ul>
   </div>
</div>
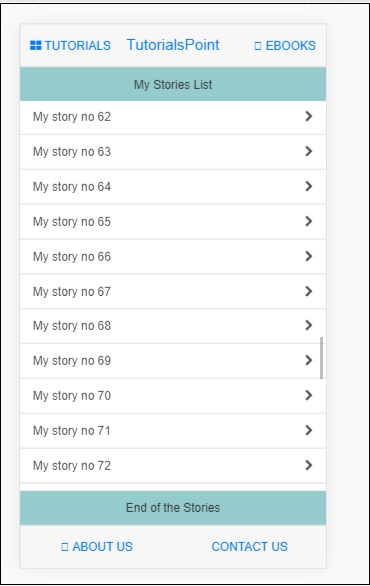
Dưới đây là một ví dụ hoạt động của Khu vực có thể cuộn.
index.html
<!DOCTYPE html>
<html>
   <head>
      <meta charset="utf-8" />
      <title>Mobile Angular UI Demo</title>
      <meta http-equiv="X-UA-Compatible" content="IE=edge,chrome=1" />
      <meta name="apple-mobile-web-app-capable" content="yes" />
      <meta name="viewport" content="user-scalable=no, initial-scale=1.0, maximum-scale=1.0, minimal-ui" />
      <meta name="apple-mobile-web-app-status-bar-style" content="yes" />
      <link rel="shortcut icon" href="/assets/img/favicon.png" type="image/x-icon" />
      <link rel="stylesheet" href="node_modules/mobile-angular-ui/dist/css/mobile-angular-ui-hover.min.css" />
      <link rel="stylesheet" href="node_modules/mobile-angular-ui/dist/css/mobile-angular-ui-base.min.css" />
      <link rel="stylesheet" href="node_modules/mobile-angular-ui/dist/css/mobile-angular-ui-desktop.min.css" />
      <script src="node_modules/angular/angular.min.js"></script>
      <script src="node_modules/angular-route/angular-route.min.js"></script>
      <script src="node_modules/mobile-angular-ui/dist/js/mobile-angular-ui.min.js"></script>
      <script src="node_modules/angular-route/angular-route.min.js"></script>
      <script src="node_modules/mobile-angular-ui/dist/js/mobile-angular-ui.gestures.min.js"></script>
      <link rel="stylesheet" href="src/css/app.css" />
      <script src="src/js/app.js"></script>
   </head>

   <body ng-app="myFirstApp" ng-controller="MainController">

      <!-- Sidebars -->
      <div class="sidebar sidebar-left">
         <div class="scrollable">
            <h1 class="scrollable-header app-name">Tutorials</h1>
            <div class="scrollable-content">
               <div class="list-group" ui-turn-off='uiSidebarLeft'>
                  <a class="list-group-item" href="/">Home Page </a>
                  <a class="list-group-item" href="#/academic"><i class="fa fa-caret-right"></i>Academic Tutorials </a>
                  <a class="list-group-item" href="#/bigdata"><i class="fa fa-caret-right"></i>Big Data & Analytics </a>
                  <a class="list-group-item" href="#/computerProg"><i class="fa fa-caret-right"></i>Computer Programming </a>
                  <a class="list-group-item" href="#/computerscience"><i class="fa fa-caret-right"></i>Computer Science </a>
                  <a class="list-group-item" href="#/databases"><i class="fa fa-caret-right"></i>Databases </a>
                  <a class="list-group-item" href="#/devops"><i class="fa fa-caret-right"></i>DevOps </a>
               </div>
            </div>
         </div>
      </div>
      <div class="sidebar sidebar-right">
         <div class="scrollable">
            <h1 class="scrollable-header app-name">eBooks</h1>
            <div class="scrollable-content">
               <div class="list-group" ui-toggle="uiSidebarRight">
               <a class="list-group-item" href="#/php"><i class="fa fa-caret-right"></i>PHP </a>
               <a class="list-group-item" href="#/Javascript"><i class="fa fa-caret-right"></i>Javascript </a>
            </div>
         </div>
      </div>
   </div>

   <div class="app">

      <div class="navbar navbar-app navbar-absolute-top">
         <div class="navbar-brand navbar-brand-center" ui-yield-to="title">
            TutorialsPoint
         </div>
         <div class="btn-group pull-left">
            <div ui-toggle="uiSidebarLeft" class="btn sidebar-left-toggle">
               <i class="fa fa-th-large "></i> Tutorials
            </div>
         </div>
         <div class="btn-group pull-right" ui-yield-to="navbarAction">
            <div ui-toggle="uiSidebarRight" class="btn sidebar-right-toggle">
               <i class="fal fa-search"></i> eBooks
            </div>
         </div>
      </div>
      <div class="navbar navbar-app navbar-absolute-bottom">
         <div class="btn-group justified">
            <a ui-turn-on="aboutus_modal" class="btn btn-navbar"><i class="fal fa-globe"></i> About us</a>
            <a ui-turn-on="contactus_overlay" class="btn btn-navbar"><i class="fal fa-map-marker-alt"></i> Contact us</a>
         </div>
      </div>

      <!-- App body -->
      <div class='app-body'>
         <div class='app-content'>
            <ng-view></ng-view>
         </div>
      </div>
   </div><!-- ~ .app -->
   <!-- Modals and Overlays -->
   <div ui-yield-to="modals"></div>

   </body>
</html>
src / js / app.js
/* eslint no-alert: 0 */

'use strict';

//
// Here is how to define your module
// has dependent on mobile-angular-ui
//
var app=angular.module('myFirstApp', [
   'ngRoute',
   'mobile-angular-ui',
   'mobile-angular-ui.gestures'
]);
app.config(function($routeProvider, $locationProvider) {
   $routeProvider
   .when("/", {
      templateUrl : "src/home/home.html"
   });
   $locationProvider.html5Mode({enabled:true, requireBase:false});
});
app.directive('dragItem', ['$drag', function($drag) {
   return {
      controller: function($scope, $element) {
         $drag.bind($element,
            {
               transform: $drag.TRANSLATE_BOTH,
               end: function(drag) {
                  drag.reset();
               }
            },
            {
               sensitiveArea: $element.parent()
            }
         );
      }
   };
}]);
app.controller('MainController', function($rootScope, $scope, $routeParams) {
   $scope.msg="Welcome to Tutorialspoint!"
   $scope.js="JavaScript is a lightweight, interpreted programming language. It is designed
   for creating network-centric applications. It is
   complimentary to and integrated with Java.
   JavaScript is very easy to implement because it
   is integrated with HTML. It is open and cross-platform.";
   $scope.angularjs="AngularJS is a very powerful JavaScript Framework. It is used in Single Page
   Application (SPA) projects. It extends HTML DOM
   with additional attributes and makes it more
   responsive to user actions. AngularJS is open
   source, completely free, and used by thousands of
   developers around the world. It is licensed under the Apache license version 2.0.";
   $scope.reactjs="React is a front-end library developed by Facebook. It is used for handling
   the view layer for web and mobile apps. ReactJS
   allows us to create reusable UI components. It is
   currently one of the most popular JavaScript
   libraries and has a strong foundation and large community behind it.";
   var storyList=[];

   for (var i=1; i <= 100; i++) {
      storyList.push('My story no ' + i);
   }

   $scope.storylist=storyList;
   $scope.bottom=function() {
      alert('End of the stories');
   };
});
src / home / home.html
<div class="scrollable">
   <div class="scrollable-header">My Stories List</div>
   <div class="scrollable-content" ui-scroll-bottom="bottom()">
      <div class="list-group">
         <a ng-repeat="item in storylist" href="" class="list-group-item">
            {{ item }} <i class="fa fa-chevron-right pull-right"></i>
         </a>
      </div>
   </div>
   <div class="scrollable-footer">End of the Stories</div>
</div>
Sau đây là hiển thị trong trình duyệt -
Chương này sẽ tập trung vào các hình thức. Chúng ta hãy xem một ví dụ làm việc để hiểu rõ hơn về các biểu mẫu.
Trong index.html mã sẽ như sau:
<!DOCTYPE html>
<html>
   <head>
      <meta charset="utf-8" />
      <title>Mobile Angular UI Demo</title>
      <meta http-equiv="X-UA-Compatible" content="IE=edge,chrome=1" />
      <meta name="apple-mobile-web-app-capable" content="yes" />
      <meta name="viewport" content="user-scalable=no, initial-scale=1.0, maximum-scale=1.0, minimal-ui" />
      <meta name="apple-mobile-web-app-status-bar-style" content="yes" />
      <link rel="shortcut icon" href="/assets/img/favicon.png" type="image/x-icon" />
      <link rel="stylesheet" href="node_modules/mobile-angular-ui/dist/css/mobile-angular-ui-hover.min.css" />
      <link rel="stylesheet" href="node_modules/mobile-angular-ui/dist/css/mobile-angular-ui-base.min.css" />
      <link rel="stylesheet" href="node_modules/mobile-angular-ui/dist/css/mobile-angular-ui-desktop.min.css" />
      <script src="node_modules/angular/angular.min.js"></script>
      <script src="node_modules/angular-route/angular-route.min.js"></script>
      <script src="node_modules/mobile-angular-ui/dist/js/mobile-angular-ui.min.js"></script>
      <script src="node_modules/angular-route/angular-route.min.js"></script>
      <script src="node_modules/mobile-angular-ui/dist/js/mobile-angular-ui.gestures.min.js"></script>
      <link rel="stylesheet" href="src/css/app.css" />
      <script src="src/js/app.js"></script>
   </head>
   <body ng-app="myFirstApp" ng-controller="MainController" class="listening">

      <!-- Sidebars -->
         <div class="sidebar sidebar-left ">
            <div class="scrollable">
               <h1 class="scrollable-header app-name">Tutorials</h1>
               <div class="scrollable-content">
                  <div class="list-group" ui-turn-off='uiSidebarLeft'>
                  <a class="list-group-item" href="/">Home Page </a>
                  <a class="list-group-item" href="#/academic"><i class="fa fa-caret-right"></i>Academic Tutorials </a>
                  <a class="list-group-item" href="#/bigdata"><i class="fa fa-caret-right"></i>Big Data & Analytics </a>
                  <a class="list-group-item" href="#/computerProg"><i class="fa fa-caret-right"></i>Computer Programming </a>
                  <a class="list-group-item" href="#/computerscience"><i class="fa fa-caret-right"></i>Computer Science </a>
                  <a class="list-group-item" href="#/databases"><i class="fa fa-caret-right"></i>Databases </a>
                  <a class="list-group-item" href="#/devops"><i class="fa fa-caret-right"></i>DevOps </a>
               </div>
            </div>
         </div>
      </div>
      <div class="sidebar sidebar-right">
         <div class="scrollable">
            <h1 class="scrollable-header app-name">eBooks</h1>
            <div class="scrollable-content">
               <div class="list-group" ui-toggle="uiSidebarRight">
                  <a class="list-group-item" href="#/php"><i class="fa fa-caret-right"></i>PHP </a>
                  <a class="list-group-item" href="#/Javascript"><i class="fa fa-caret-right"></i>Javascript </a>
               </div>
            </div>
         </div>
      </div>
      <div class="app">
         <div class="navbar navbar-app navbar-absolute-top">
            <div class="navbar-brand navbar-brand-center" ui-yield-to="title">
               TutorialsPoint
            </div>
            <div class="btn-group pull-left">
               <div ui-toggle="uiSidebarLeft" class="btn sidebar-left-toggle">
                  <i class="fa fa-th-large "></i> Tutorials
               </div>
            </div>
            <div class="btn-group pull-right" ui-yield-to="navbarAction">
               <div ui-toggle="uiSidebarRight" class="btn sidebar-right-toggle">
                  <i class="fal fa-search"></i> eBooks
               </div>
            </div>
         </div>
         <div class="navbar navbar-app navbar-absolute-bottom">
            <div class="btn-group justified">
               <a ui-turn-on="aboutus_modal" class="btn btn-navbar"><i class="fal fa-globe"></i> About us</a>
               <a ui-turn-on="contactus_overlay" class="btn btn-navbar"><i class="fal fa-map-marker-alt"></i> Contact us</a>
            </div>
         </div>

         <!-- App body -->
         <div class='app-body'>
            <div class='app-content'>
               <ng-view></ng-view>
            </div>
         </div>
      </div><!-- ~ .app -->

      <!-- Modals and Overlays -->
      <div ui-yield-to="modals"></div>
   </body>
</html>
In home/home.html
<div class="scrollable">
   <div class="scrollable-content section">

      <form name="myform" role="form" ng-submit='myform.$valid && addDetails()'>
         <fieldset>
            <legend>Personal Details</legend>
               <div class="form-group has-success has-feedback">
                  <label>First Name</label>
                  <input type="text"
                     ng-model="fname"
                     class="form-control"
                     placeholder="Enter First Name" required>
               </div>
               <div class="form-group has-success has-feedback">
                  <label>Last Name</label>
                     <input type="text"
                     ng-model="lname"
                     class="form-control"
                     placeholder="Enter Last Name" required>
               </div>
               <div class="form-group has-success has-feedback">
                  <label>Email</label>
                  <input type="email"
                     ng-model="email"
                     class="form-control"
                     placeholder="Enter email" required>
               </div>
         </fieldset>
         <hr>
         <input class="btn btn-primary btn-block" type="submit" value="Save" />
      </form>
   </div>
</div>
Src / app.js sẽ có các chi tiết sau:
/* eslint no-alert: 0 */

'use strict';

//
// Here is how to define your module
// has dependent on mobile-angular-ui
//
var app=angular.module('myFirstApp', [
   'ngRoute',
   'mobile-angular-ui',
   'mobile-angular-ui.gestures'
]);
app.config(function($routeProvider, $locationProvider) {
   $routeProvider
   .when("/", {
      templateUrl : "src/home/home.html"
   });
   $locationProvider.html5Mode({enabled:true, requireBase:false});
});
app.directive('dragItem', ['$drag', function($drag) {
   return {
      controller: function($scope, $element) {
         $drag.bind($element,
            {
               transform: $drag.TRANSLATE_BOTH,
               end: function(drag) {
                  drag.reset();
               }
            },
            {
               sensitiveArea: $element.parent()
            }
         );
      }
   };
}]);
app.controller('MainController', function($rootScope, $scope, $routeParams) {
   $scope.addDetails=function() {
      alert("All details are saved!");
   };
});
Màn hình hiển thị trong trình duyệt như sau:

Nhập chi tiết vào biểu mẫu và nhấp vào Save cái nút.

Các chức năng như chạm, vuốt, kéo các mục được xử lý bởi mô-đun cử chỉ trong Mobile Angular UI. Mô-đun cử chỉ có chỉ thị và các dịch vụ để đảm nhận chức năng cần thiết khi chạm, vuốt và kéo.
Để làm việc với các tính năng cử chỉ trong Mobile Angular UI, bạn cần thêm mô-đun cử chỉ.
Đầu tiên hãy thêm tệp JavaScript vào bên trong index.html như được hiển thị bên dưới -
<script src="node_modules/mobile-angular-ui/dist/js/mobile-angular-ui.gestures.min.js"></script>Sau đó, thêm mô-đun cử chỉ làm phụ thuộc trong app.js như hình dưới đây -
var app=angular.module('myFirstApp', [
   'ngRoute',
   'mobile-angular-ui',
   'mobile-angular-ui.gestures'
]);
Chúng ta đã thảo luận về cách hoạt động của chức năng kéo khi sử dụng mô-đun cử chỉ. Hãy xem cùng một trongDrag and Drop Chương.
Ở đây sẽ xem xét chức năng vuốt.
Chỉ thị uiSwipeLeft và uiSwipeRight hiện diện giúp phát hiện hướng mà người dùng đã vuốt.
Đây là một ví dụ hoạt động trên Swipe -
index.html
<!DOCTYPE html>
<html>
   <head>
      <meta charset="utf-8" />
      <title>Mobile Angular UI Demo</title>
      <meta http-equiv="X-UA-Compatible" content="IE=edge,chrome=1" />
      <meta name="apple-mobile-web-app-capable" content="yes" />
      <meta name="viewport" content="user-scalable=no, initial-scale=1.0, maximum-scale=1.0, minimal-ui" />
      <meta name="apple-mobile-web-app-status-bar-style" content="yes" />
      <link rel="shortcut icon" href="/assets/img/favicon.png" type="image/x-icon" />
      <link rel="stylesheet" href="node_modules/mobile-angular-ui/dist/css/mobile-angular-ui-hover.min.css" />
      <link rel="stylesheet" href="node_modules/mobile-angular-ui/dist/css/mobile-angular-ui-base.min.css" />
      <link rel="stylesheet" href="node_modules/mobile-angular-ui/dist/css/mobile-angular-ui-desktop.min.css" />
      <script src="node_modules/angular/angular.min.js"></script>
      <script src="node_modules/angular-route/angular-route.min.js"></script>
      <script src="node_modules/mobile-angular-ui/dist/js/mobile-angular-ui.min.js"></script>
      <script src="node_modules/angular-route/angular-route.min.js"></script>
      <script src="node_modules/mobile-angular-ui/dist/js/mobile-angular-ui.gestures.min.js"></script>
      <link rel="stylesheet" href="src/css/app.css" />
      <script src="src/js/app.js"></script>
   </head>
   <body ng-app="myFirstApp" ng-controller="MainController">

      <!-- Sidebars -->
      <div class="sidebar sidebar-left">
         <div class="scrollable">
            <h1 class="scrollable-header app-name">Tutorials</h1>
            <div class="scrollable-content">
               <div class="list-group" ui-turn-off='uiSidebarLeft'>
                  <a class="list-group-item" href="/">Home Page </a>
                  <a class="list-group-item" href="#/academic"><i class="fa fa-caret-right"></i>Academic Tutorials </a>
                  <a class="list-group-item" href="#/bigdata"><i class="fa fa-caret-right"></i>Big Data & Analytics </a>
                  <a class="list-group-item" href="#/computerProg"><i class="fa fa-caret-right"></i>Computer Programming </a>
                  <a class="list-group-item" href="#/computerscience"><i class="fa fa-caret-right"></i>Computer Science </a>
                  <a class="list-group-item" href="#/databases"><i class="fa fa-caret-right"></i>Databases </a>
                  <a class="list-group-item" href="#/devops"><i class="fa fa-caret-right"></i>DevOps </a>
               </div>
            </div>
         </div>
      </div>
      <div class="sidebar sidebar-right">
         <div class="scrollable">
            <h1 class="scrollable-header app-name">eBooks</h1>
            <div class="scrollable-content">
               <div class="list-group" ui-toggle="uiSidebarRight">
                  <a class="list-group-item" href="#/php"><i class="fa fa-caret-right"></i>PHP </a>
                  <a class="list-group-item" href="#/Javascript"><i class="fa fa-caret-right"></i>Javascript </a>
               </div>
            </div>
         </div>
      </div>
      <div class="app">
         <div class="navbar navbar-app navbar-absolute-top">
            <div class="navbar-brand navbar-brand-center" ui-yield-to="title">
               TutorialsPoint
            </div>
            <div class="btn-group pull-left">
               <div ui-toggle="uiSidebarLeft" class="btn sidebar-left-toggle">
                  <i class="fa fa-th-large "></i> Tutorials
               </div>
            </div>
            <div class="btn-group pull-right" ui-yield-to="navbarAction">
               <div ui-toggle="uiSidebarRight" class="btn sidebar-right-toggle">
                  <i class="fal fa-search"></i> eBooks
               </div>
            </div>
         </div>
         <div class="navbar navbar-app navbar-absolute-bottom">
            <div class="btn-group justified">
               <a ui-turn-on="aboutus_modal" class="btn btn-navbar"><i class="fal fa-globe"></i> About us</a>
               <a ui-turn-on="contactus_overlay" class="btn btn-navbar"><i class="fal fa-map-marker-alt"></i> Contact us</a>
            </div>
         </div>

         <!-- App body -->
         <div class='app-body'>
            <div class='app-content'>
               <ng-view></ng-view>
            </div>
         </div>
      </div><!-- ~ .app -->

      <!-- Modals and Overlays -->
      <div ui-yield-to="modals"></div>
   </body>
</html>
/js/app.js
/* eslint no-alert: 0 */

'use strict';

//
// Here is how to define your module
// has dependent on mobile-angular-ui
//
var app=angular.module('myFirstApp', [
   'ngRoute',
   'mobile-angular-ui',
   'mobile-angular-ui.gestures'
]);
app.config(function($routeProvider, $locationProvider) {
   $routeProvider
   .when("/", {
      templateUrl : "src/home/home.html"
   });
   $locationProvider.html5Mode({enabled:true, requireBase:false});
});
app.directive('dragItem', ['$drag', function($drag) {
   return {
      controller: function($scope, $element) {
         $drag.bind($element,
            {
               transform: $drag.TRANSLATE_BOTH,
               end: function(drag) {
                  drag.reset();
               }
            },
            {
               sensitiveArea: $element.parent()
            }
         );
      }
   };
}]);
app.controller('MainController', function($rootScope, $scope, $routeParams) {
   $scope.testSwipe=function(direction) {
      alert('You swiped ' + direction);
   };
});
src/home/home.html
<div class="scrollable">
      <div class="scrollable-content section"
         ui-swipe-left="testSwipe('left side')"
         ui-swipe-right="testSwipe('right side')">
      <h2>Testing of Swipe gesture</h2>
      <div>
         Swipe left and right to activate the uiSwipeLeft and uiSwipeRight Directive.
      </div>
   </div>
</div>
Sau đây là hiển thị trong trình duyệt -
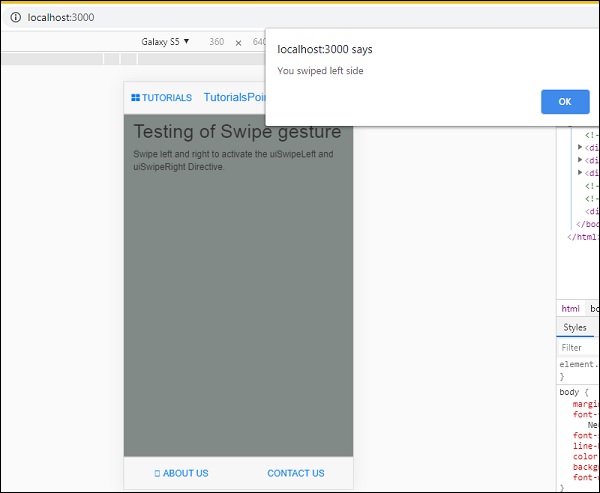
Lệnh vuốt được thêm vào bên trong home.html.
<div class="scrollable-content section"
   ui-swipe-left="testSwipe('left side')"
   ui-swipe-right="testSwipe('right side')">
Nó gọi một phương thức testSwipe (), nó được định nghĩa trong app.js.
$scope.testSwipe=function(direction) {
   alert('You swiped ' + direction);
};
Mobile Angular UI cung cấp các yếu tố chuyển đổi bằng cách sử dụng ui-switchchỉ thị. Lệnh ui-switch thực hiện chuyển đổi khi được áp dụng cho giá trị Boolean ngModel.
Đây là một ví dụ hoạt động của Chuyển đổi Chuyển đổi.
Index.html
<!DOCTYPE html>
<html>
   <head>
      <meta charset="utf-8" />
      <title>Mobile Angular UI Demo</title>
      <meta http-equiv="X-UA-Compatible" content="IE=edge,chrome=1" />
      <meta name="apple-mobile-web-app-capable" content="yes" />
      <meta name="viewport" content="user-scalable=no, initial-scale=1.0, maximum-scale=1.0, minimal-ui" />
      <meta name="apple-mobile-web-app-status-bar-style" content="yes" />
      <link rel="shortcut icon" href="/assets/img/favicon.png" type="image/x-icon" />
      <link rel="stylesheet" href="node_modules/mobile-angular-ui/dist/css/mobile-angular-ui-hover.min.css" />
      <link rel="stylesheet" href="node_modules/mobile-angular-ui/dist/css/mobile-angular-ui-base.min.css" />
      <link rel="stylesheet" href="node_modules/mobile-angular-ui/dist/css/mobile-angular-ui-desktop.min.css" />
      <script src="node_modules/angular/angular.min.js"></script>
      <script src="node_modules/angular-route/angular-route.min.js"></script>
      <script src="node_modules/mobile-angular-ui/dist/js/mobile-angular-ui.min.js"></script>
      <script src="node_modules/angular-route/angular-route.min.js"></script>
      <script src="node_modules/mobile-angular-ui/dist/js/mobile-angular-ui.gestures.min.js"></script>
      <link rel="stylesheet" href="src/css/app.css" />
      <script src="src/js/app.js"></script>
      <style>
         a.active {
            color: blue;
         }
      </style>
   </head>

   <body ng-app="myFirstApp" ng-controller="MainController" class="listening">
      <!-- Sidebars -->
      <div class="sidebar sidebar-left ">
         <div class="scrollable">
            <h1 class="scrollable-header app-name">Tutorials</h1>
            <div class="scrollable-content">
               <div class="list-group" ui-turn-off='uiSidebarLeft'>
                  <a class="list-group-item" href="/">Home Page </a>
                  <a class="list-group-item"
                  href="#/academic"><i class="fa fa-caret-right"></i>Academic Tutorials </a>
                  <a class="list-group-item" href="#/bigdata">
                  <i class="fa fa-caret-right"></i>Big Data & Analytics </a>
                  <a class="list-group-item" href="#/computerProg"><i
                  class="fa fa-caret-right"></i>Computer Programming </a>
                  <a class="list-group-item" href="#/computerscience"><
                  i class="fa fa-caret-right"></i>Computer Science </a>
                  <a class="list-group-item" href="#/databases"><i
                  class="fa fa-caret-right"></i>Databases </a>
                  <a class="list-group-item"
                  href="#/devops"><i class="fa fa-caret-right"></i>DevOps </a>
               </div>
            </div>
         </div>
      </div>
      <div class="sidebar sidebar-right">
         <div class="scrollable">
            <h1 class="scrollable-header app-name">eBooks</h1>
            <div class="scrollable-content">
               <div class="list-group" ui-toggle="uiSidebarRight">
                  <a class="list-group-item" href="#/php"><i class=
                  "fa fa-caret-right"></i>PHP </a>
                  <a class="list-group-item"
                  href="#/Javascript"><i class="fa fa-caret-right"></i>Javascript </a>
               </div>
            </div>
         </div>
      </div>
      <div class="app">
         <div class="navbar navbar-app navbar-absolute-top">
            <div class="navbar-brand navbar-brand-center" ui-yield-to="title">
               TutorialsPoint
            </div>
            <div class="btn-group pull-left">
               <div ui-toggle="uiSidebarLeft" class="btn sidebar-left-toggle">
                  <i class="fa fa-th-large "></i> Tutorials
               </div>
            </div>
            <div class="btn-group pull-right" ui-yield-to="navbarAction">
               <div ui-toggle="uiSidebarRight" class="btn sidebar-right-toggle">
                  <i class="fal fa-search"></i> eBooks
               </div>
            </div>
         </div>
         <div class="navbar navbar-app navbar-absolute-bottom">
            <div class="btn-group justified">
               <a ui-turn-on="aboutus_modal" class="btn btn-navbar"><i class="fal fa-globe"></i> About us</a>
               <a ui-turn-on="contactus_overlay" class="btn btn-navbar"><i class="fal fa-map-marker-alt"></i> Contact us</a>
            </div>
         </div>

         <!-- App body -->
         <div class='app-body'>
            <div class='app-content'>
               <ng-view></ng-view>
            </div>
         </div>
      </div><!-- ~ .app -->

      <!-- Modals and Overlays -->
      <div ui-yield-to="modals"></div>

   </body>
</html>
app.js
/* eslint no-alert: 0 */

'use strict';

//n mobile-angular-ui
//
var app=angular.
// Here is how to define your module
// has dependent omodule('myFirstApp', ['ngRoute',
   'mobile-angular-ui',
   'mobile-angular-ui.gestures',
]);
app.config(function($routeProvider, $locationProvider) {
   $routeProvider
   .when("/", {
      templateUrl : "src/home/home.html"
   });
   $locationProvider.html5Mode({enabled:true, requireBase:false});
});
app.controller('MainController', function($rootScope, $scope, $routeParams) {
   $scope.msg="Welcome to TutorialsPoint!";
});
src/home/home.html
<div class="scrollable">
   <div class="scrollable-content">
      <form>
         <h1>Testing Toogle Switch </h1>
         <ui-switch id="enabled" name="enabled" ng-model="enabled" class="green"></ui-switch>
         <p>{{ enabled }}</p>
      </form>
   </div>
</div>
Màn hình hiển thị trong trình duyệt như sau:
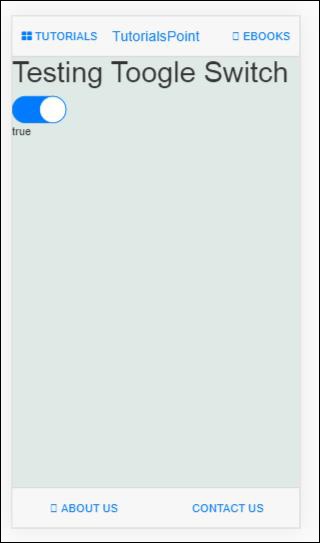

Phần là vùng chứa được hiển thị bên trong nội dung. Mobile Angular UI sử dụng các lớp có sẵn cho các phần để thay đổi cấu trúc bố cục.
Đây là index.html -
<!DOCTYPE html>
<html>
   <head>
      <meta charset="utf-8" />
      <title>Mobile Angular UI Demo</title>
      <meta http-equiv="X-UA-Compatible" content="IE=edge,chrome=1" />
      <meta name="apple-mobile-web-app-capable" content="yes" />
      <meta name="viewport" content="user-scalable=no, initial-scale=1.0, maximum-scale=1.0, minimal-ui" />
      <meta name="apple-mobile-web-app-status-bar-style" content="yes" />
      <link rel="shortcut icon" href="/assets/img/favicon.png" type="image/x-icon" />
      <link rel="stylesheet" href="node_modules/mobile-angular-ui/dist/css/mobile-angular-ui-hover.min.css" />
      <link rel="stylesheet" href="node_modules/mobile-angular-ui/dist/css/mobile-angular-ui-base.min.css" />
      <link rel="stylesheet" href="node_modules/mobile-angular-ui/dist/css/mobile-angular-ui-desktop.min.css" />
      <script src="node_modules/angular/angular.min.js"></script>
      <script src="node_modules/angular-route/angular-route.min.js"></script>
      <script src="node_modules/mobile-angular-ui/dist/js/mobile-angular-ui.min.js"></script>
      <script src="node_modules/angular-route/angular-route.min.js"></script>
      <script src="node_modules/mobile-angular-ui/dist/js/mobile-angular-ui.gestures.min.js"></script>
      <link rel="stylesheet" href="src/css/app.css" />
      <script src="src/js/app.js"></script>
      <style>
         a.active {
            color: blue;
         }
      </style>
   </head>
   <body ng-app="myFirstApp" ng-controller="MainController" class="listening">

      <!-- Sidebars -->
      <div class="sidebar sidebar-left ">
         <div class="scrollable">
            <h1 class="scrollable-header app-name">Tutorials</h1>
            <div class="scrollable-content">
               <div class="list-group" ui-turn-off='uiSidebarLeft'>
                  <a class="list-group-item" href="/">Home Page </a>
                  <a class="list-group-item" href="#/academic">
                  <i class="fa fa-caret-right"></i>Academic Tutorials </a>
                  <a class="list-group-item" href="#/bigdata">
                  <i class="fa fa-caret-right"></i>Big Data & Analytics </a>
                  <a class="list-group-item" href="#/computerProg">
                  <i class="fa fa-caret-right"></i>Computer Programming </a>
                  <a class="list-group-item" href="#/computerscience">
                  <i class="fa fa-caret-right"></i>Computer Science </a>
                  <a class="list-group-item" href="#/databases">
                  <i class="fa fa-caret-right"></i>Databases </a>
                  <a class="list-group-item" href="#/devops">
                  <i class="fa fa-caret-right"></i>DevOps </a>
               </div>
            </div>
         </div>
      </div>
      <div class="sidebar sidebar-right">
         <div class="scrollable">
            <h1 class="scrollable-header app-name">eBooks</h1>
            <div class="scrollable-content">
               <div class="list-group" ui-toggle="uiSidebarRight">
                  <a class="list-group-item" href="#/php"><i class=
                  "fa fa-caret-right"></i>PHP </a>
                  <a class="list-group-item"
                  href="#/Javascript"><i class="fa fa-caret-right"></i>Javascript </a>
               </div>
            </div>
         </div>
      </div>
      <div class="app">
         <div class="navbar navbar-app navbar-absolute-top">
            <div class="navbar-brand navbar-brand-center" ui-yield-to="title">
               TutorialsPoint
            </div>
            <div class="btn-group pull-left">
               <div ui-toggle="uiSidebarLeft" class="btn sidebar-left-toggle">
                  <i class="fa fa-th-large "></i> Tutorials
               </div>
            </div>
            <div class="btn-group pull-right" ui-yield-to="navbarAction">
               <div ui-toggle="uiSidebarRight" class="btn sidebar-right-toggle">
                  <i class="fal fa-search"></i> eBooks
               </div>
            </div>
         </div>
         <div class="navbar navbar-app navbar-absolute-bottom">
            <div class="btn-group justified">
               <a ui-turn-on="aboutus_modal" class="btn btn-navbar"><i class="fal fa-globe"></i> About us</a>
               <a ui-turn-on="contactus_overlay" class="btn btn-navbar"><i class="fal fa-map-marker-alt"></i> Contact us</a>
            </div>
         </div>

         <!-- App body -->
         <div class='app-body'>
            <div class='app-content'>
               <ng-view></ng-view>
            </div>
         </div>
      </div><!-- ~ .app -->

      <!-- Modals and Overlays -->
      <div ui-yield-to="modals"></div>
   </body>
</html>
app.js
/* eslint no-alert: 0 */

'use strict';

//
// Here is how to define your module
// has dependent on mobile-angular-ui
//
var app=angular.module('myFirstApp', ['ngRoute',
   'mobile-angular-ui',
   'mobile-angular-ui.gestures',
]);
app.config(function($routeProvider, $locationProvider) {
   $routeProvider.when("/", { templateUrl : "src/home/home.html" });
   $routeProvider.when("/academic", {templateUrl : "src/academic/academic.html" });
   $routeProvider.when("/bigdata", {templateUrl : "src/bigdata/bigdata.html" });
   $locationProvider.html5Mode({enabled:true, requireBase:false});
});
app.directive('touchtest', ['$touch', function($touch) {
   return {
      restrict: 'C',
      link: function($scope, elem) {
         $scope.touch=null;
         $touch.bind(elem, {
            start: function(touch) {
               $scope.containerRect=elem[0].getBoundingClientRect();
               $scope.touch=touch;
               $scope.$apply();
            },
            cancel: function(touch) {
               $scope.touch=touch;
               $scope.$apply();
            },
            move: function(touch) {
               $scope.touch=touch;
               $scope.$apply();
            },
            end: function(touch) {
               $scope.touch=touch;
               $scope.$apply();
            }
         });
      }
   };
}]);
app.controller('MainController', function($rootScope, $scope, $routeParams) {
   $scope.msg="Welcome to TutorialsPoint!";
});
home/home.html
<div class="scrollable ">
   <div class="scrollable-content ">
      <div class="list-group text-center">
         <div class="list-group text-center">
            <div class="list-group-item list-group-item-home">
               <h1>{{msg}}</h1>
            </div>
         </div>

         <div class="list-group-item list-group-item-home" style="background-color: #ccc;">
            <div>
               <h2 class="home-heading">List of Latest Courses</h2>
            </div>
         </div>

         <div class="list-group-item list-group-item-home list-tuts">
            <div>
               <h4 class="home-heading">Information Technology</h4>
            </div>
         </div>

         <div class="list-group-item list-group-item-home list-tuts">
            <div>
               <h4 class="home-heading">Academics</h4>
            </div>
         </div>

         <div class="list-group-item list-group-item-home list-tuts">
            <div>
               <h4 class="home-heading">Development</h4>
            </div>
         </div>
         <div class="list-group-item list-group-item-home list-tuts">
            <div>
               <h4 class="home-heading">Business</h4>
            </div>
         </div>
         <div class="list-group-item list-group-item-home list-tuts">
            <div>
               <h4 class="home-heading">Design</h4>
            </div>
         </div>

         <div class="list-group-item list-group-item-home list-tuts">
            <div>
               <h4 class="home-heading">Others</h4>
            </div>
         </div>

      </div>
   </div>
</div>
Hộp đựng có đẳng cấp .app, giữ thanh điều hướng trên cùng và dưới cùng và nội dung chính được hiển thị trên màn hình. Lớp.app không có bất kỳ phần đệm hoặc nền nào.
Lớp .section có css để thêm đệm và nền.
Đây là một bố cục không có phần.

Sau khi thêm lớp .section, bạn sẽ thấy phần đệm được thêm vào bố cục -
<div class="app section"></div>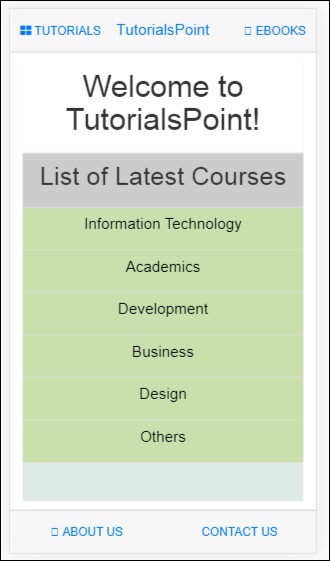
Có một số biến thể khác trong các phần cho bố cục.
.section-wide : makes horizontal padding as 0
.section-condensed : makes vertical padding as 0
.section-break : this class will add margin-bottom as well shadow to show the break in sections on the screen.
Bạn cũng có thể thử với các lớp bổ sung như .section-default, .section-primary, .section-success, .section-info, .section-warning hoặc .section-risk để thay đổi bố cục.
Mô-đun Mobile Angular Core quản lý tất cả các chức năng cốt lõi. Bạn có thể sử dụng nó bên trong ứng dụng góc bằng cách sử dụng 'mobile- angle -ui .core' làm mô-đun phụ thuộc. Trong các chương trước, chúng tôi đã sử dụng trực tiếp 'mobile-angle-ui' cũng có mô-đun cốt lõi. Nhưng bạn có thể độc lập sử dụng mô-đun 'mobile-angle-ui.core' . Bạn có thể làm điều này khi bạn cần chức năng hạn chế, tức là chỉ chức năng cốt lõi của Mobile Angular UI trong ứng dụng của bạn.
Sau đây là các mô-đun phụ quan trọng mà chúng ta sẽ nói trong Mô-đun Core Angular dành cho thiết bị di động -
activeLinks
capture
outerClick
Để làm việc với Touch và các sự kiện của nó, bạn cần thêm mô-đun sau:
mobile-angular-ui.gesturesNếu bạn chỉ quan tâm đến mô-đun cảm ứng, thì bạn chỉ có thể thêm mobile-angle-ui.gestures.touch .
$ touch là một dịch vụ có sẵn với mô-đun cảm ứng. Nó sẽ hoạt động trên bất kỳ thiết bị đầu vào nào bạn muốn làm việc. Nó cung cấp các chi tiết như chuyển động, thời lượng, vận tốc, hướng, v.v.
Các phương pháp trong $ touch
Sau đây là các phương pháp khả dụng trong $ touch -
trói buộc
Hãy để chúng tôi xem xét phương thức ràng buộc .
Syntax
$touch.bind(element, eventHandlers, [options])Parameters
element - phần tử html bạn muốn xử lý các chi tiết liên lạc.
eventHandlers- Một đối tượng có trình xử lý cho các sự kiện chạm cụ thể. Các bộ xử lý sự kiện có sẵn là -
start - đó là một cuộc gọi lại cho sự kiện touchstart.
end - đó là một sự kiện gọi lại để chạm vào.
move - đó là một cuộc gọi lại cho sự kiện touchmove.
cancel - đó là một cuộc gọi lại cho sự kiện hủy liên lạc.
options - Nó là một đối tượng có thể có các chi tiết như sau -
movementThreshold- Một giá trị nguyên. Số lượng pixel chuyển động trước khi bắt đầu để kích hoạt trình xử lý cảm ứng.
valid - Đây là một hàm trả về giá trị boolean quyết định xem có nên xử lý hay bỏ qua một lần chạm hay không.
sensitiveArea- Nó có thể là một hàm, hoặc phần tử hoặc BoundClientRect. Vùng nhạy cảm xác định ranh giới để giải phóng cảm ứng khi có chuyển động bên ngoài.
pointerTypes - Là một mảng con trỏ có các khóa là một tập con của bản đồ sự kiện con trỏ mặc định.
Các loại có sẵn trong $ touch
Sau đây là các loại có sẵn trong $ touch -
| Bất động sản | Kiểu | Sự miêu tả |
|---|---|---|
| kiểu | chuỗi | Điều này sẽ cho bạn biết loại sự kiện. Ví dụ - touchmove, touchstart, touchhend, touchcancel |
| dấu thời gian | Ngày | Dấu thời gian khi chạm xảy ra |
| thời hạn | int | Sự khác biệt giữa sự kiện chạm hiện tại và bắt đầu chạm |
| startX | Phao nổi | Tọa độ X của touchstart |
| bắt đầuY | Phao nổi | Tọa độ Y của touchstart |
| trước đây | Phao nổi | Tọa độ X của touchstart hoặc touchmove đã xảy ra trước đó |
| trướcY | Phao nổi | Tọa độ Y của touchstart hoặc touchmove đã xảy ra trước đó |
| x | Phao nổi | Tọa độ X của sự kiện chạm |
| y | Phao nổi | Tọa độ Y của sự kiện chạm |
| bươc | Phao nổi | Khoảng cách giữa các điểm trước, trước Y và x, y |
| stepX | Phao nổi | Khoảng cách giữa điểm trước và x |
| bướcY | Phao nổi | Khoảng cách giữa điểm Y và Y |
| vận tốc | Phao nổi | Vận tốc tính bằng pixel của sự kiện chạm trên giây |
| vận tốc trung bình | Phao nổi | Tốc độ trung bình của sự kiện bắt đầu cảm ứng mỗi giây |
| khoảng cách | Phao nổi | Khoảng cách giữa các điểm startX, startY và x, y |
| khoảng cáchX | Phao nổi | Khoảng cách giữa điểm startX và x |
| khoảng cáchY | Phao nổi | Khoảng cách giữa điểm startY và y |
| toàn bộ | Phao nổi | Tổng chuyển động tức là chuyển động ngang và dọc được thực hiện trên thiết bị |
| totalX | Phao nổi | Tổng chuyển động tức là hướng ngang, nó cũng bao gồm quay vòng và thay đổi hướng |
| tổng sốY | Phao nổi | Tổng chuyển động tức là hướng thẳng đứng. Nó cũng bao gồm quay vòng và thay đổi hướng |
| phương hướng | Phao nổi | Vị trí hướng trái, trên, dưới, phải của cảm ứng |
| góc | Phao nổi | Góc tính bằng độ từ trục x và y |
Đây là một ví dụ hoạt động hiển thị các loại cảm ứng.
index.html
<!DOCTYPE html>
<html>
   <head>
      <meta charset="utf-8" />
      <title>Mobile Angular UI Demo</title>
      <meta http-equiv="X-UA-Compatible" content="IE=edge,chrome=1" />
      <meta name="apple-mobile-web-app-capable" content="yes" />
      <meta name="viewport" content="user-scalable=no, initial-scale=1.0, maximum-scale=1.0, minimal-ui" />
      <meta name="apple-mobile-web-app-status-bar-style" content="yes" />
      <link rel="shortcut icon" href="/assets/img/favicon.png" type="image/x-icon" />
      <link rel="stylesheet" href="node_modules/mobile-angular-ui/dist/css/mobile-angular-ui-hover.min.css" />
      <link rel="stylesheet" href="node_modules/mobile-angular-ui/dist/css/mobile-angular-ui-base.min.css" />
      <link rel="stylesheet" href="node_modules/mobile-angular-ui/dist/css/mobile-angular-ui-desktop.min.css" />
      <script src="node_modules/angular/angular.min.js"></script>
      <script src="node_modules/angular-route/angular-route.min.js"></script>
      <script src="node_modules/mobile-angular-ui/dist/js/mobile-angular-ui.min.js"></script>
      <script src="node_modules/angular-route/angular-route.min.js"></script>
      <script src="node_modules/mobile-angular-ui/dist/js/mobile-angular-ui.gestures.min.js"></script>
      <link rel="stylesheet" href="src/css/app.css" />
      <script src="src/js/app.js"></script>
      <style>
         a.active {
            color: blue;
         }
      </style>
   </head>

   <body ng-app="myFirstApp" ng-controller="MainController" class="listening">

      <!-- Sidebars -->
      <div class="sidebar sidebar-left ">
         <div class="scrollable">
            <h1 class="scrollable-header app-name">Tutorials</h1>
            <div class="scrollable-content">
               <div class="list-group" ui-turn-off='uiSidebarLeft'>
                  <a class="list-group-item" href="/">Home Page </a>
                  <a class="list-group-item" href="#/academic"><i class ="fa fa-caret-right"></i>Academic Tutorials </a>
                  <a class="list-group-item" href="#/bigdata"><i class ="fa fa-caret-right"></i>Big Data & Analytics </a>
                  <a class="list-group-item" href="#/computerProg"><i class="fa fa-caret-right"></i>Computer Programming </a>
                  <a class="list-group-item" href="#/computerscience"><i class="fa fa-caret-right"></i>Computer Science </a>
                  <a class="list-group-item" href="#/databases"><i class="fa fa-caret-right"></i>Databases </a>
                  <a class="list-group-item" href="#/devops"><i class="fa fa-caret-right"></i>DevOps </a>
               </div>
            </div>
         </div>
      </div>
      <div class="sidebar sidebar-right">
         <div class="scrollable">
            <h1 class="scrollable-header app-name">eBooks</h1>
            <div class="scrollable-content">
               <div class="list-group" ui-toggle="uiSidebarRight">
                  <a class="list-group-item" href="#/php"><i class="fa fa-caret-right"></i>PHP </a>
                  <a class="list-group-item" href="#/Javascript"><i class="fa fa-caret-right"></i>Javascript </a>
               </div>
            </div>
         </div>
      </div>
      <div class="app">
         <div class="navbar navbar-app navbar-absolute-top">
            <div class="navbar-brand navbar-brand-center" ui-yield-to="title">
               TutorialsPoint
            </div>
            <div class="btn-group pull-left">
               <div ui-toggle="uiSidebarLeft" class="btn sidebar-left-toggle">
                  <i class="fa fa-th-large "></i> Tutorials
               </div>
            </div>
            <div class="btn-group pull-right" ui-yield-to="navbarAction">
               <div ui-toggle="uiSidebarRight" class="btn sidebar-right-toggle">
                  <i class="fal fa-search"></i> eBooks
               </div>
            </div>
         </div>
         <div class="navbar navbar-app navbar-absolute-bottom">
            <div class="btn-group justified">
               <a ui-turn-on="aboutus_modal" class="btn btn-navbar"><i class="fal fa-globe"></i> About us</a>
               <a ui-turn-on="contactus_overlay" class="btn btn-navbar"><i class="fal fa-map-marker-alt"></i> Contact us</a>
            </div>
         </div>

         <!-- App body -->
         <div class='app-body'>
            <div class='app-content'>
               <ng-view></ng-view>
            </div>
         </div>
      </div><!-- ~ .app -->

      <!-- Modals and Overlays -->
      <div ui-yield-to="modals"></div>
   </body>
</html>
Có touchtest chỉ thị được thêm vào app.js sử dụng phương thức $ touch.bind.
directive('touchtest', ['$touch', function($touch) {
   return {
      restrict: 'C',
      link: function($scope, elem) {
         $scope.touch=null;
         $touch.bind(elem, {
            start: function(touch) {
               $scope.containerRect=elem[0].getBoundingClientRect();
               $scope.touch=touch;
               $scope.$apply();
            },
            cancel: function(touch) {
               $scope.touch=touch;
               $scope.$apply();
            },
            move: function(touch) {
               $scope.touch=touch;
               $scope.$apply();
            },
            end: function(touch) {
               $scope.touch=touch;
               $scope.$apply();
            }
         });
      }
   };
}]);
Mã hoàn chỉnh bên trong app.js như sau:
/* eslint no-alert: 0 */

'use strict';
//
// Here is how to define your module
// has dependent on mobile-angular-ui
//
var app=angular.module('myFirstApp', ['ngRoute',
   'mobile-angular-ui',
   'mobile-angular-ui.gestures',
]);
app.config(function($routeProvider, $locationProvider) {
   $routeProvider
   .when("/", {
      templateUrl : "src/home/home.html"
   });
   $locationProvider.html5Mode({enabled:true, requireBase:false});
});
app.directive('touchtest', ['$touch', function($touch) {
   return {
      restrict: 'C',
      link: function($scope, elem) {
         $scope.touch=null;
         $touch.bind(elem, {
            start: function(touch) {
               $scope.containerRect=elem[0].getBoundingClientRect();
               $scope.touch=touch;
               $scope.$apply();
            },
            cancel: function(touch) {
               $scope.touch=touch;
               $scope.$apply();
            },
            move: function(touch) {
               $scope.touch=touch;
               $scope.$apply();
            },
            end: function(touch) {
               $scope.touch=touch;
               $scope.$apply();
            }
         });
      }
   };
}]);
app.controller('MainController', function($rootScope, $scope, $routeParams) {
   $scope.msg="Welcome to TutorialsPoint!";
});
src/home/home.html
Touchtest chỉ thị được sử dụng bên trong html như hình dưới đây -
<div class="section touchtest">
   <h4>Touch Around on the screen to see the values changing</h4>
   <div>
      <p>type: {{touch.type}}</p>
      <p>direction: {{touch.direction == null ? '-' : touch.direction}}</p>
      <p>point: [{{touch.x}}, {{touch.y}}]</p>
      <p>step: {{touch.step}} [{{touch.stepX}}, {{touch.stepY}}]</p>
      <p>distance: {{touch.distance}} [{{touch.distanceX}}, {{touch.distanceY}}]</p>
      <p>total: {{touch.total}} [{{touch.totalX}}, {{touch.totalY}}]</p>
      <p>velocity: {{touch.velocity}} px/sec</p>
      <p>averageVelocity: {{touch.averageVelocity}} px/sec</p>
      <p>angle: {{touch.angle == null ? '-' : touch.angle}} deg</p>
   </div>
</div>
Bây giờ chúng ta hãy kiểm tra màn hình hiển thị trong trình duyệt. Màn hình kết quả như sau:

Trong chương này, chúng ta sẽ hiểu cách thiết lập ứng dụng bằng phonegap và cordova.
Trước tiên hãy để chúng tôi cài đặt phần sau trong hệ thống của chúng tôi -
Cordova
Phonegap
Trong chương này, chúng tôi sẽ tạo một tệp apk của ứng dụng Mobile Angular UI. Chúng tôi sẽ sử dụng thiết lập ứng dụng được thực hiện bằng cordova và phonegap trong chương trước. Vì vậy, vui lòng kiểm tra chương trước vềApp Setup using PhoneGap and Cordova nơi chúng tôi đã cài đặt cordova, phonegap và tạo ứng dụng Mobile Angular UI trong cordova.
Bây giờ chúng ta hãy tạo một tệp APK cho ứng dụng đã tạo. Để làm được điều đó, chúng ta cần cài đặt những thứ sau:
- Bộ phát triển Java (jdk 1.8)
- Gradle
- Công cụ SDK Android
Bộ phát triển Java (jdk 1.8)
Để tạo và xây dựng ứng dụng, một yêu cầu quan trọng là JDK 1.8. Chúng tôi cần phiên bản jdk là 1.8 vì đó là phiên bản ổn định cho đến nay với bản dựng cordova.
Truy cập liên kết sau để cài đặt jdk1.8.
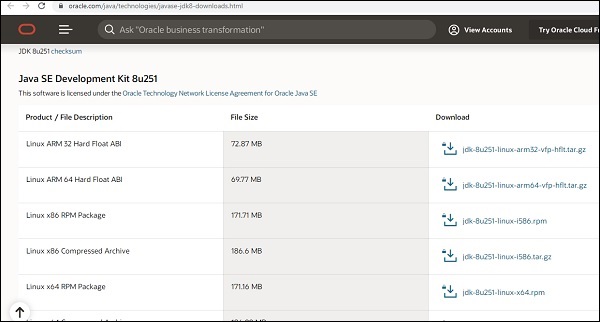
Cài đặt Jdk theo hệ điều hành của bạn. Sau khi cài đặt xong, cần phải cập nhật đường dẫn môi trường JAVA_HOME. Trong trường hợp bạn gặp khó khăn trong quá trình cài đặt Jdk, hãy tham khảo phần nàyJava installation tutorial.
Để người dùng windows cập nhật Envionment Path, hãy nhấp chuột phải vào Máy tính của tôi → thuộc tính → Cài đặt hệ thống nâng cao
Nó sẽ hiển thị màn hình như hình dưới đây -
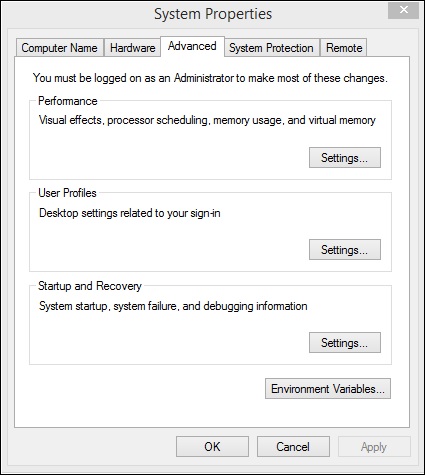
Nhấp vào Biến môi trường. Nó sẽ hiển thị màn hình như hình dưới đây -
Bấm vào nút Mới, nó sẽ hiện ra màn hình như hình dưới đây -
Tên biến sẽ là JAVA_HOME và giá trị Biến sẽ là đường dẫn chứa jdk 1.8.
Sau khi hoàn tất, hãy đóng dấu nhắc lệnh của bạn và mở lại. Bây giờ gõ java –version, nó sẽ hiển thị phiên bản java bạn đã cài đặt như hình dưới đây -

Chúng ta đã hoàn tất việc cài đặt JAVA.
Gradle
Bây giờ hãy cài đặt gradle, đây là một trong những yêu cầu quan trọng để xây dựng ứng dụng.
Tới Gradle cài đặt trang và cài đặt phiên bản mới nhất của gradle theo điều hành của bạn system.Download và cài đặt nó trên hệ thống của bạn. Sau khi cài đặt, bạn cần cập nhật đường dẫn của Gradle trong các biến môi trường. Trong trường hợp bạn gặp bất kỳ khó khăn nào trong quá trình cài đặt, hãy tham khảo hướng dẫn gradle này .
Để người dùng windows cập nhật biến môi trường, hãy thêm vị trí của gradle vào trong biến Path như hình dưới đây:
Sau khi hoàn tất, đóng dấu nhắc lệnh nếu đang mở. Bây giờ hãy mở dấu nhắc lệnh và kiểm tra phiên bản gradle được cài đặt.
Chúng tôi đã cài đặt phiên bản Gradle 6.2.2 cho hướng dẫn này.
Công cụ SDK Android
Bây giờ cài đặt Android studio trên hệ thống của bạn. Cùng với Android studio, gói sdk Android cũng sẽ được cài đặt. Chúng tôi quan tâm nhiều hơn đến gói Android SDK. Gói SDK sẽ có các công cụ và công cụ xây dựng, chúng ta cần thêm các công cụ tương tự vào Biến môi trường để cordova truy cập trong quá trình xây dựng. Trong trường hợp bạn gặp bất kỳ khó khăn nào, hãy tham khảo hướng dẫn Cài đặt Android Studio này .
Đối với windows, người dùng định vị đường dẫn của android sdk và thêm biến ANDROID _SDK_ROOT vào biến môi trường như hình dưới đây -
Bây giờ, hãy thêm các công cụ và đường dẫn công cụ xây dựng, ví dụ:
C:\Users\AppData\Local\Android\Sdk\build-tools;C:\Users\AppData\Local\Android\Sdk\tools\bin;Đến biến đường dẫn ở cuối như hình dưới đây -
Sau khi hoàn tất, hãy đóng dấu nhắc lệnh và mở lại.
Thực thi lệnh: sdkmanager "platform-tools" "platform; android-28" trong dấu nhắc lệnh của bạn. Nó sẽ cài đặt api đích android-28 mà chúng ta cần. Để biết thêm chi tiết về sdkmanager, hãy tham khảo liên kết dưới đây -
https://www.tutorialspoint.com/android/android_sdk_manager.htmChúng tôi đã tạo một thiết lập dự án bằng cordova và phonegap trong chương trước. Đây là giao diện của ứng dụng trong trình duyệt -
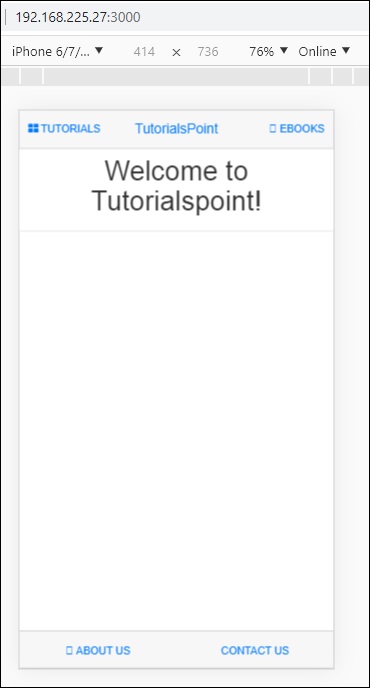
Bây giờ, hãy để chúng tôi kiểm tra xem cordova có tất cả các chi tiết để xây dựng ứng dụng hay không. Để làm điều đó, chúng ta có thể sử dụng lệnh sau - các yêu cầu của cordova .

Xây dựng ứng dụng
Để xây dựng ứng dụng bằng cordova, lệnh như sau:
cordova buildLệnh trên sẽ xây dựng ứng dụng cho tất cả các nền tảng bạn đã thêm.
Khi chạy nền tảng xây dựng, bạn có thể sử dụng lệnh sau:
cordova build ios
cordova build android
Chúng tôi đã thêm chỉ cho một nền tảng tức là android, do đó có thể sử dụng lệnh xây dựng cordova trực tiếp.
Nếu xây dựng thành công, bạn sẽ nhận được kết quả sau:

Nó hiển thị vị trí của tệp apk ứng dụng. Bây giờ chúng tôi có apk, nhưng chúng tôi không thể xuất bản giống như vậy, vì nó là app-debug.apk. Chúng tôi cần một gói ứng dụng phát hành có thể được xuất bản trong Cửa hàng Google Play.
Phát hành ứng dụng
Để tạo bản phát hành ứng dụng, chúng tôi cần tạo kho khóa. Kho khóa là một tệp có khóa cá nhân và chứng chỉ.
Để tạo một tệp kho khóa sẽ sử dụng keytool JAVA. Keytool JAVA là một công cụ giúp tạo chứng chỉ.
Sau đây là lệnh để tạo một kho khóa:
keytool -genkey -v -keystore testapp-key.keystore
-alias testapp-key -keyalg RSA -keysize 2048 -validity 10000
Tên của kho khóa mà chúng tôi đã sử dụng như sau:
testapp-key.keystoreBí danh là testapp-key giống như tên.
Thực hiện lệnh trong dòng lệnh từ thư mục gốc của dự án.
Khi lệnh thực thi, nó sẽ hỏi bạn một số câu hỏi, như mật khẩu, họ và tên, đơn vị tổ chức, thành phố, tiểu bang, v.v. Bạn có thể nhập thông tin và sau khi thực hiện xong, kho khóa sẽ được tạo và tệp kho khóa sẽ được lưu trữ bên trong thư mục gốc của dự án.
Sau khi hoàn tất kho khóa, hãy tạo build.json bên trong myfirstapp \ testapp \ platform \ android \ build.json.
Chi tiết như hình dưới đây -
{
   "android":{
      "release":{
         "keystore":"testapp-key.keystore",
         "storePassword":"testapp123",
         "alias":"testapp-key",
         "password":"testapp123",
         "keystoreType":""
      }
   }
}
Bạn sẽ phải nhập chi tiết kho khóa, cũng như mật khẩu bạn đã nhập khi tạo kho khóa.
Sau khi hoàn tất keystore và build.json, chúng tôi hiện đã sẵn sàng xây dựng apk để phát hành.
Sau đây là lệnh để xây dựng nó:
cordova build android --release
Sau khi xây dựng thành công, bạn sẽ nhận được apk phát hành như hình dưới đây -

Giờ đây, bạn có thể sử dụng gói ứng dụng này trong Cửa hàng Google Play của mình để xuất bản và phát hành ứng dụng của bạn.
Cửa hàng Google Play
Khi bạn đã sẵn sàng app-release.apk, bạn cần tải lên Google Play Store. Để tải lên, bạn cần đăng nhập vào Cửa hàng Google Play. Người dùng lần đầu tiên phải trả $ 25 như giá khởi điểm của nhà phát triển. Sau khi hoàn tất, bạn có thể tiếp tục và tải lên tệp apk của mình. Bạn có thể làm theo các bước được cung cấp tại đây để tải lên tệp APK của mình.
Trong chương này, chúng ta sẽ thảo luận về việc sử dụng Sử dụng AngularJS và Ionic để phát triển ứng dụng.
Ionic là một khuôn khổ mã nguồn mở được sử dụng để phát triển các ứng dụng di động. Nó cung cấp các công cụ và dịch vụ để xây dựng Giao diện người dùng di động với giao diện gốc. Ionic framework cần có trình bao bọc gốc để có thể chạy trên thiết bị di động.
Trong chương này, chúng ta sẽ chỉ tìm hiểu những điều cơ bản về cách chúng ta có thể sử dụng giao diện người dùng góc cạnh di động và ion để phát triển ứng dụng của bạn.
Để biết chi tiết về ion, hãy tham khảo - https://www.tutorialspoint.com/ionic/index.htm.
Để bắt đầu làm việc với ionic và anglejs, trước tiên chúng ta cần cài đặt cordova. Lệnh như sau:
npm install -g cordovaTạo thiết lập dự án bằng Cordova
Tạo một thư mục ionic_mobileui / và trong đó hãy để chúng tôi tạo thiết lập dự án của mình bằng lệnh dưới đây:
cordova create ionic-mobileui-angularjsỞ đây ionic-mobileui-anglejs là tên của ứng dụng của chúng tôi.
Bây giờ chúng ta hãy cài đặt các gói mà chúng ta cần trong dự án của mình. Danh sách được đưa ra dưới đây -
npm install --save-dev angular angular-route mobile-angular-ui @ionic/coreCác tệp được cài đặt và cấu trúc thư mục được hiển thị bên dưới:

Tất cả các tệp góc và ion đều nằm trong node_modules. Chúng tôi sẽ tận dụngwww/thư mục. Do đó, di chuyển các tệp js và css góc cạnh và ion bên trongwww/css/ và www/js/ thư mục.
Hãy để chúng tôi sửa đổi index.html với các thành phần UI góc cạnh trên thiết bị di động và cũng có thể thêm app.js trong js/ thư mục.
index.html
<!DOCTYPE html>
<!--
   Licensed to the Apache Software Foundation (ASF) under one or more contributor license agreements.
   See the NOTICE file distributed with this work for additional information regarding copyright
   ownership. The ASF licenses this file to you under the Apache License, Version 2.0 (the
   "License"); you may not use this file except in compliance with the License. You may obtain a
   copy of the License at

   http://www.apache.org/licenses/LICENSE-2.0

   Unless required by applicable law or agreed to in writing, software distributed under the License
   is distributed on an "AS IS" BASIS, WITHOUT WARRANTIES OR CONDITIONS OF ANY KIND, either
   express or implied. See the License for the specific language governing permissions and
   limitations under the License.
-->
<html>

   <head>
      <!--
      Customize this policy to fit your own app's needs. For more guidance, see:
         https://github.com/apache/cordova-plugin-whitelist/blob/master/README.md#content-security-policy
      Some notes:
         * gap: is required only on iOS (when using UIWebView) and is needed for JS->native communication
         * https://ssl.gstatic.com is required only on Android and is needed for TalkBack to function properly
         * Disables use of inline scripts in order to mitigate risk of XSS vulnerabilities. To change this:
            * Enable inline JS: add 'unsafe-inline' to default-src
      -->
      <meta http-equiv="Content-Security-Policy" content="default-src 'self' data: gap: https://ssl.gstatic.com 'unsafe-eval'; style-src 'self' 'unsafe-inline'; media-src *; img-src 'self' data: content:;">
      <meta name="format-detection" content="telephone=no">
      <meta name="msapplication-tap-highlight" content="no">
      <meta name="viewport" content="initial-scale=1, width=device-width, viewport-fit=cover">
      <link rel="stylesheet" type="text/css" href="css/index.css">
      <title>Mobile Angular UI Demo</title>
      <meta http-equiv="X-UA-Compatible" content="IE=edge,chrome=1" />
      <meta name="apple-mobile-web-app-capable" content="yes" />
      <meta name="viewport" content="user-scalable=no, initial-scale=1.0, maximum-scale=1.0, minimal-ui" />
      <meta name="apple-mobile-web-app-status-bar-style" content="yes" />
      <link rel="shortcut icon" href="/assets/img/favicon.png" type="image/x-icon" />
      <link rel="stylesheet" href="css/mobile-angular-ui-hover.min.css" /> <link rel="stylesheet" href="css/mobile-angular-ui-base.min.css" />
      <link rel="stylesheet" href="css/mobile-angular-ui-desktop.min.css" />
      <script src="js/angular.min.js"></script>
      <script src="js/angular-route.min.js"></script>
      <script src="js/mobile-angular-ui.min.js"></script>
      <script src="js/ionic.js"></script>
      <link rel="stylesheet" href="css/app.css" />
      <script src="js/app.js"></script>
      </head>
      <body ng-app="myFirstApp" ng-controller="MainController">
         <!-- Sidebars -->
            <div class="sidebar sidebar-left">
               <div class="scrollable">
                  <h1 class="scrollable-header app-name">Tutorials</h1>
                  <div class="scrollable-content"> <div class="list-group" ui-turn-off='uiSidebarLeft'>
                  <a class="list-group-item" href="/">Home Page </a>
                  <a class="list-group-item" href="#/academic"><i class="fa fa-caret-right"></i>Academic Tutorials </a>
                  <a class="list-group-item" href="#/bigdata"><i class="fa fa-caret-right"></i>Big Data & Analytics </a>
                  <a class="list-group-item" href="#/computerProg"><i class="fa fa-caret-right"></i>Computer Programming </a>
                  <a class="list-group-item" href="#/computerscience"><i class="fa fa-caret-right"></i>Computer Science </a>
                  <a class="list-group-item" href="#/databases"><i class="fa fa-caret-right"></i>Databases </a> <a class="list-group-item" href="#/devops"><i class="fa fa-caret-right"></i>DevOps </a>
               </div>
            </div>
         </div>
      </div>
      <div class="sidebar sidebar-right">
         <div class="scrollable">
            <h1 class="scrollable-header app-name">eBooks</h1>
               <div class="scrollable-content">
                  <div class="list-group" ui-toggle="uiSidebarRight">
                     <a class="list-group-item" href="#/php"><i class="fa fa-caret-right"></i>PHP </a>
                     <a class="list-group-item" href="#/Javascript"><i class="fa fa-caret-right"></i>Javascript </a>
                  </div>
               </div>
            </div>
      </div>

      <div class="app">
         <div class="navbar navbar-app navbar-absolute-top">
            <div class="navbar-brand navbar-brand-center" ui-yield-to="title">
               TutorialsPoint
            </div>
            <div class="btn-group pull-left">
               <div ui-toggle="uiSidebarLeft" class="btn sidebar-left-toggle">
                  <i class="fa fa-th-large "></i> Tutorials
               </div>
            </div>
            <div class="btn-group pull-right" ui-yield-to="navbarAction">
               <div ui-toggle="uiSidebarRight" class="btn sidebar-right-toggle">
                  <i class="fal fa-search"></i> eBooks
               </div>
            </div>
         </div>
         <div class="navbar navbar-app navbar-absolute-bottom">
            <div class="btn-group justified">
               <a ui-turn-on="aboutus_modal" class="btn btn-navbar"><i class="fal fa-globe"></i> About us</a>
               <a ui-turn-on="contactus_overlay" class="btn btn-navbar"><i class="fal fa-map-marker-alt"></i> Contact us</a>
            </div>
         </div>

         <!-- App body -->
         <div class='app-body'>
            <div class='app-content'>
               <ng-view></ng-view>
            </div>
         </div>
      </div><!-- ~ .app -->

      <!-- Modals and Overlays -->
      <div ui-yield-to="modals"></div>

      <div class="app">
         <h1>Apache Cordova</h1>
         <div id="deviceready" class="blink">
            <p class="event listening">Connecting to Device</p>
            <p class="event received">Device is Ready</p>
         </div>
      </div>
      <script type="text/javascript" src="cordova.js"></script>
      <script type="text/javascript" src="js/index.js"></script>
   </body>
</html>
Tất cả js và csscác tập tin được thêm vào phần đầu. Mô-đun và bộ điều khiển được tạo bên trong app.js như hình dưới đây -
/* eslint no-alert: 0 */

'use strict';
//
// Here is how to define your module
// has dependent on mobile-angular-ui
// var app=angular.module('myFirstApp', [
   'ngRoute',
   'mobile-angular-ui'
]);
app.config(function($routeProvider, $locationProvider) {
   $routeProvider
   .when("/", {
      templateUrl : "home/home.html"
   });
   $locationProvider.html5Mode({enabled:true, requireBase:false});
});
app.directive('dragItem', ['$drag', function($drag) {
   return {
      controller: function($scope, $element) {
         $drag.bind($element,
            {
               transform: $drag.TRANSLATE_BOTH,
               end: function(drag) {
                  drag.reset();
               }
            },
            {
               sensitiveArea: $element.parent()
            }
         );
      }
   };
}]);
app.controller('MainController', function($rootScope, $scope, $routeParams) {
   $scope.msg="Welcome to Tutorialspoint!";
});
Tạo tệp home / home.html trong thư mục www /. Sau đây là chi tiết bên trong home.html.
<div class="list-group text-center">
   <div class="list-group-item list-group-item-home">
      <h1>{{msg}}</h1>
   </div>
</div>
Để chạy ứng dụng bằng cordova, hãy thực hiện lệnh sau:
cordova platform add browserTiếp theo, thực hiện lệnh dưới đây để kiểm tra ứng dụng trong trình duyệt -
cordova run
Nhấn vào url: http://localhost:8000 trong trình duyệt, để kiểm tra ứng dụng.

Thêm thành phần Ionic vào ứng dụng Mobile Angular UI
Mở home / home.html, thêm mẫu thẻ ion sau:
home / home.html
<ion-card>
   <ion-card-header>
      <ion-card-subtitle>Ionic Card</ion-card-subtitle>
      <ion-card-title>Mobile Angular UI + Ionic</ion-card-title>
   </ion-card-header>

   <ion-card-content>
      Welcome To TutorialsPoint!
   </ion-card-content>
</ion-card>
Sau khi thực hiện xong dừng chạy dây và chạy lại. Bạn sẽ thấy chi tiết thẻ ion như hình dưới đây -

Vì vậy, bây giờ bạn có thể tạo một ứng dụng theo lựa chọn của mình bằng cách sử dụng AngularJs, Mobile Angular UI và Ionic.
Trong chương này, chúng ta sẽ xem xét một ví dụ về ứng dụng được tạo bằng Mobile Angular UI. Các tệp được yêu cầu được đề cập bên dưới, với các chi tiết mã.
index.html
<!DOCTYPE html>
<html>
   <head>
      <meta charset="utf-8" />
      <title>Mobile Angular UI Demo</title>
      <meta http-equiv="X-UA-Compatible" content="IE=edge,chrome=1" />
      <meta name="apple-mobile-web-app-capable"  content="yes" />
      <meta name="viewport" content="user-scalable=no, initial-scale=1.0, maximum-scale=1.0, minimal-ui" />
      <meta name="apple-mobile-web-app-status-bar-style" content="yes" />
      <link rel="shortcut icon" href="/assets/img/favicon.png" type="image/x-icon" />
      <link rel="stylesheet" href="node_modules/mobile-angular-ui/dist/css/mobile-angular-ui-hover.min.css" />
      <link rel="stylesheet" href="node_modules/mobile-angular-ui/dist/css/mobile-angular-ui-base.min.css" />
      <link rel="stylesheet" href="node_modules/mobile-angular-ui/dist/css/mobile-angular-ui-desktop.min.css" />
      <script src="node_modules/angular/angular.min.js"></script>
      <script src="node_modules/angular-route/angular-route.min.js"></script>
      <script src="node_modules/mobile-angular-ui/dist/js/mobile-angular-ui.min.js"></script>
      <script src="node_modules/angular-route/angular-route.min.js"></script>
      <link rel="stylesheet" href="src/css/app.css" />
      <script src="src/js/app.js"></script>
   </head>
   <body ng-app="myFirstApp" ng-controller="MainController">
      <!-- Sidebars -->
      <div class="sidebar sidebar-left">
         <div class="scrollable">
            <h1 class="scrollable-header app-name">Tutorials</h1>
            <div class="scrollable-content">
               <div class="list-group" ui-turn-off='uiSidebarLeft'>
                  <a class="list-group-item" href="/">Home Page </a>
                  <a class="list-group-item" href="#/academic"><i class="fa fa-caret-right"></i>Academic Tutorials </a>
                  <a class="list-group-item" href="#/bigdata"><i class="fa fa-caret-right"></i>Big Data & Analytics </a>
                  <a class="list-group-item" href="#/computerProg"><i class="fa fa-caret-right"></i>Computer Programming </a>
                  <a class="list-group-item" href="#/computerscience"><i class="fa fa-caret-right"></i>Computer Science </a>
                  <a class="list-group-item" href="#/databases"><i class="fa fa-caret-right"></i>Databases </a>
                  <a class="list-group-item" href="#/devops"><i class="fa fa-caret-right"></i>DevOps </a>
               </div>
            </div>
         </div>
      </div>
      <div class="sidebar sidebar-right">
         <div class="scrollable">
            <h1 class="scrollable-header app-name">eBooks</h1>
            <div class="scrollable-content">
               <div class="list-group" ui-toggle="uiSidebarRight">
                  <a class="list-group-item" href="#/php"><i class="fa fa-caret-right"></i>PHP </a>
                  <a class="list-group-item" href="#/Javascript"><i class="fa fa-caret-right"></i>Javascript </a>
               </div>
            </div>
         </div>
      </div>

      <div class="app">
         <div class="navbar navbar-app navbar-absolute-top">
            <div class="navbar-brand navbar-brand-center" ui-yield-to="title">
               TutorialsPoint
            </div>
            <div class="btn-group pull-left">
               <div ui-toggle="uiSidebarLeft" class="btn sidebar-left-toggle">
                  <i class="fa fa-th-large "></i> Tutorials
               </div>
            </div>
            <div class="btn-group pull-right" ui-yield-to="navbarAction">
               <div ui-toggle="uiSidebarRight" class="btn sidebar-right-toggle">
                  <i class="fal fa-search"></i> eBooks
               </div>
            </div>
         </div>
         <div class="navbar navbar-app navbar-absolute-bottom">
            <div class="btn-group justified">
               <a ui-turn-on="aboutus_modal" class="btn btn-navbar"><i class="fal fa-globe"></i> About us</a>
               <a ui-turn-on="contactus_overlay" class="btn btn-navbar"><i class="fal fa-map-marker-alt"></i> Contact us</a>
            </div>
         </div>

         <!-- App body -->
         <div class='app-body'>
            <div class='app-content'>
               <ng-view></ng-view>
            </div>
         </div>
      </div><!-- ~ .app -->

      <!-- Modals and Overlays -->
      <div ui-yield-to="modals"></div>
   </body>
</html>
Trong app.js, chúng tôi sẽ xây dựng đường dẫn cho tất cả các tuyến đường được đề cập ở đây -
<div class="list-group" ui-turn-off='uiSidebarLeft'>
   <a class="list-group-item" href="/">Home Page </a>
   <a class="list-group-item" href="/academic"><i class="fa fa-caret-right"></i>Academic Tutorials </a>
   <a class="list-group-item" href="/bigdata"><i class="fa fa-caret-right"></i>Big Data & Analytics </a>
   <a class="list-group-item" href="/computerProg"><i class="fa fa-caret-right"></i>Computer Programming </a>
   <a class="list-group-item" href="/computerscience"><i class="fa fa-caret-right"></i>Computer Science </a>
   <a class="list-group-item" href="/databases"><i class="fa fa-caret-right"></i>Databases </a>
   <a class="list-group-item" href="/devops"><i class="fa fa-caret-right"></i>DevOps </a>
</div>
app.js
/* eslint no-alert: 0 */

'use strict';

//
// Here is how to define your module
// has dependent on mobile-angular-ui
//
var app=angular.module('myFirstApp', ['ngRoute',
   'mobile-angular-ui',
   'mobile-angular-ui.gestures',
]);
app.config(function($routeProvider, $locationProvider) {
   $routeProvider.when("/", { templateUrl : "src/home/home.html" });
   $routeProvider.when("/academic", { templateUrl : "src/academic/academic.html" });
   $routeProvider.when("/bigdata", { templateUrl : "src/bigdata/bigdata.html" });
   $locationProvider.html5Mode({enabled:true, requireBase:false});
});
app.directive('touchtest', ['$touch', function($touch) {
   return {
      restrict: 'C',
      link: function($scope, elem) {
         $scope.touch=null;
         $touch.bind(elem, {
            start: function(touch) {
               $scope.containerRect=elem[0].getBoundingClientRect();
               $scope.touch=touch;
               $scope.$apply();
            },
            cancel: function(touch) {
               $scope.touch=touch;
               $scope.$apply();
            },
            move: function(touch) {
               $scope.touch=touch;
               $scope.$apply();
            },
            end: function(touch) {
               $scope.touch=touch;
               $scope.$apply();
            }
         });
      }
   };
}]);
app.controller('MainController', function($rootScope, $scope, $routeParams) {
   $scope.msg="Welcome to TutorialsPoint!";
});
Các tuyến đường cho các liên kết trong thanh bên được liệt kê ở đây -
app.config(function($routeProvider, $locationProvider) {
   $routeProvider.when("/", { templateUrl : "src/home/home.html" });
   $routeProvider.when("/academic", { templateUrl : "src/academic/academic.html" });
   $routeProvider.when("/bigdata", { templateUrl : "src/bigdata/bigdata.html" });
   $locationProvider.html5Mode({enabled:true, requireBase:false});
});
Ngay bây giờ, chúng tôi đã thêm cho trang chủ, học thuật và bigdata. Tương tự, bạn có thể thiết kế ứng dụng theo lựa chọn của mình và thêm các tuyến đường như hình trên.
Home / home.html sẽ như sau
<div class="scrollable ">
   <div class="scrollable-content ">
      <div class="list-group text-center">
         <div class="list-group text-center">
            <div class="list-group-item list-group-item-home">
               <h1>{{msg}}</h1>
            </div>
         </div>

         <div class="list-group-item list-group-item-home" style="background-color: #ccc;">
            <div>
               <h2 class="home-heading">List of Latest Courses</h2>
            </div>
         </div>
         <div class="list-group-item list-group-item-home list-tuts">
            <div>
               <h4 class="home-heading">Information Technology</h4>
            </div>
         </div>
         <div class="list-group-item list-group-item-home list-tuts">
            <div>
               <h4 class="home-heading">Academics</h4>
            </div>
         </div>
         <div class="list-group-item list-group-item-home list-tuts">
            <div>
               <h4 class="home-heading">Development</h4>
            </div>
         </div>
         <div class="list-group-item list-group-item-home list-tuts">
            <div>
               <h4 class="home-heading">Business</h4>
            </div>
         </div>
         <div class="list-group-item list-group-item-home list-tuts">
            <div>
               <h4 class="home-heading">Design</h4>
            </div>
         </div>

         <div class="list-group-item list-group-item-home list-tuts">
            <div>
               <h4 class="home-heading">Others</h4>
            </div>
         </div>

      </div>
   </div>
</div>
academic/academic.html
<div class="scrollable">
   <div class="scrollable-content">
      <div class="list-group text-center">
         <div class="list-group text-center">
            <div class="list-group-item list-group-item-home">
               <h1>{{msg}}</h1>
            </div>
         </div>
         <div class="list-group-item list-group-item-home" style="background-color: #ccc;">
            <div>
               <h2 class="home-heading">Academic Tutorials</h2>
            </div>
         </div>
         <div class="list-group-item list-group-item-home list-tuts">
            <div>
               <h4 class="home-heading">CBSE Syllabus</h4>
            </div>
         </div>
         <div class="list-group-item list-group-item-home list-tuts">
            <div>
               <h4 class="home-heading">Learn Accounting Basics</h4>
            </div>
         </div>
         <div class="list-group-item list-group-item-home list-tuts">
            <div>
               <h4 class="home-heading">Auditing</h4>
            </div>
         </div>
         <div class="list-group-item list-group-item-home list-tuts">
            <div>
               <h4 class="home-heading">Learn Financial Accounting</h4>
            </div>
         </div>
         <div class="list-group-item list-group-item-home list-tuts">
            <div>
               <h4 class="home-heading">Learn Forex Trading</h4>
            </div>
         </div>
         <div class="list-group-item list-group-item-home list-tuts">
            <div>
               <h4 class="home-heading">Learn Statistics</h4>
            </div>
         </div>
      </div>
   </div>
</div>
bigdata/bigdata.html
<div class="scrollable">
   <div class="scrollable-content">

      <div class="list-group text-center">
         <div class="list-group text-center">
            <div class="list-group-item list-group-item-home">
               <h1>{{msg}}</h1>
            </div>
         </div>
         <div class="list-group-item list-group-item-home" style="background-color: #ccc;">
            <div>
               <h2 class="home-heading">Big Data Tutorials</h2>
            </div>
         </div>
         <div class="list-group-item list-group-item-home list-tuts">
            <div>
               <h4 class="home-heading">Advanced Excel Charts</h4>
            </div>
         </div>
         <div class="list-group-item list-group-item-home list-tuts">
            <div>
               <h4 class="home-heading">Advanced Excel Functions</h4>
            </div>
         </div>
         <div class="list-group-item list-group-item-home list-tuts">
            <div>
               <h4 class="home-heading">Learn Apache Flume</h4>
            </div>
         </div>
         <div class="list-group-item list-group-item-home list-tuts">
            <div>
               <h4 class="home-heading">Learn Apache Kafka</h4>
            </div>
         </div>
         <div class="list-group-item list-group-item-home list-tuts">
            <div>
               <h4 class="home-heading">Learn Apache Pig</h4>
            </div>
         </div>
         <div class="list-group-item list-group-item-home list-tuts">
            <div>
               <h4 class="home-heading">Learn Apache Solr</h4>
            </div>
         </div>
      </div>
   </div>
</div>
Hiển thị trong trình duyệt cho - Trang chủ như sau -
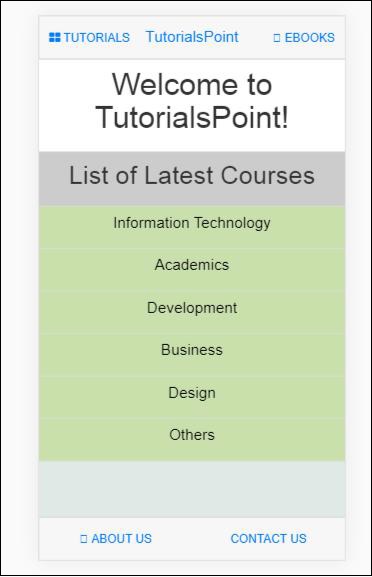
Màn hình hiển thị trong trình duyệt khi người dùng nhấp vào Hướng dẫn -

Bây giờ hãy nhấp vào Hướng dẫn học thuật -
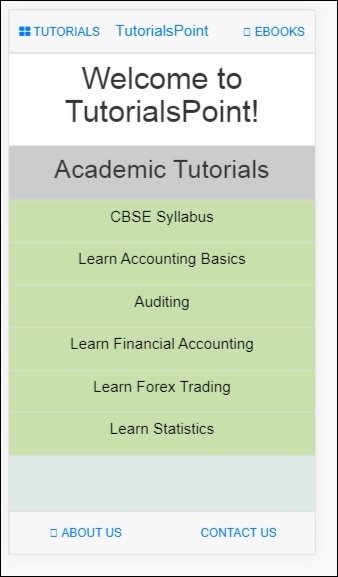
Nhấp vào Hướng dẫn → Dữ liệu lớn
