MVVM - Kiểm tra đơn vị
Ý tưởng đằng sau kiểm thử đơn vị là lấy các đoạn mã (đơn vị) rời rạc và viết các phương pháp kiểm tra sử dụng mã theo cách mong đợi, sau đó kiểm tra để xem liệu chúng có nhận được kết quả mong đợi hay không.
Bản thân là mã, các bài kiểm tra đơn vị được biên dịch giống như phần còn lại của dự án.
Chúng cũng được thực thi bởi phần mềm chạy thử nghiệm, phần mềm này có thể tăng tốc độ qua mỗi bài kiểm tra, có hiệu quả đưa ra các biểu tượng thích hoặc không thích để cho biết bài kiểm tra đã đạt hay không.
Hãy xem một ví dụ đã tạo trước đó. Sau đây là việc thực hiện Mô hình Sinh viên.
using System.ComponentModel;

namespace MVVMDemo.Model {

   public class StudentModel {}

   public class Student : INotifyPropertyChanged {
      private string firstName;
      private string lastName;

      public string FirstName {
         get { return firstName; }

         set {
            if (firstName != value) {
               firstName = value;
               RaisePropertyChanged("FirstName");
               RaisePropertyChanged("FullName");
            }
         }
      }

      public string LastName {
         get { return lastName; }

         set {
            if (lastName != value) {
               lastName = value;
               RaisePropertyChanged("LastName");
               RaisePropertyChanged("FullName");
            }
         }
      }

      public string FullName {
         get {
            return firstName + " " + lastName;
         }
      }

      public event PropertyChangedEventHandler PropertyChanged;

      private void RaisePropertyChanged(string property) {
         if (PropertyChanged != null) {
            PropertyChanged(this, new PropertyChangedEventArgs(property));
         }
      }
   }
}
Sau đây là việc triển khai StudentView.
<UserControl x:Class="MVVMDemo.Views.StudentView"
   xmlns = "http://schemas.microsoft.com/winfx/2006/xaml/presentation"
   xmlns:x = "http://schemas.microsoft.com/winfx/2006/xaml"
   xmlns:mc = "http://schemas.openxmlformats.org/markup-compatibility/2006"
   xmlns:d = "http://schemas.microsoft.com/expression/blend/2008"
   xmlns:local = "clr-namespace:MVVMDemo.Views"
   xmlns:viewModel = "clr-namespace:MVVMDemo.ViewModel"
   xmlns:data = "clr-namespace:MVVMDemo.Model"
   xmlns:vml = "clr-namespace:MVVMDemo.VML"
   vml:ViewModelLocator.AutoHookedUpViewModel = "True"
   mc:Ignorable = "d"
   d:DesignHeight = "300" d:DesignWidth = "300">

   <UserControl.Resources>
      <DataTemplate DataType = "{x:Type data:Student}">

         <StackPanel Orientation = "Horizontal">
            <TextBox Text = "{Binding Path = FirstName, Mode = TwoWay}"
               Width = "100" Margin = "3 5 3 5"/>

            <TextBox Text = "{Binding Path = LastName, Mode = TwoWay}"
               Width = "100" Margin = "0 5 3 5"/>

            <TextBlock Text = "{Binding Path = FullName, Mode = OneWay}"
               Margin = "0 5 3 5"/>
         </StackPanel>

      </DataTemplate>
   </UserControl.Resources>

   <Grid>
      <StackPanel Orientation = "Horizontal">
         <ListBox ItemsSource = "{Binding Students}"
            SelectedItem = "{Binding SelectedStudent}"/>

         <Button Content = "Delete"
            Command = "{Binding DeleteCommand}"
            HorizontalAlignment = "Left"
            VerticalAlignment = "Top"
            Width = "75" />
      </StackPanel>
   </Grid>

</UserControl>
Sau đây là triển khai StudentViewModel.
using MVVMDemo.Model;

using System.Collections.ObjectModel;
using System.Windows.Input;
using System;

namespace MVVMDemo.ViewModel {

   public class StudentViewModel {

      public MyICommand DeleteCommand { get; set;}

      public StudentViewModel() {
         LoadStudents();
         DeleteCommand = new MyICommand(OnDelete, CanDelete);
      }

      public ObservableCollection<Student> Students {
         get;
         set;
      }

      public void LoadStudents() {
         ObservableCollection<Student> students = new ObservableCollection<Student>();

         students.Add(new Student { FirstName = "Mark", LastName = "Allain" });
         students.Add(new Student { FirstName = "Allen", LastName = "Brown" });
         students.Add(new Student { FirstName = "Linda", LastName = "Hamerski" });

         Students = students;
      }

      private Student _selectedStudent;

      public Student SelectedStudent {
         get {
            return _selectedStudent;
         }

         set {
            _selectedStudent = value;
            DeleteCommand.RaiseCanExecuteChanged();
         }
      }

      private void OnDelete() {
         Students.Remove(SelectedStudent);
      }

      private bool CanDelete() {
         return SelectedStudent != null;
      }

      public int GetStudentCount() {
         return Students.Count;
      }
   }
}
Sau đây là tệp MainWindow.xaml.
<Window x:Class = "MVVMDemo.MainWindow"
   xmlns = "http://schemas.microsoft.com/winfx/2006/xaml/presentation"
   xmlns:x = "http://schemas.microsoft.com/winfx/2006/xaml"
   xmlns:d = "http://schemas.microsoft.com/expression/blend/2008"
   xmlns:mc = "http://schemas.openxmlformats.org/markup-compatibility/2006"
   xmlns:local = "clr-namespace:MVVMDemo"
   xmlns:views = "clr-namespace:MVVMDemo.Views"
   mc:Ignorable = "d"
   Title = "MainWindow" Height = "350" Width = "525">

   <Grid>
      <views:StudentView x:Name = "StudentViewControl"/>
   </Grid>

</Window>
Sau đây là triển khai MyICommand, thực hiện giao diện ICommand.
using System;
using System.Windows.Input;

namespace MVVMDemo {

   public class MyICommand : ICommand {
      Action _TargetExecuteMethod;
      Func<bool> _TargetCanExecuteMethod;

      public MyICommand(Action executeMethod) {
         _TargetExecuteMethod = executeMethod;
      }

      public MyICommand(Action executeMethod, Func<bool> canExecuteMethod) {
         _TargetExecuteMethod = executeMethod;
         _TargetCanExecuteMethod = canExecuteMethod;
      }

      public void RaiseCanExecuteChanged() {
         CanExecuteChanged(this, EventArgs.Empty);
      }

      bool ICommand.CanExecute(object parameter) {

         if (_TargetCanExecuteMethod != null) {
            return _TargetCanExecuteMethod();
         }

         if (_TargetExecuteMethod != null) {
            return true;
         }

         return false;
      }

      // Beware - should use weak references if command instance lifetime
         is longer than lifetime of UI objects that get hooked up to command

      // Prism commands solve this in their implementation

      public event EventHandler CanExecuteChanged = delegate { };

      void ICommand.Execute(object parameter) {
         if (_TargetExecuteMethod != null) {
            _TargetExecuteMethod();
         }
      }
   }
}
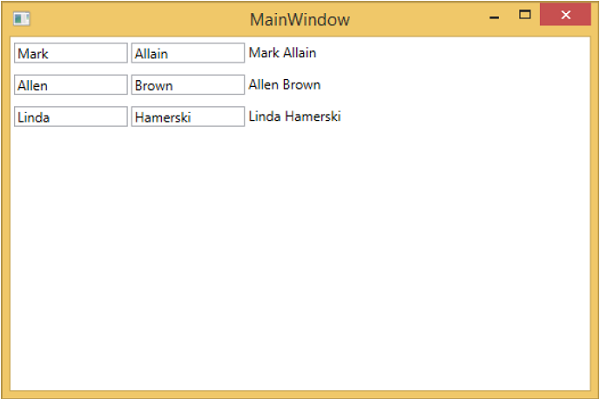
Khi đoạn mã trên được biên dịch và thực thi, bạn sẽ thấy kết quả sau trên cửa sổ chính của mình.
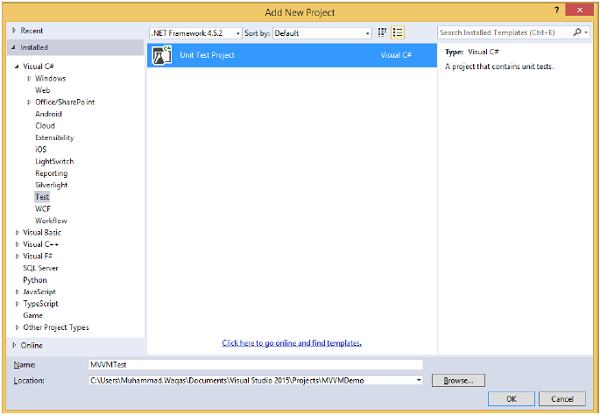
Để viết một bài kiểm tra đơn vị cho ví dụ trên, hãy thêm một Dự án Kiểm tra mới vào Giải pháp.
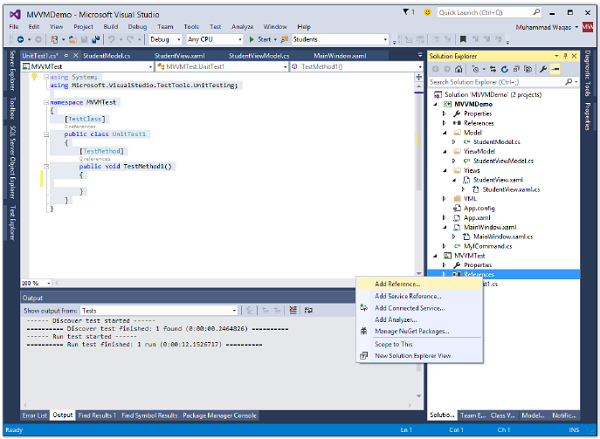
Thêm tham chiếu vào dự án bằng cách nhấp chuột phải vào Tham khảo.
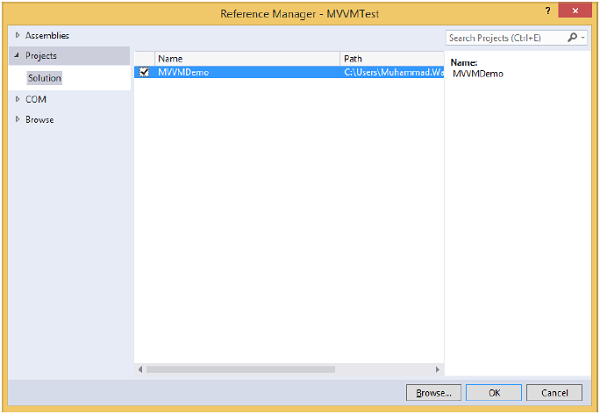
Chọn dự án hiện có và nhấp vào Ok.
Bây giờ chúng ta hãy thêm một Bài kiểm tra đơn giản sẽ kiểm tra Số học sinh như được hiển thị trong đoạn mã sau.
using System;

using Microsoft.VisualStudio.TestTools.UnitTesting;
using MVVMDemo.ViewModel;

namespace MVVMTest {
   [TestClass]

   public class UnitTest1 {
      [TestMethod]

      public void TestMethod1() {
         StudentViewModel sViewModel = new StudentViewModel();
         int count = sViewModel.GetStudentCount();
         Assert.IsTrue(count == 3);
      }
   }
}
Để thực hiện kiểm tra này, hãy chọn tùy chọn menu Kiểm tra → Chạy → Tất cả Kiểm tra.
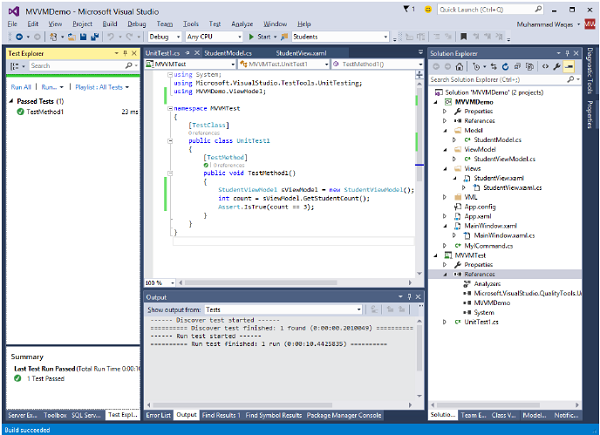
Bạn có thể thấy trong Trình khám phá Kiểm tra rằng Bài kiểm tra đã Vượt qua, vì trong StudentViewModel, ba sinh viên được thêm vào. Thay đổi điều kiện đếm từ 3 thành 4 như thể hiện trong đoạn mã sau.
using System;

using Microsoft.VisualStudio.TestTools.UnitTesting;
using MVVMDemo.ViewModel;

namespace MVVMTest {
   [TestClass]

   public class UnitTest1 {
      [TestMethod] public void TestMethod1() {
         StudentViewModel sViewModel = new StudentViewModel();
         int count = sViewModel.GetStudentCount();
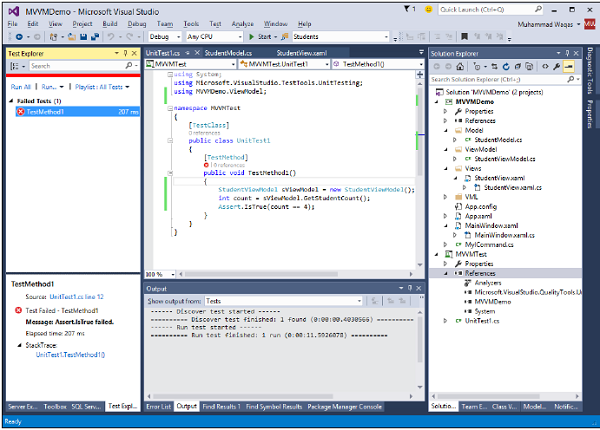
         Assert.IsTrue(count == 4);
      }
   }
}
Khi kế hoạch kiểm tra được thực hiện lại, bạn sẽ thấy rằng kiểm tra không thành công vì số học sinh không bằng 4.
Chúng tôi khuyên bạn nên thực hiện ví dụ trên theo phương pháp từng bước để hiểu rõ hơn.