Angular 6 - Enlace de datos
El enlace de datos está disponible directamente desde AngularJS, Angular 2,4 y ahora también está disponible en Angular 6. Usamos llaves para el enlace de datos - {{}}; este proceso se llama interpolación. Ya hemos visto en nuestros ejemplos anteriores cómo declaramos el valor a la variable título y el mismo se imprime en el navegador.
La variable en el app.component.html El archivo se denomina {{título}} y el valor del título se inicializa en el app.component.ts archivo y en app.component.html, se muestra el valor.
Creemos ahora un menú desplegable de meses en el navegador. Para hacer eso, hemos creado una serie de meses enapp.component.ts como sigue -
import { Component } from '@angular/core';
@Component({
   selector: 'app-root',
   templateUrl: './app.component.html',
   styleUrls: ['./app.component.css']
})
export class AppComponent {
   title = 'Angular 6 Project!';
   // declared array of months.
   months = ["January", "Feburary", "March", "April", "May",
            "June", "July", "August", "September",
            "October", "November", "December"];
}
La matriz del mes que se muestra arriba se mostrará en un menú desplegable en el navegador. Para ello, usaremos la siguiente línea de código:
<!--The content below is only a placeholder and can be replaced. -->
<div style = "text-align:center">
<h1>
Welcome to {{title}}.
</h1>
</div>
<div> Months :
<select>
<option *ngFor = "let i of months">{{i}}</option>
</select>
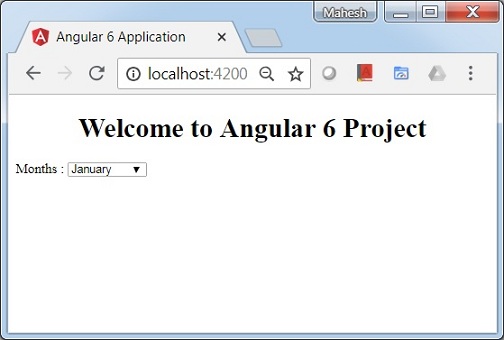
</div>Hemos creado la etiqueta de selección normal con opción. Como opción, hemos utilizado elfor loop. losfor loop se utiliza para iterar sobre la matriz de meses, que a su vez creará la etiqueta de opción con el valor presente en los meses.
La sintaxis for en Angular es *ngFor = "let I of months" y para obtener el valor de los meses, lo mostramos en {{i}}.
Las dos llaves ayudan con el enlace de datos. Declaras las variables en tuapp.component.ts archivo y el mismo será reemplazado usando las llaves.
Veamos la salida de la matriz del mes anterior en el navegador.
La variable que se establece en el app.component.ts se puede unir con el app.component.htmlusando las llaves; por ejemplo,{{}}.
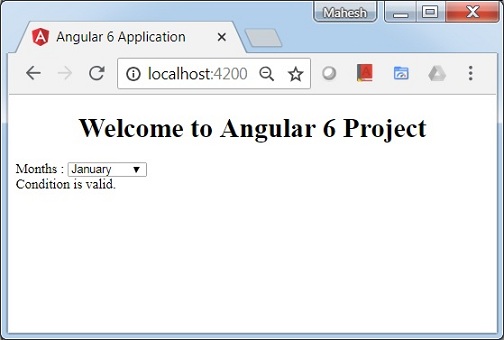
Ahora mostremos los datos en el navegador según la condición. Aquí, hemos agregado una variable y asignado el valor como verdadero. Usando la declaración if, podemos ocultar / mostrar el contenido que se mostrará.
Ejemplo
import { Component } from '@angular/core';
@Component({
   selector: 'app-root',
   templateUrl: './app.component.html',
   styleUrls: ['./app.component.css']
})
export class AppComponent {
   title = 'Angular 4 Project!';
   //array of months.
   months = ["January", "February", "March", "April",
            "May", "June", "July", "August", "September",
            "October", "November", "December"];
   isavailable = true;   //variable is set to true
}
<!--The content below is only a placeholder and can be replaced.-->
<div style = "text-align:center">
<h1>
Welcome to {{title}}.
</h1>
</div>
<div> Months :
<select>
<option *ngFor = "let i of months">{{i}}</option>
</select>
</div>
<br/>
<div>
<span *ngIf = "isavailable">Condition is valid.</span>
<!--over here based on if condition the text condition is valid is displayed.
If the value of isavailable is set to false it will not display the text.-->
</div>Salida
Probemos el ejemplo anterior usando el IF THEN ELSE condición.
Ejemplo
import { Component } from '@angular/core';
@Component({
selector: 'app-root',
templateUrl: './app.component.html',
styleUrls: ['./app.component.css']
})
export class AppComponent {
title = 'Angular 4 Project!';
//array of months.
months = ["January", "February", "March", "April",
"May", "June", "July", "August", "September",
"October", "November", "December"];
isavailable = false;
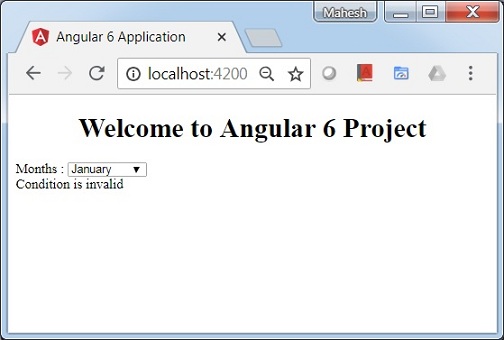
}En este caso, hemos realizado el isavailablevariable como falsa. Para imprimir elelse condición, tendremos que crear la ng-template como sigue -
<ng-template #condition1>Condition is invalid</ng-template>El código completo se ve así:
<!--The content below is only a placeholder and can be replaced.-->
<div style = "text-align:center">
   <h1>
      Welcome to {{title}}.
   </h1>
</div>
<div> Months :
   <select>
      <option *ngFor="let i of months">{{i}}</option>
   </select>
</div>
<br/>
<div>
   <span *ngIf = "isavailable; else condition1">Condition is valid.</span>
   <ng-template #condition1>Condition is invalid</ng-template>
</div>
If se utiliza con la condición else y la variable utilizada es condition1. Lo mismo se asigna comoid al ng-template, y cuando la variable disponible se establece en falso, el texto Condition is invalid se visualiza.
La siguiente captura de pantalla muestra la pantalla en el navegador.
Usemos ahora el if then else condición.
import { Component } from '@angular/core';
@Component({
   selector: 'app-root',
   templateUrl: './app.component.html',
   styleUrls: ['./app.component.css']
})
export class AppComponent {
   title = 'Angular 4 Project!';
   //array of months.
   months = ["January", "February", "March", "April",
            "May", "June", "July", "August", "September",
            "October", "November", "December"];
   isavailable = true;
}
Ahora, haremos la variable isavailablecomo cierto. En el html, la condición se escribe de la siguiente manera:
<!--The content below is only a placeholder and can be replaced.-->
<div style = "text-align:center">
   <h1>
   Welcome to {{title}}.
   </h1>
</div>
<div> Months :
   <select>
      <option *ngFor = "let i of months">{{i}}</option>
   </select>
</div>
<br/>
<div>
   <span *ngIf = "isavailable; then condition1 else condition2">Condition is valid.</span>
   <ng-template #condition1>Condition is valid</ng-template>
   <ng-template #condition2>Condition is invalid</ng-template>
</div>
Si la variable es verdadera, entonces condition1, más condition2. Ahora, se crean dos plantillas con id#condition1 y #condition2.
La pantalla en el navegador es la siguiente: