JSF - Première application
Pour créer une application JSF simple, nous utiliserons le plugin maven-archetype-webapp. Dans l'exemple suivant, nous allons créer un projet d'application Web basé sur maven dans le dossier C: \ JSF.
Créer un projet
Ouvrons la console de commande, allons le C:\ > JSF répertoire et exécutez ce qui suit mvn commander.
C:\JSF>mvn archetype:create
-DgroupId = com.tutorialspoint.test
-DartifactId = helloworld
-DarchetypeArtifactId = maven-archetype-webapp
Maven commencera le traitement et créera la structure complète du projet d'application Web Java.
[INFO] Scanning for projects...
[INFO] Searching repository for plugin with prefix: 'archetype'.
[INFO] -------------------------------------------------------------
[INFO] Building Maven Default Project
[INFO]    task-segment: [archetype:create] (aggregator-style)
[INFO] -------------------------------------------------------------
[INFO] [archetype:create {execution: default-cli}]
[INFO] Defaulting package to group ID: com.tutorialspoint.test
[INFO] artifact org.apache.maven.archetypes:maven-archetype-webapp:
checking for updates from central
[INFO] -------------------------------------------------------------
[INFO] Using following parameters for creating project
from Old (1.x) Archetype: maven-archetype-webapp:RELEASE
[INFO] -------------------------------------------------------------
[INFO] Parameter: groupId, Value: com.tutorialspoint.test
[INFO] Parameter: packageName, Value: com.tutorialspoint.test
[INFO] Parameter: package, Value: com.tutorialspoint.test
[INFO] Parameter: artifactId, Value: helloworld
[INFO] Parameter: basedir, Value: C:\JSF
[INFO] Parameter: version, Value: 1.0-SNAPSHOT
[INFO] project created from Old (1.x) Archetype in dir:
C:\JSF\helloworld
[INFO] -------------------------------------------------------------
[INFO] BUILD SUCCESSFUL
[INFO] -------------------------------------------------------------
[INFO] Total time: 7 seconds
[INFO] Finished at: Mon Nov 05 16:05:04 IST 2012
[INFO] Final Memory: 12M/84M
[INFO] -------------------------------------------------------------
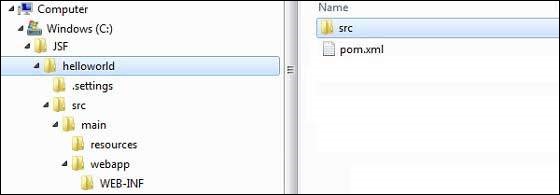
Allez maintenant dans le répertoire C: / JSF. Vous verrez un projet d'application Web Java créé, nommé helloworld (comme spécifié dans artifactId). Maven utilise une disposition de répertoire standard comme indiqué dans la capture d'écran suivante.

En utilisant l'exemple ci-dessus, nous pouvons comprendre les concepts clés suivants.
| S. Non | Structure et description des dossiers |
|---|---|
| 1 | helloworld Contient le dossier src et pom.xml |
| 2 | src/main/wepapp Contient le dossier WEB-INF et la page index.jsp |
| 3 | src/main/resources Il contient des images / fichiers de propriétés (dans l'exemple ci-dessus, nous devons créer cette structure manuellement) |
Ajouter la capacité JSF au projet
Ajoutez les dépendances JSF suivantes.
<dependencies>
   <dependency>
      <groupId>com.sun.faces</groupId>
      <artifactId>jsf-api</artifactId>
      <version>2.1.7</version>
   </dependency>

   <dependency>
      <groupId>com.sun.faces</groupId>
      <artifactId>jsf-impl</artifactId>
      <version>2.1.7</version>
   </dependency>

</dependencies>
POM.xml complet
<project xmlns = "http://maven.apache.org/POM/4.0.0"
   xmlns:xsi = "http://www.w3.org/2001/XMLSchema-instance"
   xsi:schemaLocation = "http://maven.apache.org/POM/4.0.0
   http://maven.apache.org/maven-v4_0_0.xsd">

   <modelVersion>4.0.0</modelVersion>
   <groupId>com.tutorialspoint.test</groupId>
   <artifactId>helloworld</artifactId>
   <packaging>war</packaging>
   <version>1.0-SNAPSHOT</version>
   <name>helloworld Maven Webapp</name>
   <url>http://maven.apache.org</url>

   <dependencies>
      <dependency>
         <groupId>junit</groupId>
         <artifactId>junit</artifactId>
         <version>3.8.1</version>
         <scope>test</scope>
      </dependency>

      <dependency>
         <groupId>com.sun.faces</groupId>
         <artifactId>jsf-api</artifactId>
         <version>2.1.7</version>
      </dependency>

      <dependency>
         <groupId>com.sun.faces</groupId>
         <artifactId>jsf-impl</artifactId>
         <version>2.1.7</version>
      </dependency>

   </dependencies>

   <build>
      <finalName>helloworld</finalName>
      <plugins>
         <plugin>
            <groupId>org.apache.maven.plugins</groupId>
            <artifactId>maven-compiler-plugin</artifactId>
            <version>2.3.1</version>

            <configuration>
               <source>1.6</source>
               <target>1.6</target>
            </configuration>
         </plugin>
      </plugins>

   </build>
</project>
Préparer le projet Eclipse
Ouvrons la console de commande. Allez leC:\ > JSF > helloworld répertoire et exécutez ce qui suit mvn commander.
C:\JSF\helloworld>mvn eclipse:eclipse -Dwtpversion = 2.0Maven commencera le traitement, créera le projet prêt pour l'éclipse et ajoutera la capacité wtp.
Downloading: http://repo.maven.apache.org/org/apache/maven/plugins/
maven-compiler-plugin/2.3.1/maven-compiler-plugin-2.3.1.pom
5K downloaded  (maven-compiler-plugin-2.3.1.pom)
Downloading: http://repo.maven.apache.org/org/apache/maven/plugins/
maven-compiler-plugin/2.3.1/maven-compiler-plugin-2.3.1.jar
29K downloaded  (maven-compiler-plugin-2.3.1.jar)
[INFO] Searching repository for plugin with prefix: 'eclipse'.
[INFO] ------------------------------------------------------------
[INFO] Building helloworld Maven Webapp
[INFO]    task-segment: [eclipse:eclipse]
[INFO] ------------------------------------------------------------
[INFO] Preparing eclipse:eclipse
[INFO] No goals needed for project - skipping
[INFO] [eclipse:eclipse {execution: default-cli}]
[INFO] Adding support for WTP version 2.0.
[INFO] Using Eclipse Workspace: null
[INFO] Adding default classpath container: org.eclipse.jdt.
launching.JRE_CONTAINER
Downloading: http://repo.maven.apache.org/
com/sun/faces/jsf-api/2.1.7/jsf-api-2.1.7.pom
12K downloaded  (jsf-api-2.1.7.pom)
Downloading: http://repo.maven.apache.org/
com/sun/faces/jsf-impl/2.1.7/jsf-impl-2.1.7.pom
10K downloaded  (jsf-impl-2.1.7.pom)
Downloading: http://repo.maven.apache.org/
com/sun/faces/jsf-api/2.1.7/jsf-api-2.1.7.jar
619K downloaded  (jsf-api-2.1.7.jar)
Downloading: http://repo.maven.apache.org/
com/sun/faces/jsf-impl/2.1.7/jsf-impl-2.1.7.jar
1916K downloaded  (jsf-impl-2.1.7.jar)
[INFO] Wrote settings to C:\JSF\helloworld\.settings\
org.eclipse.jdt.core.prefs
[INFO] Wrote Eclipse project for "helloworld" to C:\JSF\helloworld.
[INFO]
[INFO] -----------------------------------------------------------
[INFO] BUILD SUCCESSFUL
[INFO] -----------------------------------------------------------
[INFO] Total time: 6 minutes 7 seconds
[INFO] Finished at: Mon Nov 05 16:16:25 IST 2012
[INFO] Final Memory: 10M/89M
[INFO] -----------------------------------------------------------
Importer un projet dans Eclipse
Voici les étapes -
Importez un projet dans eclipse à l'aide de l'assistant d'importation.
Aller à File → Import... → Existing project into workspace.
Sélectionnez le répertoire racine de helloworld.
Garder Copy projects into workspace à vérifier.
Cliquez sur le bouton Terminer.
Eclipse importera et copiera le projet dans son espace de travail C:\ → Projects → Data → WorkSpace.

Configurer le servlet Faces dans web.xml
Localisez web.xml dans webapp → WEB-INF dossier et mettez-le à jour comme indiqué ci-dessous.
<?xml version = "1.0" encoding = "UTF-8"?>
<web-app xmlns:xsi = "http://www.w3.org/2001/XMLSchema-instance"
   xmlns = "http://java.sun.com/xml/ns/javaee"
   xmlns:web = "http://java.sun.com/xml/ns/javaee/web-app_2_5.xsd"
   xsi:schemaLocation = "http://java.sun.com/xml/ns/javaee
   http://java.sun.com/xml/ns/javaee/web-app_2_5.xsd"
   id = "WebApp_ID" version="2.5">

   <welcome-file-list>
      <welcome-file>faces/home.xhtml</welcome-file>
   </welcome-file-list>

   <!--
      FacesServlet is main servlet responsible to handle all request.
      It acts as central controller.
      This servlet initializes the JSF components before the JSP is displayed.
   -->

   <servlet>
      <servlet-name>Faces Servlet</servlet-name>
      <servlet-class>javax.faces.webapp.FacesServlet</servlet-class>
      <load-on-startup>1</load-on-startup>
   </servlet>

   <servlet-mapping>
      <servlet-name>Faces Servlet</servlet-name>
      <url-pattern>/faces/*</url-pattern>
   </servlet-mapping>

   <servlet-mapping>
      <servlet-name>Faces Servlet</servlet-name>
      <url-pattern>*.jsf</url-pattern>
   </servlet-mapping>

   <servlet-mapping>
      <servlet-name>Faces Servlet</servlet-name>
      <url-pattern>*.faces</url-pattern>
   </servlet-mapping>

   <servlet-mapping>
      <servlet-name>Faces Servlet</servlet-name>
      <url-pattern>*.xhtml</url-pattern>
   </servlet-mapping>

</web-app>
Créer un bean géré
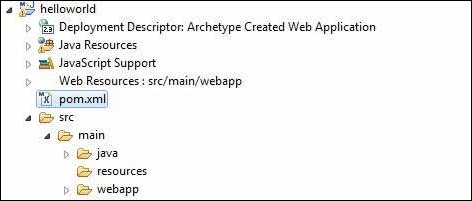
Créez une structure de package sous src → main → java as com → tutorialspoint → test. Créez la classe HelloWorld.java dans ce package. Mettre à jour le code deHelloWorld.java comme indiqué ci-dessous.
package com.tutorialspoint.test;

import javax.faces.bean.ManagedBean;

@ManagedBean(name = "helloWorld", eager = true)
public class HelloWorld {

   public HelloWorld() {
      System.out.println("HelloWorld started!");
   }

   public String getMessage() {
      return "Hello World!";
   }
}
Créer une page JSF
Créez une page home.xhtml sous webappdossier. Mettre à jour le code dehome.xhtml comme indiqué ci-dessous.
<!DOCTYPE html PUBLIC "-//W3C//DTD XHTML 1.0 Transitional//EN"
   "http://www.w3.org/TR/xhtml1/DTD/xhtml1-transitional.dtd">

<html xmlns = "http://www.w3.org/1999/xhtml">
   <head>
      <title>JSF Tutorial!</title>
   </head>

   <body>
      #{helloWorld.getMessage()}
   </body>
</html>
Construisez le projet
Voici les étapes.
Sélectionnez le projet helloworld dans eclipse
Utiliser l'assistant Exécuter en tant que
Sélectionner Run As → Maven package
Maven commencera à construire le projet et créera helloworld.war sous C:\ → Projects → Data → WorkSpace → helloworld → target dossier.
[INFO] Scanning for projects...
[INFO] -----------------------------------------------------
[INFO] Building helloworld Maven Webapp
[INFO]
[INFO] Id: com.tutorialspoint.test:helloworld:war:1.0-SNAPSHOT
[INFO] task-segment: [package]
[INFO] -----------------------------------------------------
[INFO] [resources:resources]
[INFO] Using default encoding to copy filtered resources.
[INFO] [compiler:compile]
[INFO] Nothing to compile - all classes are up to date
[INFO] [resources:testResources]
[INFO] Using default encoding to copy filtered resources.
[INFO] [compiler:testCompile]
[INFO] No sources to compile
[INFO] [surefire:test]
[INFO] Surefire report directory:
C:\Projects\Data\WorkSpace\helloworld\target\surefire-reports

-------------------------------------------------------
 T E S T S
-------------------------------------------------------
There are no tests to run.

Results :

Tests run: 0, Failures: 0, Errors: 0, Skipped: 0

[INFO] [war:war]
[INFO] Packaging webapp
[INFO] Assembling webapp[helloworld] in
[C:\Projects\Data\WorkSpace\helloworld\target\helloworld]
[INFO] Processing war project
[INFO] Webapp assembled in[150 msecs]
[INFO] Building war:
C:\Projects\Data\WorkSpace\helloworld\target\helloworld.war
[INFO] ------------------------------------------------
[INFO] BUILD SUCCESSFUL
[INFO] ------------------------------------------------
[INFO] Total time: 3 seconds
[INFO] Finished at: Mon Nov 05 16:34:46 IST 2012
[INFO] Final Memory: 2M/15M
[INFO] ------------------------------------------------
Déployer le fichier WAR
Voici les étapes.
Arrêtez le serveur tomcat.
Copiez le fichier helloworld.war dans tomcat installation directory → webapps folder.
Démarrez le serveur tomcat.
Regardez dans le répertoire webapps, il devrait y avoir un dossier que helloworld a été créé.
Désormais, helloworld.war est déployé avec succès dans la racine du serveur Web Tomcat.
Lancer l'application
Entrez une URL dans le navigateur Web: http://localhost:8080/helloworld/home.jsf pour lancer l'application.
Le nom du serveur (localhost) et le port (8080) peuvent varier selon la configuration de votre chat.
