Inscription au service avec Eureka
Dans ce chapitre, vous allez apprendre en détail comment enregistrer l'application de service Spring Boot Micro sur le serveur Eureka. Avant d'enregistrer l'application, veuillez vous assurer qu'Eureka Server fonctionne sur le port 8761 ou commencez par créer le serveur Eureka et exécutez-le. Pour plus d'informations sur la construction du serveur Eureka, vous pouvez vous référer au chapitre précédent.
Tout d'abord, vous devez ajouter les dépendances suivantes dans notre fichier de configuration de construction pour enregistrer le microservice auprès du serveur Eureka.
Les utilisateurs Maven peuvent ajouter les dépendances suivantes dans le pom.xml fichier -
<dependency>
   <groupId>org.springframework.cloud</groupId>
   <artifactId>spring-cloud-starter-eureka</artifactId>
</dependency>
Les utilisateurs de Gradle peuvent ajouter les dépendances suivantes dans le build.gradle fichier -
compile('org.springframework.cloud:spring-cloud-starter-eureka')Maintenant, nous devons ajouter l'annotation @EnableEurekaClient dans le fichier de classe d'application Spring Boot principal. L'annotation @EnableEurekaClient fait que votre application Spring Boot agit comme un client Eureka.
L'application principale Spring Boot est indiquée ci-dessous -
package com.tutorialspoint.eurekaclient;

import org.springframework.boot.SpringApplication;
import org.springframework.boot.autoconfigure.SpringBootApplication;
import org.springframework.cloud.netflix.eureka.EnableEurekaClient;

@SpringBootApplication
@EnableEurekaClient
public class EurekaclientApplication {
   public static void main(String[] args) {
      SpringApplication.run(EurekaclientApplication.class, args);
   }
}
Pour enregistrer l'application Spring Boot dans Eureka Server, nous devons ajouter la configuration suivante dans notre fichier application.properties ou application.yml et spécifier l'URL du serveur Eureka dans notre configuration.
Le code du fichier application.yml est donné ci-dessous -
eureka:
   client:
      serviceUrl:
         defaultZone: http://localhost:8761/eureka
      instance:
      preferIpAddress: true
spring:
   application:
      name: eurekaclient
Le code du fichier application.properties est donné ci-dessous -
eureka.client.serviceUrl.defaultZone  = http://localhost:8761/eureka
eureka.client.instance.preferIpAddress = true
spring.application.name = eurekaclient
Maintenant, ajoutez le point de terminaison Rest pour renvoyer String dans l'application principale Spring Boot et la dépendance Web Spring Boot Starter dans le fichier de configuration de construction. Observez le code ci-dessous -
package com.tutorialspoint.eurekaclient;

import org.springframework.boot.SpringApplication;
import org.springframework.boot.autoconfigure.SpringBootApplication;
import org.springframework.cloud.netflix.eureka.EnableEurekaClient;
import org.springframework.web.bind.annotation.RequestMapping;
import org.springframework.web.bind.annotation.RestController;

@SpringBootApplication
@EnableEurekaClient
@RestController
public class EurekaclientApplication {
   public static void main(String[] args) {
      SpringApplication.run(EurekaclientApplication.class, args);
   }
   @RequestMapping(value = "/")
   public String home() {
      return "Eureka Client application";
   }
}
Le fichier de configuration complet est donné ci-dessous.
For Maven user - pom.xml
<?xml version = "1.0" encoding = "UTF-8"?>
<project xmlns = "http://maven.apache.org/POM/4.0.0"
   xmlns:xsi = "http://www.w3.org/2001/XMLSchema-instance"
   xsi:schemaLocation = "http://maven.apache.org/POM/4.0.0
   http://maven.apache.org/xsd/maven-4.0.0.xsd">

   <modelVersion>4.0.0</modelVersion>
   <groupId>com.tutorialspoint</groupId>
   <artifactId>eurekaclient</artifactId>
   <version>0.0.1-SNAPSHOT</version>
   <packaging>jar</packaging>

   <name>eurekaclient</name>
   <description>Demo project for Spring Boot</description>

   <parent>
      <groupId>org.springframework.boot</groupId>
      <artifactId>spring-boot-starter-parent</artifactId>
      <version>1.5.9.RELEASE</version>
      <relativePath/> <!-- lookup parent from repository -->
   </parent>

   <properties>
      <project.build.sourceEncoding>UTF-8</project.build.sourceEncoding>
      <project.reporting.outputEncoding>UTF-8</project.reporting.outputEncoding>
      <java.version>1.8</java.version>
      <spring-cloud.version>Edgware.RELEASE</spring-cloud.version>
   </properties>

   <dependencies>
      <dependency>
         <groupId>org.springframework.cloud</groupId>
         <artifactId>spring-cloud-starter-eureka</artifactId>
      </dependency>
      <dependency>
         <groupId>org.springframework.boot</groupId>
         <artifactId>spring-boot-starter-web</artifactId>
      </dependency>
      <dependency>
         <groupId>org.springframework.boot</groupId>
         <artifactId>spring-boot-starter-test</artifactId>
         <scope>test</scope>
      </dependency>
   </dependencies>

   <dependencyManagement>
      <dependencies>
         <dependency>
            <groupId>org.springframework.cloud</groupId>
            <artifactId>spring-cloud-dependencies</artifactId>
            <version>${spring-cloud.version}</version>
            <type>pom</type>
            <scope>import</scope>
         </dependency>
      </dependencies>
   </dependencyManagement>

   <build>
      <plugins>
         <plugin>
            <groupId>org.springframework.boot</groupId>
            <artifactId>spring-boot-maven-plugin</artifactId>
         </plugin>
      </plugins>
   </build>

</projecta>
For Gradle user – build.gradle
buildscript {
   ext {
      springBootVersion = '1.5.9.RELEASE'
   }
   repositories {
      mavenCentral()
   }
   dependencies {
      classpath("org.springframework.boot:spring-boot-gradle-plugin:${springBootVersion}")
   }
}

apply plugin: 'java'
apply plugin: 'eclipse'
apply plugin: 'org.springframework.boot'

group = 'com.tutorialspoint'
version = '0.0.1-SNAPSHOT'
sourceCompatibility = 1.8

repositories {
   mavenCentral()
}
ext {
   springCloudVersion = 'Edgware.RELEASE'
}
dependencies {
   compile('org.springframework.cloud:spring-cloud-starter-eureka')
   testCompile('org.springframework.boot:spring-boot-starter-test')
   compile('org.springframework.boot:spring-boot-starter-web')
}
dependencyManagement {
   imports {
      mavenBom "org.springframework.cloud:spring-cloud-dependencies:${springCloudVersion}"
   }
}
Vous pouvez créer un fichier JAR exécutable et exécuter l'application Spring Boot à l'aide des commandes Maven ou Gradle suivantes:
Pour Maven, vous pouvez utiliser la commande suivante -
mvn clean installAprès «BUILD SUCCESS», vous pouvez trouver le fichier JAR sous le répertoire cible.
Pour Gradle, vous pouvez utiliser la commande suivante -
gradle clean buildAprès «BUILD SUCCESSFUL», vous pouvez trouver le fichier JAR dans le répertoire build / libs.
Maintenant, exécutez le fichier JAR en utilisant la commande comme indiqué -
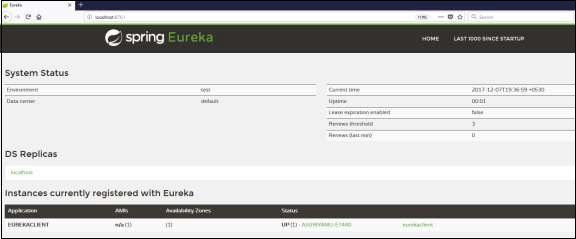
java –jar <JARFILE>Maintenant, l'application a démarré sur le port Tomcat 8080 et l'application client Eureka est enregistrée auprès du serveur Eureka comme indiqué ci-dessous -

Cliquez sur l'URL http: // localhost: 8761 / dans votre navigateur Web et vous pouvez voir que l'application client Eureka est enregistrée auprès du serveur Eureka.

Cliquez maintenant sur l'URL http://localhost:8080/ dans votre navigateur Web et consultez la sortie Rest Endpoint.
