स्प्रिंग एमवीसी - टेक्स्ट बॉक्स उदाहरण
निम्न उदाहरण दिखाता है कि स्प्रिंग वेब एमवीसी ढांचे का उपयोग करके रूपों में पाठ बक्से का उपयोग कैसे करें। आरंभ करने के लिए, हमारे पास एक काम करने वाली ग्रहण आईडीई है और स्प्रिंग वेब फ्रेमवर्क का उपयोग करते हुए डायनामिक फॉर्म आधारित वेब एप्लिकेशन विकसित करने के लिए निम्न चरणों से चिपके रहें -
| कदम | विवरण |
|---|---|
| 1 | स्प्रिंग एमवीसी - हैलो वर्ल्ड उदाहरण चैप्टर में बताए गए एक पैकेज com.tutorialspoint के तहत HelloWeb नाम से एक प्रोजेक्ट बनाएं। |
| 2 | एक जावा कक्षाएं बनाएँ छात्र, छात्र.कंट्रोलर com.tutorialspoint पैकेज के तहत। |
| 3 | Jsp उप-फ़ोल्डर के अंतर्गत एक दृश्य फ़ाइलें student.jsp, result.jsp बनाएँ। |
| 4 | अंतिम चरण स्रोत और कॉन्फ़िगरेशन फ़ाइलों की सामग्री बनाना और नीचे बताए अनुसार एप्लिकेशन को निर्यात करना है। |
Student.java
package com.tutorialspoint;

public class Student {
   private Integer age;
   private String name;
   private Integer id;

   public void setAge(Integer age) {
      this.age = age;
   }
   public Integer getAge() {
      return age;
   }

   public void setName(String name) {
      this.name = name;
   }
   public String getName() {
      return name;
   }

   public void setId(Integer id) {
      this.id = id;
   }
   public Integer getId() {
      return id;
   }
}
StudentController.java
package com.tutorialspoint;

import org.springframework.stereotype.Controller;
import org.springframework.web.bind.annotation.ModelAttribute;
import org.springframework.web.bind.annotation.RequestMapping;
import org.springframework.web.bind.annotation.RequestMethod;
import org.springframework.web.servlet.ModelAndView;
import org.springframework.ui.ModelMap;

@Controller
public class StudentController {

   @RequestMapping(value = "/student", method = RequestMethod.GET)
   public ModelAndView student() {
      return new ModelAndView("student", "command", new Student());
   }

   @RequestMapping(value = "/addStudent", method = RequestMethod.POST)
   public String addStudent(@ModelAttribute("SpringWeb")Student student,
      ModelMap model) {
      model.addAttribute("name", student.getName());
      model.addAttribute("age", student.getAge());
      model.addAttribute("id", student.getId());

      return "result";
   }
}
यहां, पहली सेवा पद्धति student(), हमने "कमांड" नाम के साथ ModelAndView ऑब्जेक्ट में एक रिक्त छात्र-विषय पास किया है, क्योंकि वसंत ढांचा "कमांड" नाम के साथ एक ऑब्जेक्ट की उम्मीद करता है, यदि आप उपयोग कर रहे हैं <form:form>आपकी JSP फ़ाइल में टैग। इसलिए, जब छात्र () विधि को रिटर्न कहा जाता हैstudent.jsp view।
दूसरी सेवा विधि addStudent() पर एक पोस्ट विधि के खिलाफ बुलाया जाएगा HelloWeb/addStudentयूआरएल। आप प्रस्तुत जानकारी के आधार पर अपना मॉडल ऑब्जेक्ट तैयार करेंगे। अंत में, एक "परिणाम" दृश्य सेवा पद्धति से वापस आ जाएगा, जिसके परिणामस्वरूप रेंडरिंग परिणाम होगा। jsp
student.jsp
<%@taglib uri = "http://www.springframework.org/tags/form" prefix = "form"%>
<html>
   <head>
      <title>Spring MVC Form Handling</title>
   </head>
   <body>

      <h2>Student Information</h2>
      <form:form method = "POST" action = "/HelloWeb/addStudent">
         <table>
            <tr>
               <td><form:label path = "name">Name</form:label></td>
               <td><form:input path = "name" /></td>
            </tr>
            <tr>
               <td><form:label path = "age">Age</form:label></td>
               <td><form:input path = "age" /></td>
            </tr>
            <tr>
               <td><form:label path = "id">id</form:label></td>
               <td><form:input path = "id" /></td>
            </tr>
            <tr>
               <td colspan = "2">
                  <input type = "submit" value = "Submit"/>
               </td>
            </tr>
         </table>
      </form:form>
   </body>
</html>
यहां, हम उपयोग कर रहे हैं <form:input />HTML टेक्स्ट बॉक्स रेंडर करने के लिए टैग। उदाहरण के लिए -
<form:input path = "name" />यह HTML सामग्री के बाद रेंडर करेगा।
<input id = "name" name = "name" type = "text" value = ""/>result.jsp
<%@taglib uri = "http://www.springframework.org/tags/form" prefix = "form"%>
<html>
   <head>
      <title>Spring MVC Form Handling</title>
   </head>
   <body>

      <h2>Submitted Student Information</h2>
      <table>
         <tr>
            <td>Name</td>
            <td>${name}</td>
         </tr>
         <tr>
            <td>Age</td>
            <td>${age}</td>
         </tr>
         <tr>
            <td>ID</td>
            <td>${id}</td>
         </tr>
      </table>
   </body>
</html>
एक बार जब हम स्रोत और कॉन्फ़िगरेशन फ़ाइल बनाने के साथ हो जाते हैं, तो अपने एप्लिकेशन को निर्यात करें। अपने आवेदन पर राइट क्लिक करें, उपयोग करेंExport → WAR File विकल्प और सहेजें HelloWeb.war टॉमकैट के वेबैप फ़ोल्डर में फ़ाइल।
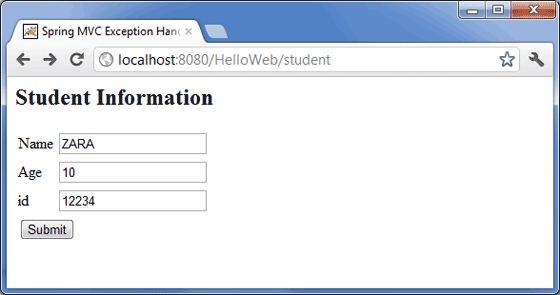
अब, टॉमकैट सर्वर शुरू करें और सुनिश्चित करें कि आप मानक ब्राउज़र का उपयोग करके वेबैप फ़ोल्डर से अन्य वेबपेजों तक पहुंचने में सक्षम हैं। URL आज़माएं -http://localhost:8080/HelloWeb/student और हम निम्न स्क्रीन देखेंगे यदि स्प्रिंग वेब एप्लिकेशन के साथ सब कुछ ठीक है।

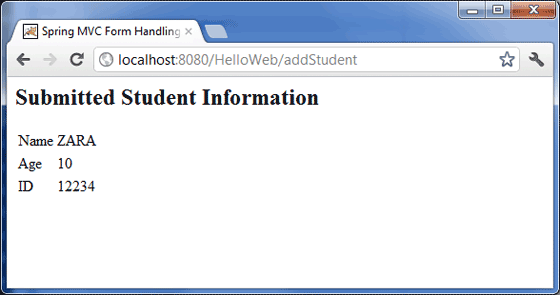
आवश्यक जानकारी सबमिट करने के बाद, फॉर्म सबमिट करने के लिए सबमिट बटन पर क्लिक करें। हमें निम्न स्क्रीन को देखना चाहिए, अगर स्प्रिंग वेब एप्लिकेशन के साथ सब कुछ ठीक है।
