WebRTC - संदेश भेजना
अब एक सरल उदाहरण बनाते हैं। सबसे पहले, हम "नोड सर्वर" के माध्यम से "सिग्नलिंग सर्वर" ट्यूटोरियल में बनाए गए सिग्नलिंग सर्वर को चलाएं।
पृष्ठ पर तीन पाठ इनपुट होंगे, एक लॉगिन के लिए, एक उपयोगकर्ता नाम के लिए, और एक संदेश जो हम दूसरे सहकर्मी को भेजना चाहते हैं। एक index.html फ़ाइल बनाएँ और निम्न कोड जोड़ें -
<html lang = "en">
   <head>
      <meta charset = "utf-8" />
   </head>

   <body>
      <div>
         <input type = "text" id = "loginInput" />
         <button id = "loginBtn">Login</button>
      </div>

      <div>
         <input type = "text" id = "otherUsernameInput" />
         <button id = "connectToOtherUsernameBtn">Establish connection</button>
      </div>

      <div>
         <input type = "text" id = "msgInput" />
         <button id = "sendMsgBtn">Send text message</button>
      </div>

      <script src = "client.js"></script>
   </body>

</html>
हमने लॉगिन करने, कनेक्शन स्थापित करने और संदेश भेजने के लिए तीन बटन भी जोड़े हैं। अब एक client.js फ़ाइल बनाएं और निम्नलिखित कोड जोड़ें -
var connection = new WebSocket('ws://localhost:9090');
var name = "";

var loginInput = document.querySelector('#loginInput');
var loginBtn = document.querySelector('#loginBtn');

var otherUsernameInput = document.querySelector('#otherUsernameInput');
var connectToOtherUsernameBtn = document.querySelector('#connectToOtherUsernameBtn');
var msgInput = document.querySelector('#msgInput');
var sendMsgBtn = document.querySelector('#sendMsgBtn');
var connectedUser, myConnection, dataChannel;

//when a user clicks the login button
loginBtn.addEventListener("click", function(event) {
   name = loginInput.value;

   if(name.length > 0) {
      send({
         type: "login",
         name: name
      });
   }
});

//handle messages from the server
connection.onmessage = function (message) {
   console.log("Got message", message.data);
   var data = JSON.parse(message.data);

   switch(data.type) {
      case "login":
         onLogin(data.success);
         break;
      case "offer":
         onOffer(data.offer, data.name);
         break;
      case "answer":
         onAnswer(data.answer);
         break;
      case "candidate":
         onCandidate(data.candidate);
         break;
      default:
         break;
   }
};

//when a user logs in
function onLogin(success) {

   if (success === false) {
      alert("oops...try a different username");
   } else {
      //creating our RTCPeerConnection object
      var configuration = {
         "iceServers": [{ "url": "stun:stun.1.google.com:19302" }]
      };

      myConnection = new webkitRTCPeerConnection(configuration, {
         optional: [{RtpDataChannels: true}]
      });

      console.log("RTCPeerConnection object was created");
      console.log(myConnection);

      //setup ice handling
      //when the browser finds an ice candidate we send it to another peer
      myConnection.onicecandidate = function (event) {

         if (event.candidate) {
            send({
               type: "candidate",
               candidate: event.candidate
            });
         }
      };

      openDataChannel();

   }
};

connection.onopen = function () {
   console.log("Connected");
};

connection.onerror = function (err) {
   console.log("Got error", err);
};

// Alias for sending messages in JSON format
function send(message) {
   if (connectedUser) {
      message.name = connectedUser;
   }

   connection.send(JSON.stringify(message));
};
आप देख सकते हैं कि हम अपने सिग्नलिंग सर्वर में एक सॉकेट कनेक्शन स्थापित करते हैं। जब कोई उपयोगकर्ता लॉगिन बटन पर क्लिक करता है तो एप्लिकेशन सर्वर पर अपना उपयोगकर्ता नाम भेजता है। यदि लॉगिन सफल होता है तो एप्लिकेशन RTCPeerConnection ऑब्जेक्ट बनाता है और सेटअप ऑनिकेकेंडिडेट हैंडलर बनाता है जो अन्य पाए गए सभी icecandidates को भेजता है। यह OpenDataChannel () फ़ंक्शन भी चलाता है जो एक डेटाचैनल बनाता है। ध्यान दें कि जब RTCPeerConnection ऑब्जेक्ट को कंस्ट्रक्टर वैकल्पिक में दूसरा तर्क बनाते हैं: [{RtpDataChannels: true}] अनिवार्य है यदि आप क्रोम या ओपेरा का उपयोग कर रहे हैं। अगला कदम दूसरे सहकर्मी को एक प्रस्ताव बनाना है। आपके लिए निम्न कोड जोड़ें client.js फ़ाइल
//setup a peer connection with another user
connectToOtherUsernameBtn.addEventListener("click", function () {

   var otherUsername = otherUsernameInput.value;
   connectedUser = otherUsername;

   if (otherUsername.length > 0) {
      //make an offer
      myConnection.createOffer(function (offer) {
         console.log();

         send({
            type: "offer",
            offer: offer
         });

         myConnection.setLocalDescription(offer);
      }, function (error) {
         alert("An error has occurred.");
      });
   }
});

//when somebody wants to call us
function onOffer(offer, name) {
   connectedUser = name;
   myConnection.setRemoteDescription(new RTCSessionDescription(offer));

   myConnection.createAnswer(function (answer) {
      myConnection.setLocalDescription(answer);

      send({
         type: "answer",
         answer: answer
      });

   }, function (error) {
      alert("oops...error");
   });
}

//when another user answers to our offer
function onAnswer(answer) {
   myConnection.setRemoteDescription(new RTCSessionDescription(answer));
}

//when we got ice candidate from another user
function onCandidate(candidate) {
   myConnection.addIceCandidate(new RTCIceCandidate(candidate));
}
आप देख सकते हैं कि जब कोई उपयोगकर्ता "कनेक्शन स्थापित करें" बटन पर क्लिक करता है, तो एप्लिकेशन दूसरे सहकर्मी को एसडीपी ऑफर देता है। हम onAnswer और onCandidate हैंडलर भी सेट करते हैं । अंत में, आइए OpenDataChannel () फ़ंक्शन को लागू करें जो हमारा डेटाचैनल बनाता है। निम्न कोड को अपने client.js फ़ाइल में जोड़ें -
//creating data channel
function openDataChannel() {

   var dataChannelOptions = {
      reliable:true
   };

   dataChannel = myConnection.createDataChannel("myDataChannel", dataChannelOptions);

   dataChannel.onerror = function (error) {
      console.log("Error:", error);
   };

   dataChannel.onmessage = function (event) {
      console.log("Got message:", event.data);
   };
}

//when a user clicks the send message button
sendMsgBtn.addEventListener("click", function (event) {
   console.log("send message");
   var val = msgInput.value;
   dataChannel.send(val);
});
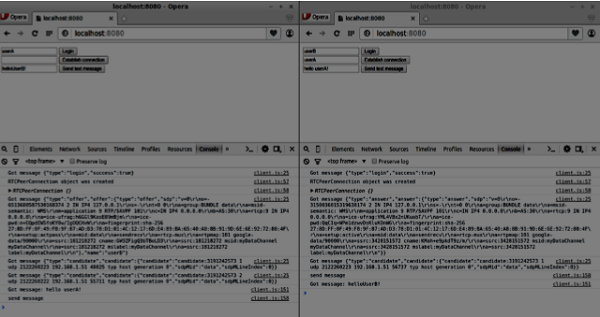
यहां हम अपने कनेक्शन के लिए डेटाचैनल बनाते हैं और "संदेश भेजें" बटन के लिए ईवेंट हैंडलर को जोड़ते हैं। अब इस पृष्ठ को दो टैब में खोलें, दो उपयोगकर्ताओं के साथ लॉगिन करें, एक कनेक्शन स्थापित करें, और संदेश भेजने का प्रयास करें। आपको उन्हें कंसोल आउटपुट में देखना चाहिए। ध्यान दें कि ओपेरा में उपरोक्त उदाहरण का परीक्षण किया गया है।

अब आप देख सकते हैं कि RTCDataChannel WebRTC API का बेहद शक्तिशाली हिस्सा है। इस ऑब्जेक्ट के लिए बहुत सारे अन्य उपयोग के मामले हैं, जैसे पीयर-टू-पीयर गेमिंग या टोरेंट-आधारित फ़ाइल साझाकरण।