Perakitan - Panduan Cepat
Apa Bahasa Assembly?
Setiap komputer pribadi memiliki mikroprosesor yang mengelola aktivitas aritmatika, logika, dan kontrol komputer.
Setiap keluarga prosesor memiliki serangkaian instruksi sendiri untuk menangani berbagai operasi seperti mendapatkan input dari keyboard, menampilkan informasi di layar dan melakukan berbagai pekerjaan lainnya. Serangkaian instruksi ini disebut 'instruksi bahasa mesin'.
Prosesor hanya memahami instruksi bahasa mesin, yang terdiri dari string 1 dan 0. Namun, bahasa mesin terlalu kabur dan rumit untuk digunakan dalam pengembangan perangkat lunak. Jadi, bahasa rakitan tingkat rendah dirancang untuk keluarga prosesor tertentu yang mewakili berbagai instruksi dalam kode simbolik dan bentuk yang lebih mudah dipahami.
Keuntungan Bahasa Perakitan
Memiliki pemahaman tentang bahasa assembly membuat seseorang menyadari -
- Bagaimana program berinteraksi dengan OS, prosesor, dan BIOS;
- Bagaimana data direpresentasikan dalam memori dan perangkat eksternal lainnya;
- Bagaimana prosesor mengakses dan menjalankan instruksi;
- Bagaimana instruksi mengakses dan memproses data;
- Bagaimana program mengakses perangkat eksternal.
Keuntungan lain menggunakan bahasa assembly adalah -
Ini membutuhkan lebih sedikit memori dan waktu eksekusi;
Ini memungkinkan pekerjaan kompleks khusus perangkat keras dengan cara yang lebih mudah;
Sangat cocok untuk pekerjaan yang membutuhkan waktu kritis;
Ini paling cocok untuk menulis rutinitas layanan interupsi dan program penghuni memori lainnya.
Fitur Dasar Perangkat Keras PC
Perangkat keras internal utama PC terdiri dari prosesor, memori, dan register. Register adalah komponen prosesor yang menyimpan data dan alamat. Untuk menjalankan program, sistem menyalinnya dari perangkat eksternal ke memori internal. Prosesor menjalankan instruksi program.
Unit dasar penyimpanan komputer adalah sedikit; itu bisa ON (1) atau OFF (0) dan sekelompok 8 bit terkait membuat byte di sebagian besar komputer modern.
Jadi, bit paritas digunakan untuk membuat jumlah bit dalam satu byte menjadi ganjil. Jika paritasnya genap, sistem mengasumsikan bahwa telah terjadi kesalahan paritas (meskipun jarang), yang mungkin disebabkan karena kesalahan perangkat keras atau gangguan listrik.
Prosesor mendukung ukuran data berikut -
- Word: item data 2-byte
- Doubleword: item data 4-byte (32 bit)
- Quadword: item data 8-byte (64 bit)
- Paragraf: area 16-byte (128 bit)
- Kilobyte: 1024 byte
- Megabyte: 1.048.576 byte
Sistem Bilangan Biner
Setiap sistem bilangan menggunakan notasi posisi, yaitu setiap posisi penulisan digit memiliki nilai posisi yang berbeda. Setiap posisi adalah pangkat dari basis, yaitu 2 untuk sistem bilangan biner, dan pangkat ini dimulai dari 0 dan meningkat 1.
Tabel berikut menunjukkan nilai posisi untuk bilangan biner 8-bit, di mana semua bit disetel ON.
| Nilai bit | 1 | 1 | 1 | 1 | 1 | 1 | 1 | 1 |
|---|---|---|---|---|---|---|---|---|
| Nilai posisi sebagai pangkat basis 2 | 128 | 64 | 32 | 16 | 8 | 4 | 2 | 1 |
| Nomor bit | 7 | 6 | 5 | 4 | 3 | 2 | 1 | 0 |
Nilai bilangan biner didasarkan pada keberadaan 1 bit dan nilai posisinya. Jadi, nilai bilangan biner yang diberikan adalah -
1 + 2 + 4 + 8 +16 + 32 + 64 + 128 = 255
yang sama dengan 2 8 - 1.
Sistem Angka Heksadesimal
Sistem bilangan heksadesimal menggunakan basis 16. Angka dalam sistem ini berkisar dari 0 hingga 15. Sesuai ketentuan, huruf A hingga F digunakan untuk mewakili digit heksadesimal yang sesuai dengan nilai desimal 10 hingga 15.
Bilangan heksadesimal dalam komputasi digunakan untuk menyingkat representasi biner yang panjang. Pada dasarnya, sistem bilangan heksadesimal mewakili data biner dengan membagi setiap byte menjadi dua dan menyatakan nilai dari setiap setengah byte. Tabel berikut menyediakan desimal, biner, dan heksadesimal yang setara -
| Angka desimal | Representasi biner | Representasi heksadesimal |
|---|---|---|
| 0 | 0 | 0 |
| 1 | 1 | 1 |
| 2 | 10 | 2 |
| 3 | 11 | 3 |
| 4 | 100 | 4 |
| 5 | 101 | 5 |
| 6 | 110 | 6 |
| 7 | 111 | 7 |
| 8 | 1000 | 8 |
| 9 | 1001 | 9 |
| 10 | 1010 | SEBUAH |
| 11 | 1011 | B |
| 12 | 1100 | C |
| 13 | 1101 | D |
| 14 | 1110 | E |
| 15 | 1111 | F |
Untuk mengonversi bilangan biner menjadi padanan heksadesimalnya, pisahkan menjadi kelompok yang masing-masing terdiri dari 4 kelompok yang berurutan, mulai dari kanan, dan tuliskan kelompok tersebut di atas digit yang sesuai dari bilangan heksadesimal.
Example - Bilangan biner 1000 1100 1101 0001 setara dengan heksadesimal - 8CD1
Untuk mengonversi bilangan heksadesimal menjadi biner, tulis saja setiap digit heksadesimal ke dalam 4 digit ekuivalen binernya.
Example - Bilangan heksadesimal FAD8 setara dengan biner - 1111 1010 1101 1000
Aritmatika Biner
Tabel berikut menggambarkan empat aturan sederhana untuk penjumlahan biner -
| (saya) | (ii) | (aku aku aku) | (iv) |
|---|---|---|---|
| 1 | |||
| 0 | 1 | 1 | 1 |
| +0 | +0 | +1 | +1 |
| = 0 | = 1 | = 10 | = 11 |
Aturan (iii) dan (iv) menunjukkan carry 1-bit ke posisi kiri berikutnya.
Example
| Desimal | Biner |
|---|---|
| 60 | 00111100 |
| +42 | 00101010 |
| 102 | 01100110 |
Nilai biner negatif dinyatakan dalam two's complement notation. Menurut aturan ini, untuk mengubah bilangan biner menjadi nilai negatifnya adalah membalikkan nilai bitnya dan menambahkan 1 .
Example
| Nomor 53 | 00110101 |
| Balikkan bit | 11001010 |
| Tambahkan 1 | 0000000 1 |
| Nomor -53 | 11001011 |
Untuk mengurangi satu nilai dari yang lain, konversikan angka yang dikurangi menjadi format komplemen dua dan tambahkan angka-angka tersebut .
Example
Kurangi 42 dari 53
| Nomor 53 | 00110101 |
| Nomor 42 | 00101010 |
| Balikkan bit 42 | 11010101 |
| Tambahkan 1 | 0000000 1 |
| Nomor -42 | 11010110 |
| 53 - 42 = 11 | 00001011 |
Overflow dari 1 bit terakhir hilang.
Addressing Data in Memory
The process through which the processor controls the execution of instructions is referred as the fetch-decode-execute cycle or the execution cycle. It consists of three continuous steps −
- Fetching the instruction from memory
- Decoding or identifying the instruction
- Executing the instruction
The processor may access one or more bytes of memory at a time. Let us consider a hexadecimal number 0725H. This number will require two bytes of memory. The high-order byte or most significant byte is 07 and the low-order byte is 25.
The processor stores data in reverse-byte sequence, i.e., a low-order byte is stored in a low memory address and a high-order byte in high memory address. So, if the processor brings the value 0725H from register to memory, it will transfer 25 first to the lower memory address and 07 to the next memory address.
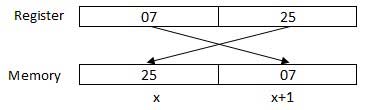
x: memory address
When the processor gets the numeric data from memory to register, it again reverses the bytes. There are two kinds of memory addresses −
Absolute address - a direct reference of specific location.
Segment address (or offset) - starting address of a memory segment with the offset value.
Local Environment Setup
Assembly language is dependent upon the instruction set and the architecture of the processor. In this tutorial, we focus on Intel-32 processors like Pentium. To follow this tutorial, you will need −
- An IBM PC or any equivalent compatible computer
- A copy of Linux operating system
- A copy of NASM assembler program
There are many good assembler programs, such as −
- Microsoft Assembler (MASM)
- Borland Turbo Assembler (TASM)
- The GNU assembler (GAS)
We will use the NASM assembler, as it is −
- Free. You can download it from various web sources.
- Well documented and you will get lots of information on net.
- Could be used on both Linux and Windows.
Installing NASM
If you select "Development Tools" while installing Linux, you may get NASM installed along with the Linux operating system and you do not need to download and install it separately. For checking whether you already have NASM installed, take the following steps −
Open a Linux terminal.
Type whereis nasm and press ENTER.
If it is already installed, then a line like, nasm: /usr/bin/nasm appears. Otherwise, you will see just nasm:, then you need to install NASM.
To install NASM, take the following steps −
Check The netwide assembler (NASM) website for the latest version.
Download the Linux source archive
nasm-X.XX.ta.gz, whereX.XXis the NASM version number in the archive.Unpack the archive into a directory which creates a subdirectory
nasm-X. XX.cd to
nasm-X.XXand type ./configure. This shell script will find the best C compiler to use and set up Makefiles accordingly.Type make to build the nasm and ndisasm binaries.
Type make install to install nasm and ndisasm in /usr/local/bin and to install the man pages.
This should install NASM on your system. Alternatively, you can use an RPM distribution for the Fedora Linux. This version is simpler to install, just double-click the RPM file.
An assembly program can be divided into three sections −
The data section,
The bss section, and
The text section.
The data Section
The data section is used for declaring initialized data or constants. This data does not change at runtime. You can declare various constant values, file names, or buffer size, etc., in this section.
The syntax for declaring data section is −
section.dataThe bss Section
The bss section is used for declaring variables. The syntax for declaring bss section is −
section.bssThe text section
The text section is used for keeping the actual code. This section must begin with the declaration global _start, which tells the kernel where the program execution begins.
The syntax for declaring text section is −
section.text
   global _start
_start:
Comments
Assembly language comment begins with a semicolon (;). It may contain any printable character including blank. It can appear on a line by itself, like −
; This program displays a message on screenor, on the same line along with an instruction, like −
add eax, ebx ; adds ebx to eaxAssembly Language Statements
Assembly language programs consist of three types of statements −
- Executable instructions or instructions,
- Assembler directives or pseudo-ops, and
- Macros.
The executable instructions or simply instructions tell the processor what to do. Each instruction consists of an operation code (opcode). Each executable instruction generates one machine language instruction.
The assembler directives or pseudo-ops tell the assembler about the various aspects of the assembly process. These are non-executable and do not generate machine language instructions.
Macros are basically a text substitution mechanism.
Syntax of Assembly Language Statements
Assembly language statements are entered one statement per line. Each statement follows the following format −
[label] mnemonic [operands] [;comment]The fields in the square brackets are optional. A basic instruction has two parts, the first one is the name of the instruction (or the mnemonic), which is to be executed, and the second are the operands or the parameters of the command.
Following are some examples of typical assembly language statements −
INC COUNT        ; Increment the memory variable COUNT

MOV TOTAL, 48    ; Transfer the value 48 in the
                 ; memory variable TOTAL

ADD AH, BH       ; Add the content of the
                 ; BH register into the AH register

AND MASK1, 128   ; Perform AND operation on the
                 ; variable MASK1 and 128

ADD MARKS, 10    ; Add 10 to the variable MARKS
MOV AL, 10       ; Transfer the value 10 to the AL register
The Hello World Program in Assembly
The following assembly language code displays the string 'Hello World' on the screen −
section	.text
   global _start     ;must be declared for linker (ld)

_start:	            ;tells linker entry point
   mov	edx,len     ;message length
   mov	ecx,msg     ;message to write
   mov	ebx,1       ;file descriptor (stdout)
   mov	eax,4       ;system call number (sys_write)
   int	0x80        ;call kernel

   mov	eax,1       ;system call number (sys_exit)
   int	0x80        ;call kernel

section	.data
msg db 'Hello, world!', 0xa  ;string to be printed
len equ $ - msg     ;length of the string
When the above code is compiled and executed, it produces the following result −
Hello, world!Compiling and Linking an Assembly Program in NASM
Make sure you have set the path of nasm and ld binaries in your PATH environment variable. Now, take the following steps for compiling and linking the above program −
Type the above code using a text editor and save it as hello.asm.
Make sure that you are in the same directory as where you saved hello.asm.
To assemble the program, type nasm -f elf hello.asm
If there is any error, you will be prompted about that at this stage. Otherwise, an object file of your program named hello.o will be created.
To link the object file and create an executable file named hello, type ld -m elf_i386 -s -o hello hello.o
Execute the program by typing ./hello
If you have done everything correctly, it will display 'Hello, world!' on the screen.
We have already discussed the three sections of an assembly program. These sections represent various memory segments as well.
Interestingly, if you replace the section keyword with segment, you will get the same result. Try the following code −
segment .text	   ;code segment
   global _start    ;must be declared for linker

_start:	           ;tell linker entry point
   mov edx,len	   ;message length
   mov ecx,msg     ;message to write
   mov ebx,1	   ;file descriptor (stdout)
   mov eax,4	   ;system call number (sys_write)
   int 0x80	   ;call kernel

   mov eax,1       ;system call number (sys_exit)
   int 0x80	   ;call kernel

segment .data      ;data segment
msg	db 'Hello, world!',0xa   ;our dear string
len	equ	$ - msg          ;length of our dear string
When the above code is compiled and executed, it produces the following result −
Hello, world!Memory Segments
A segmented memory model divides the system memory into groups of independent segments referenced by pointers located in the segment registers. Each segment is used to contain a specific type of data. One segment is used to contain instruction codes, another segment stores the data elements, and a third segment keeps the program stack.
In the light of the above discussion, we can specify various memory segments as −
Data segment − It is represented by .data section and the .bss. The .data section is used to declare the memory region, where data elements are stored for the program. This section cannot be expanded after the data elements are declared, and it remains static throughout the program.
The .bss section is also a static memory section that contains buffers for data to be declared later in the program. This buffer memory is zero-filled.
Code segment − It is represented by .text section. This defines an area in memory that stores the instruction codes. This is also a fixed area.
Stack − This segment contains data values passed to functions and procedures within the program.
Processor operations mostly involve processing data. This data can be stored in memory and accessed from thereon. However, reading data from and storing data into memory slows down the processor, as it involves complicated processes of sending the data request across the control bus and into the memory storage unit and getting the data through the same channel.
To speed up the processor operations, the processor includes some internal memory storage locations, called registers.
The registers store data elements for processing without having to access the memory. A limited number of registers are built into the processor chip.
Processor Registers
There are ten 32-bit and six 16-bit processor registers in IA-32 architecture. The registers are grouped into three categories −
- General registers,
- Control registers, and
- Segment registers.
The general registers are further divided into the following groups −
- Data registers,
- Pointer registers, and
- Index registers.
Data Registers
Four 32-bit data registers are used for arithmetic, logical, and other operations. These 32-bit registers can be used in three ways −
As complete 32-bit data registers: EAX, EBX, ECX, EDX.
Lower halves of the 32-bit registers can be used as four 16-bit data registers: AX, BX, CX and DX.
Lower and higher halves of the above-mentioned four 16-bit registers can be used as eight 8-bit data registers: AH, AL, BH, BL, CH, CL, DH, and DL.

Some of these data registers have specific use in arithmetical operations.
AX is the primary accumulator; it is used in input/output and most arithmetic instructions. For example, in multiplication operation, one operand is stored in EAX or AX or AL register according to the size of the operand.
BX is known as the base register, as it could be used in indexed addressing.
CX is known as the count register, as the ECX, CX registers store the loop count in iterative operations.
DX is known as the data register. It is also used in input/output operations. It is also used with AX register along with DX for multiply and divide operations involving large values.
Pointer Registers
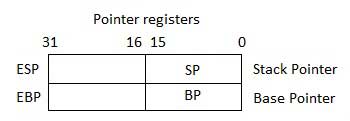
The pointer registers are 32-bit EIP, ESP, and EBP registers and corresponding 16-bit right portions IP, SP, and BP. There are three categories of pointer registers −
Instruction Pointer (IP) − The 16-bit IP register stores the offset address of the next instruction to be executed. IP in association with the CS register (as CS:IP) gives the complete address of the current instruction in the code segment.
Stack Pointer (SP) − The 16-bit SP register provides the offset value within the program stack. SP in association with the SS register (SS:SP) refers to be current position of data or address within the program stack.
Base Pointer (BP) − The 16-bit BP register mainly helps in referencing the parameter variables passed to a subroutine. The address in SS register is combined with the offset in BP to get the location of the parameter. BP can also be combined with DI and SI as base register for special addressing.
Index Registers
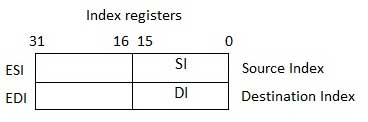
The 32-bit index registers, ESI and EDI, and their 16-bit rightmost portions. SI and DI, are used for indexed addressing and sometimes used in addition and subtraction. There are two sets of index pointers −
Source Index (SI) − It is used as source index for string operations.
Destination Index (DI) − It is used as destination index for string operations.
Control Registers
The 32-bit instruction pointer register and the 32-bit flags register combined are considered as the control registers.
Many instructions involve comparisons and mathematical calculations and change the status of the flags and some other conditional instructions test the value of these status flags to take the control flow to other location.
The common flag bits are:
Overflow Flag (OF) − It indicates the overflow of a high-order bit (leftmost bit) of data after a signed arithmetic operation.
Direction Flag (DF) − It determines left or right direction for moving or comparing string data. When the DF value is 0, the string operation takes left-to-right direction and when the value is set to 1, the string operation takes right-to-left direction.
Interrupt Flag (IF) − It determines whether the external interrupts like keyboard entry, etc., are to be ignored or processed. It disables the external interrupt when the value is 0 and enables interrupts when set to 1.
Trap Flag (TF) − It allows setting the operation of the processor in single-step mode. The DEBUG program we used sets the trap flag, so we could step through the execution one instruction at a time.
Sign Flag (SF) − It shows the sign of the result of an arithmetic operation. This flag is set according to the sign of a data item following the arithmetic operation. The sign is indicated by the high-order of leftmost bit. A positive result clears the value of SF to 0 and negative result sets it to 1.
Zero Flag (ZF) − It indicates the result of an arithmetic or comparison operation. A nonzero result clears the zero flag to 0, and a zero result sets it to 1.
Auxiliary Carry Flag (AF) − It contains the carry from bit 3 to bit 4 following an arithmetic operation; used for specialized arithmetic. The AF is set when a 1-byte arithmetic operation causes a carry from bit 3 into bit 4.
Parity Flag (PF) − It indicates the total number of 1-bits in the result obtained from an arithmetic operation. An even number of 1-bits clears the parity flag to 0 and an odd number of 1-bits sets the parity flag to 1.
Carry Flag (CF) − It contains the carry of 0 or 1 from a high-order bit (leftmost) after an arithmetic operation. It also stores the contents of last bit of a shift or rotate operation.
The following table indicates the position of flag bits in the 16-bit Flags register:
| Flag: | O | D | I | T | S | Z | A | P | C | |||||||
|---|---|---|---|---|---|---|---|---|---|---|---|---|---|---|---|---|
| Bit no: | 15 | 14 | 13 | 12 | 11 | 10 | 9 | 8 | 7 | 6 | 5 | 4 | 3 | 2 | 1 | 0 |
Segment Registers
Segments are specific areas defined in a program for containing data, code and stack. There are three main segments −
Code Segment − It contains all the instructions to be executed. A 16-bit Code Segment register or CS register stores the starting address of the code segment.
Data Segment − It contains data, constants and work areas. A 16-bit Data Segment register or DS register stores the starting address of the data segment.
Stack Segment − It contains data and return addresses of procedures or subroutines. It is implemented as a 'stack' data structure. The Stack Segment register or SS register stores the starting address of the stack.
Apart from the DS, CS and SS registers, there are other extra segment registers - ES (extra segment), FS and GS, which provide additional segments for storing data.
In assembly programming, a program needs to access the memory locations. All memory locations within a segment are relative to the starting address of the segment. A segment begins in an address evenly divisible by 16 or hexadecimal 10. So, the rightmost hex digit in all such memory addresses is 0, which is not generally stored in the segment registers.
The segment registers stores the starting addresses of a segment. To get the exact location of data or instruction within a segment, an offset value (or displacement) is required. To reference any memory location in a segment, the processor combines the segment address in the segment register with the offset value of the location.
Example
Look at the following simple program to understand the use of registers in assembly programming. This program displays 9 stars on the screen along with a simple message −
section	.text
   global _start	 ;must be declared for linker (gcc)

_start:	         ;tell linker entry point
   mov	edx,len  ;message length
   mov	ecx,msg  ;message to write
   mov	ebx,1    ;file descriptor (stdout)
   mov	eax,4    ;system call number (sys_write)
   int	0x80     ;call kernel

   mov	edx,9    ;message length
   mov	ecx,s2   ;message to write
   mov	ebx,1    ;file descriptor (stdout)
   mov	eax,4    ;system call number (sys_write)
   int	0x80     ;call kernel

   mov	eax,1    ;system call number (sys_exit)
   int	0x80     ;call kernel

section	.data
msg db 'Displaying 9 stars',0xa ;a message
len equ $ - msg  ;length of message
s2 times 9 db '*'
When the above code is compiled and executed, it produces the following result −
Displaying 9 stars
*********
System calls are APIs for the interface between the user space and the kernel space. We have already used the system calls. sys_write and sys_exit, for writing into the screen and exiting from the program, respectively.
Linux System Calls
You can make use of Linux system calls in your assembly programs. You need to take the following steps for using Linux system calls in your program −
- Put the system call number in the EAX register.
- Store the arguments to the system call in the registers EBX, ECX, etc.
- Call the relevant interrupt (80h).
- The result is usually returned in the EAX register.
There are six registers that store the arguments of the system call used. These are the EBX, ECX, EDX, ESI, EDI, and EBP. These registers take the consecutive arguments, starting with the EBX register. If there are more than six arguments, then the memory location of the first argument is stored in the EBX register.
The following code snippet shows the use of the system call sys_exit −
mov	eax,1		; system call number (sys_exit)
int	0x80		; call kernel
The following code snippet shows the use of the system call sys_write −
mov	edx,4		; message length
mov	ecx,msg		; message to write
mov	ebx,1		; file descriptor (stdout)
mov	eax,4		; system call number (sys_write)
int	0x80		; call kernel
All the syscalls are listed in /usr/include/asm/unistd.h, together with their numbers (the value to put in EAX before you call int 80h).
The following table shows some of the system calls used in this tutorial −
| %eax | Name | %ebx | %ecx | %edx | %esx | %edi |
|---|---|---|---|---|---|---|
| 1 | sys_exit | int | - | - | - | - |
| 2 | sys_fork | struct pt_regs | - | - | - | - |
| 3 | sys_read | unsigned int | char * | size_t | - | - |
| 4 | sys_write | unsigned int | const char * | size_t | - | - |
| 5 | sys_open | const char * | int | int | - | - |
| 6 | sys_close | unsigned int | - | - | - | - |
Example
The following example reads a number from the keyboard and displays it on the screen −
section .data                           ;Data segment
   userMsg db 'Please enter a number: ' ;Ask the user to enter a number
   lenUserMsg equ $-userMsg             ;The length of the message
   dispMsg db 'You have entered: '
   lenDispMsg equ $-dispMsg

section .bss           ;Uninitialized data
   num resb 5

section .text          ;Code Segment
   global _start

_start:                ;User prompt
   mov eax, 4
   mov ebx, 1
   mov ecx, userMsg
   mov edx, lenUserMsg
   int 80h

   ;Read and store the user input
   mov eax, 3
   mov ebx, 2
   mov ecx, num
   mov edx, 5          ;5 bytes (numeric, 1 for sign) of that information
   int 80h

   ;Output the message 'The entered number is: '
   mov eax, 4
   mov ebx, 1
   mov ecx, dispMsg
   mov edx, lenDispMsg
   int 80h

   ;Output the number entered
   mov eax, 4
   mov ebx, 1
   mov ecx, num
   mov edx, 5
   int 80h

   ; Exit code
   mov eax, 1
   mov ebx, 0
   int 80h
When the above code is compiled and executed, it produces the following result −
Please enter a number:
1234
You have entered:1234
Most assembly language instructions require operands to be processed. An operand address provides the location, where the data to be processed is stored. Some instructions do not require an operand, whereas some other instructions may require one, two, or three operands.
When an instruction requires two operands, the first operand is generally the destination, which contains data in a register or memory location and the second operand is the source. Source contains either the data to be delivered (immediate addressing) or the address (in register or memory) of the data. Generally, the source data remains unaltered after the operation.
The three basic modes of addressing are −
- Register addressing
- Immediate addressing
- Memory addressing
Register Addressing
In this addressing mode, a register contains the operand. Depending upon the instruction, the register may be the first operand, the second operand or both.
For example,
MOV DX, TAX_RATE   ; Register in first operand
MOV COUNT, CX	   ; Register in second operand
MOV EAX, EBX	   ; Both the operands are in registers
As processing data between registers does not involve memory, it provides fastest processing of data.
Immediate Addressing
An immediate operand has a constant value or an expression. When an instruction with two operands uses immediate addressing, the first operand may be a register or memory location, and the second operand is an immediate constant. The first operand defines the length of the data.
For example,
BYTE_VALUE  DB  150    ; A byte value is defined
WORD_VALUE  DW  300    ; A word value is defined
ADD  BYTE_VALUE, 65    ; An immediate operand 65 is added
MOV  AX, 45H           ; Immediate constant 45H is transferred to AX
Direct Memory Addressing
When operands are specified in memory addressing mode, direct access to main memory, usually to the data segment, is required. This way of addressing results in slower processing of data. To locate the exact location of data in memory, we need the segment start address, which is typically found in the DS register and an offset value. This offset value is also called effective address.
In direct addressing mode, the offset value is specified directly as part of the instruction, usually indicated by the variable name. The assembler calculates the offset value and maintains a symbol table, which stores the offset values of all the variables used in the program.
In direct memory addressing, one of the operands refers to a memory location and the other operand references a register.
For example,
ADD	BYTE_VALUE, DL	; Adds the register in the memory location
MOV	BX, WORD_VALUE	; Operand from the memory is added to register
Direct-Offset Addressing
This addressing mode uses the arithmetic operators to modify an address. For example, look at the following definitions that define tables of data −
BYTE_TABLE DB  14, 15, 22, 45      ; Tables of bytes
WORD_TABLE DW  134, 345, 564, 123  ; Tables of words
The following operations access data from the tables in the memory into registers −
MOV CL, BYTE_TABLE[2]	; Gets the 3rd element of the BYTE_TABLE
MOV CL, BYTE_TABLE + 2	; Gets the 3rd element of the BYTE_TABLE
MOV CX, WORD_TABLE[3]	; Gets the 4th element of the WORD_TABLE
MOV CX, WORD_TABLE + 3	; Gets the 4th element of the WORD_TABLE
Indirect Memory Addressing
This addressing mode utilizes the computer's ability of Segment:Offset addressing. Generally, the base registers EBX, EBP (or BX, BP) and the index registers (DI, SI), coded within square brackets for memory references, are used for this purpose.
Indirect addressing is generally used for variables containing several elements like, arrays. Starting address of the array is stored in, say, the EBX register.
The following code snippet shows how to access different elements of the variable.
MY_TABLE TIMES 10 DW 0  ; Allocates 10 words (2 bytes) each initialized to 0
MOV EBX, [MY_TABLE]     ; Effective Address of MY_TABLE in EBX
MOV [EBX], 110          ; MY_TABLE[0] = 110
ADD EBX, 2              ; EBX = EBX +2
MOV [EBX], 123          ; MY_TABLE[1] = 123
The MOV Instruction
We have already used the MOV instruction that is used for moving data from one storage space to another. The MOV instruction takes two operands.
Syntax
The syntax of the MOV instruction is −
MOV destination, sourceThe MOV instruction may have one of the following five forms −
MOV  register, register
MOV  register, immediate
MOV  memory, immediate
MOV  register, memory
MOV  memory, register
Please note that −
- Both the operands in MOV operation should be of same size
- The value of source operand remains unchanged
The MOV instruction causes ambiguity at times. For example, look at the statements −
MOV  EBX, [MY_TABLE]  ; Effective Address of MY_TABLE in EBX
MOV  [EBX], 110	      ; MY_TABLE[0] = 110
It is not clear whether you want to move a byte equivalent or word equivalent of the number 110. In such cases, it is wise to use a type specifier.
Following table shows some of the common type specifiers −
| Type Specifier | Bytes addressed |
|---|---|
| BYTE | 1 |
| WORD | 2 |
| DWORD | 4 |
| QWORD | 8 |
| TBYTE | 10 |
Example
The following program illustrates some of the concepts discussed above. It stores a name 'Zara Ali' in the data section of the memory, then changes its value to another name 'Nuha Ali' programmatically and displays both the names.
section	.text
   global _start     ;must be declared for linker (ld)
_start:             ;tell linker entry point

   ;writing the name 'Zara Ali'
   mov	edx,9       ;message length
   mov	ecx, name   ;message to write
   mov	ebx,1       ;file descriptor (stdout)
   mov	eax,4       ;system call number (sys_write)
   int	0x80        ;call kernel

   mov	[name],  dword 'Nuha'    ; Changed the name to Nuha Ali

   ;writing the name 'Nuha Ali'
   mov	edx,8       ;message length
   mov	ecx,name    ;message to write
   mov	ebx,1       ;file descriptor (stdout)
   mov	eax,4       ;system call number (sys_write)
   int	0x80        ;call kernel

   mov	eax,1       ;system call number (sys_exit)
   int	0x80        ;call kernel

section	.data
name db 'Zara Ali '
When the above code is compiled and executed, it produces the following result −
Zara Ali Nuha AliNASM provides various define directives for reserving storage space for variables. The define assembler directive is used for allocation of storage space. It can be used to reserve as well as initialize one or more bytes.
Allocating Storage Space for Initialized Data
The syntax for storage allocation statement for initialized data is −
[variable-name] define-directive initial-value [,initial-value]...Where, variable-name is the identifier for each storage space. The assembler associates an offset value for each variable name defined in the data segment.
There are five basic forms of the define directive −
| Directive | Purpose | Storage Space |
|---|---|---|
| DB | Define Byte | allocates 1 byte |
| DW | Define Word | allocates 2 bytes |
| DD | Define Doubleword | allocates 4 bytes |
| DQ | Define Quadword | allocates 8 bytes |
| DT | Define Ten Bytes | allocates 10 bytes |
Following are some examples of using define directives −
choice		DB	'y'
number		DW	12345
neg_number	DW	-12345
big_number	DQ	123456789
real_number1	DD	1.234
real_number2	DQ	123.456
Please note that −
Each byte of character is stored as its ASCII value in hexadecimal.
Each decimal value is automatically converted to its 16-bit binary equivalent and stored as a hexadecimal number.
Processor uses the little-endian byte ordering.
Negative numbers are converted to its 2's complement representation.
Short and long floating-point numbers are represented using 32 or 64 bits, respectively.
The following program shows the use of define directive −
section .text
   global _start          ;must be declared for linker (gcc)

_start:                   ;tell linker entry point
   mov	edx,1		  ;message length
   mov	ecx,choice        ;message to write
   mov	ebx,1		  ;file descriptor (stdout)
   mov	eax,4		  ;system call number (sys_write)
   int	0x80		  ;call kernel

   mov	eax,1		  ;system call number (sys_exit)
   int	0x80		  ;call kernel

section .data
choice DB 'y'
When the above code is compiled and executed, it produces the following result −
yAllocating Storage Space for Uninitialized Data
The reserve directives are used for reserving space for uninitialized data. The reserve directives take a single operand that specifies the number of units of space to be reserved. Each define directive has a related reserve directive.
There are five basic forms of the reserve directive −
| Directive | Purpose |
|---|---|
| RESB | Reserve a Byte |
| RESW | Reserve a Word |
| RESD | Reserve a Doubleword |
| RESQ | Reserve a Quadword |
| REST | Reserve a Ten Bytes |
Multiple Definitions
You can have multiple data definition statements in a program. For example −
choice	  DB 	'Y' 		 ;ASCII of y = 79H
number1	  DW 	12345 	 ;12345D = 3039H
number2    DD  12345679  ;123456789D = 75BCD15H
The assembler allocates contiguous memory for multiple variable definitions.
Multiple Initializations
The TIMES directive allows multiple initializations to the same value. For example, an array named marks of size 9 can be defined and initialized to zero using the following statement −
marks TIMES 9 DW 0The TIMES directive is useful in defining arrays and tables. The following program displays 9 asterisks on the screen −
section	.text
   global _start        ;must be declared for linker (ld)

_start:                 ;tell linker entry point
   mov	edx,9		;message length
   mov	ecx, stars	;message to write
   mov	ebx,1		;file descriptor (stdout)
   mov	eax,4		;system call number (sys_write)
   int	0x80		;call kernel

   mov	eax,1		;system call number (sys_exit)
   int	0x80		;call kernel

section	.data
stars   times 9 db '*'
When the above code is compiled and executed, it produces the following result −
*********There are several directives provided by NASM that define constants. We have already used the EQU directive in previous chapters. We will particularly discuss three directives −
- EQU
- %assign
- %define
The EQU Directive
The EQU directive is used for defining constants. The syntax of the EQU directive is as follows −
CONSTANT_NAME EQU expressionFor example,
TOTAL_STUDENTS equ 50You can then use this constant value in your code, like −
mov  ecx,  TOTAL_STUDENTS
cmp  eax,  TOTAL_STUDENTS
The operand of an EQU statement can be an expression −
LENGTH equ 20
WIDTH  equ 10
AREA   equ length * width
Above code segment would define AREA as 200.
Example
The following example illustrates the use of the EQU directive −
SYS_EXIT  equ 1
SYS_WRITE equ 4
STDIN     equ 0
STDOUT    equ 1
section	 .text
   global _start    ;must be declared for using gcc

_start:             ;tell linker entry point
   mov eax, SYS_WRITE
   mov ebx, STDOUT
   mov ecx, msg1
   mov edx, len1
   int 0x80

   mov eax, SYS_WRITE
   mov ebx, STDOUT
   mov ecx, msg2
   mov edx, len2
   int 0x80

   mov eax, SYS_WRITE
   mov ebx, STDOUT
   mov ecx, msg3
   mov edx, len3
   int 0x80

   mov eax,SYS_EXIT    ;system call number (sys_exit)
   int 0x80            ;call kernel

section	 .data
msg1 db	'Hello, programmers!',0xA,0xD
len1 equ $ - msg1

msg2 db 'Welcome to the world of,', 0xA,0xD
len2 equ $ - msg2 msg3 db 'Linux assembly programming! ' len3 equ $- msg3
When the above code is compiled and executed, it produces the following result −
Hello, programmers!
Welcome to the world of,
Linux assembly programming!
The %assign Directive
The %assign directive can be used to define numeric constants like the EQU directive. This directive allows redefinition. For example, you may define the constant TOTAL as −
%assign TOTAL 10Later in the code, you can redefine it as −
%assign TOTAL 20This directive is case-sensitive.
The %define Directive
The %define directive allows defining both numeric and string constants. This directive is similar to the #define in C. For example, you may define the constant PTR as −
%define PTR [EBP+4]The above code replaces PTR by [EBP+4].
This directive also allows redefinition and it is case-sensitive.
The INC Instruction
The INC instruction is used for incrementing an operand by one. It works on a single operand that can be either in a register or in memory.
Syntax
The INC instruction has the following syntax −
INC destinationThe operand destination could be an 8-bit, 16-bit or 32-bit operand.
Example
INC EBX	     ; Increments 32-bit register
INC DL       ; Increments 8-bit register
INC [count]  ; Increments the count variable
The DEC Instruction
The DEC instruction is used for decrementing an operand by one. It works on a single operand that can be either in a register or in memory.
Syntax
The DEC instruction has the following syntax −
DEC destinationThe operand destination could be an 8-bit, 16-bit or 32-bit operand.
Example
segment .data
   count dw  0
   value db  15

segment .text
   inc [count]
   dec [value]

   mov ebx, count
   inc word [ebx]

   mov esi, value
   dec byte [esi]
The ADD and SUB Instructions
The ADD and SUB instructions are used for performing simple addition/subtraction of binary data in byte, word and doubleword size, i.e., for adding or subtracting 8-bit, 16-bit or 32-bit operands, respectively.
Syntax
The ADD and SUB instructions have the following syntax −
ADD/SUB destination, sourceThe ADD/SUB instruction can take place between −
- Register to register
- Memory to register
- Register to memory
- Register to constant data
- Memory to constant data
However, like other instructions, memory-to-memory operations are not possible using ADD/SUB instructions. An ADD or SUB operation sets or clears the overflow and carry flags.
Example
The following example will ask two digits from the user, store the digits in the EAX and EBX register, respectively, add the values, store the result in a memory location 'res' and finally display the result.
SYS_EXIT  equ 1
SYS_READ  equ 3
SYS_WRITE equ 4
STDIN     equ 0
STDOUT    equ 1

segment .data

   msg1 db "Enter a digit ", 0xA,0xD
   len1 equ $- msg1 msg2 db "Please enter a second digit", 0xA,0xD len2 equ $- msg2

   msg3 db "The sum is: "
   len3 equ $- msg3

segment .bss

   num1 resb 2
   num2 resb 2
   res resb 1

section	.text
   global _start    ;must be declared for using gcc

_start:             ;tell linker entry point
   mov eax, SYS_WRITE
   mov ebx, STDOUT
   mov ecx, msg1
   mov edx, len1
   int 0x80

   mov eax, SYS_READ
   mov ebx, STDIN
   mov ecx, num1
   mov edx, 2
   int 0x80

   mov eax, SYS_WRITE
   mov ebx, STDOUT
   mov ecx, msg2
   mov edx, len2
   int 0x80

   mov eax, SYS_READ
   mov ebx, STDIN
   mov ecx, num2
   mov edx, 2
   int 0x80

   mov eax, SYS_WRITE
   mov ebx, STDOUT
   mov ecx, msg3
   mov edx, len3
   int 0x80

   ; moving the first number to eax register and second number to ebx
   ; and subtracting ascii '0' to convert it into a decimal number

   mov eax, [num1]
   sub eax, '0'

   mov ebx, [num2]
   sub ebx, '0'

   ; add eax and ebx
   add eax, ebx
   ; add '0' to to convert the sum from decimal to ASCII
   add eax, '0'

   ; storing the sum in memory location res
   mov [res], eax

   ; print the sum
   mov eax, SYS_WRITE
   mov ebx, STDOUT
   mov ecx, res
   mov edx, 1
   int 0x80

exit:

   mov eax, SYS_EXIT
   xor ebx, ebx
   int 0x80
Ketika kode di atas dikompilasi dan dijalankan, itu menghasilkan hasil sebagai berikut -
Enter a digit:
3
Please enter a second digit:
4
The sum is:
7
The program with hardcoded variables −
section	.text
   global _start    ;must be declared for using gcc

_start:             ;tell linker entry point
   mov	eax,'3'
   sub     eax, '0'

   mov 	ebx, '4'
   sub     ebx, '0'
   add 	eax, ebx
   add	eax, '0'

   mov 	[sum], eax
   mov	ecx,msg
   mov	edx, len
   mov	ebx,1	;file descriptor (stdout)
   mov	eax,4	;system call number (sys_write)
   int	0x80	;call kernel

   mov	ecx,sum
   mov	edx, 1
   mov	ebx,1	;file descriptor (stdout)
   mov	eax,4	;system call number (sys_write)
   int	0x80	;call kernel

   mov	eax,1	;system call number (sys_exit)
   int	0x80	;call kernel

section .data
   msg db "The sum is:", 0xA,0xD
   len equ $ - msg
   segment .bss
   sum resb 1
Ketika kode di atas dikompilasi dan dijalankan, itu menghasilkan hasil sebagai berikut -
The sum is:
7
Instruksi MUL / IMUL
Ada dua instruksi untuk mengalikan data biner. Instruksi MUL (Multiply) menangani data unsigned dan IMUL (Integer Multiply) menangani data yang ditandatangani. Kedua instruksi tersebut mempengaruhi flag Carry dan Overflow.
Sintaksis
Sintaks untuk instruksi MUL / IMUL adalah sebagai berikut -
MUL/IMUL multiplierPerkalian dalam kedua kasus akan berada dalam akumulator, tergantung pada ukuran pengali dan pengali dan produk yang dihasilkan juga disimpan dalam dua register tergantung pada ukuran operan. Bagian berikut menjelaskan instruksi MUL dengan tiga kasus berbeda -
| Sr.No. | Skenario |
|---|---|
| 1 | When two bytes are multiplied − Pengali ada di register AL, dan pengali adalah byte di memori atau di register lain. Produk ada di AX. 8 bit orde tinggi produk disimpan dalam AH dan 8 bit orde rendah disimpan di AL.

|
| 2 | When two one-word values are multiplied − Pengali harus ada di register AX, dan pengali adalah kata dalam memori atau register lain. Misalnya, untuk instruksi seperti MUL DX, Anda harus menyimpan pengali di DX dan pengali di AX. Produk yang dihasilkan adalah kata ganda, yang akan membutuhkan dua register. Bagian urutan tinggi (paling kiri) disimpan di DX dan bagian urutan bawah (paling kanan) disimpan di AX.

|
| 3 | When two doubleword values are multiplied − Ketika dua nilai kata ganda dikalikan, perkalian dan harus dalam EAX dan pengganda adalah nilai kata ganda yang disimpan di memori atau di register lain. Produk yang dihasilkan disimpan dalam register EDX: EAX, yaitu 32 bit orde tinggi disimpan dalam register EDX dan 32 bit orde rendah disimpan dalam register EAX.

|
Contoh
MOV AL, 10
MOV DL, 25
MUL DL
...
MOV DL, 0FFH	; DL= -1
MOV AL, 0BEH	; AL = -66
IMUL DL
Contoh
Contoh berikut mengalikan 3 dengan 2, dan menampilkan hasilnya -
section	.text
   global _start    ;must be declared for using gcc

_start:             ;tell linker entry point

   mov	al,'3'
   sub     al, '0'

   mov 	bl, '2'
   sub     bl, '0'
   mul 	bl
   add	al, '0'

   mov 	[res], al
   mov	ecx,msg
   mov	edx, len
   mov	ebx,1	;file descriptor (stdout)
   mov	eax,4	;system call number (sys_write)
   int	0x80	;call kernel

   mov	ecx,res
   mov	edx, 1
   mov	ebx,1	;file descriptor (stdout)
   mov	eax,4	;system call number (sys_write)
   int	0x80	;call kernel

   mov	eax,1	;system call number (sys_exit)
   int	0x80	;call kernel

section .data
msg db "The result is:", 0xA,0xD
len equ $- msg
segment .bss
res resb 1
Ketika kode di atas dikompilasi dan dijalankan, itu menghasilkan hasil sebagai berikut -
The result is:
6
Instruksi DIV / IDIV
Operasi pembagian menghasilkan dua elemen - a quotient dan a remainder. Dalam kasus perkalian, luapan tidak terjadi karena register panjang ganda digunakan untuk menyimpan produk. Namun, dalam kasus pembagian, luapan dapat terjadi. Prosesor menghasilkan interupsi jika terjadi overflow.
Instruksi DIV (Divide) digunakan untuk data unsigned dan IDIV (Integer Divide) digunakan untuk data yang ditandatangani.
Sintaksis
Format untuk instruksi DIV / IDIV -
DIV/IDIV divisorDividen ada di akumulator. Kedua instruksi ini dapat bekerja dengan operan 8-bit, 16-bit atau 32-bit. Operasi tersebut mempengaruhi keenam bendera status. Bagian berikut menjelaskan tiga kasus pembagian dengan ukuran operan yang berbeda -
| Sr.No. | Skenario |
|---|---|
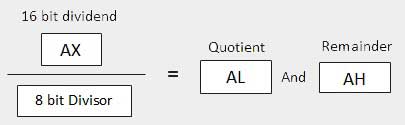
| 1 | When the divisor is 1 byte − Dividen diasumsikan berada di register AX (16 bit). Setelah pembagian, hasil bagi pergi ke register AL dan sisanya ke register AH.
|
| 2 | When the divisor is 1 word − Dividen diasumsikan sepanjang 32 bit dan dalam register DX: AX. 16 bit orde tinggi ada di DX dan 16 bit orde rendah ada di AX. Setelah pembagian, hasil bagi 16-bit masuk ke register AX dan sisanya 16-bit masuk ke register DX.

|
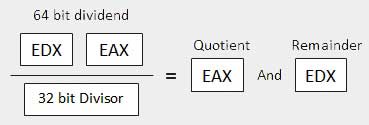
| 3 | When the divisor is doubleword − Dividen diasumsikan 64 bit dan di EDX: register EAX. 32 bit orde tinggi ada di EDX dan 32 bit orde rendah ada di EAX. Setelah pembagian, hasil bagi 32-bit masuk ke register EAX dan sisanya 32-bit masuk ke register EDX.
|
Contoh
Contoh berikut membagi 8 dengan 2. The dividend 8 disimpan di 16-bit AX register dan divisor 2 disimpan di 8-bit BL register.
section	.text
   global _start    ;must be declared for using gcc

_start:             ;tell linker entry point
   mov	ax,'8'
   sub     ax, '0'

   mov 	bl, '2'
   sub     bl, '0'
   div 	bl
   add	ax, '0'

   mov 	[res], ax
   mov	ecx,msg
   mov	edx, len
   mov	ebx,1	;file descriptor (stdout)
   mov	eax,4	;system call number (sys_write)
   int	0x80	;call kernel

   mov	ecx,res
   mov	edx, 1
   mov	ebx,1	;file descriptor (stdout)
   mov	eax,4	;system call number (sys_write)
   int	0x80	;call kernel

   mov	eax,1	;system call number (sys_exit)
   int	0x80	;call kernel

section .data
msg db "The result is:", 0xA,0xD
len equ $- msg
segment .bss
res resb 1
Ketika kode di atas dikompilasi dan dijalankan, itu menghasilkan hasil sebagai berikut -
The result is:
4
Set instruksi prosesor menyediakan instruksi logika Boolean AND, OR, XOR, TEST, dan NOT, yang menguji, mengatur, dan membersihkan bit sesuai dengan kebutuhan program.
Format untuk instruksi ini -
| Sr.No. | Petunjuk | Format |
|---|---|---|
| 1 | DAN | AND operand1, operand2 |
| 2 | ATAU | ATAU operand1, operand2 |
| 3 | XOR | Operand XOR1, operand2 |
| 4 | UJI | TEST operand1, operand2 |
| 5 | TIDAK | TIDAK operand1 |
Operan pertama dalam semua kasus dapat berupa register atau memori. Operan kedua dapat berupa register / memori atau nilai langsung (konstan). Namun, operasi memori-ke-memori tidak dimungkinkan. Instruksi ini membandingkan atau mencocokkan bit dari operan dan mengatur tanda CF, OF, PF, SF dan ZF.
Petunjuk AND
Instruksi AND digunakan untuk mendukung ekspresi logika dengan melakukan operasi AND bitwise. Operasi bitwise AND mengembalikan 1, jika bit yang cocok dari kedua operan adalah 1, jika tidak, mengembalikan 0. Misalnya -
Operand1: 	0101
             Operand2: 	0011
----------------------------
After AND -> Operand1:	0001
Operasi AND dapat digunakan untuk membersihkan satu atau lebih bit. Misalnya, register BL berisi 0011 1010. Jika Anda perlu menghapus bit orde tinggi ke nol, Anda DAN dengan 0FH.
AND BL, 0FH ; This sets BL to 0000 1010Mari kita ambil contoh lainnya. Jika Anda ingin memeriksa apakah suatu bilangan ganjil atau genap, tes sederhananya adalah memeriksa bit yang paling tidak signifikan dari bilangan tersebut. Jika ini 1, angkanya ganjil, jika tidak angkanya genap.
Dengan asumsi nomor tersebut ada dalam register AL, kita dapat menulis -
AND	AL, 01H     ; ANDing with 0000 0001
JZ    EVEN_NUMBER
Program berikut menggambarkan hal ini -
Contoh
section .text
   global _start            ;must be declared for using gcc

_start:                     ;tell linker entry point
   mov   ax,   8h           ;getting 8 in the ax
   and   ax, 1              ;and ax with 1
   jz    evnn
   mov   eax, 4             ;system call number (sys_write)
   mov   ebx, 1             ;file descriptor (stdout)
   mov   ecx, odd_msg       ;message to write
   mov   edx, len2          ;length of message
   int   0x80               ;call kernel
   jmp   outprog

evnn:

   mov   ah,  09h
   mov   eax, 4             ;system call number (sys_write)
   mov   ebx, 1             ;file descriptor (stdout)
   mov   ecx, even_msg      ;message to write
   mov   edx, len1          ;length of message
   int   0x80               ;call kernel

outprog:

   mov   eax,1              ;system call number (sys_exit)
   int   0x80               ;call kernel

section   .data
even_msg  db  'Even Number!' ;message showing even number
len1  equ  $ - even_msg odd_msg db 'Odd Number!' ;message showing odd number len2 equ $ - odd_msg
Ketika kode di atas dikompilasi dan dijalankan, itu menghasilkan hasil sebagai berikut -
Even Number!Ubah nilai dalam register kapak dengan digit ganjil, seperti -
mov ax, 9h ; getting 9 in the axProgram akan menampilkan:
Odd Number!Demikian pula untuk menghapus seluruh register Anda bisa DAN dengan 00H.
Instruksi OR
Instruksi OR digunakan untuk mendukung ekspresi logika dengan melakukan operasi OR bitwise. Operator bitwise OR mengembalikan 1, jika bit yang cocok dari salah satu atau kedua operan adalah satu. Ia mengembalikan 0, jika kedua bit tersebut nol.
Sebagai contoh,
Operand1:     0101
             Operand2:     0011
----------------------------
After OR -> Operand1:    0111
Operasi OR dapat digunakan untuk mengatur satu atau lebih bit. Sebagai contoh, mari kita asumsikan register AL berisi 0011 1010, Anda perlu menyetel empat bit orde rendah, Anda dapat ATAU dengan nilai 0000 1111, yaitu FH.
OR BL, 0FH ; This sets BL to 0011 1111Contoh
Contoh berikut menunjukkan instruksi OR. Mari kita simpan nilai 5 dan 3 masing-masing di register AL dan BL, lalu instruksi,
OR AL, BLharus menyimpan 7 di register AL -
section .text
   global _start            ;must be declared for using gcc

_start:                     ;tell linker entry point
   mov    al, 5             ;getting 5 in the al
   mov    bl, 3             ;getting 3 in the bl
   or     al, bl            ;or al and bl registers, result should be 7
   add    al, byte '0'      ;converting decimal to ascii

   mov    [result],  al
   mov    eax, 4
   mov    ebx, 1
   mov    ecx, result
   mov    edx, 1
   int    0x80

outprog:
   mov    eax,1             ;system call number (sys_exit)
   int    0x80              ;call kernel

section    .bss
result resb 1
Ketika kode di atas dikompilasi dan dijalankan, itu menghasilkan hasil sebagai berikut -
7Instruksi XOR
Instruksi XOR mengimplementasikan operasi XOR bitwise. Operasi XOR menetapkan bit resultan ke 1, jika dan hanya jika bit dari operan berbeda. Jika bit dari operan sama (keduanya 0 atau keduanya 1), bit resultan dihapus ke 0.
Sebagai contoh,
Operand1:     0101
             Operand2:     0011
----------------------------
After XOR -> Operand1:    0110
XORing operan dengan sendirinya mengubah operan menjadi 0. Ini digunakan untuk menghapus register.
XOR EAX, EAXInstruksi TEST
Instruksi TEST bekerja sama dengan operasi AND, tetapi tidak seperti instruksi AND, ini tidak mengubah operan pertama. Jadi, jika kita perlu memeriksa apakah suatu bilangan dalam register genap atau ganjil, kita juga dapat melakukan ini menggunakan instruksi TEST tanpa mengubah nomor aslinya.
TEST    AL, 01H
JZ      EVEN_NUMBER
Instruksi NOT
Instruksi NOT mengimplementasikan operasi NOT bitwise. Operasi NOT membalikkan bit-bit dalam operan. Operand bisa dalam register atau di memori.
Sebagai contoh,
Operand1:    0101 0011
After NOT -> Operand1:    1010 1100
Eksekusi bersyarat dalam bahasa assembly diselesaikan dengan beberapa instruksi perulangan dan percabangan. Instruksi ini dapat mengubah aliran kendali dalam suatu program. Eksekusi bersyarat diamati dalam dua skenario -
| Sr.No. | Instruksi Bersyarat |
|---|---|
| 1 | Unconditional jump Ini dilakukan dengan instruksi JMP. Eksekusi bersyarat sering melibatkan transfer kendali ke alamat instruksi yang tidak mengikuti instruksi yang sedang dieksekusi. Pengalihan kendali mungkin maju, untuk menjalankan sekumpulan instruksi baru atau mundur, untuk menjalankan kembali langkah yang sama. |
| 2 | Conditional jump Ini dilakukan oleh sekumpulan instruksi lompat j <condition> tergantung pada kondisinya. Instruksi bersyarat mentransfer kontrol dengan memutus aliran sekuensial dan melakukannya dengan mengubah nilai offset di IP. |
Mari kita bahas instruksi CMP sebelum membahas instruksi bersyarat.
Instruksi CMP
Instruksi CMP membandingkan dua operan. Ini umumnya digunakan dalam eksekusi bersyarat. Instruksi ini pada dasarnya mengurangi satu operan dari yang lain untuk membandingkan apakah operan sama atau tidak. Itu tidak mengganggu tujuan atau operan sumber. Ini digunakan bersama dengan instruksi lompat bersyarat untuk pengambilan keputusan.
Sintaksis
CMP destination, sourceCMP membandingkan dua bidang data numerik. Operan tujuan dapat berupa register atau memori. Operan sumber dapat berupa data, register, atau memori konstan (langsung).
Contoh
CMP DX,	00  ; Compare the DX value with zero
JE  L7      ; If yes, then jump to label L7
.
.
L7: ...
CMP sering digunakan untuk membandingkan apakah nilai pencacah telah mencapai jumlah berapa kali perulangan perlu dijalankan. Pertimbangkan kondisi khas berikut -
INC	EDX
CMP	EDX, 10	; Compares whether the counter has reached 10
JLE	LP1     ; If it is less than or equal to 10, then jump to LP1
Lompat Tanpa Syarat
Seperti disebutkan sebelumnya, ini dilakukan oleh instruksi JMP. Eksekusi bersyarat sering melibatkan transfer kendali ke alamat instruksi yang tidak mengikuti instruksi yang sedang dieksekusi. Pengalihan kendali mungkin maju, untuk menjalankan sekumpulan instruksi baru atau mundur, untuk menjalankan kembali langkah yang sama.
Sintaksis
Instruksi JMP memberikan nama label dimana aliran kendali ditransfer segera. Sintaks instruksi JMP adalah -
JMP labelContoh
Potongan kode berikut menggambarkan instruksi JMP -
MOV  AX, 00    ; Initializing AX to 0
MOV  BX, 00    ; Initializing BX to 0
MOV  CX, 01    ; Initializing CX to 1
L20:
ADD  AX, 01    ; Increment AX
ADD  BX, AX    ; Add AX to BX
SHL  CX, 1     ; shift left CX, this in turn doubles the CX value
JMP  L20       ; repeats the statements
Lompatan Bersyarat
Jika beberapa kondisi tertentu terpenuhi dalam lompatan bersyarat, aliran kontrol ditransfer ke instruksi target. Ada banyak instruksi lompat bersyarat tergantung pada kondisi dan datanya.
Berikut adalah instruksi lompat bersyarat yang digunakan pada data bertanda yang digunakan untuk operasi aritmatika -
| Petunjuk | Deskripsi | Bendera diuji |
|---|---|---|
| JE / JZ | Jump Equal atau Jump Zero | ZF |
| JNE / JNZ | Lompat tidak Sama atau Lompat Bukan Nol | ZF |
| JG / JNLE | Lompat Lebih Besar atau Lompat Tidak Kurang / Sama | DARI, SF, ZF |
| JGE / JNL | Lompat Lebih Besar / Setara atau Lompat Bukan Lebih Sedikit | DARI, SF |
| JL / JNGE | Lompat Lebih Sedikit atau Lompat Tidak Lebih Besar / Sama | DARI, SF |
| JLE / JNG | Lompat Lebih Sedikit / Sama dengan atau Lompat Tidak Lebih Besar | DARI, SF, ZF |
Berikut ini adalah instruksi lompat bersyarat yang digunakan pada data unsigned yang digunakan untuk operasi logis -
| Petunjuk | Deskripsi | Bendera diuji |
|---|---|---|
| JE / JZ | Jump Equal atau Jump Zero | ZF |
| JNE / JNZ | Lompat tidak Sama atau Lompat Bukan Nol | ZF |
| JA / JNBE | Lompat Di Atas atau Lompat Tidak Di Bawah / Setara | CF, ZF |
| JAE / JNB | Lompat Di Atas / Sama dengan atau Lompat Tidak Di Bawah | CF. |
| JB / JNAE | Lompat di Bawah atau Lompat Tidak Di Atas / Sama | CF. |
| JBE / JNA | Lompat Di Bawah / Sama dengan atau Lompat Tidak Di Atas | AF, CF |
Instruksi lompat bersyarat berikut memiliki kegunaan khusus dan memeriksa nilai bendera -
| Petunjuk | Deskripsi | Bendera diuji |
|---|---|---|
| JXCZ | Lompat jika CX adalah Nol | tidak ada |
| JC | Lompat Jika Membawa | CF. |
| JNC | Lompat Jika Tidak Membawa | CF. |
| JO | Langsung Jika Meluap | DARI |
| JNO | Lompat Jika Tidak Ada Luapan | DARI |
| JP / JPE | Jump Parity atau Jump Parity Even | PF |
| JNP / JPO | Jump No Parity atau Jump Parity Odd | PF |
| JS | Jump Sign (nilai negatif) | SF |
| JNS | Jump No Sign (nilai positif) | SF |
Sintaks untuk set instruksi J <condition> -
Contoh,
CMP	AL, BL
JE	EQUAL
CMP	AL, BH
JE	EQUAL
CMP	AL, CL
JE	EQUAL
NON_EQUAL: ...
EQUAL: ...
Contoh
Program berikut menampilkan tiga variabel terbesar. Variabel adalah variabel dua digit. Ketiga variabel num1, num2 dan num3 masing-masing memiliki nilai 47, 22 dan 31 -
section	.text
   global _start         ;must be declared for using gcc

_start:	                 ;tell linker entry point
   mov   ecx, [num1]
   cmp   ecx, [num2]
   jg    check_third_num
   mov   ecx, [num2]

	check_third_num:

   cmp   ecx, [num3]
   jg    _exit
   mov   ecx, [num3]

	_exit:

   mov   [largest], ecx
   mov   ecx,msg
   mov   edx, len
   mov   ebx,1	;file descriptor (stdout)
   mov   eax,4	;system call number (sys_write)
   int   0x80	;call kernel

   mov   ecx,largest
   mov   edx, 2
   mov   ebx,1	;file descriptor (stdout)
   mov   eax,4	;system call number (sys_write)
   int   0x80	;call kernel

   mov   eax, 1
   int   80h

section	.data

   msg db "The largest digit is: ", 0xA,0xD
   len equ $- msg
   num1 dd '47'
   num2 dd '22'
   num3 dd '31'

segment .bss
   largest resb 2
Ketika kode di atas dikompilasi dan dijalankan, itu menghasilkan hasil sebagai berikut -
The largest digit is:
47
Instruksi JMP dapat digunakan untuk mengimplementasikan loop. Misalnya, cuplikan kode berikut dapat digunakan untuk menjalankan loop-body 10 kali.
MOV	CL, 10
L1:
<LOOP-BODY>
DEC	CL
JNZ	L1
Set instruksi prosesor, bagaimanapun, termasuk sekelompok instruksi loop untuk mengimplementasikan iterasi. Instruksi LOOP dasar memiliki sintaks berikut -
LOOP labelDimana, label adalah label target yang mengidentifikasikan instruksi target seperti pada instruksi lompat. Instruksi LOOP mengasumsikan bahwa fileECX register contains the loop count. Ketika instruksi loop dijalankan, register ECX dikurangi dan kontrol melompat ke label target, sampai nilai register ECX, yaitu, penghitung mencapai nilai nol.
Potongan kode di atas dapat ditulis sebagai -
mov ECX,10
l1:
<loop body>
loop l1
Contoh
Program berikut mencetak angka 1 hingga 9 di layar -
section	.text
   global _start        ;must be declared for using gcc

_start:	                ;tell linker entry point
   mov ecx,10
   mov eax, '1'

l1:
   mov [num], eax
   mov eax, 4
   mov ebx, 1
   push ecx

   mov ecx, num
   mov edx, 1
   int 0x80

   mov eax, [num]
   sub eax, '0'
   inc eax
   add eax, '0'
   pop ecx
   loop l1

   mov eax,1             ;system call number (sys_exit)
   int 0x80              ;call kernel
section	.bss
num resb 1
Ketika kode di atas dikompilasi dan dijalankan, itu menghasilkan hasil sebagai berikut -
123456789:Data numerik umumnya direpresentasikan dalam sistem biner. Instruksi aritmatika beroperasi pada data biner. Ketika angka ditampilkan di layar atau dimasukkan dari keyboard, angka tersebut dalam bentuk ASCII.
Sejauh ini, kami telah mengubah data masukan ini dalam bentuk ASCII menjadi biner untuk kalkulasi aritmatika dan mengubah hasilnya kembali ke biner. Kode berikut menunjukkan ini -
section	.text
   global _start        ;must be declared for using gcc

_start:	                ;tell linker entry point
   mov	eax,'3'
   sub     eax, '0'

   mov 	ebx, '4'
   sub     ebx, '0'
   add 	eax, ebx
   add	eax, '0'

   mov 	[sum], eax
   mov	ecx,msg
   mov	edx, len
   mov	ebx,1	         ;file descriptor (stdout)
   mov	eax,4	         ;system call number (sys_write)
   int	0x80	         ;call kernel

   mov	ecx,sum
   mov	edx, 1
   mov	ebx,1	         ;file descriptor (stdout)
   mov	eax,4	         ;system call number (sys_write)
   int	0x80	         ;call kernel

   mov	eax,1	         ;system call number (sys_exit)
   int	0x80	         ;call kernel

section .data
msg db "The sum is:", 0xA,0xD
len equ $ - msg
segment .bss
sum resb 1
Ketika kode di atas dikompilasi dan dijalankan, itu menghasilkan hasil sebagai berikut -
The sum is:
7
Konversi semacam itu, bagaimanapun, memiliki overhead, dan pemrograman bahasa assembly memungkinkan pemrosesan angka dengan cara yang lebih efisien, dalam bentuk biner. Angka desimal dapat direpresentasikan dalam dua bentuk -
- Formulir ASCII
- BCD atau bentuk Desimal Berkode Biner
Representasi ASCII
Dalam representasi ASCII, bilangan desimal disimpan sebagai string karakter ASCII. Misalnya, nilai desimal 1234 disimpan sebagai -
31 32 33 34HDimana 31H adalah nilai ASCII untuk 1, 32H adalah nilai ASCII untuk 2, dan seterusnya. Ada empat instruksi untuk memproses angka dalam representasi ASCII -
AAA - ASCII Sesuaikan Setelah Penambahan
AAS - ASCII Sesuaikan Setelah Pengurangan
AAM - ASCII Sesuaikan Setelah Perkalian
AAD - ASCII Sesuaikan Sebelum Divisi
Instruksi ini tidak menggunakan operand apa pun dan menganggap operand yang diperlukan ada di register AL.
Contoh berikut menggunakan instruksi AAS untuk mendemonstrasikan konsep -
section	.text
   global _start        ;must be declared for using gcc

_start:	                ;tell linker entry point
   sub     ah, ah
   mov     al, '9'
   sub     al, '3'
   aas
   or      al, 30h
   mov     [res], ax

   mov	edx,len	        ;message length
   mov	ecx,msg	        ;message to write
   mov	ebx,1	        ;file descriptor (stdout)
   mov	eax,4	        ;system call number (sys_write)
   int	0x80	        ;call kernel

   mov	edx,1	        ;message length
   mov	ecx,res	        ;message to write
   mov	ebx,1	        ;file descriptor (stdout)
   mov	eax,4	        ;system call number (sys_write)
   int	0x80	        ;call kernel

   mov	eax,1	        ;system call number (sys_exit)
   int	0x80	        ;call kernel

section	.data
msg db 'The Result is:',0xa
len equ $ - msg
section .bss
res resb 1
Ketika kode di atas dikompilasi dan dijalankan, itu menghasilkan hasil sebagai berikut -
The Result is:
6
Representasi BCD
Ada dua jenis representasi BCD -
- Representasi BCD yang tidak dikemas
- Representasi BCD yang dikemas
Dalam representasi BCD yang tidak dikemas, setiap byte menyimpan ekuivalen biner dari digit desimal. Misalnya, angka 1234 disimpan sebagai -
01 02 03 04HAda dua instruksi untuk memproses angka-angka ini -
AAM - ASCII Sesuaikan Setelah Perkalian
AAD - ASCII Sesuaikan Sebelum Divisi
Empat instruksi penyesuaian ASCII, AAA, AAS, AAM, dan AAD, juga dapat digunakan dengan representasi BCD yang tidak dikemas. Dalam representasi BCD yang dikemas, setiap digit disimpan menggunakan empat bit. Dua digit desimal dikemas menjadi satu byte. Misalnya, angka 1234 disimpan sebagai -
12 34HAda dua instruksi untuk memproses angka-angka ini -
DAA - Penyesuaian Desimal Setelah Penambahan
DAS - Desimal Sesuaikan Setelah Pengurangan
Tidak ada dukungan untuk perkalian dan pembagian dalam representasi BCD yang dikemas.
Contoh
Program berikut menjumlahkan dua bilangan desimal 5-digit dan menampilkan jumlahnya. Ini menggunakan konsep di atas -
section	.text
   global _start        ;must be declared for using gcc

_start:	                ;tell linker entry point

   mov     esi, 4       ;pointing to the rightmost digit
   mov     ecx, 5       ;num of digits
   clc
add_loop:
   mov 	al, [num1 + esi]
   adc 	al, [num2 + esi]
   aaa
   pushf
   or 	al, 30h
   popf

   mov	[sum + esi], al
   dec	esi
   loop	add_loop

   mov	edx,len	        ;message length
   mov	ecx,msg	        ;message to write
   mov	ebx,1	        ;file descriptor (stdout)
   mov	eax,4	        ;system call number (sys_write)
   int	0x80	        ;call kernel

   mov	edx,5	        ;message length
   mov	ecx,sum	        ;message to write
   mov	ebx,1	        ;file descriptor (stdout)
   mov	eax,4	        ;system call number (sys_write)
   int	0x80	        ;call kernel

   mov	eax,1	        ;system call number (sys_exit)
   int	0x80	        ;call kernel

section	.data
msg db 'The Sum is:',0xa
len equ $ - msg
num1 db '12345'
num2 db '23456'
sum db '     '
Ketika kode di atas dikompilasi dan dijalankan, itu menghasilkan hasil sebagai berikut -
The Sum is:
35801
Kami telah menggunakan string panjang variabel dalam contoh kami sebelumnya. String panjang variabel dapat memiliki karakter sebanyak yang diperlukan. Umumnya, kami menentukan panjang string dengan salah satu dari dua cara -
- Menyimpan panjang string secara eksplisit
- Menggunakan karakter sentinel
Kita bisa menyimpan panjang string secara eksplisit dengan menggunakan simbol $ location counter yang mewakili nilai saat ini dari counter lokasi. Dalam contoh berikut -
msg  db  'Hello, world!',0xa ;our dear string
len  equ  $ - msg            ;length of our dear string
$ menunjuk ke byte setelah karakter terakhir dari variabel string msg . Karena itu,$-msgmemberikan panjang string. Kami juga bisa menulis
msg db 'Hello, world!',0xa ;our dear string
len equ 13                 ;length of our dear string
Alternatifnya, Anda dapat menyimpan string dengan karakter sentinel di belakangnya untuk membatasi string alih-alih menyimpan panjang string secara eksplisit. Karakter sentinel harus merupakan karakter khusus yang tidak muncul dalam string.
Misalnya -
message DB 'I am loving it!', 0Instruksi String
Setiap instruksi string mungkin memerlukan operan sumber, operan tujuan atau keduanya. Untuk segmen 32-bit, instruksi string menggunakan register ESI dan EDI untuk masing-masing menunjuk ke operan sumber dan tujuan.
Untuk segmen 16-bit, register SI dan DI digunakan untuk menunjuk ke sumber dan tujuan.
Ada lima instruksi dasar untuk memproses string. Mereka adalah -
MOVS - Instruksi ini memindahkan data 1 Byte, Word atau Doubleword dari lokasi memori ke lokasi lain.
LODS- Instruksi ini dimuat dari memori. Jika operan adalah satu byte, itu dimuat ke register AL, jika operan adalah satu kata, itu dimuat ke register AX dan doubleword dimuat ke register EAX.
STOS - Instruksi ini menyimpan data dari register (AL, AX, atau EAX) ke memori.
CMPS- Instruksi ini membandingkan dua item data dalam memori. Data bisa dalam ukuran byte, word atau doubleword.
SCAS - Instruksi ini membandingkan isi register (AL, AX atau EAX) dengan isi item dalam memori.
Setiap instruksi di atas memiliki versi byte, word, dan doubleword, dan instruksi string dapat diulang dengan menggunakan awalan pengulangan.
Instruksi ini menggunakan pasangan register ES: DI dan DS: SI, di mana register DI dan SI berisi alamat offset valid yang mengacu pada byte yang disimpan dalam memori. SI biasanya dikaitkan dengan DS (segmen data) dan DI selalu dikaitkan dengan ES (segmen tambahan).
Register DS: SI (atau ESI) dan ES: DI (atau EDI) masing-masing menunjuk ke operand sumber dan tujuan. Operand sumber diasumsikan berada di DS: SI (atau ESI) dan operand tujuan di ES: DI (atau EDI) di memori.
Untuk alamat 16-bit, register SI dan DI digunakan, dan untuk alamat 32-bit, register ESI dan EDI digunakan.
Tabel berikut menyediakan berbagai versi instruksi string dan ruang yang diasumsikan dari operan.
| Instruksi Dasar | Operand di | Operasi Byte | Operasi Kata | Operasi Kata Ganda |
|---|---|---|---|---|
| MOVS | ES: DI, DS: SI | MOVSB | MOVSW | MOVSD |
| LODS | AX, DS: SI | LODSB | LODSW | LODSD |
| STOS | ES: DI, AX | STOSB | STOSW | STOSD |
| CMPS | DS: SI, ES: DI | CMPSB | CMPSW | CMPSD |
| SCAS | ES: DI, AX | SCASB | SCASW | SCASD |
Awalan Pengulangan
Awalan REP, ketika diatur sebelum instruksi string, misalnya - REP MOVSB, menyebabkan pengulangan instruksi berdasarkan penghitung yang ditempatkan di register CX. REP mengeksekusi instruksi, menurunkan CX sebanyak 1, dan memeriksa apakah CX nol. Ini mengulangi pemrosesan instruksi sampai CX nol.
Direction Flag (DF) menentukan arah operasi.
- Gunakan CLD (Clear Direction Flag, DF = 0) untuk melakukan operasi dari kiri ke kanan.
- Gunakan STD (Set Direction Flag, DF = 1) untuk melakukan operasi dari kanan ke kiri.
Awalan REP juga memiliki variasi berikut:
REP: Ini adalah pengulangan tanpa syarat. Ini mengulangi operasi sampai CX nol.
REPE atau REPZ: Ini adalah pengulangan bersyarat. Ini mengulangi operasi sementara bendera nol menunjukkan sama dengan / nol. Ini berhenti ketika ZF menunjukkan tidak sama dengan / nol atau ketika CX adalah nol.
REPNE atau REPNZ: Ini juga merupakan pengulangan bersyarat. Ini mengulangi operasi sementara bendera nol menunjukkan tidak sama dengan / nol. Ini berhenti ketika ZF menunjukkan sama dengan / nol atau ketika CX diturunkan menjadi nol.
Kita telah membahas bahwa arahan definisi data ke assembler digunakan untuk mengalokasikan penyimpanan untuk variabel. Variabel juga dapat diinisialisasi dengan beberapa nilai tertentu. Nilai yang diinisialisasi dapat ditentukan dalam bentuk heksadesimal, desimal, atau biner.
Misalnya, kita dapat mendefinisikan variabel kata 'bulan' dengan salah satu cara berikut -
MONTHS	DW	12
MONTHS	DW	0CH
MONTHS	DW	0110B
Arahan definisi data juga dapat digunakan untuk mendefinisikan array satu dimensi. Mari kita definisikan deretan angka satu dimensi.
NUMBERS DW 34, 45, 56, 67, 75, 89Definisi di atas menyatakan larik enam kata yang masing-masing diinisialisasi dengan angka 34, 45, 56, 67, 75, 89. Ini mengalokasikan 2x6 = 12 byte ruang memori berturut-turut. Alamat simbolis dari nomor pertama adalah ANGKA dan nomor kedua adalah ANGKA + 2 dan seterusnya.
Mari kita ambil contoh lainnya. Anda dapat menentukan larik bernama inventaris ukuran 8, dan menginisialisasi semua nilai dengan nol, seperti -
INVENTORY   DW  0
            DW  0
            DW  0
            DW  0
            DW  0
            DW  0
            DW  0
            DW  0
Yang bisa disingkat menjadi -
INVENTORY DW 0, 0 , 0 , 0 , 0 , 0 , 0 , 0Direktif TIMES juga dapat digunakan untuk beberapa inisialisasi ke nilai yang sama. Menggunakan TIMES, array INVENTORY dapat didefinisikan sebagai:
INVENTORY TIMES 8 DW 0Contoh
Contoh berikut mendemonstrasikan konsep di atas dengan mendefinisikan larik 3 elemen x, yang menyimpan tiga nilai: 2, 3 dan 4. Ini menambahkan nilai dalam larik dan menampilkan jumlah 9 -
section	.text
   global _start   ;must be declared for linker (ld)

_start:

   mov  eax,3      ;number bytes to be summed
   mov  ebx,0      ;EBX will store the sum
   mov  ecx, x     ;ECX will point to the current element to be summed

top:  add  ebx, [ecx]

   add  ecx,1      ;move pointer to next element
   dec  eax        ;decrement counter
   jnz  top        ;if counter not 0, then loop again

done:

   add   ebx, '0'
   mov  [sum], ebx ;done, store result in "sum"

display:

   mov  edx,1      ;message length
   mov  ecx, sum   ;message to write
   mov  ebx, 1     ;file descriptor (stdout)
   mov  eax, 4     ;system call number (sys_write)
   int  0x80       ;call kernel

   mov  eax, 1     ;system call number (sys_exit)
   int  0x80       ;call kernel

section	.data
global x
x:
   db  2
   db  4
   db  3

sum:
   db  0
Ketika kode di atas dikompilasi dan dijalankan, itu menghasilkan hasil sebagai berikut -
9Prosedur atau subrutin sangat penting dalam bahasa assembly, karena program bahasa assembly cenderung berukuran besar. Prosedur diidentifikasi dengan sebuah nama. Mengikuti nama ini, bagian dari prosedur dijelaskan yang melakukan pekerjaan yang ditentukan dengan baik. Akhir prosedur ditunjukkan dengan pernyataan pengembalian.
Sintaksis
Berikut ini adalah sintaks untuk mendefinisikan prosedur -
proc_name:
   procedure body
   ...
   ret
Prosedur dipanggil dari fungsi lain dengan menggunakan instruksi CALL. Instruksi CALL harus memiliki nama dari prosedur yang dipanggil sebagai argumen seperti yang ditunjukkan di bawah ini -
CALL proc_nameProsedur yang dipanggil mengembalikan kontrol ke prosedur pemanggilan dengan menggunakan instruksi RET.
Contoh
Mari kita tulis prosedur yang sangat sederhana bernama sum yang menambahkan variabel yang disimpan di register ECX dan EDX dan mengembalikan jumlah tersebut di register EAX -
section	.text
   global _start        ;must be declared for using gcc

_start:	                ;tell linker entry point
   mov	ecx,'4'
   sub     ecx, '0'

   mov 	edx, '5'
   sub     edx, '0'

   call    sum          ;call sum procedure
   mov 	[res], eax
   mov	ecx, msg
   mov	edx, len
   mov	ebx,1	        ;file descriptor (stdout)
   mov	eax,4	        ;system call number (sys_write)
   int	0x80	        ;call kernel

   mov	ecx, res
   mov	edx, 1
   mov	ebx, 1	        ;file descriptor (stdout)
   mov	eax, 4	        ;system call number (sys_write)
   int	0x80	        ;call kernel

   mov	eax,1	        ;system call number (sys_exit)
   int	0x80	        ;call kernel
sum:
   mov     eax, ecx
   add     eax, edx
   add     eax, '0'
   ret

section .data
msg db "The sum is:", 0xA,0xD
len equ $- msg

segment .bss
res resb 1
Ketika kode di atas dikompilasi dan dijalankan, itu menghasilkan hasil sebagai berikut -
The sum is:
9
Tumpukan Struktur Data
Tumpukan adalah struktur data seperti larik dalam memori tempat data dapat disimpan dan dihapus dari lokasi yang disebut 'atas' tumpukan. Data yang perlu disimpan 'didorong' ke dalam tumpukan dan data yang akan diambil 'dikeluarkan' dari tumpukan. Stack adalah struktur data LIFO, yaitu data yang disimpan pertama kali diambil terakhir.
Bahasa assembly menyediakan dua instruksi untuk operasi stack: PUSH dan POP. Instruksi ini memiliki sintaks seperti -
PUSH    operand
POP     address/register
Ruang memori yang dicadangkan di segmen tumpukan digunakan untuk mengimplementasikan tumpukan. Register SS dan ESP (atau SP) digunakan untuk mengimplementasikan stack. Bagian atas tumpukan, yang menunjuk ke item data terakhir yang dimasukkan ke dalam tumpukan ditunjukkan oleh register SS: ESP, di mana register SS menunjuk ke awal segmen tumpukan dan SP (atau ESP) memberikan offset ke segmen tumpukan.
Implementasi tumpukan memiliki karakteristik berikut -
Hanya words atau doublewords bisa disimpan ke dalam tumpukan, bukan satu byte.
Tumpukan tumbuh ke arah sebaliknya, yaitu menuju alamat memori yang lebih rendah
Bagian atas tumpukan menunjuk ke item terakhir yang dimasukkan ke dalam tumpukan; itu menunjuk ke byte bawah dari kata terakhir yang disisipkan.
Seperti yang kita bahas tentang menyimpan nilai register di tumpukan sebelum menggunakannya untuk beberapa penggunaan; itu dapat dilakukan dengan cara berikut -
; Save the AX and BX registers in the stack
PUSH    AX
PUSH    BX

; Use the registers for other purpose
MOV	AX, VALUE1
MOV 	BX, VALUE2
...
MOV 	VALUE1, AX
MOV	VALUE2, BX

; Restore the original values
POP	BX
POP	AX
Contoh
Program berikut menampilkan seluruh himpunan karakter ASCII. Program utama memanggil prosedur bernama display , yang menampilkan set karakter ASCII.
section	.text
   global _start        ;must be declared for using gcc

_start:	                ;tell linker entry point
   call    display
   mov	eax,1	        ;system call number (sys_exit)
   int	0x80	        ;call kernel

display:
   mov    ecx, 256

next:
   push    ecx
   mov     eax, 4
   mov     ebx, 1
   mov     ecx, achar
   mov     edx, 1
   int     80h

   pop     ecx
   mov	dx, [achar]
   cmp	byte [achar], 0dh
   inc	byte [achar]
   loop    next
   ret

section .data
achar db '0'
Ketika kode di atas dikompilasi dan dijalankan, itu menghasilkan hasil sebagai berikut -
0123456789:;<=>?@ABCDEFGHIJKLMNOPQRSTUVWXYZ[\]^_`abcdefghijklmnopqrstuvwxyz{|}
...
...
Prosedur rekursif adalah salah satu yang menyebut dirinya sendiri. Ada dua jenis rekursi: langsung dan tidak langsung. Dalam rekursi langsung, prosedur memanggil dirinya sendiri dan dalam rekursi tidak langsung, prosedur pertama memanggil prosedur kedua, yang pada gilirannya memanggil prosedur pertama.
Rekursi dapat diamati dalam berbagai algoritma matematika. Misalnya, pertimbangkan kasus penghitungan faktorial sebuah bilangan. Faktorial suatu angka diberikan oleh persamaan -
Fact (n) = n * fact (n-1) for n > 0Contoh: faktorial 5 adalah 1 x 2 x 3 x 4 x 5 = 5 x faktorial dari 4 dan ini bisa menjadi contoh yang baik untuk menunjukkan prosedur rekursif. Setiap algoritma rekursif harus memiliki kondisi akhir, yaitu pemanggilan program rekursif harus dihentikan ketika kondisi terpenuhi. Dalam kasus algoritma faktorial, kondisi akhir tercapai ketika n bernilai 0.
Program berikut menunjukkan bagaimana faktorial n diimplementasikan dalam bahasa assembly. Agar program tetap sederhana, kita akan menghitung faktorial 3.
section	.text
   global _start         ;must be declared for using gcc

_start:                  ;tell linker entry point

   mov bx, 3             ;for calculating factorial 3
   call  proc_fact
   add   ax, 30h
   mov  [fact], ax

   mov	  edx,len        ;message length
   mov	  ecx,msg        ;message to write
   mov	  ebx,1          ;file descriptor (stdout)
   mov	  eax,4          ;system call number (sys_write)
   int	  0x80           ;call kernel

   mov   edx,1            ;message length
   mov	  ecx,fact       ;message to write
   mov	  ebx,1          ;file descriptor (stdout)
   mov	  eax,4          ;system call number (sys_write)
   int	  0x80           ;call kernel

   mov	  eax,1          ;system call number (sys_exit)
   int	  0x80           ;call kernel

proc_fact:
   cmp   bl, 1
   jg    do_calculation
   mov   ax, 1
   ret

do_calculation:
   dec   bl
   call  proc_fact
   inc   bl
   mul   bl        ;ax = al * bl
   ret

section	.data
msg db 'Factorial 3 is:',0xa
len equ $ - msg

section .bss
fact resb 1
Ketika kode di atas dikompilasi dan dijalankan, itu menghasilkan hasil sebagai berikut -
Factorial 3 is:
6
Menulis makro adalah cara lain untuk memastikan pemrograman modular dalam bahasa assembly.
Makro adalah urutan instruksi, ditetapkan dengan nama dan dapat digunakan di mana saja dalam program.
Di NASM, makro ditentukan dengan %macro dan %endmacro arahan.
Makro dimulai dengan% macro directive dan diakhiri dengan% endmacro directive.
Sintaks untuk definisi makro -
%macro macro_name  number_of_params
<macro body>
%endmacro
Di mana, number_of_params menentukan parameter angka, macro_name menentukan nama makro.
Makro dipanggil dengan menggunakan nama makro bersama dengan parameter yang diperlukan. Saat Anda perlu menggunakan beberapa urutan instruksi berkali-kali dalam sebuah program, Anda dapat meletakkan instruksi tersebut dalam makro dan menggunakannya daripada menulis instruksi sepanjang waktu.
Misalnya, kebutuhan yang sangat umum akan program adalah untuk menulis serangkaian karakter di layar. Untuk menampilkan serangkaian karakter, Anda memerlukan urutan instruksi berikut -
mov	edx,len	    ;message length
mov	ecx,msg	    ;message to write
mov	ebx,1       ;file descriptor (stdout)
mov	eax,4       ;system call number (sys_write)
int	0x80        ;call kernel
Dalam contoh di atas untuk menampilkan string karakter, register EAX, EBX, ECX dan EDX telah digunakan oleh pemanggilan fungsi INT 80H. Jadi, setiap kali Anda perlu menampilkan di layar, Anda perlu menyimpan register ini di stack, memanggil INT 80H dan kemudian mengembalikan nilai asli register dari stack. Jadi, akan berguna jika menulis dua makro untuk menyimpan dan memulihkan data.
Kami telah mengamati bahwa, beberapa instruksi seperti IMUL, IDIV, INT, dll., Memerlukan beberapa informasi untuk disimpan di beberapa register tertentu dan bahkan mengembalikan nilai di beberapa register tertentu. Jika program sudah menggunakan register tersebut untuk menyimpan data penting, maka data yang ada dari register ini harus disimpan di stack dan dikembalikan setelah instruksi dijalankan.
Contoh
Contoh berikut memperlihatkan pendefinisian dan penggunaan makro -
; A macro with two parameters
; Implements the write system call
   %macro write_string 2
      mov   eax, 4
      mov   ebx, 1
      mov   ecx, %1
      mov   edx, %2
      int   80h
   %endmacro

section	.text
   global _start            ;must be declared for using gcc

_start:                     ;tell linker entry point
   write_string msg1, len1
   write_string msg2, len2
   write_string msg3, len3

   mov eax,1                ;system call number (sys_exit)
   int 0x80                 ;call kernel

section	.data
msg1 db	'Hello, programmers!',0xA,0xD
len1 equ $ - msg1 msg2 db 'Welcome to the world of,', 0xA,0xD len2 equ $- msg2

msg3 db 'Linux assembly programming! '
len3 equ $- msg3
Ketika kode di atas dikompilasi dan dijalankan, itu menghasilkan hasil sebagai berikut -
Hello, programmers!
Welcome to the world of,
Linux assembly programming!
Sistem menganggap data masukan atau keluaran sebagai aliran byte. Ada tiga aliran file standar -
- Masukan standar (stdin),
- Output standar (stdout), dan
- Kesalahan standar (stderr).
Deskriptor File
SEBUAH file descriptoradalah integer 16-bit yang ditetapkan ke file sebagai id file. Saat file baru dibuat atau file yang sudah ada dibuka, deskriptor file digunakan untuk mengakses file.
Deskriptor file dari aliran file standar - stdin, stdout dan stderr adalah 0, 1 dan 2.
Penunjuk File
SEBUAH file pointermenentukan lokasi untuk operasi baca / tulis berikutnya dalam file dalam satuan byte. Setiap file dianggap sebagai urutan byte. Setiap file terbuka dikaitkan dengan penunjuk file yang menentukan offset dalam byte, relatif terhadap awal file. Saat file dibuka, penunjuk file diatur ke nol.
Panggilan Sistem Penanganan File
Tabel berikut menjelaskan secara singkat panggilan sistem yang terkait dengan penanganan file -
| % eax | Nama | % ebx | % ecx | % edx |
|---|---|---|---|---|
| 2 | sys_fork | struct pt_regs | - | - |
| 3 | sys_read | unsigned int | char * | size_t |
| 4 | sys_write | unsigned int | const char * | size_t |
| 5 | sys_open | const char * | int | int |
| 6 | sys_close | unsigned int | - | - |
| 8 | sys_creat | const char * | int | - |
| 19 | sys_lseek | unsigned int | off_t | unsigned int |
Langkah-langkah yang diperlukan untuk menggunakan panggilan sistem sama, seperti yang kita bahas sebelumnya -
- Masukkan nomor panggilan sistem di register EAX.
- Simpan argumen ke panggilan sistem di register EBX, ECX, dll.
- Panggil interupsi yang relevan (80 jam).
- Hasilnya biasanya dikembalikan dalam register EAX.
Membuat dan Membuka File
Untuk membuat dan membuka file, lakukan tugas-tugas berikut -
- Letakkan sistem call sys_creat () nomor 8, di register EAX.
- Masukkan nama file di register EBX.
- Masukkan izin file ke register ECX.
Panggilan sistem mengembalikan deskriptor file dari file yang dibuat dalam register EAX, jika terjadi kesalahan, kode kesalahan ada dalam register EAX.
Membuka File yang Ada
Untuk membuka file yang sudah ada, lakukan tugas berikut -
- Letakkan system call sys_open () nomor 5, di register EAX.
- Masukkan nama file di register EBX.
- Letakkan mode akses file di register ECX.
- Masukkan izin file ke register EDX.
Panggilan sistem mengembalikan deskriptor file dari file yang dibuat dalam register EAX, jika terjadi kesalahan, kode kesalahan ada dalam register EAX.
Di antara mode akses file, yang paling umum digunakan adalah: read-only (0), write-only (1), dan read-write (2).
Membaca dari File
Untuk membaca dari file, lakukan tugas berikut -
Letakkan system call sys_read () nomor 3, di register EAX.
Letakkan deskriptor file di register EBX.
Letakkan pointer ke buffer input di register ECX.
Letakkan ukuran buffer, yaitu jumlah byte yang akan dibaca, dalam register EDX.
Panggilan sistem mengembalikan jumlah byte yang dibaca di register EAX, jika terjadi kesalahan, kode kesalahan ada di register EAX.
Menulis ke File
Untuk menulis ke file, lakukan tugas berikut -
Letakkan system call sys_write () number 4, di register EAX.
Letakkan deskriptor file di register EBX.
Letakkan penunjuk ke buffer keluaran di register ECX.
Letakkan ukuran buffer, yaitu jumlah byte yang akan ditulis, di register EDX.
Panggilan sistem mengembalikan jumlah sebenarnya dari byte yang ditulis dalam register EAX, jika terjadi kesalahan, kode kesalahan ada dalam register EAX.
Menutup File
Untuk menutup file, lakukan tugas berikut -
- Letakkan sistem call sys_close () nomor 6, di register EAX.
- Letakkan deskriptor file di register EBX.
Panggilan sistem kembali, jika terjadi kesalahan, kode kesalahan dalam register EAX.
Memperbarui File
Untuk memperbarui file, lakukan tugas berikut -
- Masukkan nomor sistem call sys_lseek () 19, di register EAX.
- Letakkan deskriptor file di register EBX.
- Masukkan nilai offset ke register ECX.
- Letakkan posisi referensi offset di register EDX.
Posisi referensi bisa jadi:
- Awal file - nilai 0
- Posisi saat ini - nilai 1
- Akhir file - nilai 2
Panggilan sistem kembali, jika terjadi kesalahan, kode kesalahan dalam register EAX.
Contoh
Program berikut membuat dan membuka file bernama myfile.txt , dan menulis teks 'Selamat Datang di Tutorial Point' di file ini. Selanjutnya, program membaca dari file dan menyimpan data ke dalam buffer bernama info . Terakhir, ini menampilkan teks seperti yang disimpan dalam info .
section	.text
   global _start         ;must be declared for using gcc

_start:                  ;tell linker entry point
   ;create the file
   mov  eax, 8
   mov  ebx, file_name
   mov  ecx, 0777        ;read, write and execute by all
   int  0x80             ;call kernel

   mov [fd_out], eax

   ; write into the file
   mov	edx,len          ;number of bytes
   mov	ecx, msg         ;message to write
   mov	ebx, [fd_out]    ;file descriptor
   mov	eax,4            ;system call number (sys_write)
   int	0x80             ;call kernel

   ; close the file
   mov eax, 6
   mov ebx, [fd_out]

   ; write the message indicating end of file write
   mov eax, 4
   mov ebx, 1
   mov ecx, msg_done
   mov edx, len_done
   int  0x80

   ;open the file for reading
   mov eax, 5
   mov ebx, file_name
   mov ecx, 0             ;for read only access
   mov edx, 0777          ;read, write and execute by all
   int  0x80

   mov  [fd_in], eax

   ;read from file
   mov eax, 3
   mov ebx, [fd_in]
   mov ecx, info
   mov edx, 26
   int 0x80

   ; close the file
   mov eax, 6
   mov ebx, [fd_in]
   int  0x80

   ; print the info
   mov eax, 4
   mov ebx, 1
   mov ecx, info
   mov edx, 26
   int 0x80

   mov	eax,1             ;system call number (sys_exit)
   int	0x80              ;call kernel

section	.data
file_name db 'myfile.txt'
msg db 'Welcome to Tutorials Point'
len equ  $-msg

msg_done db 'Written to file', 0xa
len_done equ $-msg_done

section .bss
fd_out resb 1
fd_in  resb 1
info resb  26
Ketika kode di atas dikompilasi dan dijalankan, itu menghasilkan hasil sebagai berikut -
Written to file
Welcome to Tutorials Point
Itu sys_brk()panggilan sistem disediakan oleh kernel, untuk mengalokasikan memori tanpa perlu memindahkannya nanti. Panggilan ini mengalokasikan memori tepat di belakang gambar aplikasi dalam memori. Fungsi sistem ini memungkinkan Anda untuk mengatur alamat tertinggi yang tersedia di bagian data.
Panggilan sistem ini menggunakan satu parameter, yaitu alamat memori tertinggi yang perlu disetel. Nilai ini disimpan di register EBX.
Jika terjadi kesalahan, sys_brk () mengembalikan -1 atau mengembalikan kode kesalahan negatif itu sendiri. Contoh berikut menunjukkan alokasi memori dinamis.
Contoh
Program berikut mengalokasikan 16kb memori menggunakan panggilan sistem sys_brk () -
section	.text
   global _start         ;must be declared for using gcc

_start:	                 ;tell linker entry point

   mov	eax, 45		 ;sys_brk
   xor	ebx, ebx
   int	80h

   add	eax, 16384	 ;number of bytes to be reserved
   mov	ebx, eax
   mov	eax, 45		 ;sys_brk
   int	80h

   cmp	eax, 0
   jl	exit	;exit, if error
   mov	edi, eax	 ;EDI = highest available address
   sub	edi, 4		 ;pointing to the last DWORD
   mov	ecx, 4096	 ;number of DWORDs allocated
   xor	eax, eax	 ;clear eax
   std			 ;backward
   rep	stosd            ;repete for entire allocated area
   cld			 ;put DF flag to normal state

   mov	eax, 4
   mov	ebx, 1
   mov	ecx, msg
   mov	edx, len
   int	80h		 ;print a message

exit:
   mov	eax, 1
   xor	ebx, ebx
   int	80h

section	.data
msg    	db	"Allocated 16 kb of memory!", 10
len     equ	$ - msg
Ketika kode di atas dikompilasi dan dijalankan, itu menghasilkan hasil sebagai berikut -
Allocated 16 kb of memory!