Apache CXF-빠른 가이드
오늘날의 환경에서는 여러 옵션을 사용하여 웹 서비스 응용 프로그램을 만들 수 있습니다. 통신에 널리 사용되는 여러 표준 프로토콜 중 하나 이상을 사용할 수 있습니다. 예를 들어 SOAP , XML / HTTP, RESTful HTTP 및 CORBA (Common Object Request Broker Architecture)는 예전에는 매우 유명했지만 지금은 자주 사용되지 않습니다.
또한 HTTP, JMS , JBI 와 같은 다양한 전송과 JAX-RS 및 JAX-WS 와 같은 프런트 엔드 API를 선택할 수 있습니다. 웹 서비스 개발을위한 옵션이 너무 많기 때문에 위에서 언급 한 모든 옵션을 하나로 묶을 수있는 오픈 소스 서비스 프레임 워크가 필요하며 이것이 Apache CXF가하는 일 입니다.
이 자습서에서는 위에 나열된 옵션 중 하나 이상을 사용하여 CXF를 사용하여 웹 서비스와 서비스를 사용하는 클라이언트를 모두 만드는 방법을 배웁니다. 이 튜토리얼은 서버와 클라이언트 모두에 대한 전체 코드 개발을 안내합니다. 각 응용 프로그램은 각 범주의 옵션 중 하나, 즉 프런트 엔드, 전송 및 프로토콜 만 사용할 수 있으므로이 세 가지의 모든 순열과 조합을 고려할 때 응용 프로그램 수가 엄청나게 많습니다.
이 튜토리얼은 다음 프로젝트의 개발에 대해 자세히 설명합니다.
POJO (Plain Old Apache CXF Objects)가있는 CXF
JAX-WS를 사용하는 CXF
WSDL을 사용한 CXF
JAX-RS를 사용하는 CXF
JMS를 사용한 CXF
단순하게 유지하기 위해 명령 줄 인터페이스와 함께 maven을 사용했습니다. Maven 프로젝트를 만들기 위해 선호하는 IDE를 사용할 수 있습니다.
다음 장에서는 첫 번째 장부터 시작하겠습니다.
이 장에서는 사용자에게 인사말 메시지를 보내는 간단한 웹 응용 프로그램을 개발하는 방법을 배웁니다. 웹 서비스 프로젝트는 WSDL 모델을 사용 합니다. CXF를 사용하면 Apache CXF API를 기본 WSDL에 매핑하는 간단한 프런트 엔드를 제공하여이 WSDL 모델을 숨길 수 있습니다.
이 가장 간단한 프로젝트에서 웹 서비스의 인터페이스는 클라이언트에 직접 노출되고 클라이언트는 네이티브 Apache CXF API를 사용하여 웹 서비스를 호출합니다.
먼저 웹 서비스를 만듭니다. 모든 서비스에는 클라이언트에 노출되는 인터페이스가 있습니다. 이 인터페이스를 간단한 Apache CXF 인터페이스 또는 WSDL 문서로 작성할 수 있습니다. 이 Apache CXF-First 접근 방식에서는 Apache CXF 인터페이스를 통해 서비스를 노출합니다.
웹 서비스 개발
웹에서 생성 할 서비스에는 greetings. 이 방법은string사용자 이름을 보낼 유형 인수입니다. 이 서비스는 수신 된 사용자 이름이 메시지에 포함 된 인사말 메시지를 발신자에게 다시 보냅니다.
웹 서비스 인터페이스
웹 서비스의 인터페이스를 노출하기 위해 다음과 같이 Apache CXF 인터페이스를 생성합니다.
//HelloWorld.java
package com.tutorialspoint.cxf.pojo;
public interface HelloWorld {
   String greetings(String text);
}
인터페이스에는 greetings. 서버는이 인터페이스를 구현합니다. 사소한 애플리케이션에서이 인터페이스는 클라이언트에 직접 노출됩니다. 일반적으로 웹 서비스 애플리케이션에서는 WSDL을 사용하여 웹 서비스 인터페이스를 설명합니다. 이 간단한 애플리케이션에서 우리는 클라이언트 개발자에게이 직접적인 인터페이스를 제공 할 것입니다. 그런 다음 클라이언트는greetings서버 개체의 메시지. 그럼 먼저 웹 서비스를 만들어 보겠습니다.
웹 서비스 구현
그만큼 HelloWorld 인터페이스는 HelloWorldImpl 아래와 같이 Apache CXF 클래스-
//HelloWorldImpl.java
package com.tutorialspoint.cxf.pojo;
public class HelloWorldImpl implements HelloWorld {
   @Override
   public String greetings(String text) {
      return "Hi " + text;
   }
}
그만큼 greetings 메소드는 매개 변수를받습니다. string 유형, 인사말 메시지에 추가하고 결과 문자열을 호출자에게 반환합니다.
다음으로 서버 애플리케이션을 작성하여 HelloWorld 서비스.
서버 생성
서버 애플리케이션은 두 부분으로 구성됩니다.
첫 번째 부분은 웹 서비스를위한 팩토리를 만들고
두 번째 부분은 main 인스턴스화하는 방법.
서버는 ServerFactoryBean CXF 라이브러리에서 제공하는 클래스는 HelloWorld원격 클라이언트에 대한 인터페이스. 따라서 먼저ServerFactoryBean 클래스 다음 다양한 속성을 설정합니다-
ServerFactoryBean factory = new ServerFactoryBean();호출 할 서비스 클래스를 설정합니다. setServiceClass 에 방법 factory 객체-
factory.setServiceClass(HelloWorld.class);우리는 공장의 전화를 걸어 서비스를 호출 할 URL을 설정합니다. setAddress방법. 서비스는이 URL에 게시됩니다.
factory.setAddress("http://localhost:5000/Hello");이 경우 서비스는 임베디드 서버에 배포되고 포트 5000을 수신합니다. 원하는 포트 번호를 선택할 수 있습니다.
팩토리를 작성하기 전에 서비스 구현 클래스에 대해 팩토리에 알려야합니다. 이것은setServiceBean 에 방법 factory 여기에 표시된 객체-
factory.setServiceBean(new HelloWorldImpl());서비스 빈은 서비스 구현 클래스의 인스턴스로 설정됩니다. 마지막으로 공장을 호출하여create 방법-
factory.create();이제 웹 서비스를 실행하기 위해 공장을 개발 했으므로 다음으로 main 인스턴스화하고 얼마 동안 계속 실행하는 메서드입니다.
이제 main 인스턴스화하는 방법 HelloServer 다음과 같이 클래스-
public static void main(String[] args) throws Exception {
   new HelloServer();
   System.out.println("Listening on port 5000 ...");
}
인스턴스화되면 HelloServer클래스는 무기한으로 계속 실행됩니다. 프로덕션 배포의 경우 서버를 영원히 계속 실행하게됩니다. 현재 상황에서는 다음과 같이 미리 정해진 시간이 지나면 서버를 종료합니다.
Thread.sleep(5 * 60 * 1000);
System.out.println("Server exiting ...");
System.exit(0);
에 대한 전체 코드 HelloServer 클래스는 다음과 같습니다-
//HelloServer.java//HelloServer.java
package com.tutorialspoint.cxf.pojo;
import org.apache.cxf.frontend.ServerFactoryBean;
public class HelloServer {
protected HelloServer() throws Exception {
ServerFactoryBean factory = new ServerFactoryBean();
factory.setServiceClass(HelloWorld.class);
factory.setAddress("http://localhost:5000/Hello");
factory.setServiceBean(new HelloWorldImpl());
factory.create();
}
public static void main(String[] args) throws Exception {
new HelloServer();
System.out.println("Listening on port 5000 ...");
Thread.sleep(5 * 60 * 1000);
System.out.println("Server exiting ...");
System.exit(0);
}
}우리가 만든 서버 응용 프로그램은 ServerFactoryBeanCXF 라이브러리의 클래스. 이제 프로젝트에 이러한 라이브러리를 포함하여 성공적으로HelloServer수업. 우리는 사용할 것입니다Maven 프로젝트 종속성을 설정합니다.
Maven 프로젝트 설정
Maven 프로젝트를 만들려면 명령 줄 창에 다음 명령을 입력합니다. 우리는 이것을 Mac 컴퓨터에서 테스트했습니다. Windows 및 Linux 설치의 경우 지침이 일부 위치에서 다를 수 있습니다.
mvn archetype:generate속성을 요청하면 다음 값을 입력하십시오.
Define value for property 'groupId': : com.tutorialspoint
Define value for property 'artifactId': : cxf-pojo
Define value for property 'version': 1.0-SNAPSHOT: : 1.0
Define value for property 'package': com.tutorialspoint: : com.tutorialspoint.cxf.pojo
maven 명령이 완료되면 pom.xml 파일과 함께 현재 폴더에 생성 된 적절한 폴더 구조를 찾을 수 있습니다.
생성 된 디렉토리 구조는 다음과 같습니다.

CXF 종속성을 pom.xml또한 위에서 생성 한 Apache CXF 파일을 maven 생성 구조의 적절한 폴더에 복사합니다. 준비된 참조를 위해 시스템에서 만든 프로젝트에 대한 pom.xml 파일을 아래에 제공했습니다.
<?xml version = "1.0" encoding = "UTF-8"?>
<project xmlns = "http://maven.apache.org/POM/4.0.0" xmlns:xsi = "http://www.w3.org/2001/XMLSchema-instance" xsi:schemaLocation = "http://maven.apache.org/POM/4.0.0 http://maven.apache.org/xsd/maven-4.0.0.xsd">
   <modelVersion>4.0.0</modelVersion>
   <groupId>com.tutorialspoint</groupId>
   <artifactId>cxf-pojo</artifactId>
   <version>1.0</version>
   <packaging>jar</packaging>

   <profiles>
      <profile>
         <id>server</id>
         <build>
            <defaultGoal>test</defaultGoal>
            <plugins>
               <plugin>
                  <groupId>org.codehaus.mojo</groupId>
                  <artifactId>exec-maven-plugin</artifactId>
                  <executions>
                     <execution>
                        <phase>test</phase>
                        <goals>
                           <goal>java</goal>
                        </goals>
                        <configuration>
                           <mainClass>
                              com.tutorialspoint.cxf.pojo.HelloServer
                           </mainClass>
                        </configuration>
                     </execution>
                  </executions>
               </plugin>
            </plugins>
         </build>
      </profile>

      <profile>
         <id>client</id>
         <build>
            <defaultGoal>test</defaultGoal>
            <plugins>
               <plugin>
                  <groupId>org.codehaus.mojo</groupId>
                  <artifactId>exec-maven-plugin</artifactId>
                  <executions>
                     <execution>
                        <phase>test</phase>
                        <goals>
                           <goal>java</goal>
                        </goals>
                        <configuration>
                           <mainClass>
                           com.tutorialspoint.cxf.pojo.HelloClient
                           </mainClass>
                        </configuration>
                     </execution>
                  </executions>
               </plugin>
            </plugins>
         </build>
      </profile>
   </profiles>

   <dependencies>
      <dependency>
         <groupId>org.apache.cxf</groupId>
         <artifactId>cxf-rt-features-logging</artifactId>
         <version>3.3.0</version>
         <type>jar</type>
      </dependency>
      <dependency>
         <groupId>org.apache.cxf</groupId>
         <artifactId>cxf-rt-frontend-simple</artifactId>
         <version>3.3.0</version>
         <type>jar</type>
      </dependency>
      <dependency>
         <groupId>org.apache.cxf</groupId>
         <artifactId>cxf-rt-transports-http</artifactId>
         <version>3.3.0</version>
      </dependency>
      <dependency>
         <groupId>org.apache.cxf</groupId>
         <artifactId>cxf-rt-frontend-jaxws</artifactId>
         <version>3.3.0</version>
      </dependency>
      <!-- Jetty is needed if you're using the CXFServlet -->
      <dependency>
         <groupId>org.apache.cxf</groupId>
         <artifactId>cxf-rt-transports-http-jetty</artifactId>
         <version>3.3.0</version>
      </dependency>
   </dependencies>
   <properties>
      <project.build.sourceEncoding>UTF-8</project.build.sourceEncoding>
      <maven.compiler.source>1.8</maven.compiler.source>
      <maven.compiler.target>1.8</maven.compiler.target>
   </properties>
</project>
위의 pom.xml에는이 프로젝트와 무관 한 추가 종속성이 포함될 수 있지만이 자습서의 다음 프로젝트에 필요합니다. 어쨌든 추가 종속성을 포함하는 것과 같은 해는 없습니다.
프로젝트 폴더 구조
서버 및 클라이언트 Apache CXF 파일을 배치 한 후 내 컴퓨터의 프로젝트 폴더 구조는 빠른 참조를 위해 아래에 나와 있습니다.

실행중인 서버
프로젝트를 빌드하려면 명령 줄 창에서 다음 명령을 사용하십시오.
mvn clean install다음 명령을 사용하여 서버를 시작할 수 있습니다-
mvn -Pserver이렇게하면 서버가 시작되고 콘솔에 다음 프롬프트가 표시됩니다.
INFO: Creating Service {http://pojo.cxf.tutorialspoint.com/}HelloWorld from class com.tutorialspoint.cxf.pojo.HelloWorld
INFO: Setting the server's publish address to be http://localhost:5000/Hello
Listening on port 5000 ...
이제 브라우저 창에서 게시 된 서비스의 URL을 지정하십시오. 다음 출력이 표시됩니다.

이것은 우리 서비스가 localhost의 지정된 포트에서 실행되고 있음을 확인합니다. 우리가 지정하지 않았기 때문에greetings 호출시 SOAP 오류 메시지가 브라우저에 반환됩니다.
선택한 SOAP 클라이언트를 사용하여 웹 서비스를 추가로 테스트 할 수 있습니다. 여기서는 Postman 을 사용 하여 서버를 테스트했습니다.
출력은 다음과 같습니다.
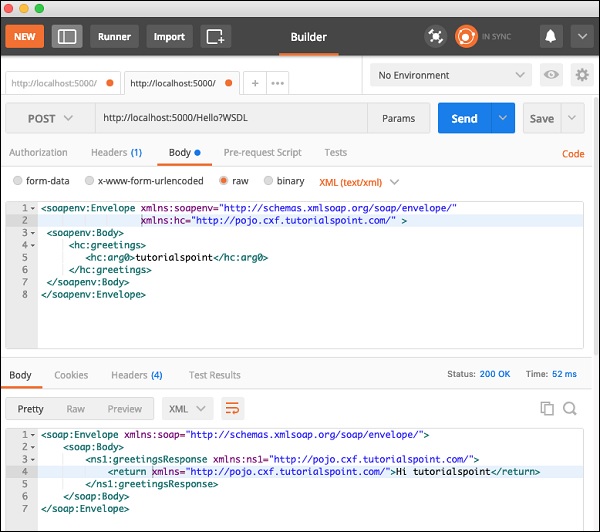
그것을 관찰하십시오 SOAP Request손으로 코딩했습니다. 요청을 게시 한 후 서버는SOAP Response 이 메시지는 스크린 샷 하단에 표시됩니다.
이를 통해 CXF는 요청과 응답 모두에 SOAP 프로토콜을 사용하는 동시에 오늘날 세계에 존재하는 다양한 웹 기술에 대한 통합보기를 제공한다는 것을 이해할 수 있습니다. 이것은 웹 애플리케이션 개발을 크게 단순화합니다.
다음 작업은 생성 한 웹 서비스를 사용할 클라이언트를 생성하는 것입니다.
클라이언트 생성
서버 애플리케이션에서 HelloWorld웹 서비스를 노출하는 인터페이스입니다. 웹 서비스 자체는 클라이언트에게 일반 인사말 메시지를 제공합니다. 일반적으로 웹 서비스 인터페이스는 WSDL (Web Services Description Language)을 사용하여 외부에 노출됩니다. 이 간단한 응용 프로그램에서는 서비스 인터페이스를 직접 노출하여 웹 서비스를 클라이언트에 노출합니다.HelloWorld.class.
이를 위해 CXF는 ClientProxyFactoryBean 생성 된 팩토리 인스턴스에 원하는 인터페이스를 연결할 수 있습니다.
먼저 다음과 같이 팩토리 빈 인스턴스를 생성합니다.
ClientProxyFactoryBean factory = new ClientProxyFactoryBean();우리는 setAddress웹 서비스를 호출 할 수있는 URL을 설정하는 팩토리 빈 인스턴스의 메서드. 우리의 경우 이전 단계에서 서버를 생성하는 동안 사용 된 URL을 사용합니다.
factory.setAddress("http://localhost:5000/Hello");다음으로 우리는 create 에 방법 factory 서비스 인터페이스를 연결할 인스턴스 HelloWorld.class 그것에.
HelloWorld helloServer = factory.create(HelloWorld.class);마지막으로 우리는 greetings 원격 웹 서비스를 호출하는 메소드.
System.out.println(helloServer.greetings(System.getProperty("user.name")));콘솔에 인사말 메시지가 인쇄됩니다.
클라이언트 애플리케이션의 전체 소스는 다음과 같습니다.
//HelloClient.java
package com.tutorialspoint.cxf.pojo;
import org.apache.cxf.frontend.ClientProxyFactoryBean;
public class HelloClient {
   public static void main(String[] args) throws Exception {
      ClientProxyFactoryBean factory = new ClientProxyFactoryBean();
      factory.setAddress("http://localhost:5000/Hello");
      HelloWorld helloServer = factory.create(HelloWorld.class);
      System.out.println(helloServer.greetings(System.getProperty("user.name")));
   }
}
실행중인 클라이언트
서버가 컴퓨터에서 여전히 실행 중인지 확인하십시오. 시간이 초과 된 경우 다음 명령으로 서버를 다시 시작하십시오.
mvn -Pserver콘솔에 다음 메시지가 표시됩니다.
Listening on port 5000 ...이제 서버가 5 분으로 설정 한 시간이 초과되기 전에 다른 명령 줄 창을 열고 다음 명령으로 클라이언트를 시작합니다.
mvn -Pclient명령 줄에 다음과 유사한 메시지가 표시됩니다.
Hi tutorialspoint참고 tutorialspoint사용자 이름입니다. 자신의 이름으로 인사를드립니다.
다음 장에서는 JAX-WS (Apache CXF API for XML Web Services) 프로젝트에서 CXF를 사용하는 방법을 배웁니다.
이 JAX-WS 애플리케이션에서는 이전 POJO 애플리케이션과 같은 Apache CXF 우선 접근 방식을 사용합니다. 따라서 먼저 웹 서비스를위한 인터페이스를 생성합니다.
서비스 인터페이스 선언
앞의 경우와 마찬가지로 greeting이라는 인터페이스 메서드가 하나만있는 사소한 서비스를 만듭니다. 서비스 인터페이스의 코드는 다음과 같습니다.
//HelloWorld.java
package com.tutorialspoint.cxf.jaxws.helloworld;
import javax.jws.WebService;

@WebService
public interface HelloWorld {
   String greetings(String text);
}
인터페이스에 @WebService꼬리표. 다음으로이 인터페이스를 구현합니다.
웹 인터페이스 구현
웹 인터페이스의 구현은 다음과 같습니다.
//HelloWorldImpl.java
package com.tutorialspoint.cxf.jaxws.helloworld;
public class HelloWorldImpl implements HelloWorld {
   @Override
   public String greetings(String name) {
      return ("hi " + name);
   }
}
인사 방법은 다음과 같이 주석 처리됩니다. @Override꼬리표. 이 메서드는 호출자에게 "hi"메시지를 반환합니다.
다음으로 서버 개발을위한 코드를 작성합니다.
서버 개발
POJO 애플리케이션과 달리 이제 CXF에서 제공하는 Endpoint 클래스를 사용하여 서비스를 게시하여 인터페이스를 분리합니다. 이것은 다음 두 줄의 코드에서 수행됩니다.
HelloWorld implementor = new HelloWorldImpl();
Endpoint.publish(
   "http://localhost:9090/HelloServerPort",
   implementor,
   new LoggingFeature()
);
게시 메소드의 첫 번째 매개 변수는 클라이언트가 서비스를 사용할 수있는 URL을 지정합니다. 두 번째 매개 변수는 서비스의 구현 클래스를 지정합니다. 서버의 전체 코드는 다음과 같습니다.
//Server.java
package com.tutorialspoint.cxf.jaxws.helloworld;
import javax.xml.ws.Endpoint;
import org.apache.cxf.ext.logging.LoggingFeature;
public class Server {
   public static void main(String[] args) throws Exception {
      HelloWorld implementor = new HelloWorldImpl();
      Endpoint.publish("http://localhost:9090/HelloServerPort",
      implementor,
      new LoggingFeature());
      System.out.println("Server ready...");
      Thread.sleep(5 * 60 * 1000);
      System.out.println("Server exiting ...");
      System.exit(0);
   }
}
서버를 배포하려면 아래 나열된대로 프로젝트를 몇 가지 더 수정해야합니다.
서버 배포
마지막으로 서버 애플리케이션을 배포하려면 pom.xml에서 한 번 더 수정하여 애플리케이션을 웹 애플리케이션으로 설정해야합니다. 추가해야하는 코드pom.xml 아래에 주어진다-
<profiles>
   <profile>
      <id>server</id>
      <build>
         <defaultGoal>test</defaultGoal>
         <plugins>
            <plugin>
               <groupId>org.codehaus.mojo</groupId>
               <artifactId>exec-maven-plugin</artifactId>
               <version>1.6.0</version>
               <executions>
                  <execution>
                     <phase>test</phase>
                     <goals>
                        <goal>java</goal>
                     </goals>
                     <configuration>
                        <mainClass>
                           com.tutorialspoint.cxf.jaxws.helloworld.Server
                        </mainClass>
                     </configuration>
                  </execution>
               </executions>
            </plugin>
         </plugins>
      </build>
   </profile>
</profiles>
애플리케이션을 배포하기 전에 프로젝트에 두 개의 파일을 더 추가해야합니다. 아래 스크린 샷에 나와 있습니다.

이 파일은 다음에 대한 매핑을 정의하는 CXF 표준 파일입니다. CXFServlet. 내 코드web.xml 파일은 빠른 참조를 위해 여기에 표시됩니다.
//Web.xml
<?xml version = "1.0" encoding = "UTF-8"??>
<web-app xmlns = "http://java.sun.com/xml/ns/javaee"
xmlns:xsi="http://www.w3.org/2001/XMLSchema-instance" version="2.5"
xsi:schemaLocation = "http://java.sun.com/xml/ns/javaee
http://java.sun.com/xml/ns/javaee/web-app_2_5.xsd">
   <display-name>cxf</display-name>
   <servlet>
      <description>Apache CXF Endpoint</description>
      <display-name>cxf</display-name>
      <servlet-name>cxf</servlet-name>
      <servlet-class>
         org.apache.cxf.transport.servlet.CXFServlet
      </servlet-class>
      <load-on-startup>
         1
      </load-on-startup>
   </servlet>
   <servlet-mapping>
      <servlet-name>
         cxf
      </servlet-name>
      <url-pattern>
         /services/*
      </url-pattern>
   </servlet-mapping>
   <session-config>
      <session-timeout>60</session-timeout>
   </session-config>
</web-app>
에서 cxf-servlet.xml,서비스의 엔드 포인트에 대한 속성을 선언합니다. 이것은 아래 코드 스 니펫에 나와 있습니다.
<beans ...>
   <jaxws:endpoint xmlns:helloworld = "http://tutorialspoint.com/"
      id = "helloHTTP"
      address = "http://localhost:9090/HelloServerPort"
      serviceName = "helloworld:HelloServiceService"
      endpointName = "helloworld:HelloServicePort">
   </jaxws:endpoint>
</beans>
여기에서 서비스 엔드 포인트의 ID, 서비스를 사용할 수있는 주소, 서비스 이름 및 엔드 포인트 이름을 정의합니다. 이제 서비스가 CXF 서블릿에 의해 라우팅되고 처리되는 방법을 배웠습니다.
최종 pom.xml
그만큼 pom.xml몇 가지 더 많은 종속성이 포함됩니다. 모든 종속성을 설명하는 대신 아래에 pom.xml의 최종 버전을 포함했습니다.
<?xml version = "1.0" encoding = "UTF-8"??>
<project xmlns = "http://maven.apache.org/POM/4.0.0"
   xmlns:xsi="http://www.w3.org/2001/XMLSchema-instance"
   xsi:schemaLocation = "http://maven.apache.org/POM/4.0.0
   http://maven.apache.org/xsd/maven-4.0.0.xsd">
   <modelVersion>4.0.0</modelVersion>
   <groupId>com.tutorialspoint</groupId>
   <artifactId>cxf-jaxws</artifactId>
   <version>1.0</version>
   <packaging>jar</packaging>
   <properties>
      <project.build.sourceEncoding>UTF-8</project.build.sourceEncoding>
      <maven.compiler.source>1.8</maven.compiler.source>
      <maven.compiler.target>1.8</maven.compiler.target>
   </properties>
   <profiles>
      <profile>
         <id>server</id>
         <build>
            <defaultGoal>test</defaultGoal>
            <plugins>
               <plugin>
                  <groupId>org.codehaus.mojo</groupId>
                  <artifactId>exec-maven-plugin</artifactId>
                  <version>1.6.0</version>
                  <executions>
                     <execution>
                        <phase>test</phase>
                        <goals>
                           <goal>java</goal>
                        </goals>
                        <configuration>
                           <mainClass>
                              com.tutorialspoint.cxf.jaxws.helloworld.Server
                           </mainClass>
                        </configuration>
                     </execution>
                  </executions>
               </plugin>
            </plugins>
         </build>
      </profile>
      <profile>
         <id>client</id>
         <build>
            <defaultGoal>test</defaultGoal>
            <plugins>
               <plugin>
                  <groupId>org.codehaus.mojo</groupId>
                  <artifactId>exec-maven-plugin</artifactId>
                  <executions>
                     <execution>
                        <phase>test</phase>
                        <goals>
                           <goal>java</goal>
                        <goals>
                        <configuration>
                           <mainClass>
                              com.tutorialspoint.cxf.jaxws.helloworld.Client
                           </mainClass>
                        </configuration>
                     </execution>
                  </executions>
               </plugin>
            </plugins>
         </build>
      </profile>
   </profiles>
   <dependencies>
      <dependency>
         <groupId>org.apache.cxf</groupId>
         <artifactId>cxf-rt-frontend-jaxws</artifactId>
         <version>3.3.0</version>
      </dependency>
      <dependency>
         <groupId>org.apache.cxf</groupId>
         <artifactId>cxf-rt-transports-http</artifactId>
         <version>3.3.0</version>
      </dependency>
      <dependency>
         <groupId>org.apache.cxf</groupId>
         <artifactId>cxf-rt-features-logging</artifactId>
         <version>3.3.0</version>
      </dependency>
      <dependency>
         <groupId>org.apache.cxf</groupId>
         <artifactId>cxf-rt-transports-http-jetty</artifactId>
         <version>3.3.0</version>
      </dependency>
   </dependencies>
</project>
이 튜토리얼의 뒷부분에서 배우게 될 클라이언트 구축을위한 프로필도 포함되어 있습니다.
HelloWorld 서비스 실행
이제 웹앱을 실행할 준비가되었습니다. 명령 창에서 다음 명령을 사용하여 빌드 스크립트를 실행합니다.
mvn clean installmvn -Pserver콘솔에 다음 메시지가 표시됩니다.
INFO: Setting the server's publish address to be http://localhost:9090/HelloServerPort
Server ready…
이전과 마찬가지로 브라우저에서 서버 URL을 열어 서버를 테스트 할 수 있습니다.

작업을 지정하지 않았으므로 응용 프로그램에서 오류 메시지 만 브라우저에 반환합니다.
이제 ?wsdl URL에 다음과 같은 출력이 표시됩니다.

따라서 서버 애플리케이션이 예상대로 실행됩니다. 다음과 같은 SOAP 클라이언트를 사용할 수 있습니다.Postman 서비스를 추가 테스트하기 위해 앞에서 설명한 것입니다.
다음 섹션에서는 서비스를 사용하는 클라이언트를 작성하는 방법을 배웁니다.
클라이언트 개발
CXF 애플리케이션에서 클라이언트를 작성하는 것은 서버를 작성하는 것만 큼 간단합니다. 다음은 클라이언트를위한 완전한 코드입니다.
//Client.java
package com.tutorialspoint.cxf.jaxws.helloworld;
import javax.xml.namespace.QName;
import javax.xml.ws.Service;
import javax.xml.ws.soap.SOAPBinding;
public final class Client {
   private static final QName SERVICE_NAME
   = new QName("http://helloworld.jaxws.cxf.tutorialspoint.com/",
   "HelloWorld");
   private static final QName PORT_NAME
   = new QName("http://helloworld.jaxws.cxf.tutorialspoint.com/",
   "HelloWorldPort");
   private Client() {
   }
   public static void main(String[] args) throws Exception {
      Service service = Service.create(SERVICE_NAME);
      System.out.println("service created");
      String endpointAddress = "http://localhost:9090/HelloServerPort";
      service.addPort(PORT_NAME, SOAPBinding.SOAP11HTTP_BINDING,
      endpointAddress);
      HelloWorld hw = service.getPort(HelloWorld.class);
      System.out.println(hw.greetings("World"));
   }
}
여기에서는 제공된 CXF를 사용합니다. Service알려진 서비스에 바인딩 할 클래스. 우리는create 에 방법 Service서비스의 인스턴스를 가져 오는 클래스. 우리는 다음을 호출하여 알려진 포트를 설정합니다.addPort 에 방법 service 예.
이제 서비스를 사용할 준비가되었습니다. 먼저 다음을 호출하여 서비스 인터페이스를 가져옵니다. getPort 에 방법 service예. 마지막으로 우리는greetings 콘솔에 인사말 메시지를 인쇄하는 방법.
이제 Apache CXF-First 접근 방식을 사용하여 CXF의 기본 사항을 배웠으므로 이제 다음 장에서 WSDL-First 접근 방식과 함께 CXF를 사용하는 방법을 배웁니다.
개발 한 CXF-POJO 애플리케이션은 클라이언트와 서버 사이에 매우 긴밀한 결합을 제공합니다. 서비스 인터페이스에 대한 직접 액세스 권한을 부여하면 심각한 보안 위협이 발생할 수도 있습니다. 따라서 일반적으로 클라이언트와 서버 간의 분리가 바람직하며 이는 WSDL (Web Services Description Language)을 사용하여 수행됩니다.
XML 기반의 WSDL 문서에 웹 서비스 인터페이스를 작성합니다. 이 WSDL을 Apache CXF 인터페이스에 매핑하는 도구를 사용하여 클라이언트 및 서버 응용 프로그램에서 구현하고 사용합니다. 디커플링을 제공하려면 WSDL로 시작하는 것이 선호되는 방법입니다. 이를 위해서는 먼저 새로운 언어 인 WSDL을 배워야합니다. WSDL을 작성하려면 신중한 접근 방식이 필요하며 작업을 시작하기 전에 이에 대해 어느 정도 이해할 수 있다면 더 좋을 것입니다.
이 레슨에서는 WSDL 문서에서 웹 서비스 인터페이스를 정의하는 것으로 시작합니다. CXF를 사용하여 WSDL로 시작하는 서버 및 클라이언트 응용 프로그램을 만드는 방법을 배웁니다. CXF 사용에 초점을 맞추기 위해 애플리케이션을 단순하게 유지합니다. 서버 애플리케이션이 생성 된 후 내장 CXF 클래스를 사용하여 원하는 URL에 게시합니다.
먼저 우리가 사용할 WSDL에 대해 설명하겠습니다.
HelloWorld 용 WSDL
우리가 구현할 웹 서비스에는 greetings 수락하는 string매개 변수는 사용자 이름을 보유하고 사용자 이름에 인사말 메시지를 추가 한 후 호출자에게 문자열 메시지를 반환합니다. 완전한 wsdl은 다음과 같습니다.
//Hello.wsdl
<?xml version = "1.0" encoding = "UTF-8"?>
<wsdl:definitions xmlns:soap = "http://schemas.xmlsoap.org/wsdl/soap/"
   xmlns:tns = "http://helloworld.tutorialspoint.com/"
   xmlns:wsdl = "http://schemas.xmlsoap.org/wsdl/"
   xmlns:xsd = "http://www.w3.org/2001/XMLSchema"
   name = "HelloWorld"
   targetNamespace = "http://helloworld.tutorialspoint.com/">
   <wsdl:types>
      <xsd:schema attributeFormDefault = "unqualified"
         elementFormDefault = "qualified"
         targetNamespace = "http://helloworld.tutorialspoint.com/">
         <xsd:element name = "greetings" type = "tns:greetings"/>
         <xsd:complexType name = "greetings">
            <xsd:sequence>
               <xsd:element minOccurs = "0" name = "arg0" type = "xsd:string"/>
            </xsd:sequence>
         </xsd:complexType>
         <xsd:element name = "greetingsResponse"
         type = "tns:greetingsResponse"/>
         <xsd:complexType name = "greetingsResponse">
            <xsd:sequence>
               <xsd:element minOccurs = "0" name = "return" type = "xsd:string"/>
            </xsd:sequence>
         </xsd:complexType>
      </xsd:schema>
   </wsdl:types>
   <wsdl:message name = "greetings">
      <wsdl:part element = "tns:greetings" name = "parameters"> </wsdl:part>
   </wsdl:message>
   <wsdl:message name = "greetingsResponse">
      <wsdl:part element = "tns:greetingsResponse" name = "parameters"> </wsdl:part>
   </wsdl:message>
   <wsdl:portType name = "HelloWorldPortType">
      <wsdl:operation name = "greetings">
         <wsdl:input message = "tns:greetings" name = "greetings">  </wsdl:input>
         <wsdl:output message = "tns:greetingsResponse" name = "greetingsResponse">
         </wsdl:output>
      </wsdl:operation>
   </wsdl:portType>
   <wsdl:binding name = "HelloWorldSoapBinding" type = "tns:HelloWorldPortType">
      <soap:binding style = "document"
      transport = "http://schemas.xmlsoap.org/soap/http"/>
      <wsdl:operation name = "greetings">
         <soap:operation soapAction = "" style = "document"/>
         <wsdl:input name = "greetings"></wsdl:input>
         <wsdl:output name = "greetingsResponse">
            <soap:body use = "literal"/>
         </wsdl:output>
         </wsdl:operation>
   </wsdl:binding>
   <wsdl:service name = "HelloWorldService">
      <wsdl:port binding = "tns:HelloWorldSoapBinding" name = "HelloWorldPort">
         <soap:address location = "http://localhost:9090/HelloServerPort"/>
      </wsdl:port>
   </wsdl:service>
</wsdl:definitions>
구문 적으로 올바른 wsdl을 작성하는 것은 항상 개발자에게 도전이었습니다. wsdl을 만드는 데 사용할 수있는 많은 도구와 온라인 편집기가 있습니다. 이러한 편집기는 메시지에 전달할 매개 변수와 함께 구현할 메시지의 이름과 클라이언트 애플리케이션이 수신 할 반환 메시지의 유형을 요청합니다. wsdl 구문을 알고 있다면 전체 문서를 직접 코딩하거나 편집기 중 하나를 사용하여 직접 작성할 수 있습니다.
위의 wsdl에서 우리는 greetings. 메시지는 다음과 같은 서비스로 전달됩니다.HelloWorldService 실행중인 http://localhost:9090/HelloServerPort.
이것으로 우리는 이제 서버 개발을 진행할 것입니다. 서버를 개발하기 전에 웹 서비스에 대한 Apache CXF 인터페이스를 생성해야합니다. 이것은 주어진 wsdl에서 수행됩니다. 이를 위해 다음과 같은 도구를 사용합니다.wsdl2java.
wsdl2java 플러그인
프로젝트를 빌드하기 위해 maven을 사용할 것이므로 다음 플러그인을 추가해야합니다. pom.xml 파일.
<plugins>
   <plugin>
      <groupId>org.apache.cxf</groupId>
      <artifactId>cxf-codegen-plugin</artifactId>
      <version>3.3.0</version>
      <executions>
         <execution>
            <id>generate-sources</id>
            <phase>generate-sources</phase>
            <configuration>
               <wsdlOptions>
                  <wsdlOption>
                     <wsdl>src/main/resources/hello.wsdl</wsdl>
                     <faultSerialVersionUID> 1 </faultSerialVersionUID>
                  </wsdlOption>
               </wsdlOptions>
            </configuration>
            <goals>
               <goal>wsdl2java</goal>
            </goals>
         </execution>
      </executions>
   </plugin>
</plugins>
우리는 wsdl 파일로 src/main/resources/Hello.wsdl. 프로젝트에 적합한 디렉토리 구조를 생성하고 이전에 표시된 내용을 추가해야합니다.hello.wsdl 파일을 지정된 폴더에 추가합니다.
그만큼 wsdl2java플러그인은이 wsdl을 컴파일하고 미리 정의 된 폴더에 Apache CXF 클래스를 만듭니다. 참조 할 수 있도록 전체 프로젝트 구조가 여기에 표시됩니다.
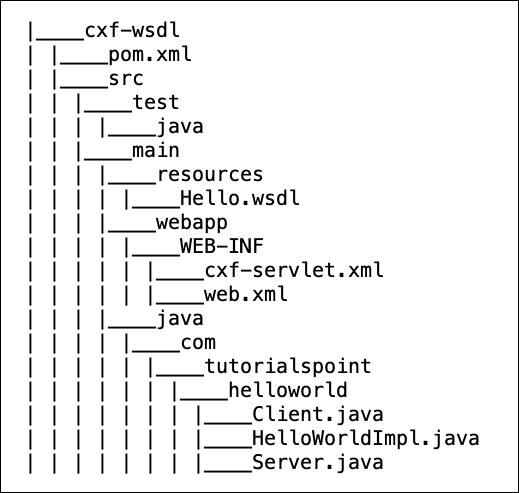
이제 다음을 사용하여 서버를 만들 준비가되었습니다. wsdl2java생성 된 클래스. wsdl2java가 만든 클래스는 아래 그림과 같습니다.

생성 된 서비스 인터페이스
생성 된 클래스 목록에서 그중 하나가 Apache CXF 인터페이스임을 확인해야합니다. HelloWorldPortType.java. 코드 편집기에서이 파일을 검토하십시오. 여기에 파일 내용이 표시되어 있습니다.
//HelloWorldPortType.java
package com.tutorialspoint.helloworld;
import javax.jws.WebMethod;
import javax.jws.WebParam;
import javax.jws.WebResult;
import javax.jws.WebService;
import javax.xml.bind.annotation.XmlSeeAlso;
import javax.xml.ws.RequestWrapper;
import javax.xml.ws.ResponseWrapper;
/**
* This class was generated by Apache CXF 3.3.0
* 2019-02-11T12:05:55.220+05:30
* Generated source version: 3.3.0
*
*/

@WebService(targetNamespace = "http://helloworld.tutorialspoint.com/",
   name = "HelloWorldPortType")
@XmlSeeAlso({ObjectFactory.class})
public interface HelloWorldPortType {
   @WebMethod
   @RequestWrapper(localName = "greetings", targetNamespace =
      "http://helloworld.tutorialspoint.com/", className =
      "com.tutorialspoint.helloworld.Greetings")
      @ResponseWrapper(localName = "greetingsResponse", targetNamespace =
         "http://helloworld.tutorialspoint.com/", className =
         "com.tutorialspoint.helloworld.GreetingsResponse")
   @WebResult(name = "return", targetNamespace =
      "http://helloworld.tutorialspoint.com/")
   public java.lang.String greetings(
      @WebParam(name = "arg0", targetNamespace =
      "http://helloworld.tutorialspoint.com/")
      java.lang.String arg0
   );
}
인터페이스에는 greetings. 이것은 우리 wsdl의 메시지 유형이었습니다. 그만큼wsdl2java도구가 생성 된 인터페이스에이 메소드를 추가했습니다. 이제 wsdl에 어떤 메시지를 작성하든 해당 메서드가 인터페이스에서 생성된다는 것을 이해할 수 있습니다.
이제 작업은 wsdl에서 정의한 다양한 메시지에 해당하는 이러한 모든 메소드를 구현하는 것입니다. Apache CXF-First의 이전 예에서는 웹 서비스를위한 Apache CXF 인터페이스로 시작했습니다. 이 경우 Apache CXF 인터페이스는 wsdl에서 생성됩니다.
서비스 인터페이스 구현
서비스 인터페이스의 구현은 간단합니다. 전체 구현은 아래 목록에 나와 있습니다.
//HelloWorldImpl.java
package com.tutorialspoint.helloworld;
public class HelloWorldImpl implements HelloWorldPortType {
   @Override
   public String greetings(String name) {
      return ("hi " + name);
   }
}
이 코드는 다음과 같은 유일한 인터페이스 메서드를 구현합니다. greetings. 이 메서드는 다음 중 하나의 매개 변수를 사용합니다.string type, "hi"메시지를 앞에 추가하고 결과 문자열을 호출자에게 반환합니다.
다음으로 서버 애플리케이션을 작성합니다.
서버 개발
서버 애플리케이션 개발은 다시 한 번 사소합니다. 여기에서는 제공된 CXF를 사용합니다.Endpoint우리의 서비스를 게시하는 클래스. 이것은 다음 두 줄의 코드에서 수행됩니다.
HelloWorldPortType implementor = new HelloWorldImpl();
   Endpoint.publish("http://localhost:9090/HelloServerPort",
      implementor,
      new LoggingFeature());
먼저 서비스 구현 자 클래스의 객체를 만듭니다. HelloWorldImpl. 그런 다음이 참조를 두 번째 매개 변수로publish방법. 첫 번째 매개 변수는 서비스가 게시되는 주소입니다. 클라이언트는이 URL을 사용하여 서비스에 액세스합니다. 서버 애플리케이션의 전체 소스가 여기에 제공됩니다.
//Server.java
package com.tutorialspoint.helloworld;
import javax.xml.ws.Endpoint;
import org.apache.cxf.ext.logging.LoggingFeature;
public class Server {
   public static void main(String[] args) throws Exception {
      HelloWorldPortType implementor = new HelloWorldImpl();
      Endpoint.publish("http://localhost:9090/HelloServerPort",
         implementor,
         new LoggingFeature());
      System.out.println("Server ready...");
      Thread.sleep(5 * 60 * 1000);
      System.out.println("Server exiting");
      System.exit(0);
   }
}
이 서버 클래스를 빌드하려면 빌드 프로필을 pom.xml. 이것은 아래에 표시됩니다-
<profile>
   <id>server</id>
   <build>
      <defaultGoal>test</defaultGoal>
      <plugins>
         <plugin>
            <groupId>org.codehaus.mojo</groupId>
            <artifactId>exec-maven-plugin</artifactId>
            <version>1.6.0</version>
            <executions>
               <execution>
                  <phase>test</phase>
                  <goals>
                     <goal>java</goal>
                  </goals>
                  <configuration>
                     <mainClass>
                        com.tutorialspoint.helloworld.Server
                     </mainClass>
                  </configuration>
               </execution>
            </executions>
         </plugin>
      </plugins>
   </build>
   <dependencies>
      <dependency>
         <groupId>org.apache.cxf</groupId>
         <artifactId>cxf-rt-transports-http-jetty</artifactId>
         <version>3.3.0</version>
      </dependency>
   </dependencies>
</profile>
정규화 된 이름은 Server클래스는 구성에 지정됩니다. 또한 종속성 태그는 임베디드 jetty 웹 서버를 사용하여 서버 애플리케이션을 배포 할 것임을 지정합니다.
서버 배포
마지막으로 서버 애플리케이션을 배포하려면 pom.xml에서 한 번 더 수정하여 애플리케이션을 웹 애플리케이션으로 설정해야합니다. 추가해야하는 코드pom.xml 아래에 주어진다-
<defaultGoal>install</defaultGoal>
<pluginManagement>
   <plugins>
      <plugin>
         <artifactId>maven-war-plugin</artifactId>
         <version>3.2.2</version>
         <configuration>
            <webXml>src/main/webapp/WEB-INF/web.xml</webXml>
            <webResources>
               <resource>
                  <directory>src/main/resources</directory>
                  <targetPath>WEB-INF</targetPath>
                  <includes>
                     <include>*.wsdl</include>
                  </includes>
               </resource>
            </webResources>
         </configuration>
      </plugin>
   </plugins>
</pluginManagement>
애플리케이션을 배포하기 전에 프로젝트에 두 개의 파일을 더 추가해야합니다. 아래 스크린 샷에 나와 있습니다.

이 파일은 다음에 대한 매핑을 정의하는 CXF 표준 파일입니다. CXFServlet. 내 코드web.xml 파일은 빠른 참조를 위해 여기에 표시됩니다.
//cxf-servlet.xml
<web-app xmlns = "http://java.sun.com/xml/ns/javaee"
   xmlns:xsi = "http://www.w3.org/2001/XMLSchema-instance" version="2.5"
   xsi:schemaLocation = "http://java.sun.com/xml/ns/javaee
   http://java.sun.com/xml/ns/javaee/web-app_2_5.xsd">
   <display-name>cxf</display-name>
   <servlet>
      <description>Apache CXF Endpoint</description>
      <display-name>cxf</display-name>
      <servlet-name>cxf</servlet-name>
      <servlet-class>
         org.apache.cxf.transport.servlet.CXFServlet
      </servlet-class>
      <load-on-startup>1</load-on-startup>
   </servlet>
   <servlet-mapping>
      <servlet-name>cxf</servlet-name>
      <url-pattern>/services/*</url-pattern>
   </servlet-mapping>
   <session-config>
      <session-timeout>60</session-timeout>
   </session-config>
</web-app>
에서 cxf-servlet.xml서비스의 엔드 포인트에 대한 속성을 선언합니다. 이것은 아래 코드 스 니펫에 나와 있습니다.
<beans ...>
   <jaxws:endpoint xmlns:helloworld = "http://tutorialspoint.com/"
      id="helloHTTP"
      address = "http://localhost:9090/HelloServerPort"
      serviceName = "helloworld:HelloServiceService"
      endpointName = "helloworld:HelloServicePort">
   </jaxws:endpoint>
</beans>
여기에서 서비스 엔드 포인트의 ID, 서비스를 사용할 수있는 주소, 서비스 이름 및 엔드 포인트 이름을 정의합니다. 이제 서비스가 CXF 서블릿에 의해 라우팅되고 처리되는 방식을 이해했습니다.
최종 pom.xml
그만큼 pom.xml몇 가지 더 많은 종속성이 포함됩니다. 모든 종속성을 설명하는 대신 아래에 pom.xml의 최종 버전을 포함했습니다.
<?xml version="1.0" encoding = "UTF-8"?>
<project xmlns = "http://maven.apache.org/POM/4.0.0"
   xmlns:xsi = "http://www.w3.org/2001/XMLSchema-instance"
   xsi:schemaLocation = "http://maven.apache.org/POM/4.0.0 http://maven.apache.org/xsd/maven-4.0.0.xsd">
   <modelVersion>4.0.0</modelVersion>
   <groupId>com.tutorialspoint</groupId>
   <artifactId>cxf-wsdl</artifactId>
   <version>1.0</version>
   <packaging>jar</packaging>
   <properties>
      <project.build.sourceEncoding>UTF-8</project.build.sourceEncoding>
      <maven.compiler.source>1.8</maven.compiler.source>
      <maven.compiler.target>1.8</maven.compiler.target>
   </properties>
   <build>
      <defaultGoal>install</defaultGoal>
      <pluginManagement>
         <plugins>
            <plugin>
               <artifactId>maven-war-plugin</artifactId>
               <version>3.2.2</version>
               <configuration>
                  <webXml>src/main/webapp/WEB-INF/web.xml</webXml>
                  <webResources>
                     <resource>
                        <directory>src/main/resources</directory>
                        <targetPath>WEB-INF</targetPath>
                        <includes>
                           <include>*.wsdl</include>
                        </includes>
                     </resource>
                  </webResources>
               </configuration>
            </plugin>
         </plugins>
      </pluginManagement>
      <plugins>
         <plugin>
            <groupId>org.apache.cxf</groupId>
            <artifactId>cxf-codegen-plugin</artifactId>
            <version>3.3.0</version>
            <executions>
               <execution>
                  <id>generate-sources</id>
                  <phase>generate-sources</phase>
                  <configuration>
                     <wsdlOptions>
                        <wsdlOption>
                           <wsdl>src/main/resources/Hello.wsdl</wsdl>
                           <faultSerialVersionUID>1</faultSerialVersionUID>
                        </wsdlOption>
                     </wsdlOptions>
                  </configuration>
                  <goals>
                     <goal>wsdl2java</goal>
                  </goals>
               </execution>
            </executions>
         </plugin>
      </plugins>
   </build>
   <profiles>
      <profile>
         <id>server</id>
         <build>
            <defaultGoal>test</defaultGoal>
            <plugins>
               <plugin>
                  <groupId>org.codehaus.mojo</groupId>
                  <artifactId>exec-maven-plugin</artifactId>
                  <version>1.6.0</version>
                  <executions>
                     <execution>
                        <phase>test</phase>
                        <goals>
                           <goal>java</goal>
                        </goals>
                        <configuration>
                           <mainClass>
                              com.tutorialspoint.helloworld.Server
                           </mainClass>
                        </configuration>
                     </execution>
                  </executions>
               </plugin>
            </plugins>
         </build>
         <dependencies>
            <dependency>
               <groupId>org.apache.cxf</groupId>
               <artifactId>cxf-rt-transports-http-jetty</artifactId>
               <version>3.3.0</version>
            </dependency>
         </dependencies>
      </profile>
      <profile>
         <id>client</id>
         <build>
            <defaultGoal>test</defaultGoal>
            <plugins>
               <plugin>
                  <groupId>org.codehaus.mojo</groupId>
                  <artifactId>exec-maven-plugin</artifactId>
                  <executions>
                     <execution>
                        <phase>test</phase>
                        <goals>
                           <goal>java</goal>
                        </goals>
                        <configuration>
                           <mainClass>
                              com.tutorialspoint.helloworld.Client
                           </mainClass>
                        </configuration>
                     </execution>
                  </executions>
               </plugin>
            </plugins>
         </build>
      </profile>
   </profiles>
   <dependencies>
      <dependency>
         <groupId>org.apache.cxf</groupId>
         <artifactId>cxf-rt-frontend-jaxws</artifactId>
         <version>3.3.0</version>
      </dependency>

      <dependency>
         <groupId>org.apache.cxf</groupId>
         <artifactId>cxf-rt-transports-http</artifactId>
         <version>3.3.0</version>
      </dependency>

      <dependency>
         <groupId>org.apache.cxf</groupId>
         <artifactId>cxf-rt-management</artifactId>
         <version>3.3.0</version>
      </dependency>

      <dependency>
         <groupId>org.apache.cxf</groupId>
         <artifactId>cxf-rt-features-metrics</artifactId>
         <version>3.3.0</version>
      </dependency>

      <dependency>
         <groupId>org.apache.cxf.xjc-utils</groupId>
         <artifactId>cxf-xjc-runtime</artifactId>
         <version>3.3.0</version>
      </dependency>

      <dependency>
         <groupId>org.apache.cxf</groupId>
         <artifactId>cxf-rt-features-logging</artifactId>
         <version>3.3.0</version>
      </dependency>

     <dependency>
         <groupId>org.codehaus.mojo</groupId>
         <artifactId>exec-maven-plugin</artifactId>
         <version>1.6.0</version>
      </dependency>

      <dependency>
         <groupId>org.slf4j</groupId>
         <artifactId>slf4j-api</artifactId>
         <version>1.8.0-beta2</version>
      </dependency>

      <dependency>
         <groupId>org.apache.cxf</groupId>
         <artifactId>cxf-rt-transports-http-jetty</artifactId>
         <version>3.3.0</version>
      </dependency>
   </dependencies>
</project>
클라이언트 구축을위한 프로필도 포함되어 있으며 이는 이후 섹션에서 곧 배울 것입니다.
HelloWorld 서비스 실행
이제 웹앱을 실행할 준비가되었습니다. 명령 창에서 다음 명령을 사용하여 빌드 스크립트를 실행합니다.
mvn clean install그러면 wsdl에서 적절한 Apache CXF 클래스가 생성되고, Apache CXF 클래스를 컴파일하고, 임베디드 jetty 서버에 서버를 배포하고 애플리케이션을 실행합니다.
콘솔에 다음 메시지가 표시됩니다.
INFO: Setting the server's publish address to be
http://localhost:9090/HelloServerPort
Server ready...
이전과 마찬가지로 브라우저에서 서버 URL을 열어 서버를 테스트 할 수 있습니다.
작업을 지정하지 않았으므로 응용 프로그램에서 오류 메시지 만 브라우저에 반환합니다. 이제?wsdl URL에 다음과 같은 출력이 표시됩니다.

따라서 서버 애플리케이션이 예상대로 실행됩니다. 다음과 같은 SOAP 클라이언트를 사용할 수 있습니다.Postman 서비스를 추가 테스트하기 위해 앞에서 설명한 것입니다.
이 튜토리얼의 다음 부분은 우리 서비스를 사용하는 클라이언트를 작성하는 것입니다.
클라이언트 개발
CXF 애플리케이션에서 클라이언트를 작성하는 것은 서버 작성만큼 중요합니다. 다음은 기본적으로 세 줄로만 구성된 클라이언트의 전체 코드이며 나머지 줄은 서비스 정보를 사용자에게 인쇄합니다.
//Client.java
package com.tutorialspoint.helloworld;
public class Client {
   public static void main(String[] args) throws Exception {
      //Create the service client with its default wsdlurl
      HelloWorldService helloServiceService = new HelloWorldService();
      System.out.println("service: " +
         helloServiceService.getServiceName());
      System.out.println("wsdl location: " +
         helloServiceService.getWSDLDocumentLocation());
      HelloWorldPortType helloService =
         helloServiceService.getHelloWorldPort();
      System.out.println(helloService.greetings
      (System.getProperty("user.name")));
   }
}
여기서 우리는 단순히 우리 서비스의 인스턴스를 생성합니다. HelloWorldService, 호출하여 포트를 가져옵니다. getHelloWorldPort 메서드를 전달한 다음 greetings그것에 메시지. 클라이언트를 실행하면 다음 출력이 표시됩니다.
service: {http://helloworld.tutorialspoint.com/}HelloWorldService
wsdl location: file:/Users/drsarang/Desktop/tutorialpoint/cxf-
wsdl/src/main/resources/Hello.wsdl
hi drsarang
지금까지 Apache CXF-First 및 WSDL-First 아키텍처에서 CXF를 사용하는 방법을 배웠습니다. Apache CXF-First 접근 방식에서는 다음과 함께 POJO를 사용했습니다.ServerFactoryBeanCXF 라이브러리의 클래스를 사용하여 서버를 만듭니다. 사용한 클라이언트를 만들려면ClientProxyFactoryBeanCXF 라이브러리의 클래스. WSDL-First 접근 방식에서는Endpoint원하는 URL과 지정된 구현 자에 서비스를 게시하는 클래스입니다. 이제 이러한 기술을 확장하여 다양한 프로토콜과 전송을 통합 할 수 있습니다.
이 장으로 진행하기 전에 Java로 RESTful 웹 서비스를 작성하는 방법을 알고 있다고 가정합니다. 이 JAX-RS (RESTful 웹 서비스 용 Java API) 위에 CXF를 사용하는 방법을 보여 드리겠습니다. 최신 영화 목록을 유지하는 웹 서비스를 만들 것입니다. 사용자가 영화를 요청하면 요청에 영화 ID를 지정하면 서버가 영화를 찾아 클라이언트에 반환합니다. 사소한 경우에는 실제 바이너리 MP4 파일이 아니라 단순히 영화 이름을 클라이언트에 반환합니다. 이제 JAX-RS 애플리케이션 작성을 시작하겠습니다.
영화 요소 선언
주어진 영화의 ID와 이름을 저장하기 위해 Movie라는 XML 루트 요소를 선언합니다. 요소는 Movie.java라는 파일에서 선언됩니다. 파일의 내용은 다음과 같습니다.
//Movie.java
package com.tutorialspoint.cxf.jaxrs.movie;
import javax.xml.bind.annotation.XmlRootElement;
@XmlRootElement(name = "Movie")
public class Movie {
   private long id;
   private String name;
   public long getId() {
      return id;
   }
   public void setId(long id) {
      this.id = id;
   }
   public String getName() {
      return name;
   }
   public void setName(String name) {
      this.name = name;
   }
}
사용 참고 XmlRootElement 에 대한 XML 요소를 선언하는 태그 Movie꼬리표. 다음으로 데이터베이스에 영화 목록을 보관하는 서비스를 만듭니다.
영화 서비스 데이터베이스 생성
영화 목록을 저장하려면 Java 제공 Map키-값 쌍을 저장합니다. 목록이 크면 관리하기 쉬운 외부 데이터베이스 저장소를 사용합니다. 사소한 경우에는 데이터베이스에 5 개의 영화 만 저장합니다. MovieService 클래스의 코드는 다음과 같습니다.
//MovieService.java
package com.tutorialspoint.cxf.jaxrs.movie;
import java.util.HashMap;
import java.util.Map;
import javax.ws.rs.GET;
import javax.ws.rs.Path;
import javax.ws.rs.PathParam;
import javax.ws.rs.Produces;
@Path("/movieservice/")
@Produces("text/xml")
public class MovieService {
   long currentId = 123;
   Map<Long, Movie> movies = new HashMap<>();
   public MovieService() {
      init();
   }
   @GET
   @Path("/movie/{id}/")
   public Movie getMovie(@PathParam("id") String id) {
      long idNumber = Long.parseLong(id);
      return movies.get(idNumber);
   }
   final void init() {
      Movie c1 = new Movie();
      c1.setName("Aquaman");
      c1.setId(1001);
      movies.put(c1.getId(), c1);

      Movie c2 = new Movie();
      c2.setName("Mission Imposssible");
      c2.setId(1002);
      movies.put(c2.getId(), c2);

      Movie c3 = new Movie();
      c3.setName("Black Panther");
      c3.setId(1003);
      movies.put(c3.getId(), c3);

      Movie c4 = new Movie();
      c4.setName("A Star is Born");
      c4.setId(1004);
      movies.put(c4.getId(), c4);

      Movie c5 = new Movie();
      c5.setName("The Meg");
      c5.setId(1005);
      movies.put(c5.getId(), c5);
   }
}
다음 두 주석을 사용하여 영화 서비스의 URL 경로와 반환 유형을 지정합니다.
@Path("/movieservice/")
@Produces("text/xml")
@GET 및 @Path 주석을 사용하여 다음과 같이 GET 요청에 대한 URL을 지정합니다.
@GET
@Path("/movie/{id}/")
영화 데이터베이스 자체는 init 메서드에서 초기화되며, 여기서 데이터베이스에 영화 항목 5 개를 추가합니다.
다음 작업은 서버 애플리케이션을 작성하는 것입니다.
서버 개발
서버를 생성하려면 제공된 CXF를 사용합니다. JAXRSServerFactoryBean 수업.
JAXRSServerFactoryBean factory = new JAXRSServerFactoryBean();리소스 클래스를 설정하려면 setResourceClasses 방법.
factory.setResourceClasses(Movie.class);
factory.setResourceClasses(MovieService.class);
우리는 setResourceProvider 방법.
factory.setResourceProvider(MovieService.class,
new SingletonResourceProvider(new MovieService()));
우리는 원하는 설정 publish 전화하여 주소 aetAddress 방법-
factory.setAddress("http://localhost:9000/");마지막으로 서버에서 create 메서드를 호출하여 factory 예.
factory.create();서버 애플리케이션의 전체 코드는 다음과 같습니다.
//Server.java
package com.tutorialspoint.cxf.jaxrs.movie;
import org.apache.cxf.jaxrs.JAXRSServerFactoryBean;
import org.apache.cxf.jaxrs.lifecycle.SingletonResourceProvider;
public class Server {
   public static void main(String[] args) throws Exception {
      JAXRSServerFactoryBean factory = new JAXRSServerFactoryBean();
      factory.setResourceClasses(Movie.class);
      factory.setResourceClasses(MovieService.class);
      factory.setResourceProvider(MovieService.class,
         new SingletonResourceProvider(new MovieService()));
      factory.setAddress("http://localhost:9000/");
      factory.create();

      System.out.println("Server ready...");
      Thread.sleep(5 * 60 * 1000);

      System.out.println("Server exiting ...");
      System.exit(0);
   }
}
최종 pom.xml
여기에 pom.xml의 최종 버전이 아래에 포함되어 있습니다.
<?xml version = "1.0" encoding = "UTF-8"?>
<project xmlns = "http://maven.apache.org/POM/4.0.0"
   xmlns:xsi = "http://www.w3.org/2001/XMLSchema-instance"
   xsi:schemaLocation = "http://maven.apache.org/POM/4.0.0
   http://maven.apache.org/xsd/maven-4.0.0.xsd">
   <modelVersion>4.0.0</modelVersion>
   <groupId>com.tutorialspoint</groupId>
   <artifactId>cxf-jaxrs</artifactId>
   <version>1.0</version>
   <packaging>jar</packaging>
   <properties>
      <project.build.sourceEncoding>UTF-8</project.build.sourceEncoding>
      <maven.compiler.source>1.8</maven.compiler.source>
      <maven.compiler.target>1.8</maven.compiler.target>
   </properties>
   <profiles>
      <profile>
         <id>server</id>
         <build>
            <defaultGoal>test</defaultGoal>
            <plugins>
               <plugin>
                  <groupId>org.codehaus.mojo</groupId>
                  <artifactId>exec-maven-plugin</artifactId>
                  <version>1.6.0</version>
                  <executions>
                     <execution>
                        <phase>test</phase>
                        <goals>
                           <goal>java</goal>
                        </goals>
                        <configuration>
                           <mainClass>
                              com.tutorialspoint.cxf.jaxrs.movie.Server
                           </mainClass>
                        </configuration>
                     </execution>
                  </executions>
               </plugin>
            </plugins>
         </build>
         <dependencies>
            <dependency>
               <groupId>org.apache.cxf</groupId>
               <artifactId>cxf-rt-transports-http-jetty</artifactId>
               <version>3.3.0</version>
            </dependency>
         </dependencies>
      </profile>
      <profile>
         <id>client</id>
         <build>
            <defaultGoal>test</defaultGoal>
            <plugins>
               <plugin>
                  <groupId>org.codehaus.mojo</groupId>
                  <artifactId>exec-maven-plugin</artifactId>
                  <executions>
                     <execution>
                        <phase>test</phase>
                        <goals>
                           <goal>java</goal>
                        </goals>
                        <configuration>
                           <mainClass>
                              com.tutorialspoint.cxf.jaxrs.movie.Client
                           </mainClass>
                        </configuration>
                     </execution>
                  </executions>
               </plugin>
            </plugins>
         </build>
      </profile>
   </profiles>
   <dependencies>
      <dependency>
         <groupId>org.apache.cxf</groupId>
         <artifactId>cxf-rt-transports-http</artifactId>
         <version>3.3.0</version>
      </dependency>
      <dependency>
         <groupId>org.apache.cxf</groupId>
         <artifactId>cxf-rt-transports-http-jetty</artifactId>
         <version>3.3.0</version>
      </dependency>
      <dependency>
         <groupId>org.apache.cxf</groupId>
         <artifactId>cxf-rt-frontend-jaxrs</artifactId>
         <version>3.3.0</version>
         </dependency>
      <dependency>
         <groupId>jakarta.ws.rs</groupId>
         <artifactId>jakarta.ws.rs-api</artifactId>
         <version>2.1.5</version>
      </dependency>
      <dependency>
         <groupId>org.apache.httpcomponents</groupId>
         <artifactId>httpclient</artifactId>
         <version>4.5.7</version>
      </dependency>
   </dependencies>
</project>
클라이언트 개발
RS 클라이언트를 작성하는 것은 간단합니다. URL 객체를 만들고 스트림을 열기 만하면됩니다. CXF 제공 IOUtils 클래스를 사용하여 입력 스트림의 내용을 로컬 스트림에 복사합니다.
URL url = new URL("http://localhost:9000/movieservice/movie/1002");
try (InputStream instream = url.openStream();
CachedOutputStream outstream = new CachedOutputStream()) {
   IOUtils.copy(instream, outstream);
}
클라이언트 응용 프로그램의 전체 코드는 다음과 같습니다.
//Client.java
package com.tutorialspoint.cxf.jaxrs.movie;
import java.io.InputStream;
import java.net.URL;
import org.apache.cxf.helpers.IOUtils;
import org.apache.cxf.io.CachedOutputStream;
public class Client {
   public static void main(String[] args) throws Exception {
      URL url = new URL("http://localhost:9000/movieservice/movie/1002");
      try (InputStream instream = url.openStream();
      CachedOutputStream outstream = new CachedOutputStream()) {
         IOUtils.copy(instream, outstream);
         String str = outstream.getOut().toString();
         System.out.println(str);
      }
   }
}
JAX-RS 애플리케이션 테스트
명령 줄 창에서 다음 명령을 사용하여 서버를 실행하십시오-
mvn -Pserver이제 콘솔에 다음 메시지가 표시됩니다.
INFO: Setting the server's publish address to be http://localhost:9000이제 브라우저를 열고 다음 URL을 입력하십시오.
http://localhost:9000/movieservice/movie/1002브라우저 창에 다음이 표시됩니다.

별도의 명령 줄 창에서 다음 명령을 실행하여 개발 한 Java 클라이언트 응용 프로그램을 사용하여 서비스를 호출 할 수 있습니다.
mvn -Pclient다음 출력이 표시됩니다.
<?xml version="1.0" encoding = "UTF-8" standalone="yes"?>
<Movie><id>1002</id><name>Mission Imposssible</name></Movie>
CXF 샘플은 JAX-RS에서 CXF를 사용하는 방법에 대한 몇 가지 예를 제공합니다. 관심있는 독자는이 샘플을 연구하는 것이 좋습니다.
앞서 언급했듯이 JMS 전송과 함께 CXF를 사용할 수 있습니다. 이 경우 클라이언트는 JMS 메시지를 알려진 Messaging Server로 보냅니다. 우리의 서버 응용 프로그램은 들어오는 메시지에 대해 메시징 서버를 지속적으로 수신합니다. 메시지가 도착하면 메시지를 처리하고 클라이언트 요청을 실행하고 응답을 다른 메시지로 클라이언트에 보냅니다.
이전과 같이 먼저 다음과 같은 단일 웹 메서드를 제공하는 샘플 서버 애플리케이션을 만듭니다. sayHi.
서비스 인터페이스 생성
우리의 서비스 인터페이스 HelloWorld 서비스는 여기에 표시됩니다-
//HelloWorld.java
package com.tutorialspoint.service;

import javax.jws.WebMethod;
import javax.jws.WebParam;
import javax.jws.WebService;

@WebService
public interface HelloWorld {
   @WebMethod
   String sayHi(@WebParam(name = "name") String name);
}
서비스 구현
서비스 인터페이스의 구현은 다음과 같이 정의됩니다-
//HelloWorldImpl.java
package com.tutorialspoint.service.impl;

import javax.jws.WebService;
import com.tutorialspoint.service.HelloWorld;

@WebService
public class HelloWorldImpl implements HelloWorld {
   @Override
   public String sayHi(String name) {
      return "Hello " + name;
   }
}
구현은 단순히 사용자에게 Hello 메시지를 반환합니다. 보시다시피 인터페이스와 그 구현은 지금까지 공부 한이 자습서의 모든 이전 프로젝트와 유사합니다.
이제 가장 중요한 점은 메시지 대기열을 설정하고 수신 메시지를 계속 수신하는 서버 응용 프로그램을 만드는 것입니다.
서버 생성
서버 애플리케이션에서 먼저 JMS 다음과 같이 끝점-
private static final String JMS_ENDPOINT_URI =
   "jms:queue:test.cxf.jmstransport.queue?timeToLive=1000"
      + "&jndiConnectionFactoryName=ConnectionFactory"
      + "&jndiInitialContextFactory"
      + "= org.apache.activemq.jndi.ActiveMQInitialContextFactory"
      + "&jndiURL = tcp://localhost:61616";
지정된 시간 동안 유지되는 지정된 포트에 대기열을 설정했습니다. 이제 인스턴스화하여 메시징 서비스를 만듭니다.org.apache.activemq.broker.BrokerService수업. 이것은 서버 클래스입니다ActiveMQ 메시징 서버.
BrokerService broker = new BrokerService();다음을 제외한 다른 메시징 서버를 사용할 수 있습니다. ActiveMQ. 이제이 서버를 원하는 URI에 연결합니다.
broker.addConnector("tcp://localhost:61616");수신 메시지의 데이터 저장을위한 디렉토리를 설정했습니다.
broker.setDataDirectory("target/activemq-data");마지막으로 시작 방법을 사용하여 서버를 시작합니다.
broker.start();다음으로 서비스 빈의 인스턴스를 만듭니다. HelloWorld 이전 POJO 애플리케이션에서 사용 된 서버 팩토리 빈 클래스 사용-
Object implementor = new HelloWorldImpl();
JaxWsServerFactoryBean factory = new JaxWsServerFactoryBean();
factory.setServiceClass(HelloWorld.class);
다음으로, 공장에서 수신 메시지를 계속 수신하도록 공장에 JMS 엔드 포인트를 설정합니다.
factory.setTransportId
(JMSSpecConstants.SOAP_JMS_SPECIFICATION_TRANSPORTID);
factory.setAddress(JMS_ENDPOINT_URI);
마지막으로 팩토리에서 구현 자 클래스를 설정하고 실행을 시작합니다.
factory.setServiceBean(implementor);
factory.create();
이 시점에서 서버가 실행 중입니다. POJO 애플리케이션에서와 같이 팩토리 빈 클래스를 사용했기 때문에 CXFServlet 및 web.xml 파일이 필요하지 않습니다.
전체 서버 애플리케이션 코드는 다음과 같습니다.
//ServerJMS.java
package com.tutorialspoint.server;

import java.util.Collections;
import org.apache.cxf.ext.logging.LoggingFeature;
import org.apache.cxf.jaxws.JaxWsServerFactoryBean;
import org.apache.cxf.transport.jms.spec.JMSSpecConstants;
import com.tutorialspoint.service.HelloWorld;
import com.tutorialspoint.service.impl.HelloWorldImpl;
import org.apache.activemq.broker.BrokerService;

public final class ServerJMS {

   private static final String JMS_ENDPOINT_URI =
      "jms:queue:test.cxf.jmstransport.queue?timeToLive=1000"
         + "&jndiConnectionFactoryName=ConnectionFactory"
         + "&jndiInitialContextFactory"
         + "= org.apache.activemq.jndi.ActiveMQInitialContextFactory"
         + "&jndiURL = tcp://localhost:61616";

   public static void main(String[] args) throws Exception {

      BrokerService broker = new BrokerService();
      broker.addConnector("tcp://localhost:61616");
      broker.setDataDirectory("target/activemq-data");
      broker.start();

      Object implementor = new HelloWorldImpl();
      JaxWsServerFactoryBean factory = new JaxWsServerFactoryBean();
      factory.setServiceClass(HelloWorld.class);
      factory.setTransportId
      (JMSSpecConstants.SOAP_JMS_SPECIFICATION_TRANSPORTID);
      factory.setAddress(JMS_ENDPOINT_URI);
      factory.setServiceBean(implementor);
      factory.setFeatures(Collections.singletonList(new LoggingFeature()));
      factory.create();

      System.out.println("Server ready...");
      Thread.sleep(5 * 60 * 1000);
      System.out.println("Server exiting");
      System.exit(0);
   }
}
종속성 추가
우리가 만든 서버 응용 프로그램은 ActiveMQ 메시징 서버를 사용합니다. 따라서 프로젝트에 몇 가지 종속성을 추가해야합니다. 필요한 추가 종속성을 이해할 수 있도록 전체 pom.xml 파일이 여기에 표시됩니다.
<?xml version = "1.0" encoding = "UTF-8"?>
<project xmlns = "http://maven.apache.org/POM/4.0.0"
   xmlns:xsi = "http://www.w3.org/2001/XMLSchema-instance"
   xsi:schemaLocation = "http://maven.apache.org/POM/4.0.0
   http://maven.apache.org/xsd/maven-4.0.0.xsd">
   <modelVersion>4.0.0</modelVersion>
   <groupId>com.tutorialspoint</groupId>
   <artifactId>cxf-jms</artifactId>
   <version>1.0</version>
   <packaging>jar</packaging>

   <properties>
      <project.build.sourceEncoding>UTF-8</project.build.sourceEncoding>
      <maven.compiler.source>1.8</maven.compiler.source>
      <maven.compiler.target>1.8</maven.compiler.target>
   </properties>

   <profiles>
      <profile>
         <id>server</id>
         <build>
            <defaultGoal>test</defaultGoal>
            <plugins>
               <plugin>
                  <groupId>org.codehaus.mojo</groupId>
                  <artifactId>exec-maven-plugin</artifactId>
                  <version>1.6.0</version>
                  <executions>
                     <execution>
                        <phase>test</phase>
                        <goals>
                           <goal>java</goal>
                        </goals>
                        <configuration>
                           <mainClass>
                              com.tutorialspoint.server.ServerJMS
                           </mainClass>
                        </configuration>
                     </execution>
                  </executions>
               </plugin>
            </plugins>
         </build>
      </profile>
      <profile>
         <id>client</id>
         <build>
            <defaultGoal>test</defaultGoal>
            <plugins>
               <plugin>
                  <groupId>org.codehaus.mojo</groupId>
                  <artifactId>exec-maven-plugin</artifactId>
                  <executions>
                     <execution>
                        <phase>test</phase>
                        <goals>
                           <goal>java</goal>
                        </goals>
                        <configuration>
                           <mainClass>
                              com.tutorialspoint.client.ClientJMS
                           </mainClass>
                        </configuration>
                     </execution>
                  </executions>
               </plugin>
            </plugins>
         </build>
      </profile>
   </profiles>

   <dependencies>
      <dependency>
         <groupId>org.apache.activemq</groupId>
         <artifactId>activemq-broker</artifactId>
         <version>5.15.8</version>
      </dependency>

      <dependency>
         <groupId>org.apache.activemq</groupId>
         <artifactId>activemq-kahadb-store</artifactId>
         <version>5.15.8</version>
      </dependency>

      <dependency>
         <groupId>org.apache.cxf</groupId>
         <artifactId>cxf-rt-frontend-jaxws</artifactId>
         <version>3.3.0</version>
      </dependency>

      <dependency>
         <groupId>org.apache.cxf</groupId>
         <artifactId>cxf-rt-transports-jms</artifactId>
         <version>3.3.0</version>
      </dependency>

      <dependency>
         <groupId>org.apache.cxf</groupId>
         <artifactId>cxf-rt-features-logging</artifactId>
         <version>3.3.0</version>
      </dependency>

      <dependency>
         <groupId>org.apache.cxf</groupId>
         <artifactId>cxf-rt-transports-http-jetty</artifactId>
         <version>3.3.0</version>
      </dependency>
   </dependencies>
</project>
실행중인 서버
서버 실행을 시작하려면 이전의 경우와 같이 명령 창에 다음 명령을 입력하십시오.
mvn -Pserver그러면 ActiveMQ 메시지 서버가 시작되고 메시징 큐가 설정되며이 큐를 계속 수신하는 팩토리 빈이 생성됩니다.
다음 작업은 클라이언트 응용 프로그램을 만드는 것입니다.
클라이언트 생성
클라이언트 애플리케이션에서 먼저 서버 애플리케이션에서 사용되는 것과 동일한 JMS 엔드 포인트를 설정합니다.
private static final String JMS_ENDPOINT_URI =
   "jms:queue:test.cxf.jmstransport.queue?timeToLive=1000"
      + "&jndiConnectionFactoryName=ConnectionFactory"
      + "&jndiInitialContextFactory"
      + " = org.apache.activemq.jndi.ActiveMQInitialContextFactory"
      + "&jndiURL = tcp://localhost:61616";
POJO 애플리케이션에서와 같이 팩토리를 생성합니다.
JaxWsProxyFactoryBean factory = new JaxWsProxyFactoryBean();엔드 포인트 URI와 구현 자 클래스를 다음과 같이 설정합니다.
factory.setTransportId (JMSSpecConstants.SOAP_JMS_SPECIFICATION_TRANSPORTID);
factory.setAddress (JMS_ENDPOINT_URI);
HelloWorld client = factory.create(HelloWorld.class);
마지막으로 서비스 메소드를 호출하고 결과 출력을 인쇄합니다.
String reply = client.sayHi("TutorialsPoint");
System.out.println(reply);
전체 클라이언트 코드는 다음과 같습니다.
// ClientJMS.java
package com.tutorialspoint.client;

import com.tutorialspoint.service.HelloWorld;
import org.apache.cxf.jaxws.JaxWsProxyFactoryBean;
import org.apache.cxf.transport.jms.spec.JMSSpecConstants;

public final class ClientJMS {
   private static final String JMS_ENDPOINT_URI =
   "jms:queue:test.cxf.jmstransport.queue?timeToLive=1000"
   + "&jndiConnectionFactoryName=ConnectionFactory"
   + "&jndiInitialContextFactory"
   + " = org.apache.activemq.jndi.ActiveMQInitialContextFactory"
   + "&jndiURL = tcp://localhost:61616";

   public static void main(String[] args) throws Exception {
      JaxWsProxyFactoryBean factory = new JaxWsProxyFactoryBean();
      factory.setTransportId(JMSSpecConstants.SOAP_JMS_SPECIFICATION_TRANSPORTID);
      factory.setAddress(JMS_ENDPOINT_URI);
      HelloWorld client = factory.create(HelloWorld.class);
      String reply = client.sayHi("TutorialsPoint");
      System.out.println(reply);
      System.exit(0);
   }
}
Apache CXF-결론
CXF는 웹 애플리케이션 생성을 위해 오늘날 세계에 존재하는 여러 웹 프로토콜 및 전송을 믹스 앤 매치하는 통합 접근 방식을 제공합니다. 기존 Java 인터페이스로 시작하여 CXF를 사용하는 웹 애플리케이션을 만드는 방법을 배웠습니다. 다음으로 WSDL로 시작하는 웹 애플리케이션과 해당 클라이언트를 만드는 방법을 배웠습니다.
WSDL은 서비스 인터페이스의 XML 표현을 제공합니다. wsdl2java 도구를 사용하여 WSDL에서 Java 인터페이스를 생성하고 마지막으로 생성 된 인터페이스를 사용하여 서버와 클라이언트를 모두 작성했습니다. 이 자습서에서는 RESTful 웹 서비스 애플리케이션에서 CXF를 사용하는 방법도 간략하게 소개했습니다. 마지막으로 CXF를 JMS와 함께 사용하는 방법도 설명했습니다. 이제 추가 연구를 위해 CXF 샘플 을 참조 할 수 있습니다 .
Note − 전체 프로젝트 소스 코드는 여기에서 다운로드 할 수 있습니다.