POJO가있는 Apache CXF
이 장에서는 사용자에게 인사말 메시지를 보내는 간단한 웹 응용 프로그램을 개발하는 방법을 배웁니다. 웹 서비스 프로젝트는 WSDL 모델을 사용 합니다. CXF를 사용하면 Apache CXF API를 기본 WSDL에 매핑하는 간단한 프런트 엔드를 제공하여이 WSDL 모델을 숨길 수 있습니다.
이 가장 간단한 프로젝트에서 웹 서비스의 인터페이스는 클라이언트에 직접 노출되고 클라이언트는 네이티브 Apache CXF API를 사용하여 웹 서비스를 호출합니다.
먼저 웹 서비스를 만듭니다. 모든 서비스에는 클라이언트에 노출되는 인터페이스가 있습니다. 이 인터페이스를 간단한 Apache CXF 인터페이스 또는 WSDL 문서로 작성할 수 있습니다. 이 Apache CXF-First 접근 방식에서는 Apache CXF 인터페이스를 통해 서비스를 노출합니다.
웹 서비스 개발
웹에서 생성 할 서비스에는 greetings. 이 방법은string사용자 이름을 보낼 유형 인수입니다. 서비스는 메시지에 포함 된 수신 된 사용자 이름과 함께 인사말 메시지를 발신자에게 다시 보냅니다.
웹 서비스 인터페이스
웹 서비스의 인터페이스를 노출하기 위해 다음과 같이 Apache CXF 인터페이스를 생성합니다.
//HelloWorld.java
package com.tutorialspoint.cxf.pojo;
public interface HelloWorld {
   String greetings(String text);
}
인터페이스에는 greetings. 서버는이 인터페이스를 구현합니다. 사소한 응용 프로그램에서이 인터페이스는 클라이언트에 직접 노출됩니다. 일반적으로 웹 서비스 애플리케이션에서는 WSDL을 사용하여 웹 서비스 인터페이스를 설명합니다. 이 간단한 응용 프로그램에서는 클라이언트 개발자에게이 직접 인터페이스를 제공합니다. 그런 다음 클라이언트는greetings서버 개체의 메시지. 그럼 먼저 웹 서비스를 만들어 보겠습니다.
웹 서비스 구현
그만큼 HelloWorld 인터페이스는 HelloWorldImpl 아래와 같이 Apache CXF 클래스-
//HelloWorldImpl.java
package com.tutorialspoint.cxf.pojo;
public class HelloWorldImpl implements HelloWorld {
   @Override
   public String greetings(String text) {
      return "Hi " + text;
   }
}
그만큼 greetings 메소드는 매개 변수를받습니다. string 유형, 인사말 메시지에 추가하고 결과 문자열을 호출자에게 반환합니다.
다음으로 서버 애플리케이션을 작성하여 HelloWorld 서비스.
서버 생성
서버 애플리케이션은 두 부분으로 구성됩니다.
첫 번째 부분은 웹 서비스를위한 팩토리를 만들고
두 번째 부분은 main 인스턴스화하는 방법.
서버는 ServerFactoryBean CXF 라이브러리에서 제공하는 클래스는 HelloWorld원격 클라이언트에 대한 인터페이스. 따라서 먼저ServerFactoryBean 클래스 다음 다양한 속성을 설정합니다-
ServerFactoryBean factory = new ServerFactoryBean();호출 할 서비스 클래스를 설정합니다. setServiceClass 에 방법 factory 객체-
factory.setServiceClass(HelloWorld.class);우리는 공장의 서비스를 호출하여 서비스를 호출하기위한 URL을 설정합니다. setAddress방법. 서비스는이 URL에 게시됩니다.
factory.setAddress("http://localhost:5000/Hello");이 경우 서비스는 임베디드 서버에 배포되고 포트 5000을 수신합니다. 원하는 포트 번호를 선택할 수 있습니다.
팩토리를 만들기 전에 서비스 구현 클래스에 대해 팩토리에 알려야합니다. 이것은setServiceBean 에 방법 factory 여기에 표시된 객체-
factory.setServiceBean(new HelloWorldImpl());서비스 빈은 서비스 구현 클래스의 인스턴스로 설정됩니다. 마지막으로 공장을 호출하여create 방법-
factory.create();이제 웹 서비스를 실행하기 위해 공장을 개발 했으므로 다음으로 main 인스턴스화하고 얼마 동안 계속 실행하는 방법.
이제 main 인스턴스화하는 방법 HelloServer 다음과 같이 클래스-
public static void main(String[] args) throws Exception {
   new HelloServer();
   System.out.println("Listening on port 5000 ...");
}
인스턴스화되면 HelloServer클래스는 무기한으로 계속 실행됩니다. 프로덕션 배포의 경우 서버를 영원히 계속 실행하게됩니다. 현재 상황에서는 다음과 같이 미리 정해진 시간이 지나면 서버를 종료합니다.
Thread.sleep(5 * 60 * 1000);
System.out.println("Server exiting ...");
System.exit(0);
에 대한 전체 코드 HelloServer 클래스는 다음과 같습니다-
//HelloServer.java//HelloServer.java
package com.tutorialspoint.cxf.pojo;
import org.apache.cxf.frontend.ServerFactoryBean;
public class HelloServer {
protected HelloServer() throws Exception {
ServerFactoryBean factory = new ServerFactoryBean();
factory.setServiceClass(HelloWorld.class);
factory.setAddress("http://localhost:5000/Hello");
factory.setServiceBean(new HelloWorldImpl());
factory.create();
}
public static void main(String[] args) throws Exception {
new HelloServer();
System.out.println("Listening on port 5000 ...");
Thread.sleep(5 * 60 * 1000);
System.out.println("Server exiting ...");
System.exit(0);
}
}우리가 만든 서버 응용 프로그램은 ServerFactoryBeanCXF 라이브러리의 클래스. 이제 프로젝트에 이러한 라이브러리를 포함하여 성공적으로HelloServer수업. 우리는 사용할 것입니다Maven 프로젝트 종속성을 설정합니다.
Maven 프로젝트 설정
Maven 프로젝트를 만들려면 명령 줄 창에 다음 명령을 입력합니다. 우리는 이것을 Mac 컴퓨터에서 테스트했습니다. Windows 및 Linux 설치의 경우 지침이 일부 위치에서 다를 수 있습니다.
mvn archetype:generate속성을 요청하면 다음 값을 입력하십시오.
Define value for property 'groupId': : com.tutorialspoint
Define value for property 'artifactId': : cxf-pojo
Define value for property 'version': 1.0-SNAPSHOT: : 1.0
Define value for property 'package': com.tutorialspoint: : com.tutorialspoint.cxf.pojo
maven 명령이 완료되면 pom.xml 파일과 함께 현재 폴더에 생성 된 적절한 폴더 구조를 찾을 수 있습니다.
생성 된 디렉토리 구조는 다음과 같습니다.

CXF 종속성을 pom.xml또한 위에서 생성 한 Apache CXF 파일을 maven 생성 구조의 적절한 폴더에 복사합니다. 준비된 참조를 위해 시스템에서 만든 프로젝트에 대한 pom.xml 파일을 아래에 제공했습니다.
<?xml version = "1.0" encoding = "UTF-8"?>
<project xmlns = "http://maven.apache.org/POM/4.0.0" xmlns:xsi = "http://www.w3.org/2001/XMLSchema-instance" xsi:schemaLocation = "http://maven.apache.org/POM/4.0.0 http://maven.apache.org/xsd/maven-4.0.0.xsd">
   <modelVersion>4.0.0</modelVersion>
   <groupId>com.tutorialspoint</groupId>
   <artifactId>cxf-pojo</artifactId>
   <version>1.0</version>
   <packaging>jar</packaging>

   <profiles>
      <profile>
         <id>server</id>
         <build>
            <defaultGoal>test</defaultGoal>
            <plugins>
               <plugin>
                  <groupId>org.codehaus.mojo</groupId>
                  <artifactId>exec-maven-plugin</artifactId>
                  <executions>
                     <execution>
                        <phase>test</phase>
                        <goals>
                           <goal>java</goal>
                        </goals>
                        <configuration>
                           <mainClass>
                              com.tutorialspoint.cxf.pojo.HelloServer
                           </mainClass>
                        </configuration>
                     </execution>
                  </executions>
               </plugin>
            </plugins>
         </build>
      </profile>

      <profile>
         <id>client</id>
         <build>
            <defaultGoal>test</defaultGoal>
            <plugins>
               <plugin>
                  <groupId>org.codehaus.mojo</groupId>
                  <artifactId>exec-maven-plugin</artifactId>
                  <executions>
                     <execution>
                        <phase>test</phase>
                        <goals>
                           <goal>java</goal>
                        </goals>
                        <configuration>
                           <mainClass>
                           com.tutorialspoint.cxf.pojo.HelloClient
                           </mainClass>
                        </configuration>
                     </execution>
                  </executions>
               </plugin>
            </plugins>
         </build>
      </profile>
   </profiles>

   <dependencies>
      <dependency>
         <groupId>org.apache.cxf</groupId>
         <artifactId>cxf-rt-features-logging</artifactId>
         <version>3.3.0</version>
         <type>jar</type>
      </dependency>
      <dependency>
         <groupId>org.apache.cxf</groupId>
         <artifactId>cxf-rt-frontend-simple</artifactId>
         <version>3.3.0</version>
         <type>jar</type>
      </dependency>
      <dependency>
         <groupId>org.apache.cxf</groupId>
         <artifactId>cxf-rt-transports-http</artifactId>
         <version>3.3.0</version>
      </dependency>
      <dependency>
         <groupId>org.apache.cxf</groupId>
         <artifactId>cxf-rt-frontend-jaxws</artifactId>
         <version>3.3.0</version>
      </dependency>
      <!-- Jetty is needed if you're using the CXFServlet -->
      <dependency>
         <groupId>org.apache.cxf</groupId>
         <artifactId>cxf-rt-transports-http-jetty</artifactId>
         <version>3.3.0</version>
      </dependency>
   </dependencies>
   <properties>
      <project.build.sourceEncoding>UTF-8</project.build.sourceEncoding>
      <maven.compiler.source>1.8</maven.compiler.source>
      <maven.compiler.target>1.8</maven.compiler.target>
   </properties>
</project>
위의 pom.xml에는이 프로젝트와 관련이없는 추가 종속성이 포함될 수 있지만이 자습서의 다음 프로젝트에 필요합니다. 어쨌든 추가 종속성을 포함하는 것과 같은 해는 없습니다.
프로젝트 폴더 구조
서버 및 클라이언트 Apache CXF 파일을 배치 한 후 내 컴퓨터의 프로젝트 폴더 구조는 빠른 참조를 위해 아래에 나와 있습니다.

실행중인 서버
프로젝트를 빌드하려면 명령 줄 창에서 다음 명령을 사용하십시오.
mvn clean install다음 명령을 사용하여 서버를 시작할 수 있습니다-
mvn -Pserver그러면 서버가 시작되고 콘솔에 다음 프롬프트가 표시됩니다.
INFO: Creating Service {http://pojo.cxf.tutorialspoint.com/}HelloWorld from class com.tutorialspoint.cxf.pojo.HelloWorld
INFO: Setting the server's publish address to be http://localhost:5000/Hello
Listening on port 5000 ...
이제 브라우저 창에서 게시 된 서비스의 URL을 지정하십시오. 다음 출력이 표시됩니다.

이것은 우리 서비스가 localhost의 지정된 포트에서 실행되고 있음을 확인합니다. 우리가 지정하지 않았기 때문에greetings 호출에서 SOAP 오류 메시지가 브라우저로 반환됩니다.
선택한 SOAP 클라이언트를 사용하여 웹 서비스를 추가로 테스트 할 수 있습니다. 여기서는 Postman 을 사용 하여 서버를 테스트했습니다.
출력은 다음과 같습니다.
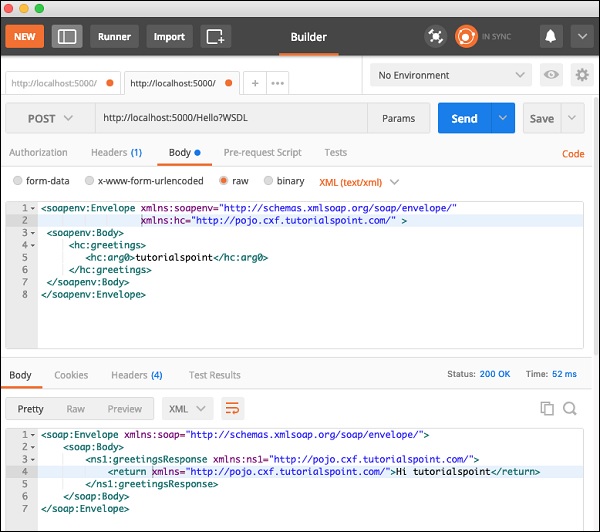
그것을 관찰하십시오 SOAP Request손으로 코딩했습니다. 요청을 게시 한 후 서버는SOAP Response 스크린 샷 하단에 표시되는 메시지입니다.
이를 통해 CXF는 요청과 응답 모두에 SOAP 프로토콜을 사용하는 동시에 오늘날 세계에 존재하는 다양한 웹 기술에 대한 통합보기를 제공한다는 것을 이해할 수 있습니다. 이것은 웹 애플리케이션 개발을 크게 단순화합니다.
다음 작업은 생성 한 웹 서비스를 사용할 클라이언트를 생성하는 것입니다.
클라이언트 생성
서버 애플리케이션에서 HelloWorld웹 서비스를 노출하는 인터페이스입니다. 웹 서비스 자체는 클라이언트에게 일반 인사말 메시지를 제공합니다. 일반적으로 웹 서비스 인터페이스는 WSDL (Web Services Description Language)을 사용하여 외부에 노출됩니다. 이 간단한 응용 프로그램에서는 서비스 인터페이스를 직접 노출하여 웹 서비스를 클라이언트에 노출합니다.HelloWorld.class.
이를 위해 CXF는 ClientProxyFactoryBean 생성 된 팩토리 인스턴스에 원하는 인터페이스를 연결할 수 있습니다.
먼저 다음과 같이 팩토리 빈 인스턴스를 생성합니다.
ClientProxyFactoryBean factory = new ClientProxyFactoryBean();우리는 setAddress웹 서비스를 호출 할 수있는 URL을 설정하는 팩토리 빈 인스턴스의 메서드. 우리의 경우 이전 단계에서 서버를 생성하는 동안 사용 된 URL을 사용합니다.
factory.setAddress("http://localhost:5000/Hello");다음으로 우리는 create 에 방법 factory 서비스 인터페이스를 연결할 인스턴스 HelloWorld.class 그것에.
HelloWorld helloServer = factory.create(HelloWorld.class);마지막으로 우리는 greetings 원격 웹 서비스를 호출하는 메소드.
System.out.println(helloServer.greetings(System.getProperty("user.name")));그러면 본체에 인사말 메시지가 인쇄됩니다.
클라이언트 응용 프로그램의 전체 소스는 다음과 같습니다.
//HelloClient.java
package com.tutorialspoint.cxf.pojo;
import org.apache.cxf.frontend.ClientProxyFactoryBean;
public class HelloClient {
   public static void main(String[] args) throws Exception {
      ClientProxyFactoryBean factory = new ClientProxyFactoryBean();
      factory.setAddress("http://localhost:5000/Hello");
      HelloWorld helloServer = factory.create(HelloWorld.class);
      System.out.println(helloServer.greetings(System.getProperty("user.name")));
   }
}
실행중인 클라이언트
서버가 여전히 컴퓨터에서 실행 중인지 확인하십시오. 시간이 초과 된 경우 다음 명령으로 서버를 다시 시작하십시오.
mvn -Pserver콘솔에 다음 메시지가 표시됩니다.
Listening on port 5000 ...이제 5 분으로 설정 한 서버 시간이 초과되기 전에 다른 명령 줄 창을 열고 다음 명령으로 클라이언트를 시작합니다.
mvn -Pclient명령 줄에 다음과 유사한 메시지가 표시됩니다.
Hi tutorialspoint참고 tutorialspoint사용자 이름입니다. 자신의 이름으로 인사를드립니다.
다음 장에서는 JAX-WS (Apache CXF API for XML Web Services) 프로젝트에서 CXF를 사용하는 방법을 배웁니다.