iText-셀 내용 서식 지정
이 장에서는 iText 라이브러리를 사용하여 PDF 문서를 만들고 표를 추가하고 표의 셀 내용을 포맷하는 방법을 살펴 봅니다.
표의 셀 서식 지정
빈 PDF를 만들 수 있습니다. DocumentDocument 클래스를 인스턴스화하여. 이 클래스를 인스턴스화하는 동안PdfDocument개체를 생성자에 매개 변수로 추가합니다. 그런 다음 문서에 테이블을 추가하려면 다음을 인스턴스화해야합니다.Table 클래스를 사용하고이 개체를 문서에 추가합니다. add()방법. 다음 방법을 사용하여 표의 셀 내용을 형식화 할 수 있습니다.Cell 수업.
다음은 표에서 셀 내용의 서식을 지정하는 단계입니다.
1 단계 : PdfWriter 개체 만들기
그만큼 PdfWriter클래스는 PDF 용 DocWriter를 나타냅니다. 이 클래스는 패키지에 속합니다.com.itextpdf.kernel.pdf. 이 클래스의 생성자는 PDF가 생성 될 파일의 경로를 나타내는 문자열을받습니다.
아래와 같이 생성자에 문자열 값 (PDF를 만들어야하는 경로를 나타냄)을 전달하여 PdfWriter 클래스를 인스턴스화합니다.
// Creating a PdfWriter
String dest = "C:/itextExamples/addingBackground.pdf";
PdfWriter writer = new PdfWriter(dest);
이 유형의 객체가 PdfDocument (클래스)에 전달되면이 문서에 추가 된 모든 요소가 지정된 파일에 기록됩니다.
2 단계 : PdfDocument 개체 만들기
그만큼 PdfDocumentclass는 iText에서 PDFDocument를 나타내는 클래스입니다. 이 클래스는 패키지에 속합니다.com.itextpdf.kernel.pdf. 이 클래스를 인스턴스화하려면 (쓰기 모드에서) 클래스의 객체를 전달해야합니다.PdfWriter 생성자에.
인스턴스화 PdfDocument 위에서 생성 된 PdfWriter 아래와 같이 생성자에 개체를 추가합니다.
// Creating a PdfDocument
PdfDocument pdfDoc = new PdfDocument(writer);
한 번 PdfDocument 객체가 생성되면 해당 클래스에서 제공하는 각 메소드를 사용하여 페이지, 글꼴, 파일 첨부, 이벤트 핸들러와 같은 다양한 요소를 추가 할 수 있습니다.
3 단계 : Document 개체 만들기
그만큼 Document 패키지 클래스 com.itextpdf.layout자급 자족 PDF를 만드는 동안 루트 요소입니다. 이 클래스의 생성자 중 하나는 PdfDocument 클래스의 개체를받습니다.
인스턴스화 Document 클래스의 객체를 전달하여 클래스 PdfDocument 아래와 같이 이전 단계에서 생성되었습니다.
// Creating a Document
Document document = new Document(pdfDoc);
4 단계 : 테이블 개체 만들기
그만큼 Table클래스는 행과 열로 정렬 된 셀로 채워진 2 차원 격자를 나타냅니다. 패키지에 속합니다.com.itextpdf.layout.element.
아래와 같이 Table 클래스를 인스턴스화합니다.
// Creating a table
float [] pointColumnWidths = {200F, 200F};
Table table = new Table(pointColumnWidths);
5 단계 : 셀 만들기
만들기 cell 개체를 인스턴스화하여 Cell 패키지 클래스 com.itextpdf.layout.element. 다음을 사용하여 셀의 내용을 추가합니다.add() 의 방법 Cell 아래와 같이 클래스.
// Adding cell 1 to the table
Cell cell1 = new Cell();     // Creating a cell
cell1.add("Name");           // Adding content to the cell

// Adding cell 2 to the table
Cell cell2 = new Cell();     // Creating a cell
cell2.add("Raju");           // Adding content to the cell
6 단계 : 셀에 배경 추가
셀을 만들고 내용을 추가 한 후에는 셀 서식을 지정할 수 있습니다. 예를 들어, 다음과 같은 셀 클래스의 다른 메서드를 사용하여 배경을 설정하고, 셀 내부에 텍스트를 정렬하고, 텍스트 색상을 변경하는 등의 작업을 수행 할 수 있습니다.setBackgroundColor(), setBorder(), setTextAlignment().
아래와 같이 이전 단계에서 만든 셀에 배경색, 테두리 및 텍스트 정렬을 설정할 수 있습니다.
c1.setBackgroundColor(Color.DARK_GRAY);    // Setting background color to cell1
c1.setBorder(Border.NO_BORDER);            // Setting border to cell1
c1.setTextAlignment(TextAlignment.CENTER); // Setting text alignment to cell1
7 단계 : 표에 셀 추가
마지막으로이 셀을 테이블에 추가하려면 addCell() 의 방법 Table 수업과 통과 cell 다음과 같이이 메서드에 대한 매개 변수로 개체를 사용합니다.
table.addCell(c1);8 단계 : 문서에 표 추가
추가 table 이전 단계에서 만든 개체 add() 의 방법 Document 아래와 같이 클래스.
// Adding list to the document
document.add(table);
9 단계 : 문서 닫기
다음을 사용하여 문서를 닫습니다. close() 의 방법 Document 아래와 같이 클래스.
// Closing the document
document.close();
예
다음 Java 프로그램은 iText 라이브러리를 사용하여 테이블의 셀 내용을 형식화하는 방법을 보여줍니다. 이름을 가진 PDF 문서를 생성합니다.addingBackground.pdf, 테이블을 추가하고, 셀의 내용을 포맷하고, 경로에 저장합니다. C:/itextExamples/
이 코드를 이름으로 파일에 저장하십시오. BackgroundToTable.java.
import com.itextpdf.kernel.color.Color;
import com.itextpdf.kernel.pdf.PdfDocument;
import com.itextpdf.kernel.pdf.PdfWriter;

import com.itextpdf.layout.Document;
import com.itextpdf.layout.border.Border;
import com.itextpdf.layout.element.Cell;
import com.itextpdf.layout.element.Table;
import com.itextpdf.layout.property.TextAlignment;

public class BackgroundToTable {
   public static void main(String args[]) throws Exception {
      // Creating a PdfWriter object
      String dest = "C:/itextExamples/addingBackground.pdf";
      PdfWriter writer = new PdfWriter(dest);

      // Creating a PdfDocument object
      PdfDocument pdfDoc = new PdfDocument(writer);

      // Creating a Document object
      Document doc = new Document(pdfDoc);

      // Creating a table
      float [] pointColumnWidths = {200F, 200F};
      Table table = new Table(pointColumnWidths);

      // Populating row 1 and adding it to the table
      Cell c1 = new Cell();                        // Creating cell 1
      c1.add("Name");                              // Adding name to cell 1
      c1.setBackgroundColor(Color.DARK_GRAY);      // Setting background color
      c1.setBorder(Border.NO_BORDER);              // Setting border
      c1.setTextAlignment(TextAlignment.CENTER);   // Setting text alignment
      table.addCell(c1);                           // Adding cell 1 to the table

      Cell c2 = new
      Cell();
      c2.add("Raju");
      c2.setBackgroundColor(Color.GRAY);
      c2.setBorder(Border.NO_BORDER);
      c2.setTextAlignment(TextAlignment.CENTER);
      table.addCell(c2);

      // Populating row 2 and adding it to the table
      Cell c3 = new Cell();
      c3.add("Id");
      c3.setBackgroundColor(Color.WHITE);
      c3.setBorder(Border.NO_BORDER);
      c3.setTextAlignment(TextAlignment.CENTER);
      table.addCell(c3);

      Cell c4 = new Cell();
      c4.add("001");
      c4.setBackgroundColor(Color.WHITE);
      c4.setBorder(Border.NO_BORDER);
      c4.setTextAlignment(TextAlignment.CENTER);
      table.addCell(c4);

      // Populating row 3 and adding it to the table
      Cell c5 = new Cell();
      c5.add("Designation");
      c5.setBackgroundColor(Color.DARK_GRAY);
      c5.setBorder(Border.NO_BORDER);
      c5.setTextAlignment(TextAlignment.CENTER);
      table.addCell(c5);

      Cell c6 = new Cell();
      c6.add("Programmer");
      c6.setBackgroundColor(Color.GRAY);
      c6.setBorder(Border.NO_BORDER);
      c6.setTextAlignment(TextAlignment.CENTER);
      table.addCell(c6);

      // Adding Table to document
      doc.add(table);

      // Closing the document
      doc.close();

      System.out.println("Background added successfully..");
   }
}
다음 명령을 사용하여 명령 프롬프트에서 저장된 Java 파일을 컴파일하고 실행합니다.
javac BackgroundToTable.java
java BackgroundToTable
실행시 위의 프로그램은 PDF 문서를 생성하고 다음 메시지를 표시합니다.
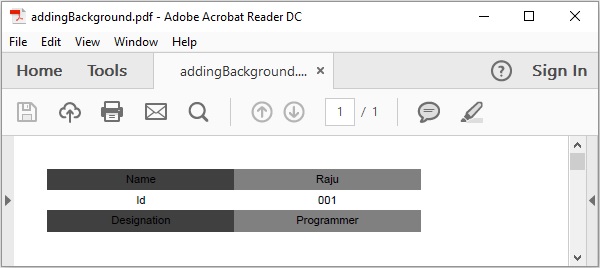
Background added successfully..지정된 경로를 확인하면 아래와 같이 생성 된 PDF 문서를 찾을 수 있습니다.
