폴리머-이벤트
이벤트는 DOM 트리의 상태 변경과 부모 요소와 통신 할 수있는 요소에서 사용되며 이벤트를 생성, 전달 및 수신하는 데 표준 DOM API를 사용합니다. 그만큼annotated event listeners 이벤트 리스너를 DOM 템플릿의 작은 덩어리로 정의하는 Polymer에서 사용되며 템플릿의 onevent 주석을 사용하여 DOM 자식에 추가 할 수 있습니다.
예
다음 예제는 템플릿에 주석이 달린 이벤트 리스너를 추가합니다. index.html이라는 파일을 만들고 그 안에 다음 코드를 넣습니다.
<!doctype html>
<html>
   <head>
      <title>Polymer Example</title>
      <script src = "bower_components/webcomponentsjs/webcomponents-lite.js"></script>
      <link rel = "import" href="bower_components/polymer/polymer.html">
      <link rel = "import" href = "annotated-eventlistners.html">
   </head>

   <body>
      <template id = "myapp" is = "dom-bind">
         //tap event is part of gesture events that fires consistently across both mobile
         //and desktop devices
         <annotated-eventlistners on-tap = "myClick"></annotated-eventlistners>
      </template>

      <script>
         var myval = document.querySelector('#myapp');
         myval.myClick =  function(e) {
            console.log('Hello World!!!');
         };
      </script>
   </body>
</html>
산출
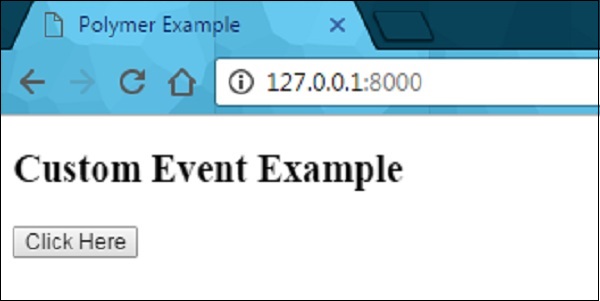
애플리케이션을 실행하려면 생성 된 프로젝트 디렉터리로 이동하여 다음 명령을 실행합니다.
polymer serve이제 브라우저를 열고 http://127.0.0.1:8000/. 다음은 출력입니다.

텍스트를 클릭하면 다음 스크린 샷과 같이 콘솔에서 결과를 볼 수 있습니다.

맞춤 이벤트
표준 CustomEvent 생성자와 호스트 요소의 dispatchEvent 메서드를 사용하여 사용자 지정 이벤트를 트리거 할 수 있습니다.
호스트 요소에서 사용자 지정 이벤트를 트리거하는 다음 예제를 고려하십시오. index.html 파일을 열고 다음 코드를 추가하십시오.
<!doctype html>
<html>
   <head>
      <title>Polymer Example</title>
      <script src = "bower_components/webcomponentsjs/webcomponents-lite.js"></script>
      <link rel = "import" href = "bower_components/polymer/polymer.html">
      <link rel = "import" href = "custom-event.html">
   </head>

   <body>
      <custom-event></custom-event>
      <script>
         document.querySelector('custom-event').addEventListener('customValue', function (e) {
            console.log(e.detail.customval); // true
         })
      </script>
   </body>
</html>
이제 custom-event.html이라는 다른 파일을 만들고 다음 코드를 포함합니다.
<link rel = "import" href = "bower_components/polymer/polymer-element.html">

//it specifies the start of an element's local DOM
<dom-module id = "custom-event">
   <template>
      <h2>Custom Event Example</h2>
      <button on-click = "myClick">Click Here</button>
   </template>

   <script>
      Polymer ({
         is: "custom-event", myClick(e) {
            this.dispatchEvent(new CustomEvent('customValue', {detail: {customval: true}}));
         }
      });
   </script>
</dom-module>
산출
이전 예제에 표시된대로 애플리케이션을 실행하고 다음으로 이동하십시오. http://127.0.0.1:8000/. 다음은 출력입니다.
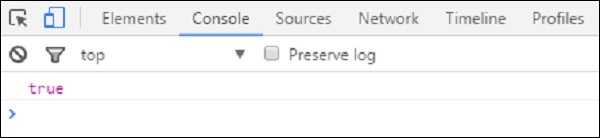
이제 버튼을 클릭하고 콘솔을 열고 다음 스크린 샷에 표시된대로 사용자 지정 이벤트의 실제 값을 확인합니다.
이제 "이벤트 리 타게팅"으로 이동합니다. 이벤트의 타겟을 지정합니다. 여기서 요소가 청취 요소와 동일한 범위에서 표현 될 수 있습니다. 예를 들어 대상은 섀도우 트리가 아닌 주 문서에서 리스너를 사용하는 동안 주 문서의 요소로 간주 될 수 있습니다. 자세한 설명과 예 는 Polymer shadow dom 스타일링 장을 참조하세요.
제스처 이벤트
제스처 이벤트는 터치 및 모바일 장치 모두에서 더 나은 상호 작용을 정의하는 사용자 상호 작용에 사용할 수 있습니다. 예를 들어 탭 이벤트는 모바일 및 데스크톱 장치에서 일관되게 실행되는 제스처 이벤트의 일부입니다.
이 장의 시작 부분에 설명 된 제스처 이벤트에 대한 예제를 참조 할 수 있습니다. on-tap 템플릿에 주석이 달린 이벤트 리스너를 추가하는 이벤트입니다.
다음 표에는 다양한 유형의 제스처 이벤트 유형이 나열되어 있습니다.
| Sr. 아니. | 이벤트 유형 및 설명 | 속성 |
|---|---|---|
| 1 | down 손가락 / 버튼이 아래로 이동했음을 지정합니다. |
|
| 2 | up 손가락 / 버튼이 위로 이동했음을 지정합니다. |
|
| 삼 | tap 업 및 다운 동작의 발생을 지정합니다. |
|
| 4 | track 업 및 다운 동작의 발생을 지정합니다. |
|
예
다음 예제는 템플릿에서 제스처 이벤트 유형의 사용을 지정합니다. index.html이라는 파일을 만들고 그 안에 다음 코드를 넣습니다.
<!doctype html>
<html>
   <head>
      <title>Polymer Example</title>
      <script src = "bower_components/webcomponentsjs/webcomponents-lite.js"></script>
      <link rel = "import" href = "bower_components/polymer/polymer.html">
      <link rel = "import" href = "gesture-event.html">
   </head>

   <body>
      <gesture-event></gesture-event>
   </body>
</html>
이제 gesture-event.html이라는 다른 파일을 만들고 다음 코드를 포함합니다.
<link rel = "import" href = "bower_components/polymer/polymer-element.html">

//it specifies the start of an element's local DOM
<dom-module id = "gesture-event">
   <template>
      <style>
         #box {
            width: 200px;
            height: 200px;
            background: #D7D0B7;
         }
      </style>

      <h2>Gesture Event Types Example</h2>
      <div id = "box" on-track = "myClick">{{track_message}}</div>
   </template>

   <script>
      Polymer ({
         is: 'gesture-event', myClick: function(e) {
            switch(e.detail.state) {
               case 'start':
               this.track_message = 'Tracking event started...';
               break;
               case 'track':
                  this.track_message = 'Tracking event is in progress... ' +
                  e.detail.x + ', ' + e.detail.y;
               break;
               case 'end':
                  this.track_message = 'Tracking event ended...';
               break;
            }
         }
      });
   </script>
</dom-module>
산출
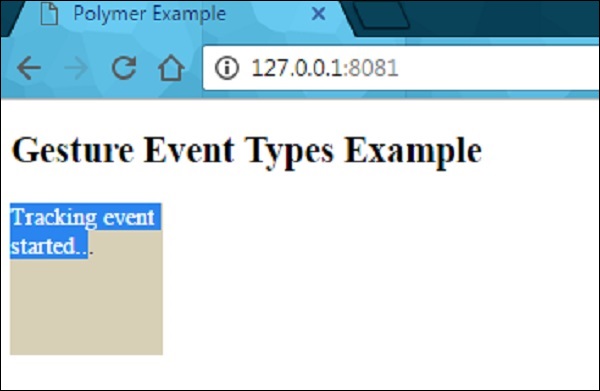
이전 예제에 표시된대로 애플리케이션을 실행하고 다음으로 이동하십시오. http://127.0.0.1:8081/. 이제 요소에서 마우스를 드래그하기 시작하면 다음 스크린 샷과 같은 상태가 표시됩니다.
요소에서 마우스를 드래그하면 다음 스크린 샷과 같이 이벤트 추적 진행률이 표시됩니다.

마우스 드래그를 중지하면 다음 스크린 샷과 같이 요소에 대한 추적 이벤트가 종료됩니다.
