AngularJS - คู่มือฉบับย่อ
AngularJS คืออะไร?
AngularJS เป็นเฟรมเวิร์กแอปพลิเคชันบนเว็บแบบโอเพนซอร์ส ได้รับการพัฒนาครั้งแรกในปี 2009 โดย Misko Hevery และ Adam Abrons ปัจจุบันได้รับการดูแลโดย Google เวอร์ชันล่าสุดคือ 1.4.3
คำจำกัดความของ AngularJS ตามเอกสารอย่างเป็นทางการมีดังนี้ -
AngularJS เป็นกรอบโครงสร้างสำหรับเว็บแอปแบบไดนามิก ช่วยให้คุณใช้ HTML เป็นภาษาเทมเพลตของคุณและช่วยให้คุณสามารถขยายไวยากรณ์ของ HTML เพื่อแสดงส่วนประกอบของแอปพลิเคชันของคุณได้อย่างชัดเจนและรวบรัด การผูกข้อมูลของ Angular และการแทรกขึ้นต่อกันช่วยขจัดโค้ดส่วนใหญ่ที่คุณต้องเขียนในปัจจุบัน และทั้งหมดนี้เกิดขึ้นภายในเบราว์เซอร์ทำให้เป็นพันธมิตรที่เหมาะกับเทคโนโลยีเซิร์ฟเวอร์ใด ๆ
คุณสมบัติ
AngularJS เป็นกรอบการพัฒนาที่ใช้ JavaScript ที่มีประสิทธิภาพเพื่อสร้าง RICH Internet Application (RIA)
AngularJS ให้ตัวเลือกนักพัฒนาในการเขียนแอปพลิเคชันฝั่งไคลเอ็นต์ (โดยใช้ JavaScript) ด้วยวิธี MVC (Model View Controller) ที่สะอาด
แอปพลิเคชันที่เขียนด้วย AngularJS เป็นไปตามข้อกำหนดข้ามเบราว์เซอร์ AngularJS จัดการโค้ด JavaScript ที่เหมาะสมกับแต่ละเบราว์เซอร์โดยอัตโนมัติ
AngularJS เป็นโอเพ่นซอร์สฟรีและใช้งานโดยนักพัฒนาหลายพันคนทั่วโลก ได้รับอนุญาตภายใต้ Apache License เวอร์ชัน 2.0
โดยรวมแล้ว AngularJS เป็นเฟรมเวิร์กสำหรับสร้างเว็บแอปพลิเคชันขนาดใหญ่และมีประสิทธิภาพสูงในขณะเดียวกันก็ทำให้ง่ายต่อการบำรุงรักษา
คุณสมบัติหลัก
ต่อไปนี้เป็นคุณสมบัติหลักที่สำคัญที่สุดของ AngularJS -
Data-binding - เป็นการซิงโครไนซ์ข้อมูลระหว่างโมเดลและส่วนประกอบมุมมองโดยอัตโนมัติ
Scope- สิ่งเหล่านี้คือวัตถุที่อ้างถึงโมเดล พวกเขาทำหน้าที่เป็นกาวระหว่างตัวควบคุมและมุมมอง
Controller - นี่คือฟังก์ชัน JavaScript ที่เชื่อมโยงกับขอบเขตเฉพาะ
Services- AngularJS มาพร้อมกับบริการในตัวหลายอย่างเช่น $ https: เพื่อสร้าง XMLHttpRequests สิ่งเหล่านี้เป็นวัตถุเดี่ยวที่สร้างอินสแตนซ์เพียงครั้งเดียวในแอป
Filters - สิ่งเหล่านี้เลือกชุดย่อยของรายการจากอาร์เรย์และส่งคืนอาร์เรย์ใหม่
Directives- Directives คือเครื่องหมายบนองค์ประกอบ DOM (เช่นองค์ประกอบแอตทริบิวต์ css และอื่น ๆ ) สิ่งเหล่านี้สามารถใช้เพื่อสร้างแท็ก HTML ที่กำหนดเองซึ่งทำหน้าที่เป็นวิดเจ็ตที่กำหนดเองใหม่ AngularJS มีคำสั่งในตัว (ngBind, ngModel ... )
Templates- นี่คือมุมมองที่แสดงผลพร้อมข้อมูลจากคอนโทรลเลอร์และโมเดล ไฟล์เหล่านี้อาจเป็นไฟล์เดียว (เช่น index.html) หรือหลายมุมมองในหน้าเดียวโดยใช้ "partials"
Routing - เป็นแนวคิดในการเปลี่ยนมุมมอง
Model View Whatever- MVC เป็นรูปแบบการออกแบบสำหรับการแบ่งแอปพลิเคชันออกเป็นส่วนต่างๆ (เรียกว่า Model, View และ Controller) ซึ่งแต่ละส่วนมีความรับผิดชอบที่แตกต่างกัน AngularJS ไม่ได้ใช้ MVC ในความหมายดั้งเดิม แต่เป็นสิ่งที่ใกล้เคียงกับ MVVM (Model-View-ViewModel) ทีม Angular JS เรียกมันอย่างขบขันว่า Model View Whatever
Deep Linking- Deep Link ช่วยให้คุณสามารถเข้ารหัสสถานะของแอปพลิเคชันใน URL เพื่อให้สามารถบุ๊กมาร์กได้ จากนั้นแอปพลิเคชันสามารถกู้คืนจาก URL ไปสู่สถานะเดียวกันได้
Dependency Injection - AngularJS มีระบบย่อยการฉีดพึ่งพาในตัวที่ช่วยนักพัฒนาโดยทำให้แอปพลิเคชันพัฒนาทำความเข้าใจและทดสอบได้ง่ายขึ้น
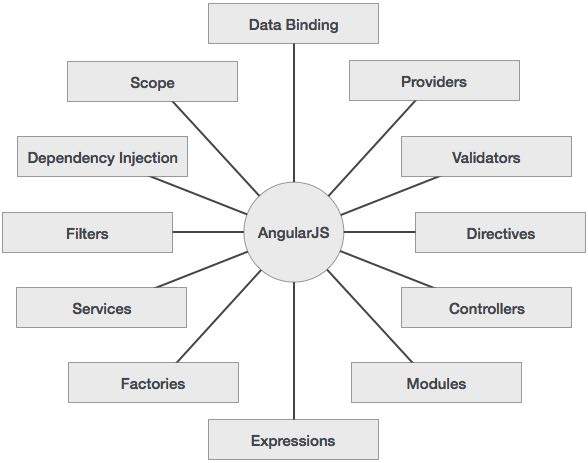
แนวคิด
แผนภาพต่อไปนี้แสดงให้เห็นถึงบางส่วนที่สำคัญของ AngularJS ซึ่งเราจะพูดถึงโดยละเอียดในบทต่อ ๆ ไป
ข้อดีของ AngularJS
AngularJS ให้ความสามารถในการสร้าง Single Page Application ด้วยวิธีที่สะอาดและดูแลรักษาได้
AngularJS ให้ความสามารถในการผูกข้อมูลกับ HTML จึงทำให้ผู้ใช้ได้รับประสบการณ์ที่หลากหลายและตอบสนอง
รหัส AngularJS เป็นหน่วยที่สามารถทดสอบได้
AngularJS ใช้การฉีดแบบพึ่งพาและใช้ประโยชน์จากการแยกข้อกังวล
AngularJS มีส่วนประกอบที่ใช้ซ้ำได้
ด้วย AngularJS นักพัฒนาจะเขียนโค้ดน้อยลงและรับฟังก์ชันการทำงานมากขึ้น
ใน AngularJS มุมมองเป็นเพจ html ที่บริสุทธิ์และตัวควบคุมที่เขียนด้วย JavaScript จะทำการประมวลผลทางธุรกิจ
เหนือสิ่งอื่นใดแอปพลิเคชัน AngularJS สามารถทำงานบนเบราว์เซอร์และสมาร์ทโฟนหลัก ๆ ทั้งหมดรวมถึงโทรศัพท์ / แท็บเล็ตที่ใช้ Android และ iOS
ข้อเสียของ AngularJS
แม้ว่า AngularJS จะมาพร้อมกับคะแนนบวกมากมาย แต่ในเวลาเดียวกันเราควรพิจารณาประเด็นต่อไปนี้ -
Not Secure- เนื่องจากเป็นเพียงเฟรมเวิร์ก JavaScript เท่านั้นแอปพลิเคชันที่เขียนด้วย AngularJS จึงไม่ปลอดภัย การรับรองความถูกต้องและการอนุญาตฝั่งเซิร์ฟเวอร์จะต้องรักษาความปลอดภัยของแอปพลิเคชัน
Not degradable - หากผู้ใช้แอปพลิเคชันของคุณปิดการใช้งาน JavaScript ผู้ใช้จะเห็นหน้าพื้นฐานและไม่มีอะไรเพิ่มเติม
ส่วนประกอบ AngularJS
กรอบ AngularJS สามารถแบ่งออกเป็นสามส่วนใหญ่ ๆ ดังต่อไปนี้ -
ng-app - คำสั่งนี้กำหนดและเชื่อมโยงแอปพลิเคชัน AngularJS กับ HTML
ng-model - คำสั่งนี้ผูกค่าของข้อมูลแอปพลิเคชัน AngularJS กับตัวควบคุมอินพุต HTML
ng-bind - คำสั่งนี้ผูกข้อมูลแอปพลิเคชัน AngularJS กับแท็ก HTML
ในบทนี้เราจะพูดถึงวิธีการตั้งค่าไลบรารี AngularJS เพื่อใช้ในการพัฒนาเว็บแอปพลิเคชัน นอกจากนี้เราจะศึกษาโครงสร้างไดเร็กทอรีและเนื้อหาโดยสังเขป
เมื่อคุณเปิดลิงค์ https://angularjs.org/คุณจะเห็นว่ามีสองตัวเลือกในการดาวน์โหลดไลบรารี AngularJS -

View on GitHub - คลิกที่ปุ่มนี้เพื่อไปที่ GitHub และรับสคริปต์ล่าสุดทั้งหมด
Download AngularJS 1 - หรือคลิกที่ปุ่มนี้จะเห็นหน้าจอด้านล่าง -

หน้าจอนี้ให้ตัวเลือกต่างๆในการใช้ Angular JS ดังนี้ -
Downloading and hosting files locally
มีสองตัวเลือกที่แตกต่างกัน legacy และ latest. ชื่อตัวเองเป็นตัวอธิบายlegacy มีเวอร์ชันน้อยกว่า 1.2.x และ latest มีเวอร์ชัน 1.5.x
นอกจากนี้เรายังสามารถใช้เวอร์ชันย่อขนาดไม่บีบอัดหรือบีบอัดได้
CDN access- คุณยังสามารถเข้าถึง CDN CDN จะช่วยให้คุณสามารถเข้าถึงศูนย์ข้อมูลระดับภูมิภาคได้ทั่วโลกซึ่งในกรณีนี้โฮสต์ของ Google ซึ่งหมายความว่าการใช้ CDN จะย้ายความรับผิดชอบในการโฮสต์ไฟล์จากเซิร์ฟเวอร์ของคุณไปยังชุดไฟล์ภายนอก นอกจากนี้ยังมีข้อได้เปรียบที่หากผู้เยี่ยมชมหน้าเว็บของคุณดาวน์โหลดสำเนา AngularJS จาก CDN เดียวกันแล้วจะไม่ต้องดาวน์โหลดซ้ำ
Try the new angularJS 2 - คลิกที่ปุ่มนี้เพื่อดาวน์โหลด Angular JS beta 2 เวอร์ชันนี้เร็วมากรองรับมือถือและยืดหยุ่นเมื่อเทียบกับรุ่นเก่าและล่าสุดของ AngularJS 1
เรากำลังใช้ไลบรารีเวอร์ชัน CDN ตลอดบทช่วยสอนนี้
ตัวอย่าง
ตอนนี้ให้เราเขียนตัวอย่างง่ายๆโดยใช้ไลบรารี AngularJS ให้เราสร้างไฟล์ HTML myfirstexample.htmlดังต่อไปนี้ -
<!doctype html>
<html>

   <head>
      <script src = "https://ajax.googleapis.com/ajax/libs/angularjs/1.5.2/angular.min.js"></script>
   </head>

   <body ng-app = "myapp">

      <div ng-controller = "HelloController" >
         <h2>Welcome {{helloTo.title}} to the world of Tutorialspoint!</h2>
      </div>

      <script>
         angular.module("myapp", [])

         .controller("HelloController", function($scope) {
            $scope.helloTo = {};
            $scope.helloTo.title = "AngularJS";
         });
      </script>

   </body>
</html>
ส่วนต่อไปนี้อธิบายรหัสข้างต้นโดยละเอียด -
รวม AngularJS
เราได้รวมไฟล์ AngularJS JavaScript ไว้ในหน้า HTML เพื่อให้เราสามารถใช้ AngularJS -
<head>
   <script src = "https://ajax.googleapis.com/ajax/libs/angularjs/1.4.8/angular.min.js"></script>
</head>
หากคุณต้องการอัปเดตเป็น Angular JS เวอร์ชันล่าสุดให้ใช้ซอร์สสคริปต์ต่อไปนี้หรืออื่น ๆ ตรวจสอบ AngularJS เวอร์ชันล่าสุดบนเว็บไซต์ทางการ
<head>
   <script src = "https://ajax.googleapis.com/ajax/libs/angularjs/1.5.2/angular.min.js"></script>
</head>
ชี้ไปที่แอพ AngularJS
ต่อไปเราจะบอกว่าส่วนใดของ HTML ที่มีแอป AngularJS สิ่งนี้ทำได้โดยการเพิ่มแอตทริบิวต์ng-appในองค์ประกอบ HTML รากของแอป AngularJS คุณสามารถเพิ่มลงในองค์ประกอบhtmlหรือองค์ประกอบของร่างกายตามที่แสดงด้านล่าง -
<body ng-app = "myapp">
</body>
ดู
มุมมองคือส่วนนี้ -
<div ng-controller = "HelloController" >
   <h2>Welcome {{helloTo.title}} to the world of Tutorialspoint!</h2>
</div>ng-controllerบอก AngularJS ว่าจะใช้คอนโทรลเลอร์อะไรกับมุมมองนี้ helloTo.titleบอกให้ AngularJS เขียนค่า "model" ชื่อ helloTo.title ลงใน HTML ที่ตำแหน่งนี้
ตัวควบคุม
ส่วนควบคุมคือ -
<script>
   angular.module("myapp", [])

   .controller("HelloController", function($scope) {
      $scope.helloTo = {};
      $scope.helloTo.title = "AngularJS";
   });
</script>รหัสนี้ลงทะเบียนฟังก์ชั่นชื่อตัวควบคุมเป็นHelloControllerในโมดูลชื่อเชิงมุมmyapp เราจะศึกษาเพิ่มเติมเกี่ยวกับโมดูลและคอนโทรลเลอร์ในบทต่างๆ ฟังก์ชันคอนโทรลเลอร์ถูกลงทะเบียนในเชิงมุมผ่านการเรียกฟังก์ชัน angular.module (... ). controller (... )
พารามิเตอร์ $ ขอบเขตส่งผ่านไปยังฟังก์ชั่นการควบคุมเป็นรูปแบบ ฟังก์ชันคอนโทรลเลอร์จะเพิ่มอ็อบเจกต์helloTo JavaScript และในอ็อบเจ็กต์นั้นจะเพิ่มฟิลด์หัวเรื่อง
การดำเนินการ
บันทึกโค้ดด้านบนเป็นmyfirstexample.htmlและเปิดในเบราว์เซอร์ใดก็ได้ คุณจะเห็นผลลัพธ์ดังต่อไปนี้ -
Welcome AngularJS to the world of Tutorialspoint!เมื่อโหลดเพจในเบราว์เซอร์สิ่งต่อไปนี้จะเกิดขึ้น -
เอกสาร HTML ถูกโหลดลงในเบราว์เซอร์และประเมินโดยเบราว์เซอร์ ไฟล์ AngularJS JavaScript ถูกโหลดและสร้างวัตถุส่วนกลางเชิงมุม ถัดไป JavaScript ที่ลงทะเบียนฟังก์ชันคอนโทรลเลอร์จะถูกเรียกใช้งาน
ถัดไป AngularJS จะสแกนผ่าน HTML เพื่อค้นหาแอป AngularJS และมุมมอง เมื่อตั้งค่ามุมมองแล้วจะเชื่อมต่อมุมมองนั้นกับฟังก์ชันคอนโทรลเลอร์ที่เกี่ยวข้อง
ถัดไป AngularJS เรียกใช้ฟังก์ชันคอนโทรลเลอร์ จากนั้นแสดงมุมมองพร้อมข้อมูลจากโมเดลที่เติมโดยคอนโทรลเลอร์ ตอนนี้หน้าพร้อมแล้ว
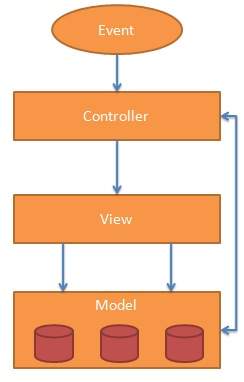
Mโอเดล Vเอียว Controller หรือ MVC ตามที่นิยมเรียกกันว่าเป็นรูปแบบการออกแบบซอฟต์แวร์สำหรับพัฒนาเว็บแอปพลิเคชัน รูปแบบ Model View Controller ประกอบด้วยสามส่วนต่อไปนี้ -
Model - เป็นระดับต่ำสุดของรูปแบบที่รับผิดชอบในการดูแลรักษาข้อมูล
View - มีหน้าที่แสดงข้อมูลทั้งหมดหรือบางส่วนให้กับผู้ใช้
Controller - เป็นรหัสซอฟต์แวร์ที่ควบคุมการโต้ตอบระหว่าง Model และ View
MVC ได้รับความนิยมเนื่องจากแยกตรรกะของแอปพลิเคชันออกจากเลเยอร์อินเทอร์เฟซผู้ใช้และสนับสนุนการแยกข้อกังวล คอนโทรลเลอร์ได้รับคำขอทั้งหมดสำหรับแอปพลิเคชันจากนั้นจะทำงานกับโมเดลเพื่อเตรียมข้อมูลที่จำเป็นสำหรับมุมมอง จากนั้นมุมมองจะใช้ข้อมูลที่เตรียมโดยคอนโทรลเลอร์เพื่อสร้างคำตอบสุดท้ายที่สามารถนำเสนอได้ นามธรรม MVC สามารถแสดงเป็นกราฟิกได้ดังนี้
นางแบบ
โมเดลมีหน้าที่จัดการข้อมูลแอปพลิเคชัน ตอบสนองต่อคำขอจากมุมมองและคำแนะนำจากคอนโทรลเลอร์เพื่ออัปเดตตัวเอง
มุมมอง
การนำเสนอข้อมูลในรูปแบบเฉพาะที่เกิดจากการตัดสินใจของผู้ควบคุมในการนำเสนอข้อมูล เป็นระบบเทมเพลตที่ใช้สคริปต์เช่น JSP, ASP, PHP และง่ายต่อการรวมเข้ากับเทคโนโลยี AJAX
ตัวควบคุม
คอนโทรลเลอร์ตอบสนองต่ออินพุตของผู้ใช้และดำเนินการโต้ตอบกับอ็อบเจ็กต์โมเดลข้อมูล ตัวควบคุมได้รับอินพุตตรวจสอบความถูกต้องและดำเนินการทางธุรกิจที่ปรับเปลี่ยนสถานะของโมเดลข้อมูล
AngularJS เป็นเฟรมเวิร์กที่ใช้ MVC ในบทต่อ ๆ ไปเราจะมาดูกันว่า AngularJS ใช้วิธีการ MVC อย่างไร
ก่อนที่เราจะเริ่มสร้างแอปพลิเคชัน HelloWorld โดยใช้ AngularJS ให้เราดูว่าอะไรคือส่วนที่แท้จริงของแอปพลิเคชัน AngularJS แอปพลิเคชัน AngularJS ประกอบด้วยสามส่วนที่สำคัญดังต่อไปนี้ -
ng-app - คำสั่งนี้กำหนดและเชื่อมโยงแอปพลิเคชัน AngularJS กับ HTML
ng-model - คำสั่งนี้ผูกค่าของข้อมูลแอปพลิเคชัน AngularJS กับตัวควบคุมอินพุต HTML
ng-bind - คำสั่งนี้ผูกข้อมูลแอปพลิเคชัน AngularJS กับแท็ก HTML
ขั้นตอนในการสร้าง AngularJS Application
ขั้นตอนที่ 1: โหลดเฟรมเวิร์ก
เป็นเฟรมเวิร์ก JavaScript แท้สามารถเพิ่มได้โดยใช้แท็ก <Script>
<script src = "https://ajax.googleapis.com/ajax/libs/angularjs/1.3.14/angular.min.js">
</script>
ขั้นตอนที่ 2: กำหนด AngularJS Application โดยใช้ ng-app directive
<div ng-app = "">
   ...
</div>
ขั้นตอนที่ 3: กำหนดชื่อรุ่นโดยใช้ ng-model directive
<p>Enter your Name: <input type = "text" ng-model = "name"></p>ขั้นตอนที่ 4: ผูกค่าของโมเดลด้านบนที่กำหนดโดยใช้คำสั่ง ng-bind
<p>Hello <span ng-bind = "name"></span>!</p>ขั้นตอนในการเรียกใช้ AngularJS Application
ใช้สามขั้นตอนดังกล่าวข้างต้นในหน้า HTML
testAngularJS.htm
<html>
   <head>
      <title>AngularJS First Application</title>
   </head>

   <body>
      <h1>Sample Application</h1>

      <div ng-app = "">
         <p>Enter your Name: <input type = "text" ng-model = "name"></p>
         <p>Hello <span ng-bind = "name"></span>!</p>
      </div>

      <script src = "https://ajax.googleapis.com/ajax/libs/angularjs/1.3.14/angular.min.js">
      </script>

   </body>
</html>
เอาต์พุต
เปิด textAngularJS.htm ในเว็บเบราว์เซอร์ ป้อนชื่อของคุณและดูผลลัพธ์
AngularJS ทำงานร่วมกับ HTML อย่างไร
คำสั่ง ng-app ระบุจุดเริ่มต้นของแอปพลิเคชัน AngularJS
ng-model directive จะสร้างตัวแปร model ชื่อ "name" ซึ่งสามารถใช้ได้กับเพจ html และภายใน div ที่มีคำสั่ง ng-app
ng-bind จากนั้นใช้โมเดลชื่อที่จะแสดงในแท็กช่วง html เมื่อใดก็ตามที่ผู้ใช้ป้อนข้อมูลบางอย่างในกล่องข้อความ
แท็กปิด </div> ระบุจุดสิ้นสุดของแอปพลิเคชัน AngularJS
คำสั่ง AngularJS ใช้เพื่อขยาย HTML นี่คือคุณสมบัติพิเศษที่ขึ้นต้นด้วย ng- คำนำหน้า เราจะพูดถึงคำสั่งต่อไปนี้ -
ng-app - คำสั่งนี้เริ่มต้นแอปพลิเคชัน AngularJS
ng-init - คำสั่งนี้เริ่มต้นข้อมูลแอปพลิเคชัน
ng-model - คำสั่งนี้ผูกค่าของข้อมูลแอปพลิเคชัน AngularJS กับตัวควบคุมอินพุต HTML
ng-repeat - คำสั่งนี้ซ้ำองค์ประกอบ html สำหรับแต่ละรายการในคอลเลกชัน
คำสั่ง ng-app
คำสั่ง ng-app เริ่มแอปพลิเคชัน AngularJS เป็นการกำหนดองค์ประกอบราก เริ่มต้นหรือบูตแอปพลิเคชันโดยอัตโนมัติเมื่อโหลดหน้าเว็บที่มี AngularJS Application นอกจากนี้ยังใช้เพื่อโหลดโมดูล AngularJS ต่างๆใน AngularJS Application ในตัวอย่างต่อไปนี้เราได้กำหนดแอปพลิเคชัน AngularJS เริ่มต้นโดยใช้คุณสมบัติ ng-app ขององค์ประกอบ div
<div ng-app = "">
   ...
</div>
คำสั่ง ng-init
คำสั่ง ng-init เตรียมข้อมูลเบื้องต้นของ AngularJS Application ใช้เพื่อใส่ค่าให้กับตัวแปรที่จะใช้ในแอปพลิเคชัน ในตัวอย่างต่อไปนี้เราจะเริ่มต้นอาร์เรย์ของประเทศ เรากำลังใช้ไวยากรณ์ JSON เพื่อกำหนดอาร์เรย์ของประเทศ
<div ng-app = "" ng-init = "countries = [{locale:'en-US',name:'United States'},
   {locale:'en-GB',name:'United Kingdom'}, {locale:'en-FR',name:'France'}]">
   ...
</div>
คำสั่ง ng-model
คำสั่งนี้ผูกค่าของข้อมูลแอปพลิเคชัน AngularJS กับตัวควบคุมอินพุต HTML ในตัวอย่างต่อไปนี้เราได้กำหนดโมเดลชื่อ "name"
<div ng-app = "">
   ...
   <p>Enter your Name: <input type = "text" ng-model = "name"></p>
</div>
คำสั่ง ng-repeat
คำสั่ง ng-repeat ทำซ้ำองค์ประกอบ html สำหรับแต่ละรายการในคอลเลกชัน ในตัวอย่างต่อไปนี้เราได้ทำซ้ำในหลายประเทศ
<div ng-app = "">
   ...
   <p>List of Countries with locale:</p>

   <ol>
      <li ng-repeat = "country in countries">
         {{ 'Country: ' + country.name + ', Locale: ' + country.locale }}
      </li>
   </ol>
</div>
ตัวอย่าง
ตัวอย่างต่อไปนี้จะแสดงคำสั่งที่กล่าวถึงข้างต้นทั้งหมด
testAngularJS.htm
<html>
   <head>
      <title>AngularJS Directives</title>
   </head>

   <body>
      <h1>Sample Application</h1>

      <div ng-app = "" ng-init = "countries = [{locale:'en-US',name:'United States'},
         {locale:'en-GB',name:'United Kingdom'}, {locale:'en-FR',name:'France'}]">
         <p>Enter your Name: <input type = "text" ng-model = "name"></p>
         <p>Hello <span ng-bind = "name"></span>!</p>
         <p>List of Countries with locale:</p>

         <ol>
            <li ng-repeat = "country in countries">
               {{ 'Country: ' + country.name + ', Locale: ' + country.locale }}
            </li>
         </ol>
      </div>

      <script src = "https://ajax.googleapis.com/ajax/libs/angularjs/1.3.14/angular.min.js">
      </script>

   </body>
</html>
เอาต์พุต
เปิด textAngularJS.htm ในเว็บเบราว์เซอร์ ป้อนชื่อของคุณและดูผลลัพธ์
นิพจน์ใช้เพื่อผูกข้อมูลแอปพลิเคชันกับ html นิพจน์เขียนไว้ในวงเล็บปีกกาคู่เช่น {{expression}} นิพจน์ทำงานในลักษณะเดียวกับคำสั่ง ng-bind นิพจน์แอ็พพลิเคชัน AngularJS เป็นนิพจน์จาวาสคริปต์ที่บริสุทธิ์และส่งออกข้อมูลที่ใช้
การใช้ตัวเลข
<p>Expense on Books : {{cost * quantity}} Rs</p>การใช้สตริง
<p>Hello {{student.firstname + " " + student.lastname}}!</p>การใช้วัตถุ
<p>Roll No: {{student.rollno}}</p>ใช้อาร์เรย์
<p>Marks(Math): {{marks[3]}}</p>ตัวอย่าง
ตัวอย่างต่อไปนี้จะแสดงนิพจน์ที่กล่าวถึงข้างต้นทั้งหมด
testAngularJS.htm
<html>
   <head>
      <title>AngularJS Expressions</title>
   </head>

   <body>
      <h1>Sample Application</h1>

      <div ng-app = "" ng-init = "quantity = 1;cost = 30;
         student = {firstname:'Mahesh',lastname:'Parashar',rollno:101};
         marks = [80,90,75,73,60]">
         <p>Hello {{student.firstname + " " + student.lastname}}!</p>
         <p>Expense on Books : {{cost * quantity}} Rs</p>
         <p>Roll No: {{student.rollno}}</p>
         <p>Marks(Math): {{marks[3]}}</p>
      </div>

      <script src = "https://ajax.googleapis.com/ajax/libs/angularjs/1.3.14/angular.min.js">
      </script>

   </body>
</html>
เอาต์พุต
เปิด textAngularJS.htm ในเว็บเบราว์เซอร์ ดูผลลัพธ์
แอปพลิเคชัน AngularJS ส่วนใหญ่อาศัยคอนโทรลเลอร์เพื่อควบคุมการไหลของข้อมูลในแอปพลิเคชัน ตัวควบคุมถูกกำหนดโดยใช้คำสั่ง ng-controller คอนโทรลเลอร์คืออ็อบเจ็กต์ JavaScript ที่มีคุณลักษณะ / คุณสมบัติและฟังก์ชัน คอนโทรลเลอร์แต่ละตัวยอมรับ $ scope เป็นพารามิเตอร์ซึ่งอ้างถึงแอ็พพลิเคชัน / โมดูลที่คอนโทรลเลอร์ใช้ควบคุม
<div ng-app = "" ng-controller = "studentController">
   ...
</div>
ที่นี่เราได้ประกาศตัวควบคุม studentControllerใช้คำสั่ง ng-controller ในขั้นตอนต่อไปเราจะกำหนด studentController ดังนี้ -
<script>
   function studentController($scope) {
      $scope.student = {
         firstName: "Mahesh",
         lastName: "Parashar",

         fullName: function() {
            var studentObject;
            studentObject = $scope.student;
            return studentObject.firstName + " " + studentObject.lastName;
         }
      };
   }
</script>
studentController กำหนดเป็นวัตถุ JavaScript โดยมี $ ขอบเขตเป็นอาร์กิวเมนต์
$ ขอบเขตหมายถึงแอปพลิเคชันที่ใช้วัตถุ studentController
$ scope.student เป็นคุณสมบัติของอ็อบเจ็กต์ studentController
firstName และ lastName เป็นคุณสมบัติสองอย่างของวัตถุ $ scope.student เราได้ส่งผ่านค่าเริ่มต้นไปให้แล้ว
fullName เป็นฟังก์ชันของอ็อบเจ็กต์ $ scope.student ซึ่งมีภารกิจในการส่งคืนชื่อรวม
ในฟังก์ชัน fullName เราได้รับวัตถุนักเรียนจากนั้นส่งคืนชื่อที่รวมกัน
หมายเหตุเรายังสามารถกำหนดออบเจ็กต์คอนโทรลเลอร์ในไฟล์ JS แยกต่างหากและอ้างอิงไฟล์นั้นในเพจ html
ตอนนี้เราสามารถใช้คุณสมบัตินักเรียนของ studentController โดยใช้ ng-model หรือใช้นิพจน์ดังนี้
Enter first name: <input type = "text" ng-model = "student.firstName"><br>
Enter last name: <input type = "text" ng-model = "student.lastName"><br>
<br>
You are entering: {{student.fullName()}}
เราได้กำหนด student.firstName และ student.lastname ไว้ในช่องป้อนข้อมูลสองช่อง
เราได้กำหนด student.fullName () เป็น HTML
ตอนนี้ทุกครั้งที่คุณพิมพ์อะไรก็ได้ในช่องใส่ชื่อและนามสกุลคุณจะเห็นชื่อเต็มได้รับการอัปเดตโดยอัตโนมัติ
ตัวอย่าง
ตัวอย่างต่อไปนี้จะแสดงการใช้คอนโทรลเลอร์
testAngularJS.htm
<html>
   <head>
      <title>Angular JS Controller</title>
      <script src = "https://ajax.googleapis.com/ajax/libs/angularjs/1.3.14/angular.min.js">
      </script>
   </head>

   <body>
      <h2>AngularJS Sample Application</h2>

      <div ng-app = "mainApp" ng-controller = "studentController">
         Enter first name: <input type = "text" ng-model = "student.firstName"><br>
         <br>
         Enter last name: <input type = "text" ng-model = "student.lastName"><br>
         <br>
         You are entering: {{student.fullName()}}
      </div>

      <script>
         var mainApp = angular.module("mainApp", []);

         mainApp.controller('studentController', function($scope) {
            $scope.student = {
               firstName: "Mahesh",
               lastName: "Parashar",

               fullName: function() {
                  var studentObject;
                  studentObject = $scope.student;
                  return studentObject.firstName + " " + studentObject.lastName;
               }
            };
         });
      </script>

   </body>
</html>
เอาต์พุต
เปิด textAngularJS.htm ในเว็บเบราว์เซอร์ ดูผลลัพธ์
ฟิลเตอร์ใช้เพื่อเปลี่ยนแปลงแก้ไขข้อมูลและสามารถใช้ในนิพจน์หรือคำสั่งโดยใช้อักขระไปป์ ต่อไปนี้เป็นรายการตัวกรองที่ใช้กันทั่วไป
| ซีเนียร์ | ชื่อและคำอธิบาย |
|---|---|
| 1 | uppercase แปลงข้อความเป็นข้อความตัวพิมพ์ใหญ่ |
| 2 | lowercase แปลงข้อความเป็นข้อความตัวพิมพ์เล็ก |
| 3 | currency จัดรูปแบบข้อความในรูปแบบสกุลเงิน |
| 4 | filter กรองอาร์เรย์เป็นชุดย่อยตามเกณฑ์ที่ให้ไว้ |
| 5 | orderby สั่งซื้ออาร์เรย์ตามเกณฑ์ที่ให้ไว้ |
ตัวกรองตัวพิมพ์ใหญ่
เพิ่มตัวกรองตัวพิมพ์ใหญ่ให้กับนิพจน์โดยใช้อักขระไปป์ ที่นี่เราได้เพิ่มตัวกรองตัวพิมพ์ใหญ่เพื่อพิมพ์ชื่อนักเรียนด้วยตัวพิมพ์ใหญ่ทั้งหมด
Enter first name:<input type = "text" ng-model = "student.firstName">
Enter last name: <input type = "text" ng-model = "student.lastName">
Name in Upper Case: {{student.fullName() | uppercase}}
ตัวกรองตัวพิมพ์เล็ก
เพิ่มตัวกรองตัวพิมพ์เล็กให้กับนิพจน์โดยใช้อักขระไปป์ ที่นี่เราได้เพิ่มตัวกรองตัวพิมพ์เล็กเพื่อพิมพ์ชื่อนักเรียนด้วยตัวพิมพ์เล็กทั้งหมด
Enter first name:<input type = "text" ng-model = "student.firstName">
Enter last name: <input type = "text" ng-model = "student.lastName">
Name in Lower Case: {{student.fullName() | lowercase}}
ตัวกรองสกุลเงิน
เพิ่มตัวกรองสกุลเงินให้กับนิพจน์ที่ส่งกลับตัวเลขโดยใช้อักขระไปป์ ที่นี่เราได้เพิ่มตัวกรองสกุลเงินเพื่อพิมพ์ค่าธรรมเนียมโดยใช้รูปแบบสกุลเงิน
Enter fees: <input type = "text" ng-model = "student.fees">
fees: {{student.fees | currency}}
ฟิลเตอร์ฟิลเตอร์
ในการแสดงเฉพาะเรื่องที่จำเป็นเราใช้ subjectName เป็นตัวกรอง
Enter subject: <input type = "text" ng-model = "subjectName">
Subject:
<ul>
   <li ng-repeat = "subject in student.subjects | filter: subjectName">
      {{ subject.name + ', marks:' + subject.marks }}
   </li>
</ul>
orderby กรอง
ในการสั่งซื้อวิชาด้วยเครื่องหมายเราใช้เครื่องหมาย orderBy
Subject:
<ul>
   <li ng-repeat = "subject in student.subjects | orderBy:'marks'">
      {{ subject.name + ', marks:' + subject.marks }}
   </li>
</ul>
ตัวอย่าง
ตัวอย่างต่อไปนี้จะแสดงตัวกรองที่กล่าวถึงข้างต้นทั้งหมด
testAngularJS.htm
<html>
   <head>
      <title>Angular JS Filters</title>
      <script src = "https://ajax.googleapis.com/ajax/libs/angularjs/1.3.14/angular.min.js">
      </script>
   </head>

   <body>
      <h2>AngularJS Sample Application</h2>

      <div ng-app = "mainApp" ng-controller = "studentController">
         <table border = "0">
            <tr>
               <td>Enter first name:</td>
               <td><input type = "text" ng-model = "student.firstName"></td>
            </tr>
            <tr>
               <td>Enter last name: </td>
               <td><input type = "text" ng-model = "student.lastName"></td>
            </tr>
            <tr>
               <td>Enter fees: </td>
               <td><input type = "text" ng-model = "student.fees"></td>
            </tr>
            <tr>
               <td>Enter subject: </td>
               <td><input type = "text" ng-model = "subjectName"></td>
            </tr>
         </table>
         <br/>

         <table border = "0">
            <tr>
               <td>Name in Upper Case: </td><td>{{student.fullName() | uppercase}}</td>
            </tr>
            <tr>
               <td>Name in Lower Case: </td><td>{{student.fullName() | lowercase}}</td>
            </tr>
            <tr>
               <td>fees: </td><td>{{student.fees | currency}}
               </td>
            </tr>
            <tr>
               <td>Subject:</td>
               <td>
                  <ul>
                     <li ng-repeat = "subject in student.subjects | filter: subjectName |orderBy:'marks'">
                        {{ subject.name + ', marks:' + subject.marks }}
                     </li>
                  </ul>
               </td>
            </tr>
         </table>
      </div>

      <script>
         var mainApp = angular.module("mainApp", []);

         mainApp.controller('studentController', function($scope) {
            $scope.student = {
               firstName: "Mahesh",
               lastName: "Parashar",
               fees:500,

               subjects:[
                  {name:'Physics',marks:70},
                  {name:'Chemistry',marks:80},
                  {name:'Math',marks:65}
               ],

               fullName: function() {
                  var studentObject;
                  studentObject = $scope.student;
                  return studentObject.firstName + " " + studentObject.lastName;
               }
            };
         });
      </script>

   </body>
</html>
เอาต์พุต
เปิด textAngularJS.htm ในเว็บเบราว์เซอร์ ดูผลลัพธ์
โดยปกติข้อมูลตารางสามารถทำซ้ำได้ตามธรรมชาติ ng-repeat directive สามารถใช้วาดตารางได้อย่างง่ายดาย ตัวอย่างต่อไปนี้ระบุการใช้คำสั่ง ng-repeat เพื่อวาดตาราง
<table>
   <tr>
      <th>Name</th>
      <th>Marks</th>
   </tr>

   <tr ng-repeat = "subject in student.subjects">
      <td>{{ subject.name }}</td>
      <td>{{ subject.marks }}</td>
   </tr>
</table>
สามารถจัดสไตล์ตารางได้โดยใช้ CSS Styling
<style>
   table, th , td {
      border: 1px solid grey;
      border-collapse: collapse;
      padding: 5px;
   }

   table tr:nth-child(odd) {
      background-color: #f2f2f2;
   }

   table tr:nth-child(even) {
      background-color: #ffffff;
   }
</style>
ตัวอย่าง
ตัวอย่างต่อไปนี้จะแสดงคำสั่งที่กล่าวถึงข้างต้นทั้งหมด
testAngularJS.htm
<html>
   <head>
      <title>Angular JS Table</title>
      <script src = "https://ajax.googleapis.com/ajax/libs/angularjs/1.3.14/angular.min.js"></script>

      <style>
         table, th , td {
            border: 1px solid grey;
            border-collapse: collapse;
            padding: 5px;
         }

         table tr:nth-child(odd) {
            background-color: #f2f2f2;
         }

         table tr:nth-child(even) {
            background-color: #ffffff;
         }
      </style>
   </head>

   <body>
      <h2>AngularJS Sample Application</h2>
      <div ng-app = "mainApp" ng-controller = "studentController">

         <table border = "0">
            <tr>
               <td>Enter first name:</td>
               <td><input type = "text" ng-model = "student.firstName"></td>
            </tr>
            <tr>
               <td>Enter last name: </td>
               <td>
                  <input type = "text" ng-model = "student.lastName">
               </td>
            </tr>
            <tr>
               <td>Name: </td>
               <td>{{student.fullName()}}</td>
            </tr>
            <tr>
               <td>Subject:</td>

               <td>
                  <table>
                     <tr>
                        <th>Name</th>.
                        <th>Marks</th>
                     </tr>
                     <tr ng-repeat = "subject in student.subjects">
                        <td>{{ subject.name }}</td>
                        <td>{{ subject.marks }}</td>
                     </tr>
                  </table>
               </td>
            </tr>
         </table>
      </div>

      <script>
         var mainApp = angular.module("mainApp", []);

         mainApp.controller('studentController', function($scope) {
            $scope.student = {
               firstName: "Mahesh",
               lastName: "Parashar",
               fees:500,

               subjects:[
                  {name:'Physics',marks:70},
                  {name:'Chemistry',marks:80},
                  {name:'Math',marks:65},
                  {name:'English',marks:75},
                  {name:'Hindi',marks:67}
               ],

               fullName: function() {
                  var studentObject;
                  studentObject = $scope.student;
                  return studentObject.firstName + " " + studentObject.lastName;
               }
            };
         });
      </script>

   </body>
</html>
เอาต์พุต
เปิด textAngularJS.htm ในเว็บเบราว์เซอร์ ดูผลลัพธ์
คำสั่งต่อไปนี้สามารถใช้เพื่อผูกข้อมูลแอปพลิเคชันกับแอตทริบิวต์ของ HTML DOM Elements
| ซีเนียร์ | ชื่อและคำอธิบาย |
|---|---|
| 1 | ng-disabled ปิดใช้งานการควบคุมที่กำหนด |
| 2 | ng-show แสดงการควบคุมที่กำหนด |
| 3 | ng-hide ซ่อนการควบคุมที่กำหนด |
| 4 | ng-click แทนเหตุการณ์คลิก AngularJS |
คำสั่ง ng-disabled
เพิ่มแอตทริบิวต์ ng-disabled ลงในปุ่ม HTML และส่งต่อแบบจำลอง ผูกโมเดลเข้ากับช่องทำเครื่องหมายและดูรูปแบบ
<input type = "checkbox" ng-model = "enableDisableButton">Disable Button
<button ng-disabled = "enableDisableButton">Click Me!</button>
คำสั่ง ng-show
เพิ่มคุณสมบัติ ng-show ลงในปุ่ม HTML และส่งผ่านโมเดล ผูกโมเดลเข้ากับช่องทำเครื่องหมายและดูรูปแบบ
<input type = "checkbox" ng-model = "showHide1">Show Button
<button ng-show = "showHide1">Click Me!</button>
คำสั่ง ng-hide
เพิ่มแอตทริบิวต์ ng-hide ให้กับปุ่ม HTML และส่งต่อแบบจำลอง ผูกโมเดลเข้ากับช่องทำเครื่องหมายและดูรูปแบบ
<input type = "checkbox" ng-model = "showHide2">Hide Button
<button ng-hide = "showHide2">Click Me!</button>
คำสั่ง ng-click
เพิ่มแอตทริบิวต์ ng-click ลงในปุ่ม HTML และอัปเดตโมเดล ผูกโมเดลกับ html แล้วดูรูปแบบ
<p>Total click: {{ clickCounter }}</p>
<button ng-click = "clickCounter = clickCounter + 1">Click Me!</button>
ตัวอย่าง
ตัวอย่างต่อไปนี้จะแสดงคำสั่งที่กล่าวถึงข้างต้นทั้งหมด
testAngularJS.htm
<html>
   <head>
      <title>AngularJS HTML DOM</title>
   </head>

   <body>
      <h2>AngularJS Sample Application</h2>

      <div ng-app = "">
         <table border = "0">
            <tr>
               <td><input type = "checkbox" ng-model = "enableDisableButton">Disable Button</td>
               <td><button ng-disabled = "enableDisableButton">Click Me!</button></td>
            </tr>

            <tr>
               <td><input type = "checkbox" ng-model = "showHide1">Show Button</td>
               <td><button ng-show = "showHide1">Click Me!</button></td>
            </tr>

            <tr>
               <td><input type = "checkbox" ng-model = "showHide2">Hide Button</td>
               <td><button ng-hide = "showHide2">Click Me!</button></td>
            </tr>

            <tr>
               <td><p>Total click: {{ clickCounter }}</p></td>
               <td><button ng-click = "clickCounter = clickCounter + 1">Click Me!</button></td>
            </tr>
         </table>
      </div>

      <script src = "https://ajax.googleapis.com/ajax/libs/angularjs/1.3.14/angular.min.js">
      </script>

   </body>
</html>
เอาต์พุต
เปิด textAngularJS.htm ในเว็บเบราว์เซอร์ ดูผลลัพธ์
AngularJS สนับสนุนวิธีการแบบแยกส่วน โมดูลใช้เพื่อแยกลอจิกกล่าวว่าบริการตัวควบคุมแอปพลิเคชัน ฯลฯ และรักษารหัสให้สะอาด เรากำหนดโมดูลในไฟล์ js แยกกันและตั้งชื่อตามไฟล์ module.js ในตัวอย่างนี้เราจะสร้างโมดูลสองโมดูล
Application Module - ใช้เพื่อเริ่มต้นแอปพลิเคชันด้วยคอนโทรลเลอร์
Controller Module - ใช้เพื่อกำหนดคอนโทรลเลอร์
โมดูลแอปพลิเคชัน
mainApp.js
var mainApp = angular.module("mainApp", []);ที่นี่เราได้ประกาศแอปพลิเคชัน mainAppโมดูลที่ใช้ฟังก์ชัน angular.module เราได้ส่งอาร์เรย์ว่างไป โดยทั่วไปอาร์เรย์นี้ประกอบด้วยโมดูลที่ขึ้นต่อกัน
โมดูลคอนโทรลเลอร์
studentController.js
mainApp.controller("studentController", function($scope) {
   $scope.student = {
      firstName: "Mahesh",
      lastName: "Parashar",
      fees:500,

      subjects:[
         {name:'Physics',marks:70},
         {name:'Chemistry',marks:80},
         {name:'Math',marks:65},
         {name:'English',marks:75},
         {name:'Hindi',marks:67}
      ],

      fullName: function() {
         var studentObject;
         studentObject = $scope.student;
         return studentObject.firstName + " " + studentObject.lastName;
      }
   };
});
ที่นี่เราได้ประกาศตัวควบคุม studentController โมดูลที่ใช้ฟังก์ชัน mainApp.controller
ใช้โมดูล
<div ng-app = "mainApp" ng-controller = "studentController">
   ...
   <script src = "mainApp.js"></script>
   <script src = "studentController.js"></script>

</div>
ที่นี่เราใช้โมดูลแอปพลิเคชันโดยใช้คำสั่ง ng-app และตัวควบคุมโดยใช้คำสั่ง ng-controller เราได้นำเข้า mainApp.js และ studentController.js ในหน้า html หลัก
ตัวอย่าง
ตัวอย่างต่อไปนี้จะแสดงโมดูลที่กล่าวถึงข้างต้นทั้งหมด
testAngularJS.htm
<html>
   <head>
      <title>Angular JS Modules</title>
      <script src = "https://ajax.googleapis.com/ajax/libs/angularjs/1.3.14/angular.min.js"></script>
      <script src = "/angularjs/src/module/mainApp.js"></script>
      <script src = "/angularjs/src/module/studentController.js"></script>

      <style>
         table, th , td {
            border: 1px solid grey;
            border-collapse: collapse;
            padding: 5px;
         }

         table tr:nth-child(odd) {
            background-color: #f2f2f2;
         }

         table tr:nth-child(even) {
            background-color: #ffffff;
         }
      </style>
   </head>

   <body>
      <h2>AngularJS Sample Application</h2>
      <div ng-app = "mainApp" ng-controller = "studentController">

         <table border = "0">
            <tr>
               <td>Enter first name:</td>
               <td><input type = "text" ng-model = "student.firstName"></td>
            </tr>

            <tr>
               <td>Enter last name: </td>
               <td><input type = "text" ng-model = "student.lastName"></td>
            </tr>

            <tr>
               <td>Name: </td>
               <td>{{student.fullName()}}</td>
            </tr>

            <tr>
               <td>Subject:</td>

               <td>
                  <table>
                     <tr>
                        <th>Name</th>
                        <th>Marks</th>
                     </tr>
                     <tr ng-repeat = "subject in student.subjects">
                        <td>{{ subject.name }}</td>
                        <td>{{ subject.marks }}</td>
                     </tr>
                  </table>
               </td>
            </tr>
         </table>
      </div>

   </body>
</html>
mainApp.js
var mainApp = angular.module("mainApp", []);studentController.js
mainApp.controller("studentController", function($scope) {
   $scope.student = {
      firstName: "Mahesh",
      lastName: "Parashar",
      fees:500,

      subjects:[
         {name:'Physics',marks:70},
         {name:'Chemistry',marks:80},
         {name:'Math',marks:65},
         {name:'English',marks:75},
         {name:'Hindi',marks:67}
      ],

      fullName: function() {
         var studentObject;
         studentObject = $scope.student;
         return studentObject.firstName + " " + studentObject.lastName;
      }
   };
});
เอาต์พุต
เปิด textAngularJS.htm ในเว็บเบราว์เซอร์ ดูผลลัพธ์
AngularJS เสริมสร้างการกรอกแบบฟอร์มและการตรวจสอบความถูกต้อง เราสามารถใช้ ng-click เพื่อจัดการ AngularJS click ที่ปุ่มและใช้แฟล็ก $ dirty และ $ invalid เพื่อทำการตรวจสอบความถูกต้องในลักษณะที่ดูเหมือนจะไม่ถูกต้อง ใช้ novalidate กับการประกาศแบบฟอร์มเพื่อปิดใช้งานการตรวจสอบความถูกต้องเฉพาะเบราว์เซอร์ใด ๆ การควบคุมแบบฟอร์มใช้ประโยชน์จากเหตุการณ์เชิงมุมเป็นจำนวนมาก มาดูเหตุการณ์อย่างรวดเร็วก่อน
เหตุการณ์
AngularJS มีหลายเหตุการณ์ที่สามารถเชื่อมโยงกับตัวควบคุม HTML ตัวอย่างเช่น ng-click ปกติจะเชื่อมโยงกับปุ่ม ต่อไปนี้เป็นเหตุการณ์ที่รองรับใน Angular JS
- ng-click
- ng-dbl-click
- ng-mousedown
- ng-mouseup
- ng-mouseenter
- ng-mouseleave
- ng-mousemove
- ng-mouseover
- ng-keydown
- ng-keyup
- ng-keypress
- ng-change
ng- คลิก
รีเซ็ตข้อมูลของแบบฟอร์มโดยใช้คำสั่งเมื่อคลิกปุ่ม
<input name = "firstname" type = "text" ng-model = "firstName" required>
<input name = "lastname" type = "text" ng-model = "lastName" required>
<input name = "email" type = "email" ng-model = "email" required>
<button ng-click = "reset()">Reset</button>

<script>
   function studentController($scope) {
      $scope.reset = function() {
         $scope.firstName = "Mahesh";
         $scope.lastName = "Parashar";
         $scope.email = "[email protected]";
      }

      $scope.reset();
   }
</script>
ตรวจสอบข้อมูล
ต่อไปนี้สามารถใช้เพื่อติดตามข้อผิดพลาด
$dirty - ระบุว่ามีการเปลี่ยนแปลงค่า
$invalid - ระบุว่าค่าที่ป้อนไม่ถูกต้อง
$error - ระบุข้อผิดพลาดที่แน่นอน
ตัวอย่าง
ตัวอย่างต่อไปนี้จะแสดงคำสั่งที่กล่าวถึงข้างต้นทั้งหมด
testAngularJS.htm
<html>
   <head>
      <title>Angular JS Forms</title>
      <script src = "https://ajax.googleapis.com/ajax/libs/angularjs/1.3.14/angular.min.js"></script>

      <style>
         table, th , td {
            border: 1px solid grey;
            border-collapse: collapse;
            padding: 5px;
         }

         table tr:nth-child(odd) {
            background-color: #f2f2f2;
         }

         table tr:nth-child(even) {
            background-color: #ffffff;
         }
      </style>

   </head>
   <body>

      <h2>AngularJS Sample Application</h2>
      <div ng-app = "mainApp" ng-controller = "studentController">

         <form name = "studentForm" novalidate>
            <table border = "0">
               <tr>
                  <td>Enter first name:</td>
                  <td><input name = "firstname" type = "text" ng-model = "firstName" required>
                     <span style = "color:red" ng-show = "studentForm.firstname.$dirty && studentForm.firstname.$invalid">
                        <span ng-show = "studentForm.firstname.$error.required">First Name is required.</span>
                     </span>
                  </td>
               </tr>

               <tr>
                  <td>Enter last name: </td>
                  <td><input name = "lastname"  type = "text" ng-model = "lastName" required>
                     <span style = "color:red" ng-show = "studentForm.lastname.$dirty && studentForm.lastname.$invalid">
                        <span ng-show = "studentForm.lastname.$error.required">Last Name is required.</span>
                     </span>
                  </td>
               </tr>

               <tr>
                  <td>Email: </td><td><input name = "email" type = "email" ng-model = "email" length = "100" required>
                     <span style = "color:red" ng-show = "studentForm.email.$dirty && studentForm.email.$invalid">
                        <span ng-show = "studentForm.email.$error.required">Email is required.</span>
                        <span ng-show = "studentForm.email.$error.email">Invalid email address.</span>
                     </span>
                  </td>
               </tr>

               <tr>
                  <td>
                     <button ng-click = "reset()">Reset</button>
                  </td>
                  <td>
                     <button ng-disabled = "studentForm.firstname.$dirty &&
                        studentForm.firstname.$invalid || studentForm.lastname.$dirty &&
                        studentForm.lastname.$invalid || studentForm.email.$dirty &&
                        studentForm.email.$invalid" ng-click="submit()">Submit</button>
                  </td>
               </tr>

            </table>
         </form>
      </div>

      <script>
         var mainApp = angular.module("mainApp", []);

         mainApp.controller('studentController', function($scope) {
            $scope.reset = function() {
               $scope.firstName = "Mahesh";
               $scope.lastName = "Parashar";
               $scope.email = "[email protected]";
            }

            $scope.reset();
         });
      </script>

   </body>
</html>
เอาต์พุต
เปิด textAngularJS.htm ในเว็บเบราว์เซอร์ ดูผลลัพธ์
HTML ไม่สนับสนุนการฝังหน้า html ภายในหน้า html เพื่อให้บรรลุฟังก์ชันนี้ใช้วิธีต่อไปนี้ -
Using Ajax - โทรหาเซิร์ฟเวอร์เพื่อรับหน้า html ที่เกี่ยวข้องและตั้งค่าเป็น innerHTML ของการควบคุม html
Using Server Side Includes - JSP, PHP และเทคโนโลยีเซิร์ฟเวอร์ฝั่งเว็บอื่น ๆ สามารถรวมเพจ html ไว้ในเพจไดนามิก
การใช้ AngularJS เราสามารถฝังหน้า HTML ภายในหน้า HTML โดยใช้คำสั่ง ng-include
<div ng-app = "" ng-controller = "studentController">
   <div ng-include = "'main.htm'"></div>
   <div ng-include = "'subjects.htm'"></div>
</div>
ตัวอย่าง
tryAngularJS.htm
<html>
   <head>
      <title>Angular JS Includes</title>
      <script src = "https://ajax.googleapis.com/ajax/libs/angularjs/1.3.14/angular.min.js">
      </script>

      <style>
         table, th , td {
            border: 1px solid grey;
            border-collapse: collapse;
            padding: 5px;
         }

         table tr:nth-child(odd) {
            background-color: #f2f2f2;
         }

         table tr:nth-child(even) {
            background-color: #ffffff;
         }
      </style>
   </head>

   <body>
      <h2>AngularJS Sample Application</h2>

      <div ng-app = "mainApp" ng-controller = "studentController">
         <div ng-include = "'/angularjs/src/include/main.htm'"></div>
         <div ng-include = "'/angularjs/src/include/subjects.htm'"></div>
      </div>

      <script>
         var mainApp = angular.module("mainApp", []);

         mainApp.controller('studentController', function($scope) {
            $scope.student = {
               firstName: "Mahesh",
               lastName: "Parashar",
               fees:500,

               subjects:[
                  {name:'Physics',marks:70},
                  {name:'Chemistry',marks:80},
                  {name:'Math',marks:65},
                  {name:'English',marks:75},
                  {name:'Hindi',marks:67}
               ],

               fullName: function() {
                  var studentObject;
                  studentObject = $scope.student;
                  return studentObject.firstName + " " + studentObject.lastName;
               }
            };
         });
      </script>

   </body>
</html>
main.htm
<table border = "0">
   <tr>
      <td>Enter first name:</td>
      <td><input type = "text" ng-model = "student.firstName"></td>
   </tr>

   <tr>
      <td>Enter last name: </td>
      <td><input type = "text" ng-model = "student.lastName"></td>
   </tr>

   <tr>
      <td>Name: </td>
      <td>{{student.fullName()}}</td>
   </tr>
</table>
subjects.htm
<p>Subjects:</p>
<table>
   <tr>
      <th>Name</th>
      <th>Marks</th>
   </tr>

   <tr ng-repeat = "subject in student.subjects">
      <td>{{ subject.name }}</td>
      <td>{{ subject.marks }}</td>
   </tr>
</table>
เอาต์พุต
ในการรันตัวอย่างนี้คุณต้องปรับใช้ textAngularJS.htm, main.htm และ subjects.htm กับเว็บเซิร์ฟเวอร์ เปิด textAngularJS.htm โดยใช้ url ของเซิร์ฟเวอร์ของคุณในเว็บเบราว์เซอร์ ดูผลลัพธ์
AngularJS ให้ $ https: การควบคุมซึ่งทำงานเป็นบริการเพื่ออ่านข้อมูลจากเซิร์ฟเวอร์ เซิร์ฟเวอร์ทำการเรียกฐานข้อมูลเพื่อรับระเบียนที่ต้องการ AngularJS ต้องการข้อมูลในรูปแบบ JSON เมื่อข้อมูลพร้อมแล้วสามารถใช้ $ https: เพื่อรับข้อมูลจากเซิร์ฟเวอร์ในลักษณะต่อไปนี้ -
function studentController($scope,$https:) {
   var url = "data.txt";

   $https:.get(url).success( function(response) {
      $scope.students = response;
   });
}
ที่นี่ไฟล์ data.txt มีบันทึกของนักเรียน $ https: บริการโทร ajax และตั้งค่าการตอบสนองต่อนักเรียนของสถานที่ให้บริการ แบบจำลองนักเรียนสามารถใช้เพื่อวาดตารางใน HTML
ตัวอย่าง
data.txt
[
   {
      "Name" : "Mahesh Parashar",
      "RollNo" : 101,
      "Percentage" : "80%"
   },

   {
      "Name" : "Dinkar Kad",
      "RollNo" : 201,
      "Percentage" : "70%"
   },

   {
      "Name" : "Robert",
      "RollNo" : 191,
      "Percentage" : "75%"
   },

   {
      "Name" : "Julian Joe",
      "RollNo" : 111,
      "Percentage" : "77%"
   }
]
testAngularJS.htm
<html>
   <head>
      <title>Angular JS Includes</title>

      <style>
         table, th , td {
            border: 1px solid grey;
            border-collapse: collapse;
            padding: 5px;
         }

         table tr:nth-child(odd) {
            background-color: #f2f2f2;
         }

         table tr:nth-child(even) {
            background-color: #ffffff;
         }
      </style>
   </head>

   <body>
      <h2>AngularJS Sample Application</h2>
      <div ng-app = "" ng-controller = "studentController">

         <table>
            <tr>
               <th>Name</th>
               <th>Roll No</th>
               <th>Percentage</th>
            </tr>

            <tr ng-repeat = "student in students">
               <td>{{ student.Name }}</td>
               <td>{{ student.RollNo }}</td>
               <td>{{ student.Percentage }}</td>
            </tr>
         </table>
      </div>

      <script>
         function studentController($scope,$http) {
            var url = "data.txt";

            $http.get(url).then( function(response) {
               $scope.students = response.data;
            });
         }
      </script>

      <script src = "https://ajax.googleapis.com/ajax/libs/angularjs/1.2.15/angular.min.js">
      </script>

   </body>
</html>
เอาต์พุต
ในการดำเนินการตัวอย่างนี้คุณต้องปรับใช้ไฟล์ testAngularJS.htmและdata.txtกับเว็บเซิร์ฟเวอร์ เปิดไฟล์testAngularJS.htmโดยใช้ URL ของเซิร์ฟเวอร์ของคุณในเว็บเบราว์เซอร์และดูผลลัพธ์
AngularJS รองรับ Single Page Application ผ่านหลายมุมมองในหน้าเดียว การทำ AngularJS นี้ได้จัดเตรียมคำสั่ง ng-view และ ng-template และบริการ $ routeProvider
ng-view
แท็ก ng-view จะสร้างตัวยึดที่ซึ่งสามารถวางมุมมองที่เกี่ยวข้อง (มุมมอง html หรือ ng-template) ตามการกำหนดค่า
การใช้งาน
กำหนด div ด้วย ng-view ภายในโมดูลหลัก
<div ng-app = "mainApp">
   ...
   <div ng-view></div>

</div>
ng-template
คำสั่ง ng-template ใช้เพื่อสร้างมุมมอง html โดยใช้แท็กสคริปต์ มันมีแอตทริบิวต์ "id" ซึ่ง $ routeProvider ใช้เพื่อแมปมุมมองกับคอนโทรลเลอร์
การใช้งาน
กำหนดบล็อกสคริปต์ด้วย type เป็น ng-template ภายในโมดูลหลัก
<div ng-app = "mainApp">
   ...

   <script type = "text/ng-template" id = "addStudent.htm">
      <h2> Add Student </h2>
      {{message}}
   </script>

</div>
$ routeProvider
$ routeProvider เป็นบริการหลักที่ตั้งค่าการกำหนดค่าของ url แมปกับหน้า html หรือ ng-template ที่เกี่ยวข้องและแนบคอนโทรลเลอร์ด้วยสิ่งเดียวกัน
การใช้งาน
กำหนดบล็อกสคริปต์ด้วยโมดูลหลักและตั้งค่าการกำหนดเส้นทาง
var mainApp = angular.module("mainApp", ['ngRoute']);

mainApp.config(['$routeProvider', function($routeProvider) {
   $routeProvider

   .when('/addStudent', {
      templateUrl: 'addStudent.htm', controller: 'AddStudentController'
   })

   .when('/viewStudents', {
      templateUrl: 'viewStudents.htm', controller: 'ViewStudentsController'
   })

   .otherwise ({
      redirectTo: '/addStudent'
   });

}]);
ต่อไปนี้เป็นประเด็นสำคัญที่ต้องพิจารณาในตัวอย่างข้างต้น
$ routeProvider ถูกกำหนดให้เป็นฟังก์ชันภายใต้ config ของโมดูล mainApp โดยใช้คีย์เป็น '$ routeProvider'
$ routeProvider.when กำหนด url "/ addStudent" ซึ่งจะแมปกับ "addStudent.htm" addStudent.htm ควรอยู่ในพา ธ เดียวกับเพจ html หลักหากไม่ได้กำหนดเพจ htm ดังนั้น ng-template ที่จะใช้กับ id = "addStudent.htm" เราใช้ ng-template
"มิฉะนั้น" ใช้เพื่อตั้งค่ามุมมองเริ่มต้น
"ตัวควบคุม" ใช้เพื่อตั้งค่าตัวควบคุมที่เกี่ยวข้องสำหรับมุมมอง
ตัวอย่าง
ตัวอย่างต่อไปนี้จะแสดงคำสั่งที่กล่าวถึงข้างต้นทั้งหมด
testAngularJS.htm
<html>
   <head>
      <title>Angular JS Views</title>
      <script src = "https://ajax.googleapis.com/ajax/libs/angularjs/1.3.14/angular.min.js"></script>
      <script src = "https://ajax.googleapis.com/ajax/libs/angularjs/1.3.14/angular-route.min.js">
      </script>
   </head>

   <body>
      <h2>AngularJS Sample Application</h2>
      <div ng-app = "mainApp">
         <p><a href = "#addStudent">Add Student</a></p>
         <p><a href = "#viewStudents">View Students</a></p>
         <div ng-view></div>

         <script type = "text/ng-template" id = "addStudent.htm">
            <h2> Add Student </h2>
            {{message}}
         </script>

         <script type = "text/ng-template" id = "viewStudents.htm">
            <h2> View Students </h2>
            {{message}}
         </script>
      </div>

      <script>
         var mainApp = angular.module("mainApp", ['ngRoute']);
         mainApp.config(['$routeProvider', function($routeProvider) {
            $routeProvider

            .when('/addStudent', {
               templateUrl: 'addStudent.htm',
               controller: 'AddStudentController'
            })

            .when('/viewStudents', {
               templateUrl: 'viewStudents.htm',
               controller: 'ViewStudentsController'
            })

            .otherwise({
               redirectTo: '/addStudent'
            });
         }]);

         mainApp.controller('AddStudentController', function($scope) {
            $scope.message = "This page will be used to display add student form";
         });

         mainApp.controller('ViewStudentsController', function($scope) {
            $scope.message = "This page will be used to display all the students";
         });
      </script>

   </body>
</html>
ผลลัพธ์
เปิด textAngularJS.htm ในเว็บเบราว์เซอร์ ดูผลลัพธ์
ขอบเขตเป็นวัตถุจาวาสคริปต์พิเศษที่มีบทบาทในการเข้าร่วมคอนโทรลเลอร์กับมุมมอง ขอบเขตประกอบด้วยข้อมูลแบบจำลอง ในคอนโทรลเลอร์ข้อมูลโมเดลจะถูกเข้าถึงผ่านวัตถุ $ ขอบเขต
<script>
   var mainApp = angular.module("mainApp", []);

   mainApp.controller("shapeController", function($scope) {
      $scope.message = "In shape controller";
      $scope.type = "Shape";
   });
</script>
ต่อไปนี้เป็นประเด็นสำคัญที่ต้องพิจารณาในตัวอย่างข้างต้น
$ ขอบเขตถูกส่งผ่านเป็นอาร์กิวเมนต์แรกไปยังคอนโทรลเลอร์ระหว่างนิยามตัวสร้าง
$ scope.message และ $ scope.type เป็นโมเดลที่จะใช้ในเพจ HTML
เราได้กำหนดค่าเป็นแบบจำลองซึ่งจะแสดงในโมดูลแอปพลิเคชันที่มีคอนโทรลเลอร์เป็น shapeController
เราสามารถกำหนดฟังก์ชันได้เช่นกันใน $ scope
ขอบเขตการสืบทอด
ขอบเขตเป็นตัวควบคุมเฉพาะ หากเรากำหนดตัวควบคุมที่ซ้อนกันตัวควบคุมลูกจะสืบทอดขอบเขตของตัวควบคุมหลัก
<script>
   var mainApp = angular.module("mainApp", []);

   mainApp.controller("shapeController", function($scope) {
      $scope.message = "In shape controller";
      $scope.type = "Shape";
   });

   mainApp.controller("circleController", function($scope) {
      $scope.message = "In circle controller";
   });

</script>
ต่อไปนี้เป็นประเด็นสำคัญที่ต้องพิจารณาในตัวอย่างข้างต้น
เราได้กำหนดค่าเป็นโมเดลใน shapeController
เราได้ลบล้างข้อความใน CircleController ตัวควบคุมเด็ก เมื่อ "ข้อความ" ถูกใช้ภายในโมดูลของคอนโทรลเลอร์ circleController ข้อความที่ถูกแทนที่จะถูกใช้
ตัวอย่าง
ตัวอย่างต่อไปนี้จะแสดงคำสั่งที่กล่าวถึงข้างต้นทั้งหมด
testAngularJS.htm
<html>
   <head>
      <title>Angular JS Forms</title>
   </head>

   <body>
      <h2>AngularJS Sample Application</h2>

      <div ng-app = "mainApp" ng-controller = "shapeController">
         <p>{{message}} <br/> {{type}} </p>

         <div ng-controller = "circleController">
            <p>{{message}} <br/> {{type}} </p>
         </div>

         <div ng-controller = "squareController">
            <p>{{message}} <br/> {{type}} </p>
         </div>

      </div>
      <script src = "https://ajax.googleapis.com/ajax/libs/angularjs/1.3.14/angular.min.js">
      </script>

      <script>
         var mainApp = angular.module("mainApp", []);

         mainApp.controller("shapeController", function($scope) {
            $scope.message = "In shape controller";
            $scope.type = "Shape";
         });

         mainApp.controller("circleController", function($scope) {
            $scope.message = "In circle controller";
         });

         mainApp.controller("squareController", function($scope) {
            $scope.message = "In square controller";
            $scope.type = "Square";
         });

      </script>

   </body>
</html>
ผลลัพธ์
เปิด textAngularJS.htm ในเว็บเบราว์เซอร์ ดูผลลัพธ์
AngularJS สนับสนุนแนวคิดของ "การแยกข้อกังวล" โดยใช้สถาปัตยกรรมบริการ บริการเป็นฟังก์ชั่นจาวาสคริปต์และรับผิดชอบในการทำงานบางอย่างเท่านั้น สิ่งนี้ทำให้เป็นเอนทิตีแต่ละตัวที่สามารถบำรุงรักษาและทดสอบได้ ตัวควบคุมตัวกรองสามารถเรียกได้ตามความต้องการ โดยปกติบริการจะฉีดโดยใช้กลไกการฉีดแบบพึ่งพาของ AngularJS
AngularJS มีบริการในตัวมากมายเช่น $ https :, $ route, $ window, $ location เป็นต้นแต่ละบริการมีหน้าที่รับผิดชอบงานเฉพาะเช่น $ https: ใช้ในการโทร ajax เพื่อรับข้อมูลเซิร์ฟเวอร์ $ route ใช้เพื่อกำหนดข้อมูลเส้นทางและอื่น ๆ บริการ Inbuilt จะขึ้นต้นด้วยสัญลักษณ์ $ เสมอ
มีสองวิธีในการสร้างบริการ
- factory
- service
ใช้วิธีโรงงาน
ใช้วิธีการโรงงานก่อนอื่นเรากำหนดโรงงานจากนั้นกำหนดวิธีการให้
var mainApp = angular.module("mainApp", []);
mainApp.factory('MathService', function() {
   var factory = {};

   factory.multiply = function(a, b) {
      return a * b
   }

   return factory;
});
ใช้วิธีการบริการ
ใช้วิธีการบริการเรากำหนดบริการจากนั้นกำหนดวิธีการให้ นอกจากนี้เรายังได้ฉีดบริการที่มีอยู่แล้วให้กับมัน
mainApp.service('CalcService', function(MathService) {
   this.square = function(a) {
      return MathService.multiply(a,a);
   }
});
ตัวอย่าง
ตัวอย่างต่อไปนี้จะแสดงคำสั่งที่กล่าวถึงข้างต้นทั้งหมด
testAngularJS.htm
<html>
   <head>
      <title>Angular JS Services</title>
      <script src = "https://ajax.googleapis.com/ajax/libs/angularjs/1.3.14/angular.min.js">
      </script>
   </head>

   <body>
      <h2>AngularJS Sample Application</h2>

      <div ng-app = "mainApp" ng-controller = "CalcController">
         <p>Enter a number: <input type = "number" ng-model = "number" /></p>
         <button ng-click = "square()">X<sup>2</sup></button>
         <p>Result: {{result}}</p>
      </div>

      <script>
         var mainApp = angular.module("mainApp", []);

         mainApp.factory('MathService', function() {
            var factory = {};

            factory.multiply = function(a, b) {
               return a * b
            }
            return factory;
         });

         mainApp.service('CalcService', function(MathService) {
            this.square = function(a) {
               return MathService.multiply(a,a);
            }
         });

         mainApp.controller('CalcController', function($scope, CalcService) {
            $scope.square = function() {
               $scope.result = CalcService.square($scope.number);
            }
         });
      </script>

   </body>
</html>
ผลลัพธ์
เปิด textAngularJS.htm ในเว็บเบราว์เซอร์ ดูผลลัพธ์
Dependency Injection เป็นรูปแบบการออกแบบซอฟต์แวร์ที่ส่วนประกอบต่างๆได้รับการอ้างอิงแทนที่จะเข้ารหัสอย่างหนักภายในส่วนประกอบ สิ่งนี้ช่วยลดส่วนประกอบจากการค้นหาการอ้างอิงและทำให้การอ้างอิงสามารถกำหนดค่าได้ สิ่งนี้ช่วยในการทำให้ส่วนประกอบสามารถนำกลับมาใช้ใหม่บำรุงรักษาและทดสอบได้
AngularJS มีกลไก Dependency Injection ที่ดีเยี่ยม มีส่วนประกอบหลักดังต่อไปนี้ซึ่งสามารถฉีดเข้าด้วยกันเป็นการอ้างอิง
- value
- factory
- service
- provider
- constant
มูลค่า
ค่าเป็นวัตถุ javascript ธรรมดาและใช้เพื่อส่งผ่านค่าไปยังคอนโทรลเลอร์ในระหว่างขั้นตอนการกำหนดค่า
//define a module
var mainApp = angular.module("mainApp", []);

//create a value object as "defaultInput" and pass it a data.
mainApp.value("defaultInput", 5);
...

//inject the value in the controller using its name "defaultInput"
mainApp.controller('CalcController', function($scope, CalcService, defaultInput) {
   $scope.number = defaultInput;
   $scope.result = CalcService.square($scope.number);

   $scope.square = function() {
      $scope.result = CalcService.square($scope.number);
   }
});
โรงงาน
factory เป็นฟังก์ชันที่ใช้ในการส่งคืนค่า สร้างมูลค่าตามความต้องการเมื่อใดก็ตามที่ต้องการบริการหรือตัวควบคุม โดยปกติจะใช้ฟังก์ชันโรงงานในการคำนวณและส่งคืนค่า
//define a module
var mainApp = angular.module("mainApp", []);

//create a factory "MathService" which provides a method multiply to return multiplication of two numbers
mainApp.factory('MathService', function() {
   var factory = {};

   factory.multiply = function(a, b) {
      return a * b
   }
   return factory;
});

//inject the factory "MathService" in a service to utilize the multiply method of factory.
mainApp.service('CalcService', function(MathService) {
   this.square = function(a) {
      return MathService.multiply(a,a);
   }
});
...
บริการ
service คืออ็อบเจ็กต์ javascript แบบซิงเกิลตันที่มีชุดของฟังก์ชันเพื่อทำงานบางอย่าง บริการถูกกำหนดโดยใช้ฟังก์ชัน service () จากนั้นจึงฉีดเข้าไปในคอนโทรลเลอร์
//define a module
var mainApp = angular.module("mainApp", []);
...

//create a service which defines a method square to return square of a number.
mainApp.service('CalcService', function(MathService) {
   this.square = function(a) {
      return MathService.multiply(a,a);
   }
});

//inject the service "CalcService" into the controller
mainApp.controller('CalcController', function($scope, CalcService, defaultInput) {
   $scope.number = defaultInput;
   $scope.result = CalcService.square($scope.number);

   $scope.square = function() {
      $scope.result = CalcService.square($scope.number);
   }
});
ผู้ให้บริการ
AngularJS ใช้ผู้ให้บริการภายในเพื่อสร้างบริการโรงงาน ฯลฯ ในระหว่างขั้นตอนการกำหนดค่า (เฟสระหว่างที่ AngularJS bootstraps เอง) สคริปต์ด้านล่างนี้สามารถใช้เพื่อสร้าง MathService ที่เราสร้างไว้ก่อนหน้านี้ Provider เป็นวิธีการพิเศษจากโรงงานที่มีเมธอด get () ซึ่งใช้ในการส่งคืนค่า / บริการ / โรงงาน
//define a module
var mainApp = angular.module("mainApp", []);
...

//create a service using provider which defines a method square to return square of a number.
mainApp.config(function($provide) {
   $provide.provider('MathService', function() {
      this.$get = function() {
         var factory = {};

         factory.multiply = function(a, b) {
            return a * b;
         }
         return factory;
      };
   });
});
คงที่
ค่าคงที่ถูกใช้เพื่อส่งผ่านค่าในเฟสการกำหนดค่าโดยพิจารณาจากข้อเท็จจริงที่ว่าไม่สามารถใช้ค่าเพื่อส่งผ่านระหว่างเฟสการกำหนดค่าได้
mainApp.constant("configParam", "constant value");ตัวอย่าง
ตัวอย่างต่อไปนี้จะแสดงคำสั่งที่กล่าวถึงข้างต้นทั้งหมด
testAngularJS.htm
<html>
   <head>
      <title>AngularJS Dependency Injection</title>
   </head>

   <body>
      <h2>AngularJS Sample Application</h2>

      <div ng-app = "mainApp" ng-controller = "CalcController">
         <p>Enter a number: <input type = "number" ng-model = "number" /></p>
         <button ng-click = "square()">X<sup>2</sup></button>
         <p>Result: {{result}}</p>
      </div>

      <script src = "https://ajax.googleapis.com/ajax/libs/angularjs/1.3.14/angular.min.js">
      </script>

      <script>
         var mainApp = angular.module("mainApp", []);

         mainApp.config(function($provide) {
            $provide.provider('MathService', function() {
               this.$get = function() {
                  var factory = {};

                  factory.multiply = function(a, b) {
                     return a * b;
                  }
                  return factory;
               };
            });
         });

         mainApp.value("defaultInput", 5);

         mainApp.factory('MathService', function() {
            var factory = {};

            factory.multiply = function(a, b) {
               return a * b;
            }
            return factory;
         });

         mainApp.service('CalcService', function(MathService) {
            this.square = function(a) {
               return MathService.multiply(a,a);
            }
         });

         mainApp.controller('CalcController', function($scope, CalcService, defaultInput) {
            $scope.number = defaultInput;
            $scope.result = CalcService.square($scope.number);

            $scope.square = function() {
               $scope.result = CalcService.square($scope.number);
            }
         });
      </script>

   </body>
</html>
ผลลัพธ์
เปิด textAngularJS.htm ในเว็บเบราว์เซอร์ ดูผลลัพธ์
คำสั่งที่กำหนดเองถูกใช้ใน AngularJS เพื่อขยายการทำงานของ HTML คำสั่งที่กำหนดเองถูกกำหนดโดยใช้ฟังก์ชัน "คำสั่ง" คำสั่งที่กำหนดเองจะแทนที่องค์ประกอบที่เปิดใช้งาน แอปพลิเคชัน AngularJS ระหว่าง bootstrap ค้นหาองค์ประกอบที่ตรงกันและทำกิจกรรมครั้งเดียวโดยใช้วิธีการคอมไพล์ () ของคำสั่งที่กำหนดเองจากนั้นประมวลผลองค์ประกอบโดยใช้วิธีการ link () ของคำสั่งที่กำหนดเองตามขอบเขตของคำสั่ง AngularJS ให้การสนับสนุนเพื่อสร้างคำสั่งที่กำหนดเองสำหรับองค์ประกอบประเภทต่อไปนี้
Element directives - คำสั่งเปิดใช้งานเมื่อพบองค์ประกอบที่ตรงกัน
Attribute - คำสั่งเปิดใช้งานเมื่อพบแอตทริบิวต์ที่ตรงกัน
CSS - คำสั่งเปิดใช้งานเมื่อพบสไตล์ css ที่ตรงกัน
Comment - คำสั่งเปิดใช้งานเมื่อพบความคิดเห็นที่ตรงกัน
ทำความเข้าใจกับคำสั่งที่กำหนดเอง
กำหนดแท็ก html ที่กำหนดเอง
<student name = "Mahesh"></student><br/>
<student name = "Piyush"></student>
กำหนดคำสั่งที่กำหนดเองเพื่อจัดการเหนือแท็ก html ที่กำหนดเอง
var mainApp = angular.module("mainApp", []);

//Create a directive, first parameter is the html element to be attached.
//We are attaching student html tag.
//This directive will be activated as soon as any student element is encountered in html

mainApp.directive('student', function() {
   //define the directive object
   var directive = {};

   //restrict = E, signifies that directive is Element directive
   directive.restrict = 'E';

   //template replaces the complete element with its text.
   directive.template = "Student: <b>{{student.name}}</b> ,
      Roll No: <b>{{student.rollno}}</b>";

   //scope is used to distinguish each student element based on criteria.
   directive.scope = {
      student : "=name"
   }

   //compile is called during application initialization. AngularJS calls
      it once when html page is loaded.

   directive.compile = function(element, attributes) {
      element.css("border", "1px solid #cccccc");

      //linkFunction is linked with each element with scope to get the element specific data.
      var linkFunction = function($scope, element, attributes) {
         element.html("Student: <b>"+$scope.student.name +"</b> ,
            Roll No: <b>"+$scope.student.rollno+"</b><br/>");
         element.css("background-color", "#ff00ff");
      }
      return linkFunction;
   }

   return directive;
});
กำหนดตัวควบคุมเพื่ออัปเดตขอบเขตสำหรับคำสั่ง ที่นี่เรากำลังใช้ค่าแอตทริบิวต์ของชื่อเป็นลูกของขอบเขต
mainApp.controller('StudentController', function($scope) {
   $scope.Mahesh = {};
   $scope.Mahesh.name = "Mahesh Parashar";
   $scope.Mahesh.rollno  = 1;

   $scope.Piyush = {};
   $scope.Piyush.name = "Piyush Parashar";
   $scope.Piyush.rollno  = 2;
});
ตัวอย่าง
<html>
   <head>
      <title>Angular JS Custom Directives</title>
   </head>

   <body>
      <h2>AngularJS Sample Application</h2>

      <div ng-app = "mainApp" ng-controller = "StudentController">
         <student name = "Mahesh"></student><br/>
         <student name = "Piyush"></student>
      </div>

      <script src = "https://ajax.googleapis.com/ajax/libs/angularjs/1.3.14/angular.min.js">
      </script>

      <script>
         var mainApp = angular.module("mainApp", []);

         mainApp.directive('student', function() {
            var directive = {};
            directive.restrict = 'E';
            directive.template = "Student: <b>{{student.name}}</b> ,
               Roll No: <b>{{student.rollno}}</b>";

            directive.scope = {
               student : "=name"
            }

            directive.compile = function(element, attributes) {
               element.css("border", "1px solid #cccccc");

               var linkFunction = function($scope, element, attributes) {
                  element.html("Student: <b>"+$scope.student.name +"</b> ,
                     Roll No: <b>"+$scope.student.rollno+"</b><br/>");
                  element.css("background-color", "#ff00ff");
               }
               return linkFunction;
            }

            return directive;
         });

         mainApp.controller('StudentController', function($scope) {
            $scope.Mahesh = {};
            $scope.Mahesh.name = "Mahesh Parashar";
            $scope.Mahesh.rollno  = 1;

            $scope.Piyush = {};
            $scope.Piyush.name = "Piyush Parashar";
            $scope.Piyush.rollno  = 2;
         });
      </script>

   </body>
</html>
ผลลัพธ์
เปิด textAngularJS.htm ในเว็บเบราว์เซอร์ ดูผลลัพธ์
AngularJS รองรับการทำให้เป็นสากลแบบ inbuilt สำหรับสกุลเงินตัวกรองวันที่และตัวเลขสามประเภท เราจำเป็นต้องรวม js ที่เกี่ยวข้องตามสถานที่ของประเทศเท่านั้น โดยค่าเริ่มต้นจะจัดการโลแคลของเบราว์เซอร์ ตัวอย่างเช่นหากต้องการใช้ภาษาเดนมาร์กให้ใช้สคริปต์ต่อไปนี้
<script src = "https://code.angularjs.org/1.2.5/i18n/angular-locale_da-dk.js">
</script>
ตัวอย่างการใช้ภาษาเดนมาร์ก
testAngularJS.htm
<html>
   <head>
      <title>Angular JS Forms</title>
   </head>

   <body>
      <h2>AngularJS Sample Application</h2>

      <div ng-app = "mainApp" ng-controller = "StudentController">
         {{fees | currency }}  <br/><br/>
         {{admissiondate | date }}  <br/><br/>
         {{rollno | number }}
      </div>

      <script src = "https://ajax.googleapis.com/ajax/libs/angularjs/1.3.14/angular.min.js">
      </script>
      <script src = "https://code.angularjs.org/1.3.14/i18n/angular-locale_da-dk.js">
      </script>

      <script>
         var mainApp = angular.module("mainApp", []);

         mainApp.controller('StudentController', function($scope) {
            $scope.fees = 100;
            $scope.admissiondate  = new Date();
            $scope.rollno = 123.45;
         });
      </script>

   </body>
</html>
ผลลัพธ์
เปิด textAngularJS.htm ในเว็บเบราว์เซอร์ ดูผลลัพธ์
ตัวอย่างการใช้ภาษาของเบราว์เซอร์
testAngularJS.htm
<html>
   <head>
      <title>Angular JS Forms</title>
   </head>

   <body>
      <h2>AngularJS Sample Application</h2>

      <div ng-app = "mainApp" ng-controller = "StudentController">
         {{fees | currency }}  <br/><br/>
         {{admissiondate | date }}  <br/><br/>
         {{rollno | number }}
      </div>

      <script src = "https://ajax.googleapis.com/ajax/libs/angularjs/1.3.14/angular.min.js">
      </script>
      <!-- <script src = "https://code.angularjs.org/1.3.14/i18n/angular-locale_da-dk.js">
      </script> -->

      <script>
         var mainApp = angular.module("mainApp", []);

         mainApp.controller('StudentController', function($scope) {
            $scope.fees = 100;
            $scope.admissiondate  = new Date();
            $scope.rollno = 123.45;
         });
      </script>

   </body>
</html>
ผลลัพธ์
เปิด textAngularJS.htm ในเว็บเบราว์เซอร์ ดูผลลัพธ์
AngularJS รองรับการทำให้เป็นสากลแบบ inbuilt สำหรับตัวกรองสามประเภท: สกุลเงินวันที่และตัวเลข เราจำเป็นต้องรวมสคริปต์ java ที่เกี่ยวข้องตามสถานที่ของประเทศเท่านั้น โดยค่าเริ่มต้นจะพิจารณาตำแหน่งที่ตั้งของเบราว์เซอร์ ตัวอย่างเช่นสำหรับภาษาเดนมาร์กให้ใช้สคริปต์ต่อไปนี้ -
<script src = "https://code.angularjs.org/1.2.5/i18n/angular-locale_da-dk.js">
</script>
ตัวอย่างการใช้ภาษาเดนมาร์ก
testAngularJS.htm
<html>
   <head>
      <title>Angular JS Forms</title>
   </head>

   <body>
      <h2>AngularJS Sample Application</h2>

      <div ng-app = "mainApp" ng-controller = "StudentController">
         {{fees | currency }}  <br/><br/>
         {{admissiondate | date }}  <br/><br/>
         {{rollno | number }}
      </div>

      <script src = "https://ajax.googleapis.com/ajax/libs/angularjs/1.3.14/angular.min.js">
      </script>
      <script src = "https://code.angularjs.org/1.3.14/i18n/angular-locale_da-dk.js">
      </script>

      <script>
         var mainApp = angular.module("mainApp", []);

         mainApp.controller('StudentController', function($scope) {
            $scope.fees = 100;
            $scope.admissiondate  = new Date();
            $scope.rollno = 123.45;
         });
      </script>

   </body>
</html>
เอาต์พุต
เปิดไฟล์testAngularJS.htmในเว็บเบราว์เซอร์และดูผลลัพธ์
ตัวอย่างการใช้ Browser Locale
testAngularJS.htm
<html>
   <head>
      <title>Angular JS Forms</title>
   </head>

   <body>
      <h2>AngularJS Sample Application</h2>

      <div ng-app = "mainApp" ng-controller = "StudentController">
         {{fees | currency }}  <br/><br/>
         {{admissiondate | date }}  <br/><br/>
         {{rollno | number }}
      </div>

      <script src = "https://ajax.googleapis.com/ajax/libs/angularjs/1.3.14/angular.min.js">
      </script>
      <!-- <script src = "https://code.angularjs.org/1.3.14/i18n/angular-locale_da-dk.js">
      </script> -->

      <script>
         var mainApp = angular.module("mainApp", []);

         mainApp.controller('StudentController', function($scope) {
            $scope.fees = 100;
            $scope.admissiondate  = new Date();
            $scope.rollno = 123.45;
         });
      </script>

   </body>
</html>
เอาต์พุต
เปิดไฟล์testAngularJS.htmในเว็บเบราว์เซอร์และดูผลลัพธ์