Apache Solr - ข้อมูลการจัดทำดัชนี
โดยทั่วไปแล้ว indexingเป็นการจัดเรียงเอกสารหรือ (หน่วยงานอื่น ๆ ) อย่างเป็นระบบ การจัดทำดัชนีช่วยให้ผู้ใช้สามารถค้นหาข้อมูลในเอกสารได้
การจัดทำดัชนีจะรวบรวมแยกวิเคราะห์และจัดเก็บเอกสาร
ทำดัชนีเพื่อเพิ่มความเร็วและประสิทธิภาพของคำค้นหาในขณะที่ค้นหาเอกสารที่ต้องการ
การสร้างดัชนีใน Apache Solr
ใน Apache Solr เราสามารถจัดทำดัชนี (เพิ่มลบแก้ไข) รูปแบบเอกสารต่างๆเช่น xml, csv, pdf เป็นต้นเราสามารถเพิ่มข้อมูลลงในดัชนี Solr ได้หลายวิธี
ในบทนี้เราจะพูดถึงการจัดทำดัชนี -
- การใช้ Solr Web Interface
- การใช้ไคลเอนต์ API เช่น Java, Python และอื่น ๆ
- ใช้ post tool.
ในบทนี้เราจะพูดถึงวิธีการเพิ่มข้อมูลลงในดัชนีของ Apache Solr โดยใช้อินเทอร์เฟซต่างๆ (บรรทัดคำสั่งเว็บอินเตอร์เฟสและ Java ไคลเอ็นต์ API)
การเพิ่มเอกสารโดยใช้ Post Command
Solr มีไฟล์ post คำสั่งใน bin/ไดเรกทอรี เมื่อใช้คำสั่งนี้คุณสามารถสร้างดัชนีไฟล์รูปแบบต่างๆเช่น JSON, XML, CSV ใน Apache Solr
เรียกดูไฟล์ bin ไดเรกทอรีของ Apache Solr และเรียกใช้ไฟล์ –h option ของคำสั่ง post ดังที่แสดงในบล็อกโค้ดต่อไปนี้
[Hadoop@localhost bin]$ cd $SOLR_HOME
[Hadoop@localhost bin]$ ./post -h
ในการดำเนินการคำสั่งข้างต้นคุณจะได้รับรายการตัวเลือกของไฟล์ post commandตามที่แสดงด้านล่าง
Usage: post -c <collection> [OPTIONS] <files|directories|urls|-d [".."]>
or post –help
   collection name defaults to DEFAULT_SOLR_COLLECTION if not specified
OPTIONS
=======
Solr options:
   -url <base Solr update URL> (overrides collection, host, and port)
   -host <host> (default: localhost)
   -p or -port <port> (default: 8983)
   -commit yes|no (default: yes)

Web crawl options:
   -recursive <depth> (default: 1)
   -delay <seconds> (default: 10)

Directory crawl options:
   -delay <seconds> (default: 0)

stdin/args options:
   -type <content/type> (default: application/xml)

Other options:
   -filetypes <type>[,<type>,...] (default:
   xml,json,jsonl,csv,pdf,doc,docx,ppt,pptx,xls,xlsx,odt,odp,ods,ott,otp,ots,
   rtf,htm,html,txt,log)
   -params "<key> = <value>[&<key> = <value>...]" (values must be
   URL-encoded; these pass through to Solr update request)
   -out yes|no (default: no; yes outputs Solr response to console)
   -format Solr (sends application/json content as Solr commands
   to /update instead of /update/json/docs)

Examples:
* JSON file:./post -c wizbang events.json
* XML files: ./post -c records article*.xml
* CSV file: ./post -c signals LATEST-signals.csv
* Directory of files: ./post -c myfiles ~/Documents
* Web crawl: ./post -c gettingstarted http://lucene.apache.org/Solr -recursive 1 -delay 1
* Standard input (stdin): echo '{commit: {}}' | ./post -c my_collection -
type application/json -out yes –d
* Data as string: ./post -c signals -type text/csv -out yes -d $'id,value\n1,0.47'
ตัวอย่าง
สมมติว่าเรามีไฟล์ชื่อ sample.csv โดยมีเนื้อหาดังต่อไปนี้ (ในไฟล์ bin ไดเรกทอรี)
| รหัสนักศึกษา | ชื่อจริง | ชื่อ Lasst | โทรศัพท์ | เมือง |
|---|---|---|---|---|
| 001 | ราจีฟ | เรดดี้ | 9848022337 | ไฮเดอราบาด |
| 002 | สิทธารถ์ | ภัตตาคารยา | 9848022338 | กัลกัตตา |
| 003 | Rajesh | คันนา | 9848022339 | เดลี |
| 004 | พรีธี | Agarwal | 9848022330 | ปูน |
| 005 | ทรัพฐี | Mohanty | 9848022336 | บูบันเนสชวาร์ |
| 006 | อรชนา | มิชรา | 9848022335 | เจนไน |
ชุดข้อมูลด้านบนประกอบด้วยรายละเอียดส่วนบุคคลเช่นรหัสนักศึกษาชื่อนามสกุลโทรศัพท์และเมือง ไฟล์ CSV ของชุดข้อมูลแสดงอยู่ด้านล่าง ที่นี่คุณต้องทราบว่าคุณต้องพูดถึงสคีมาโดยจัดทำเป็นเอกสารบรรทัดแรก
id,    first_name,   last_name,   phone_no,      location
001,   Pruthvi,      Reddy,       9848022337,    Hyderabad
002,   kasyap,       Sastry,      9848022338,    Vishakapatnam
003,   Rajesh,       Khanna,      9848022339,    Delhi
004,   Preethi,      Agarwal,     9848022330,    Pune
005,   Trupthi,      Mohanty,     9848022336,    Bhubaneshwar
006,   Archana,      Mishra,      9848022335,    Chennai
คุณสามารถจัดทำดัชนีข้อมูลนี้ภายใต้แกนที่ชื่อ sample_Solr ใช้ post คำสั่งดังนี้ -
[Hadoop@localhost bin]$ ./post -c Solr_sample sample.csvในการดำเนินการคำสั่งดังกล่าวเอกสารที่ระบุจะถูกจัดทำดัชนีภายใต้แกนที่ระบุโดยสร้างเอาต์พุตต่อไปนี้
/home/Hadoop/java/bin/java -classpath /home/Hadoop/Solr/dist/Solr-core
6.2.0.jar -Dauto = yes -Dc = Solr_sample -Ddata = files
org.apache.Solr.util.SimplePostTool sample.csv
SimplePostTool version 5.0.0
Posting files to [base] url http://localhost:8983/Solr/Solr_sample/update...
Entering auto mode. File endings considered are
xml,json,jsonl,csv,pdf,doc,docx,ppt,pptx,xls,xlsx,odt,odp,ods,ott,otp,ots,rtf,
htm,html,txt,log
POSTing file sample.csv (text/csv) to [base]
1 files indexed.
COMMITting Solr index changes to
http://localhost:8983/Solr/Solr_sample/update...
Time spent: 0:00:00.228
ไปที่หน้าแรกของ Solr Web UI โดยใช้ URL ต่อไปนี้ -
http://localhost:8983/
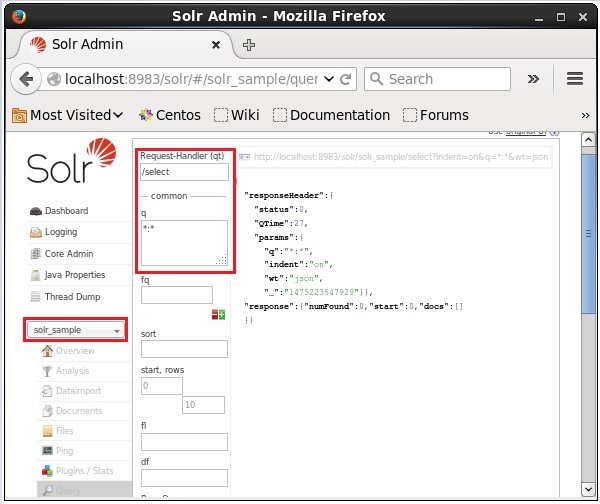
เลือกแกน Solr_sample. โดยค่าเริ่มต้นตัวจัดการคำขอคือ/selectและข้อความค้นหาคือ“:” โดยไม่ต้องทำการแก้ไขใด ๆ ให้คลิกไฟล์ExecuteQuery ที่ด้านล่างของหน้า
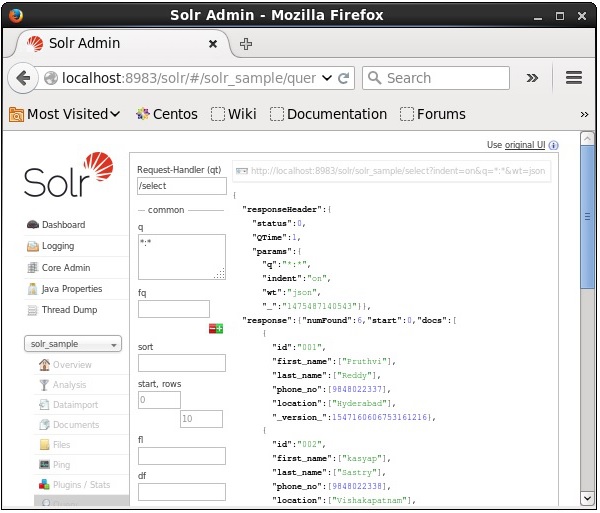
ในการดำเนินการสืบค้นคุณสามารถสังเกตเนื้อหาของเอกสาร CSV ที่จัดทำดัชนีในรูปแบบ JSON (ค่าเริ่มต้น) ดังที่แสดงในภาพหน้าจอต่อไปนี้
Note - ในทำนองเดียวกันคุณสามารถสร้างดัชนีรูปแบบไฟล์อื่น ๆ เช่น JSON, XML, CSV และอื่น ๆ
การเพิ่มเอกสารโดยใช้ Solr Web Interface
คุณยังสามารถจัดทำดัชนีเอกสารโดยใช้เว็บอินเตอร์เฟสที่ Solr จัดเตรียมไว้ให้ ให้เราดูวิธีการจัดทำดัชนีเอกสาร JSON ต่อไปนี้
[
   {
      "id" : "001",
      "name" : "Ram",
      "age" : 53,
      "Designation" : "Manager",
      "Location" : "Hyderabad",
   },
   {
      "id" : "002",
      "name" : "Robert",
      "age" : 43,
      "Designation" : "SR.Programmer",
      "Location" : "Chennai",
   },
   {
      "id" : "003",
      "name" : "Rahim",
      "age" : 25,
      "Designation" : "JR.Programmer",
      "Location" : "Delhi",
   }
]
ขั้นตอนที่ 1
เปิดเว็บอินเตอร์เฟส Solr โดยใช้ URL ต่อไปนี้ -
http://localhost:8983/
Step 2
เลือกแกน Solr_sample. ตามค่าเริ่มต้นค่าของฟิลด์ Request Handler, Common Within, Overwrite และ Boost คือ / update, 1000, true และ 1.0 ตามลำดับดังที่แสดงในภาพหน้าจอต่อไปนี้
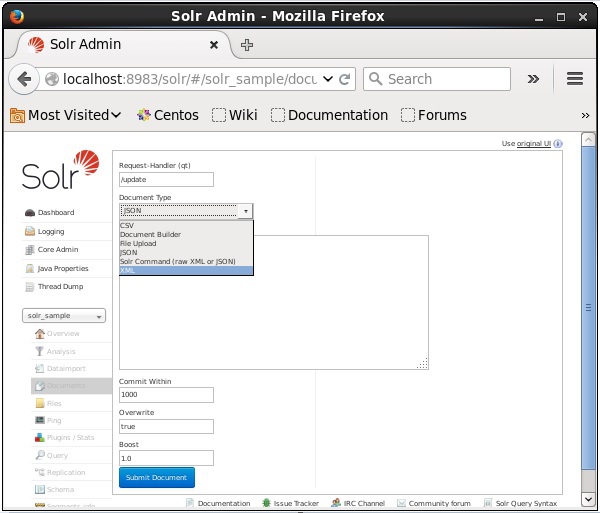
ตอนนี้เลือกรูปแบบเอกสารที่คุณต้องการจาก JSON, CSV, XML และอื่น ๆ พิมพ์เอกสารที่จะจัดทำดัชนีในพื้นที่ข้อความและคลิก Submit Document ดังที่แสดงในภาพหน้าจอต่อไปนี้

การเพิ่มเอกสารโดยใช้ Java Client API
ต่อไปนี้เป็นโปรแกรม Java เพื่อเพิ่มเอกสารในดัชนี Apache Solr บันทึกรหัสนี้ในไฟล์ที่มีชื่อAddingDocument.java.
import java.io.IOException;

import org.apache.Solr.client.Solrj.SolrClient;
import org.apache.Solr.client.Solrj.SolrServerException;
import org.apache.Solr.client.Solrj.impl.HttpSolrClient;
import org.apache.Solr.common.SolrInputDocument;

public class AddingDocument {
   public static void main(String args[]) throws Exception {
      //Preparing the Solr client
      String urlString = "http://localhost:8983/Solr/my_core";
      SolrClient Solr = new HttpSolrClient.Builder(urlString).build();

      //Preparing the Solr document
      SolrInputDocument doc = new SolrInputDocument();

      //Adding fields to the document
      doc.addField("id", "003");
      doc.addField("name", "Rajaman");
      doc.addField("age","34");
      doc.addField("addr","vishakapatnam");

      //Adding the document to Solr
      Solr.add(doc);

      //Saving the changes
      Solr.commit();
      System.out.println("Documents added");
   }
}
คอมไพล์โค้ดด้านบนโดยดำเนินการคำสั่งต่อไปนี้ในเทอร์มินัล -
[Hadoop@localhost bin]$ javac AddingDocument
[Hadoop@localhost bin]$ java AddingDocument
ในการดำเนินการคำสั่งดังกล่าวคุณจะได้รับผลลัพธ์ต่อไปนี้
Documents added