การดำเนินการแบบอะซิงโครนัส
ในบทนี้เราจะเรียนรู้วิธีทดสอบการทำงานแบบอะซิงโครนัสโดยใช้ Espresso Idling Resources
ความท้าทายประการหนึ่งของแอปพลิเคชันสมัยใหม่คือการมอบประสบการณ์การใช้งานที่ราบรื่น การมอบประสบการณ์การใช้งานที่ราบรื่นนั้นเกี่ยวข้องกับการทำงานอยู่เบื้องหลังจำนวนมากเพื่อให้แน่ใจว่าขั้นตอนการสมัครใช้เวลาไม่เกินสองสามมิลลิวินาที งานเบื้องหลังมีตั้งแต่งานง่ายๆไปจนถึงงานที่มีราคาแพงและซับซ้อนในการดึงข้อมูลจาก API / ฐานข้อมูลระยะไกล ในการเผชิญหน้ากับความท้าทายในอดีตนักพัฒนาเคยเขียนงานที่ต้องเสียค่าใช้จ่ายและใช้งานมานานในเธรดพื้นหลังและซิงค์กับUIThreadหลักเมื่อเธรดพื้นหลังเสร็จสิ้น
หากการพัฒนาแอปพลิเคชันแบบมัลติเธรดมีความซับซ้อนการเขียนกรณีทดสอบก็ยิ่งซับซ้อนมากขึ้น ตัวอย่างเช่นเราไม่ควรทดสอบAdapterViewก่อนที่ข้อมูลที่จำเป็นจะถูกโหลดจากฐานข้อมูล หากดึงข้อมูลในเธรดแยกต่างหากการทดสอบจะต้องรอจนกว่าเธรดจะเสร็จสมบูรณ์ ดังนั้นสภาพแวดล้อมการทดสอบควรจะซิงค์ระหว่างเธรดพื้นหลังและเธรด UI เอสเปรสโซให้การสนับสนุนที่ดีเยี่ยมสำหรับการทดสอบแอพพลิเคชั่นมัลติเธรด แอปพลิเคชันใช้เธรดด้วยวิธีต่อไปนี้และเอสเปรสโซรองรับทุกสถานการณ์
เธรดอินเทอร์เฟซผู้ใช้
Android SDK ถูกใช้ภายในเพื่อมอบประสบการณ์การใช้งานที่ราบรื่นด้วยองค์ประกอบ UI ที่ซับซ้อน เอสเปรสโซรองรับสถานการณ์นี้อย่างโปร่งใสและไม่ต้องการการกำหนดค่าและการเข้ารหัสพิเศษใด ๆ
งาน Async
ภาษาโปรแกรมสมัยใหม่รองรับการเขียนโปรแกรมแบบ async เพื่อทำเธรดน้ำหนักเบาโดยไม่ต้องมีความซับซ้อนของการเขียนโปรแกรมเธรด งาน Async ได้รับการสนับสนุนอย่างโปร่งใสโดยกรอบเอสเปรสโซ
เธรดผู้ใช้
นักพัฒนาอาจเริ่มเธรดใหม่เพื่อดึงข้อมูลที่ซับซ้อนหรือมีขนาดใหญ่จากฐานข้อมูล เพื่อรองรับสถานการณ์นี้เอสเปรสโซให้แนวคิดทรัพยากรที่ไม่ได้ใช้งาน
ให้ใช้เรียนรู้แนวคิดของทรัพยากรที่ไม่ทำงานและวิธีการใช้งานในบทนี้
ภาพรวม
แนวคิดของทรัพยากรที่ไม่ทำงานนั้นเรียบง่ายและใช้งานง่าย แนวคิดพื้นฐานคือการสร้างตัวแปร (ค่าบูลีน) เมื่อใดก็ตามที่กระบวนการที่รันเป็นเวลานานเริ่มต้นในเธรดแยกต่างหากเพื่อระบุว่ากระบวนการทำงานอยู่หรือไม่และลงทะเบียนในสภาพแวดล้อมการทดสอบ ในระหว่างการทดสอบผู้ทดสอบจะตรวจสอบตัวแปรที่ลงทะเบียนหากพบแล้วจะพบสถานะการทำงาน หากสถานะการวิ่งเป็นจริงนักวิ่งทดสอบจะรอจนกว่าสถานะจะกลายเป็นเท็จ
Espresso มีอินเทอร์เฟซ IdlingResources สำหรับวัตถุประสงค์ในการรักษาสถานะการทำงาน วิธีการหลักในการดำเนินการคือ isIdleNow () ถ้า isIdleNow () คืนค่าเป็นจริงเอสเปรสโซจะดำเนินการทดสอบต่อหรือมิฉะนั้นจะรอจนกว่า isIdleNow () จะส่งคืนเท็จ เราจำเป็นต้องใช้ IdlingResources และใช้คลาสที่ได้รับ นอกจากนี้เอสเปรสโซยังมีการใช้งาน IdlingResources ในตัวเพื่อลดภาระงานของเรา มีดังนี้
CountingIdlingResource
สิ่งนี้รักษาตัวนับภายในของงานที่กำลังรันอยู่ มันเสี่ยงที่เพิ่มขึ้น ()และลดลง ()วิธีการ Increment ()เพิ่มหนึ่งในตัวนับและการลด ()ลบหนึ่งตัวจากตัวนับ isIdleNow ()ส่งคืนค่าจริงเฉพาะเมื่อไม่มีงานแอ็คทีฟ
UriIdlingResource
สิ่งนี้คล้ายกับCounintIdlingResourceยกเว้นว่าตัวนับจะต้องเป็นศูนย์เป็นระยะเวลานานเพื่อใช้เวลาแฝงของเครือข่ายด้วย
IdlingThreadPoolExecutor
นี่เป็นการใช้งานThreadPoolExecutorแบบกำหนดเองเพื่อรักษาจำนวนงานที่กำลังรันอยู่ในเธรดพูลปัจจุบัน
IdlingScheduledThreadPoolExecutor
สิ่งนี้คล้ายกับIdlingThreadPoolExecutorแต่จะกำหนดเวลางานด้วยและการใช้งาน ScheduledThreadPoolExecutor แบบกำหนดเอง
หากการใช้งานIdlingResourcesข้างต้นหรือการใช้งานที่กำหนดเองใด ๆ ในแอปพลิเคชันเราจำเป็นต้องลงทะเบียนเข้ากับสภาพแวดล้อมการทดสอบก่อนที่จะทดสอบแอปพลิเคชันโดยใช้คลาสIdlingRegistryดังต่อไปนี้
IdlingRegistry.getInstance().register(MyIdlingResource.getIdlingResource());นอกจากนี้ยังสามารถลบออกได้เมื่อการทดสอบเสร็จสิ้นดังต่อไปนี้ -
IdlingRegistry.getInstance().unregister(MyIdlingResource.getIdlingResource());Espresso มีฟังก์ชันนี้ในแพ็คเกจแยกต่างหากและต้องกำหนดค่าแพ็คเกจตามด้านล่างใน app.gradle
dependencies {
   implementation 'androidx.test.espresso:espresso-idling-resource:3.1.1'
   androidTestImplementation "androidx.test.espresso.idling:idlingconcurrent:3.1.1"
}
แอปพลิเคชันตัวอย่าง
ให้เราสร้างแอปพลิเคชั่นง่ายๆเพื่อแสดงรายการผลไม้โดยดึงมาจากบริการเว็บในเธรดแยกจากนั้นทดสอบโดยใช้แนวคิดทรัพยากรที่ไม่ได้ใช้งาน
เริ่ม Android studio
สร้างโครงการใหม่ตามที่กล่าวไว้ก่อนหน้านี้และตั้งชื่อว่า MyIdlingFruitApp
ย้ายแอปพลิเคชันไปยังเฟรมเวิร์ก AndroidX โดยใช้Refactor →ย้ายไปที่เมนูตัวเลือกAndroidX
เพิ่มไลบรารีทรัพยากรที่ไม่ได้ใช้งานเอสเปรสโซในแอพ / build.gradle (และซิงค์) ตามที่ระบุด้านล่าง
dependencies {
   implementation 'androidx.test.espresso:espresso-idling-resource:3.1.1'
   androidTestImplementation "androidx.test.espresso.idling:idlingconcurrent:3.1.1"
}
ลบการออกแบบเริ่มต้นในกิจกรรมหลักและเพิ่ม ListView เนื้อหาของactivity_main.xmlมีดังนี้
<?xml version = "1.0" encoding = "utf-8"?>
<RelativeLayout xmlns:android = "http://schemas.android.com/apk/res/android"
   xmlns:app = "http://schemas.android.com/apk/res-auto"
   xmlns:tools = "http://schemas.android.com/tools"
   android:layout_width = "match_parent"
   android:layout_height = "match_parent"
   tools:context = ".MainActivity">
   <ListView
      android:id = "@+id/listView"
      android:layout_width = "wrap_content"
      android:layout_height = "wrap_content" />
</RelativeLayout>เพิ่มทรัพยากรเค้าโครงใหม่item.xmlเพื่อระบุเทมเพลตรายการของมุมมองรายการ เนื้อหาของitem.xmlมีดังนี้
<?xml version = "1.0" encoding = "utf-8"?>
<TextView xmlns:android = "http://schemas.android.com/apk/res/android"
   android:id = "@+id/name"
   android:layout_width = "fill_parent"
   android:layout_height = "fill_parent"
   android:padding = "8dp"
/>
สร้างคลาสใหม่ - MyIdlingResource MyIdlingResourceใช้เพื่อเก็บ IdlingResource ของเราไว้ในที่เดียวและดึงข้อมูลเมื่อจำเป็น เราจะใช้CountingIdlingResourceในตัวอย่างของเรา
package com.tutorialspoint.espressosamples.myidlingfruitapp;
import androidx.test.espresso.IdlingResource;
import androidx.test.espresso.idling.CountingIdlingResource;

public class MyIdlingResource {
   private static CountingIdlingResource mCountingIdlingResource =
      new CountingIdlingResource("my_idling_resource");
   public static void increment() {
      mCountingIdlingResource.increment();
   }
   public static void decrement() {
      mCountingIdlingResource.decrement();
   }
   public static IdlingResource getIdlingResource() {
      return mCountingIdlingResource;
   }
}ประกาศตัวแปรส่วนกลางmIdlingResourceของชนิดCountingIdlingResourceในคลาสMainActivityดังต่อไปนี้
@Nullable
private CountingIdlingResource mIdlingResource = null;
เขียนวิธีการส่วนตัวเพื่อดึงรายชื่อผลไม้จากเว็บด้านล่าง
private ArrayList<String> getFruitList(String data) {
   ArrayList<String> fruits = new ArrayList<String>();
   try {
      // Get url from async task and set it into a local variable
      URL url = new URL(data);
      Log.e("URL", url.toString());

      // Create new HTTP connection
      HttpURLConnection conn = (HttpURLConnection) url.openConnection();

      // Set HTTP connection method as "Get"
      conn.setRequestMethod("GET");

      // Do a http request and get the response code
      int responseCode = conn.getResponseCode();

      // check the response code and if success, get response content
      if (responseCode == HttpURLConnection.HTTP_OK) {
         BufferedReader in = new BufferedReader(new InputStreamReader(conn.getInputStream()));
         String line;
         StringBuffer response = new StringBuffer();
         while ((line = in.readLine()) != null) {
            response.append(line);
         }
         in.close();
         JSONArray jsonArray = new JSONArray(response.toString());
         Log.e("HTTPResponse", response.toString());
         for(int i = 0; i < jsonArray.length(); i++) {
            JSONObject jsonObject = jsonArray.getJSONObject(i);
            String name = String.valueOf(jsonObject.getString("name"));
            fruits.add(name);
         }
      } else {
         throw new IOException("Unable to fetch data from url");
      }
      conn.disconnect();
   } catch (IOException | JSONException e) {
      e.printStackTrace();
   }
   return fruits;
}สร้างงานใหม่ในเมธอด onCreate ()เพื่อดึงข้อมูลจากเว็บโดยใช้เมธอดgetFruitListของเราตามด้วยการสร้างอะแดปเตอร์ใหม่และตั้งค่าเป็นมุมมองรายการ นอกจากนี้ลดทรัพยากรที่ไม่ทำงานเมื่องานของเราเสร็จสมบูรณ์ในเธรด รหัสมีดังนี้
// Get data
class FruitTask implements Runnable {
   ListView listView;
   CountingIdlingResource idlingResource;
   FruitTask(CountingIdlingResource idlingRes, ListView listView) {
      this.listView = listView;
      this.idlingResource = idlingRes;
   }
   public void run() {
      //code to do the HTTP request
      final ArrayList<String> fruitList = getFruitList("http://<your domain or IP>/fruits.json");
      try {
         synchronized (this){
            runOnUiThread(new Runnable() {
               @Override
               public void run() {
                  // Create adapter and set it to list view
                  final ArrayAdapter adapter = new
                     ArrayAdapter(MainActivity.this, R.layout.item, fruitList);
                  ListView listView = (ListView)findViewById(R.id.listView);
                  listView.setAdapter(adapter);
               }
            });
         }
      } catch (Exception e) {
         e.printStackTrace();
      }
      if (!MyIdlingResource.getIdlingResource().isIdleNow()) {
         MyIdlingResource.decrement(); // Set app as idle.
      }
   }
}
ที่นี่ URL ผลไม้ถือเป็นhttp: // <โดเมนของคุณหรือ IP / fruits.jsonและอยู่ในรูปแบบ JSON เนื้อหามีดังนี้
[
   {
      "name":"Apple"
   },
   {
      "name":"Banana"
   },
   {
      "name":"Cherry"
   },
   {
      "name":"Dates"
   },
   {
      "name":"Elderberry"
   },
   {
      "name":"Fig"
   },
   {
      "name":"Grapes"
   },
   {
      "name":"Grapefruit"
   },
   {
      "name":"Guava"
   },
   {
      "name":"Jack fruit"
   },
   {
      "name":"Lemon"
   },
   {
      "name":"Mango"
   },
   {
      "name":"Orange"
   },
   {
      "name":"Papaya"
   },
   {
      "name":"Pears"
   },
   {
      "name":"Peaches"
   },
   {
      "name":"Pineapple"
   },
   {
      "name":"Plums"
   },
   {
      "name":"Raspberry"
   },
   {
      "name":"Strawberry"
   },
   {
      "name":"Watermelon"
   }
]
Note - วางไฟล์ไว้ในเว็บเซิร์ฟเวอร์ของคุณและใช้งานได้
ตอนนี้ค้นหามุมมองสร้างเธรดใหม่โดยส่งFruitTaskเพิ่มทรัพยากรที่ไม่ทำงานและในที่สุดก็เริ่มงาน
// Find list view
ListView listView = (ListView) findViewById(R.id.listView);
Thread fruitTask = new Thread(new FruitTask(this.mIdlingResource, listView));
MyIdlingResource.increment();
fruitTask.start();รหัสที่สมบูรณ์ของMainActivityมีดังต่อไปนี้
package com.tutorialspoint.espressosamples.myidlingfruitapp;

import androidx.annotation.NonNull;
import androidx.annotation.Nullable;
import androidx.annotation.VisibleForTesting;
import androidx.appcompat.app.AppCompatActivity;
import androidx.test.espresso.idling.CountingIdlingResource;

import android.os.Bundle;
import android.util.Log;
import android.widget.ArrayAdapter;
import android.widget.ListView;

import org.json.JSONArray;
import org.json.JSONException;
import org.json.JSONObject;

import java.io.BufferedReader;
import java.io.IOException;
import java.io.InputStreamReader;
import java.net.HttpURLConnection;
import java.net.URL;
import java.util.ArrayList;

public class MainActivity extends AppCompatActivity {
   @Nullable
   private CountingIdlingResource mIdlingResource = null;
   @Override
   protected void onCreate(Bundle savedInstanceState) {
      super.onCreate(savedInstanceState);
      setContentView(R.layout.activity_main);

      // Get data
      class FruitTask implements Runnable {
         ListView listView;
         CountingIdlingResource idlingResource;
         FruitTask(CountingIdlingResource idlingRes, ListView listView) {
            this.listView = listView;
            this.idlingResource = idlingRes;
         }
         public void run() {
            //code to do the HTTP request
            final ArrayList<String> fruitList = getFruitList(
               "http://<yourdomain or IP>/fruits.json");
            try {
               synchronized (this){
                  runOnUiThread(new Runnable() {
                     @Override
                     public void run() {
                        // Create adapter and set it to list view
                        final ArrayAdapter adapter = new ArrayAdapter(
                           MainActivity.this, R.layout.item, fruitList);
                        ListView listView = (ListView) findViewById(R.id.listView);
                        listView.setAdapter(adapter);
                     }
                  });
               }
            } catch (Exception e) {
               e.printStackTrace();
            }
            if (!MyIdlingResource.getIdlingResource().isIdleNow()) {
               MyIdlingResource.decrement(); // Set app as idle.
            }
         }
      }
      // Find list view
      ListView listView = (ListView) findViewById(R.id.listView);
      Thread fruitTask = new Thread(new FruitTask(this.mIdlingResource, listView));
      MyIdlingResource.increment();
      fruitTask.start();
   }
   private ArrayList<String> getFruitList(String data) {
      ArrayList<String> fruits = new ArrayList<String>();
      try {
         // Get url from async task and set it into a local variable
         URL url = new URL(data);
         Log.e("URL", url.toString());

         // Create new HTTP connection
         HttpURLConnection conn = (HttpURLConnection) url.openConnection();

         // Set HTTP connection method as "Get"
         conn.setRequestMethod("GET");

         // Do a http request and get the response code
         int responseCode = conn.getResponseCode();

         // check the response code and if success, get response content
         if (responseCode == HttpURLConnection.HTTP_OK) {
            BufferedReader in = new BufferedReader(new InputStreamReader(conn.getInputStream()));
            String line;
            StringBuffer response = new StringBuffer();
            while ((line = in.readLine()) != null) {
               response.append(line);
            }
            in.close();
            JSONArray jsonArray = new JSONArray(response.toString());
            Log.e("HTTPResponse", response.toString());

            for(int i = 0; i < jsonArray.length(); i++) {
               JSONObject jsonObject = jsonArray.getJSONObject(i);
               String name = String.valueOf(jsonObject.getString("name"));
               fruits.add(name);
            }
         } else {
            throw new IOException("Unable to fetch data from url");
         }
         conn.disconnect();
      } catch (IOException | JSONException e) {
         e.printStackTrace();
      }
      return fruits;
   }
}ตอนนี้เพิ่มการกำหนดค่าด้านล่างในไฟล์รายการแอปพลิเคชันAndroidManifest.xml
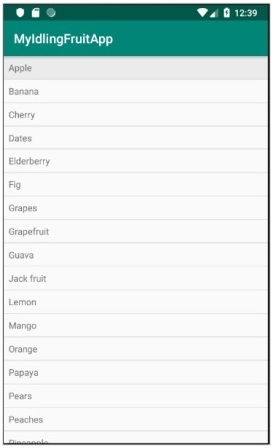
<uses-permission android:name = "android.permission.INTERNET" />ตอนนี้รวบรวมรหัสด้านบนและเรียกใช้แอปพลิเคชัน ภาพหน้าจอของแอป My Idling Fruitมีดังนี้

ตอนนี้เปิดไฟล์ExampleInstrumentedTest.javaและเพิ่ม ActivityTestRule ตามที่ระบุด้านล่าง
@Rule
public ActivityTestRule<MainActivity> mActivityRule =
   new ActivityTestRule<MainActivity>(MainActivity.class);
Also, make sure the test configuration is done in app/build.gradle
dependencies {
   testImplementation 'junit:junit:4.12'
   androidTestImplementation 'androidx.test:runner:1.1.1'
   androidTestImplementation 'androidx.test:rules:1.1.1'
   androidTestImplementation 'androidx.test.espresso:espresso-core:3.1.1'
   implementation 'androidx.test.espresso:espresso-idling-resource:3.1.1'
   androidTestImplementation "androidx.test.espresso.idling:idlingconcurrent:3.1.1"
}
เพิ่มกรณีทดสอบใหม่เพื่อทดสอบมุมมองรายการด้านล่าง
@Before
public void registerIdlingResource() {
   IdlingRegistry.getInstance().register(MyIdlingResource.getIdlingResource());
}
@Test
public void contentTest() {
   // click a child item
   onData(allOf())
   .inAdapterView(withId(R.id.listView))
   .atPosition(10)
   .perform(click());
}
@After
public void unregisterIdlingResource() {
   IdlingRegistry.getInstance().unregister(MyIdlingResource.getIdlingResource());
}
สุดท้ายเรียกใช้กรณีทดสอบโดยใช้เมนูบริบทของ android studio และตรวจสอบว่ากรณีทดสอบทั้งหมดประสบความสำเร็จหรือไม่