GraphQL - การตั้งค่าสภาพแวดล้อม
ในบทนี้เราจะเรียนรู้เกี่ยวกับการตั้งค่าสภาพแวดล้อมสำหรับ GraphQL ในการดำเนินการตามตัวอย่างในบทช่วยสอนนี้คุณจะต้องมีสิ่งต่อไปนี้ -
คอมพิวเตอร์ที่ใช้ Linux, macOS หรือ Windows
เว็บเบราว์เซอร์ควรเป็น Google Chrome เวอร์ชันล่าสุด
ติดตั้ง Node.js เวอร์ชันล่าสุดแล้ว ขอแนะนำให้ใช้ LTS เวอร์ชันล่าสุด
Visual Studio Code ที่มีนามสกุล GraphQL สำหรับ VSCode ที่ติดตั้งหรือโปรแกรมแก้ไขโค้ดที่คุณเลือก
วิธีสร้างเซิร์ฟเวอร์ GraphQL ด้วย Nodejs
เราจะทำตามขั้นตอนอย่างละเอียดเพื่อสร้างเซิร์ฟเวอร์ GraphQL ด้วย Nodejs ดังที่แสดงด้านล่าง -
ขั้นตอนที่ 1 - ตรวจสอบเวอร์ชันโหนดและ Npm
หลังจากติดตั้ง NodeJs ให้ตรวจสอบเวอร์ชันของโหนดและ npm โดยใช้คำสั่งต่อไปนี้บนเทอร์มินัล -
C:\Users\Admin>node -v
v8.11.3

C:\Users\Admin>npm -v
5.6.0
ขั้นตอนที่ 2 - สร้างโฟลเดอร์โครงการและเปิดใน VSCode
โฟลเดอร์รูทของโปรเจ็กต์สามารถตั้งชื่อเป็นแอพทดสอบ
เปิดโฟลเดอร์โดยใช้โปรแกรมแก้ไขโค้ด Visual Studio โดยใช้คำแนะนำด้านล่าง -
C:\Users\Admin>mkdir test-app
C:\Users\Admin>cd test-app
C:\Users\Admin\test-app>code.
ขั้นตอนที่ 3 - สร้าง package.json และติดตั้งการอ้างอิง
สร้างไฟล์ package.json ซึ่งจะมีการอ้างอิงทั้งหมดของแอปพลิเคชันเซิร์ฟเวอร์ GraphQL
{
   "name": "hello-world-server",
   "private": true,
   "scripts": {
      "start": "nodemon --ignore data/ server.js"
   },

   "dependencies": {
      "apollo-server-express": "^1.4.0",
      "body-parser": "^1.18.3",
      "cors": "^2.8.4",
      "express": "^4.16.3",
      "graphql": "^0.13.2",
      "graphql-tools": "^3.1.1"
   },

   "devDependencies": {
      "nodemon": "1.17.1"
   }
}
ติดตั้งการอ้างอิงโดยใช้คำสั่งตามที่ระบุด้านล่าง -
C:\Users\Admin\test-app>npm installขั้นตอนที่ 4 - สร้างฐานข้อมูลไฟล์แบบแบนในโฟลเดอร์ข้อมูล
ในขั้นตอนนี้เราใช้ไฟล์แบบแบนเพื่อจัดเก็บและดึงข้อมูล สร้างข้อมูลโฟลเดอร์และเพิ่มสองไฟล์students.json และ colleges.json.
ต่อไปนี้คือไฟล์ colleges.json ไฟล์ -
[
   {
      "id": "col-101",
      "name": "AMU",
      "location": "Uttar Pradesh",
      "rating":5.0
   },

   {
      "id": "col-102",
      "name": "CUSAT",
      "location": "Kerala",
      "rating":4.5
   }
]
ต่อไปนี้คือไฟล์ students.json ไฟล์ -
[
   {
      "id": "S1001",
      "firstName":"Mohtashim",
      "lastName":"Mohammad",
      "email": "[email protected]",
      "password": "pass123",
      "collegeId": "col-102"
   },

   {
      "id": "S1002",
      "email": "[email protected]",
      "firstName":"Kannan",
      "lastName":"Sudhakaran",
      "password": "pass123",
      "collegeId": "col-101"
   },

   {
      "id": "S1003",
      "email": "[email protected]",
      "firstName":"Kiran",
      "lastName":"Panigrahi",
      "password": "pass123",
      "collegeId": "col-101"
   }
]
ขั้นตอนที่ 5 - สร้างชั้นการเข้าถึงข้อมูล
เราจำเป็นต้องสร้างที่เก็บข้อมูลที่โหลดเนื้อหาโฟลเดอร์ข้อมูล ในกรณีนี้เราต้องตัวแปรคอลเลกชัน, นักเรียนและวิทยาลัย เมื่อใดก็ตามที่แอปพลิเคชันต้องการข้อมูลก็จะใช้ตัวแปรการรวบรวมเหล่านี้
สร้างไฟล์ db.js ในโฟลเดอร์โปรเจ็กต์ดังนี้ -
const { DataStore } = require('notarealdb');

const store = new DataStore('./data');

module.exports = {
   students:store.collection('students'),
   colleges:store.collection('colleges')
};
ขั้นตอนที่ 6 - สร้างไฟล์ Schema, schema.graphql
สร้างไฟล์สคีมาในโฟลเดอร์โครงการปัจจุบันและเพิ่มเนื้อหาต่อไปนี้ -
type Query  {
   test: String
}
ขั้นตอนที่ 7 - สร้างไฟล์ Resolver, resolvers.js
สร้างไฟล์ตัวแก้ไขในโฟลเดอร์โครงการปัจจุบันและเพิ่มเนื้อหาต่อไปนี้ -
const Query = {
   test: () => 'Test Success, GraphQL server is up & running !!'
}
module.exports = {Query}
ขั้นตอนที่ 8 - สร้าง Server.js และกำหนดค่า GraphQL
สร้างไฟล์เซิร์ฟเวอร์และกำหนดค่า GraphQL ดังนี้ -
const bodyParser = require('body-parser');
const cors = require('cors');
const express = require('express');
const db = require('./db');

const port = process.env.PORT || 9000;
const app = express();

const fs = require('fs')
const typeDefs = fs.readFileSync('./schema.graphql',{encoding:'utf-8'})
const resolvers = require('./resolvers')

const {makeExecutableSchema} = require('graphql-tools')
const schema = makeExecutableSchema({typeDefs, resolvers})

app.use(cors(), bodyParser.json());

const  {graphiqlExpress,graphqlExpress} = require('apollo-server-express')
app.use('/graphql',graphqlExpress({schema}))
app.use('/graphiql',graphiqlExpress({endpointURL:'/graphql'}))

app.listen(
   port, () => console.info(
      `Server started on port ${port}`
   )
);
ขั้นตอนที่ 9 - เรียกใช้แอปพลิเคชันและทดสอบกับ GraphiQL
ตรวจสอบโครงสร้างโฟลเดอร์ของแอปทดสอบโครงการดังนี้ -
test-app /
   -->package.json
   -->db.js
   -->data
      students.json
      colleges.json
   -->resolvers.js
   -->schema.graphql
   -->server.js
รันคำสั่ง npm start ตามที่ระบุด้านล่าง -
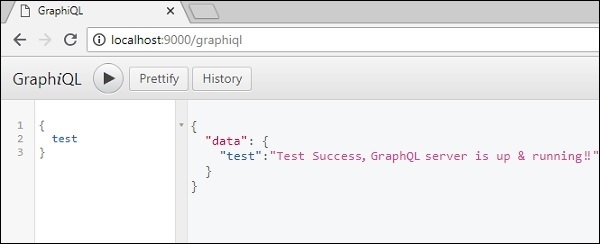
C:\Users\Admin\test-app>npm startเซิร์ฟเวอร์กำลังทำงานในพอร์ต 9000 ดังนั้นเราจึงสามารถทดสอบแอปพลิเคชันโดยใช้เครื่องมือ GraphiQL เปิดเบราว์เซอร์และป้อน URL http: // localhost: 9000 / graphiql พิมพ์คำค้นหาต่อไปนี้ในตัวแก้ไข -
{
   Test
}
การตอบสนองจากเซิร์ฟเวอร์ได้รับด้านล่าง -
{
   "data": {
      "test": "Test Success, GraphQL server is running !!"
   }
}