Jupyter - คู่มือฉบับย่อ
Project Jupyter เป็นชุดผลิตภัณฑ์ซอฟต์แวร์ที่ใช้ในคอมพิวเตอร์เชิงโต้ตอบ IPython ได้รับการพัฒนาโดย Fernando Perez ในปี 2544 ในฐานะล่าม Python ที่ได้รับการปรับปรุง อินเทอร์เฟซบนเว็บไปยังเทอร์มินัล IPython ในรูปแบบของโน้ตบุ๊ก IPython ได้รับการแนะนำในปี 2554 ในปี 2014 Project Jupyter เริ่มต้นเป็นโปรเจ็กต์แยกจาก IPython
แพ็คเกจภายใต้โครงการ Jupyter ประกอบด้วย -
Jupyter notebook - อินเทอร์เฟซบนเว็บสำหรับสภาพแวดล้อมการเขียนโปรแกรมของ Python, Julia, R และอื่น ๆ อีกมากมาย
QtConsole - เทอร์มินัลที่ใช้ Qt สำหรับเมล็ด Jupyter ที่คล้ายกับ IPython
nbviewer - สิ่งอำนวยความสะดวกในการแบ่งปันสมุดบันทึก Jupyter
JupyterLab - อินเทอร์เฟซแบบบูรณาการบนเว็บที่ทันสมัยสำหรับผลิตภัณฑ์ทั้งหมด
การกระจายมาตรฐานของ Python มาพร้อมกับไฟล์ REPL (Read-Evaluate-Print Loop) สภาพแวดล้อมในรูปแบบของ Python shell ด้วย >>>พรอมต์ IPython (ย่อมาจาก Interactive Python) เป็นสภาพแวดล้อมแบบโต้ตอบที่ได้รับการปรับปรุงสำหรับ Python ที่มีฟังก์ชันมากมายเมื่อเทียบกับ Python shell มาตรฐาน
คุณสมบัติของ IPython
IPython มีคุณสมบัติมากกว่าเมื่อเทียบกับ Python มาตรฐาน มีดังนี้ -
นำเสนอ Python shell แบบโต้ตอบที่มีประสิทธิภาพ
ทำหน้าที่เป็นเคอร์เนลหลักสำหรับสมุดบันทึก Jupyter และเครื่องมือส่วนหน้าอื่น ๆ ของ Project Jupyter
มีความสามารถในการวิปัสสนาวัตถุ Introspection คือความสามารถในการตรวจสอบคุณสมบัติของวัตถุในระหว่างรันไทม์
การเน้นไวยากรณ์
จัดเก็บประวัติการโต้ตอบ
การเติมคำหลักตัวแปรและชื่อฟังก์ชัน
ระบบคำสั่ง Magic มีประโยชน์สำหรับการควบคุมสภาพแวดล้อม Python และการทำงานของระบบปฏิบัติการ
ความสามารถในการฝังตัวในโปรแกรม Python อื่น ๆ
ให้การเข้าถึงดีบักเกอร์ Python
ประวัติศาสตร์และพัฒนาการ
IPython ได้รับการพัฒนาโดย Fernando Perez ในปี 2544 เวอร์ชันปัจจุบันคือ IPython7.0.1 ซึ่งต้องใช้เวอร์ชัน Python 3.4 หรือสูงกว่า IPython 6.0 เป็นเวอร์ชันแรกที่รองรับ Python 3 ผู้ใช้ที่มี Python 2.7 ควรทำงานร่วมกับเวอร์ชัน 2.0 ถึง 5.7 ของ IPython
แนวคิดของสมุดบันทึกการคำนวณเริ่มต้นในทศวรรษที่ 80 เมื่อ MATLAB และ Mathematica วางจำหน่าย ส่วนหน้า GUI เหล่านี้ไปยังเชลล์แบบโต้ตอบมีคุณสมบัติเช่นการจัดรูปแบบข้อความการเพิ่มกราฟิกตารางและการเพิ่มสัญลักษณ์ทางคณิตศาสตร์ สมุดบันทึก Sage ยังเป็นสมุดบันทึกบนเว็บ
ผู้สร้าง IPython เริ่มทำงานกับอินเทอร์เฟซโน้ตบุ๊กสำหรับ IPython shell ในปี 2548 ในไม่ช้าโน้ตบุ๊ก IPython ได้เพิ่มการรองรับภาษาอื่น ๆ เช่น R และ Julia ในปี 2014 Perez ได้เริ่มโครงการ Jupyter เป็นโปรเจ็กต์แยกจาก IPython เนื่องจากโปรเจ็กต์ IPython เริ่มมีขนาดใหญ่โดยมีผลิตภัณฑ์อย่างเช่นเซิร์ฟเวอร์โน้ตบุ๊กและคอนโซล Qt เพิ่มเข้ามา
ตั้งแต่ IPython 4.0 ส่วนประกอบเพิ่มเติมทั้งหมดถูกย้ายไปที่ Project Jupyter และเพิ่มการรองรับภาษาอื่น ๆ ให้กับโน้ตบุ๊ก IPython IPython ยังคงให้ความสำคัญกับการปรับปรุงคุณสมบัติล่ามที่ได้รับการปรับปรุง นอกจากนี้ยังจัดเตรียมเคอร์เนลหลักให้กับส่วนหน้าของสมุดบันทึก Jupyter
IPython ถูกรวมไว้โดยค่าเริ่มต้นในการแจกจ่าย Anaconda ของ Python สามารถดาวน์โหลดได้จากหน้าดาวน์โหลดของ Anaconda www.anaconda.com/download/ไบนารีสำหรับระบบปฏิบัติการหลักทั้งหมด (Windows, MacOS และ Linux) และสถาปัตยกรรม (32 บิตและ 64 บิต) มีอยู่ในลิงค์นี้
ในการติดตั้ง IPython แยกต่างหากในการติดตั้ง Python มาตรฐานคุณสามารถใช้คำสั่ง pip ดังที่แสดงด้านล่าง -
pip3 install ipythonIPython ใช้แพ็คเกจต่อไปนี้ภายใน -
| ซีเนียร์ | การพึ่งพา IPython และฟังก์ชันการทำงาน |
|---|---|
| 1 | colorama ข้ามแพลตฟอร์ม API สำหรับพิมพ์ข้อความเทอร์มินัลสีจาก Python |
| 2 | jedi เครื่องมือเติมข้อความอัตโนมัติสำหรับ Python |
| 3 | pickleshare 'ชั้นวาง' ขนาดเล็กเช่นพื้นที่เก็บข้อมูลที่รองรับการทำงานพร้อมกัน |
| 4 | prompt_toolkit ไลบรารีสำหรับสร้างบรรทัดคำสั่งแบบโต้ตอบที่มีประสิทธิภาพใน Python |
| 5 | pygments แพ็คเกจการเน้นไวยากรณ์ที่เขียนด้วย Python |
| 6 | simplegeneric ฟังก์ชั่นทั่วไปที่เรียบง่าย |
| 7 | traitlets ระบบกำหนดค่าสำหรับแอปพลิเคชัน Python |
โดยทั่วไปการอ้างอิงทั้งหมดจะได้รับการติดตั้งโดยอัตโนมัติ มิฉะนั้นคุณสามารถติดตั้งทีละรายการโดยใช้ pip
บทนี้จะอธิบายวิธีการเริ่มต้นใช้งาน IPython
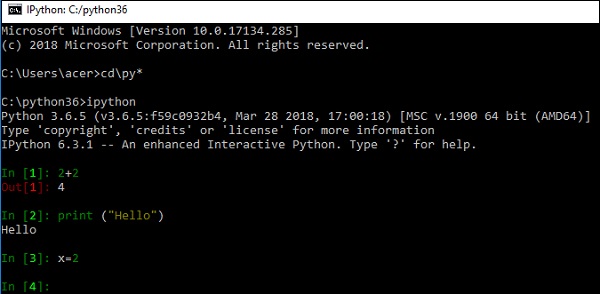
เริ่มต้น IPython จาก Command Prompt
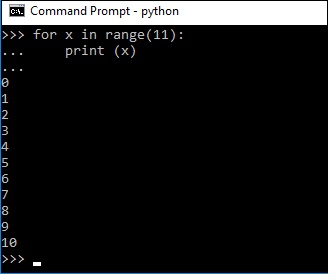
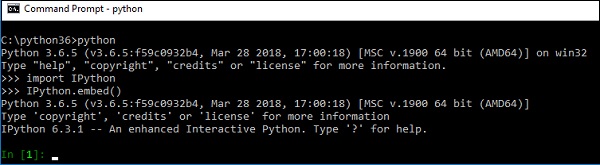
ก่อนดำเนินการทำความเข้าใจเกี่ยวกับ IPython ในเชิงลึกโปรดทราบว่าแทนที่จะเป็นแบบปกติ >>>คุณจะสังเกตเห็นพรอมต์ Python หลักสองรายการตามที่อธิบายไว้ด้านล่าง -
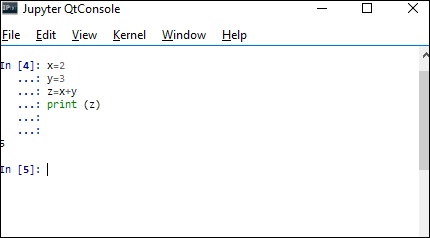
In[1] ปรากฏก่อนนิพจน์อินพุตใด ๆ
Out[1] ปรากฏขึ้นก่อนที่ผลลัพธ์จะปรากฏขึ้น
นอกจากนี้ตัวเลขในวงเล็บเหลี่ยมจะเพิ่มขึ้นโดยอัตโนมัติ สังเกตภาพหน้าจอต่อไปนี้เพื่อความเข้าใจที่ดีขึ้น -
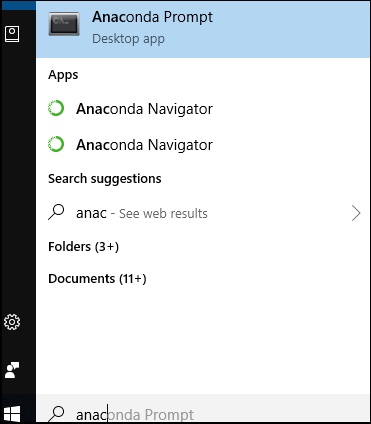
ตอนนี้หากคุณติดตั้งการแจกจ่ายงูใหญ่ของ Anaconda ให้เปิดพรอมต์ Anaconda จากเมนูเริ่ม
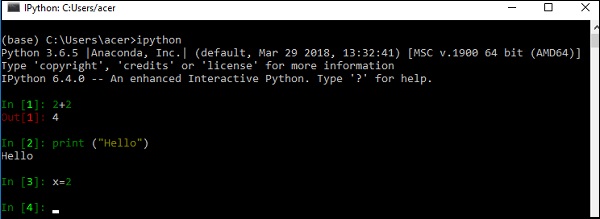
เริ่มต้น IPython จากพรอมต์ conda
เมื่อเปรียบเทียบกับ Python console ทั่วไปเราสามารถสังเกตเห็นความแตกต่างได้ เปลือก IPython แสดงการเน้นไวยากรณ์โดยใช้โทนสีที่แตกต่างกันสำหรับองค์ประกอบต่างๆเช่นนิพจน์ฟังก์ชันตัวแปรเป็นต้น
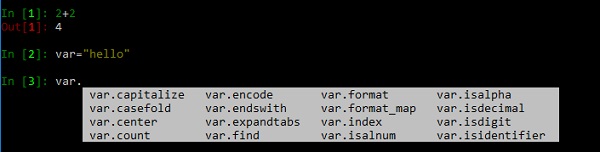
การเพิ่มประสิทธิภาพที่มีประโยชน์อีกอย่างคือการทำให้แท็บสมบูรณ์ เรารู้ว่าแต่ละออบเจ็กต์มีวิธีการอย่างน้อยหนึ่งวิธีตามที่กำหนดไว้ในคลาสของมัน IPython จะแสดงรายการวิธีการที่เหมาะสมเมื่อคุณกดปุ่มแท็บหลังจุดหน้าวัตถุ
ในตัวอย่างต่อไปนี้มีการกำหนดสตริง ในการตอบกลับเมธอดของคลาสสตริงจะแสดงขึ้น
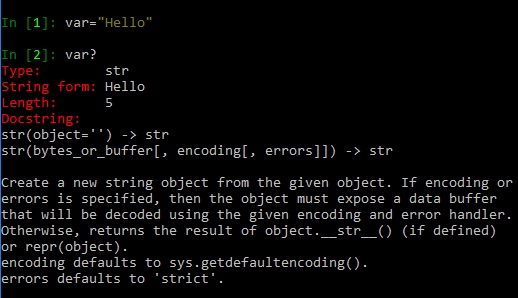
IPython ให้ข้อมูลของวัตถุใด ๆ โดยใส่ '?' ด้านหน้าของมัน ซึ่งรวมถึง docstring คำจำกัดความของฟังก์ชันและรายละเอียดตัวสร้างของคลาส ตัวอย่างเช่นในการสำรวจตัวแปรออบเจ็กต์สตริงที่กำหนดไว้ด้านบนในพรอมต์อินพุตให้ป้อนvar?. ผลลัพธ์จะแสดงข้อมูลทั้งหมดเกี่ยวกับเรื่องนี้ สังเกตภาพหน้าจอด้านล่างเพื่อความเข้าใจที่ดีขึ้น -
ฟังก์ชั่นมายากล
ฟังก์ชั่นเวทย์มนตร์ในตัวของ IPython นั้นทรงพลังอย่างมาก มีสองประเภทของฟังก์ชันเวทมนตร์
- Line magicsซึ่งทำงานเหมือนกับคำสั่ง DOS
- Cell magicsซึ่งทำงานกับโค้ดหลายบรรทัด
เราจะเรียนรู้เกี่ยวกับฟังก์ชั่นเวทย์มนตร์สายและฟังก์ชันเวทย์มนตร์ของเซลล์โดยละเอียดในบทต่อ ๆ ไป
ในบทนี้ให้เราเข้าใจวิธีเรียกใช้และแก้ไขสคริปต์ Python
เรียกใช้คำสั่ง
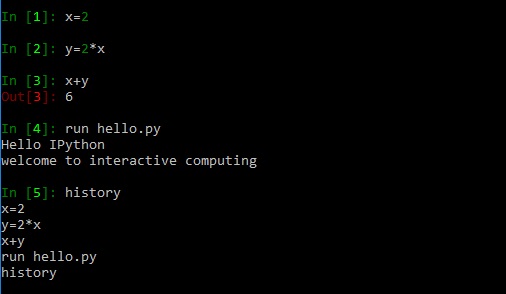
คุณสามารถใช้ได้ runคำสั่งในพรอมต์อินพุตเพื่อเรียกใช้สคริปต์ Python คำสั่ง run เป็นคำสั่ง line magic และควรเขียนเป็นไฟล์%run. อย่างไรก็ตาม%automagic โดยค่าเริ่มต้นจะเปิดโหมดไว้เสมอดังนั้นคุณจึงไม่สามารถละเว้นสิ่งนี้ได้
In [1]: run hello.py
Hello IPython
แก้ไขคำสั่ง
IPython ยังมีคำสั่งแก้ไขมายากล เรียกใช้โปรแกรมแก้ไขเริ่มต้นของระบบปฏิบัติการ คุณสามารถเปิดได้ผ่านตัวแก้ไข Windows Notepad และสามารถแก้ไขสคริปต์ได้ เมื่อคุณปิดหลังจากบันทึกอินพุตแล้วผลลัพธ์ของสคริปต์ที่แก้ไขจะแสดงขึ้น
In [2]: edit hello.py
Editing... done. Executing edited code...
Hello IPython
welcome to interactive computing
โปรดทราบว่าในตอนแรก hello.py มีเพียงหนึ่งคำสั่งและหลังจากแก้ไขอีกหนึ่งคำสั่งก็ถูกเพิ่มเข้าไป หากไม่มีการกำหนดชื่อไฟล์ให้กับคำสั่งแก้ไขไฟล์ชั่วคราวจะถูกสร้างขึ้น สังเกตรหัสต่อไปนี้ที่แสดงเหมือนกัน
In [7]: edit
IPython will make a temporary file named:
C:\Users\acer\AppData\Local\Temp\ipython_edit_4aa4vx8f\ipython_edit_t7i6s_er.py
Editing... done. Executing edited code...
magic of IPython
Out[7]: 'print ("magic of IPython")'
IPython เก็บรักษาทั้งคำสั่งและผลลัพธ์ของเซสชันปัจจุบัน เราสามารถเลื่อนดูคำสั่งก่อนหน้าได้โดยกดปุ่มขึ้นลง
นอกจากนี้อ็อบเจ็กต์เอาต์พุตสามตัวสุดท้ายจะถูกเก็บไว้ในตัวแปรพิเศษ _, __ และ ___ history คำสั่งมายากลแสดงคำสั่งก่อนหน้าในเซสชันปัจจุบันดังที่แสดงในภาพหน้าจอด้านล่าง -
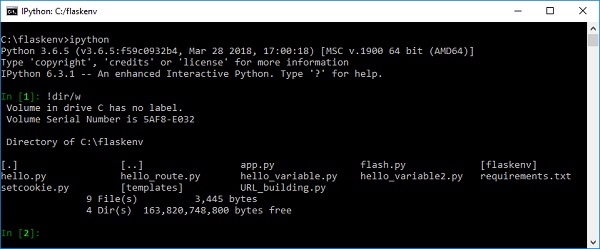
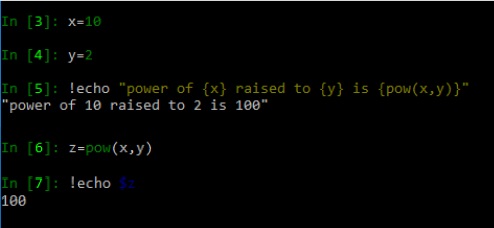
หากคำสั่งในเซลล์อินพุตเริ่มต้นด้วยสัญลักษณ์อัศเจรีย์ (!) จะถือว่าเป็นคำสั่งระบบสำหรับระบบปฏิบัติการที่อยู่ภายใต้ ตัวอย่างเช่น,!ls (สำหรับ linux) และ !dir (สำหรับ windows) แสดงเนื้อหาของไดเร็กทอรีปัจจุบัน
ผลลัพธ์ของคำสั่งระบบยังสามารถกำหนดให้กับตัวแปร Python ดังที่แสดงด้านล่าง -

ตัวแปรจัดเก็บเอาต์พุตโดยไม่มีสีและแยกที่อักขระขึ้นบรรทัดใหม่
นอกจากนี้ยังสามารถรวมตัวแปร Python หรือนิพจน์เข้ากับการเรียกใช้คำสั่งของระบบ ตัวแปรในวงเล็บปีกกา {} สามารถฝังอยู่ในข้อความคำสั่ง ดูตัวอย่างต่อไปนี้ -

นี่เป็นอีกตัวอย่างหนึ่งเพื่อให้เข้าใจว่าการใส่คำนำหน้าตัวแปร Python ด้วย $ ก็ให้ผลลัพธ์เดียวกัน
ในบทนี้ให้เราเข้าใจวิธีการทำงานกับตัวเลือกบรรทัดคำสั่งต่างๆใน IPython
เรียกใช้โปรแกรม IPython
คุณสามารถเรียกใช้โปรแกรม IPython โดยใช้ตัวเลือกต่อไปนี้ -
C:\python36> ipython [subcommand] [options] [-c cmd | -m mod | file] [--] [arg]ตัวเลือกไฟล์คือสคริปต์ Python ที่มีนามสกุล. py หากไม่มีการระบุตัวเลือกอื่นสคริปต์จะถูกเรียกใช้งานและพรอมต์คำสั่งจะปรากฏขึ้นอีกครั้ง
C:\python36>ipython hello.py
Hello IPython
welcome to interactive computing
คำสั่งย่อยและพารามิเตอร์
คำสั่ง IPython ยอมรับอ็อพชันคำสั่งย่อยต่อไปนี้ -
Profile - สร้างและจัดการโปรไฟล์ IPython
Kernel - เริ่มเคอร์เนลโดยไม่มีส่วนหน้าที่แนบมา
Locate - พิมพ์เส้นทางไปยัง IPython dir
History - จัดการฐานข้อมูลประวัติ IPython
คำสั่งย่อยโปรไฟล์ IPython ยอมรับพารามิเตอร์ต่อไปนี้ -
ipython profile create myprofile - สร้างโปรไฟล์ใหม่
ipython profile list - แสดงโปรไฟล์ที่มีอยู่ทั้งหมด
ipython locate profile myprofile - ค้นหาโปรไฟล์ที่ต้องการ
ในการติดตั้งเคอร์เนล IPython ใหม่ให้ใช้คำสั่งต่อไปนี้ -
Ipython kernel –install –nameในการพิมพ์เส้นทางไปยัง IPython dir ให้ใช้คำสั่งต่อไปนี้ -
C:\python36>ipython locate myprofile
C:\Users\acer\.ipython
นอกจากนี้เรารู้ว่า -
history คำสั่งย่อยจัดการฐานข้อมูลประวัติ IPython
trim ตัวเลือกลดฐานข้อมูลประวัติ IPython ให้เหลือ 1,000 รายการล่าสุด
clear ตัวเลือกลบรายการทั้งหมด
ตัวเลือกบรรทัดคำสั่งที่สำคัญอื่น ๆ ของ IPython มีดังต่อไปนี้ -
| ซีเนียร์ | คำสั่งและคำอธิบาย IPython |
|---|---|
| 1 | --automagic เปิดการเรียกคำสั่งเวทย์มนตร์อัตโนมัติ |
| 2 | --pdb เปิดใช้งานการเรียกใช้ดีบักเกอร์ pdb โดยอัตโนมัติหลังจากทุกข้อยกเว้น |
| 3 | --pylab โหลด matplotlib ล่วงหน้าและ numpy สำหรับการใช้งานแบบโต้ตอบกับแบ็กเอนด์ matplotlib เริ่มต้น |
| 4 | --matplotlib กำหนดค่า matplotlib สำหรับการใช้งานแบบโต้ตอบกับแบ็กเอนด์ matplotlib เริ่มต้น |
| 5 | --gui=options เปิดใช้งานการรวมลูปเหตุการณ์ GUI กับ ('glut', 'gtk', 'gtk2', 'gtk3', 'osx', 'pyglet', 'qt', 'qt4', 'qt5', 'tk', ' wx ',' gtk2 ',' qt4 ') |
ตัวอย่างการใช้งานตัวเลือกบรรทัดคำสั่ง IPython แสดงในตารางต่อไปนี้ -
| ซีเนียร์ | คำสั่งและคำอธิบาย IPython |
|---|---|
| 1 | ipython --matplotlib เปิดใช้งานการรวม matplotlib |
| 2 | ipython --matplotlib=qt เปิดใช้งานการรวม matplotlib กับแบ็กเอนด์ qt4 |
| 3 | ipython --profile=myprofile เริ่มต้นด้วยโปรไฟล์ foo |
| 4 | ipython profile create myprofile สร้างโปรไฟล์ foo w / ไฟล์กำหนดค่าเริ่มต้น |
| 5 | ipython help profile แสดงความช่วยเหลือสำหรับ subcmd โปรไฟล์ |
| 6 | ipython locate พิมพ์เส้นทางไปยังไดเร็กทอรี IPython |
| 7 | ipython locate profile myprofile พิมพ์เส้นทางไปยังไดเร็กทอรีสำหรับโปรไฟล์ "myprofile" |
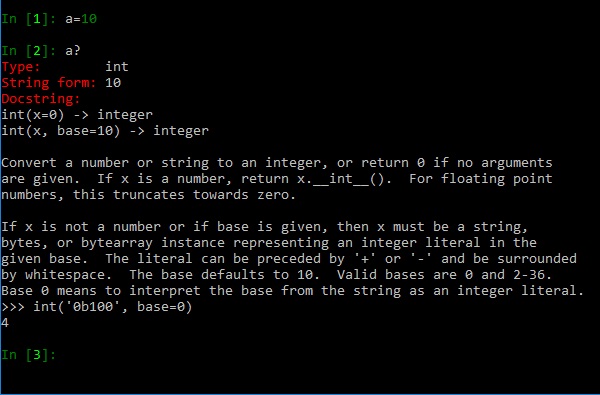
IPython มีวิธีต่างๆในการรับข้อมูลเกี่ยวกับวัตถุ Python แบบไดนามิก ในบทนี้ให้เราเรียนรู้วิธีการวิปัสสนาวัตถุแบบไดนามิกใน IPython
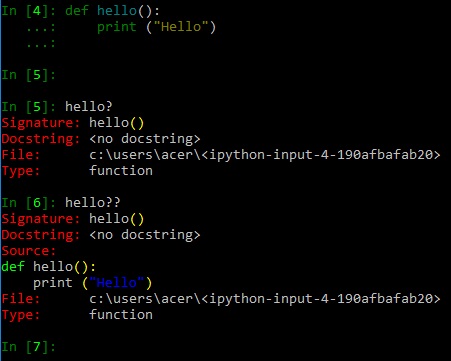
การใช้ ? และ ??ให้ข้อมูลเฉพาะและรายละเอียดเพิ่มเติมเกี่ยวกับวัตถุ ในตัวอย่างแรกที่กล่าวถึงด้านล่างอ็อบเจ็กต์จำนวนเต็มอย่างง่ายถูกสร้างขึ้น ข้อมูลสามารถจัดหาได้โดยพิมพ์ a? ในเซลล์อินพุต
ในตัวอย่างที่สองให้เรากำหนดฟังก์ชันและไตร่ตรองวัตถุฟังก์ชันนี้ด้วย ? และ ??.
โปรดทราบว่าฟังก์ชันมายากล %psearch เทียบเท่ากับการใช้ ? หรือ ?? สำหรับการดึงข้อมูลวัตถุ
เซลล์อินพุตและเอาต์พุตบนคอนโซล IPython จะมีหมายเลขเพิ่มขึ้น ในบทนี้ให้เราดูรายละเอียดการแคช IO ใน Python
ใน IPython อินพุตจะดึงข้อมูลโดยใช้ปุ่มลูกศรขึ้น นอกจากนี้อินพุตก่อนหน้าทั้งหมดจะถูกบันทึกและสามารถเรียกคืนได้ ตัวแปร_i, __iและ ___iเก็บรายการอินพุตสามรายการก่อนหน้านี้ไว้เสมอ นอกจากนี้In และ _inตัวแปรแสดงรายการอินพุตทั้งหมด เห็นได้ชัด_in[n]ดึงข้อมูลจากเซลล์อินพุตที่ n เซสชัน IPython ต่อไปนี้ช่วยให้คุณเข้าใจปรากฏการณ์นี้ -
In [1]: print ("Hello")
Hello

In [2]: 2+2
Out[2]: 4

In [3]: x = 10

In [4]: y = 2

In [5]: pow(x,y)
Out[5]: 100

In [6]: _iii, _ii, _i
Out[6]: ('x = 10', 'y = 2', 'pow(x,y)')

In [7]: In
Out[7]:
['',
   'print ("Hello")',
   '2+2',
   'x = 10',
   'y = 2',
   'pow(x,y)',
   '_iii, _ii, _i',
   'In'
]

In [8]: In[5] 9. IPython — IO
Out[8]: 'pow(x,y)'

In [9]: _ih
Out[9]:
['',
   'print ("Hello")',
   '2+2',
   'x = 10',
   'y = 2',
   'pow(x,y)',
   '_iii, _ii, _i',
   'In',
   'In[5]',
   '_ih'
]

In [11]: _ih[4]
Out[11]: 'y = 2'

In [12]: In[1:4]
Out[12]: ['print ("Hello")', '2+2', 'x=10']
ในทำนองเดียวกันขีดล่างเดี่ยวสองและสามทำหน้าที่เป็นตัวแปรในการจัดเก็บเอาต์พุตสามรายการก่อนหน้า นอกจากนี้Out และ _ohสร้างอ็อบเจ็กต์พจนานุกรมของจำนวนเซลล์และเอาต์พุตของเซลล์ที่ดำเนินการ (ไม่รวมคำสั่งการกำหนด) ในการดึงเนื้อหาของเซลล์เอาต์พุตเฉพาะให้ใช้Out[n] หรือ _oh[n]. คุณยังสามารถใช้การแบ่งส่วนเพื่อให้ได้เซลล์ผลลัพธ์ภายในช่วง
In [1]: print ("Hello")
Hello
In [2]: 2+2
Out[2]: 4
In [3]: x = 10
In [4]: y = 3
In [5]: pow(x,y)
Out[5]: 1000
In [6]: ___, __, _
Out[6]: ('', 4, 1000)
In [7]: Out
Out[7]: {2: 4, 5: 1000, 6: ('', 4, 1000)}
In [8]: _oh
Out[8]: {2: 4, 5: 1000, 6: ('', 4, 1000)}
In [9]: _5
Out[9]: 1000
In [10]: Out[6]
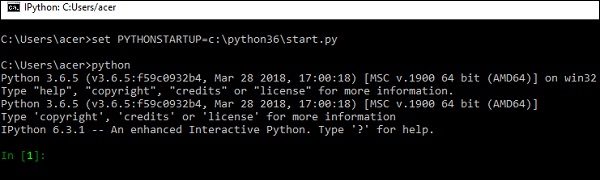
Out[10]: ('', 4, 1000)ตัวแปรสภาพแวดล้อมที่แตกต่างกันมีอิทธิพลต่อพฤติกรรมของ Python ตัวแปรสภาพแวดล้อม PYTHONSTARTUP ถูกกำหนดให้กับสคริปต์ Python ผลสคริปต์นี้จะถูกเรียกใช้งานก่อนที่พรอมต์ Python จะปรากฏขึ้น สิ่งนี้มีประโยชน์หากต้องโหลดโมดูลบางโมดูลตามค่าเริ่มต้นทุกครั้งที่เซสชัน Python ใหม่เริ่มต้น
สคริปต์ต่อไปนี้ (start.py) นำเข้าโมดูล IPython และเรียกใช้ฟังก์ชัน start_ipython () เพื่อแทนที่ Python shell เริ่มต้นด้วยพร้อมต์ (>>>) โดย IPython เชลล์เมื่อเรียกใช้งาน Python
import os, IPython
os.environ['PYTHONSTARTUP'] = ''
IPython.start_ipython()
raise SystemExit
สมมติว่าไฟล์นี้ถูกเก็บไว้ในไดเร็กทอรีการติดตั้งของ Python (c: \ python36) ตั้งค่าตัวแปรสภาพแวดล้อม PYTHONSTARTUP และเริ่ม Python จากบรรทัดคำสั่ง จากนั้น IPython shell จะปรากฏขึ้นดังที่แสดงด้านล่าง -
โปรดทราบว่าตัวแปรสภาพแวดล้อมสามารถตั้งค่าได้อย่างถาวรโดยใช้กล่องโต้ตอบคุณสมบัติของระบบใน Windows และใช้คำสั่ง export บน Linux
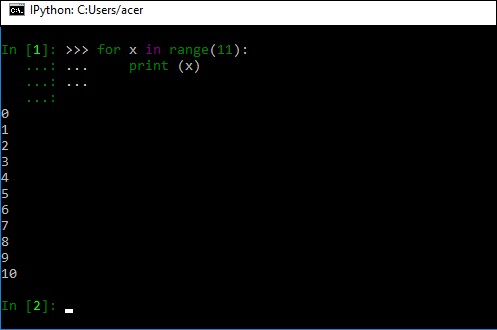
IPython สามารถอ่านจากคอนโซล Python มาตรฐานที่มีค่าเริ่มต้น >>>พร้อมต์และเซสชัน IPython อื่น ภาพหน้าจอต่อไปนี้แสดงสำหรับลูปที่เขียนใน Python shell มาตรฐาน -
คัดลอกรหัส (พร้อมกับ Python prompt) และวางสิ่งเดียวกันในเซลล์อินพุต IPython IPython กรองคำสั่งอินพุต (>>> และ ... ) หรือ IPython อย่างชาญฉลาด (ใน [N]: และ ... :)
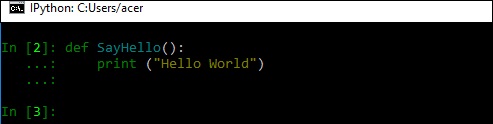
ในทำนองเดียวกันรหัสจากเซสชัน IPython หนึ่งสามารถวางในอีกเซสชันหนึ่งได้ ภาพหน้าจอแรกที่ระบุด้านล่างแสดงคำจำกัดความของฟังก์ชัน SayHello () ในหน้าต่าง IPython เดียว -
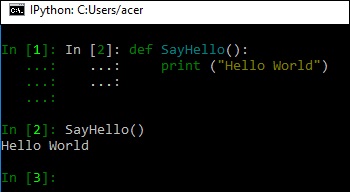
ตอนนี้ให้เราเลือกรหัสและวางในเปลือก IPython อื่นและเรียกใช้ฟังก์ชัน SayHello ()
ฟังก์ชัน embed () ของโมดูล IPython ทำให้สามารถฝัง IPython ในเนมสเปซของรหัส Python ได้ ดังนั้นคุณสามารถใช้ประโยชน์จากคุณสมบัติของ IPython เช่นการตรวจสอบวัตถุและการเติมแท็บในสภาพแวดล้อม Python เริ่มต้น
ออบเจ็กต์ Python ที่มีอยู่ในเนมสเปซส่วนกลางก่อนที่จะฝังจะพร้อมใช้งานสำหรับ IPython
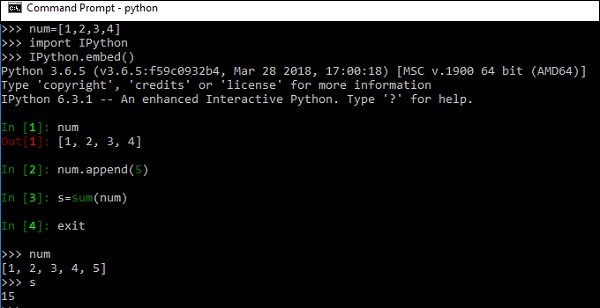
หากออบเจ็กต์ใหม่ถูกสร้างขึ้นในขณะที่อยู่ใน IPython หรืออ็อบเจ็กต์ก่อนหน้าถูกแก้ไขอ็อบเจ็กต์เหล่านั้นจะพร้อมใช้งานโดยอัตโนมัติสำหรับสภาพแวดล้อมเริ่มต้นหลังจากออกจาก IPython เปลือก IPython ในตัวจะไม่เปลี่ยนสถานะของรหัสหรือวัตถุก่อนหน้านี้
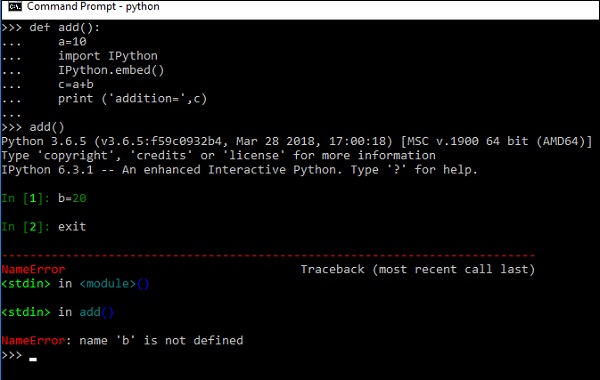
อย่างไรก็ตามหาก IPython ฝังอยู่ในเนมสเปซในเครื่องเช่นภายในฟังก์ชันอ็อบเจ็กต์ที่อยู่ภายในจะไม่สามารถใช้งานได้เมื่อปิดแล้ว ที่นี่เราได้กำหนดฟังก์ชัน add () ภายใน add () เราเรียกใช้ IPython และประกาศตัวแปร หากเราพยายามเข้าถึงตัวแปรใน IPython หลังจากปิดไปแล้วข้อยกเว้น NameError จะถูกเพิ่มขึ้น
คำสั่งเวทย์มนตร์หรือฟังก์ชันเวทมนตร์เป็นหนึ่งในการปรับปรุงที่สำคัญที่ IPython นำเสนอเมื่อเทียบกับ Python shell มาตรฐาน คำสั่งวิเศษเหล่านี้มีไว้เพื่อแก้ปัญหาทั่วไปในการวิเคราะห์ข้อมูลโดยใช้ Python ในความเป็นจริงพวกเขาควบคุมพฤติกรรมของ IPython เอง
คำสั่งเวทย์มนตร์ทำหน้าที่เป็นฟังก์ชันที่สะดวกโดยที่ไวยากรณ์ของ Python ไม่ใช่คำสั่งที่เป็นธรรมชาติที่สุด ซึ่งมีประโยชน์ในการฝังไวยากรณ์ python ที่ไม่ถูกต้องในขั้นตอนการทำงาน
ประเภทของคำสั่งเวทมนตร์
คำสั่งเวทย์มนตร์มีสองประเภท -
- สายเวทย์
- เวทมนตร์ของเซลล์
Line Magics
คล้ายกับการเรียกบรรทัดคำสั่ง เริ่มต้นด้วยอักขระ% ส่วนที่เหลือของบรรทัดคืออาร์กิวเมนต์ที่ส่งผ่านโดยไม่มีวงเล็บหรือเครื่องหมายคำพูด Line magics สามารถใช้เป็นนิพจน์และสามารถกำหนดค่าที่ส่งคืนให้กับตัวแปรได้
เวทมนตร์ของเซลล์
มีคำนำหน้าอักขระ %% ซึ่งแตกต่างจากฟังก์ชั่นมายากลแบบเส้นตรงที่สามารถทำงานได้หลายบรรทัดด้านล่างการโทร ในความเป็นจริงพวกเขาสามารถทำการปรับเปลี่ยนอินพุตที่ได้รับโดยพลการซึ่งไม่จำเป็นต้องเป็นรหัส Python ที่ถูกต้องเลย พวกเขาได้รับทั้งบล็อกเป็นสตริงเดียว
หากต้องการทราบข้อมูลเพิ่มเติมเกี่ยวกับฟังก์ชั่นเวทมนตร์เวทมนตร์ในตัวและสตริงของพวกเขาให้ใช้คำสั่งเวทมนตร์ ข้อมูลของฟังก์ชั่นเวทมนตร์เฉพาะจะได้รับโดย%magicfunction?คำสั่ง ตอนนี้ให้เราอธิบายคำสั่งเวทย์มนตร์บรรทัดและเซลล์ในตัว
สายเวทย์ในตัว
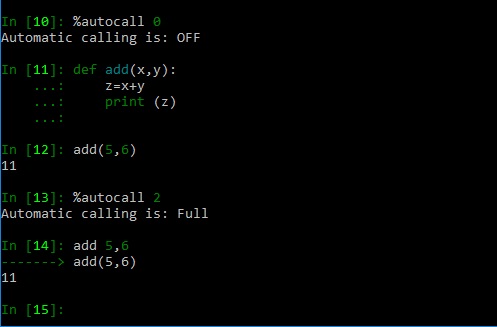
%autocall [mode]ฟังก์ชันวิเศษนี้ทำให้สามารถเรียกฟังก์ชันได้โดยอัตโนมัติโดยไม่ต้องใช้วงเล็บ ใช้พารามิเตอร์โหมดที่เป็นไปได้สามแบบ:0 (off), 1 (smart) is default or 2 (always on).
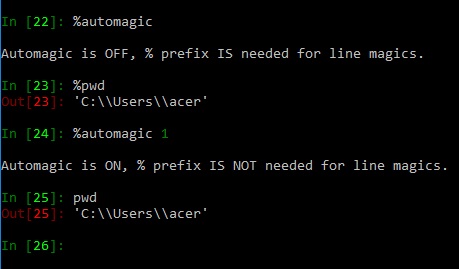
%automagic
Magic functions are callable without having to type the initial % if set to 1. Without arguments it toggles on/off. To deactivate, set to 0.
The following example shows a magic function %pwd (displays present working directory) being called without leading % when %automagic set to 1
%cd
This line magic changes the current directory. This command automatically maintains an internal list of directories you visit during your IPython session, in the variable _dh. You can also do ‘cd -<tab>’ to see directory history conveniently.
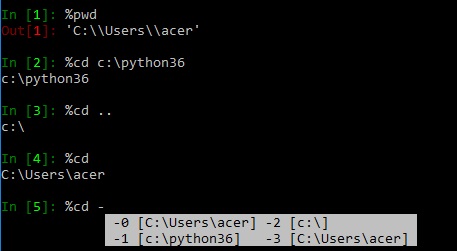
Usage
The %cd command can be used in the following ways −
%cd <dir> − Changes current working directory to <dir>
%cd.. − Changes current directory to parent directory
%cd − changes to last visited directory.
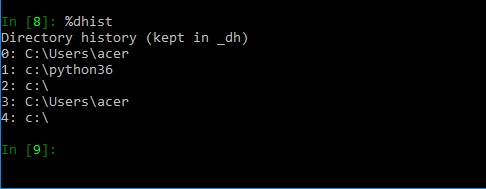
%dhist
This magic command prints all directories you have visited in current session. Every time %cd command is used, this list is updated in _dh variable.
%edit
This magic command calls upon the default text editor of current operating system (Notepad for Windows) for editing a Python script. The script is executed as the editor is closed.
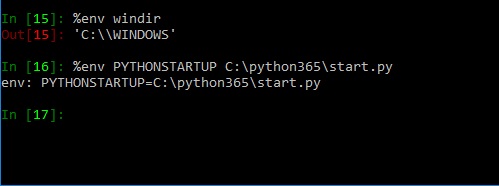
%env
This magic command will list all environment variables. It also reads value of particular variable or set the value of environment variable.
Usage
The %cd command can be used in the following ways −
%env − Lists all environment variables
%env var − Gets value for var
%env var val − Sets value for var
%gui [GUINAME]
When used without argument this command enables or disables IPython GUI event loop integration. With GUINAME argument, this magic replaces the default GUI toolkits by the specified one.
| Sr.No. | Command & Description |
|---|---|
| 1 | %gui wx enable wxPython event loop integration |
| 2 | %gui qt4|qt enable PyQt4 event loop integration |
| 3 | %gui qt5 enable PyQt5 event loop integration |
| 4 | %gui gtk enable PyGTK event loop integration |
| 5 | %gui gtk3 enable Gtk3 event loop integration |
| 6 | %gui tk enable Tk event loop integration |
| 7 | %gui osx enable Cocoa event loop integration |
| 8 | (requires %matplotlib 1.1) |
| 9 | %gui disable all event loop integration |
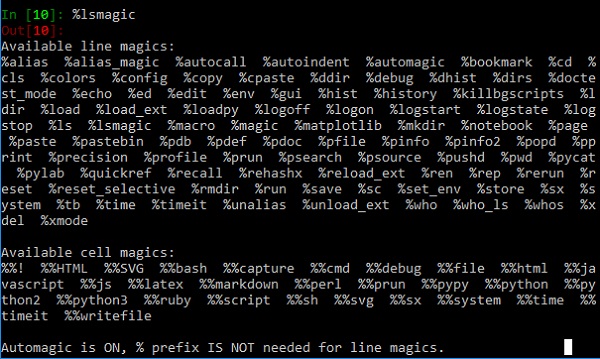
%lsmagic
Displays all magic functions currently available
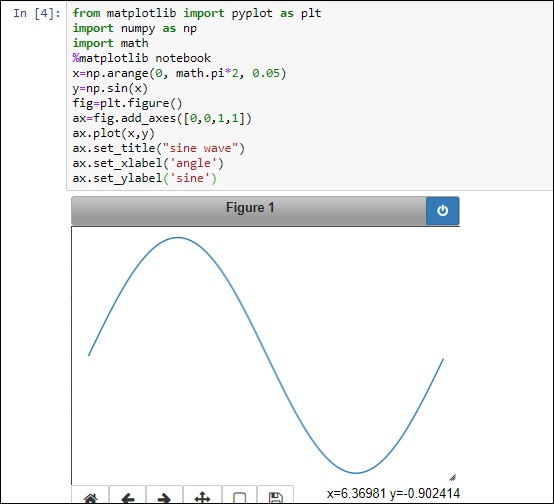
%matplotlib
This function activates matplotlib interactive support during an IPython session. However, it does not import matplotlib library. The matplotlib default GUI toolkit is TkAgg. But you can explicitly request a different GUI backend. You can see a list of the available backends as shown −
In [4]: %matplotlib --list
Available matplotlib backends:
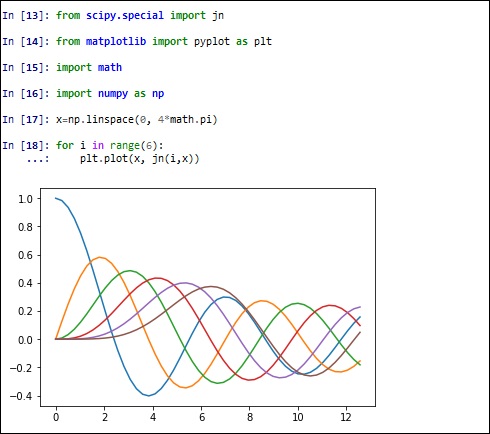
['osx', 'qt4', 'qt5', 'gtk3', 'notebook', 'wx', 'qt', 'nbagg','gtk', 'tk', 'inline']The IPython session shown here plots a sine wave using qt toolkit −
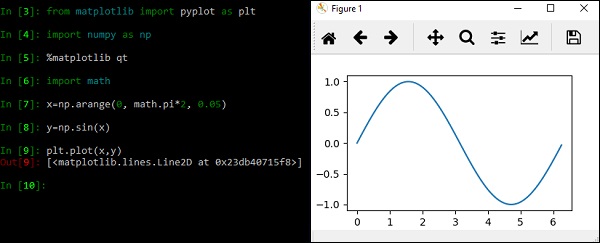
While using Jupyter notebook, %matplotlib inline directive displays plot output in the browser only.
%notebook
This function converts current IPython history into an IPython notebook file with ipynb extension. The input cells in previous example are saved as sine.ipynb
%notebook sine.ipynb%pinfo
This function is similar to object introspection ? character. To obtain information about an object, use the following command −
%pinfo objectThis is synonymous to object? or ?object.
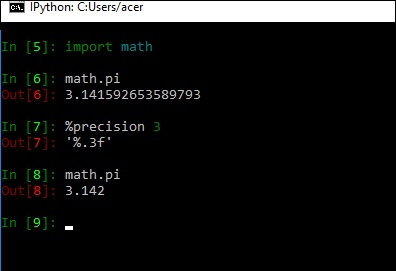
%precision
This magic function restricts a floating point result to specified digits after decimal.
%pwd
This magic function returns the present working directory.

%pylab
This function populates current IPython session with matplotlib, and numpy libraries.

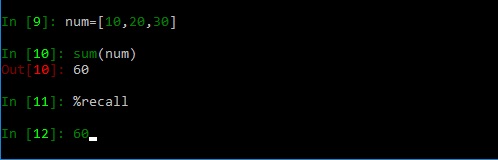
%recall
When executed without any parameter, this function executes previous command.
Note that in %recall n, number in front of it is input cell number. Hence the command in the nth cell is recalled. You can recall commands in section of cells by using command such as %recall 1-4. Current input cell is populated with recalled cell and the cursor blinks till the enter key is pressed.
%run
This command runs a Python script from within IPython shell.

%time
This command displays time required by IPython environment to execute a Python expression.

%timeit
This function also displays time required by IPython environment to execute a Python expression. Time execution of a Python statement or expression uses the timeit module. This function can be used both as a line and cell magic as explained here −
In line mode you can time a single-line.
In cell mode, the statement in the first line is used as setup code and the body of the cell is timed. The cell body has access to any variables created in the setup code.
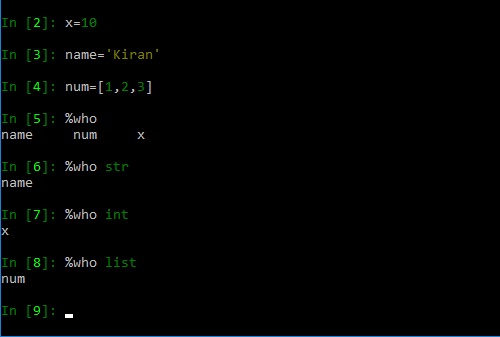
%who
This line magic prints all interactive variables, with some minimal formatting. If any arguments are given, only variables whose type matches one of these are printed.
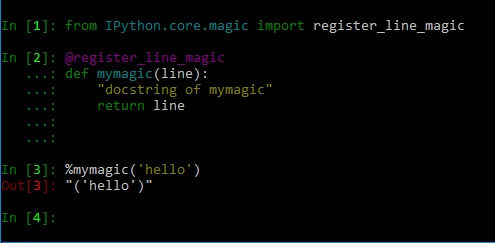
IPython Custom Line Magic function
IPython’s core library contains register_line_magic decorator. A user defined function is converted into a line magic function using this decorator.
Project Jupyter started as a spin-off from IPython project in 2014. IPython’s language-agnostic features were moved under the name – Jupyter. The name is a reference to core programming languages supported by Jupyter which are Julia, Python and RProducts under Jupyter project are intended to support interactive data science and scientific computing.
The project Jupyter consists of various products described as under −
IPykernel − This is a package that provides IPython kernel to Jupyter.
Jupyter client − This package contains the reference implementation of the Jupyter protocol. It is also a client library for starting, managing and communicating with Jupyter kernels.
Jupyter notebook − This was earlier known as IPython notebook. This is a web based interface to IPython kernel and kernels of many other programming languages.
Jupyter kernels − Kernel is the execution environment of a programming language for Jupyter products.
The list of Jupyter kernels is given below −
| Kernel | Language | URL |
|---|---|---|
| IJulia | Julia | https://github.com/JuliaLang |
| IHaskell | Haskell | https://github.com/gibiansky |
| IRuby | Ruby | https://github.com/SciRuby/iruby |
| IJavaScript | JavaScript | https://github.com/n-riesco |
| IPHP | PHP | https://github.com/dawehner |
| IRKernel | R | http://irkernel.github.io/ |
Qtconsole − A rich Qt-based console for working with Jupyter kernels
nbconvert − Converts Jupyter notebook files in other formats
JupyterLab − Web based integrated interface for notebooks, editors, consoles etc.
nbviewer − HTML viewer for notebook files
IPython notebook was developed by Fernando Perez as a web based front end to IPython kernel. As an effort to make an integrated interactive computing environment for multiple language, Notebook project was shifted under Project Jupyter providing front end for programming environments Juila and R in addition to Python.
A notebook document consists of rich text elements with HTML formatted text, figures, mathematical equations etc. The notebook is also an executable document consisting of code blocks in Python or other supporting languages.
Jupyter notebook is a client-server application. The application starts the server on local machine and opens the notebook interface in web browser where it can be edited and run from. The notebook is saved as ipynb file and can be exported as html, pdf and LaTex files.
If you are new to Jupyter, you can try features of Jupyter notebook before installing on your local machine. For this purpose, visit https://jupyter.org in your browser and choose ‘Try Jupyter with Python’ option.
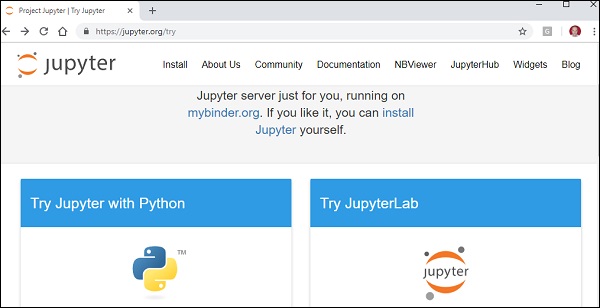
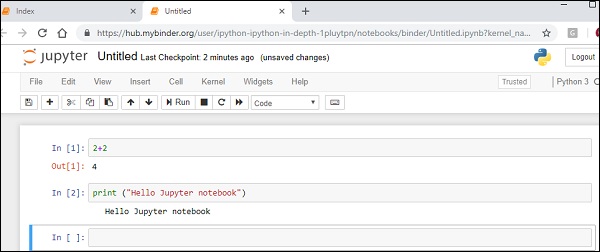
This will open home page of https://mybinder.org From the File menu, choose new notebook option to open a blank Jupyter in your browser. The input cell, as similar to that in IPython terminal, will be displayed. You can execute any Python expression in it.
You can easily install Jupyter notebook application using pip package manager.
pip3 install jupyterTo start the application, use the following command in the command prompt window.
c:\python36>jupyter notebookThe server application starts running at default port number 8888 and browser window opens to show notebook dashboard.
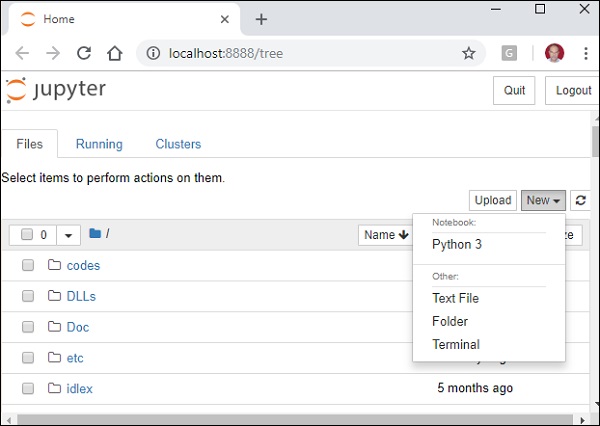
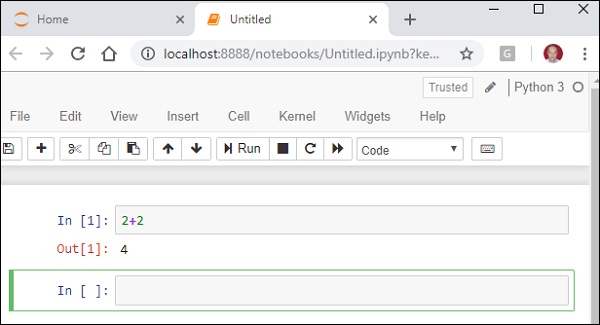
Observe that the dashboard shows a dropdown near the right border of browser with an arrow beside the New button. It contains the currently available notebook kernels. Now, choose Python 3, then a new notebook opens in a new tab. An input cell as similar to that of in IPython console is displayed.
You can execute any Python expression in it. The result will be displayed in the Out cell.
The dashboard of Jupyter Notebook contains three tabs as shown in the screenshot given below −
Files Tab
The "Files" tab displays files and folders under current directory from which notebook app was invoked. The row corresponding to a notebook which is currently open and the running status is shown just beside the last modified column. It also displays Upload button using which a file can be uploaded to notebook server.
Running Tab
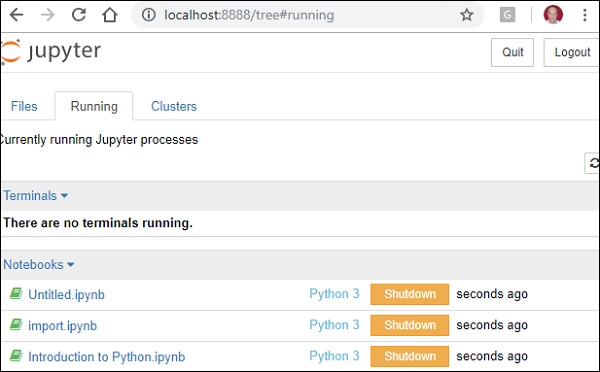
The "Running" tab shows which of the notebooks are currently running.
Cluster Tab
The third tab, "Clusters", is provided by IPython parallel. IPython's parallel computing framework, an extended version of the IPython kernel.
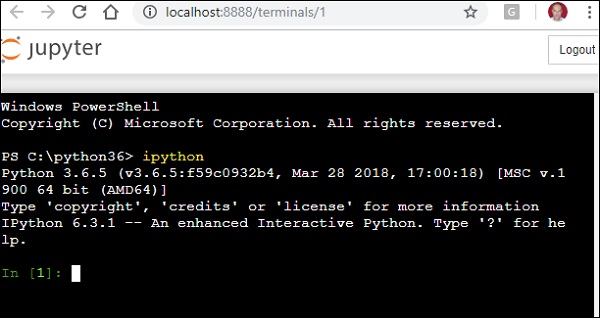
From the New dropdown choose Terminal to open a cmd window. You can now start an IPython terminal here.
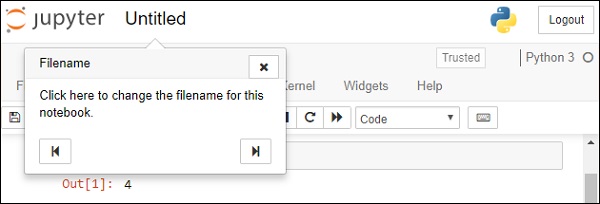
In the user interface of Jupyter, just beside the logo in the header, the file name is displayed.
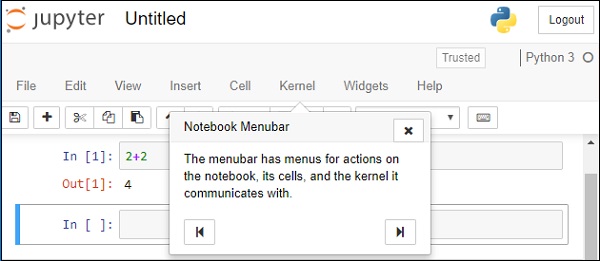
You can find the menu bar below the header. Each menu contains many options that will be discussed later.
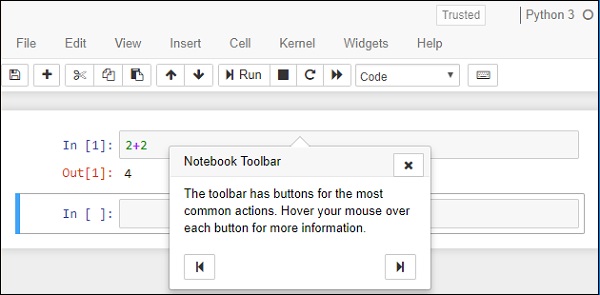
A row of icons forming toolbar helps user to perform often required operations
The notebook has two modes − Command mode and Edit mode. Notebook enters edit mode when a cell is clicked. Notice the pencil symbol just besides name of kernel.
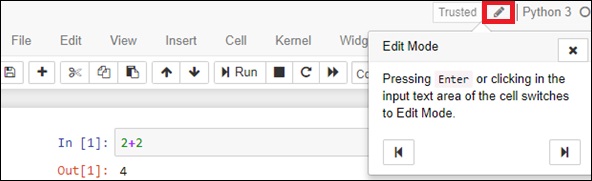
Kernel indicator symbol is displayed just to the right of kernel name. Note that a hollow circle means kernel is idle and solid circle means it is busy.

File Menu
The following are the options available in the File menu −
| Sr.No. | File menu & Description |
|---|---|
| 1 | New notebook choose the kernel to start new notebook |
| 2 | Open Takes user to dashboard to choose notebook to open |
| 3 | Save as save current notebook and start new kernel |
| 4 | Rename rename current notebook |
| 5 | Save saves current notebook and stores current checkpoint |
| 6 | Revert reverts state of notebook to earlier checkpoint |
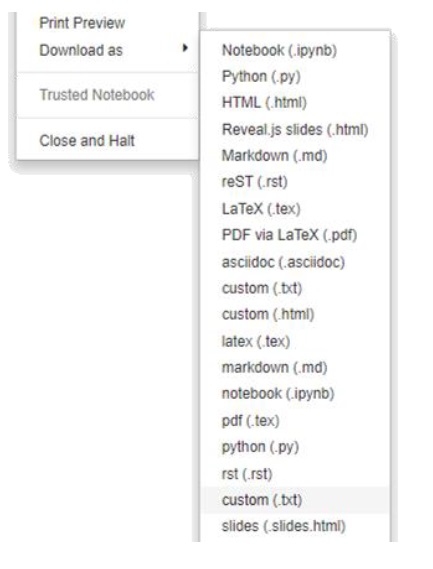
| 7 | Download export notebook in one of various file formats |
The file formats that are available are shown below −
Edit Menu
Edit menu consists of buttons to perform cut, copy and paste cells, delete selected cell, split and merge cells, move cells up and down, find and replace within notebook, cut/copy attachments and insert image.
View Menu
Buttons in this menu help us to hide/display header, toolbar and cell numbers.
Insert Menu
This menu gives you options for inserting cell before or after the current cell.
Cell Menu
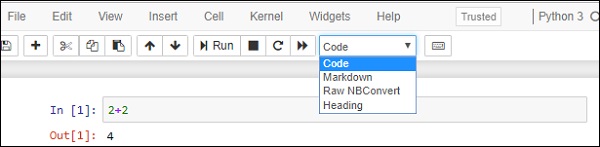
The options in this menu let user run all or specific cells in the notebook. You can also set the cell type to code type, markdown or raw nbconvert type.
Kernel Menu
From this menu you can start, interrupt, restart or shutdown the kernel. You can also start a new kernel.
Widgets Menu
From this menu you can save, clear, download or embed widget state.
Help menu
Various predefined keyboard shortcuts are displayed from this menu. You can also edit the shortcuts as per your convenience.
Cells in Jupyter notebook are of three types − Code, Markdown and Raw.
Code Cells
Contents in this cell are treated as statements in a programming language of current kernel. Default kernel is Python. So, we can write Python statements in a code cell. When such cell is run, its result is displayed in an output cell. The output may be text, image, matplotlib plots or HTML tables. Code cells have rich text capability.
Markdown Cells
These cells contain text formatted using markdown language. All kinds of formatting features are available like making text bold and italic, displaying ordered or unordered list, rendering tabular contents etc. Markdown cells are especially useful to provide documentation to the computational process of the notebook.
Raw Cells
Contents in raw cells are not evaluated by notebook kernel. When passed through nbconvert, they will be rendered as desired. If you type LatEx in a raw cell, rendering will happen after nbconvert is applied.
While the menu bar and toolbar lets you perform various operations on notebook, it is desirable to be able to use keyboard shortcuts to perform them quickly.
Jupyter Notebooks have two different keyboard input modes −
Command Mode − Binds the keyboard to notebook level actions. Indicated by a grey cell border with a blue left margin.
Edit Mode − When you are typing in a cell. Indicated by a green cell border.
Command Mode (press Esc to enable)
F |
find and replace | 1 |
change cell to heading 1 |
Ctrl-Shift-F |
open the command palette | 2 |
change cell to heading 2 |
Ctrl-Shift-P |
open the command palette | 3 |
change cell to heading 3 |
Enter |
enter edit mode | 4 |
change cell to heading 4 |
P |
open the command palette | 5 |
change cell to heading 5 |
Shift-Enter |
run cell, select below | 6 |
change cell to heading 6 |
Ctrl-Enter |
run selected cells | A |
insert cell above |
Alt-Enter |
run cell and insert below | B |
insert cell below |
Y |
change cell to code | X |
cut selected cells |
M |
change cell to markdown | C |
copy selected cells |
R |
change cell to raw | V |
paste cells below |
K |
select cell above | Z |
undo cell deletion |
Up |
select cell above | D,D |
delete selected cells |
Down |
select cell below | Shift-M |
merge selected cells, or current cell with cell below if only one cell is selected |
J |
select cell below | Shift-V |
paste cells above |
Shift-K |
extend selected cells above | L |
toggle line numbers |
Shift-Up |
extend selected cells above | O |
toggle output of selected cells |
Shift-Down |
extend selected cells below | Shift-O |
toggle output scrolling of selected cells |
Shift-J |
extend selected cells below | I,I |
interrupt the kernel |
Ctrl-S |
Save and Checkpoint | 0,0 |
restart the kernel (with dialog) |
S |
Save and Checkpoint | Esc |
close the pager |
Shift-L |
toggles line numbers in all cells, and persist the setting | Q |
close the pager |
Shift-Space |
scroll notebook up | Space |
scroll notebook down |
Edit Mode (press Enter to enable)
Tab |
code completion or indent | Ctrl-Home |
go to cell start |
Shift-Tab |
tooltip | Ctrl-Up |
go to cell start |
Ctrl-] |
indent | Ctrl-End |
go to cell end |
Ctrl-[ |
dedent | Ctrl-Down |
go to cell end |
Ctrl-A |
select all | Ctrl-Left |
go one word left |
Ctrl-Z |
undo | Ctrl-Right |
go one word right |
Ctrl-/ |
comment | Ctrl-M |
enter command mode |
Ctrl-D |
delete whole line | Ctrl-Shift-F |
open the command palette |
Ctrl-U |
undo selection | Ctrl-Shift-P |
open the command palette |
Insert |
toggle overwrite flag | Esc |
enter command mode |
Ctrl-Backspace |
delete word before | Ctrl-Y |
redo |
Ctrl-Delete |
delete word after | Alt-U |
redo selection |
Shift-Enter |
run cell, select below | Ctrl-Shift-Minus |
split cell at cursor |
Ctrl-Enter |
run selected cells | Down |
move cursor down |
Alt-Enter |
run cell and insert below | Up |
move cursor up |
Ctrl-S |
Save and Checkpoint |
Markdown cell displays text which can be formatted using markdown language. In order to enter a text which should not be treated as code by Notebook server, it must be first converted as markdown cell either from cell menu or by using keyboard shortcut M while in command mode. The In[] prompt before cell disappears.
Header cell
A markdown cell can display header text of 6 sizes, similar to HTML headers. Start the text in markdown cell by # symbol. Use as many # symbols corresponding to level of header you want. It means single # will render biggest header line, and six # symbols renders header of smallest font size. The rendering will take place when you run the cell either from cell menu or run button of toolbar.
Following screenshot shows markdown cells in edit mode with headers of three different levels.
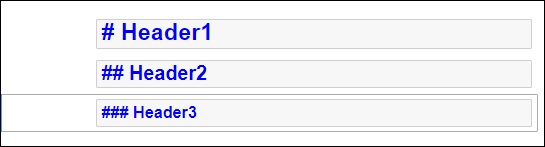
When cells are run, the output is as follows −

Note that Jupyter notebook markdown doesn’t support WYSWYG feature. The effect of formatting will be rendered only after the markdown cell is run.
Ordered Lists
To render a numbered list as is done by <ol> tag of HTML, the First item in the list should be numbered as 1. Subsequent items may be given any number. It will be rendered serially when the markdown cell is run. To show an indented list, press tab key and start first item in each sublist with 1.
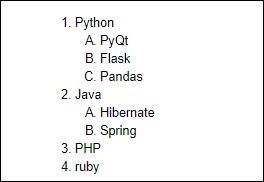
If you give the following data for markdown −
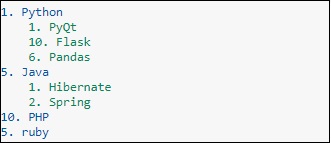
It will display the following list −
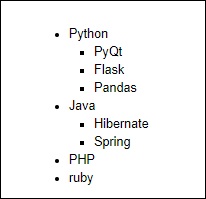
Bullet lists
Each item in the list will display a solid circle if it starts with – symbol where as solid square symbol will be displayed if list starts with * symbol. The following example explains this feature −
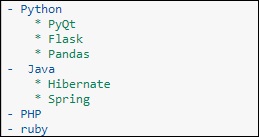
The rendered markdown shows up as below −
Hyperlinks
Markdown text starting with http or https automatically renders hyperlink. To attach link to text, place text in square brackets [] and link in parentheses () optionally including hovering text. Following screenshot will explain this.

The rendered markdown appears as shown below −

Bold and Italics
To show a text in bold face, put it in between double underscores or two asterisks. To show in italics, put it between single underscores or single asterisks.

The result is as shown below −
Images
To display image in a markdown cell, choose ‘Insert image’ option from Edit menu and browse to desired image file. The markdown cell shows its syntax as follows −
Image will be rendered on the notebook as shown below −
Table
In a markdown cell, a table can be constructed using | (pipe symbol) and – (dash) to mark columns and rows. Note that the symbols need not be exactly aligned while typing. It should only take respective place of column borders and row border. Notebook will automatically resize according to content. A table is constructed as shown below −

The output table will be rendered as shown below −

In this chapter, let us understand cell magic functions and their functionalities.
%%html
This cell magic function renders contents of code cell as html script.

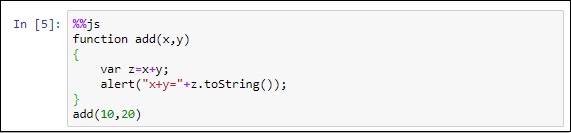
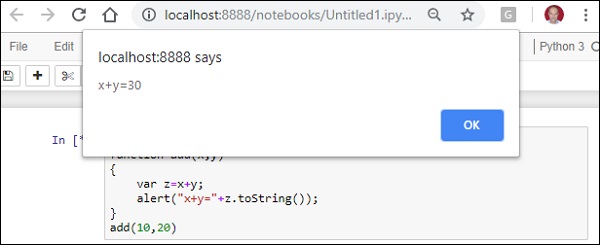
%%js or %%javascript
You can embed javascript code in Jupyter notebook cell with the help of this cell magic command.
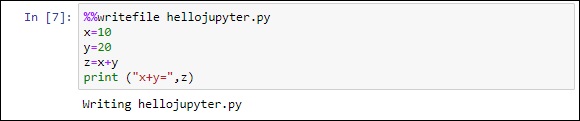
%%writefile
Contents of code cell are written to a file using this command.
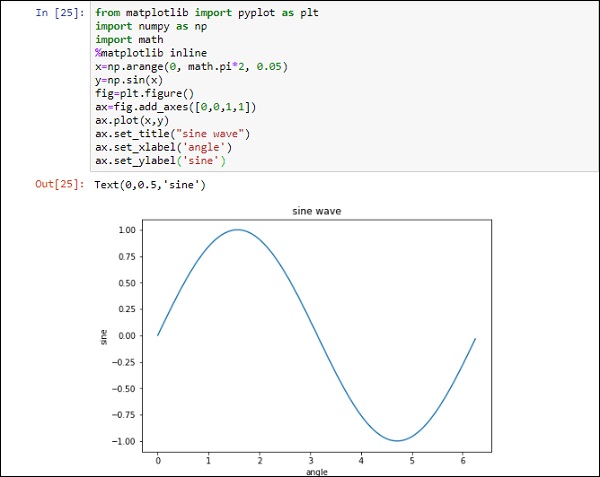
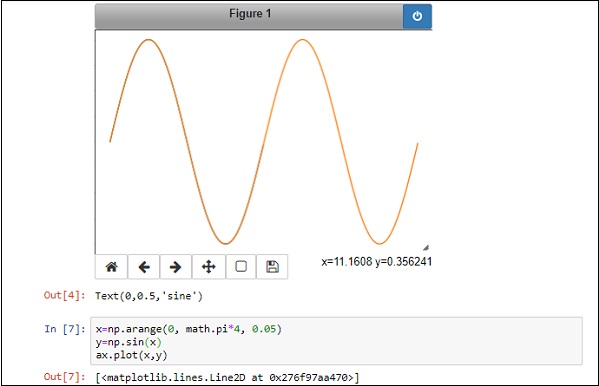
IPython kernel of Jupyter notebook is able to display plots of code in input cells. It works seamlessly with matplotlib library. The inline option with the %matplotlib magic function renders the plot out cell even if show() function of plot object is not called. The show() function causes the figure to be displayed below in[] cell without out[] with number.
Now, add plt.show() at the end and run the cell again to see the difference.
Note that the %matplotlib notebook magic renders interactive plot.
Just below the figure, you can find a tool bar to switch views, pan, zoom and download options.
Importantly, if you modify the data underneath the plot, the display changes dynamically without drawing another plot.
In the above example, change the data sets of x and y in the cell below and plot the figure again, the figure above will get dynamically refreshed.
Jupyter notebook files have .ipynb extension. Notebook is rendered in web browser by the notebook app. It can be exported to various file formats by using download as an option in the file menu. Jupyter also has a command line interface in the form of nbconvert option. By default, nbconvert exports the notebook to HTML format. You can use the following command for tis purpose −
jupyter nbconvert mynotebook.ipynbThis will convert mynotebook.ipynb to the mynotebook.html. Other export format is specified with `--to` clause.
Note that other options include ['asciidoc', 'custom', 'html', 'latex', 'markdown', 'notebook', 'pdf', 'python', 'rst', 'script', 'slides']
HTML includes 'basic' and 'full' templates. You can specify that in the command line as shown below −
jupyter nbconvert --to html --template basic mynotebook.ipynbLaTex is a document preparation format used specially in scientific typesetting. Jupyter includes 'base', 'article' and 'report' templates.
jupyter nbconvert --to latex –template report mynotebook.ipynbTo generate PDF via latex, use the following command −
jupyter nbconvert mynotebook.ipynb --to pdfNotebook can be exported to HTML slideshow. The conversion uses Reveal.js in the background. To serve the slides by an HTTP server, add --postserve on the command-line. To make slides that does not require an internet connection, just place the Reveal.js library in the same directory where your_talk.slides.html is located.
jupyter nbconvert myslides.ipynb --to slides --post serveThe markdown option converts notebook to simple markdown output. Markdown cells are unaffected, and code cells indented 4 spaces.
--to markdownYou can use rst option to convert notebook to Basic reStructuredText output. It is useful as a starting point for embedding notebooks in Sphinx docs.
--to rstThis is the simplest way to get a Python (or other language, depending on the kernel) script out of a notebook.
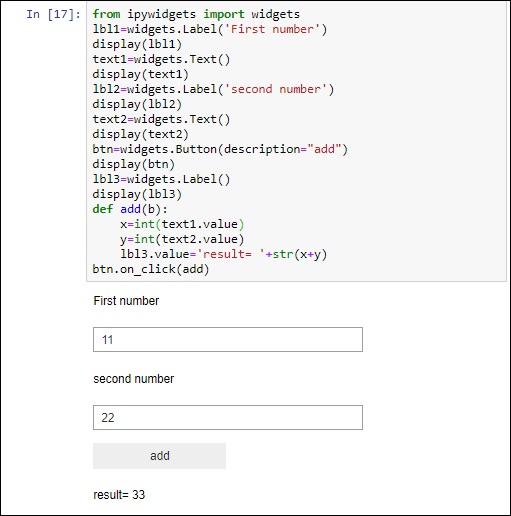
--to scriptIPyWidgets is a Python library of HTML interactive widgets for Jupyter notebook. Each UI element in the library can respond to events and invokes specified event handler functions. They enhance the interactive feature of Jupyter notebook application.
In order to incorporate widgets in the notebook, we have to import the following module as shown below −
from ipywidgets import widgetsSome basic IPyWidgets are explained here −
Text input
The widgets.text() function renders widgets in the notebook. It is similar to text box form element in HTML. The object of this widget has on_submit() method which listens to activity of the text field and can invoke event handler given as an argument to it.
Button
This widget is similar to HTML button. When it is clicked, the event is registered by on_click() method which calls the click event handler.
IntSlider
A slider control which displays the incrementing integer values. There is also a FloatSlider and IntRangeSlider (changing integer between a range)
Label
This widget is useful to display non editable text in the notebook.
display()
This function from ipywidgets module renders the widget object in notebook’s input cell.
Interact
This function automatically renders a widget depending upon type of data argument given to it. First argument to this function is the event handler and second is a value passed to event handler itself.
Following example shows three label widgets, two text widgets and a button with ‘add’ caption. When the button is clicked, sum of numbers in two text input fields is displayed on the lowermost label.
In this chapter, let us understand how to get started with QtConsole. This chapter will give you an overview about this software and explains its installation steps.
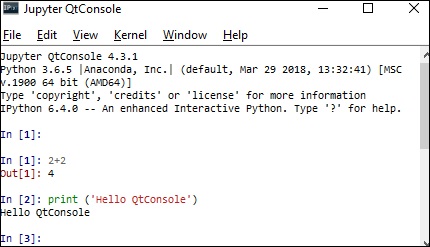
Overview
The Qt console is a GUI application similar to IPython terminal. However, it provides a number of enhancements which are not available in text based IPython terminal. The enhance features are inline figures, multi-line editing with syntax highlighting, graphical calltips, etc. The Qt console can use any Jupyter kernel, default being IPython kernel.
การติดตั้ง
Jupyter QtConsole เป็นส่วนหนึ่งของ Project Jupyter การจัดจำหน่ายของ Anaconda มีแอปพลิเคชัน QTconsole อยู่แล้ว ในการติดตั้งทีละรายการให้ใช้คำสั่ง pip ดังที่แสดงด้านล่าง -
pip3 install qtconsoleคุณยังสามารถใช้คำสั่ง conda เพื่อจุดประสงค์นี้ -
conda install qtconsoleคุณสามารถเริ่มคอนโซล Jupyter จากเครื่องนำทาง Anaconda ในการเริ่มต้นจากบรรทัดคำสั่งคุณควรใช้คำสั่งต่อไปนี้จากพรอมต์คำสั่งของ Windows หรือพรอมต์อนาคอนดา -
jupyter qtonsoleคุณจะได้รับเทอร์มินัลที่คล้ายกับเทอร์มินัล IPython พร้อมกับ In [] ครั้งแรก ตอนนี้คุณสามารถเรียกใช้นิพจน์ Python ได้เหมือนกับที่เราทำในเทอร์มินัล IPython หรือสมุดบันทึก Jupyter
การแก้ไขหลายบรรทัดเป็นหนึ่งในคุณสมบัติที่ไม่มีในเทอร์มินัล IPython ในการป้อนคำสั่งมากกว่าหนึ่งรายการในเซลล์อินพุตเดียวให้กดctrl+enterหลังจากบรรทัดแรก จากนั้นเพียงแค่กด Enter ก็จะเป็นการเพิ่มบรรทัดใหม่ในเซลล์เดียวกัน ในการหยุดป้อนบรรทัดใหม่และเซลล์ที่กำลังรันอยู่ให้กดปุ่ม Enter อีกครั้งในตอนท้าย เซลล์จะทำงานและเอาต์พุตจะแสดงในเซลล์ถัดไป []
การปรับปรุงที่สำคัญอีกประการหนึ่งที่นำเสนอโดย QtConsole คือความสามารถในการแสดงกราฟิกแบบอินไลน์โดยเฉพาะอย่างยิ่งพล็อต คุณลักษณะนี้ทำงานได้ดีกับ Matplotlib และไลบรารีการวางแผนอื่น ๆ
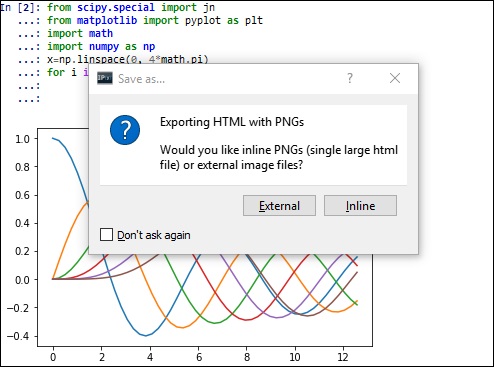
ตัวเลือกนี้เพื่อบันทึกเอาต์พุต QtConsole เป็นไฟล์ HTML มีอยู่ในเมนูไฟล์ คุณสามารถเลือกที่จะสร้างไฟล์ด้วยรูปภาพแบบอินไลน์หรือรูปที่พล็อตเป็นไฟล์ png ภายนอกในโฟลเดอร์ที่อยู่ติดกัน (ตั้งชื่อว่า qt_files)
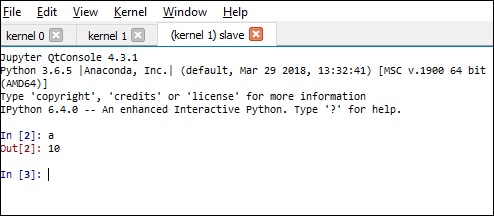
คุณสามารถเปิดได้มากกว่าหนึ่งแท็บในแอปพลิเคชันคอนโซล Jupyter สามตัวเลือกในเมนูไฟล์มีไว้เพื่อจุดประสงค์นี้
New Tab with New kernel - คุณสามารถโหลดเคอร์เนลใหม่ด้วยเมนูไฟล์นี้
New Tab with Existing kernel - เมื่อใช้ตัวเลือกนี้คุณสามารถเลือกจากเมล็ดเพิ่มเติมนอกเหนือจากเคอร์เนล IPython
New Tab with Same Kernel- สร้างทาสของเคอร์เนลที่โหลดบนแท็บเฉพาะ ด้วยเหตุนี้วัตถุที่เริ่มต้นบนแท็บหลักจะสามารถเข้าถึงได้ในทาสและในทางกลับกัน
มีคำสั่งเวทมนต์% qtconsole สำหรับใช้กับโน้ตบุ๊ก Jupyter สิ่งนี้เรียกใช้ QtConsole เป็นเทอร์มินัลทาสไปยังส่วนหน้าของโน้ตบุ๊ก ด้วยเหตุนี้จึงสามารถแชร์ข้อมูลระหว่างโน้ตบุ๊กและเทอร์มินัล Qtconsole ได้
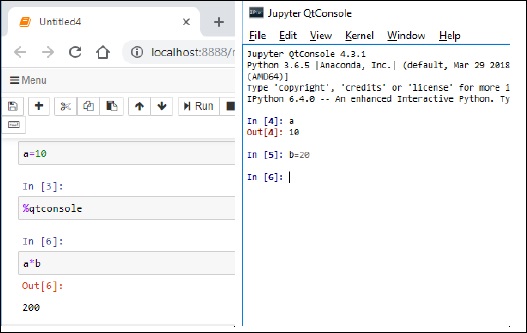
คุณจะเห็นว่าตัวแปรในสมุดบันทึกสามารถเข้าถึงได้ภายใน qtconsoleหน้าต่าง. นอกจากนี้ยังมีการใช้ตัวแปรใหม่ใน Qtconsole ในโน้ตบุ๊ก
สังเกตว่าเซลล์อินพุตและเอาต์พุตจะมีหมายเลขเพิ่มขึ้นระหว่างสองเซลล์
Sharing Jupyter notebook – Using github and nbviewer
ไฟล์ Jupyter Notebook ที่มีไฟล์ .ipynbส่วนขยายในที่เก็บ GitHub จะแสดงผลเป็นไฟล์ HTML แบบคงที่เมื่อเปิดขึ้น คุณลักษณะแบบโต้ตอบของสมุดบันทึกเช่นพล็อต JavaScript ที่กำหนดเองจะไม่ทำงานในที่เก็บของคุณบน GitHub
ในการแชร์ไฟล์สมุดบันทึกโดยใช้ github ให้เข้าสู่ระบบ https://github.comและสร้างที่เก็บสาธารณะ จากนั้นอัพโหลดไฟล์ของคุณโดยใช้ปุ่มอัพโหลดไฟล์ดังที่แสดงด้านล่าง -
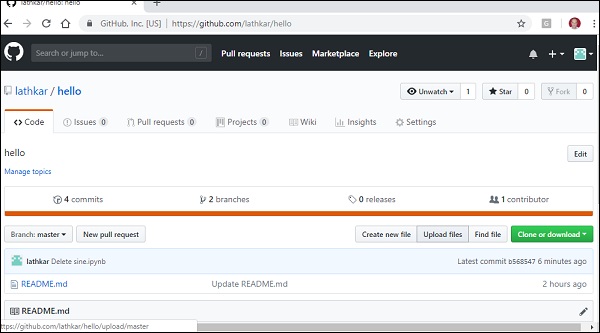
สิ่งนี้จะทำให้คุณมีตัวเลือกในการยอมรับการเปลี่ยนแปลงที่ทำกับที่เก็บ จากนั้นที่เก็บจะแสดงไฟล์ที่อัปโหลดดังต่อไปนี้ -

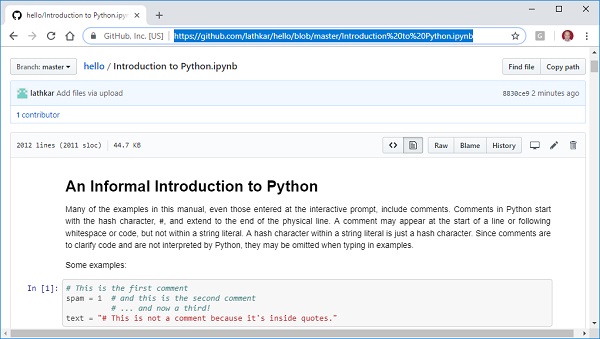
คลิกที่ไฟล์ที่อัปโหลดเพื่อดูภายในโปรแกรมดู github คุณสามารถแบ่งปัน URL ที่ไฮไลต์ให้กับผู้อื่นได้
อีกวิธีหนึ่งในการดูไฟล์สมุดบันทึกออนไลน์คือการใช้ยูทิลิตี้ nbviewer ของ Project Jupyter เปิดhttps://nbviewer.jupyter.org/และใส่ URL ของไฟล์ในที่เก็บของคุณในฟิลด์ข้อความดังที่แสดง กดปุ่ม Go เพื่อดูสมุดบันทึก
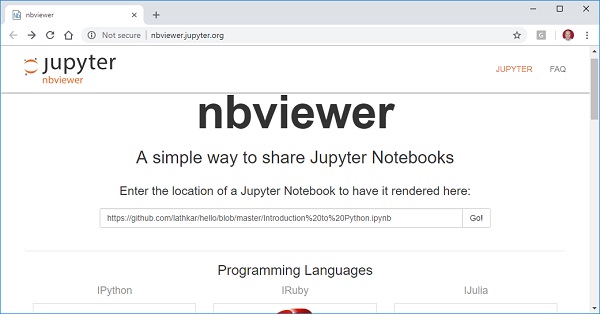
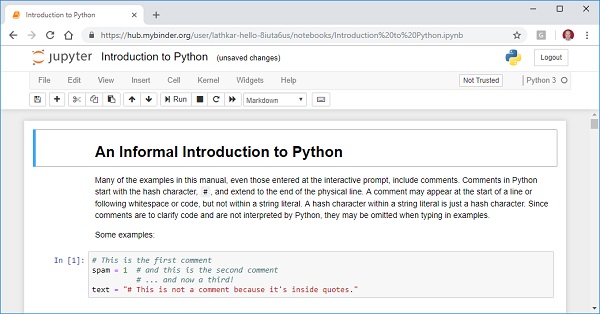
ทั้งสองวิธีนี้แสดงไฟล์สมุดบันทึกเป็น html แบบคงที่ เพื่อให้สามารถรันโค้ดในโน้ตบุ๊กได้ให้เปิดโดยใช้แอปพลิเคชัน Binder ของ Jupyter project
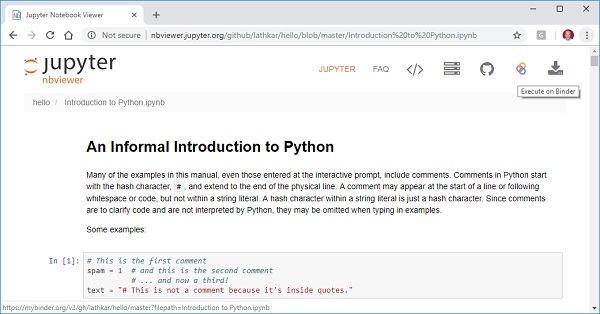
ในหน้าต่าง nbviewer คุณจะเห็นปุ่ม 'Execute on Binder' คลิกที่ไฟล์และคุณจะเห็นไฟล์โน้ตบุ๊กที่เปิดเหมือนกับที่คุณเปิดจากแดชบอร์ดภายในของเซิร์ฟเวอร์โน้ตบุ๊กบนเครื่องของคุณ คุณสามารถดำเนินการทั้งหมดเช่นเพิ่ม / แก้ไขเซลล์เรียกใช้เซลล์เป็นต้น
Project Jupyter อธิบายว่า JupyterLab เป็นอินเทอร์เฟซผู้ใช้บนเว็บรุ่นใหม่สำหรับผลิตภัณฑ์ทั้งหมดภายใต้ระบบนิเวศของ Jupyter ช่วยให้คุณสามารถทำงานร่วมกับโน้ตบุ๊กบรรณาธิการและเทอร์มินัลได้อย่างราบรื่นในลักษณะที่ขยายได้
คุณสมบัติที่สำคัญบางประการของ JupyterLab มีการกล่าวถึงด้านล่าง -
Code Console ทำหน้าที่เป็น scratchpad สำหรับรันโค้ดแบบโต้ตอบ มีการสนับสนุนอย่างเต็มที่สำหรับเอาต์พุตที่หลากหลายและสามารถเชื่อมโยงกับเคอร์เนลของโน้ตบุ๊กเพื่อบันทึกกิจกรรมของโน้ตบุ๊ก
ไฟล์ข้อความใด ๆ (Markdown, Python, R, LaTeX และอื่น ๆ ) สามารถเรียกใช้แบบโต้ตอบในเคอร์เนล Jupyter
เอาต์พุตของเซลล์โน้ตบุ๊กสามารถแสดงในแท็บของตัวเองหรือพร้อมกับโน้ตบุ๊กซึ่งเปิดใช้งานแดชบอร์ดแบบง่ายพร้อมการควบคุมแบบโต้ตอบที่เคอร์เนลสนับสนุน
การแก้ไขเอกสารแบบสดจะสะท้อนให้เห็นในผู้ชมคนอื่น ๆ เช่นบรรณาธิการหรือคอนโซล เป็นไปได้ที่จะแสดงตัวอย่างแบบสดของ Markdown ค่าที่คั่นด้วยตัวคั่นหรือเอกสาร Vega / Vega-Lite
JupyterLab สามารถจัดการไฟล์ได้หลายรูปแบบ (รูปภาพ, CSV, JSON, Markdown, PDF เป็นต้น) นอกจากนี้ยังแสดงผลลัพธ์ที่หลากหลายในรูปแบบเหล่านี้ JupyterLab มีแป้นพิมพ์ลัดที่ปรับแต่งได้โดยใช้คีย์แมปจากโปรแกรมแก้ไขข้อความที่มีชื่อเสียงมากมาย
คุณสามารถลองใช้คุณสมบัติของ JupyterLab ทางออนไลน์ได้ก่อนทำการติดตั้ง เยี่ยมชมhttps://jupyter.org/try และเลือกตัวเลือก 'ลองใช้ JupyterLab'
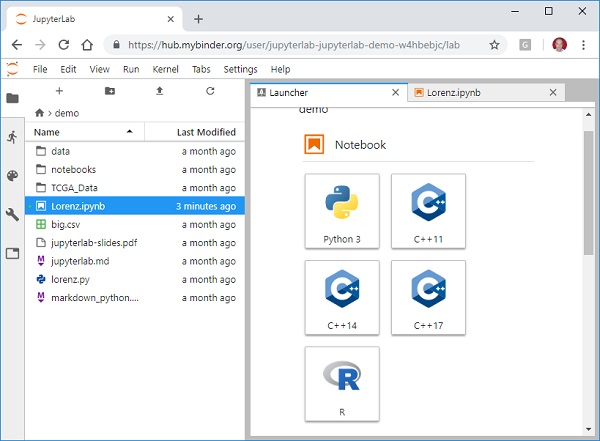
แท็บตัวเรียกใช้งานจะแสดงเมล็ดและคอนโซลที่มีอยู่ในปัจจุบัน คุณสามารถเริ่มต้นโน้ตบุ๊กใหม่ตาม / เทอร์มินัลโดยอิงจากเครื่องใดก็ได้ คอลัมน์ด้านซ้ายยังมีแท็บสำหรับเบราว์เซอร์ไฟล์เรียกใช้เคอร์เนลและแท็บและมุมมองการตั้งค่า
โดยปกติ JupyterLab จะติดตั้งโดยอัตโนมัติด้วยการแจกจ่าย Anaconda อย่างไรก็ตามสามารถติดตั้งแยกกันได้โดยใช้คำสั่ง conda ดังต่อไปนี้ -
conda install -c conda-forge jupyterlabคุณยังสามารถใช้คำสั่ง pip เพื่อจุดประสงค์นี้ -
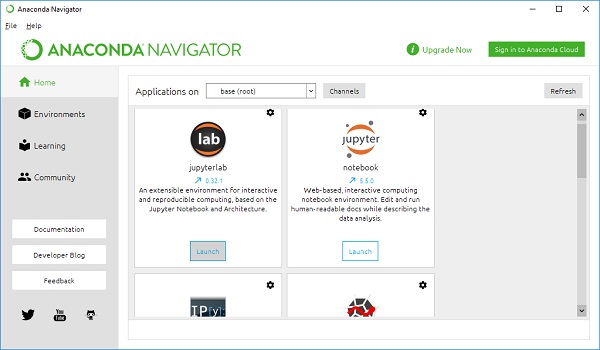
pip3 install jupyterlabในการเริ่มแอปพลิเคชัน JupyterLab วิธีที่สะดวกที่สุดคือจาก Anaconda Navigator หากมีการติดตั้ง
หรือเริ่มจากบรรทัดคำสั่งจากเทอร์มินัลคำสั่ง Windows / Linux หรือพรอมต์ Anaconda โดยใช้คำสั่งนี้ -
jupyter labไม่ว่าจะด้วยวิธีใดหน้าจอเรียกใช้แอปพลิเคชัน JupyterLab จะมีลักษณะดังนี้ -
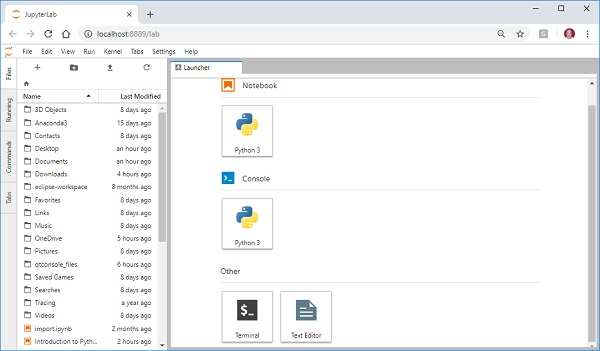
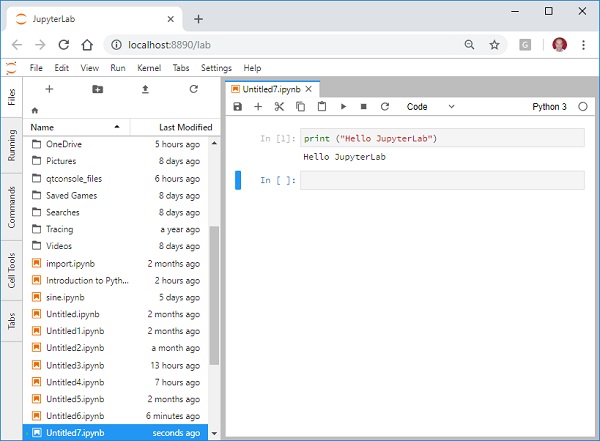
ในการเริ่มสมุดบันทึกใหม่ให้คลิกเคอร์เนลที่ต้องการ ในภาพหน้าจอด้านบนจะเห็นเคอร์เนลหนึ่งเคอร์เนลนั่นคือเคอร์เนล Python3 คลิกเพื่อเริ่มสมุดบันทึก Python สังเกตว่าฟังก์ชันการทำงานคล้ายกับที่เราได้ศึกษาในบทช่วยสอนนี้
แถบเมนู
แถบเมนูอยู่ทางด้านบนของหน้าต่าง เมนูเริ่มต้นที่คุณสามารถพบได้ในนี้คือ -
File - การดำเนินการที่เกี่ยวข้องกับไฟล์และไดเรกทอรี
Edit - การดำเนินการที่เกี่ยวข้องกับการแก้ไขเอกสารและกิจกรรมอื่น ๆ
View - การดำเนินการที่เปลี่ยนแปลงลักษณะของ JupyterLab
Run - การดำเนินการสำหรับการรันโค้ดในกิจกรรมต่างๆเช่นโน้ตบุ๊กและโค้ดคอนโซล
Kernel - การดำเนินการสำหรับการจัดการเมล็ดซึ่งเป็นกระบวนการแยกต่างหากสำหรับการรันโค้ด
Tabs - รายการเอกสารและกิจกรรมที่เปิดอยู่ในแผงท่าเรือ
Settings - การตั้งค่าทั่วไปและตัวแก้ไขการตั้งค่าขั้นสูง
Help - รายการ JupyterLab และลิงค์ช่วยเหลือเคอร์เนล
แถบด้านข้างซ้ายแสดงปุ่มสำหรับเริ่มตัวเรียกใช้งานใหม่เพิ่มโฟลเดอร์อัปโหลดไฟล์และรีเฟรชรายการไฟล์ บานหน้าต่างด้านขวาเป็นพื้นที่ทำงานหลักที่แสดงโน้ตบุ๊กคอนโซลและเทอร์มินัลในมุมมองแบบแท็บ
ในการเริ่มคอนโซลใหม่ให้คลิกสัญลักษณ์ + ในแถบด้านซ้ายเพื่อเปิดตัวเรียกใช้งานใหม่จากนั้นคลิกตัวเลือกคอนโซล คอนโซลจะเปิดขึ้นในแท็บใหม่ทางบานหน้าต่างด้านขวา
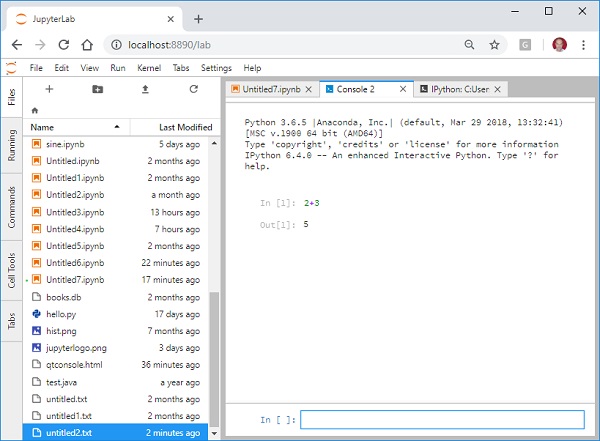
โปรดสังเกตว่าเซลล์อินพุตอยู่ที่ด้านล่างสุด แต่เมื่อรันเซลล์และเซลล์เอาต์พุตที่เกี่ยวข้องจะปรากฏในส่วนบนของแท็บคอนโซล
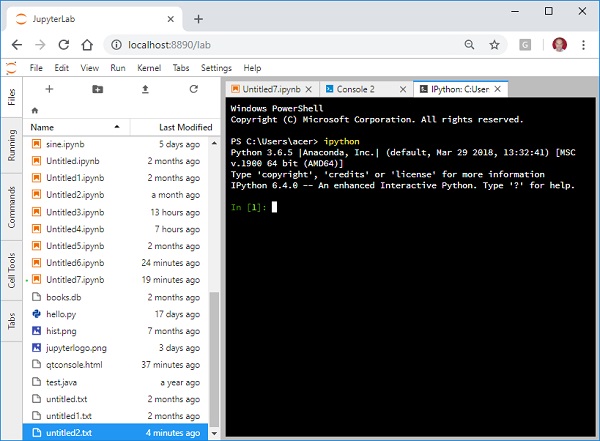
ตัวเรียกใช้งานยังช่วยให้คุณสามารถเปิดโปรแกรมแก้ไขข้อความและเทอร์มินัลที่สามารถเรียกใช้เปลือก IPython ได้
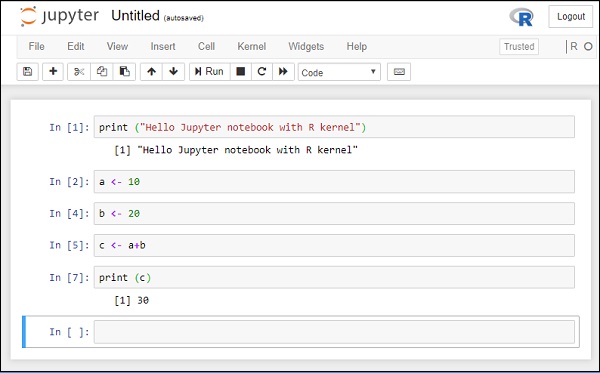
Project Jupyter รองรับเคอร์เนลของสภาพแวดล้อมการเขียนโปรแกรมแล้ว ตอนนี้เราจะมาดูวิธีการติดตั้งเคอร์เนล R ในการแจกจ่ายอนาคอนดา
ในหน้าต่างพรอมต์ Anaconda ให้ป้อนคำสั่งต่อไปนี้ -
conda install -c r r-essentialsตอนนี้จากแท็บตัวเรียกใช้งานให้เลือกเคอร์เนล R เพื่อเริ่มสมุดบันทึกใหม่

ต่อไปนี้เป็นภาพหน้าจอของสมุดบันทึก Jupyter ที่มีเคอร์เนล R -