Symfony - แบบฟอร์ม
Symfony มีแท็กในตัวที่หลากหลายเพื่อจัดการกับรูปแบบ HTML ได้อย่างง่ายดายและปลอดภัย ส่วนประกอบฟอร์มของ Symfony ดำเนินการสร้างแบบฟอร์มและกระบวนการตรวจสอบความถูกต้อง มันเชื่อมต่อโมเดลและเลเยอร์มุมมอง จัดเตรียมชุดขององค์ประกอบฟอร์มเพื่อสร้างแบบฟอร์ม html ที่สมบูรณ์จากโมเดลที่กำหนดไว้ล่วงหน้า บทนี้จะอธิบายเกี่ยวกับแบบฟอร์มโดยละเอียด
แบบฟอร์มฟิลด์
Symfony framework API รองรับประเภทฟิลด์กลุ่มใหญ่ มาดูรายละเอียดของฟิลด์แต่ละประเภทกัน
FormType
ใช้เพื่อสร้างฟอร์มในเฟรมเวิร์ก Symfony ไวยากรณ์มีดังนี้ -
use Symfony\Component\Form\Extension\Core\Type\TextType;
use Symfony\Component\Form\Extension\Core\Type\EmailType;
use Symfony\Component\Form\Extension\Core\Type\FormType;
// ...

$builder = $this->createFormBuilder($studentinfo);
$builder
   ->add('title', TextType::class);
ที่นี่ $studentinfo เป็นเอนทิตีประเภท Student createFormBuilderใช้เพื่อสร้างฟอร์ม HTML ใช้วิธีการเพิ่มเพื่อadd องค์ประกอบการป้อนข้อมูลภายในแบบฟอร์ม title หมายถึงคุณสมบัติของนักเรียน TextType::classหมายถึงฟิลด์ข้อความ html Symfony มีคลาสสำหรับองค์ประกอบ html ทั้งหมด
TextType
ฟิลด์ TextType แสดงถึงฟิลด์ข้อความอินพุตพื้นฐานที่สุด ไวยากรณ์มีดังนี้ -
use Symfony\Component\Form\Extension\Core\Type\TextType;
$builder->add(‘name’, TextType::class);
ที่นี่ชื่อจะถูกจับคู่กับเอนทิตี
TextareaType
แสดงผลองค์ประกอบ HTML textarea ไวยากรณ์มีดังนี้ -
use Symfony\Component\Form\Extension\Core\Type\TextareaType;
$builder->add('body', TextareaType::class, array(
   'attr' => array('class' => 'tinymce'),
));
EmailType
ฟิลด์ EmailType คือฟิลด์ข้อความที่แสดงผลโดยใช้แท็กอีเมล HTML5 ไวยากรณ์มีดังนี้ -
use Symfony\Component\Form\Extension\Core\Type\EmailType;
$builder->add('token', EmailType::class, array(
   'data' => 'abcdef', ));
PasswordType
ฟิลด์ PasswordType จะแสดงกล่องข้อความรหัสผ่านที่ป้อน ไวยากรณ์มีดังนี้ -
use Symfony\Component\Form\Extension\Core\Type\PasswordType;
$bulder->add('password', PasswordType::class);
RangeType
ฟิลด์ RangeType คือแถบเลื่อนที่แสดงผลโดยใช้แท็กช่วง HTML5 ไวยากรณ์มีดังนี้ -
use Symfony\Component\Form\Extension\Core\Type\RangeType;
// ...
$builder->add('name', RangeType::class, array(
   'attr' => array(
      'min' => 100,
      'max' => 200
   )
));
PercentType
PercentType แสดงผลฟิลด์ข้อความป้อนและเชี่ยวชาญในการจัดการข้อมูลเปอร์เซ็นต์ ไวยากรณ์มีดังนี้ -
use Symfony\Component\Form\Extension\Core\Type\PercentType;
// ...
$builder->add('token', PercentType::class, array(
   'data' => 'abcdef',
));
DateType
แสดงรูปแบบวันที่ ไวยากรณ์มีดังนี้ -
use Symfony\Component\Form\Extension\Core\Type\DateType;
// ...
$builder->add(‘joined’, DateType::class, array(
   'widget' => 'choice',
));
นี่วิดเจ็ตเป็นวิธีพื้นฐานในการแสดงผลฟิลด์
ทำหน้าที่ดังต่อไปนี้
choice- แสดงสามอินพุตที่เลือก ลำดับของการเลือกถูกกำหนดไว้ในตัวเลือกรูปแบบ
text - แสดงการป้อนข้อความประเภทสามช่อง (เดือนวันปี)
single_text- แสดงการป้อนข้อมูลประเภทวันที่เดียว อินพุตของผู้ใช้ได้รับการตรวจสอบความถูกต้องตามตัวเลือกรูปแบบ
CheckboxType
สร้างช่องทำเครื่องหมายอินพุตเดียว ควรใช้สำหรับฟิลด์ที่มีค่าบูลีนเสมอ ไวยากรณ์มีดังนี้ -
use Symfony\Component\Form\Extension\Core\Type\CheckboxType;
// ...
$builder-<add(‘sports’, CheckboxType::class, array(
   'label'    =< ‘Are you interested in sports?’,
   'required' =< false,
));
RadioType
สร้างปุ่มตัวเลือกเดียว หากเลือกปุ่มตัวเลือกฟิลด์จะถูกตั้งค่าเป็นค่าที่ระบุ ไวยากรณ์มีดังนี้ -
use Symfony\Component\Form\Extension\Core\Type\RadioType;
// ...
$builder->add('token', RadioType::class, array(
   'data' => 'abcdef',
));
โปรดทราบว่าไม่สามารถยกเลิกการเลือกปุ่มวิทยุได้ค่าจะเปลี่ยนแปลงก็ต่อเมื่อมีการตรวจสอบปุ่มตัวเลือกอื่นที่มีชื่อเดียวกัน
RepeatType
นี่คือฟิลด์พิเศษ "กลุ่ม" ที่สร้างฟิลด์ที่เหมือนกันสองฟิลด์ซึ่งค่าต้องตรงกัน ไวยากรณ์มีดังนี้ -
use Symfony\Component\Form\Extension\Core\Type\RepeatedType;
use Symfony\Component\Form\Extension\Core\Type\PasswordType;

// ...
$builder->add('password', RepeatedType::class, array(
   'type' => PasswordType::class,
   'invalid_message' => 'The password fields must match.',
   'options' => array('attr' => array('class' => 'password-field')),
   'required' => true,
   'first_options'  => array('label' => 'Password'),
   'second_options' => array('label' => 'Repeat Password'),
));
ส่วนใหญ่จะใช้เพื่อตรวจสอบรหัสผ่านหรืออีเมลของผู้ใช้
ButtonType
ปุ่มที่คลิกได้ง่ายๆ ไวยากรณ์มีดังนี้ -
use Symfony\Component\Form\Extension\Core\Type\ButtonType;
// ...
$builder->add('save', ButtonType::class, array(
   'attr' => array('class' => 'save'),
));
ResetType
ปุ่มที่รีเซ็ตฟิลด์ทั้งหมดเป็นค่าเริ่มต้น ไวยากรณ์มีดังนี้ -
use Symfony\Component\Form\Extension\Core\Type\ResetType;
// ...
$builder->add('save', ResetType::class, array(
   'attr' => array('class' => 'save'),
));
ChoiceType
ช่องอเนกประสงค์ใช้เพื่อให้ผู้ใช้ "เลือก" ตัวเลือกหนึ่งตัวเลือกขึ้นไป สามารถแสดงเป็นแท็กเลือกปุ่มตัวเลือกหรือช่องทำเครื่องหมาย ไวยากรณ์มีดังนี้ -
use Symfony\Component\Form\Extension\Core\Type\ChoiceType;
// ...
$builder->add(‘gender’, ChoiceType::class, array(
   'choices'  => array(
      ‘Male’ => true,
      ‘Female’ => false,
   ),
));
SubmitType
ปุ่มส่งใช้ในการส่งแบบฟอร์มข้อมูล ไวยากรณ์มีดังนี้ -
use Symfony\Component\Form\Extension\Core\Type\SubmitType;
// ...
$builder->add('save', SubmitType::class, array(
   'attr' => array('class' => 'save'),
))
ฟังก์ชันตัวช่วยฟอร์ม
ฟังก์ชันตัวช่วยฟอร์มเป็นฟังก์ชันกิ่งไม้ที่ใช้สร้างฟอร์มในเทมเพลตได้อย่างง่ายดาย
form_start
ส่งคืนแท็กรูปแบบ HTML ที่ชี้ไปยังการดำเนินการเส้นทางหรือ URL ที่ถูกต้อง ไวยากรณ์มีดังนี้ -
{{ form_start(form, {'attr': {'id': 'form_person_edit'}}) }}form_end
ปิดแท็กฟอร์ม HTML ที่สร้างโดยใช้ form_start ไวยากรณ์มีดังนี้ -
{{ form_end(form) }}textarea
ส่งคืนแท็ก textarea ซึ่งเป็นทางเลือกที่จะห่อด้วยโปรแกรมแก้ไข JavaScript แบบ Rich-text
ช่องทำเครื่องหมาย
ส่งคืนแท็กอินพุตที่เข้ากันได้กับ XHTML พร้อม type =“ checkbox” ไวยากรณ์มีดังนี้ -
echo checkbox_tag('choice[]', 1);
echo checkbox_tag('choice[]', 2);
echo checkbox_tag('choice[]', 3);
echo checkbox_tag('choice[]', 4);
input_password_tag
ส่งคืนแท็กอินพุตที่เข้ากันได้กับ XHTML พร้อม type =“ password” ไวยากรณ์มีดังนี้ -
echo input_password_tag('password');
echo input_password_tag('password_confirm');
input_tag
ส่งคืนแท็กอินพุตที่สอดคล้องกับ XHTML พร้อม type =“ text” ไวยากรณ์มีดังนี้ -
echo input_tag('name');ฉลาก
ส่งคืนป้ายกำกับด้วยพารามิเตอร์ที่ระบุ
radiobutton
ส่งคืนแท็กอินพุตที่สอดคล้องกับ XHTML พร้อม type =“ radio” ไวยากรณ์มีดังนี้ -
echo ' Yes '.radiobutton_tag(‘true’, 1);
echo ' No '.radiobutton_tag(‘false’, 0);
reset_tag
ส่งคืนแท็กอินพุตที่เข้ากันได้กับ XHTML โดยมี type =“ reset” ไวยากรณ์มีดังนี้ -
echo reset_tag('Start Over');เลือก
ส่งคืนแท็กที่เลือกซึ่งมีข้อมูลทุกประเทศในโลก ไวยากรณ์มีดังนี้ -
echo select_tag(
   'url', options_for_select($url_list),
   array('onChange' => 'Javascript:this.form.submit();'));
ส่ง
ส่งคืนแท็กอินพุตที่เข้ากันได้กับ XHTML พร้อม type =“ submit” ไวยากรณ์มีดังนี้ -
echo submit_tag('Update Record');ในส่วนถัดไปเราจะเรียนรู้วิธีการสร้างแบบฟอร์มโดยใช้ฟิลด์แบบฟอร์ม
ใบสมัครนักศึกษา
มาสร้างแบบฟอร์มรายละเอียดของนักเรียนอย่างง่ายโดยใช้ฟิลด์ Symfony Form ในการดำเนินการนี้เราควรปฏิบัติตามขั้นตอนต่อไปนี้ -
ขั้นตอนที่ 1: สร้างแอปพลิเคชัน Symfony
สร้างแอปพลิเคชัน Symfony formsampleโดยใช้คำสั่งต่อไปนี้
symfony new formsampleโดยปกติเอนทิตีจะถูกสร้างขึ้นภายใต้ไดเร็กทอรี“ src / AppBundle / Entity /“
ขั้นตอนที่ 2: สร้างเอนทิตี
สร้างไฟล์“ StudentForm.php” ภายใต้ไดเร็กทอรี“ src / AppBundle / Entity /” เพิ่มการเปลี่ยนแปลงต่อไปนี้ในไฟล์
StudentForm.php
<?php
namespace AppBundle\Entity;

class StudentForm {
   private $studentName;
   private $studentId;
   public $password;
   private $address;
   public $joined;
   public $gender;
   private $email;
   private $marks;
   public $sports;

   public function getStudentName() {
      return $this->studentName;
   }
   public function setStudentName($studentName) {
      $this->studentName = $studentName;
   }
   public function getStudentId() {
      return $this->studentId;
   }
   public function setStudentId($studentid) {
      $this->studentid = $studentid;
   }
   public function getAddress() {
      return $this->address;
   }
   public function setAddress($address) {
      $this->address = $address;
   }
   public function getEmail() {
      return $this->email;
   }
   public function setEmail($email) {
      $this->email = $email;
   }
   public function getMarks() {
      return $this->marks;
   }
   public function setMarks($marks) {
      $this->marks = $marks;
   }
}
ขั้นตอนที่ 3: เพิ่ม StudentController
ย้ายไปที่ไดเร็กทอรี“ src / AppBundle / Controller” สร้างไฟล์“ StudentController.php” และเพิ่มรหัสต่อไปนี้
StudentController.php
<?php
namespace AppBundle\Controller;

use AppBundle\Entity\StudentForm;
use AppBundle\Form\FormValidationType;

use Symfony\Bundle\FrameworkBundle\Controller\Controller;
use Symfony\Component\HttpFoundation\Request;
use Sensio\Bundle\FrameworkExtraBundle\Configuration\Route;

use Symfony\Component\HttpFoundation\Response;
use Symfony\Component\Form\Extension\Core\Type\TextType;
use Symfony\Component\Form\Extension\Core\Type\DateType;
use Symfony\Component\Form\Extension\Core\Type\SubmitType;
use Symfony\Component\Form\Extension\Core\Type\ChoiceType;
use Symfony\Component\Form\Extension\Core\Type\PasswordType;
use Symfony\Component\Form\Extension\Core\Type\RangeType;
use Symfony\Component\Form\Extension\Core\Type\EmailType;
use Symfony\Component\Form\Extension\Core\Type\CheckboxType;
use Symfony\Component\Form\Extension\Core\Type\ButtonType;
use Symfony\Component\Form\Extension\Core\Type\TextareaType;
use Symfony\Component\Form\Extension\Core\Type\PercentType;
use Symfony\Component\Form\Extension\Core\Type\RepeatedType;

class StudentController extends Controller {
   /**
      * @Route("/student/new")
   */
   public function newAction(Request $request) {
      $stud = new StudentForm();
      $form = $this->createFormBuilder($stud)
         ->add('studentName', TextType::class)
         ->add('studentId', TextType::class)
         ->add('password', RepeatedType::class, array(
            'type' => PasswordType::class,
            'invalid_message' => 'The password fields
            must match.', 'options' => array('attr' => array('class' => 'password-field')),
            'required' => true, 'first_options'  => array('label' => 'Password'),
            'second_options' => array('label' => 'Re-enter'),
         ))

         ->add('address', TextareaType::class)
         ->add('joined', DateType::class, array(
               'widget' => 'choice',
         ))

         ->add('gender', ChoiceType::class, array(
            'choices'  => array(
               'Male' => true,
               'Female' => false,
            ),
         ))

         ->add('email', EmailType::class)
         ->add('marks', PercentType::class)
         ->add('sports', CheckboxType::class, array(
            'label'    => 'Are you interested in sports?', 'required' => false,
         ))

         ->add('save', SubmitType::class, array('label' => 'Submit'))
         ->getForm();
         return $this->render('student/new.html.twig', array(
            'form' => $form->createView(),
         ));
   }
}
ขั้นตอนที่ 4: แสดงมุมมอง
ย้ายไปที่ไดเร็กทอรี“ app / Resources / views / student /“ สร้างไฟล์“ new.html.twig” และเพิ่มการเปลี่ยนแปลงต่อไปนี้
{% extends 'base.html.twig' %}
{% block stylesheets %}
<style>
   #simpleform {
      width:600px;
      border:2px solid grey;
      padding:14px;
   }
   #simpleform label {
      font-size:14px;
      float:left;
      width:300px;
      text-align:right;
      display:block;
   }
   #simpleform span {
      font-size:11px;
      color:grey;
      width:100px;
      text-align:right;
      display:block;
   }
   #simpleform input {
      border:1px solid grey;
      font-family:verdana;
      font-size:14px;
      color:light blue;
      height:24px;
      width:250px;
      margin: 0 0 10px 10px;
   }
   #simpleform textarea {
      border:1px solid grey;
      font-family:verdana;
      font-size:14px;
      color:light blue;
      height:120px;
      width:250px;
      margin: 0 0 20px 10px;
   }
   #simpleform select {
      margin: 0 0 20px 10px;
   }
   #simpleform button {
      clear:both;
      margin-left:250px;
      background: grey;
      color:#FFFFFF;
      border:solid 1px #666666;
      font-size:16px;
   }
</style>

{% endblock %}
   {% block body %}
   <h3>Student details:</h3>
   <div id="simpleform">
      {{ form_start(form) }}
      {{ form_widget(form) }}
      {{ form_end(form) }}
   </div>
{% endblock %}
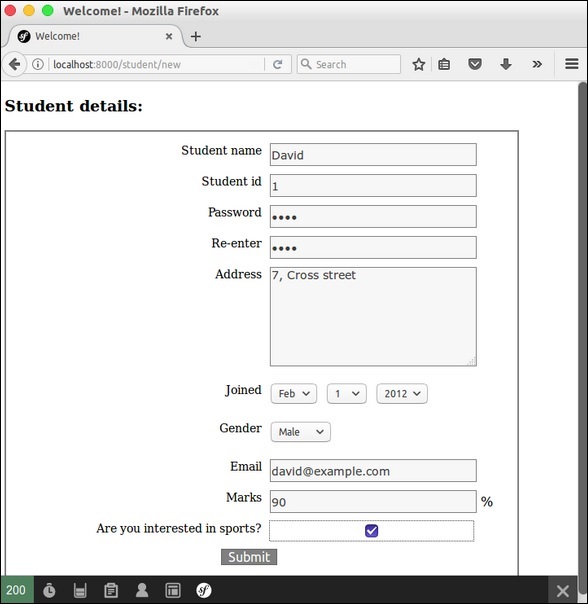
ตอนนี้ขอ url“ http: // localhost: 8000 / student / new” และจะให้ผลลัพธ์ดังต่อไปนี้
ผลลัพธ์
