iOS - Uygulama İçi Satın Alma
Uygulama içi satın alma, ek içerik satın almak veya bir uygulamaya ilişkin özellikleri yükseltmek için kullanılır.
İlgili Adımlar
Step 1 - iTunes connect'te, unique App ID ve uygulama güncellemesini oluşturduğumuzda bundle ID ve ilgili sağlama profiliyle Xcode'da kod imzalama.
Step 2- Yeni bir uygulama oluşturun ve uygulama bilgilerini güncelleyin. Apple'da bunun hakkında daha fazla bilgi edinebilirsiniz.Add new apps belgeler.
Step 3 - Uygulama içi satın alma için yeni bir ürün ekleyin Manage In-App Purchase uygulamanızın sayfasından.
Step 4- Uygulamanız için banka ayrıntılarını belirlediğinizden emin olun. Bunun için kurulum yapılması gerekiyorIn-App purchaseçalışmak. Ayrıca, şunu kullanarak bir test kullanıcı hesabı oluşturun:Manage Users uygulamanızın iTunes bağlantı sayfasındaki seçeneği.
Step 5 - Sonraki adımlar, Uygulama İçi satın alma işlemimiz için kod işleme ve kullanıcı arabirimi oluşturma ile ilgilidir.
Step 6 - Bir single view application ve paket tanımlayıcısını girin, iTunes connect'te belirtilen tanımlayıcıdır.
Step 7 - Güncelle ViewController.xib aşağıda gösterildiği gibi -

Step 8 - Oluştur IBOutlets sırasıyla productTitleLabel, productDescriptionLabel, productPriceLabel ve PurchaseButton olarak adlandıran düğme için.
Step 9 - Proje dosyanızı seçin, ardından hedefleri seçin ve ardından ekleyin StoreKit.framework.
Step 10 - Güncelleme ViewController.h aşağıdaki gibi -
#import <UIKit/UIKit.h>
#import <StoreKit/StoreKit.h>

@interface ViewController : UIViewController<
SKProductsRequestDelegate,SKPaymentTransactionObserver> {
   SKProductsRequest *productsRequest;
   NSArray *validProducts;
   UIActivityIndicatorView *activityIndicatorView;
   IBOutlet UILabel *productTitleLabel;
   IBOutlet UILabel *productDescriptionLabel;
   IBOutlet UILabel *productPriceLabel;
   IBOutlet UIButton *purchaseButton;
}

- (void)fetchAvailableProducts;
- (BOOL)canMakePurchases;
- (void)purchaseMyProduct:(SKProduct*)product;
- (IBAction)purchase:(id)sender;

@end
Step 11 - Güncelleme ViewController.m aşağıdaki gibi -
#import "ViewController.h"
#define kTutorialPointProductID
@"com.tutorialPoints.testApp.testProduct"

@interface ViewController ()
@end

@implementation ViewController

- (void)viewDidLoad {
   [super viewDidLoad];

   // Adding activity indicator
   activityIndicatorView = [[UIActivityIndicatorView alloc]
   initWithActivityIndicatorStyle:UIActivityIndicatorViewStyleWhiteLarge];
   activityIndicatorView.center = self.view.center;
   [activityIndicatorView hidesWhenStopped];
   [self.view addSubview:activityIndicatorView];
   [activityIndicatorView startAnimating];

   //Hide purchase button initially
   purchaseButton.hidden = YES;
   [self fetchAvailableProducts];
}

- (void)didReceiveMemoryWarning {
   [super didReceiveMemoryWarning];
   // Dispose of any resources that can be recreated.
}

-(void)fetchAvailableProducts {
   NSSet *productIdentifiers = [NSSet
   setWithObjects:kTutorialPointProductID,nil];
   productsRequest = [[SKProductsRequest alloc]
   initWithProductIdentifiers:productIdentifiers];
   productsRequest.delegate = self;
   [productsRequest start];
}

- (BOOL)canMakePurchases {
   return [SKPaymentQueue canMakePayments];
}

- (void)purchaseMyProduct:(SKProduct*)product {
   if ([self canMakePurchases]) {
      SKPayment *payment = [SKPayment paymentWithProduct:product];
      [[SKPaymentQueue defaultQueue] addTransactionObserver:self];
      [[SKPaymentQueue defaultQueue] addPayment:payment];
   } else {
      UIAlertView *alertView = [[UIAlertView alloc]initWithTitle:
      @"Purchases are disabled in your device" message:nil delegate:
      self cancelButtonTitle:@"Ok" otherButtonTitles: nil];
      [alertView show];
   }
}
-(IBAction)purchase:(id)sender {
   [self purchaseMyProduct:[validProducts objectAtIndex:0]];
   purchaseButton.enabled = NO;
}

#pragma mark StoreKit Delegate

-(void)paymentQueue:(SKPaymentQueue *)queue
updatedTransactions:(NSArray *)transactions {
   for (SKPaymentTransaction *transaction in transactions) {
      switch (transaction.transactionState) {
         case SKPaymentTransactionStatePurchasing:
            NSLog(@"Purchasing");
         break;

         case SKPaymentTransactionStatePurchased:
            if ([transaction.payment.productIdentifier
            isEqualToString:kTutorialPointProductID]) {
               NSLog(@"Purchased ");
               UIAlertView *alertView = [[UIAlertView alloc]initWithTitle:
               @"Purchase is completed succesfully" message:nil delegate:
               self cancelButtonTitle:@"Ok" otherButtonTitles: nil];
               [alertView show];
            }
            [[SKPaymentQueue defaultQueue] finishTransaction:transaction];
         break;

         case SKPaymentTransactionStateRestored:
            NSLog(@"Restored ");
            [[SKPaymentQueue defaultQueue] finishTransaction:transaction];
         break;

         case SKPaymentTransactionStateFailed:
            NSLog(@"Purchase failed ");
         break
         default:
         break;
      }
   }
}

-(void)productsRequest:(SKProductsRequest *)request
didReceiveResponse:(SKProductsResponse *)response {
   SKProduct *validProduct = nil;
   int count = [response.products count];

   if (count>0) {
      validProducts = response.products;
      validProduct = [response.products objectAtIndex:0];

      if ([validProduct.productIdentifier
         isEqualToString:kTutorialPointProductID]) {
         [productTitleLabel setText:[NSString stringWithFormat:
            @"Product Title: %@",validProduct.localizedTitle]];
         [productDescriptionLabel setText:[NSString stringWithFormat:
            @"Product Desc: %@",validProduct.localizedDescription]];
         [productPriceLabel setText:[NSString stringWithFormat:
            @"Product Price: %@",validProduct.price]];
      }
   } else {
      UIAlertView *tmp = [[UIAlertView alloc]
         initWithTitle:@"Not Available"
         message:@"No products to purchase"
         delegate:self
         cancelButtonTitle:nil
         otherButtonTitles:@"Ok", nil];
         [tmp show];
   }

   [activityIndicatorView stopAnimating];
   purchaseButton.hidden = NO;
}
@end
Not
Uygulama İçi Satın Alma işleminiz için oluşturduğunuz ürün kimliğine kTutorialPointProductID'yi güncellemeniz gerekir. FetchAvailableProducts içindeki productIdentifiers'ın NSSet'ini güncelleyerek birden fazla ürün ekleyebilirsiniz. Benzer şekilde, eklediğiniz ürün kimlikleri için satın alma ile ilgili işlemleri gerçekleştirin.
Çıktı
Uygulamayı çalıştırdığımızda, aşağıdaki çıktıyı alacağız -

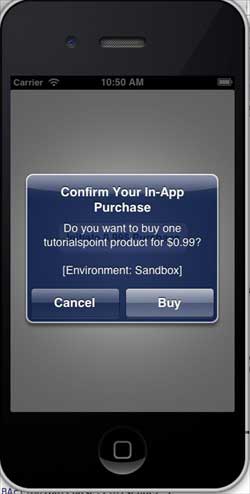
Ayarlar ekranında hesabınızdan çıkış yaptığınızdan emin olun. Satın Alma İşlemini Başlat'a tıkladıktan sonra Mevcut Apple Kimliğini Kullan'ı seçin. Geçerli test hesabı kullanıcı adınızı ve şifrenizi girin. Birkaç saniye içinde aşağıdaki uyarı gösterilecek.

Ürününüz başarıyla satın alındıktan sonra aşağıdaki uyarıyı alacaksınız. Bu uyarıyı gösterdiğimiz uygulama özelliklerini güncellemek için ilgili kodu görebilirsiniz.
