Spring WS - Hızlı Kılavuz
Spring Web Services (Spring-WS), Spring Community tarafından geliştirilen projelerden biridir. Öncelikli odak noktası, belge odaklı Web Hizmetleri oluşturmaktır. Spring Web Services projesi, sözleşmeyi önce kolaylaştırırSOAP Service Development, XML yüklerini çeşitli şekillerde işleyebilen esnek web hizmetleri oluşturmak için birden çok yol sağlar.
Spring web hizmetleri, bağımlılık ekleme ve yapılandırmalar gibi Spring kavramlarını sorunsuz bir şekilde kullanır. Spring-WS, Spring 3.0 Sürümünü gerektirir. Sözleşme öncelikli geliştirmeyle başlıyoruzWSDL Contract ve ardından gerekli sözleşmeyi uygulamak için JAVA'yı kullanacaktır.
JAVA arayüzlerinin WSDL / XSD sözleşmesi ürettiği sözleşmeye dayalı yaklaşımın aksine. WSDL tabanlı sözleşme, sözleşmenin öncelikli yaklaşımında JAVA uygulamasından bağımsız kalır. JAVA arayüzlerini değiştirmemiz gerektiğinde, mevcut WSDL sözleşmesinde yapılan değişiklikleri web hizmetleri kullanıcılarına iletmeye gerek yoktur. Spring-WS, WSDL sözleşmesi ile JAVA tabanlı uygulaması arasında gevşek bir bağlantı sağlamayı amaçlamaktadır.
Özellikleri
Spring Web Hizmetlerinin özellikleri aşağıdadır -
XML Mapping to Objects - XML tabanlı istekler, Mesaj Yükü, SOAP Eylem Başlığı'nda depolanan bilgiler kullanılarak veya bir XPath İfadesi kullanılarak herhangi bir nesneye eşlenebilir.
Multiple API Support to parse XML - Gelen XML isteklerini ayrıştırmak için standart JAXP API'lerinin (DOM, SAX, StAX) yanı sıra, JDOM, dom4j, XOM gibi diğer kitaplıklar da desteklenmektedir.
Multiple API Support to marshal XML- Spring Web Services, Object / XML Mapping modülünü kullanarak JAXB 1 ve 2, Castor, XMLBeans, JiBX ve XStream kitaplıklarını destekler. Nesne / XML Eşleme modülü, web dışı servis kodlarında da kullanılabilir.
Spring based configurations - Spring Web Services, Spring Web MVC ile benzer bir mimariye sahip yapılandırmaları için Spring Uygulama Bağlamlarını kullanır.
Integrated WS-Security module - WS-Security modülünü kullanarak, SOAP Mesajlarını İmzalayabilir, Şifreleyebilir, Şifresini Çözebilir veya Kimlik Doğrulaması yapabilirsiniz.
Support for Acegi Security - Spring Web Hizmetlerinin WS-Security uygulamasını kullanarak, Acegi yapılandırması SOAP hizmetleriniz için kullanılabilir.
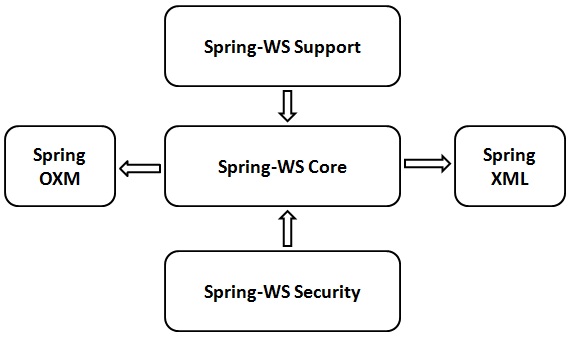
Mimari
Spring-WS projesi, aşağıda açıklanan beş ana modülden oluşmaktadır.
Spring-WS Core - Birincil modüldür ve Merkezi Arayüzleri sağlar. WebServiceMessage ve SoapMessage, sunucu tarafı çerçevesi, güçlü mesaj gönderme yeteneği ve Web hizmeti uç noktalarını uygulamak için sınıfları destekler. Ayrıca, Web Hizmeti tüketici istemcisini şu şekilde sağlar:WebServiceTemplate.
Spring-WS Support - Bu modül JMS, e-postalar vb. İçin destek sağlar.
Spring-WS Security- Bu modül, temel Web Hizmeti Modülü ile entegre WS-Security uygulaması sağlamaktan sorumludur. Bu modülü kullanarak temel belirteçler ekleyebilir, SOAP mesajlarını imzalayabilir, şifreleyebilir ve şifresini çözebiliriz. Bu modül, kimlik doğrulama ve yetkilendirme için mevcut Spring Security Uygulamasının kullanılmasına izin verir.
Spring XML- Bu modül, Spring Web Hizmetleri için XML destek sınıfları sağlar. Bu modül dahili olarak Spring-WS çerçevesi tarafından kullanılmaktadır.
Spring OXM - Bu modül, XML ve Nesne Eşleme için destek sınıfları sağlar.
Bu Bölümde, Windows ve Linux tabanlı sistemlerde Spring-WS kurma sürecini anlayacağız. Spring-WS, mevcut sisteminizle kolayca kurulabilir ve entegre edilebilir.Java environment ve MAVENkarmaşık kurulum prosedürleri olmadan birkaç basit adımı takip ederek. Kurulum sırasında kullanıcı yönetimi gereklidir.
sistem gereksinimleri
Aşağıdaki tablo sistem gereksinimlerini listelerken, sonraki adımlar ortam kurulum prosedüründe bize yol gösterecektir.
| JDK | Java SE 2 JDK 1.5 veya üstü |
| Hafıza | 1 GB RAM (önerilir) |
| Disk alanı | Minimum gereklilik yok |
| İşletim Sistemi Sürümü | Windows XP veya üzeri, Linux |
Şimdi Spring-WS'yi kurma adımlarına geçelim.
Adım 1: Java Kurulumunu Doğrulayın
Başlangıç olarak, sisteminizde Java Yazılım Geliştirme Kiti'nin (SDK) yüklü olması gerekir. Bunu doğrulamak için üzerinde çalıştığınız platforma bağlı olarak aşağıdaki iki komuttan herhangi birini uygulayın.
Java yüklemesi düzgün bir şekilde yapıldıysa, Java yüklemenizin mevcut sürümünü ve teknik özelliklerini gösterecektir. Aşağıdaki tabloda örnek bir çıktı verilmiştir.
| Platform | Komut | Örnek Çıktı |
|---|---|---|
| pencereler | Komut konsolunu açın ve şunu yazın - \> java sürümü |
Java sürümü "1.7.0_60" Java (TM) SE Çalışma Zamanı Ortamı (derleme 1.7.0_60-b19) Java Hotspot (TM) 64-bit Sunucu VM (derleme 24.60-b09, karma mod) |
| Linux | Komut terminalini açın ve şunu yazın - $ java sürümü |
java sürümü "1.7.0_25" JDK Çalışma Zamanı Ortamını açın (rhel-2.3.10.4.el6_4-x86_64) JDK 64-Bit Sunucu VM'yi açın (23.7-b01 derleme, karma mod) |
Bu öğreticinin okuyucularının sistemlerinde Java SDK sürüm 1.7.0_60 yüklü olduğunu varsayıyoruz.
Java SDK'nız yoksa, mevcut sürümünü şuradan indirin: https://www.oracle.com/technetwork/java/javase/downloads/index.html ve yüklemesini sağlayın.
2. Adım: Java Ortamınızı ayarlayın
Ortam değişkenini ayarlayın JAVA_HOME Makinenizde Java'nın kurulu olduğu temel dizin konumuna işaret etmek için.
| S.No. | Platform ve Açıklama |
|---|---|
| 1 | Windows JAVA_HOME'u C: \ ProgramFiles \ java \ jdk1.7.0_60 olarak ayarlayın |
| 2 | Linux JAVA_HOME = / usr / local / java-current dosyasını dışa aktar |
Java derleyici konumunun tam yolunu Sistem Yoluna ekleyin.
| S.No. | Platform ve Açıklama |
|---|---|
| 1 | Windows PATH sistem değişkeninin sonuna "C: \ Program Files \ Java \ jdk1.7.0_60 \ bin" Dizesini ekleyin. |
| 2 | Linux Export PATH = $ PATH: $ JAVA_HOME / bin / |
Komutu yürütün java -version yukarıda açıklandığı gibi komut isteminden.
3. Adım: Maven arşivini indirin
Maven 3.3.3'ü şuradan indirin: https://maven.apache.org/download.cgi
| işletim sistemi | Arşiv adı |
|---|---|
| pencereler | apache-maven-3.3.3-bin.zip |
| Linux | apache-maven-3.3.3-bin.tar.gz |
| Mac | apache-maven-3.3.3-bin.tar.gz |
4. Adım: Maven arşivini çıkarın
Arşivi Maven 3.3.3'ü kurmak istediğiniz dizine çıkarın. Arşivden apache-maven-3.3.3 alt dizini oluşturulacaktır.
| işletim sistemi | Konum (kurulumunuza bağlı olarak farklı olabilir) |
|---|---|
| pencereler | C: \ Program Files \ Apache Software Foundation \ apache-maven-3.3.3 |
| Linux | / usr / local / apache-maven |
| Mac | / usr / local / apache-maven |
Adım 5: Maven ortam değişkenlerini ayarlayın
Ortam değişkenlerine M2_HOME, M2 ve MAVEN_OPTS ekleyin.
| işletim sistemi | Çıktı |
|---|---|
| pencereler | Sistem özelliklerini kullanarak ortam değişkenlerini ayarlayın. M2_HOME = C: \ Program Files \ Apache Software Foundation \ apache-maven-3.3.3 M2 =% M2_HOME% \ bin MAVEN_OPTS = -Xms256m -Xmx512m |
| Linux | Komut terminalini açın ve ortam değişkenlerini ayarlayın. dışa aktar M2_HOME = / usr / local / apache-maven / apache-maven-3.3.3 dışa aktar M2 = M2_HOME / bin $ dışa aktar MAVEN_OPTS = -Xms256m -Xmx512m |
| Mac | Komut terminalini açın ve ortam değişkenlerini ayarlayın. dışa aktar M2_HOME = / usr / local / apache-maven / apache-maven-3.3.3 dışa aktar M2 = M2_HOME / bin $ dışa aktar MAVEN_OPTS = -Xms256m -Xmx512m |
Adım 6: Maven bin dizin konumunu sistem yoluna ekleyin
Şimdi M2 değişkenini Sistem Yoluna ekleyin.
| işletim sistemi | Çıktı |
|---|---|
| pencereler | Dizeyi ekleyin;% M2% sistem değişkeni olan Yol'un sonuna. |
| Linux | dışa aktarma PATH = M2 $: $ PATH |
| Mac | dışa aktarma PATH = M2 $: $ PATH |
7. Adım: Maven kurulumunu doğrulayın
Şimdi konsolu açın, aşağıdakileri yürütün mvn komut.
| işletim sistemi | Görev | Komut |
|---|---|---|
| pencereler | Komut Konsolunu Aç | c: \> mvn --version |
| Linux | Komut Terminalini Aç | $ mvn --version |
| Mac | Açık Terminal | machine: <joseph $ mvn --version |
Son olarak, aşağıda gösterildiği gibi olması gereken yukarıdaki komutların çıktısını doğrulayın -
| işletim sistemi | Çıktı |
|---|---|
| pencereler | Apache Maven 3.3.3 (7994120775791599e205a5524ec3e0dfe41d4a06; 2015-04-22T17: 27: 37 + 05: 30) Maven ana sayfası: C: \ Program Files \ Apache Software Foundation \ apache-maven-3.3.3 Java sürümü: 1.7.0_75, satıcı: Oracle Corporation Java ana sayfası: C: \ Program Files \ Java \ jdk1.7.0_75 \ jre Varsayılan yerel ayar: en_US, platform kodlaması: Cp1252 |
| Linux | Apache Maven 3.3.3 (7994120775791599e205a5524ec3e0dfe41d4a06; 2015-04-22T17: 27: 37 + 05: 30) Maven ana sayfası: /usr/local/apache-maven/apache-maven-3.3.3 Java sürümü: 1.7.0_75, satıcı: Oracle Corporation Java ana sayfası: /usr/local/java-current/jdk1.7.0_75/jre |
| Mac | Apache Maven 3.3.3 (7994120775791599e205a5524ec3e0dfe41d4a06; 2015-04-22T17: 27: 37 + 05: 30) Maven ana sayfası: /usr/local/apache-maven/apache-maven-3.3.3 Java sürümü: 1.7.0_75, satıcı: Oracle Corporation Java ana sayfası: /Library/Java/Home/jdk1.7.0_75/jre |
Adım 8: Eclipse IDE'yi Kurun
Bu eğitimdeki tüm örnekler Eclipse IDE kullanılarak yazılmıştır. Okuyucuların makinelerinde Eclipse'in en son sürümünü kurmaları önerilir. Eclipse IDE'yi kurmak için, en son Eclipse ikili dosyalarını aşağıdaki bağlantıdan indirinhttps://www.eclipse.org/downloads/. Kurulum indirildikten sonra, ikili dağıtımı uygun bir konuma açın.
Örneğin C:\eclipse pencerelerde veya /usr/local/eclipseLinux / Unix üzerinde ve son olarak PATH değişkenini uygun şekilde ayarlayın. Eclipse, Windows makinesinde aşağıdaki komutları çalıştırarak başlatılabilir veya eclipse.exe'ye çift tıklayabilirsiniz.
%C:\eclipse\eclipse.exeEclipse, UNIX (Solaris, Linux, vb.) Makinesinde aşağıdaki komutlar çalıştırılarak başlatılabilir -
$/usr/local/eclipse/eclipseBaşarılı bir başlangıçtan sonra, her şey yolundaysa, aşağıdaki ekranı göstermelidir -
Adım 9: Apache Tomcat'i Kurun
Tomcat'in en son sürümünü şu adresten indirebiliriz: https://tomcat.apache.org/. Kurulum indirildikten sonra, ikili dağıtımı uygun bir konuma açın. ÖrneğinC:\apache-tomcat-7.0.59 Windows makinesinde veya /usr/local/apache-tomcat-7.0.59 bir Linux / Unix makinesinde ve ardından CATALINA_HOME kurulum konumlarını gösteren ortam değişkeni.
Tomcat, bir Windows makinesinde aşağıdaki komutların çalıştırılmasıyla başlatılabilir veya basitçe startup.bat üzerine çift tıklayabilirsiniz.
%CATALINA_HOME%\bin\startup.bat

or

C:\apache-tomcat-7.0.59\bin\startup.bat
Tomcat, UNIX (Solaris, Linux, vb.) Makinesinde aşağıdaki komutlar çalıştırılarak başlatılabilir -
$CATALINA_HOME/bin/startup.sh

or

/usr/local/apache-tomcat-7.0.59/bin/startup.sh
Başarılı bir başlangıçtan sonra, Tomcat ile birlikte gelen varsayılan web uygulamaları şu adresi ziyaret ederek kullanılabilir olacaktır: http://localhost:8080/. Her şey yolundaysa, aşağıdaki ekranı göstermelidir -

Tomcat'in yapılandırılması ve çalıştırılması hakkında daha fazla bilgi burada bulunan belgelerde ve Tomcat web sitesinde bulunabilir - https://tomcat.apache.org
Tomcat, bir Windows makinesinde aşağıdaki komutlar çalıştırılarak durdurulabilir -
%CATALINA_HOME%\bin\shutdown

or

C:\apache-tomcat-7.0.59\bin\shutdown
Tomcat, UNIX (Solaris, Linux, vb.) Makinesinde aşağıdaki komutlar çalıştırılarak durdurulabilir -
$CATALINA_HOME/bin/shutdown.sh

or

/usr/local/apache-tomcat-7.0.59/bin/shutdown.sh
Bu son adımı tamamladığımızda, bir sonraki bölümde tartışacağımız ilk Web Hizmetleri Örneğine geçmeye hazırız.
Spring-WS Framework ile SOAP tabanlı gerçek bir web hizmeti yazmaya başlayalım. Spring-WS çerçevesini kullanarak ilk örneğimizi yazmaya başlamadan önce, Spring-WS ortamının Spring Web Services - Environment Setup bölümünde açıklandığı gibi doğru şekilde kurulduğundan emin olmalıyız . Okuyucuların Eclipse IDE ile bazı temel çalışma bilgilerine sahip olduğunu varsayıyoruz.
Bu nedenle, bir İK Portalında izin rezervasyonu yapmak için bir web hizmeti yöntemini ortaya çıkaracak basit bir Bahar WS Uygulaması yazmaya devam edelim.
İlk Sözleşme Yaklaşımı
Spring-WS, Sözleşme-ilk yaklaşımını kullanır, bu da bizim XML Structuresherhangi bir JAVA tabanlı uygulama kodu yazmadan önce hazır. Ayrılma ve Çalışan gibi alt nesneleri olan bir LeaveRequest Nesnesi tanımlıyoruz.
Aşağıdakiler gerekli XML yapılarıdır -
Leave.xml
<Leave xmlns = "http://tutorialspoint.com/hr/schemas">
   <StartDate>2016-07-03</StartDate>
   <EndDate>2016-07-07</EndDate>
</Leave>
Employee.xml
<Employee xmlns = "http://tutorialspoint.com/hr/schemas">
   <Number>404</Number>
   <FirstName>Mahesh</FirstName>
   <LastName>Parashar</LastName>
</Employee>
LeaveRequest.xml
<LeaveRequest xmlns = "http://tutorialspoint.com/hr/schemas">
   <Leave>
      <StartDate>2016-07-03</StartDate>
      <EndDate>2016-07-07</EndDate>
   </Leave>

   <Employee>
      <Number>404</Number>
      <FirstName>Mahesh</FirstName>
      <LastName>Parashar</LastName>
   </Employee>
</LeaveRequest>
hr.xsd
<xs:schema xmlns:xs = "http://www.w3.org/2001/XMLSchema"
   xmlns:hr = "http://tutorialspoint.com/hr/schemas"
   elementFormDefault = "qualified"
   targetNamespace = "http://tutorialspoint.com/hr/schemas">

   <xs:element name = "LeaveRequest">
      <xs:complexType>
         <xs:all>
            <xs:element name = "Leave" type = "hr:LeaveType"/>
            <xs:element name = "Employee" type = "hr:EmployeeType"/>
         </xs:all>
      </xs:complexType>
   </xs:element>

   <xs:complexType name = "LeaveType">
      <xs:sequence>
         <xs:element name = "StartDate" type = "xs:date"/>
         <xs:element name = "EndDate" type = "xs:date"/>
      </xs:sequence>
   </xs:complexType>

   <xs:complexType name = "EmployeeType">
      <xs:sequence>
         <xs:element name = "Number" type = "xs:integer"/>
         <xs:element name = "FirstName" type = "xs:string"/>
         <xs:element name = "LastName" type = "xs:string"/>
      </xs:sequence>
   </xs:complexType>
</xs:schema>
Projeyi Oluşturun
Şimdi bir komut konsolu açalım, C: \ MVN dizinine gidelim ve aşağıdakileri çalıştıralım mvn komut.
C:\MVN>mvn archetype:generate -DarchetypeGroupId = org.springframework.ws
-DarchetypeArtifactId = spring-ws-archetype -DgroupId = com.tutorialspoint.hr
-DartifactId = leaveService
Maven işlemeye başlayacak ve eksiksiz Java Uygulama Proje Yapısını oluşturacaktır.
[INFO] Scanning for projects...
[INFO]
[INFO] ------------------------------------------------------------------------
[INFO] Building Maven Stub Project (No POM) 1
[INFO] ------------------------------------------------------------------------
[INFO]
[INFO] Using property: groupId = com.tutorialspoint.hr
[INFO] Using property: artifactId = leaveService
Define value for property 'version':  1.0-SNAPSHOT: :
[INFO] Using property: package = com.tutorialspoint.hr
Confirm properties configuration:
groupId: com.tutorialspoint.hr
artifactId: leaveService
version: 1.0-SNAPSHOT
package: com.tutorialspoint.hr
 Y: :
[INFO] -------------------------------------------------------------------------
---
[INFO] Using following parameters for creating project from Old (1.x) Archetype:
 spring-ws-archetype:2.0.0-M1
[INFO] -------------------------------------------------------------------------
---
[INFO] Parameter: groupId, Value: com.tutorialspoint.hr
[INFO] Parameter: packageName, Value: com.tutorialspoint.hr
[INFO] Parameter: package, Value: com.tutorialspoint.hr
[INFO] Parameter: artifactId, Value: leaveService
[INFO] Parameter: basedir, Value: C:\mvn
[INFO] Parameter: version, Value: 1.0-SNAPSHOT
[INFO] project created from Old (1.x) Archetype in dir: C:\mvn\leaveService
[INFO] ------------------------------------------------------------------------
[INFO] BUILD SUCCESS
[INFO] ------------------------------------------------------------------------
[INFO] Total time: 35.989 s
[INFO] Finished at: 2017-01-21T11:18:31+05:30
[INFO] Final Memory: 17M/178M
[INFO] ------------------------------------------------------------------------
Şimdi gidin C:/MVNdizin. İsimli bir java uygulama projesi göreceğiz.leaveService(artifactId'de belirtildiği gibi). Pom.xml dosyasını güncelleyin ve HumanResourceService.java ve HumanResourceServiceImpl.java'yı şu klasöre ekleyin - C: \ MVN \ LeaveService \ src \ main \ java \ com \ tutorialspoint \ hr \ service klasörü. Bu yapıldıktan sonra, aşağıdaki klasöre LeaveEndpoint.java'yı ekleyin - C: \ MVN \ LeaveService \ src \ main \ java \ com \ tutorialspoint \ hr \ ws klasörüne.
pom.xml
<?xml version = "1.0" encoding = "UTF-8"?>
<project xmlns = "http://maven.apache.org/POM/4.0.0"
   xmlns:xsi = "http://www.w3.org/2001/XMLSchema-instance"
   xsi:schemaLocation = "http://maven.apache.org/POM/4.0.0
   http://maven.apache.org/maven-v4_0_0.xsd">

   <modelVersion>4.0.0</modelVersion>
   <groupId>com.tutorialspoint.hr</groupId>
   <artifactId>leaveService</artifactId>
   <packaging>war</packaging>
   <version>1.0-SNAPSHOT</version>
   <name>leaveService Spring-WS Application</name>
   <url>http://www.springframework.org/spring-ws</url>

   <build>
      <finalName>leaveService</finalName>
   </build>

   <dependencies>
      <dependency>
         <groupId>org.springframework.ws</groupId>
         <artifactId>spring-ws-core</artifactId>
         <version>2.4.0.RELEASE</version>
      </dependency>

      <dependency>
         <groupId>jdom</groupId>
         <artifactId>jdom</artifactId>
         <version>1.0</version>
      </dependency>

      <dependency>
         <groupId>jaxen</groupId>
         <artifactId>jaxen</artifactId>
         <version>1.1</version>
      </dependency>

      <dependency>
         <groupId>wsdl4j</groupId>
         <artifactId>wsdl4j</artifactId>
         <version>1.6.2</version>
      </dependency>
   </dependencies>
</project>
HumanResourceService.java
package com.tutorialspoint.hr.service;

import java.util.Date;

public interface HumanResourceService {
   void bookLeave(Date startDate, Date endDate, String name);
}
HumanResourceServiceImpl.java
package com.tutorialspoint.hr.service;

import java.util.Date;
import org.springframework.stereotype.Service;

@Service
public class HumanResourceServiceImpl implements HumanResourceService {
   public void bookLeave(Date startDate, Date endDate, String name) {
      System.out.println("Booking holiday for [" + startDate + "-" + endDate + "]
         for [" + name + "] ");
   }
}
LeaveEndpoint.java
package com.tutorialspoint.hr.ws;

import java.text.SimpleDateFormat;
import java.util.Date;

import org.springframework.beans.factory.annotation.Autowired;
import org.springframework.ws.server.endpoint.annotation.Endpoint;
import org.springframework.ws.server.endpoint.annotation.PayloadRoot;
import org.springframework.ws.server.endpoint.annotation.RequestPayload;

import com.tutorialspoint.hr.service.HumanResourceService;
import org.jdom.Element;
import org.jdom.JDOMException;
import org.jdom.Namespace;
import org.jdom.xpath.XPath;

@Endpoint
public class LeaveEndpoint {
   private static final String NAMESPACE_URI = "http://tutorialspoint.com/hr/schemas";
   private XPath startDateExpression;
   private XPath endDateExpression;
   private XPath nameExpression;
   private HumanResourceService humanResourceService;

   @Autowired
   public LeaveEndpoint(HumanResourceService humanResourceService) throws JDOMException {
      this.humanResourceService = humanResourceService;

      Namespace namespace = Namespace.getNamespace("hr", NAMESPACE_URI);

      startDateExpression = XPath.newInstance("//hr:StartDate");
      startDateExpression.addNamespace(namespace);

      endDateExpression = XPath.newInstance("//hr:EndDate");
      endDateExpression.addNamespace(namespace);

      nameExpression = XPath.newInstance("concat(//hr:FirstName,' ',//hr:LastName)");
      nameExpression.addNamespace(namespace);
   }

   @PayloadRoot(namespace = NAMESPACE_URI, localPart = "LeaveRequest")
   public void handleLeaveRequest(@RequestPayload Element leaveRequest) throws Exception {
      SimpleDateFormat dateFormat = new SimpleDateFormat("yyyy-MM-dd");
      Date startDate = dateFormat.parse(startDateExpression.valueOf(leaveRequest));
      Date endDate = dateFormat.parse(endDateExpression.valueOf(leaveRequest));
      String name = nameExpression.valueOf(leaveRequest);

      humanResourceService.bookLeave(startDate, endDate, name);
   }
}
/WEB-INF/spring-ws-servlet.xml
<beans xmlns = "http://www.springframework.org/schema/beans"
   xmlns:xsi = "http://www.w3.org/2001/XMLSchema-instance"
   xmlns:context = "http://www.springframework.org/schema/context"
   xmlns:sws = "http://www.springframework.org/schema/web-services"
   xsi:schemaLocation = "http://www.springframework.org/schema/beans

   http://www.springframework.org/schema/beans/spring-beans-3.0.xsd
   http://www.springframework.org/schema/web-services
   http://www.springframework.org/schema/web-services/web-services-2.0.xsd
   http://www.springframework.org/schema/context
   http://www.springframework.org/schema/context/spring-context-3.0.xsd">

   <context:component-scan base-package = "com.tutorialspoint.hr"/>
   <bean id = "humanResourceService"
      class = "com.tutorialspoint.hr.service.HumanResourceServiceImpl" />
   <sws:annotation-driven/>

   <sws:dynamic-wsdl id = "leave"
      portTypeName = "HumanResource"
      locationUri = "/leaveService/"
      targetNamespace = "http://tutorialspoint.com/hr/definitions">
      <sws:xsd location = "/WEB-INF/hr.xsd"/>
   </sws:dynamic-wsdl>
</beans>
/WEB-INF/web.xml
<web-app xmlns = "http://java.sun.com/xml/ns/j2ee"
   xmlns:xsi = "http://www.w3.org/2001/XMLSchema-instance"
   xsi:schemaLocation = "http://java.sun.com/xml/ns/j2ee
   http://java.sun.com/xml/ns/j2ee/web-app_2_4.xsd"
   version = "2.4">

   <display-name>TutorialsPoint HR Leave Service</display-name>
   <servlet>
      <servlet-name>spring-ws</servlet-name>
      <servlet-class>
         org.springframework.ws.transport.http.MessageDispatcherServlet
      </servlet-class>
      <init-param>
         <param-name>transformWsdlLocations</param-name>
         <param-value>true</param-value>
      </init-param>
   </servlet>

   <servlet-mapping>
      <servlet-name>spring-ws</servlet-name>
      <url-pattern>/*</url-pattern>
   </servlet-mapping>
</web-app>
/WEB-INF/hr.xsd
<xs:schema xmlns:xs = "http://www.w3.org/2001/XMLSchema"
   xmlns:hr = "http://tutorialspoint.com/hr/schemas"
   elementFormDefault = "qualified"
   targetNamespace = "http://tutorialspoint.com/hr/schemas">

   <xs:element name = "LeaveRequest">
      <xs:complexType>
         <xs:all>
            <xs:element name = "Leave" type = "hr:LeaveType"/>
            <xs:element name = "Employee" type = "hr:EmployeeType"/>
         </xs:all>
      </xs:complexType>
   </xs:element>

   <xs:complexType name = "LeaveType">
      <xs:sequence>
         <xs:element name = "StartDate" type = "xs:date"/>
         <xs:element name = "EndDate" type = "xs:date"/>
      </xs:sequence>
   </xs:complexType>

   <xs:complexType name = "EmployeeType">
      <xs:sequence>
         <xs:element name = "Number" type = "xs:integer"/>
         <xs:element name = "FirstName" type = "xs:string"/>
         <xs:element name = "LastName" type = "xs:string"/>
      </xs:sequence>
   </xs:complexType>
</xs:schema>
Projeyi Oluşturun
Şimdi komut konsolunu açalım, C: \ MVN \ LeaveService dizinine gidelim ve aşağıdakileri uygulayalım mvn komut.
C:\MVN\leaveService>mvn clean packageMaven projeyi inşa etmeye başlayacak.
[INFO] Scanning for projects...
[INFO]
[INFO] ------------------------------------------------------------------------
[INFO] Building leaveService Spring-WS Application 1.0-SNAPSHOT
[INFO] ------------------------------------------------------------------------
[INFO]
[INFO] --- maven-clean-plugin:2.5:clean (default-clean) @ leaveService ---
[INFO] Deleting C:\mvn\leaveService\target
[INFO]
[INFO] --- maven-resources-plugin:2.6:resources (default-resources) @ leaveServi
ce ---
[WARNING] Using platform encoding (Cp1252 actually) to copy filtered resources,
i.e. build is platform dependent!
[INFO] Copying 0 resource
[INFO]
[INFO] --- maven-compiler-plugin:3.1:compile (default-compile) @ leaveService --
-
[INFO] Changes detected - recompiling the module!
[WARNING] File encoding has not been set, using platform encoding Cp1252, i.e. b
uild is platform dependent!
[INFO] Compiling 3 source files to C:\mvn\leaveService\target\classes
[INFO]
[INFO] --- maven-resources-plugin:2.6:testResources (default-testResources) @ le
aveService ---
[WARNING] Using platform encoding (Cp1252 actually) to copy filtered resources,
i.e. build is platform dependent!
[INFO] skip non existing resourceDirectory C:\mvn\leaveService\src\test\resource
s
[INFO]
[INFO] --- maven-compiler-plugin:3.1:testCompile (default-testCompile) @ leaveSe
rvice ---
[INFO] No sources to compile
[INFO]
[INFO] --- maven-surefire-plugin:2.12.4:test (default-test) @ leaveService ---
[INFO] No tests to run.
[INFO]
[INFO] --- maven-war-plugin:2.2:war (default-war) @ leaveService ---
[INFO] Packaging webapp
[INFO] Assembling webapp [leaveService] in [C:\mvn\leaveService\target\leaveServ
ice]
[INFO] Processing war project
[INFO] Copying webapp resources [C:\mvn\leaveService\src\main\webapp]
[INFO] Webapp assembled in [7159 msecs]
[INFO] Building war: C:\mvn\leaveService\target\leaveService.war
[INFO] WEB-INF\web.xml already added, skipping
[INFO] ------------------------------------------------------------------------
[INFO] BUILD SUCCESS
[INFO] ------------------------------------------------------------------------
[INFO] Total time: 19.667 s
[INFO] Finished at: 2017-01-21T11:56:43+05:30
[INFO] Final Memory: 18M/173M
[INFO] ------------------------------------------------------------------------
Eclipse'de Projeyi İçe Aktar
Eclipse'de projeyi içe aktarmak için aşağıdaki adımları izleyin.
Eclipse'i açın.
Seçiniz File → Import → seçeneği.
Maven Projeleri Seçeneğini seçin. İleri Düğmesine tıklayın.
Proje konumunu seçin, burada leaveService project Maven kullanılarak oluşturuldu.
Bitir Düğmesine tıklayın.
Projeyi Çalıştırın
Kaynak ve yapılandırma dosyalarını oluşturmayı bitirdiğimizde, uygulamayı dışa aktarın. Uygulamaya sağ tıklayın, Export → WAR Dosyası seçeneğini kullanın ve allowService.war dosyasını Tomcat'in webapps klasörüne kaydedin.
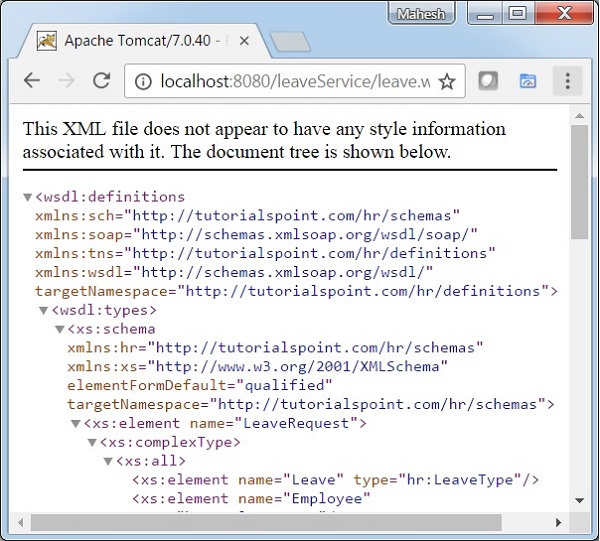
Tomcat sunucusunu başlatın ve diğer web sayfalarına standart bir tarayıcı kullanarak webapps klasöründen erişebildiğimizden emin olun. URL'ye erişmeye çalışın - http: // localhost: 8080 / ayrılmakService / ayrılmak.wsdl, Bahar Web Uygulaması ile her şey yolundaysa, aşağıdaki ekranı görmeliyiz.
Önceki Spring -WS - First Application bölümünde , Spring WS Yapılandırmasını kullanarak WSDL'yi otomatik olarak oluşturduk. Bu durumda, Spring WS kullanılarak mevcut WSDL'nin nasıl ortaya çıkarılacağını göstereceğiz.
| Adım | Açıklama |
|---|---|
| 1 | Spring WS - İlk Uygulama bölümünde açıklandığı gibi com.tutorialspoint paketinin altında LeaveService adıyla bir proje oluşturun. |
| 2 | / WEB-INF / wsdl alt klasörü altında bir WSDL allow.wsdl oluşturun. |
| 3 | / WEB-INF alt klasörünün altındaki spring-ws-servlet.xml dosyasını güncelleyin. Burada dynamic-wsdl yerine static-wsdl etiketini kullanıyoruz. |
| 4 | Son adım, tüm kaynak ve yapılandırma dosyalarının içeriğini oluşturmak ve uygulamayı aşağıda açıklandığı gibi dışa aktarmaktır. |
/WEB-INF/spring-ws-servlet.xml
<wsdl:definitions xmlns:wsdl = "http://schemas.xmlsoap.org/wsdl/"
   xmlns:soap = "http://schemas.xmlsoap.org/wsdl/soap/"
   xmlns:schema = "http://tutorialspoint.com/hr/schemas"
   xmlns:tns = "http://tutorialspoint.com/hr/definitions"
   targetNamespace = "http://tutorialspoint.com/hr/definitions">

   <wsdl:types>
      <xsd:schema xmlns:xsd = "http://www.w3.org/2001/XMLSchema">
         <xsd:import namespace = "http://tutorialspoint.com/hr/schemas"
            schemaLocation = "hr.xsd"/>
      </xsd:schema>
   </wsdl:types>

   <wsdl:message name = "LeaveRequest">
      <wsdl:part element = "schema:LeaveRequest" name = "LeaveRequest"/>
   </wsdl:message>

   <wsdl:portType name = "HumanResource">
      <wsdl:operation name = "Leave">
         <wsdl:input message = "tns:LeaveRequest" name = "LeaveRequest"/>
      </wsdl:operation>
   </wsdl:portType>

   <wsdl:binding name = "HumanResourceBinding" type = "tns:HumanResource">
      <soap:binding style = "document"
         transport = "http://schemas.xmlsoap.org/soap/http"/>
      <wsdl:operation name = "Leave">
         <soap:operation soapAction = "http://mycompany.com/RequestLeave"/>
         <wsdl:input name = "LeaveRequest">
            <soap:body use = "literal"/>
         </wsdl:input>
      </wsdl:operation>
   </wsdl:binding>

   <wsdl:service name = "HumanResourceService">
      <wsdl:port binding = "tns:HumanResourceBinding" name = "HumanResourcePort">
         <soap:address location = "http://localhost:8080/leaveService/"/>
      </wsdl:port>
   </wsdl:service>
</wsdl:definitions>
/WEB-INF/spring-ws-servlet.xml
<beans xmlns = "http://www.springframework.org/schema/beans"
   xmlns:xsi = "http://www.w3.org/2001/XMLSchema-instance"
   xmlns:context = "http://www.springframework.org/schema/context"
   xmlns:sws = "http://www.springframework.org/schema/web-services"
   xsi:schemaLocation = "http://www.springframework.org/schema/beans

   http://www.springframework.org/schema/beans/spring-beans-3.0.xsd
   http://www.springframework.org/schema/web-services
   http://www.springframework.org/schema/web-services/web-services-2.0.xsd
   http://www.springframework.org/schema/context
   http://www.springframework.org/schema/context/spring-context-3.0.xsd">

   <context:component-scan base-package = "com.tutorialspoint.hr"/>
   <sws:annotation-driven/>
   <sws:static-wsdl id = "leave" location = "/WEB-INF/wsdl/leave.wsdl"/>
</beans>
Projeyi Çalıştırın
Kaynak ve yapılandırma dosyalarını oluşturmayı bitirdiğimizde, uygulamayı dışa aktarmalıyız. Uygulamaya sağ tıklayın, Export → WAR Dosyası seçeneğini kullanın ve allowService.war dosyanızı Tomcat'in webapps klasörüne kaydedin.
Şimdi, Tomcat sunucusunu başlatın ve diğer web sayfalarına webapps klasöründen standart bir tarayıcı kullanarak erişebildiğimizden emin olun. URL'ye erişmeye çalışın - http: // localhost: 8080 / ayrılmakService / ayrılmak.wsdl, Spring Web Uygulaması ile her şey yolundaysa, aşağıdaki ekranı göreceğiz.
Bu bölümde, Spring WS kullanarak bir web uygulama sunucusunun nasıl oluşturulacağını anlayacağız.
| Adım | Açıklama |
|---|---|
| 1 | Spring WS - First Application bölümünde açıklandığı gibi com.tutorialspoint paketinin altında countryService adlı bir proje oluşturun. |
| 2 | Aşağıdaki adımlarda açıklandığı gibi country.xsd, etki alanı sınıfları, CountryRepository ve CountryEndPoint oluşturun. |
| 3 | / WEB-INF alt klasörünün altındaki spring-ws-servlet.xml dosyasını güncelleyin. |
| 4 | Son adım, tüm kaynak ve yapılandırma dosyaları için içerik oluşturmak ve aşağıda açıklandığı gibi uygulamayı dışa aktarmaktır. |
ülkeler.xsd
<xs:schema xmlns:xs = "http://www.w3.org/2001/XMLSchema"
   xmlns:tns = "http://tutorialspoint/schemas"
   targetNamespace = "http://tutorialspoint/schemas"
   elementFormDefault = "qualified">

   <xs:element name = "getCountryRequest">
      <xs:complexType>
         <xs:sequence>
            <xs:element name = "name" type = "xs:string"/>
         </xs:sequence>
      </xs:complexType>
   </xs:element>

   <xs:element name = "getCountryResponse">
      <xs:complexType>
         <xs:sequence>
            <xs:element name = "country" type = "tns:country"/>
         </xs:sequence>
      </xs:complexType>
   </xs:element>

   <xs:complexType name = "country">
      <xs:sequence>
         <xs:element name = "name" type = "xs:string"/>
         <xs:element name = "population" type = "xs:int"/>
         <xs:element name = "capital" type = "xs:string"/>
         <xs:element name = "currency" type = "tns:currency"/>
      </xs:sequence>
   </xs:complexType>

   <xs:simpleType name = "currency">
      <xs:restriction base = "xs:string">
         <xs:enumeration value = "GBP"/>
         <xs:enumeration value = "USD"/>
         <xs:enumeration value = "INR"/>
      </xs:restriction>
   </xs:simpleType>
</xs:schema>
Projeyi Oluşturun
Komut konsolunu açalım, C: \ MVN dizinine gidelim ve aşağıdakileri uygulayalım mvn komut.
C:\MVN>mvn archetype:generate -DarchetypeGroupId = org.springframework.ws
-DarchetypeArtifactId = spring-ws-archetype -DgroupId = com.tutorialspoint
-DartifactId = countryService
Maven işlemeye başlayacak ve eksiksiz Java Uygulama Proje Yapısını oluşturacaktır.
[INFO] Scanning for projects...
[INFO]
[INFO] ------------------------------------------------------------------------
[INFO] Building Maven Stub Project (No POM) 1
[INFO] ------------------------------------------------------------------------
[INFO]
[INFO] Using property: groupId = com.tutorialspoint
[INFO] Using property: artifactId = countryService
Define value for property 'version':  1.0-SNAPSHOT: :
[INFO] Using property: package = com.tutorialspoint
Confirm properties configuration:
groupId: com.tutorialspoint
artifactId: countryService
version: 1.0-SNAPSHOT
package: com.tutorialspoint
 Y: :
[INFO] -------------------------------------------------------------------------
---
[INFO] Using following parameters for creating project from Old (1.x) Archetype:
 spring-ws-archetype:2.0.0-M1
[INFO] -------------------------------------------------------------------------
---
[INFO] Parameter: groupId, Value: com.tutorialspoint
[INFO] Parameter: packageName, Value: com.tutorialspoint
[INFO] Parameter: package, Value: com.tutorialspoint
[INFO] Parameter: artifactId, Value: countryService
[INFO] Parameter: basedir, Value: C:\mvn
[INFO] Parameter: version, Value: 1.0-SNAPSHOT
[INFO] project created from Old (1.x) Archetype in dir: C:\mvn\countryService
[INFO] ------------------------------------------------------------------------
[INFO] BUILD SUCCESS
[INFO] ------------------------------------------------------------------------
[INFO] Total time: 35.989 s
[INFO] Finished at: 2017-01-21T11:18:31+05:30
[INFO] Final Memory: 17M/178M
[INFO] ------------------------------------------------------------------------
Şimdi C: / MVN dizinine gidin. CountryService adlı (artifactId'de belirtildiği gibi) oluşturulan bir java uygulama projesi göreceğiz. Pom.xml dosyasını güncelleyin.
pom.xml
<?xml version = "1.0" encoding = "UTF-8"?>
<project xmlns = "http://maven.apache.org/POM/4.0.0"
   xmlns:xsi = "http://www.w3.org/2001/XMLSchema-instance"
   xsi:schemaLocation = "http://maven.apache.org/POM/4.0.0
   http://maven.apache.org/maven-v4_0_0.xsd">

   <modelVersion>4.0.0</modelVersion>
   <groupId>com.tutorialspoint.hr</groupId>
   <artifactId>countryService</artifactId>
   <packaging>war</packaging>
   <version>1.0-SNAPSHOT</version>
   <name>countryService Spring-WS Application</name>
   <url>http://www.springframework.org/spring-ws</url>

   <build>
      <finalName>countryService</finalName>
   </build>

   <dependencies>
      <dependency>
         <groupId>org.springframework.ws</groupId>
         <artifactId>spring-ws-core</artifactId>
         <version>2.4.0.RELEASE</version>
      </dependency>

      <dependency>
         <groupId>jdom</groupId>
         <artifactId>jdom</artifactId>
         <version>1.0</version>
      </dependency>

      <dependency>
         <groupId>jaxen</groupId>
         <artifactId>jaxen</artifactId>
         <version>1.1</version>
      </dependency>

      <dependency>
         <groupId>wsdl4j</groupId>
         <artifactId>wsdl4j</artifactId>
         <version>1.6.2</version>
      </dependency>
   </dependencies>
</project>
Etki Alanı Sınıfları Oluşturun
Country.xsd dosyasını C: \ mvn \ countryService \ src \ main \ kaynaklar klasörüne kopyalayın. Komut konsolunu açalım, C: \ mvn \ countryService \ src \ main \ kaynaklar dizinine gidelim ve aşağıdakileri çalıştıralımxjc country.xsd kullanarak alan sınıfları oluşturmak için komut.
C:\MVN\countryService\src\main\resources>xjc -p com.tutorialspoint countries.xsdMaven işlemeye başlayacak ve com.tutorialspoint paketinde etki alanı sınıflarını oluşturacaktır.
parsing a schema...
compiling a schema...
com\tutorialspoint\Country.java
com\tutorialspoint\Currency.java
com\tutorialspoint\GetCountryRequest.java
com\tutorialspoint\GetCountryResponse.java
com\tutorialspoint\ObjectFactory.java
com\tutorialspoint\package-info.java
C: \ mvn \ countryService \ src \ main klasöründe java klasörü oluşturun. C: \ mvn \ countryService \ src \ main \ java klasöründeki tüm sınıfları kopyalayın. Sırasıyla ülke veritabanını ve ülke sunucusunu temsil etmek için CountryRepository ve CountryEndPoint oluşturun.
CountryRepository.java
package com.tutorialspoint;

import java.util.ArrayList;
import java.util.List;
import org.springframework.beans.propertyeditors.CurrencyEditor;
import org.springframework.stereotype.Component;
import org.springframework.util.Assert;

@Component
public class CountryRepository {
   private static final List<Country> countries = new ArrayList<Country>();

   public CountryRepository(){
      initData();
   }
   public void initData() {
      Country us = new Country();
      us.setName("United States");
      us.setCapital("Washington");
      us.setCurrency(Currency.USD);
      us.setPopulation(46704314);

      countries.add(us);

      Country india = new Country();
      india.setName("India");
      india.setCapital("New Delhi");
      india.setCurrency(Currency.INR);
      india.setPopulation(138186860);

      countries.add(india);

      Country uk = new Country();
      uk.setName("United Kingdom");
      uk.setCapital("London");
      uk.setCurrency(Currency.GBP);
      uk.setPopulation(63705000);

      countries.add(uk);
   }
   public Country findCountry(String name) {
      Assert.notNull(name);
      Country result = null;

      for (Country country : countries) {
         if (name.trim().equals(country.getName())) {
            result = country;
         }
      }
      return result;
   }
}
CountryEndPoint.java
package com.tutorialspoint.ws;

import org.jdom.JDOMException;
import org.springframework.beans.factory.annotation.Autowired;
import org.springframework.ws.server.endpoint.annotation.Endpoint;
import org.springframework.ws.server.endpoint.annotation.PayloadRoot;
import org.springframework.ws.server.endpoint.annotation.RequestPayload;
import org.springframework.ws.server.endpoint.annotation.ResponsePayload;

import com.tutorialspoint.Country;
import com.tutorialspoint.CountryRepository;
import com.tutorialspoint.GetCountryRequest;
import com.tutorialspoint.GetCountryResponse;

@Endpoint
public class CountryEndPoint {
   private static final String NAMESPACE_URI = "http://tutorialspoint/schemas";
   private CountryRepository countryRepository;

   @Autowired
   public CountryEndPoint(CountryRepository countryRepository) throws JDOMException {
      this.countryRepository = countryRepository;
   }
   @PayloadRoot(namespace = NAMESPACE_URI, localPart = "getCountryRequest")
   @ResponsePayload
   public GetCountryResponse getCountry(@RequestPayload GetCountryRequest request)
      throws JDOMException {

      Country country = countryRepository.findCountry(request.getName());
      GetCountryResponse response = new GetCountryResponse();
      response.setCountry(country);
      return response;
   }
}
/WEB-INF/spring-ws-servlet.xml
<beans xmlns = "http://www.springframework.org/schema/beans"
   xmlns:xsi = "http://www.w3.org/2001/XMLSchema-instance"
   xmlns:context = "http://www.springframework.org/schema/context"
   xmlns:sws = "http://www.springframework.org/schema/web-services"
   xsi:schemaLocation = "http://www.springframework.org/schema/beans

   http://www.springframework.org/schema/beans/spring-beans-3.0.xsd
   http://www.springframework.org/schema/web-services
   http://www.springframework.org/schema/web-services/web-services-2.0.xsd
   http://www.springframework.org/schema/context
   http://www.springframework.org/schema/context/spring-context-3.0.xsd">

   <context:component-scan base-package = "com.tutorialspoint"/>
   <sws:annotation-driven/>

   <sws:dynamic-wsdl id="countries"
      portTypeName = "CountriesPort"
      locationUri = "/countryService/"
      targetNamespace = "http://tutorialspoint.com/definitions">
      <sws:xsd location = "/WEB-INF/countries.xsd"/>
   </sws:dynamic-wsdl>
</beans>
/WEB-INF/web.xml
<web-app xmlns = "http://java.sun.com/xml/ns/j2ee"
   xmlns:xsi = "http://www.w3.org/2001/XMLSchema-instance"
   xsi:schemaLocation = "http://java.sun.com/xml/ns/j2ee
   http://java.sun.com/xml/ns/j2ee/web-app_2_4.xsd"
   version = "2.4">

   <display-name>TutorialsPoint Country Service</display-name>

   <servlet>
      <servlet-name>spring-ws</servlet-name>
      <servlet-class>org.springframework.ws.transport.http.MessageDispatcherServlet
      </servlet-class>
      <init-param>
         <param-name>transformWsdlLocations</param-name>
         <param-value>true</param-value>
      </init-param>
   </servlet>

   <servlet-mapping>
      <servlet-name>spring-ws</servlet-name>
      <url-pattern>/*</url-pattern>
   </servlet-mapping>
</web-app>
Projeyi Oluşturun
Komut konsolunu açalım. C: \ MVN \ countryService dizinine gidin ve aşağıdakileri yürütünmvn komut.
C:\MVN\countryService>mvn clean packageMaven projeyi inşa etmeye başlayacak.
INFO] Scanning for projects...
[INFO]
[INFO] ------------------------------------------------------------------------
[INFO] Building countryService Spring-WS Application 1.0-SNAPSHOT
[INFO] ------------------------------------------------------------------------
[INFO]
[INFO] --- maven-clean-plugin:2.5:clean (default-clean) @ countryService ---
[INFO] Deleting C:\mvn\countryService\target
[INFO]
[INFO] --- maven-resources-plugin:2.6:resources (default-resources) @ countrySer
vice ---
[WARNING] Using platform encoding (Cp1252 actually) to copy filtered resources,
i.e. build is platform dependent!
[INFO] Copying 0 resource
[INFO]
[INFO] --- maven-compiler-plugin:3.1:compile (default-compile) @ countryService
---
[INFO] Changes detected - recompiling the module!
[WARNING] File encoding has not been set, using platform encoding Cp1252, i.e.
build is platform dependent!
[INFO] Compiling 4 source files to C:\mvn\countryService\target\classes
[INFO]
[INFO] --- maven-resources-plugin:2.6:testResources (default-testResources) @ co
untryService ---
[WARNING] Using platform encoding (Cp1252 actually) to copy filtered resources,
i.e. build is platform dependent!
[INFO] skip non existing resourceDirectory C:\mvn\countryService\src\test\resour
ces
[INFO]
[INFO] --- maven-compiler-plugin:3.1:testCompile (default-testCompile) @ country
Service ---
[INFO] No sources to compile
[INFO]
[INFO] --- maven-surefire-plugin:2.12.4:test (default-test) @ countryService ---

[INFO] No tests to run.
[INFO]
[INFO] --- maven-war-plugin:2.2:war (default-war) @ countryService ---
[INFO] Packaging webapp
[INFO] Assembling webapp [countryService] in [C:\mvn\countryService\target\count
ryService]
[INFO] Processing war project
[INFO] Copying webapp resources [C:\mvn\countryService\src\main\webapp]
[INFO] Webapp assembled in [5137 msecs]
[INFO] Building war: C:\mvn\countryService\target\countryService.war
[INFO] WEB-INF\web.xml already added, skipping
[INFO] ------------------------------------------------------------------------
[INFO] BUILD SUCCESS
[INFO] ------------------------------------------------------------------------
[INFO] Total time: 16.484 s
[INFO] Finished at: 2017-01-28T09:07:59+05:30
[INFO] Final Memory: 19M/170M
[INFO] ------------------------------------------------------------------------
Projeyi Çalıştırın
Kaynak ve yapılandırma dosyalarını oluşturduktan sonra, countryService.war dosyasını Tomcat'in webapps klasörüne aktarın.
Şimdi, Tomcat sunucusunu başlatın ve standart bir tarayıcı kullanarak webapps klasöründen diğer web sayfalarına erişip erişemeyeceğimizden emin olun. URL'ye bir POST isteğinde bulunun - http: // localhost: 8080 / countryService / ve herhangi bir SOAP istemcisi kullanarak aşağıdaki isteği yapın.
<x:Envelope xmlns:x = "http://schemas.xmlsoap.org/soap/envelope/"
   xmlns:tns = "http://tutorialspoint/schemas">
   <x:Header/>
   <x:Body>
      <tns:getCountryRequest>
         <tns:name>United States</tns:name>
      </tns:getCountryRequest>
   </x:Body>
</x:Envelope>
Aşağıdaki sonucu göreceksiniz.
<SOAP-ENV:Envelope xmlns:SOAP-ENV = "http://schemas.xmlsoap.org/soap/envelope/">
   <SOAP-ENV:Header/>
   <SOAP-ENV:Body>
      <ns2:getCountryResponse xmlns:ns2 = "http://tutorialspoint/schemas">
         <ns2:country>
            <ns2:name>United States</ns2:name>
            <ns2:population>46704314</ns2:population>
            <ns2:capital>Washington</ns2:capital>
            <ns2:currency>USD</ns2:currency>
         </ns2:country>
      </ns2:getCountryResponse>
   </SOAP-ENV:Body>
</SOAP-ENV:Envelope>
Bu bölümde, Spring WS kullanılarak oluşturulan bir web uygulama hizmetinin birim testinin nasıl yapıldığını anlayacağız.
| Adım | Açıklama |
|---|---|
| 1 | Spring WS - Yazma Sunucusu bölümünde oluşturulan proje ülke hizmetini güncelleyin. Src / test / java klasörünü ekleyin. |
| 2 | - src / test / java / com / tutorialspoint / ws klasörü altında CustomerEndPointTest.java'yı oluşturun ve ardından POM.xml'yi aşağıda açıklandığı gibi güncelleyin. |
| 3 | Src / main / resources alt klasörünün altına spring-context.xml ekleyin. |
| 4 | Son adım, tüm kaynak ve yapılandırma dosyaları için içerik oluşturmak ve uygulamayı aşağıda açıklandığı gibi test etmektir. |
POM.xml
<?xml version = "1.0" encoding = "UTF-8"?>
<project xmlns = "http://maven.apache.org/POM/4.0.0"
   xmlns:xsi = "http://www.w3.org/2001/XMLSchema-instance"
   xsi:schemaLocation = "http://maven.apache.org/POM/4.0.0
   http://maven.apache.org/maven-v4_0_0.xsd">

   <modelVersion>4.0.0</modelVersion>
   <groupId>com.tutorialspoint</groupId>
   <artifactId>countryService</artifactId>
   <packaging>war</packaging>
   <version>1.0-SNAPSHOT</version>
   <name>countryService Spring-WS Application</name>
   <url>http://www.springframework.org/spring-ws</url>
   <build>
      <finalName>countryService</finalName>
   </build>

   <dependencies>
      <dependency>
         <groupId>org.springframework.ws</groupId>
         <artifactId>spring-ws-core</artifactId>
         <version>2.4.0.RELEASE</version>
      </dependency>

      <dependency>
         <groupId>org.springframework</groupId>
         <artifactId>spring-test</artifactId>
         <version>2.5</version>
      </dependency>

      <dependency>
         <groupId>org.springframework.ws</groupId>
         <artifactId>spring-ws-test</artifactId>
         <version>2.4.0.RELEASE</version>
      </dependency>

      <dependency>
         <groupId>org.springframework</groupId>
         <artifactId>spring-tx</artifactId>
         <version>3.1.2.RELEASE</version>
      </dependency>

      <dependency>
         <groupId>jdom</groupId>
         <artifactId>jdom</artifactId>
         <version>1.0</version>
      </dependency>

      <dependency>
         <groupId>jaxen</groupId>
         <artifactId>jaxen</artifactId>
         <version>1.1</version>
      </dependency>

      <dependency>
         <groupId>wsdl4j</groupId>
         <artifactId>wsdl4j</artifactId>
         <version>1.6.2</version>
      </dependency>

      <dependency>
         <groupId>junit</groupId>
         <artifactId>junit</artifactId>
         <version>4.5</version>
         <scope>test</scope>
      </dependency>
   </dependencies>
</project>
spring-context.xml
<beans xmlns = "http://www.springframework.org/schema/beans"
   xmlns:xsi = "http://www.w3.org/2001/XMLSchema-instance"
   xmlns:context = "http://www.springframework.org/schema/context"
   xmlns:sws = "http://www.springframework.org/schema/web-services"
   xsi:schemaLocation = "http://www.springframework.org/schema/beans

   http://www.springframework.org/schema/beans/spring-beans-3.0.xsd
   http://www.springframework.org/schema/web-services
   http://www.springframework.org/schema/web-services/web-services-2.0.xsd
   http://www.springframework.org/schema/context
   http://www.springframework.org/schema/context/spring-context-3.0.xsd">

   <context:component-scan base-package = "com.tutorialspoint"/>
   <sws:annotation-driven/>

   <bean id = "schema" class = "org.springframework.core.io.ClassPathResource">
      <constructor-arg index = "0" value = "countries.xsd" />
   </bean>
</beans>
CustomerEndPointTest.java
package com.tutorialspoint.ws;

import javax.xml.transform.Source;

import org.junit.Before;
import org.junit.Test;
import org.junit.runner.RunWith;

import org.springframework.beans.factory.annotation.Autowired;
import org.springframework.beans.factory.xml.XmlBeanDefinitionReader;
import org.springframework.context.ApplicationContext;
import org.springframework.context.support.GenericApplicationContext;
import org.springframework.test.context.ContextConfiguration;
import org.springframework.test.context.junit4.SpringJUnit4ClassRunner;
import org.springframework.ws.test.server.MockWebServiceClient;
import org.springframework.xml.transform.StringSource;

import static org.springframework.ws.test.server.RequestCreators.withPayload;
import static org.springframework.ws.test.server.ResponseMatchers.payload;

@RunWith(SpringJUnit4ClassRunner.class)
@ContextConfiguration( locations = "/spring-context.xml" )
public class CustomerEndPointTest {
   @Autowired
   private ApplicationContext applicationContext;
   private MockWebServiceClient mockClient;

   @Before
   public void createClient() {
      mockClient = MockWebServiceClient.createClient(applicationContext);
      GenericApplicationContext ctx = (GenericApplicationContext) applicationContext;
      final XmlBeanDefinitionReader definitionReader = new XmlBeanDefinitionReader(ctx);
      definitionReader.setValidationMode(XmlBeanDefinitionReader.VALIDATION_NONE);
      definitionReader.setNamespaceAware(true);
   }
   @Test
   public void testCountryEndpoint() throws Exception {
      Source requestPayload = new StringSource(
         "<getCountryRequest xmlns = 'http://tutorialspoint/schemas'>"+
         "<name>United States</name>"+
         "</getCountryRequest>");
      Source responsePayload = new StringSource(
         "<getCountryResponse xmlns='http://tutorialspoint/schemas'>" +
         "<country>" +
         "<name>United States</name>"+
         "<population>46704314</population>"+
         "<capital>Washington</capital>"+
         "<currency>USD</currency>"+
         "</country>"+
         "</getCountryResponse>");
      mockClient.sendRequest(withPayload(requestPayload)).andExpect(payload(responsePayload));
   }
}
Projeyi Oluşturun
Komut konsolunu açalım, C: \ MVN \ countryService dizinine gidelim ve aşağıdaki mvn komutunu uygulayalım.
C:\MVN\countryService>mvn testMaven projeyi inşa etmeye ve test etmeye başlayacak.
[INFO] Scanning for projects...
[INFO]
[INFO] ------------------------------------------------------------------------
[INFO] Building countryService Spring-WS Application 1.0-SNAPSHOT
[INFO] ------------------------------------------------------------------------
[INFO]
[INFO] --- maven-resources-plugin:2.6:resources (default-resources) @ countrySer
vice ---
[WARNING] Using platform encoding (Cp1252 actually) to copy filtered resources,
i.e. build is platform dependent!
[INFO] Copying 2 resources
[INFO]
[INFO] --- maven-compiler-plugin:3.1:compile (default-compile) @ countryService
---
[INFO] Nothing to compile - all classes are up to date
[INFO]
[INFO] --- maven-resources-plugin:2.6:testResources (default-testResources) @ co
untryService ---
[WARNING] Using platform encoding (Cp1252 actually) to copy filtered resources,
i.e. build is platform dependent!
[INFO] skip non existing resourceDirectory C:\MVN\countryService\src\test\resour
ces
[INFO]
[INFO] --- maven-compiler-plugin:3.1:testCompile (default-testCompile) @ country
Service ---
[INFO] Nothing to compile - all classes are up to date
[INFO]
[INFO] --- maven-surefire-plugin:2.12.4:test (default-test) @ countryService ---

[INFO] Surefire report directory: C:\MVN\countryService\target\surefire-reports

-------------------------------------------------------
 T E S T S
-------------------------------------------------------
Running com.tutorialspoint.ws.CustomerEndPointTest
Feb 27, 2017 11:49:30 AM org.springframework.test.context.TestContextManager ret
rieveTestExecutionListeners
INFO: @TestExecutionListeners is not present for class [class com.tutorialspoint
.ws.CustomerEndPointTest]: using defaults.
Feb 27, 2017 11:49:30 AM org.springframework.beans.factory.xml.XmlBeanDefinition
Reader loadBeanDefinitions
INFO: Loading XML bean definitions from class path resource [spring-context.xml]

Feb 27, 2017 11:49:30 AM org.springframework.context.support.GenericApplicationC
ontext prepareRefresh
INFO: Refreshing org.springframework.context.support.GenericApplicationContext@b
2eddc0: startup date [Mon Feb 27 11:49:30 IST 2017]; root of context hierarchy
Feb 27, 2017 11:49:31 AM org.springframework.ws.soap.addressing.server.Annotatio
nActionEndpointMapping afterPropertiesSet
INFO: Supporting [WS-Addressing August 2004, WS-Addressing 1.0]
Feb 27, 2017 11:49:31 AM org.springframework.ws.soap.saaj.SaajSoapMessageFactory
 afterPropertiesSet
INFO: Creating SAAJ 1.3 MessageFactory with SOAP 1.1 Protocol
Tests run: 1, Failures: 0, Errors: 0, Skipped: 0, Time elapsed: 1.386 sec
Feb 27, 2017 11:49:31 AM org.springframework.context.support.GenericApplicationC
ontext doClose
INFO: Closing org.springframework.context.support.GenericApplicationContext@b2ed
dc0: startup date [Mon Feb 27 11:49:30 IST 2017]; root of context hierarchy

Results :

Tests run: 1, Failures: 0, Errors: 0, Skipped: 0

[INFO] ------------------------------------------------------------------------
[INFO] BUILD SUCCESS
[INFO] ------------------------------------------------------------------------
[INFO] Total time: 3.517 s
[INFO] Finished at: 2017-02-27T11:49:31+05:30
[INFO] Final Memory: 11M/109M
[INFO] ------------------------------------------------------------------------
Bu bölümde, Spring WS kullanılarak Spring WS - Writing Server'da oluşturulan web uygulama sunucusu için bir istemcinin nasıl oluşturulacağını öğreneceğiz .
| Adım | Açıklama |
|---|---|
| 1 | Spring WS - Yazma Sunucusu bölümünde açıklandığı gibi com.tutorialspoint paketi altında proje countryService'i güncelleyin. |
| 2 | Aşağıdaki adımlarda açıklandığı gibi com.tutorialspoint paketi altında com.tutorialspoint.client ve MainApp.java paketi altında CountryServiceClient.java oluşturun. |
CountryServiceClient.java
package com.tutorialspoint.client;

import org.springframework.ws.client.core.support.WebServiceGatewaySupport;
import com.tutorialspoint.GetCountryRequest;
import com.tutorialspoint.GetCountryResponse;

public class CountryServiceClient extends WebServiceGatewaySupport {
   public GetCountryResponse getCountryDetails(String country){
      String uri = "http://localhost:8080/countryService/";
      GetCountryRequest request = new GetCountryRequest();
      request.setName(country);

      GetCountryResponse response =(GetCountryResponse) getWebServiceTemplate()
         .marshalSendAndReceive(uri, request);
      return response;
   }
}
MainApp.java
package com.tutorialspoint;

import org.springframework.oxm.jaxb.Jaxb2Marshaller;
import com.tutorialspoint.client.CountryServiceClient;

public class MainApp {
   public static void main(String[] args) {
      CountryServiceClient client = new CountryServiceClient();
      Jaxb2Marshaller marshaller = new Jaxb2Marshaller();
      marshaller.setContextPath("com.tutorialspoint");
      client.setMarshaller(marshaller);
      client.setUnmarshaller(marshaller);
      GetCountryResponse response = client.getCountryDetails("United States");

      System.out.println("Country : " + response.getCountry().getName());
      System.out.println("Capital : " + response.getCountry().getCapital());
      System.out.println("Population : " + response.getCountry().getPopulation());
      System.out.println("Currency : " + response.getCountry().getCurrency());
   }
}
Web Hizmetini Başlatın
Tomcat sunucusunu başlatın ve diğer web sayfalarına webapps klasöründen standart bir tarayıcı kullanarak erişebildiğimizden emin olun.
Web Hizmeti İstemcisini Test Edin
Eclipse altındaki uygulamanızda MainApp.java'ya sağ tıklayın ve run as Java Applicationkomut. Uygulamayla ilgili her şey yolundaysa, aşağıdaki mesajı yazdıracaktır.
Country : United States
Capital : Washington
Population : 46704314
Currency : USD
Burada bir Müşteri oluşturduk - CountryServiceClient.javaSOAP tabanlı web hizmeti için. MainApp, web hizmetine bir erişim sağlamak için CountryServiceClient kullanır, gönderi talebinde bulunur ve verileri alır.
Bu bölümde, Spring WS - Yazma İstemcisinde oluşturulan bir istemcinin, Spring WS - Yazma Sunucusu bölümünde Spring WS kullanılarak oluşturulan web uygulama sunucusu için birim testinin nasıl yapıldığını öğreneceğiz .
| Adım | Açıklama |
|---|---|
| 1 | Spring WS - Yazma Sunucusu bölümünde açıklandığı gibi com.tutorialspoint paketi altında proje countryService'i güncelleyin. |
| 2 | CountryServiceClientTest.java paketini com.tutorialspoint paketi altında SRC → Test → Java klasörü altında aşağıda verilen adımlarda açıklandığı gibi oluşturun. |
CountryServiceClientTest.java
package com.tutorialspoint;

import static org.junit.Assert.*;

import org.junit.Assert;
import org.junit.Before;
import org.junit.Test;
import org.springframework.oxm.jaxb.Jaxb2Marshaller;

import com.tutorialspoint.client.CountryServiceClient;

public class CountryServiceClientTest {
   CountryServiceClient client;

   @Before
   public void setUp() throws Exception {
      client = new CountryServiceClient();
      Jaxb2Marshaller marshaller = new Jaxb2Marshaller();
      marshaller.setContextPath("com.tutorialspoint");
      client.setMarshaller(marshaller);
      client.setUnmarshaller(marshaller);
   }
   @Test
   public void test() {
      GetCountryResponse response = client.getCountryDetails("United States");
      Country expectedCountry = new Country();
      expectedCountry.setCapital("Washington");
      Country actualCountry = response.getCountry();
      Assert.assertEquals(expectedCountry.getCapital(), actualCountry.getCapital());
   }
}
Web Hizmetini Başlatın
Tomcat sunucusunu başlatın ve diğer web sayfalarına standart bir tarayıcı kullanarak webapps klasöründen erişebildiğimizden emin olun.
Birim Testi Web Hizmeti İstemcisi
Komut konsolunu açalım, C: \ MVN \ countryService dizinine gidelim ve aşağıdaki mvn komutunu uygulayalım.
C:\MVN\countryService>mvn testMaven projeyi oluşturmaya ve test etmeye başlayacak.
[INFO] Scanning for projects...
[INFO]
[INFO] ------------------------------------------------------------------------
[INFO] Building countryService Spring-WS Application 1.0-SNAPSHOT
[INFO] ------------------------------------------------------------------------
[INFO]
[INFO] --- maven-resources-plugin:2.6:resources (default-resources) @ countrySer
vice ---
[WARNING] Using platform encoding (Cp1252 actually) to copy filtered resources,
i.e. build is platform dependent!
[INFO] Copying 2 resources
[INFO]
[INFO] --- maven-compiler-plugin:3.1:compile (default-compile) @ countryService
---
[INFO] Changes detected - recompiling the module!
[WARNING] File encoding has not been set, using platform encoding Cp1252, i.e. b
uild is platform dependent!
[INFO] Compiling 10 source files to C:\MVN\countryService\target\classes
[INFO]
[INFO] --- maven-resources-plugin:2.6:testResources (default-testResources) @ co
untryService ---
[WARNING] Using platform encoding (Cp1252 actually) to copy filtered resources,
i.e. build is platform dependent!
[INFO] skip non existing resourceDirectory C:\MVN\countryService\src\test\resour
ces
[INFO]
[INFO] --- maven-compiler-plugin:3.1:testCompile (default-testCompile) @ country
Service ---
[INFO] Changes detected - recompiling the module!
[WARNING] File encoding has not been set, using platform encoding Cp1252, i.e. b
uild is platform dependent!
[INFO] Compiling 2 source files to C:\MVN\countryService\target\test-classes
[INFO]
[INFO] --- maven-surefire-plugin:2.12.4:test (default-test) @ countryService ---

[INFO] Surefire report directory: C:\MVN\countryService\target\surefire-reports

-------------------------------------------------------
 T E S T S
-------------------------------------------------------
Running com.tutorialspoint.CountryServiceClientTest
Feb 27, 2017 8:45:26 PM org.springframework.ws.soap.saaj.SaajSoapMessageFactory
afterPropertiesSet
INFO: Creating SAAJ 1.3 MessageFactory with SOAP 1.1 Protocol
Feb 27, 2017 8:45:26 PM org.springframework.oxm.jaxb.Jaxb2Marshaller createJaxbC
ontextFromContextPath
INFO: Creating JAXBContext with context path [com.tutorialspoint]
Tests run: 1, Failures: 0, Errors: 0, Skipped: 0, Time elapsed: 0.457 sec
Running com.tutorialspoint.ws.CustomerEndPointTest
Feb 27, 2017 8:45:27 PM org.springframework.test.context.TestContextManager retr
ieveTestExecutionListeners
INFO: @TestExecutionListeners is not present for class [class com.tutorialspoint
.ws.CustomerEndPointTest]: using defaults.
Feb 27, 2017 8:45:27 PM org.springframework.beans.factory.xml.XmlBeanDefinitionR
eader loadBeanDefinitions
INFO: Loading XML bean definitions from class path resource [spring-context.xml]

Feb 27, 2017 8:45:27 PM org.springframework.context.support.GenericApplicationCo
ntext prepareRefresh
INFO: Refreshing org.springframework.context.support.GenericApplicationContext@5
17c642: startup date [Mon Feb 27 20:45:27 IST 2017]; root of context hierarchy
Feb 27, 2017 8:45:28 PM org.springframework.ws.soap.addressing.server.Annotation
ActionEndpointMapping afterPropertiesSet
INFO: Supporting [WS-Addressing August 2004, WS-Addressing 1.0]
Feb 27, 2017 8:45:28 PM org.springframework.ws.soap.saaj.SaajSoapMessageFactory
afterPropertiesSet
INFO: Creating SAAJ 1.3 MessageFactory with SOAP 1.1 Protocol
Tests run: 1, Failures: 0, Errors: 0, Skipped: 0, Time elapsed: 1.243 sec
Feb 27, 2017 8:45:28 PM org.springframework.context.support.GenericApplicationCo
ntext doClose
INFO: Closing org.springframework.context.support.GenericApplicationContext@517c
642: startup date [Mon Feb 27 20:45:27 IST 2017]; root of context hierarchy

Results :

Tests run: 2, Failures: 0, Errors: 0, Skipped: 0

[INFO] ------------------------------------------------------------------------
[INFO] BUILD SUCCESS
[INFO] ------------------------------------------------------------------------
[INFO] Total time: 5.686 s
[INFO] Finished at: 2017-02-27T20:45:28+05:30
[INFO] Final Memory: 17M/173M
[INFO] ------------------------------------------------------------------------