Spring Boot - Nền tảng đám mây của Google
Google Cloud Platform cung cấp dịch vụ điện toán đám mây chạy ứng dụng Spring Boot trong môi trường đám mây. Trong chương này, chúng ta sẽ xem cách triển khai ứng dụng Spring Boot trong nền tảng công cụ ứng dụng GCP.
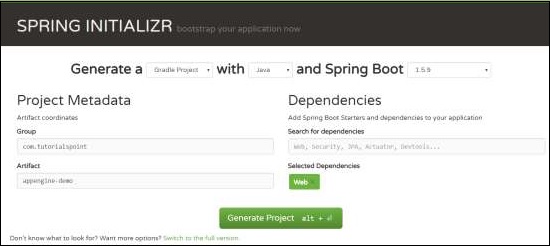
Đầu tiên, hãy tải xuống ứng dụng Gradle build Spring Boot từ trang Spring Initializer www.start.spring.io . Quan sát ảnh chụp màn hình sau.

Bây giờ, trong tệp build.gradle, hãy thêm plugin Google Cloud appengine và sự phụ thuộc vào appengine classpath.
Mã cho tệp build.gradle được cung cấp bên dưới:
buildscript {
   ext {
      springBootVersion = '1.5.9.RELEASE'
   }
   repositories {
      mavenCentral()
   }
   dependencies {
      classpath("org.springframework.boot:spring-boot-gradle-plugin:${springBootVersion}")
      classpath 'com.google.cloud.tools:appengine-gradle-plugin:1.3.3'
   }
}

apply plugin: 'java'
apply plugin: 'eclipse'
apply plugin: 'org.springframework.boot'
apply plugin: 'com.google.cloud.tools.appengine'

group = 'com.tutorialspoint'
version = '0.0.1-SNAPSHOT'
sourceCompatibility = 1.8

repositories {
   mavenCentral()
}
dependencies {
   compile('org.springframework.boot:spring-boot-starter-web')
   testCompile('org.springframework.boot:spring-boot-starter-test')
}
Bây giờ, hãy viết một Điểm cuối HTTP đơn giản và nó trả về chuỗi thành công như được hiển thị:
package com.tutorialspoint.appenginedemo;

import org.springframework.boot.SpringApplication;
import org.springframework.boot.autoconfigure.SpringBootApplication;
import org.springframework.web.bind.annotation.RequestMapping;
import org.springframework.web.bind.annotation.RestController;

@SpringBootApplication
@RestController
public class AppengineDemoApplication {
   public static void main(String[] args) {
      SpringApplication.run(AppengineDemoApplication.class, args);
   }
   @RequestMapping(value = "/")
   public String success() {
      return "APP Engine deployment success";
   }
}
Tiếp theo, thêm tệp app.yml vào thư mục src / main / appengine như hình -
runtime: java
env: flex

handlers:
- url: /.*
   script: this field is required, but ignored
Bây giờ, hãy chuyển đến bảng điều khiển Google Cloud và nhấp vào kích hoạt Google cloud shell ở đầu trang.

Bây giờ, hãy di chuyển tệp nguồn và tệp Gradle của bạn vào thư mục chính của máy đám mây google của bạn bằng cách sử dụng google cloud shell.

Bây giờ, hãy thực thi lệnh gradle appengineDeploy và nó sẽ triển khai ứng dụng của bạn vào ứng dụng Google Cloud.
Note - GCP phải được bật tính năng thanh toán và trước khi triển khai ứng dụng của bạn vào appengine, bạn nên tạo nền tảng appengine trong GCP.
Sẽ mất vài phút để triển khai ứng dụng của bạn vào nền tảng ứng dụng GCP.
Sau khi xây dựng thành công, bạn có thể thấy URL dịch vụ trong cửa sổ bảng điều khiển.

Bây giờ, hãy nhấn vào URL dịch vụ và xem kết quả.

Google Cloud SQL
Để kết nối Google Cloud SQL với ứng dụng Spring Boot của bạn, bạn nên thêm các thuộc tính sau vào tệp application.properties của mình.
Định dạng URL JDBC
jdbc:mysql://google/<DATABASE-NAME>?cloudSqlInstance = <GOOGLE_CLOUD_SQL_INSTANCE_NAME> &socketFactory = com.google.cloud.sql.mysql.SocketFactory&user = <USERNAME>&password = <PASSWORD>Note - Ứng dụng Spring Boot và Google Cloud SQL phải nằm trong cùng một dự án GCP.
Tệp application.properties được cung cấp bên dưới.
spring.dbProductService.driverClassName = com.mysql.jdbc.Driver
spring.dbProductService.url = jdbc:mysql://google/PRODUCTSERVICE?cloudSqlInstance = springboot-gcp-cloudsql:asia-northeast1:springboot-gcp-cloudsql-instance&socketFactory = com.google.cloud.sql.mysql.SocketFactory&user = root&password = rootspring.dbProductService.username = root

spring.dbProductService.password = root
spring.dbProductService.testOnBorrow = true
spring.dbProductService.testWhileIdle = true
spring.dbProductService.timeBetweenEvictionRunsMillis = 60000
spring.dbProductService.minEvictableIdleTimeMillis = 30000
spring.dbProductService.validationQuery = SELECT 1
spring.dbProductService.max-active = 15
spring.dbProductService.max-idle = 10
spring.dbProductService.max-wait = 8000
Người dùng tệp YAML có thể thêm các thuộc tính dưới đây vào tệp application.yml của bạn.
spring:
   datasource:
      driverClassName: com.mysql.jdbc.Driver
      url: "jdbc:mysql://google/PRODUCTSERVICE?cloudSqlInstance=springboot-gcp-cloudsql:asia-northeast1:springboot-gcp-cloudsql-instance&socketFactory=com.google.cloud.sql.mysql.SocketFactory&user=root&password=root"
      password: "root"
      username: "root"
      testOnBorrow: true
      testWhileIdle: true
      validationQuery: SELECT 1

      max-active: 15
      max-idle: 10
      max-wait: 8000