GWT - JUnit एकीकरण
GWT JUnit टेस्टिंग फ्रेमवर्क का उपयोग करके क्लाइंट साइड कोड के स्वचालित परीक्षण के लिए निष्पादन योग्य सहायता प्रदान करता है। इस लेख में हम GWT और JUNIT एकीकरण प्रदर्शित करेंगे।
डाउनलोड करें
JUnit आधिकारिक साइट - https://www.junit.org
डाउनलोड Junit-4.10.jar
| ओएस | संग्रह का नाम |
|---|---|
| खिड़कियाँ | junit4.10.jar |
| लिनक्स | junit4.10.jar |
| मैक | junit4.10.jar |
डाउनलोड किए गए जार फ़ाइल को अपने कंप्यूटर पर कुछ स्थान पर संग्रहीत करें। हमने इसे स्टोर कर लिया हैC:/ > JUNIT
GWT स्थापना फ़ोल्डर का पता लगाएँ
| ओएस | GWT स्थापना फ़ोल्डर |
|---|---|
| खिड़कियाँ | C: \ GWT \ gwt-2.1.0 |
| लिनक्स | /usr/local/GWT/gwt-2.1.0 |
| मैक | /Library/GWT/gwt-2.1.0 |
GWTTestCase Class
GWT प्रदान करता है GWTTestCaseआधार वर्ग जो JUnit एकीकरण प्रदान करता है। एक संकलित वर्ग को चलाना जो JUnit के तहत GWTTestCase का विस्तार करता है, HtmlUnit ब्राउज़र लॉन्च करता है जो परीक्षण निष्पादन के दौरान आपके एप्लिकेशन व्यवहार का अनुकरण करने का कार्य करता है।
GWTTestCase JUnit के TestCase से एक व्युत्पन्न वर्ग है और इसे JUnit TestRunner का उपयोग करके चलाया जा सकता है।
WebAppCreator का उपयोग करना
GWT एक विशेष कमांड लाइन उपकरण प्रदान करता है webAppCreator जो हमारे लिए एक स्टार्टर टेस्ट केस उत्पन्न कर सकता है, प्लस एंट टारगेट और एक्लिप्स लॉन्च दोनों विकास मोड और उत्पादन मोड में परीक्षण के लिए कॉन्फ़िगर करता है।
कमांड प्रॉम्प्ट खोलें और पर जाएं C:\ > GWT_WORKSPACE > जहाँ आप परीक्षण समर्थन के साथ एक नई परियोजना बनाना चाहते हैं
C:\GWT_WORKSPACE>C:\GWT\gwt-2.1.0\webAppCreator
   -out HelloWorld
   -junit C:\JUNIT\junit-4.10.jar
   com.tutorialspoint.HelloWorld
उल्लेखनीय अंक
- हम webAppCreator कमांड लाइन उपयोगिता निष्पादित कर रहे हैं।
- HelloWorld प्रोजेक्ट बनाने का नाम है
- -जूनिट ऑप्शन webAppCreator को प्रोजेक्ट में जूनियर सपोर्ट जोड़ने का निर्देश देता है
- com.tutorialspoint.HelloWorld मॉड्यूल का नाम है
आउटपुट सत्यापित करें।
Created directory HelloWorld\src
Created directory HelloWorld\war
Created directory HelloWorld\war\WEB-INF
Created directory HelloWorld\war\WEB-INF\lib
Created directory HelloWorld\src\com\tutorialspoint
Created directory HelloWorld\src\com\tutorialspoint\client
Created directory HelloWorld\src\com\tutorialspoint\server
Created directory HelloWorld\src\com\tutorialspoint\shared
Created directory HelloWorld\test\com\tutorialspoint
Created directory HelloWorld\test\com\tutorialspoint\client
Created file HelloWorld\src\com\tutorialspoint\HelloWorld.gwt.xml
Created file HelloWorld\war\HelloWorld.html
Created file HelloWorld\war\HelloWorld.css
Created file HelloWorld\war\WEB-INF\web.xml
Created file HelloWorld\src\com\tutorialspoint\client\HelloWorld.java
Created file
HelloWorld\src\com\tutorialspoint\client\GreetingService.java
Created file
HelloWorld\src\com\tutorialspoint\client\GreetingServiceAsync.java
Created file
HelloWorld\src\com\tutorialspoint\server\GreetingServiceImpl.java
Created file HelloWorld\src\com\tutorialspoint\shared\FieldVerifier.java
Created file HelloWorld\build.xml
Created file HelloWorld\README.txt
Created file HelloWorld\test\com\tutorialspoint\HelloWorldJUnit.gwt.xml
Created file HelloWorld\test\com\tutorialspoint\client\HelloWorldTest.java
Created file HelloWorld\.project
Created file HelloWorld\.classpath
Created file HelloWorld\HelloWorld.launch
Created file HelloWorld\HelloWorldTest-dev.launch
Created file HelloWorld\HelloWorldTest-prod.launch
परीक्षण वर्ग को समझना: HelloWorldTest.java
package com.tutorialspoint.client;

import com.tutorialspoint.shared.FieldVerifier;
import com.google.gwt.core.client.GWT;
import com.google.gwt.junit.client.GWTTestCase;
import com.google.gwt.user.client.rpc.AsyncCallback;
import com.google.gwt.user.client.rpc.ServiceDefTarget;

/**
 * GWT JUnit tests must extend GWTTestCase.
 */
public class HelloWorldTest extends GWTTestCase {

   /**
    * must refer to a valid module that sources this class.
    */
   public String getModuleName() {
      return "com.tutorialspoint.HelloWorldJUnit";
   }

   /**
    * tests the FieldVerifier.
    */
   public void testFieldVerifier() {
      assertFalse(FieldVerifier.isValidName(null));
      assertFalse(FieldVerifier.isValidName(""));
      assertFalse(FieldVerifier.isValidName("a"));
      assertFalse(FieldVerifier.isValidName("ab"));
      assertFalse(FieldVerifier.isValidName("abc"));
      assertTrue(FieldVerifier.isValidName("abcd"));
   }

   /**
    * this test will send a request to the server using the greetServer
    *  method in GreetingService and verify the response.
    */
   public void testGreetingService() {
      /* create the service that we will test. */
      GreetingServiceAsync greetingService =
      GWT.create(GreetingService.class);
      ServiceDefTarget target = (ServiceDefTarget) greetingService;
      target.setServiceEntryPoint(GWT.getModuleBaseURL()
      + "helloworld/greet");

      /* since RPC calls are asynchronous, we will need to wait
       for a response after this test method returns. This line
       tells the test runner to wait up to 10 seconds
       before timing out. */
      delayTestFinish(10000);

      /* send a request to the server. */
      greetingService.greetServer("GWT User",
         new AsyncCallback<String>() {
         public void onFailure(Throwable caught) {
            /* The request resulted in an unexpected error. */
            fail("Request failure: " + caught.getMessage());
         }

         public void onSuccess(String result) {
            /* verify that the response is correct. */
            assertTrue(result.startsWith("Hello, GWT User!"));

            /* now that we have received a response, we need to
             tell the test runner that the test is complete.
             You must call finishTest() after an asynchronous test
             finishes successfully, or the test will time out.*/
            finishTest();
         }
      });
   }
}
उल्लेखनीय अंक
| अनु क्रमांक। | ध्यान दें |
|---|---|
| 1 | HelloWorldTest क्लास को HelloWorld / परीक्षण निर्देशिका के तहत com.tutorialspoint.client पैकेज में जनरेट किया गया था। |
| 2 | HelloWorldTest क्लास में HelloWorld के लिए यूनिट टेस्ट केस होंगे। |
| 3 | HelloWorldTest वर्ग GWTTestCase क्लास को com.google.gwt.junit.clit पैकेज में विस्तारित करता है। |
| 4 | HelloWorldTest वर्ग में एक अमूर्त विधि (getModuleName) है जिसे GWT मॉड्यूल का नाम वापस करना होगा। HelloWorld के लिए, यह com.tutorialspoint.HelloWorldJUnit है। |
| 5 | HelloWorldTest वर्ग दो नमूना परीक्षण मामलों के साथ उत्पन्न होता है TestFieldVerifier, testSimple। हमने testGreetingService जोड़ा है। |
| 6 | ये विधियाँ कई जोरदार कार्यों में से एक का उपयोग करती हैं * जो कि JUnit Assert वर्ग से विरासत में मिला है, जो GWTTestCase का पूर्वज है। |
| 7 | मुखर (बूलियन) फ़ंक्शन का दावा है कि बूलियन तर्क सत्य के मूल्यांकन में पारित हुआ। यदि नहीं, तो JUnit में चलाने पर परीक्षण विफल हो जाएगा। |
GWT - JUnit एकीकरण पूरा उदाहरण
यह उदाहरण आपको GWT में JUnit इंटीग्रेशन का उदाहरण दिखाने के लिए सरल चरणों के माध्यम से ले जाएगा।
ऊपर दिए गए GWT एप्लिकेशन को अपडेट करने के लिए निम्नलिखित चरणों का पालन करें -
| कदम | विवरण |
|---|---|
| 1 | आयात मौजूदा परियोजना विज़ार्ड (फ़ाइल → आयात → सामान्य → कार्यक्षेत्र में मौजूदा परियोजनाओं) का उपयोग करके ग्रहण में एक नाम HelloWorld के साथ परियोजना का आयात करें। |
| 2 | HelloWorld.gwt.xml , HelloWorld.css , HelloWorld.html और HelloWorld.java को नीचे बताए अनुसार संशोधित करें। बाकी फाइलों को अपरिवर्तित रखें। |
| 3 | लागू तर्क के परिणाम को सत्यापित करने के लिए एप्लिकेशन को संकलित करें और चलाएं। |
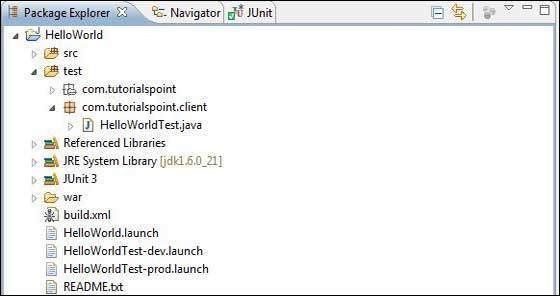
इसके बाद ग्रहण में परियोजना की संरचना होगी।

निम्नलिखित संशोधित मॉड्यूल विवरणक की सामग्री है src/com.tutorialspoint/HelloWorld.gwt.xml।
<?xml version = "1.0" encoding = "UTF-8"?>
<module rename-to = 'helloworld'>
   <!-- Inherit the core Web Toolkit stuff.                        -->
   <inherits name = 'com.google.gwt.user.User'/>

   <!-- Inherit the default GWT style sheet.                       -->
   <inherits name = 'com.google.gwt.user.theme.clean.Clean'/>
   <!-- Inherit the UiBinder module.                               -->
   <inherits name = "com.google.gwt.uibinder.UiBinder"/>
   <!-- Specify the app entry point class.                         -->
   <entry-point class = 'com.tutorialspoint.client.HelloWorld'/>

   <!-- Specify the paths for translatable code                    -->
   <source path = 'client'/>
   <source path = 'shared'/>

</module>
निम्नलिखित संशोधित स्टाइल शीट फ़ाइल की सामग्री है war/HelloWorld.css।
body {
   text-align: center;
   font-family: verdana, sans-serif;
}

h1 {
   font-size: 2em;
   font-weight: bold;
   color: #777777;
   margin: 40px 0px 70px;
   text-align: center;
}
निम्नलिखित संशोधित HTML होस्ट फ़ाइल की सामग्री है war/HelloWorld.html।
<html>
   <head>
      <title>Hello World</title>
      <link rel = "stylesheet" href = "HelloWorld.css"/>
      <script language = "javascript" src = "helloworld/helloworld.nocache.js">
      </script>
   </head>

   <body>
      <h1>JUnit Integration Demonstration</h1>
      <div id = "gwtContainer"></div>
   </body>
</html>
में HelloWorld.java की सामग्री को बदलें src/com.tutorialspoint/client निम्नलिखित के साथ पैकेज
package com.tutorialspoint.client;

import com.google.gwt.core.client.EntryPoint;

import com.google.gwt.core.client.GWT;
import com.google.gwt.event.dom.client.ClickEvent;
import com.google.gwt.event.dom.client.ClickHandler;
import com.google.gwt.event.dom.client.KeyCodes;
import com.google.gwt.event.dom.client.KeyUpEvent;
import com.google.gwt.event.dom.client.KeyUpHandler;

import com.google.gwt.user.client.Window;
import com.google.gwt.user.client.rpc.AsyncCallback;
import com.google.gwt.user.client.ui.Button;
import com.google.gwt.user.client.ui.DecoratorPanel;
import com.google.gwt.user.client.ui.HasHorizontalAlignment;
import com.google.gwt.user.client.ui.HorizontalPanel;
import com.google.gwt.user.client.ui.Label;
import com.google.gwt.user.client.ui.RootPanel;
import com.google.gwt.user.client.ui.TextBox;
import com.google.gwt.user.client.ui.VerticalPanel;

public class HelloWorld implements EntryPoint {

   public void onModuleLoad() {
      /*create UI */
      final TextBox txtName = new TextBox();
      txtName.setWidth("200");
      txtName.addKeyUpHandler(new KeyUpHandler() {
         @Override
         public void onKeyUp(KeyUpEvent event) {
            if(event.getNativeKeyCode() == KeyCodes.KEY_ENTER){
               Window.alert(getGreeting(txtName.getValue()));
            }
         }
      });
      Label lblName = new Label("Enter your name: ");

      Button buttonMessage = new Button("Click Me!");

      buttonMessage.addClickHandler(new ClickHandler() {
         @Override
         public void onClick(ClickEvent event) {
            Window.alert(getGreeting(txtName.getValue()));
         }
      });

      HorizontalPanel hPanel = new HorizontalPanel();
      hPanel.add(lblName);
      hPanel.add(txtName);
      hPanel.setCellWidth(lblName, "130");

      VerticalPanel vPanel = new VerticalPanel();
      vPanel.setSpacing(10);
      vPanel.add(hPanel);
      vPanel.add(buttonMessage);
      vPanel.setCellHorizontalAlignment(buttonMessage,
      HasHorizontalAlignment.ALIGN_RIGHT);

      DecoratorPanel panel = new DecoratorPanel();
      panel.add(vPanel);

      // Add widgets to the root panel.
      RootPanel.get("gwtContainer").add(panel);
   }

   public String getGreeting(String name){
      return "Hello "+name+"!";
   }
}
HelloWorldTest.java की सामग्री को इसमें बदलें test/com.tutorialspoint/client निम्नलिखित के साथ पैकेज
package com.tutorialspoint.client;

import com.tutorialspoint.shared.FieldVerifier;
import com.google.gwt.core.client.GWT;
import com.google.gwt.junit.client.GWTTestCase;
import com.google.gwt.user.client.rpc.AsyncCallback;
import com.google.gwt.user.client.rpc.ServiceDefTarget;

/**
 * GWT JUnit tests must extend GWTTestCase.
 */
public class HelloWorldTest extends GWTTestCase {

   /**
    * must refer to a valid module that sources this class.
    */
   public String getModuleName() {
      return "com.tutorialspoint.HelloWorldJUnit";
   }

   /**
    * tests the FieldVerifier.
    */
   public void testFieldVerifier() {
      assertFalse(FieldVerifier.isValidName(null));
      assertFalse(FieldVerifier.isValidName(""));
      assertFalse(FieldVerifier.isValidName("a"));
      assertFalse(FieldVerifier.isValidName("ab"));
      assertFalse(FieldVerifier.isValidName("abc"));
      assertTrue(FieldVerifier.isValidName("abcd"));
   }

   /**
      * this test will send a request to the server using the greetServer
      *  method in GreetingService and verify the response.
   */
   public void testGreetingService() {
      /* create the service that we will test. */
      GreetingServiceAsync greetingService =
      GWT.create(GreetingService.class);
      ServiceDefTarget target = (ServiceDefTarget) greetingService;
      target.setServiceEntryPoint(GWT.getModuleBaseURL()
      + "helloworld/greet");

      /* since RPC calls are asynchronous, we will need to wait
       for a response after this test method returns. This line
       tells the test runner to wait up to 10 seconds
       before timing out. */
      delayTestFinish(10000);

      /* send a request to the server. */
      greetingService.greetServer("GWT User",
         new AsyncCallback<String>() {
         public void onFailure(Throwable caught) {
            /* The request resulted in an unexpected error. */
            fail("Request failure: " + caught.getMessage());
         }

         public void onSuccess(String result) {
            /* verify that the response is correct. */
            assertTrue(result.startsWith("Hello, GWT User!"));

            /* now that we have received a response, we need to
             tell the test runner that the test is complete.
             You must call finishTest() after an asynchronous test
             finishes successfully, or the test will time out.*/
            finishTest();
         }
      });

      /**
         * tests the getGreeting method.
      */
      public void testGetGreeting() {
         HelloWorld helloWorld = new HelloWorld();
         String name = "Robert";
         String expectedGreeting = "Hello "+name+"!";
         assertEquals(expectedGreeting,helloWorld.getGreeting(name));
      }
   }
}
एक्लिप्स लॉन्च कॉन्फ़िगरेशन का उपयोग करके एक्लिप्स में परीक्षण मामले चलाएँ
हम विकास मोड और उत्पादन मोड दोनों के लिए webAppCreator द्वारा लॉन्च लॉन्च कॉन्फ़िगरेशन का उपयोग करके ग्रहण में इकाई परीक्षण चलाएंगे।
विकास मोड में JUnit परीक्षण चलाएँ
- ग्रहण मेनू बार से, रन → रन कॉन्फ़िगरेशन चुनें ...
- JUnit सेक्शन के तहत, HelloWorldTest-dev चुनें
- परिवर्तनों को सहेजने के लिए, लागू करें दबाएं
- परीक्षण चलाने के लिए, रन दबाएं
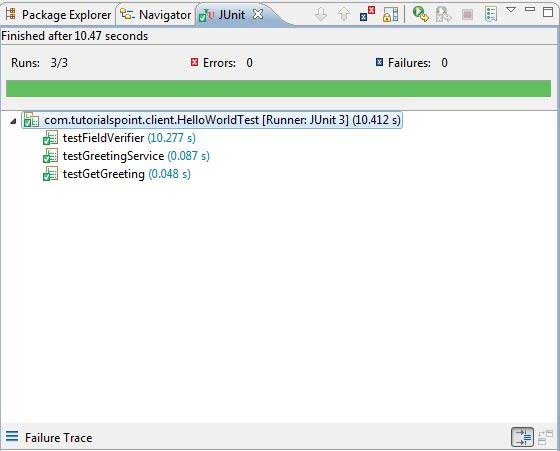
यदि आपके आवेदन में सब कुछ ठीक है, तो यह निम्नलिखित परिणाम देगा -

उत्पादन मोड में JUnit परीक्षण चलाएँ
- ग्रहण मेनू बार से, रन → रन कॉन्फ़िगरेशन चुनें ...
- JUnit सेक्शन के तहत, HelloWorldTest-prod चुनें
- परिवर्तनों को सहेजने के लिए, लागू करें दबाएं
- परीक्षण चलाने के लिए, रन दबाएं
यदि आपके आवेदन में सब कुछ ठीक है, तो यह निम्नलिखित परिणाम देगा -
