स्प्रिंग बूट - फ़ाइल हैंडलिंग
इस अध्याय में, आप वेब सेवा का उपयोग करके फ़ाइल को अपलोड और डाउनलोड करना सीखेंगे।
फाइल अपलोड
फ़ाइल अपलोड करने के लिए, आप उपयोग कर सकते हैं MultipartFileअनुरोध पैरामीटर के रूप में और इस एपीआई को मल्टी-पार्ट फॉर्म डेटा मूल्य का उपभोग करना चाहिए। नीचे दिए गए कोड को देखें -
@RequestMapping(value = "/upload", method = RequestMethod.POST, consumes = MediaType.MULTIPART_FORM_DATA_VALUE)

public String fileUpload(@RequestParam("file") MultipartFile file) {
   return null;
}
उसी के लिए पूरा कोड नीचे दिया गया है -
package com.tutorialspoint.demo.controller;

import java.io.File;
import java.io.FileOutputStream;
import java.io.IOException;

import org.springframework.http.MediaType;
import org.springframework.web.bind.annotation.RequestMapping;
import org.springframework.web.bind.annotation.RequestMethod;
import org.springframework.web.bind.annotation.RequestParam;
import org.springframework.web.bind.annotation.RestController;
import org.springframework.web.multipart.MultipartFile;

@RestController
public class FileUploadController {
   @RequestMapping(value = "/upload", method = RequestMethod.POST,
      consumes = MediaType.MULTIPART_FORM_DATA_VALUE)

   public String fileUpload(@RequestParam("file") MultipartFile file) throws IOException {
      File convertFile = new File("/var/tmp/"+file.getOriginalFilename());
      convertFile.createNewFile();
      FileOutputStream fout = new FileOutputStream(convertFile);
      fout.write(file.getBytes());
      fout.close();
      return "File is upload successfully";
   }
}
फाइल डाउनलोड
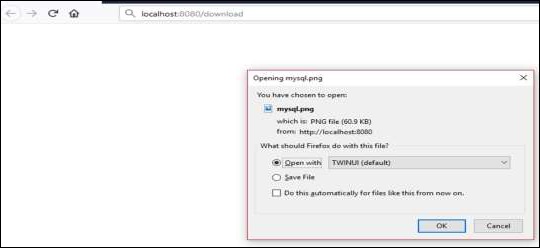
फ़ाइल डाउनलोड के लिए, आपको फ़ाइल डाउनलोड करने के लिए InputStreamResource का उपयोग करना चाहिए। हमें HttpHeader को सेट करने की आवश्यकता हैContent-Disposition प्रतिक्रिया में और प्रतिक्रिया मीडिया अनुप्रयोग के प्रकार को निर्दिष्ट करने की आवश्यकता है।
Note - निम्नलिखित उदाहरण में, फ़ाइल निर्दिष्ट पथ पर उपलब्ध होनी चाहिए जहां अनुप्रयोग चल रहा है।
@RequestMapping(value = "/download", method = RequestMethod.GET)
public ResponseEntity<Object> downloadFile() throws IOException  {
   String filename = "/var/tmp/mysql.png";
   File file = new File(filename);
   InputStreamResource resource = new InputStreamResource(new FileInputStream(file));
   HttpHeaders headers = new HttpHeaders();

   headers.add("Content-Disposition", String.format("attachment; filename=\"%s\"", file.getName()));
   headers.add("Cache-Control", "no-cache, no-store, must-revalidate");
   headers.add("Pragma", "no-cache");
   headers.add("Expires", "0");

   ResponseEntity<Object>
   responseEntity = ResponseEntity.ok().headers(headers).contentLength(file.length()).contentType(
      MediaType.parseMediaType("application/txt")).body(resource);

   return responseEntity;
}
उसी के लिए पूरा कोड नीचे दिया गया है -
package com.tutorialspoint.demo.controller;

import java.io.File;
import java.io.FileInputStream;
import java.io.IOException;

import org.springframework.core.io.InputStreamResource;
import org.springframework.http.HttpHeaders;
import org.springframework.http.MediaType;
import org.springframework.http.ResponseEntity;
import org.springframework.web.bind.annotation.RequestMapping;
import org.springframework.web.bind.annotation.RequestMethod;
import org.springframework.web.bind.annotation.RestController;

@RestController
public class FileDownloadController {
   @RequestMapping(value = "/download", method = RequestMethod.GET)
   public ResponseEntity<Object> downloadFile() throws IOException  {
      String filename = "/var/tmp/mysql.png";
      File file = new File(filename);
      InputStreamResource resource = new InputStreamResource(new FileInputStream(file));
      HttpHeaders headers = new HttpHeaders();

      headers.add("Content-Disposition", String.format("attachment; filename=\"%s\"", file.getName()));
      headers.add("Cache-Control", "no-cache, no-store, must-revalidate");
      headers.add("Pragma", "no-cache");
      headers.add("Expires", "0");

      ResponseEntity<Object>
      responseEntity = ResponseEntity.ok().headers(headers).contentLength(
         file.length()).contentType(MediaType.parseMediaType("application/txt")).body(resource);

      return responseEntity;
   }
}
मुख्य स्प्रिंग बूट आवेदन नीचे दिया गया है -
package com.tutorialspoint.demo;

import org.springframework.boot.SpringApplication;
import org.springframework.boot.autoconfigure.SpringBootApplication;

@SpringBootApplication
public class DemoApplication {
   public static void main(String[] args) {
      SpringApplication.run(DemoApplication.class, args);
   }
}
मावेन बिल्ड - pom.xml का कोड नीचे दिया गया है -
<?xml version = "1.0" encoding = "UTF-8"?>
<project xmlns = "http://maven.apache.org/POM/4.0.0"
   xmlns:xsi = "http://www.w3.org/2001/XMLSchema-instance"
   xsi:schemaLocation = "http://maven.apache.org/POM/4.0.0
   http://maven.apache.org/xsd/maven-4.0.0.xsd">

   <modelVersion>4.0.0</modelVersion>
   <groupId>com.tutorialspoint</groupId>
   <artifactId>demo</artifactId>
   <version>0.0.1-SNAPSHOT</version>
   <packaging>jar</packaging>
   <name>demo</name>
   <description>Demo project for Spring Boot</description>

   <parent>
      <groupId>org.springframework.boot</groupId>
      <artifactId>spring-boot-starter-parent</artifactId>
      <version>1.5.8.RELEASE</version>
      <relativePath/>
   </parent>

   <properties>
      <project.build.sourceEncoding>UTF-8</project.build.sourceEncoding>
      <project.reporting.outputEncoding>UTF-8</project.reporting.outputEncoding>
      <java.version>1.8</java.version>
   </properties>

   <dependencies>
      <dependency>
         <groupId>org.springframework.boot</groupId>
         <artifactId>spring-boot-starter-web</artifactId>
      </dependency>

      <dependency>
         <groupId>org.springframework.boot</groupId>
         <artifactId>spring-boot-starter-test</artifactId>
         <scope>test</scope>
      </dependency>
   </dependencies>

   <build>
      <plugins>
         <plugin>
            <groupId>org.springframework.boot</groupId>
            <artifactId>spring-boot-maven-plugin</artifactId>
         </plugin>
      </plugins>
   </build>

</project>
ग्रेडल बिल्ड - बिल्ड.ग्रेड के लिए कोड नीचे दिया गया है -
buildscript {
   ext {
      springBootVersion = '1.5.8.RELEASE'
   }
   repositories {
      mavenCentral()
   }
   dependencies {
      classpath("org.springframework.boot:spring-boot-gradle-plugin:${springBootVersion}")
   }
}

apply plugin: 'java'
apply plugin: 'eclipse'
apply plugin: 'org.springframework.boot'

group = 'com.tutorialspoint'
version = '0.0.1-SNAPSHOT'
sourceCompatibility = 1.8

repositories {
   mavenCentral()
}
dependencies {
   compile('org.springframework.boot:spring-boot-starter-web')
   testCompile('org.springframework.boot:spring-boot-starter-test')
}
अब आप एक निष्पादन योग्य JAR फ़ाइल बना सकते हैं, और नीचे दिए गए मावेन या ग्रैडल कमांड का उपयोग करके स्प्रिंग बूट एप्लिकेशन चला सकते हैं -
मावेन के लिए, नीचे दिए गए आदेश का उपयोग करें -
mvn clean install"बिल्ड सफलता" के बाद, आप लक्ष्य निर्देशिका के तहत जार फ़ाइल पा सकते हैं।
ग्रेडल के लिए, आप नीचे दिखाए गए कमांड का उपयोग करते हैं -
sgradle clean build“BUILD SUCCESSFUL” के बाद, आप JAR फ़ाइल को बिल्ड / लिबास निर्देशिका के अंतर्गत पा सकते हैं।
अब, निम्न आदेश का उपयोग करके JAR फ़ाइल चलाएँ -
java –jar <JARFILE>यह नीचे दिखाए गए अनुसार टॉमकैट पोर्ट 8080 पर आवेदन शुरू करेगा -

अब POSTMAN एप्लिकेशन में नीचे दिए गए URL को हिट करें और आप नीचे दिखाए अनुसार आउटपुट देख सकते हैं -
फ़ाइल अपलोड - http://localhost:8080/upload

फ़ाइल डाउनलोड - http://localhost:8080/upload