स्प्रिंग बूट - आराम टेम्पलेट
रेस्ट टेम्प्लेट का उपयोग उन एप्लिकेशन को बनाने के लिए किया जाता है जो रेस्टफुल वेब सर्विसेज का उपभोग करते हैं। आप उपयोग कर सकते हैंexchange()सभी HTTP विधियों के लिए वेब सेवाओं का उपभोग करने की विधि। नीचे दिए गए कोड से पता चलता है कि रेस्ट टेम्प्लेट ऑब्जेक्ट के लिए रेस्ट टेम्प्लेट के लिए बीन कैसे बनाएं।
package com.tutorialspoint.demo;

import org.springframework.boot.SpringApplication;
import org.springframework.boot.autoconfigure.SpringBootApplication;
import org.springframework.context.annotation.Bean;
import org.springframework.web.client.RestTemplate;

@SpringBootApplication
public class DemoApplication {
   public static void main(String[] args) {
      SpringApplication.run(DemoApplication.class, args);
   }
   @Bean
   public RestTemplate getRestTemplate() {
      return new RestTemplate();
   }
}
प्राप्त
Consuming the GET API by using RestTemplate - exchange() method
इस URL को मान लें http://localhost:8080/products निम्नलिखित JSON लौटाता है और हम निम्नलिखित कोड का उपयोग करके रेस्ट टेम्प्लेट का उपयोग करके इस एपीआई प्रतिक्रिया का उपभोग करने जा रहे हैं -
[
   {
      "id": "1",
      "name": "Honey"
   },
   {
      "id": "2",
      "name": "Almond"
   }
]
एपीआई का उपभोग करने के लिए आपको दिए गए बिंदुओं का पालन करना होगा -
- रेस्ट टेम्प्लेट ऑब्जेक्ट को स्वत: प्राप्त किया।
- अनुरोध हेडर सेट करने के लिए HttpHeaders का उपयोग करें।
- अनुरोध ऑब्जेक्ट को लपेटने के लिए HttpEntity का उपयोग करें।
- URL, HttpMethod, और Exchange () विधि के लिए रिटर्न प्रकार प्रदान करें।
@RestController
public class ConsumeWebService {
   @Autowired
   RestTemplate restTemplate;

   @RequestMapping(value = "/template/products")
   public String getProductList() {
      HttpHeaders headers = new HttpHeaders();
      headers.setAccept(Arrays.asList(MediaType.APPLICATION_JSON));
      HttpEntity <String> entity = new HttpEntity<String>(headers);

      return restTemplate.exchange("
         http://localhost:8080/products", HttpMethod.GET, entity, String.class).getBody();
   }
}
पद
Consuming POST API by using RestTemplate - exchange() method
इस URL को मान लें http://localhost:8080/products नीचे दर्शाई गई प्रतिक्रिया देता है, हम रेस्ट टेम्प्लेट का उपयोग करके इस एपीआई प्रतिक्रिया का उपभोग करने जा रहे हैं।
नीचे दिया गया कोड अनुरोध निकाय है -
{
   "id":"3",
   "name":"Ginger"
}
नीचे दिया गया कोड रिस्पांस बॉडी है -
Product is created successfullyएपीआई का उपभोग करने के लिए आपको नीचे दिए गए बिंदुओं का पालन करना होगा -
रेस्ट टेम्प्लेट ऑब्जेक्ट को स्वत: प्राप्त किया।
अनुरोध हेडर सेट करने के लिए HttpHeaders का उपयोग करें।
अनुरोध ऑब्जेक्ट को लपेटने के लिए HttpEntity का उपयोग करें। यहां, हम अनुरोध वस्तु पर भेजने के लिए उत्पाद ऑब्जेक्ट को लपेटते हैं।
URL, HttpMethod, और वापसी प्रकार विनिमय () विधि के लिए प्रदान करें।
@RestController
public class ConsumeWebService {
   @Autowired
   RestTemplate restTemplate;

   @RequestMapping(value = "/template/products", method = RequestMethod.POST)
   public String createProducts(@RequestBody Product product) {
      HttpHeaders headers = new HttpHeaders();
      headers.setAccept(Arrays.asList(MediaType.APPLICATION_JSON));
      HttpEntity<Product> entity = new HttpEntity<Product>(product,headers);

      return restTemplate.exchange(
         "http://localhost:8080/products", HttpMethod.POST, entity, String.class).getBody();
   }
}
डाल
Consuming PUT API by using RestTemplate - exchange() method
इस URL को मान लें http://localhost:8080/products/3 नीचे की प्रतिक्रिया देता है और हम रेस्ट टेम्प्लेट का उपयोग करके इस एपीआई प्रतिक्रिया का उपभोग करने जा रहे हैं।
नीचे दिया गया कोड अनुरोध निकाय है -
{
   "name":"Indian Ginger"
}
नीचे दिया गया कोड रिस्पांस बॉडी है -
Product is updated successfullyएपीआई का उपभोग करने के लिए आपको नीचे दिए गए बिंदुओं का पालन करना होगा -
रेस्ट टेम्प्लेट ऑब्जेक्ट को स्वत: प्राप्त किया।
अनुरोध हेडर सेट करने के लिए HttpHeaders का उपयोग करें।
अनुरोध ऑब्जेक्ट को लपेटने के लिए HttpEntity का उपयोग करें। यहां, हम अनुरोध वस्तु पर भेजने के लिए उत्पाद ऑब्जेक्ट को लपेटते हैं।
URL, HttpMethod, और वापसी प्रकार विनिमय () विधि के लिए प्रदान करें।
@RestController
public class ConsumeWebService {
   @Autowired
   RestTemplate restTemplate;

   @RequestMapping(value = "/template/products/{id}", method = RequestMethod.PUT)
   public String updateProduct(@PathVariable("id") String id, @RequestBody Product product) {
      HttpHeaders headers = new HttpHeaders();
      headers.setAccept(Arrays.asList(MediaType.APPLICATION_JSON));
      HttpEntity<Product> entity = new HttpEntity<Product>(product,headers);

      return restTemplate.exchange(
         "http://localhost:8080/products/"+id, HttpMethod.PUT, entity, String.class).getBody();
   }
}
हटाएँ
Consuming DELETE API by using RestTemplate - exchange() method
इस URL को मान लें http://localhost:8080/products/3 नीचे दी गई प्रतिक्रिया देता है और हम रेस्ट टेम्प्लेट का उपयोग करके इस एपीआई प्रतिक्रिया का उपभोग करने जा रहे हैं।
नीचे दर्शाई गई कोड की यह पंक्ति अनुक्रिया निकाय है -
Product is deleted successfullyएपीआई का उपभोग करने के लिए आपको नीचे दिखाए गए बिंदुओं का पालन करना होगा -
रेस्ट टेम्प्लेट ऑब्जेक्ट को स्वत: प्राप्त किया।
अनुरोध हेडर सेट करने के लिए HttpHeaders का उपयोग करें।
अनुरोध ऑब्जेक्ट को लपेटने के लिए HttpEntity का उपयोग करें।
URL, HttpMethod, और वापसी प्रकार विनिमय () विधि के लिए प्रदान करें।
@RestController
public class ConsumeWebService {
   @Autowired
   RestTemplate restTemplate;

   @RequestMapping(value = "/template/products/{id}", method = RequestMethod.DELETE)
   public String deleteProduct(@PathVariable("id") String id) {
      HttpHeaders headers = new HttpHeaders();
      headers.setAccept(Arrays.asList(MediaType.APPLICATION_JSON));
      HttpEntity<Product> entity = new HttpEntity<Product>(headers);

      return restTemplate.exchange(
         "http://localhost:8080/products/"+id, HttpMethod.DELETE, entity, String.class).getBody();
   }
}
पूरा रेस्ट टेम्प्लेट कंट्रोलर क्लास फाइल नीचे दिया गया है -
package com.tutorialspoint.demo.controller;

import java.util.Arrays;

import org.springframework.beans.factory.annotation.Autowired;
import org.springframework.http.HttpEntity;
import org.springframework.http.HttpHeaders;
import org.springframework.http.HttpMethod;
import org.springframework.http.MediaType;

import org.springframework.web.bind.annotation.PathVariable;
import org.springframework.web.bind.annotation.RequestBody;
import org.springframework.web.bind.annotation.RequestMapping;
import org.springframework.web.bind.annotation.RequestMethod;
import org.springframework.web.bind.annotation.RestController;
import org.springframework.web.client.RestTemplate;

import com.tutorialspoint.demo.model.Product;

@RestController
public class ConsumeWebService {
   @Autowired
   RestTemplate restTemplate;

   @RequestMapping(value = "/template/products")
   public String getProductList() {
      HttpHeaders headers = new HttpHeaders();
      headers.setAccept(Arrays.asList(MediaType.APPLICATION_JSON));
      HttpEntity<String> entity = new HttpEntity<String>(headers);

      return restTemplate.exchange(
         "http://localhost:8080/products", HttpMethod.GET, entity, String.class).getBody();
   }
   @RequestMapping(value = "/template/products", method = RequestMethod.POST)
   public String createProducts(@RequestBody Product product) {
      HttpHeaders headers = new HttpHeaders();
      headers.setAccept(Arrays.asList(MediaType.APPLICATION_JSON));
      HttpEntity<Product> entity = new HttpEntity<Product>(product,headers);

      return restTemplate.exchange(
         "http://localhost:8080/products", HttpMethod.POST, entity, String.class).getBody();
   }
   @RequestMapping(value = "/template/products/{id}", method = RequestMethod.PUT)
   public String updateProduct(@PathVariable("id") String id, @RequestBody Product product) {
      HttpHeaders headers = new HttpHeaders();
      headers.setAccept(Arrays.asList(MediaType.APPLICATION_JSON));
      HttpEntity<Product> entity = new HttpEntity<Product>(product,headers);

      return restTemplate.exchange(
         "http://localhost:8080/products/"+id, HttpMethod.PUT, entity, String.class).getBody();
   }
   @RequestMapping(value = "/template/products/{id}", method = RequestMethod.DELETE)
   public String deleteProduct(@PathVariable("id") String id) {
      HttpHeaders headers = new HttpHeaders();
      headers.setAccept(Arrays.asList(MediaType.APPLICATION_JSON));
      HttpEntity<Product> entity = new HttpEntity<Product>(headers);

      return restTemplate.exchange(
         "http://localhost:8080/products/"+id, HttpMethod.DELETE, entity, String.class).getBody();
   }
}
स्प्रिंग बूट एप्लीकेशन क्लास के लिए कोड - DemoApplication.java नीचे दिया गया है -
package com.tutorialspoint.demo;

import org.springframework.boot.SpringApplication;
import org.springframework.boot.autoconfigure.SpringBootApplication;

@SpringBootApplication
public class DemoApplication {
   public static void main(String[] args) {
      SpringApplication.run(DemoApplication.class, args);
   }
}
मावेन बिल्ड - pom.xml का कोड नीचे दिया गया है -
<?xml version = "1.0" encoding = "UTF-8"?>
<project xmlns = "http://maven.apache.org/POM/4.0.0"
   xmlns:xsi = "http://www.w3.org/2001/XMLSchema-instance"
   xsi:schemaLocation = "http://maven.apache.org/POM/4.0.0
   http://maven.apache.org/xsd/maven-4.0.0.xsd">

   <modelVersion>4.0.0</modelVersion>
   <groupId>com.tutorialspoint</groupId>
   <artifactId>demo</artifactId>
   <version>0.0.1-SNAPSHOT</version>
   <packaging>jar</packaging>
   <name>demo</name>
   <description>Demo project for Spring Boot</description>

   <parent>
      <groupId>org.springframework.boot</groupId>
      <artifactId>spring-boot-starter-parent</artifactId>
      <version>1.5.8.RELEASE</version>
      <relativePath/>
   </parent>

   <properties>
      <project.build.sourceEncoding>UTF-8</project.build.sourceEncoding>
      <project.reporting.outputEncoding>UTF-8</project.reporting.outputEncoding>
      <java.version>1.8</java.version>
   </properties>

   <dependencies>
      <dependency>
         <groupId>org.springframework.boot</groupId>
         <artifactId>spring-boot-starter-web</artifactId>
      </dependency>

      <dependency>
         <groupId>org.springframework.boot</groupId>
         <artifactId>spring-boot-starter-test</artifactId>
         <scope>test</scope>
      </dependency>
   </dependencies>

   <build>
      <plugins>
         <plugin>
            <groupId>org.springframework.boot</groupId>
            <artifactId>spring-boot-maven-plugin</artifactId>
         </plugin>
      </plugins>
   </build>

</project>
ग्रेडल बिल्ड - बिल्ड.ग्रेड के लिए कोड नीचे दिया गया है -
buildscript {
   ext {
      springBootVersion = '1.5.8.RELEASE'
   }
   repositories {
      mavenCentral()
   }
   dependencies {
      classpath("org.springframework.boot:spring-boot-gradle-plugin:${springBootVersion}")
   }
}

apply plugin: 'java'
apply plugin: 'eclipse'
apply plugin: 'org.springframework.boot'

group = 'com.tutorialspoint'
version = '0.0.1-SNAPSHOT'
sourceCompatibility = 1.8

repositories {
   mavenCentral()
}
dependencies {
   compile('org.springframework.boot:spring-boot-starter-web')
   testCompile('org.springframework.boot:spring-boot-starter-test')
}
आप एक निष्पादन योग्य JAR फ़ाइल बना सकते हैं, और निम्न Maven या Gradle कमांड का उपयोग करके स्प्रिंग बूट एप्लिकेशन चला सकते हैं -
मावेन के लिए, आप नीचे दिए गए कमांड का उपयोग कर सकते हैं -
mvn clean install"बिल्ड सफलता" के बाद, आप लक्ष्य निर्देशिका के तहत जार फ़ाइल पा सकते हैं।
ग्रेडल के लिए, आप नीचे दिखाए गए कमांड का उपयोग कर सकते हैं -
gradle clean build“BUILD SUCCESSFUL” के बाद, आप JAR फ़ाइल को बिल्ड / लिबास निर्देशिका के अंतर्गत पा सकते हैं।
अब, निम्न आदेश का उपयोग करके JAR फ़ाइल चलाएँ -
java –jar <JARFILE>अब, Tomcat पोर्ट 8080 पर आवेदन शुरू हो गया है।

अब POSTMAN एप्लिकेशन में नीचे दिए गए URL को हिट करें और आप आउटपुट देख सकते हैं।
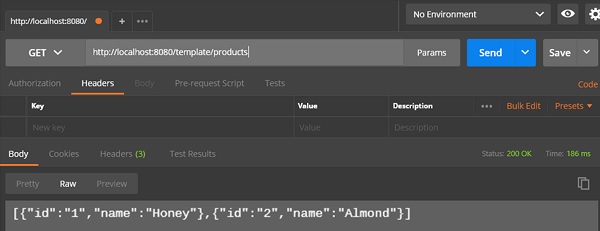
बाकी टेम्पलेट द्वारा उत्पाद प्राप्त करें - http://localhost:8080/template/products

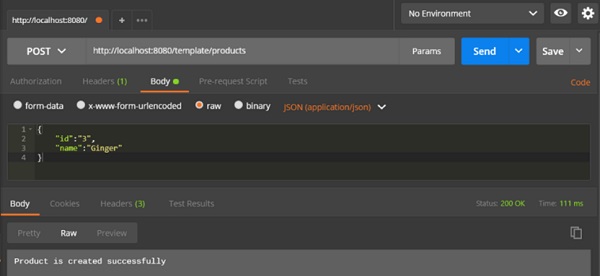
उत्पाद पोस्ट बनाएं - http://localhost:8080/template/products

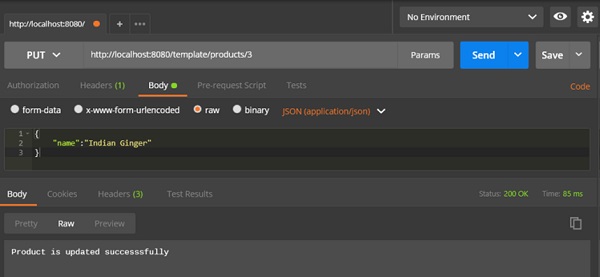
उत्पाद का अद्यतन करें - http://localhost:8080/template/products/3

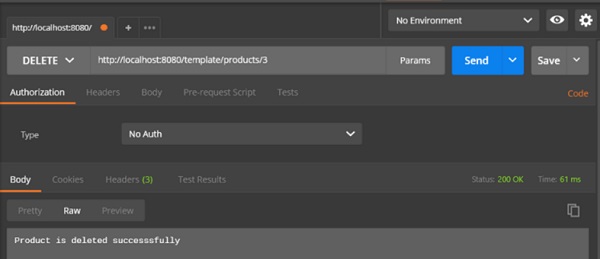
उत्पाद हटाएं - http://localhost:8080/template/products/3
