विंडोज 10 डेवलपमेंट - पहला ऐप
इस अध्याय में, हम अपना पहला सरल एप्लिकेशन बना रहे हैं "Hello world" यूनिवर्सल विंडोज प्लेटफॉर्म (यूडब्ल्यूपी) में एक्सएएमएल और सी # का उपयोग विंडोज 10. पर किया गया है। हम प्रदर्शित करेंगे कि विजुअल स्टूडियो में बनाए गए एकल यूडब्ल्यूपी एप्लिकेशन को किसी भी विंडोज 10 डिवाइस पर कैसे चलाया और चलाया जा सकता है।
नीचे दिए गए चरणों का पालन करके ऐप बनाना शुरू करें।
विजुअल स्टूडियो 2015 लॉन्च करें।
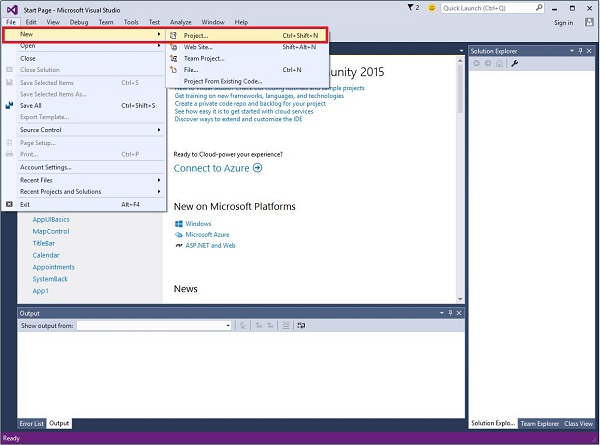
पर क्लिक करें File मेनू और चयन करें New > Project।
निम्नलिखित New Projectसंवाद विंडो प्रदर्शित की जाएगी। आप संवाद बॉक्स के बाएँ फलक पर विभिन्न प्रकार के टेम्पलेट देख सकते हैं।
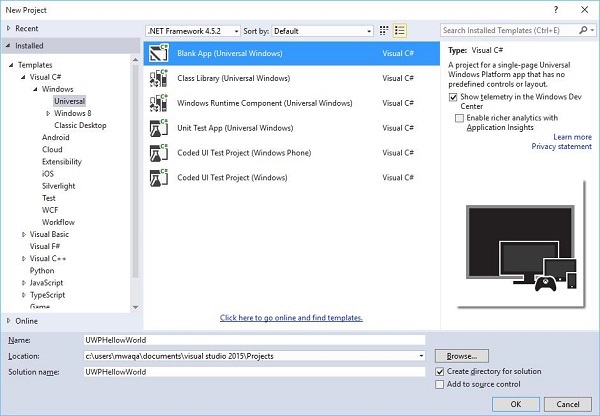
बाएँ फलक में, आप ट्री दृश्य देख सकते हैं। चुनते हैंUniversal template से Templates > Visual C# > Windows।
केंद्र फलक से, का चयन करें Blank App (Universal Windows) टेम्पलेट
प्रोजेक्ट को नाम लिखकर दें UWPHelloWorld में Name field।
क्लिक OK एक नया UWP प्रोजेक्ट बनाने के लिए।
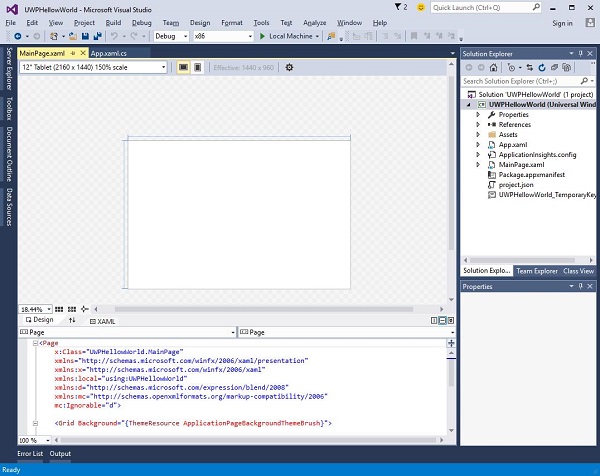
आप नई बनाई गई परियोजना को देख सकते हैं Solution Explorer।
यह एक खाली ऐप है लेकिन इसमें कई फाइलें हैं, जो किसी भी UWP एप्लिकेशन के लिए न्यूनतम आवश्यकता है।
MainPage.xaml तथा MainPage.xaml.cs जब आप अपने एप्लिकेशन को निष्पादित करते हैं तो चलाएं।
डिफ़ॉल्ट रूप से, MainPage.xaml फ़ाइल में निम्न जानकारी है।
<Page
   x:Class = ”UWPHellowWorld.MainPage”
   xmlns = ”http://schemas.microsoft.com/winfx/2006/xaml/presentation”
   xmlns:x = ”http://schemas.microsoft.com/winfx/2006/xaml”
   xmlns:local = ”using:UWPHellowWorld”
   xmlns:d = ”http://schemas.microsoft.com/expression/blend/2008”
   xmlns:mc = ”http://schemas.openxmlformats.org/markup-compatibility/2006”
   mc:Ignorable = ”d”>

   <Grid Background = ”{ThemeResource ApplicationPageBackgroundThemeBrush}”>
   </Grid>

</Page>
नीचे दी गई डिफ़ॉल्ट जानकारी में उपलब्ध है MainPage.xaml.cs।
using System;
using System.Collections.Generic;
using System.IO;
using System.Linq;
using System.Runtime.InteropServices.WindowsRuntime;

using Windows.Foundation;
using Windows.Foundation.Collections;

using Windows.UI.Xaml;
using Windows.UI.Xaml.Controls;
using Windows.UI.Xaml.Controls.Primitives;
using Windows.UI.Xaml.Data;
using Windows.UI.Xaml.Input;
using Windows.UI.Xaml.Media;
using Windows.UI.Xaml.Navigation;

// The Blank Page item template is documented at
   http://go.microsoft.com/fwlink/?LinkId=402352&clcid=0x409

namespace UWPHellowWorld {

   /// <summary>
      /// An empty page that can be used on its own or navigated to within a Frame.
   /// </summary>

   public sealed partial class MainPage : Page {
      public MainPage(){
         this.InitializeComponent();
      }
   }

}
हमें कुछ टेक्स्ट ब्लॉक, एक टेक्स्टबॉक्स और एक बटन जोड़ें जो नीचे दिए गए XAML कोड में दिखाया गया है।
<Page
   x:Class = ”UWPHellowWorld.MainPage”
   xmlns = ”http://schemas.microsoft.com/winfx/2006/xaml/presentation”
   xmlns:x = ”http://schemas.microsoft.com/winfx/2006/xaml”
   xmlns:local = ”using:UWPHellowWorld”
   xmlns:d = ”http://schemas.microsoft.com/expression/blend/2008”
   xmlns:mc = ”http://schemas.openxmlformats.org/markup-compatibility/2006”
   mc:Ignorable = ”d”>

   <Grid Background = ”{ThemeResource ApplicationPageBackgroundThemeBrush}”>

      <StackPanel HorizontalAlignment = ”Center”>
         <TextBlock Text = ”Hello, world!”  Margin = ”20”  Width = ”200”
            HorizontalAlignment = ”Left”/>

         <TextBlock Text = ”Write your name.” Margin = ”20” Width = ”200”
            HorizontalAlignment = ”Left”/>

         <TextBox x:Name = ”txtbox”  Width = ”280” Margin = ”20”
            HorizontalAlignment = ”Left”/>

         <Button x:Name = ”button” Content = ”Click Me” Margin = ”20”
            Click = ”button_Click”/>

         <TextBlock x:Name = ”txtblock” HorizontalAlignment = ”Left”
            Margin = ”20”/>
      </StackPanel>

   </Grid>

</Page>- नीचे # C में क्लिक-इवेंट बटन दिया गया है।
using System;
using System.Collections.Generic;
using System.IO;
using System.Linq;

using System.Runtime.InteropServices.WindowsRuntime;
using Windows.Foundation;
using Windows.Foundation.Collections;

using Windows.UI.Xaml;
using Windows.UI.Xaml.Controls;
using Windows.UI.Xaml.Controls.Primitives;
using Windows.UI.Xaml.Data;
using Windows.UI.Xaml.Input;
using Windows.UI.Xaml.Media;
using Windows.UI.Xaml.Navigation;

// The Blank Page item template is documented at
   http://go.microsoft.com/fwlink/?LinkId=402352&clcid=0x409

namespace UWPHellowWorld {

   /// <summary>
      /// An empty page that can be used on its own or navigated to within a Frame.
   /// </summary>

   public sealed partial class MainPage : Page {
      public MainPage() {
         this.InitializeComponent();
      }

      private void button_Click(object sender, RoutedEventArgs e) {
         if (txtbox.Text != “”)
            txtblock.Text = “Hello: “ + txtbox.Text;
         else
            txtblock.Text = “You have not write your name”;
      }

   }

}
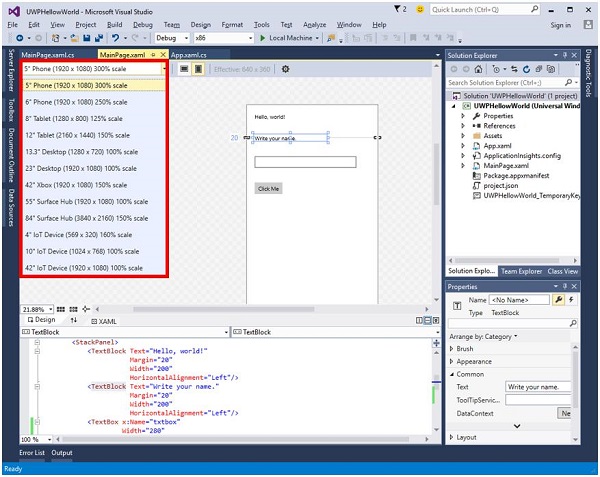
UWP परियोजना में, device preview विकल्प पर उपलब्ध है Design Window, जिसकी मदद से आप लेआउट को आसानी से बदल सकते हैं, एक डिवाइस परिवार में सभी डिवाइसों के स्क्रीन आकार में फिट होने के लिए जिन्हें आप अपने एप्लिकेशन पर लक्षित कर रहे हैं।
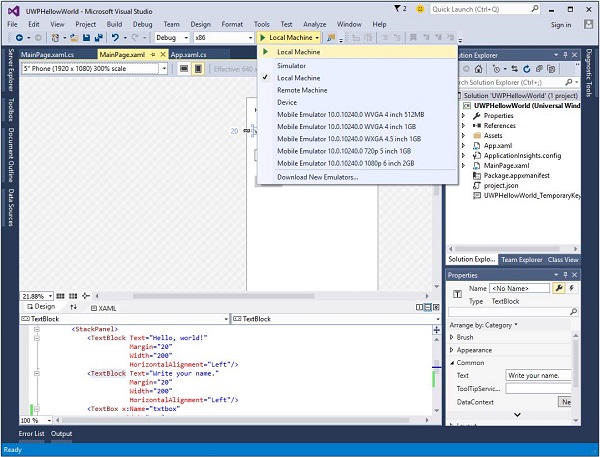
आप अपने ऐप को स्थानीय मशीन, सिम्युलेटर या एमुलेटर पर या रिमोट डिवाइस पर चला सकते हैं। आप निम्न मेनू से लक्ष्य डिवाइस का चयन कर सकते हैं जैसा कि नीचे दिखाया गया है -
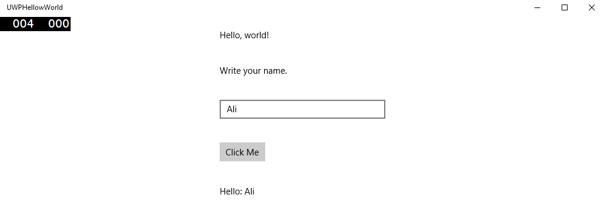
हम एक स्थानीय मशीन पर उपरोक्त कोड चलाते हैं और आपको निम्न विंडो दिखाई देगी। अब, टेक्स्ट बॉक्स में कोई भी नाम लिखें और बटन पर क्लिक करेंClick Me।
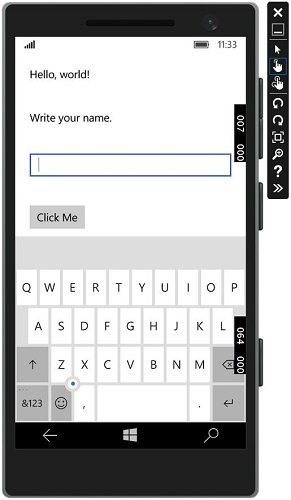
अब, यदि आप किसी एमुलेटर पर अपने ऐप का परीक्षण करना चाहते हैं, तो आप मेनू से एक विशेष एमुलेटर का चयन कर सकते हैं और अपने आवेदन को निष्पादित कर सकते हैं। आप निम्न एमुलेटर देखेंगे -
हम आपको विभिन्न उपकरणों के साथ उपरोक्त एप्लिकेशन को निष्पादित करने की सलाह देते हैं।