GWT - Panduan Cepat
Apa itu GWT?
Google Web Toolkit (GWT) adalah perangkat pengembangan yang harus dibuat RICH Internet Applications (RIA). Berikut adalah beberapa fiturnya yang terkenal -
GWT memberikan opsi pengembang untuk menulis aplikasi sisi klien di JAWA.
GWT mengkompilasi kode yang ditulis dalam JAVA ke kode JavaScript.
Aplikasi yang ditulis dalam GWT kompatibel dengan lintas browser. GWT secara otomatis menghasilkan kode javascript yang sesuai untuk setiap browser.
GWT adalah sumber terbuka, sepenuhnya gratis, dan digunakan oleh ribuan pengembang di seluruh dunia. Ini dilisensikan di bawah Lisensi Apache versi 2.0.
Secara keseluruhan, GWT adalah a framework untuk membuat aplikasi web berskala besar dan berkinerja tinggi sekaligus menjaganya agar tetap mudah dirawat.
Mengapa menggunakan GWT?
Berbasis Java, Anda dapat menggunakan JAVA IDEs seperti Eclipse untuk mengembangkan aplikasi GWT.
Pengembang dapat menggunakan pelengkapan otomatis kode / refactoring / navigasi / manajemen proyek dan semua fitur IDEs.GWT yang menyediakan kemampuan debugging penuh. Pengembang dapat men-debug aplikasi sisi klien seperti Aplikasi Java.
GWT menyediakan integrasi yang mudah dengan Junit dan Maven.
Sekali lagi berbasis Java, GWT memiliki kurva pembelajaran yang rendah untuk Pengembang Java.
GWT menghasilkan kode javascript yang dioptimalkan, menghasilkan kode javascript khusus browser sendiri.
GWT menyediakan pustaka Widget yang menyediakan sebagian besar tugas yang diperlukan dalam aplikasi.
GWT dapat diperluas dan widget khusus dapat dibuat untuk memenuhi kebutuhan aplikasi.
Di atas segalanya, aplikasi GWT dapat berjalan di semua browser utama dan ponsel pintar termasuk ponsel / tablet berbasis Android dan iOS.
Kekurangan GWT
Meskipun GWT menawarkan banyak keuntungan, GWT menderita kerugian berikut -
Not Indexable - Halaman web yang dibuat oleh GWT tidak akan diindeks oleh mesin pencari karena aplikasi ini dibuat secara dinamis.
Not Degradable - Jika pengguna aplikasi Anda menonaktifkan Javascript maka pengguna hanya akan melihat halaman dasar dan tidak lebih.
Not Designer's Friendly - GWT tidak cocok untuk desainer web yang lebih suka menggunakan HTML biasa dengan placeholder untuk memasukkan konten dinamis di lain waktu.
Komponen GWT
Kerangka GWT dapat dibagi menjadi tiga bagian utama berikut -
GWT Java to JavaScript compiler- Ini adalah bagian terpenting dari GWT yang menjadikannya alat yang ampuh untuk membangun RIA. Kompiler GWT digunakan untuk menerjemahkan semua kode aplikasi yang ditulis di Java ke dalam JavaScript.
JRE Emulation library- Google Web Toolkit menyertakan pustaka yang mengemulasi subset pustaka runtime Java. Daftar tersebut termasuk java.lang, java.lang.annotation, java.math, java.io, java.sql, java.util dan java.util.logging
GWT UI building library - Bagian GWT ini terdiri dari banyak subbagian yang mencakup komponen UI aktual, dukungan RPC, pengelolaan Riwayat, dan banyak lagi.
GWT juga menyediakan Browser Web yang Dihosting GWT yang memungkinkan Anda menjalankan dan mengeksekusi aplikasi GWT dalam mode yang dihosting, dengan kode Anda berjalan sebagai Java di Mesin Virtual Java tanpa mengompilasi ke JavaScript.
Tutorial ini akan memandu Anda tentang cara mempersiapkan lingkungan pengembangan untuk memulai pekerjaan Anda dengan Kerangka GWT. Tutorial ini juga akan mengajari Anda cara menyiapkan JDK, Tomcat, dan Eclipse di komputer Anda sebelum Anda menyiapkan Kerangka GWT -
Persyaratan Sistem
GWT membutuhkan JDK 1.6 atau lebih tinggi, jadi persyaratan pertama adalah menginstal JDK di mesin Anda.
| JDK | 1.6 atau lebih tinggi. |
|---|---|
| Penyimpanan | tidak ada persyaratan minimum. |
| Ruang Disk | tidak ada persyaratan minimum. |
| Sistem operasi | tidak ada persyaratan minimum. |
Ikuti langkah-langkah yang diberikan untuk menyiapkan lingkungan Anda untuk memulai pengembangan aplikasi GWT.
Langkah 1 - Verifikasi Instalasi Java di Mesin Anda
Sekarang buka konsol dan jalankan perintah java berikut.
| OS | Tugas | Perintah |
|---|---|---|
| Windows | Buka Konsol Perintah | c: \> java -version |
| Linux | Buka Terminal Perintah | $ java -version |
| Mac | Buka Terminal | mesin: ~ joseph $ java -version |
Mari kita verifikasi keluaran untuk semua sistem operasi
| Sr.No. | OS & Output yang Dihasilkan |
|---|---|
| 1 | Windows versi java "1.6.0_21" Java (TM) SE Runtime Environment (build 1.6.0_21-b07) VM Klien Java HotSpot (TM) (build 17.0-b17, mode campuran, berbagi) |
| 2 | Linux versi java "1.6.0_21" Java (TM) SE Runtime Environment (build 1.6.0_21-b07) ava HotSpot (TM) Client VM (build 17.0-b17, mode campuran, berbagi) |
| 3 | Mac versi java "1.6.0_21" Java (TM) SE Runtime Environment (build 1.6.0_21-b07) Java HotSpot (TM) 64-Bit Server VM (build 17.0-b17, mode campuran, berbagi) |
Langkah 2 - Siapkan Java Development Kit (JDK)
Jika Anda belum menginstal Java, Anda dapat menginstal Java Software Development Kit (SDK) dari situs Java Oracle: Java SE Downloads . Anda akan menemukan instruksi untuk menginstal JDK dalam file yang diunduh, ikuti instruksi yang diberikan untuk menginstal dan mengkonfigurasi pengaturan. Terakhir, setel variabel lingkungan PATH dan JAVA_HOME untuk merujuk ke direktori yang berisi java dan javac, biasanya masing-masing java_install_dir / bin dan java_install_dir.
Mengatur JAVA_HOMEvariabel lingkungan untuk menunjuk ke lokasi direktori dasar tempat Java diinstal pada mesin Anda. Sebagai contoh
| Sr.No. | OS & Output |
|---|---|
| 1 | Windows Setel variabel lingkungan JAVA_HOME ke C: \ Program Files \ Java \ jdk1.6.0_21 |
| 2 | Linux ekspor JAVA_HOME = / usr / local / java-current |
| 3 | Mac ekspor JAVA_HOME = / Library / Java / Home |
Tambahkan lokasi compiler Java ke System Path.
| Sr.No. | OS & Output |
|---|---|
| 1 | Windows Tambahkan string;% JAVA_HOME% \ bin ke akhir variabel sistem, Path. |
| 2 | Linux ekspor PATH =$PATH:$JAVA_HOME / bin / |
| 3 | Mac tidak dibutuhkan |
Alternatifnya, jika Anda menggunakan Integrated Development Environment (IDE) seperti Borland JBuilder, Eclipse, IntelliJ IDEA, atau Sun ONE Studio, kompilasi dan jalankan program sederhana untuk memastikan bahwa IDE mengetahui di mana Anda menginstal Java, jika tidak lakukan pengaturan yang tepat seperti dokumen yang diberikan. dari IDE.
Langkah 3 - Siapkan Eclipse IDE
Semua contoh dalam tutorial ini telah ditulis menggunakan Eclipse IDE. Jadi saya sarankan Anda harus menginstal Eclipse versi terbaru pada mesin Anda berdasarkan sistem operasi Anda.
Untuk menginstal Eclipse IDE, unduh binari Eclipse terbaru dari https://www.eclipse.org. Setelah Anda mengunduh instalasi, keluarkan distribusi biner ke lokasi yang nyaman. Misalnya di C: \ eclipse di windows, atau / usr / local / eclipse di Linux / Unix dan terakhir atur variabel PATH dengan tepat.
Eclipse dapat dimulai dengan menjalankan perintah berikut di mesin windows, atau Anda cukup mengklik dua kali pada eclipse.exe
%C:\eclipse\eclipse.exeEclipse dapat dimulai dengan menjalankan perintah berikut di mesin Unix (Solaris, Linux, dll.) -
$/usr/local/eclipse/eclipseSetelah startup berhasil, jika semuanya baik-baik saja maka itu akan menampilkan hasil sebagai berikut -

Step 4 - Install GWT SDK & Plugin for Eclipse
Follow the instructions given at the link Plugin for Eclipse (incl. SDKs) to install GWT SDK & Plugin for Eclipse version installed on your machine.
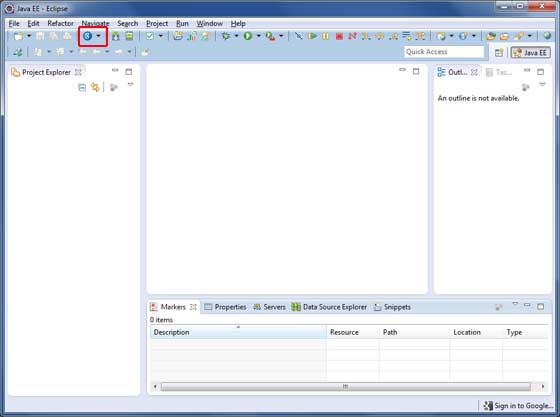
After a successful setup for the GWT plugin, if everything is fine then it should display following screen with Google icon marked with red rectangle as shown below −
Step 5: Setup Apache Tomcat
You can download the latest version of Tomcat from https://tomcat.apache.org/. Once you downloaded the installation, unpack the binary distribution into a convenient location. For example in C:\apache-tomcat-6.0.33 on windows, or /usr/local/apache-tomcat-6.0.33 on Linux/Unix and set CATALINA_HOME environment variable pointing to the installation locations.
Tomcat can be started by executing the following commands on windows machine, or you can simply double click on startup.bat
%CATALINA_HOME%\bin\startup.bat
or
/usr/local/apache-tomcat-6.0.33/bin/startup.sh
After a successful startup, the default web applications included with Tomcat will be available by visiting http://localhost:8080/. If everything is fine then it should display following result −

Further information about configuring and running Tomcat can be found in the documentation included here, as well as on the Tomcat web site − https://tomcat.apache.org/
Tomcat can be stopped by executing the following commands on windows machine −
%CATALINA_HOME%\bin\shutdown
or
C:\apache-tomcat-5.5.29\bin\shutdown
Tomcat can be stopped by executing the following commands on Unix (Solaris, Linux, etc.) machine −
$CATALINA_HOME/bin/shutdown.sh
or
/usr/local/apache-tomcat-5.5.29/bin/shutdown.sh
Before we start with creating actual "HelloWorld" application using GWT, let us see what are the actual parts of a GWT application are −
A GWT application consists of following four important parts out of which last part is optional but first three parts are mandatory.
- Module descriptors
- Public resources
- Client-side code
- Server-side code
Sample locations of different parts of a typical gwt application HelloWord will be as shown below −
| Name | Location |
|---|---|
| Project root | HelloWorld/ |
| Module descriptor | src/com/tutorialspoint/HelloWorld.gwt.xml |
| Public resources | src/com/tutorialspoint/war/ |
| Client-side code | src/com/tutorialspoint/client/ |
| Server-side code | src/com/tutorialspoint/server/ |
Module Descriptors
A module descriptor is the configuration file in the form of XML which is used to configure a GWT application.
A module descriptor file extension is *.gwt.xml, where * is the name of the application and this file should reside in the project's root.
Following will be a default module descriptor HelloWorld.gwt.xml for a HelloWorld application −
<?xml version = "1.0" encoding = "utf-8"?>
<module rename-to = 'helloworld'>
   <!-- inherit the core web toolkit stuff.                        -->
   <inherits name = 'com.google.gwt.user.user'/>

   <!-- inherit the default gwt style sheet.                       -->
   <inherits name = 'com.google.gwt.user.theme.clean.Clean'/>

   <!-- specify the app entry point class.                         -->
   <entry-point class = 'com.tutorialspoint.client.HelloWorld'/>

   <!-- specify the paths for translatable code                    -->
   <source path = '...'/>
   <source path = '...'/>

   <!-- specify the paths for static files like html, css etc.     -->
   <public path = '...'/>
   <public path = '...'/>

   <!-- specify the paths for external javascript files            -->
   <script src = "js-url" />
   <script src = "js-url" />

   <!-- specify the paths for external style sheet files            -->
   <stylesheet  src = "css-url" />
   <stylesheet  src = "css-url" />
</module>
Following is the brief detail about different parts used in module descriptor.
| Sr.No. | Nodes & Description |
|---|---|
| 1 | <module rename-to = "helloworld"> This provides name of the application. |
| 2 | <inherits name = "logical-module-name" /> This adds other gwt module in application just like import does in java applications. Any number of modules can be inherited in this manner. |
| 3 | <entry-point class = "classname" /> This specifies the name of class which will start loading the GWT Application. Any number of entry-point classes can be added and they are called sequentially in the order in which they appear in the module file. So when the onModuleLoad() of your first entry point finishes, the next entry point is called immediately. |
| 4 | <source path = "path" /> This specifies the names of source folders which GWT compiler will search for source compilation. |
| 5 | <public path = "path" /> The public path is the place in your project where static resources referenced by your GWT module, such as CSS or images, are stored. The default public path is the public subdirectory underneath where the Module XML File is stored. |
| 6 | <script src="js-url" /> Automatically injects the external JavaScript file located at the location specified by src. |
| 7 | <stylesheet src="css-url" /> Automatically injects the external CSS file located at the location specified by src. |
Public Resources
These are all files referenced by your GWT module, such as Host HTML page, CSS or images.
The location of these resources can be configured using <public path = "path" /> element in module configuration file. By default, it is the public subdirectory underneath where the Module XML File is stored.
When you compile your application into JavaScript, all the files that can be found on your public path are copied to the module's output directory.
The most important public resource is host page which is used to invoke actual GWT application. A typical HTML host page for an application might not include any visible HTML body content at all but it is always expected to include GWT application via a <script.../> tag as follows
<html>
   <head>
      <title>Hello World</title>
      <link rel = "stylesheet" href = "HelloWorld.css"/>
      <script language = "javascript" src = "helloworld/helloworld.nocache.js">
      </script>
   </head>

   <body>
      <h1>Hello World</h1>
      <p>Welcome to first GWT application</p>
   </body>
</html>
Following is the sample style sheet which we have included in our host page −
body {
   text-align: center;
   font-family: verdana, sans-serif;
}

h1 {
   font-size: 2em;
   font-weight: bold;
   color: #777777;
   margin: 40px 0px 70px;
   text-align: center;
}
Client-side Code
This is the actual Java code written implementing the business logic of the application and that the GWT compiler translates into JavaScript, which will eventually run inside the browser. The location of these resources can be configured using <source path = "path" /> element in module configuration file.
For example Entry Point code will be used as client side code and its location will be specified using <source path = "path" />.
A module entry-point is any class that is assignable to EntryPoint and that can be constructed without parameters. When a module is loaded, every entry point class is instantiated and its EntryPoint.onModuleLoad() method gets called. A sample HelloWorld Entry Point class will be as follows −
public class HelloWorld implements EntryPoint {
   public void onModuleLoad() {
      Window.alert("Hello, World!");
   }
}
Server-side Code
This is the server side part of your application and its very much optional. If you are not doing any backend processing with-in your application then you do not need this part, but if there is some processing required at backend and your client-side application interact with the server then you will have to develop these components.
Next chapter will make use of all the above mentioned concepts to create HelloWorld application using Eclipse IDE.
As power of GWT lies in Write in Java, Run in JavaScript, we'll be using Java IDE Eclipse to demonstrate our examples.
Let's start with a simple HelloWorld application −
Step 1 - Create Project
The first step is to create a simple Web Application Project using Eclipse IDE. Launch project wizard using the option Google Icon
![]()
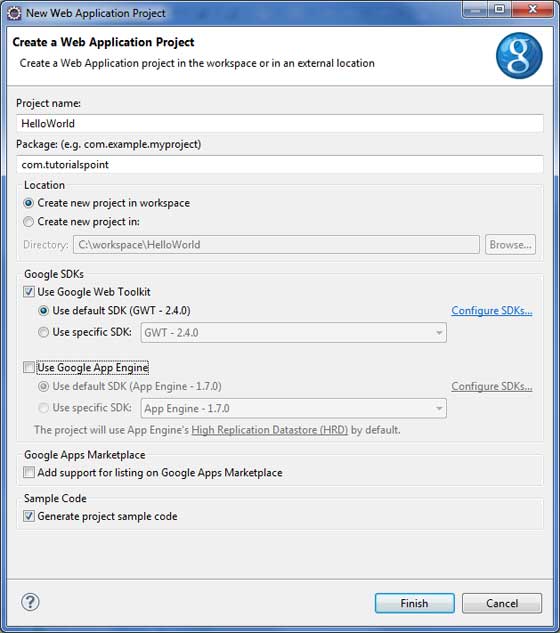
Unselect Use Google App Engine because we're not using it in this project and leave other default values (keep Generate Sample project code option checked) as such and click Finish Button.
Once your project is created successfully, you will have following content in your Project Explorer −
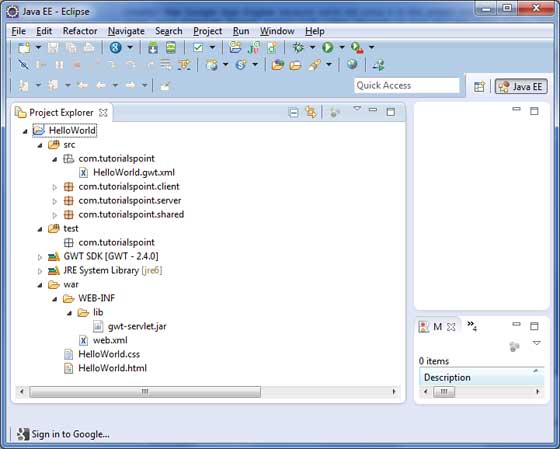
Here is brief description of all important folders
| Sr.No. | Folder & Location |
|---|---|
| 1 | src Source code (java classes) files. Client folder containing the client-side specific java classes responsible for client UI display. Server folder containing the server-side java classes responsible for server side processing. Shared folder containing the java model class to transfer data from server to client and vice versa. HelloWorld.gwt.xml, a module descriptor file required for GWT compiler to compile the HelloWorld project. |
| 2 | test Test code (java classes) source files. Client folder containing the java classes responsible to test gwt client side code. |
| 3 | war This is the most important part, it represents the actual deployable web application. WEB-INF containing compiled classes, gwt libraries, servlet libraries. HelloWorld.css, project style sheet. HelloWorld.html, hots HTML which will invoke GWT UI Application. |
Step 2 - Modify Module Descriptor: HelloWorld.gwt.xml
GWT plugin will create a default module descriptor file src/com.tutorialspoint/HelloWorld.gwt.xml which is given below. For this example we are not modifying it, but you can modify it based on your requirement.
<?xml version = "1.0" encoding = "UTF-8"?>
<module rename-to = 'helloworld'>
   <!-- Inherit the core Web Toolkit stuff.                        -->
   <inherits name = 'com.google.gwt.user.User'/>

   <!-- Inherit the default GWT style sheet.  You can change       -->
   <!-- the theme of your GWT application by uncommenting          -->
   <!-- any one of the following lines.                            -->
   <inherits name = 'com.google.gwt.user.theme.clean.Clean'/>
   <!-- <inherits name = 'com.google.gwt.user.theme.chrome.Chrome'/> -->
   <!-- <inherits name = 'com.google.gwt.user.theme.dark.Dark'/>     -->

   <!-- Other module inherits                                      -->

   <!-- Specify the app entry point class.                         -->
   <entry-point class = 'com.tutorialspoint.client.HelloWorld'/>

   <!-- Specify the paths for translatable code                    -->
   <source path = 'client'/>
   <source path = 'shared'/>

</module>
Step 3 - Modify Style Sheet: HelloWorld.css
GWT plugin will create a default Style Sheet file war/HelloWorld.css. Let us modify this file to keep our example at simplest level of understaning −
body {
   text-align: center;
   font-family: verdana, sans-serif;
}

h1 {
   font-size: 2em;
   font-weight: bold;
   color: #777777;
   margin: 40px 0px 70px;
   text-align: center;
}
Step 4 - Modify Host File: HelloWorld.html
GWT plugin will create a default HTML host file war/HelloWorld.html. Let us modify this file to keep our example at simplest level of understaning −
<html>
   <head>
      <title>Hello World</title>
      <link rel = "stylesheet" href = "HelloWorld.css"/>
      <script language = "javascript" src = "helloworld/helloworld.nocache.js">
      </script>
   </head>

   <body>
      <h1>Hello World</h1>
      <p>Welcome to first GWT application</p>
   </body>
</html>
You can create more static files like HTML, CSS or images in the same source directory or you can create further sub-directories and move files in those sub-directories and configure those sub-directories in module descriptor of the application.
Step 5 - Modify Entry Point: HelloWorld.java
GWT plugin will create a default Java file src/com.tutorialspoint/HelloWorld.java, which keeps an entry point for the application.
Let us modify this file to display "Hello,World!"
package com.tutorialspoint.client;

import com.google.gwt.core.client.EntryPoint;
import com.google.gwt.user.client.Window;

public class HelloWorld implements EntryPoint {
   public void onModuleLoad() {
      Window.alert("Hello, World!");
   }
}
You can create more Java files in the same source directory to define either entry points or to define helper routines.
Step 6 - Compile Application
Once you are ready with all the changes done, its time to compile the project. Use the option Google Icon
![]()
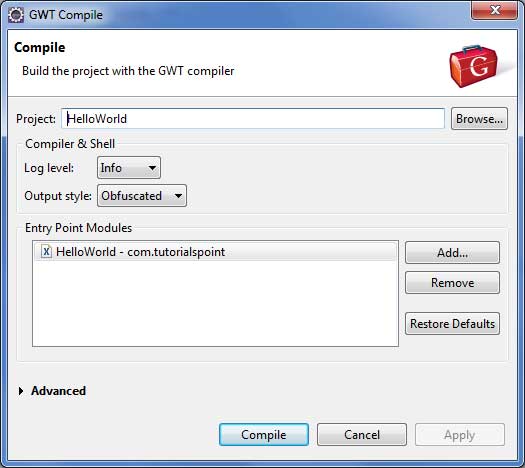
Keep default values intact and click Compile button. If everything goes fine, you will see following output in Eclipse console
Compiling module com.tutorialspoint.HelloWorld
   Compiling 6 permutations
      Compiling permutation 0...
      Compiling permutation 1...
      Compiling permutation 2...
      Compiling permutation 3...
      Compiling permutation 4...
      Compiling permutation 5...
   Compile of permutations succeeded
Linking into C:\workspace\HelloWorld\war\helloworld
   Link succeeded
   Compilation succeeded -- 33.029s
Step 7 - Run Application
Now click on

If everything is fine, you must see GWT Development Mode active in Eclipse containing a URL as shown below. Double click the URL to open the GWT application.

Because you are running your application in development mode, so you will need to install GWT plugin for your browser. Simply follow the onscreen instructions to install the plugin.
If you already have GWT plugin set for your browser, then you should be able to see the following output
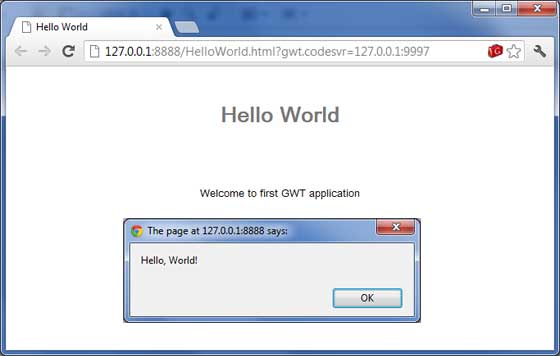
Congratulations! you have implemented your first application using Google Web Toolkit (GWT).
This tutorial will explain you how to create an application "war" file and how to deploy that in Apache Tomcat Websever root.
If you understood this simple example then you will also be able to deploy a complex GWT application following the same steps.
Let us have working Eclipse IDE along with GWT plug in place and follow the following steps to create a GWT application −
| Step | Description |
|---|---|
| 1 | Create a project with a name HelloWorld under a package com.tutorialspoint as explained in the GWT - Create Application chapter. |
| 2 | Modify HelloWorld.gwt.xml, HelloWorld.css, HelloWorld.html and HelloWorld.java as explained below. Keep rest of the files unchanged. |
| 3 | Compile and run the application to make sure business logic is working as per the requirements. |
| 4 | Finally, zip the content of the war folder of the application in the form of war file and deploy it in Apache Tomcat Webserver. |
| 5 | Launch your web application using appropriate URL as explained below in the last step. |
Following is the content of the modified module descriptor src/com.tutorialspoint/HelloWorld.gwt.xml.
<?xml version = "1.0" encoding = "UTF-8"?>
<module rename-to = 'helloworld'>
   <!-- Inherit the core Web Toolkit stuff.                        -->
   <inherits name = 'com.google.gwt.user.User'/>

   <!-- Inherit the default GWT style sheet.                       -->
   <inherits name = 'com.google.gwt.user.theme.clean.Clean'/>

   <!-- Specify the app entry point class.                         -->
   <entry-point class = 'com.tutorialspoint.client.HelloWorld'/>

   <!-- Specify the paths for translatable code                    -->
   <source path = 'client'/>
   <source path = 'shared'/>

</module>
Following is the content of the modified Style Sheet file war/HelloWorld.css.
body {
   text-align: center;
   font-family: verdana, sans-serif;
}

h1 {
   font-size: 2em;
   font-weight: bold;
   color: #777777;
   margin: 40px 0px 70px;
   text-align: center;
}
Following is the content of the modified HTML host file war/HelloWorld.html.
<html>
   <head>
      <title>Hello World</title>
      <link rel = "stylesheet" href = "HelloWorld.css"/>
      <script language = "javascript" src = "helloworld/helloworld.nocache.js">
      </script>
   </head>

   <body>
      <h1>Hello World</h1>
      <div id = "gwtContainer"></div>
   </body>
</html>
I modified HTML a little bit from previous example. Here I created a placeholder <div>...</div> where we will insert some content using our entry point java class. So let us have following content of Java file src/com.tutorialspoint/HelloWorld.java.
package com.tutorialspoint.client;

import com.google.gwt.core.client.EntryPoint;
import com.google.gwt.user.client.ui.HTML;
import com.google.gwt.user.client.ui.RootPanel;

public class HelloWorld implements EntryPoint {
   public void onModuleLoad() {
      HTML html = new HTML("<p>Welcome to GWT application</p>");

      RootPanel.get("gwtContainer").add(html);
   }
}
Here we created on basic widgest HTML and added it inside the div tag having id="gwtContainer". We will study different GWT widgets in coming chapters.
Once you are ready with all the changes done, let us compile and run the application in development mode as we did in GWT - Create Application chapter. If everything is fine with your application, this will produce following result −
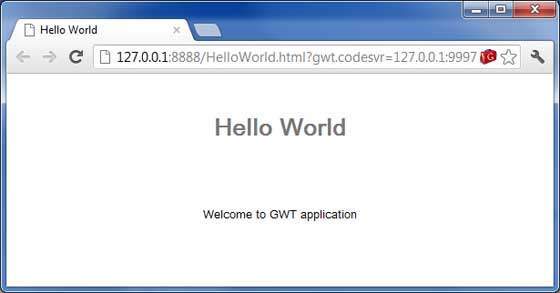
Create WAR File
Now our applictaion is working fine and we are ready to export it as a war file.
Follow the following steps −
Go into your project's war directory C:\workspace\HelloWorld\war
Select all the files & folders available inside war directory.
Zip all the selected files & folders in a file called HelloWorld.zip.
Rename HelloWorld.zip to HelloWorld.war.
Deploy WAR file
Stop the tomcat server.
Copy the HelloWorld.war file to tomcat installation directory > webapps folder.
Start the tomcat server.
Look inside webapps directory, there should be a folder helloworld got created.
Now HelloWorld.war is successfully deployed in Tomcat Webserver root.
Run Application
Enter a url in web browser: http://localhost:8080/HelloWorld to launch the application
Server name (localhost) and port (8080) may vary as per your tomcat configuration.
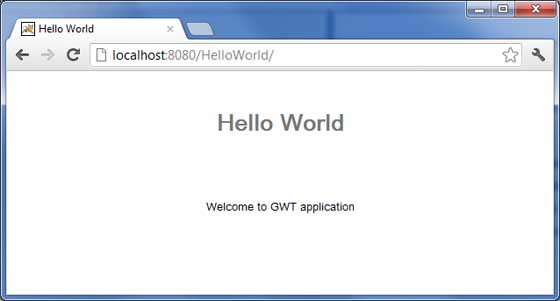
GWT widgets rely on cascading style sheets (CSS) for visual styling. By default, the class name for each component is gwt-<classname>.
For example, the Button widget has a default style of gwt-Button and similar way TextBox widgest has a default style of gwt-TextBox.
In order to give all buttons and text boxes a larger font, you could put the following rule in your application's CSS file
.gwt-Button  { font-size: 150%; }

.gwt-TextBox { font-size: 150%; }
By default, neither the browser nor GWT creates default id attributes for widgets. You must explicitly create a unique id for the elements which you can use in CSS. In order to give a particular button with id my-button-id a larger font, you could put the following rule in your application's CSS file −
#my-button-id { font-size: 150%; }To set the id for a GWT widget, retrieve its DOM Element and then set the id attribute as follows −
Button b = new Button();
DOM.setElementAttribute(b.getElement(), "id", "my-button-id")
CSS Styling APIs
There are many APIs available to hangle CSS setting for any GWT widget. Following are few important APIs which will help you in your day to day web programming using GWT −
| Sr.No. | API & Description |
|---|---|
| 1 | public void setStyleName(java.lang.String style) This method will clear any existing styles and set the widget style to the new CSS class provided using style. |
| 2 | public void addStyleName(java.lang.String style) This method will add a secondary or dependent style name to the widget. A secondary style name is an additional style name that is,so if there were any previous style names applied they are kept. |
| 3 | public void removeStyleName(java.lang.String style) This method will remove given style from the widget and leaves any others associated with the widget. |
| 4 | public java.lang.String getStyleName() This method gets all of the object's style names, as a space-separated list. |
| 5 | public void setStylePrimaryName(java.lang.String style) This method sets the object's primary style name and updates all dependent style names. |
For example, let's define two new styles which we will apply to a text −
.gwt-Big-Text {
   font-size:150%;
}

.gwt-Small-Text {
   font-size:75%;
}

.gwt-Red-Text {
   color:red;
}
Now you can use setStyleName(Style) to change the default setting to new setting. After applying the below rule, a text's font will become large
txtWidget.setStyleName("gwt-Big-Text");We can apply a secondary CSS rule on the same widget to change its color as follows −
txtWidget.addStyleName("gwt-Red-Text");Using above method you can add as many styles as you like to apply on a widget. If you remove first style from the button widget then second style will still remain with the text.
txtWidget.removeStyleName("gwt-Big-Text");Primary & Secondary Styles
By default, the primary style name of a widget will be the default style name for its widget class for example gwt-Button for Button widgets. When we add and remove style names using AddStyleName() method, those styles are called secondary styles.
The final appearance of a widget is determined by the sum of all the secondary styles added to it, plus its primary style. You set the primary style of a widget with the setStylePrimaryName(String) method. To illustrate, let's say we have a Label widget. In our CSS file, we have the following rules defined −
.MyText {
   color: blue;
}

.BigText {
   font-size: large;
}

.LoudText {
   font-weight:  bold;
}
Let's suppose we want a particular label widget to always display blue text, and in some cases, use a larger, bold font for added emphasis.
We could do something like this −
// set up our primary style
Label someText = new Label();
someText.setStylePrimaryName("MyText");
...

// later on, to really grab the user's attention
someText.addStyleName("BigText");
someText.addStyleName("LoudText");
...

// after the crisis is over
someText.removeStyleName("BigText");
someText.removeStyleName("LoudText");
Associating CSS Files
There are multiple approaches for associating CSS files with your module. Modern GWT applications typically use a combination of CssResource and UiBinder. We are using only first approach in our examples.
Using a <link> tag in the host HTML page.
Using the <stylesheet> element in the module XML file.
Using a CssResource contained within a ClientBundle.
Using an inline <ui:style> element in a UiBinder template.
GWT CSS Example
This example will take you through simple steps to apply different CSS rules on your GWT widgest. Let us have working Eclipse IDE along with GWT plug in place and follow the following steps to create a GWT application −
| Step | Description |
|---|---|
| 1 | Create a project with a name HelloWorld under a package com.tutorialspoint as explained in the GWT - Create Application chapter. |
| 2 | Modify HelloWorld.gwt.xml, HelloWorld.css, HelloWorld.html and HelloWorld.java as explained below. Keep rest of the files unchanged. |
| 3 | Compile and run the application to verify the result of the implemented logic. |
Following is the content of the modified module descriptor src/com.tutorialspoint/HelloWorld.gwt.xml.
<?xml version = "1.0" encoding = "UTF-8"?>
<module rename-to = 'helloworld'>
   <!-- Inherit the core Web Toolkit stuff.                        -->
   <inherits name = 'com.google.gwt.user.User'/>

   <!-- Inherit the default GWT style sheet.                       -->
   <inherits name = 'com.google.gwt.user.theme.clean.Clean'/>

   <!-- Specify the app entry point class.                         -->
   <entry-point class = 'com.tutorialspoint.client.HelloWorld'/>

   <!-- Specify the paths for translatable code                    -->
   <source path = 'client'/>
   <source path = 'shared'/>

</module>
Following is the content of the modified Style Sheet file war/HelloWorld.css.
body {
   text-align: center;
   font-family: verdana, sans-serif;
}

h1 {
   font-size: 2em;
   font-weight: bold;
   color: #777777;
   margin: 40px 0px 70px;
   text-align: center;
}

.gwt-Button {
   font-size: 150%;
   font-weight: bold;
   width:100px;
   height:100px;
}

.gwt-Big-Text {
   font-size:150%;
}

.gwt-Small-Text {
   font-size:75%;
}
Following is the content of the modified HTML host file war/HelloWorld.html to accomodate two buttons.
<html>
   <head>
      <title>Hello World</title>
      <link rel = "stylesheet" href = "HelloWorld.css"/>
      <script language = "javascript" src = "helloworld/helloworld.nocache.js">
      </script>
   </head>

   <body>
      <div id = "mytext"><h1>Hello, World!</h1></div>
      <div id = "gwtGreenButton"></div>
      <div id = "gwtRedButton"></div>
   </body>
</html>
Let us have following content of Java file src/com.tutorialspoint/HelloWorld.java which will take care of adding two buttons in HTML and will apply custom CSS style.
package com.tutorialspoint.client;

import com.google.gwt.core.client.EntryPoint;
import com.google.gwt.event.dom.client.ClickEvent;
import com.google.gwt.event.dom.client.ClickHandler;
import com.google.gwt.user.client.ui.Button;
import com.google.gwt.user.client.ui.HTML;
import com.google.gwt.user.client.ui.RootPanel;

public class HelloWorld implements EntryPoint {
   public void onModuleLoad() {

   // add button to change font to big when clicked.
   Button Btn1 = new Button("Big Text");
   Btn1.addClickHandler(new ClickHandler() {
      public void onClick(ClickEvent event) {
         RootPanel.get("mytext").setStyleName("gwt-Big-Text");
      }
   });

   // add button to change font to small when clicked.
   Button Btn2 = new Button("Small Text");
   Btn2.addClickHandler(new ClickHandler() {
      public void onClick(ClickEvent event) {
         RootPanel.get("mytext").setStyleName("gwt-Small-Text");
      }
   });

   RootPanel.get("gwtGreenButton").add(Btn1);
   RootPanel.get("gwtRedButton").add(Btn2);
   }
}
Once you are ready with all the changes done, let us compile and run the application in development mode as we did in GWT - Create Application chapter. If everything is fine with your application, this will produce following result −
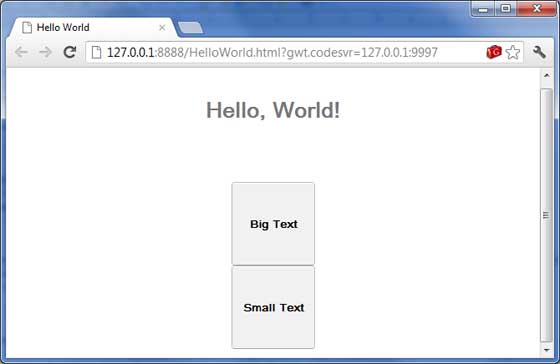
Now try clicking on the two buttons displayed and observe "Hello, World!" text which keeps changing its font upon clicking on the two buttons.
Every user interface considers the following three main aspects −
UI elements − Thes are the core visual elements the user eventually sees and interacts with. GWT provides a huge list of widely used and common elements varying from basic to complex which we will cover in this tutorial.
Layouts − They define how UI elements should be organized on the screen and provide a final look and feel to the GUI (Graphical User Interface). This part will be covered in Layout chapter.
Behavior − These are events which occur when the user interacts with UI elements. This part will be covered in Event Handling chapter.
GWT UI Elements
The GWT library provides classes in a well-defined class hierarchy to create complex web-based user interfaces. All classes in this component hierarchy has been derived from the UIObject base class as shown below −
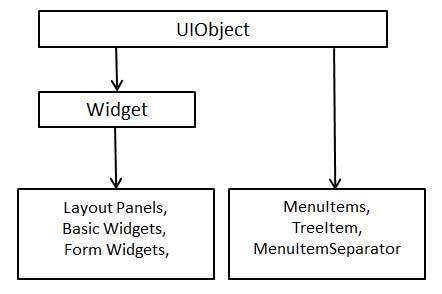
Every Basic UI widget inherits properties from Widget class which in turn inherits properties from UIObject. Tree and Menu will be covered in complex widgets tutorial.
| Sr.No. | Widget & Description |
|---|---|
| 1 | GWT UIObject Class This widget contains text, not interpreted as HTML using a <div>element, causing it to be displayed with block layout. |
| 2 | GWT Widget Class This widget can contain HTML text and displays the html content using a <div> element, causing it to be displayed with block layout. |
Basic Widgets
Following are few important Basic Widgets −
| Sr.No. | Widget & Description |
|---|---|
| 1 | Label This widget contains text, not interpreted as HTML using a <div>element, causing it to be displayed with block layout. |
| 2 | HTML This widget can contain HTML text and displays the html content using a <div> element, causing it to be displayed with block layout. |
| 3 | Image This widget displays an image at a given URL. |
| 4 | Anchor This widget represents a simple <a> element. |
Form widgets allows users to input data and provides them interaction capability with the application. Every Form widget inherits properties from Widget class which in turn inherits properties from UIObject and Wigdet classes.
| Sr.No. | Widget & Description |
|---|---|
| 1 | GWT UIObject Class This widget contains text, not interpreted as HTML using a <div>element, causing it to be displayed with block layout. |
| 2 | GWT Widget Class This widget can contain HTML text and displays the html content using a <div> element, causing it to be displayed with block layout. |
Form Widgets
Following are few important Form Widgets −
| Sr.No. | Widget & Description |
|---|---|
| 1 | Button This widget represents a standard push button. |
| 2 | PushButton This widget represents a normal push button with custom styling. |
| 3 | ToggleButton This widget represents a stylish stateful button which allows the user to toggle between up and down states. |
| 4 | CheckBox This widget represents a standard check box widget. This class also serves as a base class for RadioButton. |
| 5 | RadioButton This widget represents a mutually-exclusive selection radio button widget. |
| 6 | ListBox This widget represents a list of choices to the user, either as a list box or as a drop-down list. |
| 7 | SuggestBox This widget represents a text box or text area which displays a pre-configured set of selections that match the user's input. Each SuggestBox is associated with a single SuggestOracle. The SuggestOracle is used to provide a set of selections given a specific query string. |
| 8 | TextBox This widget represents a single line text box. |
| 9 | PasswordTextBox This widget represents a text box that visually masks its input to prevent eavesdropping.. |
| 10 | TextArea This widget represents a text box that allows multiple lines of text to be entered. |
| 11 | RichTextArea This widget represents a rich text editor that allows complex styling and formatting. |
| 12 | FileUpload This widget wraps the HTML <input type='file'> element. |
| 13 | Hidden This widget represets a hidden field in an HTML form. |
"Complex widgets" allows users to advanced interaction capability with the application. Every Complex widget inherits properties from Widget class which in turn inherits properties from UIObject.
| Sr.No. | Widget & Description |
|---|---|
| 1 | GWT UIObject Class This widget contains text, not interpreted as HTML using a <div>element, causing it to be displayed with block layout. |
| 2 | GWT Widget Class This widget can contain HTML text and displays the html content using a <div> element, causing it to be displayed with block layout. |
Complex Widgets
Following are few important Complex Widgets −
| Sr.No. | Widget & Description |
|---|---|
| 1 | Tree This widget represents a standard hierarchical tree widget. The tree contains a hierarchy of TreeItems that the user can open, close, and select. |
| 2 | MenuBar This widget represents a standard menu bar widget. A menu bar can contain any number of menu items, each of which can either fire a Command or open a cascaded menu bar. |
| 3 | DatePicker This widget represents a standard GWT date picker. |
| 4 | CellTree This widget represents a view of a tree. This widget will only work in standards mode, which requires that the HTML page in which it is run have an explicit <!DOCTYPE> declaration. |
| 5 | CellList This widget represents a single column list of cells. |
| 6 | CellTable This widget represents a tabular view that supports paging and columns. |
| 7 | CellBrowser This widget represents a browsable view of a tree in which only a single node per level may be open at one time. This widget will only work in standards mode, which requires that the HTML page in which it is run have an explicit <!DOCTYPE> declaration. |
Layout Panels can contain other widgets. These panels controls the way widgets to be shown on User Interface. Every Panel widget inherits properties from Panel class which in turn inherits properties from Widget class and which in turn inherits properties from UIObject class.
| Sr.No. | Widget & Description |
|---|---|
| 1 | GWT UIObject Class This widget contains text, not interpreted as HTML using a <div>element, causing it to be displayed with block layout. |
| 2 | GWT Widget Class This widget can contain HTML text and displays the html content using a <div> element, causing it to be displayed with block layout. |
| 3 | GWT Panel Class This is an is the abstract base class for all panels, which are widgets that can contain other widgets. |
Panel Tata Letak
Berikut adalah beberapa Panel Tata Letak penting -
| Sr.No. | Widget & Deskripsi |
|---|---|
| 1 | FlowPanel Widget ini mewakili panel yang memformat widget turunannya menggunakan perilaku tata letak HTML default. |
| 2 | HorizontalPanel Widget ini mewakili panel yang meletakkan semua widgetnya dalam satu kolom horizontal. |
| 3 | VerticalPanel Widget ini mewakili panel yang meletakkan semua widgetnya dalam satu kolom vertikal. |
| 4 | HorizontalSplitPanel Widget ini mewakili panel yang mengatur dua widget dalam satu baris horizontal dan memungkinkan pengguna untuk secara interaktif mengubah proporsi lebar yang didedikasikan untuk masing-masing dari dua widget. Widget yang terdapat dalam HorizontalSplitPanel akan secara otomatis didekorasi dengan scrollbar jika diperlukan. |
| 5 | VerticalSplitPanel Widget ini mewakili panel A yang mengatur dua widget dalam satu kolom vertikal dan memungkinkan pengguna untuk secara interaktif mengubah proporsi ketinggian yang didedikasikan untuk masing-masing dari dua widget. Widget yang terdapat dalam VertialSplitPanel akan secara otomatis didekorasi dengan scrollbar jika diperlukan. |
| 6 | FlexTable Widget ini mewakili tabel fleksibel yang membuat sel sesuai permintaan. Ini dapat bergerigi (yaitu, setiap baris dapat berisi jumlah sel yang berbeda) dan sel individu dapat diatur untuk menjangkau beberapa baris atau kolom. |
| 7 | Kotak Widget ini mewakili kisi persegi panjang yang dapat berisi teks, html, atau Widget turunan di dalam selnya. Ini harus diubah ukurannya secara eksplisit ke jumlah baris dan kolom yang diinginkan. |
| 8 | DeckPanel panel yang menampilkan semua widget turunannya dalam 'dek', di mana hanya satu yang dapat terlihat dalam satu waktu. Ini digunakan oleh TabPanel. |
| 9 | DockPanel Widget ini mewakili panel yang meletakkan widget turunannya "berlabuh" di tepi luarnya, dan memungkinkan widget terakhirnya mengambil ruang yang tersisa di tengahnya. |
| 10 | HTMLPanel Widget ini mewakili panel yang berisi HTML, dan yang dapat melampirkan widget turunan ke elemen yang diidentifikasi dalam HTML itu. |
| 11 | TabPanel Widget ini mewakili panel yang mewakili sekumpulan halaman bertab, yang masing-masing berisi widget lain. Widget turunannya ditampilkan saat pengguna memilih berbagai tab yang terkait dengannya. Tab dapat berisi HTML sembarang. |
| 12 | Gabungan Widget ini mewakili jenis widget yang dapat membungkus widget lain, menyembunyikan metode widget yang dibungkus. Saat ditambahkan ke panel, komposit berperilaku persis seperti jika widget yang dibungkusnya telah ditambahkan. |
| 13 | SimplePanel Widget ini mewakili kelas Base untuk panel yang hanya berisi satu widget. |
| 14 | ScrollPanel Widget ini mewakili panel sederhana yang membungkus isinya di area yang dapat digulir |
| 15 | FocusPanel Widget ini mewakili panel sederhana yang membuat kontennya dapat difokuskan, dan menambahkan kemampuan untuk menangkap peristiwa mouse dan keyboard. |
| 16 | FormPanel Widget ini mewakili panel yang membungkus isinya dalam elemen <FORM> HTML. |
| 17 | PopupPanel Widget ini mewakili panel yang bisa pop updi atas widget lain. Ini melapisi area klien browser (dan sembulan yang dibuat sebelumnya). |
| 18 | Kotak dialog Widget ini merepresentasikan bentuk popup yang memiliki caption area di bagian atas dan dapat di-drag oleh pengguna. Tidak seperti PopupPanel, panggilan ke PopupPanel.setWidth (String) dan PopupPanel.setHeight (String) akan menyetel lebar dan tinggi dari kotak dialog itu sendiri, meskipun widget belum ditambahkan. |
GWT menyediakan model penanganan peristiwa yang mirip dengan kerangka kerja Antarmuka Pengguna AWT atau SWING Java.
Antarmuka pendengar menentukan satu atau beberapa metode yang dipanggil widget untuk mengumumkan suatu peristiwa. GWT menyediakan daftar antarmuka yang sesuai dengan berbagai kemungkinan kejadian.
Sebuah kelas yang ingin menerima kejadian dari jenis tertentu mengimplementasikan antarmuka penangan terkait dan kemudian meneruskan referensi ke widget itu sendiri untuk berlangganan sekumpulan kejadian.
Misalnya, file Button kelas menerbitkan click eventssehingga Anda akan harus menulis kelas untuk melaksanakan ClickHandler untuk menanganiclick peristiwa.
Antarmuka Penangan Peristiwa
Semua penangan peristiwa GWT telah diperluas dari antarmuka EventHandler dan setiap penangan hanya memiliki satu metode dengan satu argumen. Argumen ini selalu merupakan objek dari tipe kejadian terkait. Setiapeventobjek memiliki sejumlah metode untuk memanipulasi objek acara yang dilewatkan. Misalnya untuk acara klik Anda harus menulis penangan Anda sebagai berikut -
/**
 * create a custom click handler which will call
 * onClick method when button is clicked.
 */
public class MyClickHandler implements ClickHandler {
   @Override
   public void onClick(ClickEvent event) {
      Window.alert("Hello World!");
   }
}
Sekarang setiap kelas yang ingin menerima peristiwa klik akan menelepon addClickHandler() untuk mendaftarkan event handler sebagai berikut -
/**
 * create button and attach click handler
 */
Button button = new Button("Click Me!");
button.addClickHandler(new MyClickHandler());
Setiap widget yang mendukung tipe event akan memiliki metode dari bentuk penambahan HandlerRegistrationFooPenangan (FooAcara) di mana Foo adalah kejadian sebenarnya seperti Klik, Kesalahan, KeyPress, dll.
Berikut adalah daftar penangan peristiwa GWT penting dan peristiwa terkait serta metode pendaftaran penangan -
| Sr.No. | Antarmuka Acara | Metode & Deskripsi Acara |
|---|---|---|
| 1 | Sebelum Penangan Pemilihan <I> | void on Before Selection (Before Selection Event<I> event); Dipanggil saat BeforeSelectionEvent diaktifkan. |
| 2 | BlurHandler | void on Blur(Blur Event event); Dipanggil saat Blur Event diaktifkan. |
| 3 | ChangeHandler | void on Change(ChangeEvent event); Dipanggil saat peristiwa perubahan diaktifkan. |
| 4 | ClickHandler | void on Click(ClickEvent event); Dipanggil saat peristiwa klik asli diaktifkan. |
| 5 | CloseHandler <T> | void on Close(CloseEvent<T> event); Dipanggil saat CloseEvent diaktifkan. |
| 6 | Penangan Menu Konteks | void on Context Menu(Context Menu Event event); Dipanggil saat peristiwa menu konteks asli diaktifkan. |
| 7 | Double Click Handler | void on Double Click(Double Click Event event); Dipanggil saat Peristiwa Klik Ganda diaktifkan. |
| 8 | Penangan Kesalahan | void on Error(Error Event event); Dipanggil saat Peristiwa Kesalahan diaktifkan. |
| 9 | Penangan Fokus | void on Focus(Focus Event event); Dipanggil saat Focus Event diaktifkan. |
| 10 | Panel Formulir. Kirim Penangan Lengkap | void on Submit Complete(Form Panel.Submit Complete Event event); Diaktifkan ketika formulir telah berhasil dikirim. |
| 11 | FormPanel.SubmitHandler | void on Submit(Form Panel.Submit Event event); Dipecat saat formulir dikirimkan. |
| 12 | Penangan Key Down | void on Key Down(Key Down Event event); Dipanggil saat KeyDownEvent diaktifkan. |
| 13 | KeyPressHandler | void on KeyPress(KeyPressEvent event); Dipanggil saat KeyPressEvent diaktifkan. |
| 14 | KeyUpHandler | void on KeyUp(KeyUpEvent event); Dipanggil saat KeyUpEvent diaktifkan. |
| 15 | LoadHandler | void on Load(LoadEvent event); Dipanggil saat LoadEvent diaktifkan. |
| 16 | MouseDownHandler | void on MouseDown(MouseDownEvent event); Dipanggil saat MouseDown ditembakkan. |
| 17 | MouseMoveHandler | void on MouseMove(MouseMoveEvent event); Dipanggil saat MouseMoveEvent diaktifkan. |
| 18 | MouseOutHandler | void on MouseOut(MouseOutEvent event); Dipanggil saat MouseOutEvent diaktifkan. |
| 19 | MouseOverHandler | void on MouseOver(MouseOverEvent event); Dipanggil saat MouseOverEvent diaktifkan. |
| 20 | MouseUpHandler | void on MouseUp(MouseUpEvent event); Dipanggil saat MouseUpEvent diaktifkan. |
| 21 | MouseWheelHandler | void on MouseWheel(MouseWheelEvent event); Dipanggil saat MouseWheelEvent diaktifkan. |
| 22 | ResizeHandler | void on Resize(ResizeEvent event); Diaktifkan saat widget diubah ukurannya. |
| 23 | ScrollHandler | void on Scroll(ScrollEvent event); Dipanggil saat ScrollEvent diaktifkan. |
| 24 | SelectionHandler <I> | void on Selection(SelectionEvent<I> event); Dipanggil saat SelectionEvent diaktifkan. |
| 25 | ValueChangeHandler <I> | void on ValueChange(ValueChangeEvent<I> event); Dipanggil saat ValueChangeEvent diaktifkan. |
| 26 | Window.ClosingHandler | void on WindowClosing(Window.ClosingEvent event); Diaktifkan tepat sebelum jendela browser menutup atau menavigasi ke situs lain. |
| 27 | Window.ScrollHandler | void on WindowScroll(Window.ScrollEvent event); Diaktifkan saat jendela browser di-scroll. |
Metode Acara
Seperti disebutkan sebelumnya, setiap penangan memiliki satu metode dengan satu argumen yang menampung objek peristiwa, misalnya void onClick (peristiwa ClickEvent) atau void onKeyDown (peristiwa KeyDownEvent) . Objek acara seperti ClickEvent dan KeyDownEvent memiliki beberapa metode umum yang tercantum di bawah ini -
| Sr.No. | Metode & Deskripsi |
|---|---|
| 1 | protected void dispatch(ClickHandler handler) Metode ini seharusnya hanya dipanggil oleh HandlerManager |
| 2 | DomEvent.Type <FooHandler> getAssociatedType() Metode ini mengembalikan tipe yang digunakan untuk mendaftar Foo peristiwa. |
| 3 | static DomEvent.Type<FooHandler> getType() Metode ini mendapatkan jenis acara yang terkait dengan Foo acara. |
| 4 | public java.lang.Object getSource() Metode ini mengembalikan sumber yang terakhir kali mengaktifkan peristiwa ini. |
| 5 | protected final boolean isLive() Metode ini mengembalikan apakah acara ditayangkan. |
| 6 | protected void kill() Metode ini mematikan acara tersebut |
Contoh
Contoh ini akan memandu Anda melalui langkah-langkah sederhana untuk menunjukkan penggunaan file Click Acara dan KeyDownPenanganan acara di GWT. Ikuti langkah-langkah berikut untuk memperbarui aplikasi GWT yang kami buat di GWT - bab Membuat Aplikasi -
| Langkah | Deskripsi |
|---|---|
| 1 | Buat proyek dengan nama HelloWorld di bawah paket com.tutorialspoint seperti yang dijelaskan di bab GWT - Membuat Aplikasi . |
| 2 | Modifikasi HelloWorld.gwt.xml , HelloWorld.css , HelloWorld.html dan HelloWorld.java seperti yang dijelaskan di bawah ini. Jaga file lainnya tidak berubah. |
| 3 | Kompilasi dan jalankan aplikasi untuk memverifikasi hasil dari logika yang diimplementasikan. |
Berikut adalah isi dari deskriptor modul yang dimodifikasi src/com.tutorialspoint/HelloWorld.gwt.xml.
<?xml version = "1.0" encoding = "UTF-8"?>
<module rename-to = 'helloworld'>
   <!-- Inherit the core Web Toolkit stuff.                        -->
   <inherits name = 'com.google.gwt.user.User'/>

   <!-- Inherit the default GWT style sheet.                       -->
   <inherits name = 'com.google.gwt.user.theme.clean.Clean'/>

   <!-- Specify the app entry point class.                         -->
   <entry-point class = 'com.tutorialspoint.client.HelloWorld'/>

   <!-- Specify the paths for translatable code                    -->
   <source path = 'client'/>
   <source path = 'shared'/>

</module>
Berikut ini adalah konten file Style Sheet yang dimodifikasi war/HelloWorld.css.
body {
   text-align: center;
   font-family: verdana, sans-serif;
}

h1 {
   font-size: 2em;
   font-weight: bold;
   color: #777777;
   margin: 40px 0px 70px;
   text-align: center;
}
Berikut adalah konten dari file host HTML yang dimodifikasi war/HelloWorld.html.
<html>
   <head>
      <title>Hello World</title>
      <link rel = "stylesheet" href = "HelloWorld.css"/>
      <script language = "javascript" src = "helloworld/helloworld.nocache.js">
      </script>
   </head>

   <body>
      <h1>Event Handling Demonstration</h1>
      <div id = "gwtContainer"></div>
   </body>
</html>
Mari kita ikuti konten file Java berikut src/com.tutorialspoint/HelloWorld.java yang akan mendemonstrasikan penggunaan Penanganan Peristiwa di GWT.
package com.tutorialspoint.client;

import com.google.gwt.core.client.EntryPoint;
import com.google.gwt.event.dom.client.ClickEvent;
import com.google.gwt.event.dom.client.ClickHandler;
import com.google.gwt.event.dom.client.KeyCodes;
import com.google.gwt.event.dom.client.KeyDownEvent;
import com.google.gwt.event.dom.client.KeyDownHandler;
import com.google.gwt.user.client.Window;
import com.google.gwt.user.client.ui.Button;
import com.google.gwt.user.client.ui.DecoratorPanel;
import com.google.gwt.user.client.ui.HasHorizontalAlignment;
import com.google.gwt.user.client.ui.RootPanel;
import com.google.gwt.user.client.ui.TextBox;
import com.google.gwt.user.client.ui.VerticalPanel;

public class HelloWorld implements EntryPoint {
   public void onModuleLoad() {
      /**
       * create textbox and attach key down handler
       */
      TextBox textBox = new TextBox();
      textBox.addKeyDownHandler(new MyKeyDownHandler());

      /*
       * create button and attach click handler
       */
      Button button = new Button("Click Me!");
      button.addClickHandler(new MyClickHandler());

      VerticalPanel panel = new VerticalPanel();
      panel.setSpacing(10);
      panel.setHorizontalAlignment(HasHorizontalAlignment.ALIGN_CENTER);
      panel.setSize("300", "100");
      panel.add(textBox);
      panel.add(button);

      DecoratorPanel decoratorPanel = new DecoratorPanel();
      decoratorPanel.add(panel);
      RootPanel.get("gwtContainer").add(decoratorPanel);
   }

   /**
    * create a custom click handler which will call
    * onClick method when button is clicked.
    */
   private class MyClickHandler implements ClickHandler {
      @Override
      public void onClick(ClickEvent event) {
         Window.alert("Hello World!");
      }
   }

   /**
    * create a custom key down handler which will call
    * onKeyDown method when a key is down in textbox.
    */
   private class MyKeyDownHandler implements KeyDownHandler {
      @Override
      public void onKeyDown(KeyDownEvent event) {
         if(event.getNativeKeyCode() == KeyCodes.KEY_ENTER){
            Window.alert(((TextBox)event.getSource()).getValue());
         }
      }
   }
}
Setelah Anda siap dengan semua perubahan yang dilakukan, mari kita kompilasi dan jalankan aplikasi dalam mode pengembangan seperti yang kita lakukan di bab GWT - Membuat Aplikasi . Jika semuanya baik-baik saja dengan aplikasi Anda, ini akan menghasilkan hasil sebagai berikut -
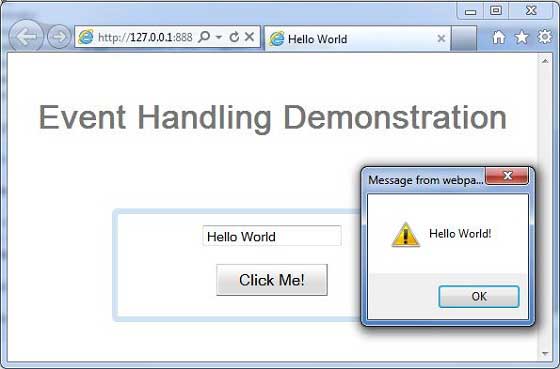
GWT menyediakan tiga cara untuk membuat elemen antarmuka pengguna khusus. Ada tiga strategi umum untuk diikuti -
Create a widget by extending Composite Class- Ini adalah cara paling umum dan termudah untuk membuat widget khusus. Di sini Anda dapat menggunakan widget yang ada untuk membuat tampilan komposit dengan properti kustom.
Create a widget using GWT DOM API in JAVA- Widget dasar GWT dibuat dengan cara ini. Masih merupakan cara yang sangat rumit untuk membuat widget khusus dan harus digunakan dengan hati-hati.
Use JavaScript and wrap it in a widget using JSNI- Ini biasanya hanya dilakukan sebagai upaya terakhir. Mempertimbangkan implikasi lintas browser dari metode asli, ini menjadi sangat rumit dan juga menjadi lebih sulit untuk di-debug.
Buat Widget Kustom dengan Kelas Komposit
Contoh ini akan memandu Anda melalui langkah-langkah sederhana untuk menampilkan pembuatan Widget Khusus di GWT. Ikuti langkah-langkah berikut untuk memperbarui aplikasi GWT yang kami buat di GWT - bab Widget Dasar -
Di sini kita akan membuat widget khusus dengan memperluas kelas Composite, yang merupakan cara termudah untuk membuat widget khusus.
| Langkah | Deskripsi |
|---|---|
| 1 | Buat proyek dengan nama HelloWorld di bawah paket com.tutorialspoint seperti yang dijelaskan di bab GWT - Membuat Aplikasi . |
| 2 | Modifikasi HelloWorld.gwt.xml , HelloWorld.css , HelloWorld.html dan HelloWorld.java seperti yang dijelaskan di bawah ini. Jaga file lainnya tidak berubah. |
| 3 | Kompilasi dan jalankan aplikasi untuk memverifikasi hasil dari logika yang diimplementasikan. |
Berikut adalah isi dari deskriptor modul yang dimodifikasi src/com.tutorialspoint/HelloWorld.gwt.xml.
<?xml version = "1.0" encoding = "UTF-8"?>
<module rename-to = 'helloworld'>
   <!-- Inherit the core Web Toolkit stuff.                        -->
   <inherits name = 'com.google.gwt.user.User'/>

   <!-- Inherit the default GWT style sheet.                       -->
   <inherits name = 'com.google.gwt.user.theme.clean.Clean'/>

   <!-- Specify the app entry point class.                         -->
   <entry-point class = 'com.tutorialspoint.client.HelloWorld'/>

   <!-- Specify the paths for translatable code                    -->
   <source path = 'client'/>
   <source path = 'shared'/>

</module>
Berikut ini adalah konten file Style Sheet yang dimodifikasi war/HelloWorld.css.
body {
   text-align: center;
   font-family: verdana, sans-serif;
}

h1 {
   font-size: 2em;
   font-weight: bold;
   color: #777777;
   margin: 40px 0px 70px;
   text-align: center;
}
Berikut adalah konten dari file host HTML yang dimodifikasi war/HelloWorld.html.
<html>
   <head>
      <title>Hello World</title>
      <link rel = "stylesheet" href = "HelloWorld.css"/>
      <script language = "javascript" src = "helloworld/helloworld.nocache.js">
      </script>
   </head>

   <body>
      <h1>Custom Widget Demonstration</h1>
      <div id = "gwtContainer"></div>
   </body>
</html>
Mari kita ikuti konten file Java berikut src/com.tutorialspoint/HelloWorld.java yang akan mendemonstrasikan pembuatan widget Kustom.
package com.tutorialspoint.client;

import com.google.gwt.core.client.EntryPoint;
import com.google.gwt.event.dom.client.ClickEvent;
import com.google.gwt.event.dom.client.ClickHandler;
import com.google.gwt.user.client.ui.CheckBox;
import com.google.gwt.user.client.ui.Composite;
import com.google.gwt.user.client.ui.HorizontalPanel;
import com.google.gwt.user.client.ui.RootPanel;
import com.google.gwt.user.client.ui.TextBox;

public class HelloWorld implements EntryPoint {

   /**
    * A composite of a TextBox and a CheckBox that optionally enables it.
    */
   private static class OptionalTextBox extends Composite implements
   ClickHandler {

      private TextBox textBox = new TextBox();
      private CheckBox checkBox = new CheckBox();
      private boolean enabled = true;

      public boolean isEnabled() {
         return enabled;
      }

      public void setEnabled(boolean enabled) {
         this.enabled = enabled;
      }

      /**
       * Style this widget using .optionalTextWidget CSS class.<br/>
       * Style textbox using .optionalTextBox CSS class.<br/>
       * Style checkbox using .optionalCheckBox CSS class.<br/>
       * Constructs an OptionalTextBox with the given caption
       * on the check.
       * @param caption the caption to be displayed with the check box
       */
      public OptionalTextBox(String caption) {
         // place the check above the text box using a vertical panel.
         HorizontalPanel panel = new HorizontalPanel();
         // panel.setBorderWidth(1);
         panel.setSpacing(10);
         panel.add(checkBox);
         panel.add(textBox);

         // all composites must call initWidget() in their constructors.
         initWidget(panel);

         //set style name for entire widget
         setStyleName("optionalTextWidget");

         //set style name for text box
         textBox.setStyleName("optionalTextBox");

         //set style name for check box
         checkBox.setStyleName("optionalCheckBox");
         textBox.setWidth("200");

         // Set the check box's caption, and check it by default.
         checkBox.setText(caption);
         checkBox.setValue(enabled);
         checkBox.addClickHandler(this);
         enableTextBox(enabled,checkBox.getValue());
      }

      public void onClick(ClickEvent event) {
         if (event.getSource() == checkBox) {
            // When the check box is clicked,
            //update the text box's enabled state.
            enableTextBox(enabled,checkBox.getValue());
         }
      }

      private void enableTextBox(boolean enable,boolean isChecked){
         enable = (enable && isChecked) || (!enable && !isChecked);
         textBox.setStyleDependentName("disabled", !enable);
         textBox.setEnabled(enable);
      }
   }

   public void onModuleLoad() {
      // Create an optional text box and add it to the root panel.
      OptionalTextBox otb = new OptionalTextBox(
         "Want to explain the solution?");
      otb.setEnabled(true);
      RootPanel.get().add(otb);
   }
}
Setelah Anda siap dengan semua perubahan yang dilakukan, mari kita kompilasi dan jalankan aplikasi dalam mode pengembangan seperti yang kita lakukan di bab GWT - Membuat Aplikasi . Jika semuanya baik-baik saja dengan aplikasi Anda, ini akan menghasilkan hasil sebagai berikut -
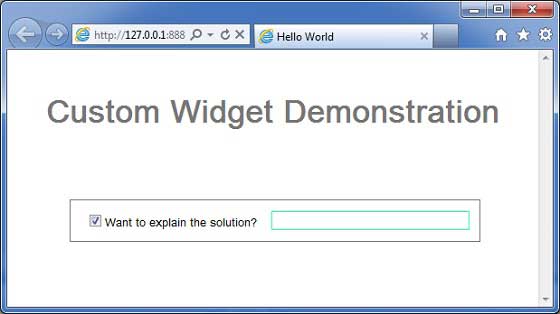
You can notice following points
Pembuatan Widget Khusus dengan memperluas widget Komposit cukup mudah.
Kami telah membuat widget dengan widget bawaan GWT, TextBox, dan CheckBox menggunakan konsep dapat digunakan kembali.
TextBox dinonaktifkan / diaktifkan tergantung pada status kotak centang. Kami telah menyediakan API untuk mengaktifkan / menonaktifkan kontrol.
Kami telah mengekspos gaya widget internal melalui gaya CSS yang didokumentasikan.
pengantar
UiBinder adalah kerangka kerja yang dirancang untuk memisahkan Fungsionalitas dan Tampilan Antarmuka Pengguna.
Kerangka kerja UiBinder memungkinkan pengembang untuk membangun aplikasi gwt sebagai halaman HTML dengan widget GWT yang dikonfigurasi di dalamnya.
Kerangka kerja UiBinder membuat kolaborasi lebih mudah dengan desainer UI yang lebih nyaman dengan XML, HTML dan CSS daripada kode sumber Java
UIBinder menyediakan cara deklaratif untuk mendefinisikan Antarmuka Pengguna.
UIBinder memisahkan logika program dari UI.
UIBinder mirip dengan JSP untuk Servlets.
Alur Kerja UiBinder
Langkah 1 - Buat File XML Deklarasi UI
Buat file deklarasi Antarmuka Pengguna berbasis XML / HTML. Kami telah membuatLogin.ui.xml mengajukan dalam contoh kami.
<ui:UiBinder xmlns:ui = 'urn:ui:com.google.gwt.uibinder'
   xmlns:gwt = 'urn:import:com.google.gwt.user.client.ui'
   xmlns:res = 'urn:with:com.tutorialspoint.client.LoginResources'>
   <ui:with type = "com.tutorialspoint.client.LoginResources" field = "res">
   </ui:with>
   <gwt:HTMLPanel>
   ...
   </gwt:HTMLPanel>
</ui:UiBinder>
Langkah 2 - Gunakan bidang ui: untuk Pengikatan Nanti
Gunakan atribut ui: field dalam elemen XML / HTML untuk menghubungkan bidang UI di XML dengan bidang UI di file JAVA untuk pengikatan nanti.
<gwt:Label ui:field = "completionLabel1" />
<gwt:Label ui:field = "completionLabel2" />
Langkah 3 - Buat mitra Java dari XML UI
Buat pasangan berbasis Java dari tata letak berbasis XML dengan memperluas widget Komposit. Kami telah membuatLogin.java mengajukan dalam contoh kami.
package com.tutorialspoint.client;
   ...
public class Login extends Composite {
   ...
}
Langkah 4 - Ikat bidang UI Java dengan anotasi UiField
gunakan anotasi @UiField di Login.java untuk menunjuk anggota kelas mitra untuk mengikat ke bidang berbasis XML di Login.ui.xml
public class Login extends Composite {
   ...
   @UiField
   Label completionLabel1;

   @UiField
   Label completionLabel2;
   ...
}
Langkah 5 - Ikat UI Java dengan XML UI dengan anotasi UiTemplate
Perintahkan GWT untuk mengikat komponen berbasis java Login.java dan tata letak berbasis XML Login.ui.xml menggunakan anotasi @UiTemplate
public class Login extends Composite {

   private static LoginUiBinder uiBinder = GWT.create(LoginUiBinder.class);

   /*
    * @UiTemplate is not mandatory but allows multiple XML templates
    * to be used for the same widget.
    * Default file loaded will be <class-name>.ui.xml
    */

   @UiTemplate("Login.ui.xml")
   interface LoginUiBinder extends UiBinder<Widget, Login> {
   }
   ...
}
Langkah 6 - Buat File CSS
Buat file CSS eksternalLogin.css dan Sumber Daya berbasis Java LoginResources.java file yang setara dengan gaya css
.blackText {
   font-family: Arial, Sans-serif;
   color: #000000;
   font-size: 11px;
   text-align: left;
}
...
Langkah 7 - Buat File Sumber Daya berbasis Java untuk File CSS
package com.tutorialspoint.client;
...
public interface LoginResources extends ClientBundle {
   public interface MyCss extends CssResource {
      String blackText();

      ...
   }

   @Source("Login.css")
   MyCss style();
}
Langkah 8 - Lampirkan sumber daya CSS di file Java UI Code.
Lampirkan file CSS eksternalLogin.css menggunakan kontruktor kelas widget berbasis Java Login.java
public Login() {
   this.res = GWT.create(LoginResources.class);
   res.style().ensureInjected();
   initWidget(uiBinder.createAndBindUi(this));
}
Contoh Lengkap UIBinder
Contoh ini akan memandu Anda melalui langkah-langkah sederhana untuk menunjukkan penggunaan UIBinder di GWT. Ikuti langkah-langkah berikut untuk memperbarui aplikasi GWT yang kami buat di GWT - bab Membuat Aplikasi -
| Langkah | Deskripsi |
|---|---|
| 1 | Buat proyek dengan nama HelloWorld di bawah paket com.tutorialspoint seperti yang dijelaskan di bab GWT - Membuat Aplikasi . |
| 2 | Modifikasi HelloWorld.gwt.xml , HelloWorld.css , HelloWorld.html dan HelloWorld.java seperti yang dijelaskan di bawah ini. Jaga file lainnya tidak berubah. |
| 3 | Kompilasi dan jalankan aplikasi untuk memverifikasi hasil dari logika yang diimplementasikan. |
Berikut adalah isi dari deskriptor modul yang dimodifikasi src/com.tutorialspoint/HelloWorld.gwt.xml.
<?xml version = "1.0" encoding = "UTF-8"?>
<module rename-to = 'helloworld'>
   <!-- Inherit the core Web Toolkit stuff.                        -->
   <inherits name = 'com.google.gwt.user.User'/>

   <!-- Inherit the default GWT style sheet.                       -->
   <inherits name = 'com.google.gwt.user.theme.clean.Clean'/>
   <!-- Inherit the UiBinder module.                               -->
   <inherits name = "com.google.gwt.uibinder.UiBinder"/>
   <!-- Specify the app entry point class.                         -->
   <entry-point class = 'com.tutorialspoint.client.HelloWorld'/>

   <!-- Specify the paths for translatable code                    -->
   <source path ='client'/>
   <source path = 'shared'/>

</module>
Berikut ini adalah konten file Style Sheet yang dimodifikasi war/HelloWorld.css.
body {
   text-align: center;
   font-family: verdana, sans-serif;
}

h1 {
   font-size: 2em;
   font-weight: bold;
   color: #777777;
   margin: 40px 0px 70px;
   text-align: center;
}
Berikut adalah konten dari file host HTML yang dimodifikasi war/HelloWorld.html.
<html>
   <head>
      <title>Hello World</title>
      <link rel = "stylesheet" href = "HelloWorld.css"/>
      <script language = "javascript" src = "helloworld/helloworld.nocache.js">
      </script>
   </head>

   <body>
      <h1>UiBinder Demonstration</h1>
      <div id = "gwtContainer"></div>
   </body>
</html>
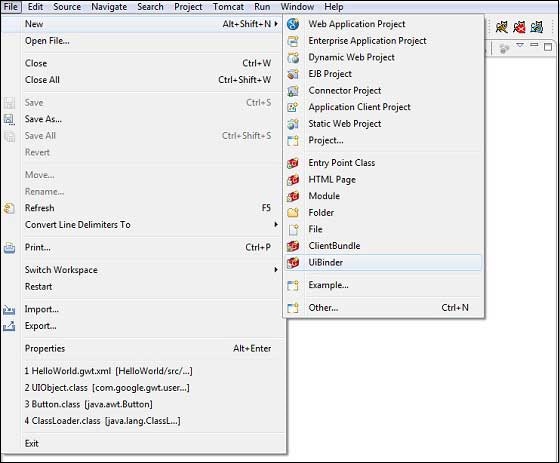
Sekarang buat template UiBinder baru dan kelas pemilik (File → New → UiBinder).
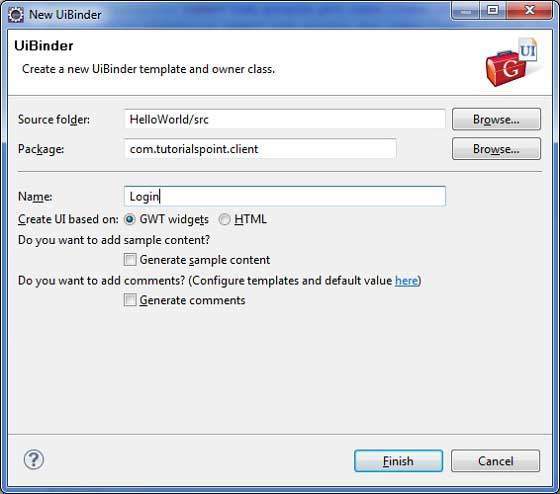
Pilih paket klien untuk proyek tersebut dan beri nama Login. Biarkan semua default lainnya. Klik tombol Selesai dan plugin akan membuat template UiBinder baru dan kelas pemilik.
Sekarang buat file Login.css di src/com.tutorialspoint/client paket dan tempatkan konten berikut di dalamnya
.blackText {
   font-family: Arial, Sans-serif;
   color: #000000;
   font-size: 11px;
   text-align: left;
}

.redText {
   font-family: Arial, Sans-serif;
   color: #ff0000;
   font-size: 11px;
   text-align: left;
}

.loginButton {
   border: 1px solid #3399DD;
   color: #FFFFFF;
   background: #555555;
   font-size: 11px;
   font-weight: bold;
   margin: 0 5px 0 0;
   padding: 4px 10px 5px;
   text-shadow: 0 -1px 0 #3399DD;
}

.box {
   border: 1px solid #AACCEE;
   display: block;
   font-size: 12px;
   margin: 0 0 5px;
   padding: 3px;
   width: 203px;
}

.background {
   background-color: #999999;
   border: 1px none transparent;
   color: #000000;
   font-size: 11px;
   margin-left: -8px;
   margin-top: 5px;
   padding: 6px;
}
Sekarang buat file LoginResources.java di src/com.tutorialspoint/client paket dan tempatkan konten berikut di dalamnya
package com.tutorialspoint.client;

import com.google.gwt.resources.client.ClientBundle;
import com.google.gwt.resources.client.CssResource;

public interface LoginResources extends ClientBundle {
   /**
    * Sample CssResource.
    */
   public interface MyCss extends CssResource {
      String blackText();

      String redText();

      String loginButton();

      String box();

      String background();
   }

   @Source("Login.css")
   MyCss style();
}
Ganti konten Login.ui.xml di src/com.tutorialspoint/client paket dengan berikut ini
<ui:UiBinder xmlns:ui = 'urn:ui:com.google.gwt.uibinder'
   xmlns:gwt = 'urn:import:com.google.gwt.user.client.ui'
   xmlns:res = 'urn:with:com.tutorialspoint.client.LoginResources'>

   <ui:with type = "com.tutorialspoint.client.LoginResources" field = "res">
   </ui:with>

   <gwt:HTMLPanel>
      <div align = "center">

         <gwt:VerticalPanel res:styleName = "style.background">
            <gwt:Label text = "Login" res:styleName = "style.blackText" />
            <gwt:TextBox ui:field="loginBox" res:styleName = "style.box" />
            <gwt:Label text = "Password" res:styleName = "style.blackText" />
            <gwt:PasswordTextBox ui:field = "passwordBox" res:styleName = "style.box" />

            <gwt:HorizontalPanel verticalAlignment = "middle">
               <gwt:Button ui:field = "buttonSubmit" text="Submit"
                  res:styleName = "style.loginButton" />
               <gwt:CheckBox ui:field = "myCheckBox" />
               <gwt:Label ui:field = "myLabel" text = "Remember me"
                  res:styleName = "style.blackText" />
            </gwt:HorizontalPanel>

            <gwt:Label ui:field = "completionLabel1" res:styleName = "style.blackText" />
            <gwt:Label ui:field = "completionLabel2" res:styleName = "style.blackText" />
         </gwt:VerticalPanel>

      </div>
   </gwt:HTMLPanel>

</ui:UiBinder>
Ganti konten Login.java di src/com.tutorialspoint/client paket dengan berikut ini
package com.tutorialspoint.client;

import com.google.gwt.core.client.GWT;
import com.google.gwt.event.dom.client.ClickEvent;
import com.google.gwt.event.logical.shared.ValueChangeEvent;
import com.google.gwt.uibinder.client.UiBinder;
import com.google.gwt.uibinder.client.UiField;
import com.google.gwt.uibinder.client.UiHandler;
import com.google.gwt.uibinder.client.UiTemplate;
import com.google.gwt.user.client.Window;
import com.google.gwt.user.client.ui.Composite;
import com.google.gwt.user.client.ui.Label;
import com.google.gwt.user.client.ui.TextBox;
import com.google.gwt.user.client.ui.Widget;

public class Login extends Composite {

   private static LoginUiBinder uiBinder = GWT.create(LoginUiBinder.class);

   /*
    * @UiTemplate is not mandatory but allows multiple XML templates
    * to be used for the same widget.
    * Default file loaded will be <class-name>.ui.xml
    */
   @UiTemplate("Login.ui.xml")
   interface LoginUiBinder extends UiBinder<Widget, Login> {
   }

   @UiField(provided = true)
   final LoginResources res;

   public Login() {
      this.res = GWT.create(LoginResources.class);
      res.style().ensureInjected();
      initWidget(uiBinder.createAndBindUi(this));
   }

   @UiField
   TextBox loginBox;

   @UiField
   TextBox passwordBox;

   @UiField
   Label completionLabel1;

   @UiField
   Label completionLabel2;

   private Boolean tooShort = false;

   /*
    * Method name is not relevant, the binding is done according to the class
    * of the parameter.
    */
   @UiHandler("buttonSubmit")
   void doClickSubmit(ClickEvent event) {
      if (!tooShort) {
         Window.alert("Login Successful!");
      } else {
         Window.alert("Login or Password is too short!");
      }
   }

   @UiHandler("loginBox")
   void handleLoginChange(ValueChangeEvent<String> event) {
      if (event.getValue().length() < 6) {
         completionLabel1.setText("Login too short (Size must be > 6)");
         tooShort = true;
      } else {
         tooShort = false;
         completionLabel1.setText("");
      }
   }

   @UiHandler("passwordBox")
   void handlePasswordChange(ValueChangeEvent<String> event) {
      if (event.getValue().length() < 6) {
         tooShort = true;
         completionLabel2.setText("Password too short (Size must be > 6)");
      } else {
         tooShort = false;
         completionLabel2.setText("");
      }
   }
}
Mari kita ikuti konten file Java berikut src/com.tutorialspoint/HelloWorld.java yang akan mendemonstrasikan penggunaan UiBinder.
package com.tutorialspoint.client;

import com.google.gwt.core.client.EntryPoint;
import com.google.gwt.user.client.ui.RootPanel;

public class HelloWorld implements EntryPoint {
   public void onModuleLoad() {
      RootPanel.get().add(new Login());
   }
}
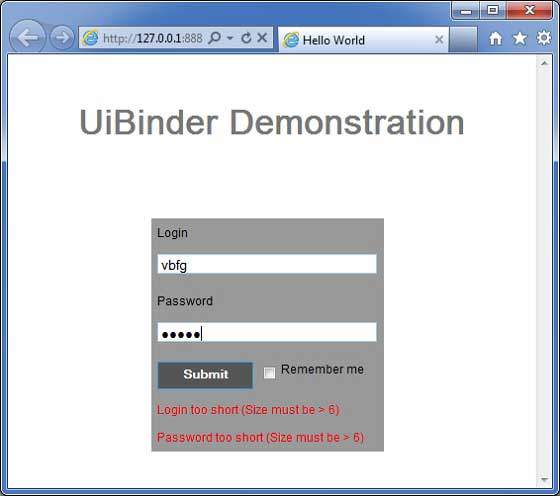
Setelah Anda siap dengan semua perubahan yang dilakukan, mari kita kompilasi dan jalankan aplikasi dalam mode pengembangan seperti yang kita lakukan di bab GWT - Membuat Aplikasi . Jika semuanya baik-baik saja dengan aplikasi Anda, ini akan menghasilkan hasil sebagai berikut -
Aplikasi berbasis GWT umumnya terdiri dari modul sisi klien dan modul sisi server. Kode sisi klien berjalan di browser dan kode sisi server berjalan di server web. Kode sisi klien harus membuat permintaan HTTP di seluruh jaringan untuk mengakses data sisi server.
RPC, Panggilan Prosedur Jarak Jauh adalah mekanisme yang digunakan oleh GWT di mana kode klien dapat langsung menjalankan metode sisi server.
GWT RPC berbasis servlet.
GWT RPC asinkron dan klien tidak pernah diblokir selama komunikasi.
Menggunakan objek Java GWT RPC dapat dikirim langsung antara klien dan server (yang secara otomatis diserialkan oleh framework GWT).
Servlet sisi server disebut sebagai service.
Panggilan prosedur jarak jauh yang memanggil metode servlet sisi server dari kode sisi klien disebut sebagai invoking a service.
Komponen RPC GWT
Berikut adalah tiga komponen yang digunakan dalam mekanisme komunikasi RPC GWT
- Layanan jarak jauh (servlet sisi server) yang berjalan di server.
- Kode klien untuk menjalankan layanan itu.
- Objek data Java yang akan diteruskan antara klien dan server.
Klien dan server GWT membuat serial dan deserialisasi data secara otomatis sehingga pengembang tidak perlu membuat serial / deserialisasi objek dan objek data dapat berjalan melalui HTTP.
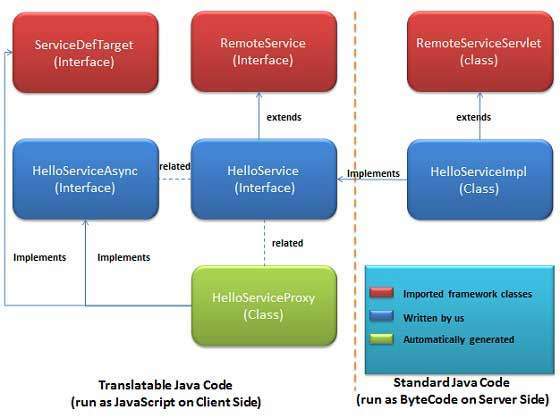
Diagram berikut menunjukkan Arsitektur RPC.
Untuk mulai menggunakan RPC, kita diharuskan untuk mengikuti konvensi GWT.
Alur Kerja Komunikasi RPC
Langkah 1 - Buat Kelas Model Serializable
Tentukan objek model java di sisi klien yang harus dapat diserialkan.
public class Message implements Serializable {
   ...
   private String message;
   public Message(){};

   public void setMessage(String message) {
      this.message = message;
   }
   ...
}
Langkah 2 - Buat Antarmuka Layanan
Tentukan antarmuka untuk layanan di sisi klien yang memperluas RemoteService yang mencantumkan semua metode layanan.
Gunakan anotasi @RemoteServiceRelativePath untuk memetakan layanan dengan jalur default servlet jarak jauh yang relatif ke URL dasar modul.
@RemoteServiceRelativePath("message")
public interface MessageService extends RemoteService {
   Message getMessage(String input);
}
Langkah 3 - Buat Antarmuka Layanan Async
Tentukan antarmuka asinkron ke layanan di sisi klien (di lokasi yang sama dengan layanan yang disebutkan di atas) yang akan digunakan dalam kode klien GWT.
public interface MessageServiceAsync {
   void getMessage(String input, AsyncCallback<Message> callback);
}
Langkah 4 - Buat kelas Servlet Implementasi Layanan
Menerapkan antarmuka di sisi server dan kelas itu harus memperluas kelas RemoteServiceServlet.
public class MessageServiceImpl extends RemoteServiceServlet
   implements MessageService{
   ...
   public Message getMessage(String input) {
      String messageString = "Hello " + input + "!";
      Message message = new Message();
      message.setMessage(messageString);
      return message;
   }
}
Langkah 5 - Perbarui Web.xml untuk menyertakan deklarasi Servlet
Edit deskriptor penerapan aplikasi web (web.xml) untuk menyertakan deklarasi MessageServiceImpl Servlet.
<web-app>
   ...
   <servlet>
      <servlet-name>messageServiceImpl</servlet-name>
      <servlet-class>com.tutorialspoint.server.MessageServiceImpl
      </servlet-class>
   </servlet>

   <servlet-mapping>
      <servlet-name>messageServiceImpl</servlet-name>
      <url-pattern>/helloworld/message</url-pattern>
   </servlet-mapping>
</web-app>
Langkah 6 - Lakukan panggilan prosedur jarak jauh dalam Kode Aplikasi
Buat kelas proxy layanan.
MessageServiceAsync messageService = GWT.create(MessageService.class);Buat AsyncCallback Handler untuk menangani callback RPC di mana server mengembalikan Pesan kembali ke klien
class MessageCallBack implements AsyncCallback<Message> {

   @Override
   public void onFailure(Throwable caught) {
      Window.alert("Unable to obtain server response: "
      + caught.getMessage());
   }

   @Override
   public void onSuccess(Message result) {
      Window.alert(result.getMessage());
   }
}
Panggil layanan Jarak Jauh saat pengguna berinteraksi dengan UI
public class HelloWorld implements EntryPoint {
   ...
   public void onModuleLoad() {
   ...
      buttonMessage.addClickHandler(new ClickHandler() {
         @Override
         public void onClick(ClickEvent event) {
            messageService.getMessage(txtName.getValue(),
            new MessageCallBack());
         }
      });
   ...
   }
}
Contoh Komunikasi RPC Lengkap
Contoh ini akan memandu Anda melalui langkah-langkah sederhana untuk menampilkan contoh Komunikasi RPC di GWT. Ikuti langkah-langkah berikut untuk memperbarui aplikasi GWT yang kami buat di GWT - bab Membuat Aplikasi -
| Langkah | Deskripsi |
|---|---|
| 1 | Buat proyek dengan nama HelloWorld di bawah paket com.tutorialspoint seperti yang dijelaskan di bab GWT - Membuat Aplikasi . |
| 2 | Modifikasi HelloWorld.gwt.xml , HelloWorld.css , HelloWorld.html dan HelloWorld.java seperti yang dijelaskan di bawah ini. Jaga file lainnya tidak berubah. |
| 3 | Kompilasi dan jalankan aplikasi untuk memverifikasi hasil dari logika yang diimplementasikan. |
Berikut adalah isi dari deskriptor modul yang dimodifikasi src/com.tutorialspoint/HelloWorld.gwt.xml.
<?xml version = "1.0" encoding = "UTF-8"?>
<module rename-to = 'helloworld'>
   <!-- Inherit the core Web Toolkit stuff.                        -->
   <inherits name = 'com.google.gwt.user.User'/>

   <!-- Inherit the default GWT style sheet.                       -->
   <inherits name = 'com.google.gwt.user.theme.clean.Clean'/>
   <!-- Inherit the UiBinder module.                               -->
   <inherits name = "com.google.gwt.uibinder.UiBinder"/>
   <!-- Specify the app entry point class.                         -->
   <entry-point class = 'com.tutorialspoint.client.HelloWorld'/>

   <!-- Specify the paths for translatable code                    -->
   <source path = 'client'/>
   <source path = 'shared'/>

</module>
Berikut ini adalah konten file Style Sheet yang dimodifikasi war/HelloWorld.css.
body {
   text-align: center;
   font-family: verdana, sans-serif;
}

h1 {
   font-size: 2em;
   font-weight: bold;
   color: #777777;
   margin: 40px 0px 70px;
   text-align: center;
}
Berikut adalah konten dari file host HTML yang dimodifikasi war/HelloWorld.html.
<html>
   <head>
      <title>Hello World</title>
      <link rel = "stylesheet" href = "HelloWorld.css"/>
      <script language = "javascript" src = "helloworld/helloworld.nocache.js">
      </script>
   </head>

   <body>
      <h1>RPC Communication Demonstration</h1>
      <div id = "gwtContainer"></div>
   </body>
</html>
Sekarang buat file Message.java di src/com.tutorialspoint/client paket dan tempatkan konten berikut di dalamnya
package com.tutorialspoint.client;

import java.io.Serializable;

public class Message implements Serializable {

   private static final long serialVersionUID = 1L;
   private String message;
   public Message(){};

   public void setMessage(String message) {
      this.message = message;
   }

   public String getMessage() {
      return message;
   }
}
Sekarang buat file MessageService.java di src/com.tutorialspoint/client paket dan tempatkan konten berikut di dalamnya
package com.tutorialspoint.client;

import com.google.gwt.user.client.rpc.RemoteService;
import com.google.gwt.user.client.rpc.RemoteServiceRelativePath;

@RemoteServiceRelativePath("message")
public interface MessageService extends RemoteService {
   Message getMessage(String input);
}
Sekarang buat file MessageServiceAsync.java di src/com.tutorialspoint/client paket dan tempatkan konten berikut di dalamnya
package com.tutorialspoint.client;

import com.google.gwt.user.client.rpc.AsyncCallback;

public interface MessageServiceAsync {
   void getMessage(String input, AsyncCallback<Message> callback);
}
Sekarang buat file MessageServiceImpl.java di src/com.tutorialspoint/server paket dan tempatkan konten berikut di dalamnya
package com.tutorialspoint.server;

import com.google.gwt.user.server.rpc.RemoteServiceServlet;
import com.tutorialspoint.client.Message;
import com.tutorialspoint.client.MessageService;

public class MessageServiceImpl extends RemoteServiceServlet
   implements MessageService{

   private static final long serialVersionUID = 1L;

   public Message getMessage(String input) {
      String messageString = "Hello " + input + "!";
      Message message = new Message();
      message.setMessage(messageString);
      return message;
   }
}
Perbarui konten deskriptor penerapan aplikasi web yang dimodifikasi war/WEB-INF/web.xml untuk menyertakan deklarasi MessageServiceImpl Servlet.
<?xml version = "1.0" encoding = "UTF-8"?>
<!DOCTYPE web-app
   PUBLIC "-//Sun Microsystems, Inc.//DTD Web Application 2.3//EN"
   "http://java.sun.com/dtd/web-app_2_3.dtd">

<web-app>
   <!-- Default page to serve -->
   <welcome-file-list>
      <welcome-file>HelloWorld.html</welcome-file>
   </welcome-file-list>

   <servlet>
      <servlet-name>messageServiceImpl</servlet-name>
      <servlet-class>com.tutorialspoint.server.MessageServiceImpl
      </servlet-class>
   </servlet>

   <servlet-mapping>
      <servlet-name>messageServiceImpl</servlet-name>
      <url-pattern>/helloworld/message</url-pattern>
   </servlet-mapping>
</web-app>
Ganti konten HelloWorld.java di src/com.tutorialspoint/client paket dengan berikut ini
package com.tutorialspoint.client;

import com.google.gwt.core.client.EntryPoint;
import com.google.gwt.core.client.GWT;
import com.google.gwt.event.dom.client.ClickEvent;
import com.google.gwt.event.dom.client.ClickHandler;
import com.google.gwt.event.dom.client.KeyCodes;
import com.google.gwt.event.dom.client.KeyUpEvent;
import com.google.gwt.event.dom.client.KeyUpHandler;
import com.google.gwt.user.client.Window;
import com.google.gwt.user.client.rpc.AsyncCallback;
import com.google.gwt.user.client.ui.Button;
import com.google.gwt.user.client.ui.DecoratorPanel;
import com.google.gwt.user.client.ui.HasHorizontalAlignment;
import com.google.gwt.user.client.ui.HorizontalPanel;
import com.google.gwt.user.client.ui.Label;
import com.google.gwt.user.client.ui.RootPanel;
import com.google.gwt.user.client.ui.TextBox;
import com.google.gwt.user.client.ui.VerticalPanel;

public class HelloWorld implements EntryPoint {

   private MessageServiceAsync messageService =
   GWT.create(MessageService.class);

   private class MessageCallBack implements AsyncCallback<Message> {
      @Override
      public void onFailure(Throwable caught) {
         /* server side error occured */
         Window.alert("Unable to obtain server response: " + caught.getMessage());
      }
      @Override
      public void onSuccess(Message result) {
          /* server returned result, show user the message */
         Window.alert(result.getMessage());
      }
   }

   public void onModuleLoad() {
      /*create UI */
      final TextBox txtName = new TextBox();
      txtName.setWidth("200");
      txtName.addKeyUpHandler(new KeyUpHandler() {
         @Override
         public void onKeyUp(KeyUpEvent event) {
            if(event.getNativeKeyCode() == KeyCodes.KEY_ENTER){
               /* make remote call to server to get the message */
               messageService.getMessage(txtName.getValue(),
               new MessageCallBack());
            }
         }
      });
      Label lblName = new Label("Enter your name: ");

      Button buttonMessage = new Button("Click Me!");

      buttonMessage.addClickHandler(new ClickHandler() {
         @Override
         public void onClick(ClickEvent event) {
            /* make remote call to server to get the message */
            messageService.getMessage(txtName.getValue(),
            new MessageCallBack());
         }
      });

      HorizontalPanel hPanel = new HorizontalPanel();
      hPanel.add(lblName);
      hPanel.add(txtName);
      hPanel.setCellWidth(lblName, "130");

      VerticalPanel vPanel = new VerticalPanel();
      vPanel.setSpacing(10);
      vPanel.add(hPanel);
      vPanel.add(buttonMessage);
      vPanel.setCellHorizontalAlignment(buttonMessage,
      HasHorizontalAlignment.ALIGN_RIGHT);

      DecoratorPanel panel = new DecoratorPanel();
      panel.add(vPanel);

      // Add widgets to the root panel.
      RootPanel.get("gwtContainer").add(panel);
   }
}
Setelah Anda siap dengan semua perubahan yang dilakukan, mari kita kompilasi dan jalankan aplikasi dalam mode pengembangan seperti yang kita lakukan di bab GWT - Membuat Aplikasi . Jika semuanya baik-baik saja dengan aplikasi Anda, ini akan menghasilkan hasil sebagai berikut -
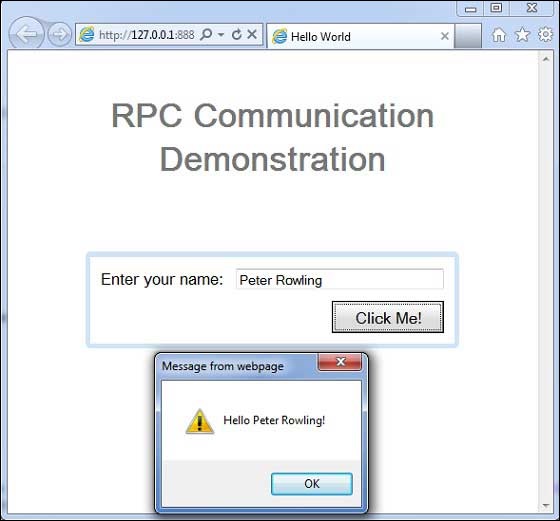
GWT memberikan dukungan yang sangat baik untuk pengujian otomatis kode sisi klien menggunakan kerangka kerja pengujian JUnit. Pada artikel ini kami akan mendemonstrasikan integrasi GWT dan JUNIT.
Unduh arsip Junit
Situs Resmi JUnit - https://www.junit.org
Unduh Junit-4.10.jar
| OS | Nama arsip |
|---|---|
| Windows | junit4.10.jar |
| Linux | junit4.10.jar |
| Mac | junit4.10.jar |
Simpan file jar yang diunduh ke beberapa lokasi di komputer Anda. Kami telah menyimpannya diC:/ > JUNIT
Temukan folder instalasi GWT
| OS | Folder instalasi GWT |
|---|---|
| Windows | C: \ GWT \ gwt-2.1.0 |
| Linux | /usr/local/GWT/gwt-2.1.0 |
| Mac | /Library/GWT/gwt-2.1.0 |
Kelas GWTTestCase
GWT menyediakan GWTTestCasekelas dasar yang menyediakan integrasi JUnit. Menjalankan kelas terkompilasi yang memperluas GWTTestCase di bawah JUnit meluncurkan browser HtmlUnit yang berfungsi untuk meniru perilaku aplikasi Anda selama eksekusi pengujian.
GWTTestCase adalah kelas turunan dari JUnit's TestCase dan dapat dijalankan menggunakan JUnit TestRunner.
Menggunakan webAppCreator
GWT menyediakan alat baris perintah khusus webAppCreator yang dapat menghasilkan kasus uji pemula untuk kami, ditambah target semut dan konfigurasi peluncuran gerhana untuk pengujian dalam mode pengembangan dan mode produksi.
Buka command prompt dan pergi ke C:\ > GWT_WORKSPACE > di mana Anda ingin membuat proyek baru dengan dukungan tes. Jalankan perintah berikut
C:\GWT_WORKSPACE>C:\GWT\gwt-2.1.0\webAppCreator
   -out HelloWorld
   -junit C:\JUNIT\junit-4.10.jar
   com.tutorialspoint.HelloWorld
Poin Penting
- Kami sedang menjalankan utilitas baris perintah webAppCreator.
- HelloWorld adalah nama proyek yang akan dibuat
- Opsi -junit menginstruksikan webAppCreator untuk menambahkan dukungan junit ke proyek
- com.tutorialspoint.HelloWorld adalah nama modulnya
Verifikasi hasilnya.
Created directory HelloWorld\src
Created directory HelloWorld\war
Created directory HelloWorld\war\WEB-INF
Created directory HelloWorld\war\WEB-INF\lib
Created directory HelloWorld\src\com\tutorialspoint
Created directory HelloWorld\src\com\tutorialspoint\client
Created directory HelloWorld\src\com\tutorialspoint\server
Created directory HelloWorld\src\com\tutorialspoint\shared
Created directory HelloWorld\test\com\tutorialspoint
Created directory HelloWorld\test\com\tutorialspoint\client
Created file HelloWorld\src\com\tutorialspoint\HelloWorld.gwt.xml
Created file HelloWorld\war\HelloWorld.html
Created file HelloWorld\war\HelloWorld.css
Created file HelloWorld\war\WEB-INF\web.xml
Created file HelloWorld\src\com\tutorialspoint\client\HelloWorld.java
Created file
HelloWorld\src\com\tutorialspoint\client\GreetingService.java
Created file
HelloWorld\src\com\tutorialspoint\client\GreetingServiceAsync.java
Created file
HelloWorld\src\com\tutorialspoint\server\GreetingServiceImpl.java
Created file HelloWorld\src\com\tutorialspoint\shared\FieldVerifier.java
Created file HelloWorld\build.xml
Created file HelloWorld\README.txt
Created file HelloWorld\test\com\tutorialspoint\HelloWorldJUnit.gwt.xml
Created file HelloWorld\test\com\tutorialspoint\client\HelloWorldTest.java
Created file HelloWorld\.project
Created file HelloWorld\.classpath
Created file HelloWorld\HelloWorld.launch
Created file HelloWorld\HelloWorldTest-dev.launch
Created file HelloWorld\HelloWorldTest-prod.launch
Memahami kelas pengujian: HelloWorldTest.java
package com.tutorialspoint.client;

import com.tutorialspoint.shared.FieldVerifier;
import com.google.gwt.core.client.GWT;
import com.google.gwt.junit.client.GWTTestCase;
import com.google.gwt.user.client.rpc.AsyncCallback;
import com.google.gwt.user.client.rpc.ServiceDefTarget;

/**
 * GWT JUnit tests must extend GWTTestCase.
 */
public class HelloWorldTest extends GWTTestCase {

   /**
    * must refer to a valid module that sources this class.
    */
   public String getModuleName() {
      return "com.tutorialspoint.HelloWorldJUnit";
   }

   /**
    * tests the FieldVerifier.
    */
   public void testFieldVerifier() {
      assertFalse(FieldVerifier.isValidName(null));
      assertFalse(FieldVerifier.isValidName(""));
      assertFalse(FieldVerifier.isValidName("a"));
      assertFalse(FieldVerifier.isValidName("ab"));
      assertFalse(FieldVerifier.isValidName("abc"));
      assertTrue(FieldVerifier.isValidName("abcd"));
   }

   /**
    * this test will send a request to the server using the greetServer
    *  method in GreetingService and verify the response.
    */
   public void testGreetingService() {
      /* create the service that we will test. */
      GreetingServiceAsync greetingService =
      GWT.create(GreetingService.class);
      ServiceDefTarget target = (ServiceDefTarget) greetingService;
      target.setServiceEntryPoint(GWT.getModuleBaseURL()
      + "helloworld/greet");

      /* since RPC calls are asynchronous, we will need to wait
       for a response after this test method returns. This line
       tells the test runner to wait up to 10 seconds
       before timing out. */
      delayTestFinish(10000);

      /* send a request to the server. */
      greetingService.greetServer("GWT User",
         new AsyncCallback<String>() {
         public void onFailure(Throwable caught) {
            /* The request resulted in an unexpected error. */
            fail("Request failure: " + caught.getMessage());
         }

         public void onSuccess(String result) {
            /* verify that the response is correct. */
            assertTrue(result.startsWith("Hello, GWT User!"));

            /* now that we have received a response, we need to
             tell the test runner that the test is complete.
             You must call finishTest() after an asynchronous test
             finishes successfully, or the test will time out.*/
            finishTest();
         }
      });
   }
}
Poin Penting
| Sr.No. | Catatan |
|---|---|
| 1 | Kelas HelloWorldTest dibuat dalam paket com.tutorialspoint.client di bawah direktori HelloWorld / test. |
| 2 | Kelas HelloWorldTest akan berisi kasus uji unit untuk HelloWorld. |
| 3 | Kelas HelloWorldTest memperluas kelas GWTTestCase dalam paket com.google.gwt.junit.client. |
| 4 | Kelas HelloWorldTest memiliki metode abstrak (getModuleName) yang harus mengembalikan nama modul GWT. Untuk HelloWorld, ini adalah com.tutorialspoint.HelloWorldJUnit. |
| 5 | Kelas HelloWorldTest dibuat dengan dua contoh kasus uji testFieldVerifier, testSimple. Kami telah menambahkan testGreetingService. |
| 6 | Metode ini menggunakan salah satu dari banyak fungsi assert * yang diwarisi dari kelas JUnit Assert, yang merupakan leluhur GWTTestCase. |
| 7 | Fungsi assertTrue (boolean) menegaskan bahwa argumen boolean yang diteruskan mengevaluasi ke true. Jika tidak, pengujian akan gagal saat dijalankan di JUnit. |
GWT - Contoh Integrasi JUnit Lengkap
Contoh ini akan memandu Anda melalui langkah-langkah sederhana untuk menunjukkan contoh JUnit Integration di GWT.
Ikuti langkah-langkah berikut untuk memperbarui aplikasi GWT yang kami buat di atas -
| Langkah | Deskripsi |
|---|---|
| 1 | Impor proyek dengan nama HelloWorld in eclipse menggunakan import project wizard yang ada (File → Impor → Umum → Proyek yang Ada ke dalam ruang kerja). |
| 2 | Modifikasi HelloWorld.gwt.xml , HelloWorld.css , HelloWorld.html dan HelloWorld.java seperti yang dijelaskan di bawah ini. Jaga file lainnya tidak berubah. |
| 3 | Kompilasi dan jalankan aplikasi untuk memverifikasi hasil dari logika yang diimplementasikan. |
Berikut adalah struktur proyek dalam gerhana.
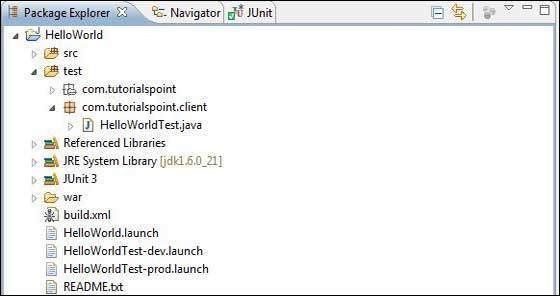
Berikut adalah isi dari deskriptor modul yang dimodifikasi src/com.tutorialspoint/HelloWorld.gwt.xml.
<?xml version = "1.0" encoding = "UTF-8"?>
<module rename-to = 'helloworld'>
   <!-- Inherit the core Web Toolkit stuff.                        -->
   <inherits name = 'com.google.gwt.user.User'/>

   <!-- Inherit the default GWT style sheet.                       -->
   <inherits name = 'com.google.gwt.user.theme.clean.Clean'/>
   <!-- Inherit the UiBinder module.                               -->
   <inherits name = "com.google.gwt.uibinder.UiBinder"/>
   <!-- Specify the app entry point class.                         -->
   <entry-point class = 'com.tutorialspoint.client.HelloWorld'/>

   <!-- Specify the paths for translatable code                    -->
   <source path = 'client'/>
   <source path = 'shared'/>

</module>
Berikut ini adalah konten file Style Sheet yang dimodifikasi war/HelloWorld.css.
body {
   text-align: center;
   font-family: verdana, sans-serif;
}

h1 {
   font-size: 2em;
   font-weight: bold;
   color: #777777;
   margin: 40px 0px 70px;
   text-align: center;
}
Berikut adalah konten dari file host HTML yang dimodifikasi war/HelloWorld.html.
<html>
   <head>
      <title>Hello World</title>
      <link rel = "stylesheet" href = "HelloWorld.css"/>
      <script language = "javascript" src = "helloworld/helloworld.nocache.js">
      </script>
   </head>

   <body>
      <h1>JUnit Integration Demonstration</h1>
      <div id = "gwtContainer"></div>
   </body>
</html>
Ganti konten HelloWorld.java di src/com.tutorialspoint/client paket dengan berikut ini
package com.tutorialspoint.client;

import com.google.gwt.core.client.EntryPoint;

import com.google.gwt.core.client.GWT;
import com.google.gwt.event.dom.client.ClickEvent;
import com.google.gwt.event.dom.client.ClickHandler;
import com.google.gwt.event.dom.client.KeyCodes;
import com.google.gwt.event.dom.client.KeyUpEvent;
import com.google.gwt.event.dom.client.KeyUpHandler;

import com.google.gwt.user.client.Window;
import com.google.gwt.user.client.rpc.AsyncCallback;
import com.google.gwt.user.client.ui.Button;
import com.google.gwt.user.client.ui.DecoratorPanel;
import com.google.gwt.user.client.ui.HasHorizontalAlignment;
import com.google.gwt.user.client.ui.HorizontalPanel;
import com.google.gwt.user.client.ui.Label;
import com.google.gwt.user.client.ui.RootPanel;
import com.google.gwt.user.client.ui.TextBox;
import com.google.gwt.user.client.ui.VerticalPanel;

public class HelloWorld implements EntryPoint {

   public void onModuleLoad() {
      /*create UI */
      final TextBox txtName = new TextBox();
      txtName.setWidth("200");
      txtName.addKeyUpHandler(new KeyUpHandler() {
         @Override
         public void onKeyUp(KeyUpEvent event) {
            if(event.getNativeKeyCode() == KeyCodes.KEY_ENTER){
               Window.alert(getGreeting(txtName.getValue()));
            }
         }
      });
      Label lblName = new Label("Enter your name: ");

      Button buttonMessage = new Button("Click Me!");

      buttonMessage.addClickHandler(new ClickHandler() {
         @Override
         public void onClick(ClickEvent event) {
            Window.alert(getGreeting(txtName.getValue()));
         }
      });

      HorizontalPanel hPanel = new HorizontalPanel();
      hPanel.add(lblName);
      hPanel.add(txtName);
      hPanel.setCellWidth(lblName, "130");

      VerticalPanel vPanel = new VerticalPanel();
      vPanel.setSpacing(10);
      vPanel.add(hPanel);
      vPanel.add(buttonMessage);
      vPanel.setCellHorizontalAlignment(buttonMessage,
      HasHorizontalAlignment.ALIGN_RIGHT);

      DecoratorPanel panel = new DecoratorPanel();
      panel.add(vPanel);

      // Add widgets to the root panel.
      RootPanel.get("gwtContainer").add(panel);
   }

   public String getGreeting(String name){
      return "Hello "+name+"!";
   }
}
Ganti konten HelloWorldTest.java di test/com.tutorialspoint/client paket dengan berikut ini
package com.tutorialspoint.client;

import com.tutorialspoint.shared.FieldVerifier;
import com.google.gwt.core.client.GWT;
import com.google.gwt.junit.client.GWTTestCase;
import com.google.gwt.user.client.rpc.AsyncCallback;
import com.google.gwt.user.client.rpc.ServiceDefTarget;

/**
 * GWT JUnit tests must extend GWTTestCase.
 */
public class HelloWorldTest extends GWTTestCase {

   /**
    * must refer to a valid module that sources this class.
    */
   public String getModuleName() {
      return "com.tutorialspoint.HelloWorldJUnit";
   }

   /**
    * tests the FieldVerifier.
    */
   public void testFieldVerifier() {
      assertFalse(FieldVerifier.isValidName(null));
      assertFalse(FieldVerifier.isValidName(""));
      assertFalse(FieldVerifier.isValidName("a"));
      assertFalse(FieldVerifier.isValidName("ab"));
      assertFalse(FieldVerifier.isValidName("abc"));
      assertTrue(FieldVerifier.isValidName("abcd"));
   }

   /**
      * this test will send a request to the server using the greetServer
      *  method in GreetingService and verify the response.
   */
   public void testGreetingService() {
      /* create the service that we will test. */
      GreetingServiceAsync greetingService =
      GWT.create(GreetingService.class);
      ServiceDefTarget target = (ServiceDefTarget) greetingService;
      target.setServiceEntryPoint(GWT.getModuleBaseURL()
      + "helloworld/greet");

      /* since RPC calls are asynchronous, we will need to wait
       for a response after this test method returns. This line
       tells the test runner to wait up to 10 seconds
       before timing out. */
      delayTestFinish(10000);

      /* send a request to the server. */
      greetingService.greetServer("GWT User",
         new AsyncCallback<String>() {
         public void onFailure(Throwable caught) {
            /* The request resulted in an unexpected error. */
            fail("Request failure: " + caught.getMessage());
         }

         public void onSuccess(String result) {
            /* verify that the response is correct. */
            assertTrue(result.startsWith("Hello, GWT User!"));

            /* now that we have received a response, we need to
             tell the test runner that the test is complete.
             You must call finishTest() after an asynchronous test
             finishes successfully, or the test will time out.*/
            finishTest();
         }
      });

      /**
         * tests the getGreeting method.
      */
      public void testGetGreeting() {
         HelloWorld helloWorld = new HelloWorld();
         String name = "Robert";
         String expectedGreeting = "Hello "+name+"!";
         assertEquals(expectedGreeting,helloWorld.getGreeting(name));
      }
   }
}
Jalankan kasus uji di Eclipse menggunakan konfigurasi peluncuran yang dihasilkan
Kami akan menjalankan pengujian unit di Eclipse menggunakan konfigurasi peluncuran yang dihasilkan oleh webAppCreator untuk mode pengembangan dan mode produksi.
Jalankan pengujian JUnit dalam mode pengembangan
- Dari bilah menu Eclipse, pilih Run → Run Configurations ...
- Di bawah bagian JUnit, pilih HelloWorldTest-dev
- Untuk menyimpan perubahan pada Argumen, tekan Apply
- Untuk menjalankan pengujian, tekan Jalankan
Jika semuanya baik-baik saja dengan aplikasi Anda, ini akan menghasilkan hasil sebagai berikut -
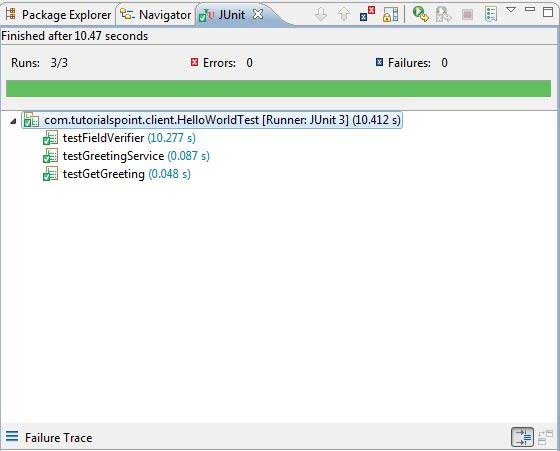
Jalankan pengujian JUnit dalam mode produksi
- Dari bilah menu Eclipse, pilih Run → Run Configurations ...
- Di bawah bagian JUnit, pilih HelloWorldTest-prod
- Untuk menyimpan perubahan pada Argumen, tekan Apply
- Untuk menjalankan pengujian, tekan Jalankan
Jika semuanya baik-baik saja dengan aplikasi Anda, ini akan menghasilkan hasil sebagai berikut -

GWT memberikan kemampuan yang sangat baik untuk men-debug sisi klien serta kode sisi server.
Selama mode pengembangan, Aplikasi GWT berbasis kode Java dan tidak diterjemahkan ke JavaScript.
Saat aplikasi berjalan dalam mode pengembangan, Java Virtual Machine (JVM) sebenarnya menjalankan kode aplikasi sebagai bytecode Java yang dikompilasi, menggunakan kemampuan GWT untuk menyambung ke jendela browser.
GWT menggunakan plugin berbasis browser untuk terhubung ke JVM.
Jadi, pengembang bebas menggunakan IDE berbasis Java apa pun untuk men-debug Kode GWT sisi klien serta kode sisi server.
Dalam artikel ini, kami akan mendemonstrasikan penggunaan debugging kode Klien GWT menggunakan Eclipse. Kami akan melakukan tugas-tugas berikut -
- Tetapkan break point dalam kode dan lihat di BreakPoint Explorer.
- Langkah melalui kode baris demi baris selama debugging.
- Lihat nilai variabel.
- Periksa nilai semua variabel.
- Periksa nilai ekspresi.
- Tampilkan bingkai tumpukan untuk benang yang ditangguhkan.
Contoh Debugging
Contoh ini akan memandu Anda melalui langkah-langkah sederhana untuk mendemonstrasikan debugging aplikasi GWT. Ikuti langkah-langkah berikut untuk memperbarui aplikasi GWT yang kami buat di GWT - bab Membuat Aplikasi -
| Langkah | Deskripsi |
|---|---|
| 1 | Buat proyek dengan nama HelloWorld di bawah paket com.tutorialspoint seperti yang dijelaskan di bab GWT - Membuat Aplikasi . |
| 2 | Modifikasi HelloWorld.gwt.xml , HelloWorld.css , HelloWorld.html dan HelloWorld.java seperti yang dijelaskan di bawah ini. Jaga file lainnya tidak berubah. |
| 3 | Kompilasi dan jalankan aplikasi untuk memverifikasi hasil dari logika yang diimplementasikan. |
Berikut adalah isi dari deskriptor modul yang dimodifikasi src/com.tutorialspoint/HelloWorld.gwt.xml.
<?xml version = "1.0" encoding = "UTF-8"?>
<module rename-to = 'helloworld'>
   <!-- Inherit the core Web Toolkit stuff.                        -->
   <inherits name = 'com.google.gwt.user.User'/>

   <!-- Inherit the default GWT style sheet.                       -->
   <inherits name = 'com.google.gwt.user.theme.clean.Clean'/>

   <!-- Specify the app entry point class.                         -->
   <entry-point class = 'com.tutorialspoint.client.HelloWorld'/>

   <!-- Specify the paths for translatable code                    -->
   <source path = 'client'/>
   <source path = 'shared'/>

</module>
Berikut ini adalah konten file Style Sheet yang dimodifikasi war/HelloWorld.css.
body {
   text-align: center;
   font-family: verdana, sans-serif;
}

h1 {
   font-size: 2em;
   font-weight: bold;
   color: #777777;
   margin: 40px 0px 70px;
   text-align: center;
}

.gwt-Label{
   font-size: 150%;
   font-weight: bold;
   color:red;
   padding:5px;
   margin:5px;
}
Berikut adalah konten dari file host HTML yang dimodifikasi war/HelloWorld.html untuk mengakomodasi dua tombol.
<html>
   <head>
      <title>Hello World</title>
      <link rel = "stylesheet" href = "HelloWorld.css"/>
      <script language = "javascript" src = "helloworld/helloworld.nocache.js">
      </script>
   </head>

   <body>
      <h1>Debugging Application Demonstration</h1>
      <div id = "gwtContainer"></div>
   </body>
</html>
Mari kita ikuti konten file Java berikut src/com.tutorialspoint/HelloWorld.java yang dengannya kami akan mendemonstrasikan kemampuan debugging Kode GWT.
package com.tutorialspoint.client;

import com.google.gwt.core.client.EntryPoint;
import com.google.gwt.event.dom.client.ClickEvent;
import com.google.gwt.event.dom.client.ClickHandler;
import com.google.gwt.event.dom.client.KeyCodes;
import com.google.gwt.event.dom.client.KeyUpEvent;
import com.google.gwt.event.dom.client.KeyUpHandler;
import com.google.gwt.user.client.Window;
import com.google.gwt.user.client.ui.Button;
import com.google.gwt.user.client.ui.DecoratorPanel;
import com.google.gwt.user.client.ui.HasHorizontalAlignment;
import com.google.gwt.user.client.ui.HorizontalPanel;
import com.google.gwt.user.client.ui.Label;
import com.google.gwt.user.client.ui.RootPanel;
import com.google.gwt.user.client.ui.TextBox;
import com.google.gwt.user.client.ui.VerticalPanel;

public class HelloWorld implements EntryPoint {

   public void onModuleLoad() {
      /*create UI */
      final TextBox txtName = new TextBox();
      txtName.setWidth("200");
      txtName.addKeyUpHandler(new KeyUpHandler() {
         @Override
         public void onKeyUp(KeyUpEvent event) {
            if(event.getNativeKeyCode() == KeyCodes.KEY_ENTER){
               Window.alert(getGreeting(txtName.getValue()));
            }
         }
      });
      Label lblName = new Label("Enter your name: ");

      Button buttonMessage = new Button("Click Me!");

      buttonMessage.addClickHandler(new ClickHandler() {
      @Override
      public void onClick(ClickEvent event) {
         Window.alert(getGreeting(txtName.getValue()));
      }});

      HorizontalPanel hPanel = new HorizontalPanel();
      hPanel.add(lblName);
      hPanel.add(txtName);
      hPanel.setCellWidth(lblName, "130");

      VerticalPanel vPanel = new VerticalPanel();
      vPanel.setSpacing(10);
      vPanel.add(hPanel);
      vPanel.add(buttonMessage);
      vPanel.setCellHorizontalAlignment(buttonMessage,
      HasHorizontalAlignment.ALIGN_RIGHT);

      DecoratorPanel panel = new DecoratorPanel();
      panel.add(vPanel);

      // Add widgets to the root panel.
      RootPanel.get("gwtContainer").add(panel);
   }

   public String getGreeting(String name){
      return "Hello "+name+"!";
   }
}
Langkah 1 - Tempatkan BreakPoints
Tempatkan breakpoint di baris pertama onModuleLoad() dari HelloWorld.java

Langkah 2 - Aplikasi Debug
Sekarang klik
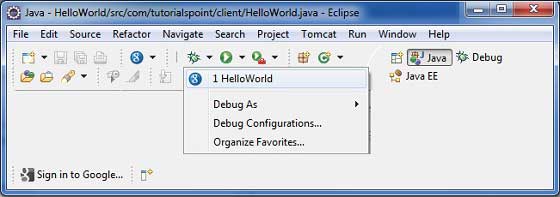
Jika semuanya baik-baik saja, Anda harus melihat Mode Pengembangan GWT aktif di Eclipse yang berisi URL seperti yang ditunjukkan di bawah ini. Klik dua kali URL untuk membuka aplikasi GWT.

Segera setelah Aplikasi diluncurkan, Anda akan melihat fokus pada titik putus Eclipse karena kami telah menempatkan titik putus pada baris pertama metode titik masuk.
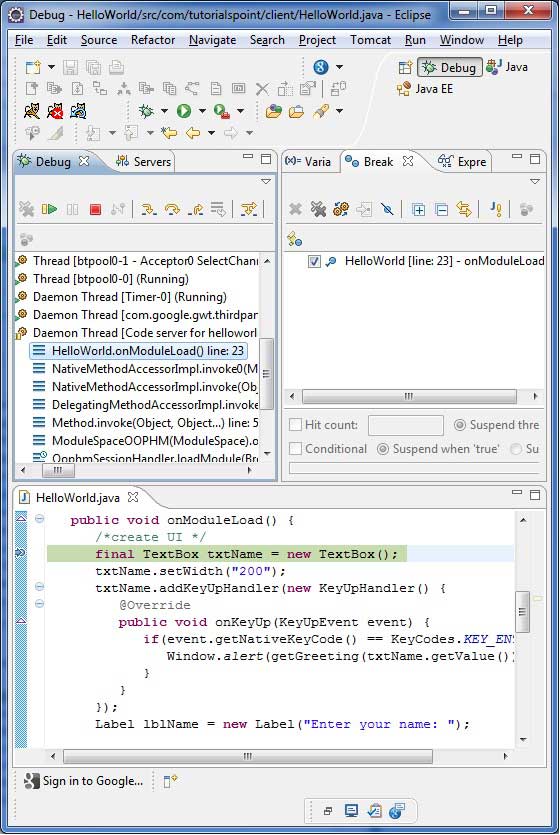
Anda dapat melihat stacktrace untuk utas yang ditangguhkan.
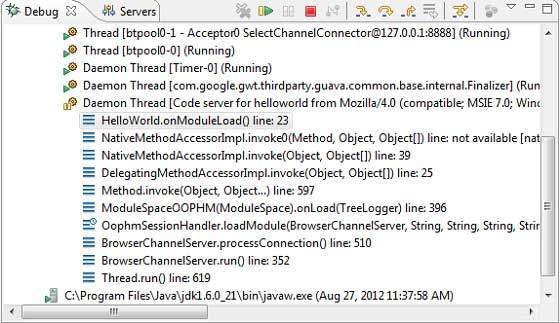
Anda dapat melihat nilai ekspresi.
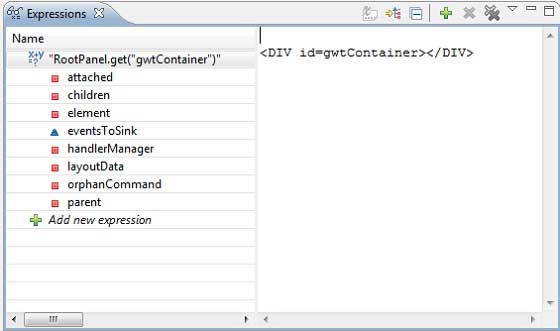
Anda dapat melihat daftar breakpoints ditempatkan.
Sekarang terus tekan F6 hingga Anda mencapai baris terakhir metode onModuleLoad (). Sebagai referensi untuk tombol fungsi, F6 memeriksa kode baris demi baris, F5 melangkah lebih jauh dan F8 akan melanjutkan aplikasi. Sekarang Anda dapat melihat daftar nilai semua variabel metode onModuleLoad ().
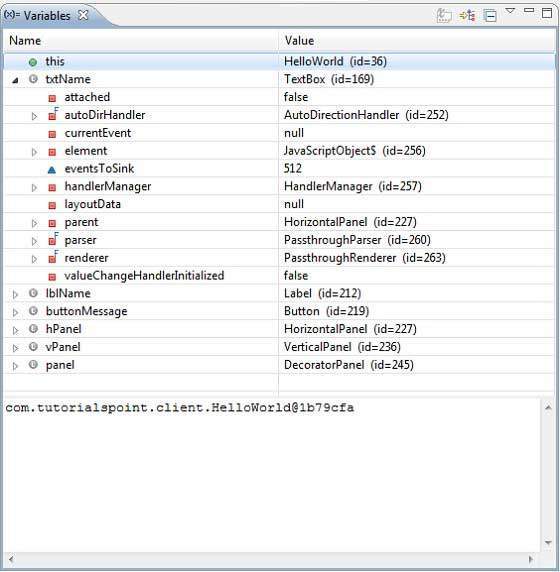
Kode klien GWT dapat di-debug dengan cara yang sama seperti Aplikasi Java dapat di-debug. Tempatkan breakpoint ke baris mana pun dan mainkan dengan kemampuan debugging GWT.
GWT menyediakan tiga cara untuk menginternasionalkan aplikasi GWT, Kami akan mendemonstrasikan penggunaan Internasionalisasi String Statis yang paling umum digunakan di antara proyek.
| Sr.No. | Teknik & Deskripsi |
|---|---|
| 1 | Static String Internationalization Teknik ini paling umum dan memerlukan sedikit biaya tambahan saat runtime; adalah teknik yang sangat efisien untuk menerjemahkan string konstan dan berparameter; paling sederhana untuk diterapkan. Internasionalisasi string statis menggunakan file properti Java standar untuk menyimpan string yang diterjemahkan dan pesan berparameter, dan antarmuka Java yang diketik dengan kuat dibuat untuk mengambil nilainya. |
| 2 | Dynamic String Internationalization Teknik ini sangat fleksibel tetapi lebih lambat dari internasionalisasi string statis. Halaman host berisi string yang dilokalkan oleh karena itu, aplikasi tidak perlu dikompilasi ulang saat kita menambahkan lokal baru. Jika aplikasi GWT akan diintegrasikan dengan sistem lokalisasi sisi server yang ada, maka teknik ini akan digunakan. |
| 3 | Localizable Interface Teknik ini adalah yang paling kuat di antara ketiga teknik tersebut. Menerapkan Localizable memungkinkan kita membuat versi jenis kustom yang dilokalkan. Ini adalah teknik internasionalisasi tingkat lanjut. |
Alur Kerja Internasionalisasi Aplikasi GWT
Langkah 1 - Buat file properti
Buat file properti yang berisi pesan untuk digunakan dalam aplikasi. Kami telah membuatHelloWorldMessages.properties mengajukan dalam contoh kami.
enterName = Enter your name
clickMe = Click Me
applicationTitle = Application Internationalization Demonstration
greeting = Hello {0}
Buat file properti yang berisi nilai terjemahan khusus untuk lokal. Kami telah membuatHelloWorldMessages_de.propertiesmengajukan dalam contoh kami. File ini berisi terjemahan dalam bahasa jerman. _de menentukan lokal jerman dan kami akan mendukung bahasa jerman di aplikasi kami.
Jika Anda membuat file properti menggunakan Eclipse, ubah encoding file menjadi UTF-8. Pilih file, lalu klik kanan di dalamnya untuk membuka jendela propertinya, lalu pilih Text file encoding as Other UTF-8. Terapkan dan Simpan perubahan.
enterName = Geben Sie Ihren Namen
clickMe = Klick mich
applicationTitle = Anwendung Internationalisierung Demonstration
greeting = Hallo {0}
Langkah 2 - Tambahkan modul i18n ke File XML Descriptor Modul
Perbarui file modul HelloWorld.gwt.xml untuk menyertakan dukungan untuk bahasa Jerman
<?xml version = "1.0" encoding = "UTF-8"?>
<module rename-to = 'helloworld'>
   ...
   <extend-property name = "locale" values="de" />
   ...
</module>
Langkah 3 - Buat Antarmuka yang setara dengan file properti
Buat antarmuka HelloWorldMessages.java dengan memperluas antarmuka Pesan dari GWT untuk menyertakan dukungan untuk internalisasi. Ini harus berisi nama metode yang sama seperti kunci dalam file properti. Placeholder akan diganti dengan argumen String.
public interface HelloWorldMessages extends Messages {

   @DefaultMessage("Enter your name")
   String enterName();

   @DefaultMessage("Click Me")
   String clickMe();

   @DefaultMessage("Application Internalization Demonstration")
   String applicationTitle();

   @DefaultMessage("Hello {0}")
   String greeting(String name);
}
Langkah 4 - Gunakan Antarmuka Pesan di komponen UI.
Gunakan objek HelloWorldMessages di HelloWorld untuk mendapatkan pesannya.
public class HelloWorld implements EntryPoint {

   /* create an object of HelloWorldMessages interface
      using GWT.create() method */
   private HelloWorldMessages messages =
   GWT.create(HelloWorldMessages.class);

   public void onModuleLoad() {
   ...
      Label titleLabel = new Label(messages.applicationTitle());
      //Add title to the application
      RootPanel.get("gwtAppTitle").add(titleLabel);
   ...
   }
}
Internasionalisasi - Contoh Lengkap
Contoh ini akan memandu Anda melalui langkah-langkah sederhana untuk mendemonstrasikan kemampuan Internasionalisasi aplikasi GWT.
Ikuti langkah-langkah berikut untuk memperbarui aplikasi GWT yang kami buat di GWT - bab Membuat Aplikasi -
| Langkah | Deskripsi |
|---|---|
| 1 | Buat proyek dengan nama HelloWorld di bawah paket com.tutorialspoint seperti yang dijelaskan di bab GWT - Membuat Aplikasi . |
| 2 | Modifikasi HelloWorld.gwt.xml , HelloWorld.css , HelloWorld.html dan HelloWorld.java seperti yang dijelaskan di bawah ini. Jaga file lainnya tidak berubah. |
| 3 | Kompilasi dan jalankan aplikasi untuk memverifikasi hasil dari logika yang diimplementasikan. |
Berikut adalah isi dari deskriptor modul yang dimodifikasi src/com.tutorialspoint/HelloWorld.gwt.xml.
<?xml version = "1.0" encoding = "UTF-8"?>
<module rename-to = 'helloworld'>
  <!-- Inherit the core Web Toolkit stuff.                        -->
  <inherits name = 'com.google.gwt.user.User'/>

  <!-- Inherit the default GWT style sheet.                       -->
  <inherits name = 'com.google.gwt.user.theme.clean.Clean'/>

  <!-- Specify the app entry point class.                         -->
  <entry-point class = 'com.tutorialspoint.client.HelloWorld'/>
  <extend-property name = "locale" values="de" />
  <!-- Specify the paths for translatable code                    -->
  <source path = 'client'/>
  <source path = 'shared'/>

</module>
Berikut ini adalah konten file Style Sheet yang dimodifikasi war/HelloWorld.css.
body {
   text-align: center;
   font-family: verdana, sans-serif;
}

h1 {
   font-size: 2em;
   font-weight: bold;
   color: #777777;
   margin: 40px 0px 70px;
   text-align: center;
}
Berikut adalah konten dari file host HTML yang dimodifikasi war/HelloWorld.html.
<html>
   <head>
      <title>Hello World</title>
      <link rel = "stylesheet" href = "HelloWorld.css"/>
      <script language = "javascript" src = "helloworld/helloworld.nocache.js">
      </script>
   </head>
   <body>

      <h1 id = "gwtAppTitle"></h1>
      <div id = "gwtContainer"></div>

   </body>
</html>
Sekarang buat file HelloWorldMessages.properties di src/com.tutorialspoint/client paket dan tempatkan konten berikut di dalamnya
enterName = Enter your name
clickMe = Click Me
applicationTitle = Application Internationalization Demonstration
greeting = Hello {0}
Sekarang buat file HelloWorldMessages_de.properties di src/com.tutorialspoint/client paket dan tempatkan konten berikut di dalamnya
enterName = Geben Sie Ihren Namen
clickMe = Klick mich
applicationTitle = Anwendung Internationalisierung Demonstration
greeting = Hallo {0}
Sekarang buat kelas HelloWorldMessages.java di file src/com.tutorialspoint/client paket dan tempatkan konten berikut di dalamnya
package com.tutorialspoint.client;
import com.google.gwt.i18n.client.Messages;

public interface HelloWorldMessages extends Messages {
   @DefaultMessage("Enter your name")
   String enterName();

   @DefaultMessage("Click Me")
   String clickMe();

   @DefaultMessage("Application Internationalization Demonstration")
   String applicationTitle();

   @DefaultMessage("Hello {0}")
   String greeting(String name);
}
Mari kita ikuti konten file Java berikut src/com.tutorialspoint/HelloWorld.java menggunakan yang kami akan menunjukkan kemampuan Internasionalisasi Kode GWT.
package com.tutorialspoint.client;

import com.google.gwt.core.client.EntryPoint;
import com.google.gwt.core.client.GWT;

import com.google.gwt.event.dom.client.ClickEvent;
import com.google.gwt.event.dom.client.ClickHandler;
import com.google.gwt.event.dom.client.KeyCodes;
import com.google.gwt.event.dom.client.KeyUpEvent;
import com.google.gwt.event.dom.client.KeyUpHandler;

import com.google.gwt.user.client.Window;
import com.google.gwt.user.client.ui.Button;
import com.google.gwt.user.client.ui.DecoratorPanel;
import com.google.gwt.user.client.ui.HasHorizontalAlignment;
import com.google.gwt.user.client.ui.HorizontalPanel;
import com.google.gwt.user.client.ui.Label;
import com.google.gwt.user.client.ui.RootPanel;
import com.google.gwt.user.client.ui.TextBox;
import com.google.gwt.user.client.ui.VerticalPanel;

public class HelloWorld implements EntryPoint {

   /* create an object of HelloWorldMessages interface
      using GWT.create() method */
   private HelloWorldMessages messages =
   GWT.create(HelloWorldMessages.class);

   public void onModuleLoad() {
      /*create UI */
      final TextBox txtName = new TextBox();
      txtName.setWidth("200");
      txtName.addKeyUpHandler(new KeyUpHandler() {
         @Override
         public void onKeyUp(KeyUpEvent event) {
            if(event.getNativeKeyCode() == KeyCodes.KEY_ENTER){
               Window.alert(getGreeting(txtName.getValue()));
            }
         }
      });
      Label lblName = new Label(messages.enterName() + ": ");

      Button buttonMessage = new Button(messages.clickMe() + "!");

      buttonMessage.addClickHandler(new ClickHandler() {
         @Override
         public void onClick(ClickEvent event) {
            Window.alert(getGreeting(txtName.getValue()));
         }
      });

      HorizontalPanel hPanel = new HorizontalPanel();
      hPanel.add(lblName);
      hPanel.add(txtName);

      VerticalPanel vPanel = new VerticalPanel();
      vPanel.setSpacing(10);
      vPanel.add(hPanel);
      vPanel.add(buttonMessage);
      vPanel.setCellHorizontalAlignment(buttonMessage,
      HasHorizontalAlignment.ALIGN_RIGHT);

      DecoratorPanel panel = new DecoratorPanel();
      panel.add(vPanel);
      Label titleLabel = new Label(messages.applicationTitle());
      //Add title to the application
      RootPanel.get("gwtAppTitle").add(titleLabel);
      // Add widgets to the root panel.
      RootPanel.get("gwtContainer").add(panel);
   }

   public String getGreeting(String name){
      return messages.greeting(name + "!");
   }
}
Setelah Anda siap dengan semua perubahan yang dilakukan, mari kita kompilasi dan jalankan aplikasi dalam mode pengembangan seperti yang kita lakukan di bab GWT - Membuat Aplikasi . Jika semuanya baik-baik saja dengan aplikasi Anda, ini akan menghasilkan hasil sebagai berikut -
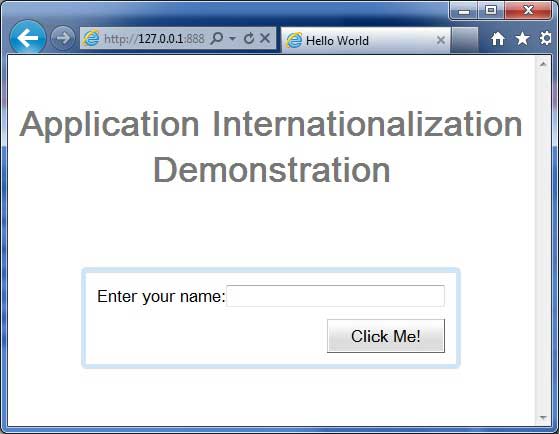
Sekarang perbarui URL untuk memuat URL locale = de.Set - http://127.0.0.1:8888/HelloWorld.html?gwt.codesvr=127.0.0.1:9997&locale=de. Jika semuanya baik-baik saja dengan aplikasi Anda, ini akan menghasilkan hasil sebagai berikut -
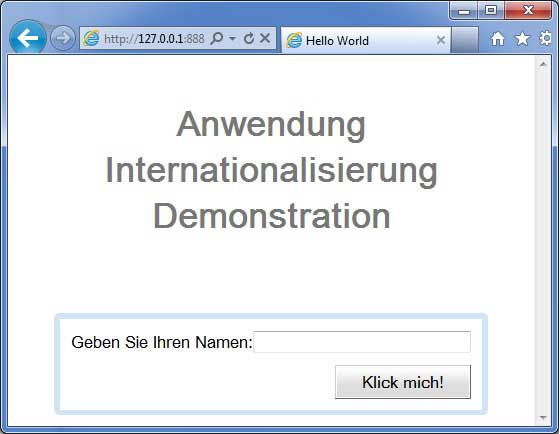
Aplikasi GWT biasanya merupakan aplikasi satu halaman yang menjalankan JavaScripts dan tidak berisi banyak halaman sehingga browser tidak melacak interaksi pengguna dengan Aplikasi. Untuk menggunakan fungsi riwayat browser, aplikasi harus menghasilkan fragmen URL unik untuk setiap halaman yang dapat dinavigasi.
GWT menyediakan History Mechanism untuk menangani situasi ini.
GWT menggunakan istilah tokenyang hanya berupa string yang dapat diurai oleh aplikasi untuk kembali ke status tertentu. Aplikasi akan menyimpan token ini dalam riwayat browser sebagai fragmen URL.
Misalnya, token riwayat bernama "pageIndex1" akan ditambahkan ke URL sebagai berikut -
http://www.tutorialspoint.com/HelloWorld.html#pageIndex0Alur Kerja Manajemen Sejarah
Langkah 1 - Aktifkan dukungan Sejarah
Untuk menggunakan dukungan Riwayat GWT, pertama-tama kita harus menyematkan iframe berikut ke halaman HTML host kita.
<iframe src = "javascript:''"
   id = "__gwt_historyFrame"
   style = "width:0;height:0;border:0"></iframe>
Langkah 2 - Tambahkan token ke Riwayat
Berikut contoh statistik bagaimana menambahkan token ke riwayat browser
int index = 0;
History.newItem("pageIndex" + index);
Langkah 3 - Ambil token dari History
Saat pengguna menggunakan tombol kembali / maju di browser, kami akan mengambil token dan memperbarui status aplikasi kami.
History.addValueChangeHandler(new ValueChangeHandler<String>() {
   @Override
   public void onValueChange(ValueChangeEvent<String> event) {
      String historyToken = event.getValue();
      /* parse the history token */
      try {
         if (historyToken.substring(0, 9).equals("pageIndex")) {
            String tabIndexToken = historyToken.substring(9, 10);
            int tabIndex = Integer.parseInt(tabIndexToken);
            /* select the specified tab panel */
            tabPanel.selectTab(tabIndex);
         } else {
            tabPanel.selectTab(0);
         }
      } catch (IndexOutOfBoundsException e) {
         tabPanel.selectTab(0);
      }
   }
});
Sekarang mari kita lihat Kelas Sejarah beraksi.
Kelas Sejarah - Contoh Lengkap
Contoh ini akan memandu Anda melalui langkah-langkah sederhana untuk mendemonstrasikan Manajemen Riwayat aplikasi GWT. Ikuti langkah-langkah berikut untuk memperbarui aplikasi GWT yang kami buat di GWT - bab Membuat Aplikasi -
| Langkah | Deskripsi |
|---|---|
| 1 | Buat proyek dengan nama HelloWorld di bawah paket com.tutorialspoint seperti yang dijelaskan di bab GWT - Membuat Aplikasi . |
| 2 | Modifikasi HelloWorld.gwt.xml , HelloWorld.css , HelloWorld.html dan HelloWorld.java seperti yang dijelaskan di bawah ini. Jaga file lainnya tidak berubah. |
| 3 | Kompilasi dan jalankan aplikasi untuk memverifikasi hasil dari logika yang diimplementasikan. |
Berikut adalah isi dari deskriptor modul yang dimodifikasi src/com.tutorialspoint/HelloWorld.gwt.xml.
<?xml version = "1.0" encoding = "UTF-8"?>
<module rename-to = 'helloworld'>
   <!-- Inherit the core Web Toolkit stuff.                        -->
   <inherits name = 'com.google.gwt.user.User'/>

   <!-- Inherit the default GWT style sheet.                       -->
   <inherits name = 'com.google.gwt.user.theme.clean.Clean'/>

   <!-- Specify the app entry point class.                         -->
   <entry-point class = 'com.tutorialspoint.client.HelloWorld'/>
   <!-- Specify the paths for translatable code                    -->
   <source path = 'client'/>
   <source path = 'shared'/>

</module>
Berikut ini adalah konten file Style Sheet yang dimodifikasi war/HelloWorld.css.
body {
   text-align: center;
   font-family: verdana, sans-serif;
}

h1 {
   font-size: 2em;
   font-weight: bold;
   color: #777777;
   margin: 40px 0px 70px;
   text-align: center;
}
Berikut adalah konten dari file host HTML yang dimodifikasi war/HelloWorld.html
<html>
   <head>
      <title>Hello World</title>
      <link rel = "stylesheet" href = "HelloWorld.css"/>
      <script language = "javascript" src = "helloworld/helloworld.nocache.js">
      </script>
   </head>

   <body>
      <iframe src = "javascript:''"id = "__gwt_historyFrame"
         style = "width:0;height:0;border:0"></iframe>
      <h1> History Class Demonstration</h1>
      <div id = "gwtContainer"></div>
   </body>
</html>
Mari kita ikuti konten file Java berikut src/com.tutorialspoint/HelloWorld.java menggunakan mana kami akan menunjukkan Manajemen Sejarah dalam GWT Code.
package com.tutorialspoint.client;

import com.google.gwt.core.client.EntryPoint;

import com.google.gwt.event.logical.shared.SelectionEvent;
import com.google.gwt.event.logical.shared.SelectionHandler;
import com.google.gwt.event.logical.shared.ValueChangeEvent;
import com.google.gwt.event.logical.shared.ValueChangeHandler;

import com.google.gwt.user.client.History;
import com.google.gwt.user.client.ui.HTML;
import com.google.gwt.user.client.ui.RootPanel;
import com.google.gwt.user.client.ui.TabPanel;

public class HelloWorld implements EntryPoint {

   /**
    * This is the entry point method.
    */
   public void onModuleLoad() {
      /* create a tab panel to carry multiple pages */
      final TabPanel tabPanel = new TabPanel();

      /* create pages */
      HTML firstPage = new HTML("<h1>We are on first Page.</h1>");
      HTML secondPage = new HTML("<h1>We are on second Page.</h1>");
      HTML thirdPage = new HTML("<h1>We are on third Page.</h1>");

      String firstPageTitle = "First Page";
      String secondPageTitle = "Second Page";
      String thirdPageTitle = "Third Page";
      tabPanel.setWidth("400");

	  /* add pages to tabPanel*/
      tabPanel.add(firstPage, firstPageTitle);
      tabPanel.add(secondPage,secondPageTitle);
      tabPanel.add(thirdPage, thirdPageTitle);

      /* add tab selection handler */
      tabPanel.addSelectionHandler(new SelectionHandler<Integer>() {
         @Override
         public void onSelection(SelectionEvent<Integer> event) {
            /* add a token to history containing pageIndex
             History class will change the URL of application
             by appending the token to it.
            */
            History.newItem("pageIndex" + event.getSelectedItem());
         }
      });

      /* add value change handler to History
       this method will be called, when browser's
       Back button or Forward button are clicked
       and URL of application changes.
       */
      History.addValueChangeHandler(new ValueChangeHandler<String>() {
         @Override
         public void onValueChange(ValueChangeEvent<String> event) {
            String historyToken = event.getValue();
            /* parse the history token */
            try {
               if (historyToken.substring(0, 9).equals("pageIndex")) {
                  String tabIndexToken = historyToken.substring(9, 10);
                  int tabIndex = Integer.parseInt(tabIndexToken);
                  /* select the specified tab panel */
                  tabPanel.selectTab(tabIndex);
               } else {
                  tabPanel.selectTab(0);
               }
            } catch (IndexOutOfBoundsException e) {
               tabPanel.selectTab(0);
            }
         }
      });

      /* select the first tab by default */
      tabPanel.selectTab(0);

      /* add controls to RootPanel */
      RootPanel.get().add(tabPanel);
   }
}
Setelah Anda siap dengan semua perubahan yang dilakukan, mari kita kompilasi dan jalankan aplikasi dalam mode pengembangan seperti yang kita lakukan di bab GWT - Membuat Aplikasi . Jika semuanya baik-baik saja dengan aplikasi Anda, ini akan menghasilkan hasil sebagai berikut -

Sekarang klik pada setiap tab untuk memilih halaman yang berbeda.
Anda harus memperhatikan, ketika setiap tab dipilih, url aplikasi berubah dan #pageIndex ditambahkan ke url.
Anda juga dapat melihat bahwa tombol kembali dan maju browser diaktifkan sekarang.
Gunakan tombol kembali dan maju dari browser dan Anda akan melihat tab yang berbeda dipilih sesuai.
GWT mendukung manajemen riwayat browser menggunakan kelas Sejarah yang dapat Anda rujuk ke GWT - bab Kelas Sejarah .
GWT menggunakan istilah tokenyang hanya berupa string yang dapat diurai oleh aplikasi untuk kembali ke status tertentu. Aplikasi akan menyimpan token ini dalam riwayat browser sebagai fragmen URL.
Di GWT - bab History Class , kami menangani pembuatan token dan pengaturan di history dengan menulis kode.
Pada artikel ini, kita akan membahas widget khusus Hyperlink yang melakukan pembuatan token dan manajemen riwayat untuk kita secara otomatis dan memberikan kemampuan aplikasi untuk bookmark.
Contoh Bookmarking
Contoh ini akan membawa Anda melalui langkah-langkah sederhana untuk mendemonstrasikan Bookmarking dari aplikasi GWT.
Berikut langkah-langkah untuk mengupdate aplikasi GWT yang kita buat di GWT - bab Membuat Aplikasi -
| Langkah | Deskripsi |
|---|---|
| 1 | Buat proyek dengan nama HelloWorld di bawah paket com.tutorialspoint seperti yang dijelaskan di bab GWT - Membuat Aplikasi . |
| 2 | Modifikasi HelloWorld.gwt.xml , HelloWorld.css , HelloWorld.html dan HelloWorld.java seperti yang dijelaskan di bawah ini. Jaga file lainnya tidak berubah. |
| 3 | Kompilasi dan jalankan aplikasi untuk memverifikasi hasil dari logika yang diimplementasikan. |
Berikut adalah isi dari deskriptor modul yang dimodifikasi src/com.tutorialspoint/HelloWorld.gwt.xml.
<?xml version = "1.0" encoding = "UTF-8"?>
<module rename-to = 'helloworld'>
   <!-- Inherit the core Web Toolkit stuff.                        -->
   <inherits name = 'com.google.gwt.user.User'/>

   <!-- Inherit the default GWT style sheet.                       -->
   <inherits name = 'com.google.gwt.user.theme.clean.Clean'/>

   <!-- Specify the app entry point class.                         -->
   <entry-point class = 'com.tutorialspoint.client.HelloWorld'/>
   <!-- Specify the paths for translatable code                    -->
   <source path = 'client'/>
   <source path = 'shared'/>

</module>
Berikut ini adalah konten file Style Sheet yang dimodifikasi war/HelloWorld.css.
body {
   text-align: center;
   font-family: verdana, sans-serif;
}

h1 {
   font-size: 2em;
   font-weight: bold;
   color: #777777;
   margin: 40px 0px 70px;
   text-align: center;
}
Berikut adalah konten dari file host HTML yang dimodifikasi war/HelloWorld.html
<html>
   <head>
      <title>Hello World</title>
      <link rel = "stylesheet" href = "HelloWorld.css"/>
      <script language = "javascript" src = "helloworld/helloworld.nocache.js">
      </script>
   </head>

   <body>
      <iframe src = "javascript:''"id = "__gwt_historyFrame"
         style = "width:0;height:0;border:0"></iframe>
      <h1> Bookmarking Demonstration</h1>
      <div id = "gwtContainer"></div>
   </body>
</html>
Mari kita ikuti konten file Java berikut src/com.tutorialspoint/HelloWorld.java menggunakan mana kami akan mendemonstrasikan Bookmarking dalam GWT Code.
package com.tutorialspoint.client;

import com.google.gwt.core.client.EntryPoint;

import com.google.gwt.event.logical.shared.ValueChangeEvent;
import com.google.gwt.event.logical.shared.ValueChangeHandler;

import com.google.gwt.user.client.History;
import com.google.gwt.user.client.ui.HTML;
import com.google.gwt.user.client.ui.HorizontalPanel;
import com.google.gwt.user.client.ui.Hyperlink;
import com.google.gwt.user.client.ui.RootPanel;
import com.google.gwt.user.client.ui.TabPanel;
import com.google.gwt.user.client.ui.VerticalPanel;

public class HelloWorld implements EntryPoint {

   private TabPanel tabPanel;

   private void selectTab(String historyToken){
      /*  parse the history token */
      try {
         if (historyToken.substring(0, 9).equals("pageIndex")) {
            String tabIndexToken = historyToken.substring(9, 10);
            int tabIndex = Integer.parseInt(tabIndexToken);
            /* Select the specified tab panel */
            tabPanel.selectTab(tabIndex);
         } else {
            tabPanel.selectTab(0);
         }
      } catch (IndexOutOfBoundsException e) {
         tabPanel.selectTab(0);
      }
   }

   /**
    * This is the entry point method.
    */
   public void onModuleLoad() {
      /* create a tab panel to carry multiple pages */
      tabPanel = new TabPanel();

      /* create pages */
      HTML firstPage = new HTML("<h1>We are on first Page.</h1>");
      HTML secondPage = new HTML("<h1>We are on second Page.</h1>");
      HTML thirdPage = new HTML("<h1>We are on third Page.</h1>");

      String firstPageTitle = "First Page";
      String secondPageTitle = "Second Page";
      String thirdPageTitle = "Third Page";

      Hyperlink firstPageLink = new Hyperlink("1", "pageIndex0");
      Hyperlink secondPageLink = new Hyperlink("2", "pageIndex1");
      Hyperlink thirdPageLink = new Hyperlink("3", "pageIndex2");

      HorizontalPanel linksHPanel = new HorizontalPanel();
      linksHPanel.setSpacing(10);
      linksHPanel.add(firstPageLink);
      linksHPanel.add(secondPageLink);
      linksHPanel.add(thirdPageLink);

      /* If the application starts with no history token,
         redirect to a pageIndex0 */
      String initToken = History.getToken();

      if (initToken.length() == 0) {
         History.newItem("pageIndex0");
         initToken = "pageIndex0";
      }

      tabPanel.setWidth("400");
      /* add pages to tabPanel*/
      tabPanel.add(firstPage, firstPageTitle);
      tabPanel.add(secondPage,secondPageTitle);
      tabPanel.add(thirdPage, thirdPageTitle);

      /* add value change handler to History
       * this method will be called, when browser's Back button
       * or Forward button are clicked.
       * and URL of application changes.
       * */
      History.addValueChangeHandler(new ValueChangeHandler<String>() {
         @Override
         public void onValueChange(ValueChangeEvent<String> event) {
            selectTab(event.getValue());
         }
      });

      selectTab(initToken);

      VerticalPanel vPanel = new VerticalPanel();

      vPanel.setSpacing(10);
      vPanel.add(tabPanel);
      vPanel.add(linksHPanel);

      /* add controls to RootPanel */
      RootPanel.get().add(vPanel);
   }
}
Setelah Anda siap dengan semua perubahan yang dilakukan, mari kita kompilasi dan jalankan aplikasi dalam mode pengembangan seperti yang kita lakukan di bab GWT - Membuat Aplikasi . Jika semuanya baik-baik saja dengan aplikasi Anda, ini akan menghasilkan hasil sebagai berikut -
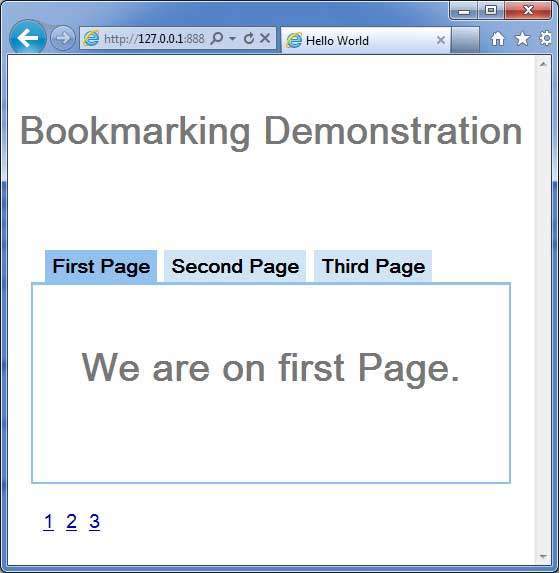
Sekarang klik 1, 2 atau 3. Anda dapat melihat bahwa tab berubah dengan indeks.
Anda harus memperhatikan, ketika Anda mengklik 1,2 atau 3, url aplikasi berubah dan #pageIndex ditambahkan ke url
Anda juga dapat melihat bahwa tombol kembali dan maju browser diaktifkan sekarang.
Gunakan tombol kembali dan maju dari browser dan Anda akan melihat tab yang berbeda dipilih sesuai.
Klik Kanan pada 1, 2 atau 3. Anda dapat melihat opsi seperti buka, buka di jendela baru, buka di tab baru, tambahkan ke favorit, dll.
Klik kanan pada 3. Pilih tambahkan ke favorit. Simpan bookmark sebagai halaman 3.
Buka favorit dan pilih halaman 3. Anda akan melihat tab ketiga dipilih.
Kerangka kerja logging mengemulasi java.util.logging, sehingga menggunakan sintaks yang sama dan memiliki perilaku yang sama seperti kode logging sisi server
GWT logging dikonfigurasi menggunakan file .gwt.xml.
Kami dapat mengkonfigurasi logging untuk diaktifkan / dinonaktifkan; kita dapat mengaktifkan / menonaktifkan penangan tertentu, dan mengubah tingkat pencatatan default.
Jenis Logger
Penebang diatur dalam struktur pohon, dengan Penebang Akar di akar pohon.
Nama logger menentukan hubungan Induk / Anak menggunakan . untuk memisahkan bagian dari nama.
Sebagai contoh jika kita memiliki dua pembalak Hospital.room1 dan Hospital.room2, maka mereka bersaudara, dengan orang tua pembalak bernama Hospital. Logger Rumah Sakit (dan setiap logger dengan nama yang tidak mengandung titik ".") Memiliki Root Logger sebagai induk.
private static Logger room1Logger = Logger.getLogger("Hospital.room1");
private static Logger room2Logger = Logger.getLogger("Hospital.room2");
private static Logger hospitalLogger = Logger.getLogger("Hospital");
private static Logger rootLogger = Logger.getLogger("");
Penangan Log
GWT menyediakan penangan default yang akan menampilkan entri log yang dibuat menggunakan penebang.
| Penangan | Masuk ke | Deskripsi |
|---|---|---|
| SystemLogHandler | stdout | Pesan ini hanya dapat dilihat dalam Mode Pengembangan di jendela DevMode. |
| DevelopmentModeLogHandler | Jendela DevMode | Log dengan memanggil metode GWT.log. Pesan ini hanya dapat dilihat dalam Mode Pengembangan di jendela DevMode. |
| ConsoleLogHandler | konsol javascript | Log ke konsol javascript, yang digunakan oleh Firebug Lite (untuk IE), Safari, dan Chrome. |
| FirebugLogHandler | Pembakar | Log ke konsol firebug. |
| PopupLogHandler | muncul | Log ke munculan yang berada di sudut kiri atas aplikasi saat penangan ini diaktifkan. |
| SimpleRemoteLogHandler | server | Penangan ini mengirimkan pesan log ke server, di mana pesan tersebut akan dicatat menggunakan mekanisme logging sisi server. |
Konfigurasi Logging di Aplikasi GWT
File HelloWorld.gwt.xml harus dikonfigurasi untuk mengaktifkan pencatatan GWT sebagai berikut -
# add logging module
   <inherits name = "com.google.gwt.logging.Logging"/>
# To change the default logLevel
   <set-property name = "gwt.logging.logLevel" value = "SEVERE"/>
# To enable logging
   <set-property name = "gwt.logging.enabled" value = "TRUE"/>
# To disable a popup Handler
   <set-property name = "gwt.logging.popupHandler" value = "DISABLED" />
Gunakan pencatat untuk mencatat tindakan pengguna
/* Create Root Logger */
private static Logger rootLogger = Logger.getLogger("");
...
rootLogger.log(Level.SEVERE, "pageIndex selected: " + event.getValue());
...
Contoh Kerangka Kerja Logging
Contoh ini akan membawa Anda melalui langkah-langkah sederhana untuk mendemonstrasikan Kemampuan Logging dari aplikasi GWT. Ikuti langkah-langkah berikut untuk memperbarui aplikasi GWT yang kami buat di GWT - bab Membuat Aplikasi -
| Langkah | Deskripsi |
|---|---|
| 1 | Buat proyek dengan nama HelloWorld di bawah paket com.tutorialspoint seperti yang dijelaskan di bab GWT - Membuat Aplikasi . |
| 2 | Modifikasi HelloWorld.gwt.xml , HelloWorld.css , HelloWorld.html dan HelloWorld.java seperti yang dijelaskan di bawah ini. Jaga file lainnya tidak berubah. |
| 3 | Kompilasi dan jalankan aplikasi untuk memverifikasi hasil dari logika yang diimplementasikan. |
Berikut adalah isi dari deskriptor modul yang dimodifikasi src/com.tutorialspoint/HelloWorld.gwt.xml.
<?xml version = "1.0" encoding = "UTF-8"?>
<module rename-to = 'helloworld'>
   <!-- Inherit the core Web Toolkit stuff.                        -->
   <inherits name = 'com.google.gwt.user.User'/>

   <!-- Inherit the default GWT style sheet.                       -->
   <inherits name = 'com.google.gwt.user.theme.clean.Clean'/>
   <inherits name = "com.google.gwt.logging.Logging"/>
   <!-- Specify the app entry point class.                         -->
   <entry-point class = 'com.tutorialspoint.client.HelloWorld'/>
   <!-- Specify the paths for translatable code                    -->
   <source path = 'client'/>
   <source path = 'shared'/>
   <set-property name = "gwt.logging.logLevel" value="SEVERE"/>
   <set-property name = "gwt.logging.enabled" value = "TRUE"/>
   <set-property name = "gwt.logging.popupHandler" value=  "DISABLED" />
</module>
Berikut ini adalah konten file Style Sheet yang dimodifikasi war/HelloWorld.css.
body {
   text-align: center;
   font-family: verdana, sans-serif;
}

h1 {
   font-size: 2em;
   font-weight: bold;
   color: #777777;
   margin: 40px 0px 70px;
   text-align: center;
}
Berikut adalah konten dari file host HTML yang dimodifikasi war/HelloWorld.html
<html>
   <head>
      <title>Hello World</title>
      <link rel = "stylesheet" href = "HelloWorld.css"/>
      <script language = "javascript" src = "helloworld/helloworld.nocache.js">
      </script>
   </head>

   <body>
      <iframe src = "javascript:''"id = "__gwt_historyFrame"
         style = "width:0;height:0;border:0"></iframe>
      <h1> Logging Demonstration</h1>
      <div id = "gwtContainer"></div>
   </body>
</html>
Mari kita ikuti konten file Java berikut src/com.tutorialspoint/HelloWorld.java menggunakan mana kami akan mendemonstrasikan Bookmarking dalam GWT Code.
package com.tutorialspoint.client;

import java.util.logging.Level;
import java.util.logging.Logger;

import com.google.gwt.core.client.EntryPoint;

import com.google.gwt.event.logical.shared.ValueChangeEvent;
import com.google.gwt.event.logical.shared.ValueChangeHandler;

import com.google.gwt.logging.client.HasWidgetsLogHandler;

import com.google.gwt.user.client.History;
import com.google.gwt.user.client.ui.HTML;
import com.google.gwt.user.client.ui.HorizontalPanel;
import com.google.gwt.user.client.ui.Hyperlink;
import com.google.gwt.user.client.ui.RootPanel;
import com.google.gwt.user.client.ui.TabPanel;
import com.google.gwt.user.client.ui.VerticalPanel;

public class HelloWorld implements EntryPoint {

   private TabPanel tabPanel;
   /* Create Root Logger */
   private static Logger rootLogger = Logger.getLogger("");
   private VerticalPanel customLogArea;

   private void selectTab(String historyToken){
      /*  parse the history token */
      try {
         if (historyToken.substring(0, 9).equals("pageIndex")) {
            String tabIndexToken = historyToken.substring(9, 10);
            int tabIndex = Integer.parseInt(tabIndexToken);
            /* Select the specified tab panel */
            tabPanel.selectTab(tabIndex);
         } else {
            tabPanel.selectTab(0);
         }
      } catch (IndexOutOfBoundsException e) {
         tabPanel.selectTab(0);
      }
   }

   /**
    * This is the entry point method.
    */
   public void onModuleLoad() {
      /* create a tab panel to carry multiple pages */
      tabPanel = new TabPanel();

      /* create pages */
      HTML firstPage = new HTML("<h1>We are on first Page.</h1>");
      HTML secondPage = new HTML("<h1>We are on second Page.</h1>");
      HTML thirdPage = new HTML("<h1>We are on third Page.</h1>");

      String firstPageTitle = "First Page";
      String secondPageTitle = "Second Page";
      String thirdPageTitle = "Third Page";

      Hyperlink firstPageLink = new Hyperlink("1", "pageIndex0");
      Hyperlink secondPageLink = new Hyperlink("2", "pageIndex1");
      Hyperlink thirdPageLink = new Hyperlink("3", "pageIndex2");

      HorizontalPanel linksHPanel = new HorizontalPanel();
      linksHPanel.setSpacing(10);
      linksHPanel.add(firstPageLink);
      linksHPanel.add(secondPageLink);
      linksHPanel.add(thirdPageLink);

      /* If the application starts with no history token,
         redirect to a pageIndex0 */
      String initToken = History.getToken();

      if (initToken.length() == 0) {
         History.newItem("pageIndex0");
         initToken = "pageIndex0";
      }

      tabPanel.setWidth("400");
      /* add pages to tabPanel*/
      tabPanel.add(firstPage, firstPageTitle);
      tabPanel.add(secondPage,secondPageTitle);
      tabPanel.add(thirdPage, thirdPageTitle);

      /* add value change handler to History
       * this method will be called, when browser's Back button
       * or Forward button are clicked.
       * and URL of application changes.
       * */
      History.addValueChangeHandler(new ValueChangeHandler<String>() {
         @Override
         public void onValueChange(ValueChangeEvent<String> event) {
            selectTab(event.getValue());
            rootLogger.log(Level.SEVERE, "pageIndex selected: "
            + event.getValue());
         }
      });

      selectTab(initToken);

      VerticalPanel vPanel = new VerticalPanel();

      vPanel.setSpacing(10);
      vPanel.add(tabPanel);
      vPanel.add(linksHPanel);

      customLogArea = new VerticalPanel();
      vPanel.add(customLogArea);

      /* an example of using own custom logging area. */
      rootLogger.addHandler(new HasWidgetsLogHandler(customLogArea));

      /* add controls to RootPanel */
      RootPanel.get().add(vPanel);
   }
}
Setelah Anda siap dengan semua perubahan yang dilakukan, mari kita kompilasi dan jalankan aplikasi dalam mode pengembangan seperti yang kita lakukan di bab GWT - Membuat Aplikasi . Jika semuanya baik-baik saja dengan aplikasi Anda, ini akan menghasilkan hasil sebagai berikut -
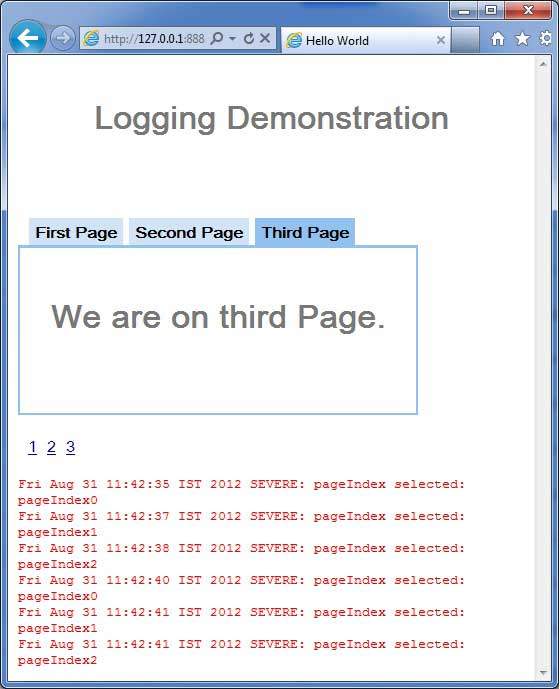
Sekarang klik 1, 2 atau 3. Anda dapat melihat, ketika Anda mengklik 1,2 atau 3, Anda dapat melihat log sedang dicetak menampilkan pageIndex. Periksa output Konsol di Eclipse. Anda juga dapat melihat log dicetak di konsol Eclipse.
Fri Aug 31 11:42:35 IST 2012
SEVERE: pageIndex selected: pageIndex0
Fri Aug 31 11:42:37 IST 2012
SEVERE: pageIndex selected: pageIndex1
Fri Aug 31 11:42:38 IST 2012
SEVERE: pageIndex selected: pageIndex2
Fri Aug 31 11:42:40 IST 2012
SEVERE: pageIndex selected: pageIndex0
Fri Aug 31 11:42:41 IST 2012
SEVERE: pageIndex selected: pageIndex1
Fri Aug 31 11:42:41 IST 2012
SEVERE: pageIndex selected: pageIndex2
Sekarang perbarui deskriptor modul src/com.tutorialspoint/HelloWorld.gwt.xml untuk mengaktifkan popupHandler.
<?xml version = "1.0" encoding = "UTF-8"?>
<module rename-to = 'helloworld'>
  <!-- Inherit the core Web Toolkit stuff.                        -->
   <inherits name = 'com.google.gwt.user.User'/>

   <!-- Inherit the default GWT style sheet.                       -->
   <inherits name = 'com.google.gwt.user.theme.clean.Clean'/>
   <inherits name = "com.google.gwt.logging.Logging"/>
   <!-- Specify the app entry point class.                         -->
   <entry-point class = 'com.tutorialspoint.client.HelloWorld'/>
   <!-- Specify the paths for translatable code                    -->
   <source path = 'client'/>
   <source path = 'shared'/>
   <set-property name = "gwt.logging.logLevel" value = "SEVERE"/>
   <set-property name = "gwt.logging.enabled" value = "TRUE"/>
   <set-property name="gwt.logging.popupHandler" value = "ENABLED" />
</module>
Setelah Anda siap dengan semua perubahan yang dilakukan, muat ulang aplikasi dengan menyegarkan jendela browser (tekan F5 / tombol muat ulang browser). Perhatikan jendela popup sekarang di sudut kiri atas aplikasi.
Sekarang klik 1, 2 atau 3. Anda dapat melihat, ketika Anda mengklik 1,2 atau 3, Anda dapat melihat log sedang dicetak menampilkan pageIndex di jendela popup.
