JSF-最初のアプリケーション
単純なJSFアプリケーションを作成するには、maven-archetype-webappプラグインを使用します。次の例では、C:\ JSFフォルダーにMavenベースのWebアプリケーションプロジェクトを作成します。
プロジェクトの作成
コマンドコンソールを開いて、 C:\ > JSF ディレクトリを作成し、以下を実行します mvn コマンド。
C:\JSF>mvn archetype:create
-DgroupId = com.tutorialspoint.test
-DartifactId = helloworld
-DarchetypeArtifactId = maven-archetype-webapp
Mavenは処理を開始し、完全なJavaWebアプリケーションプロジェクト構造を作成します。
[INFO] Scanning for projects...
[INFO] Searching repository for plugin with prefix: 'archetype'.
[INFO] -------------------------------------------------------------
[INFO] Building Maven Default Project
[INFO]    task-segment: [archetype:create] (aggregator-style)
[INFO] -------------------------------------------------------------
[INFO] [archetype:create {execution: default-cli}]
[INFO] Defaulting package to group ID: com.tutorialspoint.test
[INFO] artifact org.apache.maven.archetypes:maven-archetype-webapp:
checking for updates from central
[INFO] -------------------------------------------------------------
[INFO] Using following parameters for creating project
from Old (1.x) Archetype: maven-archetype-webapp:RELEASE
[INFO] -------------------------------------------------------------
[INFO] Parameter: groupId, Value: com.tutorialspoint.test
[INFO] Parameter: packageName, Value: com.tutorialspoint.test
[INFO] Parameter: package, Value: com.tutorialspoint.test
[INFO] Parameter: artifactId, Value: helloworld
[INFO] Parameter: basedir, Value: C:\JSF
[INFO] Parameter: version, Value: 1.0-SNAPSHOT
[INFO] project created from Old (1.x) Archetype in dir:
C:\JSF\helloworld
[INFO] -------------------------------------------------------------
[INFO] BUILD SUCCESSFUL
[INFO] -------------------------------------------------------------
[INFO] Total time: 7 seconds
[INFO] Finished at: Mon Nov 05 16:05:04 IST 2012
[INFO] Final Memory: 12M/84M
[INFO] -------------------------------------------------------------
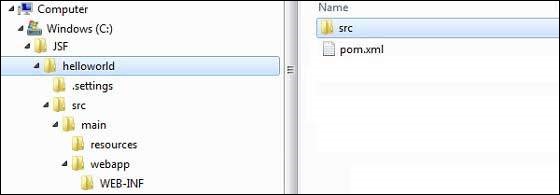
次に、C:/ JSFディレクトリに移動します。(artifactIdで指定された)helloworldという名前のJavaWebアプリケーションプロジェクトが作成されているのがわかります。Mavenは、次のスクリーンショットに示すように、標準のディレクトリレイアウトを使用します。

上記の例を使用すると、次の重要な概念を理解できます。
| S.No | フォルダ構造と説明 |
|---|---|
| 1 | helloworld srcフォルダーとpom.xmlが含まれています |
| 2 | src/main/wepapp WEB-INFフォルダーとindex.jspページが含まれています |
| 3 | src/main/resources 画像/プロパティファイルが含まれています(上記の例では、この構造を手動で作成する必要があります) |
プロジェクトにJSF機能を追加する
次のJSF依存関係を追加します。
<dependencies>
   <dependency>
      <groupId>com.sun.faces</groupId>
      <artifactId>jsf-api</artifactId>
      <version>2.1.7</version>
   </dependency>

   <dependency>
      <groupId>com.sun.faces</groupId>
      <artifactId>jsf-impl</artifactId>
      <version>2.1.7</version>
   </dependency>

</dependencies>
完全なPOM.xml
<project xmlns = "http://maven.apache.org/POM/4.0.0"
   xmlns:xsi = "http://www.w3.org/2001/XMLSchema-instance"
   xsi:schemaLocation = "http://maven.apache.org/POM/4.0.0
   http://maven.apache.org/maven-v4_0_0.xsd">

   <modelVersion>4.0.0</modelVersion>
   <groupId>com.tutorialspoint.test</groupId>
   <artifactId>helloworld</artifactId>
   <packaging>war</packaging>
   <version>1.0-SNAPSHOT</version>
   <name>helloworld Maven Webapp</name>
   <url>http://maven.apache.org</url>

   <dependencies>
      <dependency>
         <groupId>junit</groupId>
         <artifactId>junit</artifactId>
         <version>3.8.1</version>
         <scope>test</scope>
      </dependency>

      <dependency>
         <groupId>com.sun.faces</groupId>
         <artifactId>jsf-api</artifactId>
         <version>2.1.7</version>
      </dependency>

      <dependency>
         <groupId>com.sun.faces</groupId>
         <artifactId>jsf-impl</artifactId>
         <version>2.1.7</version>
      </dependency>

   </dependencies>

   <build>
      <finalName>helloworld</finalName>
      <plugins>
         <plugin>
            <groupId>org.apache.maven.plugins</groupId>
            <artifactId>maven-compiler-plugin</artifactId>
            <version>2.3.1</version>

            <configuration>
               <source>1.6</source>
               <target>1.6</target>
            </configuration>
         </plugin>
      </plugins>

   </build>
</project>
Eclipseプロジェクトを準備する
コマンドコンソールを開きましょう。行くC:\ > JSF > helloworld ディレクトリを作成し、以下を実行します mvn コマンド。
C:\JSF\helloworld>mvn eclipse:eclipse -Dwtpversion = 2.0Mavenは処理を開始し、Eclipse対応プロジェクトを作成し、wtp機能を追加します。
Downloading: http://repo.maven.apache.org/org/apache/maven/plugins/
maven-compiler-plugin/2.3.1/maven-compiler-plugin-2.3.1.pom
5K downloaded  (maven-compiler-plugin-2.3.1.pom)
Downloading: http://repo.maven.apache.org/org/apache/maven/plugins/
maven-compiler-plugin/2.3.1/maven-compiler-plugin-2.3.1.jar
29K downloaded  (maven-compiler-plugin-2.3.1.jar)
[INFO] Searching repository for plugin with prefix: 'eclipse'.
[INFO] ------------------------------------------------------------
[INFO] Building helloworld Maven Webapp
[INFO]    task-segment: [eclipse:eclipse]
[INFO] ------------------------------------------------------------
[INFO] Preparing eclipse:eclipse
[INFO] No goals needed for project - skipping
[INFO] [eclipse:eclipse {execution: default-cli}]
[INFO] Adding support for WTP version 2.0.
[INFO] Using Eclipse Workspace: null
[INFO] Adding default classpath container: org.eclipse.jdt.
launching.JRE_CONTAINER
Downloading: http://repo.maven.apache.org/
com/sun/faces/jsf-api/2.1.7/jsf-api-2.1.7.pom
12K downloaded  (jsf-api-2.1.7.pom)
Downloading: http://repo.maven.apache.org/
com/sun/faces/jsf-impl/2.1.7/jsf-impl-2.1.7.pom
10K downloaded  (jsf-impl-2.1.7.pom)
Downloading: http://repo.maven.apache.org/
com/sun/faces/jsf-api/2.1.7/jsf-api-2.1.7.jar
619K downloaded  (jsf-api-2.1.7.jar)
Downloading: http://repo.maven.apache.org/
com/sun/faces/jsf-impl/2.1.7/jsf-impl-2.1.7.jar
1916K downloaded  (jsf-impl-2.1.7.jar)
[INFO] Wrote settings to C:\JSF\helloworld\.settings\
org.eclipse.jdt.core.prefs
[INFO] Wrote Eclipse project for "helloworld" to C:\JSF\helloworld.
[INFO]
[INFO] -----------------------------------------------------------
[INFO] BUILD SUCCESSFUL
[INFO] -----------------------------------------------------------
[INFO] Total time: 6 minutes 7 seconds
[INFO] Finished at: Mon Nov 05 16:16:25 IST 2012
[INFO] Final Memory: 10M/89M
[INFO] -----------------------------------------------------------
Eclipseでプロジェクトをインポートする
手順は次のとおりです-
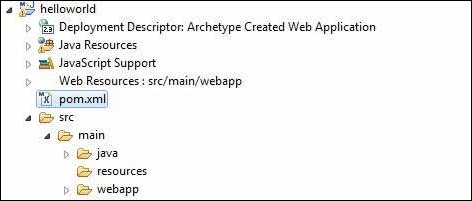
インポートウィザードを使用して、Eclipseでプロジェクトをインポートします。
に移動 File → Import... → Existing project into workspace。
helloworldへのルートディレクトリを選択します。
保つ Copy projects into workspace チェックする。
[完了]ボタンをクリックします。
Eclipseは、プロジェクトをワークスペースにインポートしてコピーします C:\ → Projects → Data → WorkSpace。

web.xmlでFacesサーブレットを構成する
でweb.xmlを見つけます webapp → WEB-INF フォルダを作成し、以下のように更新します。
<?xml version = "1.0" encoding = "UTF-8"?>
<web-app xmlns:xsi = "http://www.w3.org/2001/XMLSchema-instance"
   xmlns = "http://java.sun.com/xml/ns/javaee"
   xmlns:web = "http://java.sun.com/xml/ns/javaee/web-app_2_5.xsd"
   xsi:schemaLocation = "http://java.sun.com/xml/ns/javaee
   http://java.sun.com/xml/ns/javaee/web-app_2_5.xsd"
   id = "WebApp_ID" version="2.5">

   <welcome-file-list>
      <welcome-file>faces/home.xhtml</welcome-file>
   </welcome-file-list>

   <!--
      FacesServlet is main servlet responsible to handle all request.
      It acts as central controller.
      This servlet initializes the JSF components before the JSP is displayed.
   -->

   <servlet>
      <servlet-name>Faces Servlet</servlet-name>
      <servlet-class>javax.faces.webapp.FacesServlet</servlet-class>
      <load-on-startup>1</load-on-startup>
   </servlet>

   <servlet-mapping>
      <servlet-name>Faces Servlet</servlet-name>
      <url-pattern>/faces/*</url-pattern>
   </servlet-mapping>

   <servlet-mapping>
      <servlet-name>Faces Servlet</servlet-name>
      <url-pattern>*.jsf</url-pattern>
   </servlet-mapping>

   <servlet-mapping>
      <servlet-name>Faces Servlet</servlet-name>
      <url-pattern>*.faces</url-pattern>
   </servlet-mapping>

   <servlet-mapping>
      <servlet-name>Faces Servlet</servlet-name>
      <url-pattern>*.xhtml</url-pattern>
   </servlet-mapping>

</web-app>
マネージドBeanを作成する
下にパッケージ構造を作成します src → main → java as com → tutorialspoint → test。このパッケージにHelloWorld.javaクラスを作成します。のコードを更新しますHelloWorld.java 以下に示すように。
package com.tutorialspoint.test;

import javax.faces.bean.ManagedBean;

@ManagedBean(name = "helloWorld", eager = true)
public class HelloWorld {

   public HelloWorld() {
      System.out.println("HelloWorld started!");
   }

   public String getMessage() {
      return "Hello World!";
   }
}
JSFページを作成する
下にページhome.xhtmlを作成します webappフォルダ。のコードを更新しますhome.xhtml 以下に示すように。
<!DOCTYPE html PUBLIC "-//W3C//DTD XHTML 1.0 Transitional//EN"
   "http://www.w3.org/TR/xhtml1/DTD/xhtml1-transitional.dtd">

<html xmlns = "http://www.w3.org/1999/xhtml">
   <head>
      <title>JSF Tutorial!</title>
   </head>

   <body>
      #{helloWorld.getMessage()}
   </body>
</html>
プロジェクトを構築する
手順は次のとおりです。
Eclipseでhelloworldプロジェクトを選択します
実行ウィザードを使用する
選択する Run As → Maven package
Mavenはプロジェクトのビルドを開始し、下にhelloworld.warを作成します。 C:\ → Projects → Data → WorkSpace → helloworld → target フォルダ。
[INFO] Scanning for projects...
[INFO] -----------------------------------------------------
[INFO] Building helloworld Maven Webapp
[INFO]
[INFO] Id: com.tutorialspoint.test:helloworld:war:1.0-SNAPSHOT
[INFO] task-segment: [package]
[INFO] -----------------------------------------------------
[INFO] [resources:resources]
[INFO] Using default encoding to copy filtered resources.
[INFO] [compiler:compile]
[INFO] Nothing to compile - all classes are up to date
[INFO] [resources:testResources]
[INFO] Using default encoding to copy filtered resources.
[INFO] [compiler:testCompile]
[INFO] No sources to compile
[INFO] [surefire:test]
[INFO] Surefire report directory:
C:\Projects\Data\WorkSpace\helloworld\target\surefire-reports

-------------------------------------------------------
 T E S T S
-------------------------------------------------------
There are no tests to run.

Results :

Tests run: 0, Failures: 0, Errors: 0, Skipped: 0

[INFO] [war:war]
[INFO] Packaging webapp
[INFO] Assembling webapp[helloworld] in
[C:\Projects\Data\WorkSpace\helloworld\target\helloworld]
[INFO] Processing war project
[INFO] Webapp assembled in[150 msecs]
[INFO] Building war:
C:\Projects\Data\WorkSpace\helloworld\target\helloworld.war
[INFO] ------------------------------------------------
[INFO] BUILD SUCCESSFUL
[INFO] ------------------------------------------------
[INFO] Total time: 3 seconds
[INFO] Finished at: Mon Nov 05 16:34:46 IST 2012
[INFO] Final Memory: 2M/15M
[INFO] ------------------------------------------------
WARファイルをデプロイする
手順は次のとおりです。
Tomcatサーバーを停止します。
helloworld.warファイルをにコピーします tomcat installation directory → webapps folder。
Tomcatサーバーを起動します。
webappsディレクトリ内を見ると、helloworldが作成されたフォルダがあるはずです。
これで、helloworld.warがTomcatWebサーバールートに正常にデプロイされました。
アプリケーションを実行する
WebブラウザにURLを入力します。 http://localhost:8080/helloworld/home.jsf アプリケーションを起動します。
サーバー名(localhost)とポート(8080)は、Tomcatの構成によって異なる場合があります。
