ReactNative-Flexbox
さまざまな画面サイズに対応するために、ReactNativeは Flexbox サポート。
で使用したのと同じコードを使用します React Native - Styling章。変更するだけですPresentationalComponent。
レイアウト
目的のレイアウトを実現するために、flexboxには3つの主要なプロパティがあります。 flexDirection justifyContent そして alignItems。
次の表に、可能なオプションを示します。
| プロパティ | 値 | 説明 |
|---|---|---|
| flexDirection | '列行' | 要素を垂直方向に配置するか水平方向に配置するかを指定するために使用されます。 |
| justifyContent | 'center'、 'flex-start'、 'flex-end'、 'space-around'、 'space-between' | 要素をコンテナ内にどのように分散させるかを決定するために使用されます。 |
| alignItems | 'center'、 'flex-start'、 'flex-end'、 'stretched' | 2次軸(flexDirectionの反対側)に沿って要素をコンテナ内にどのように分散させるかを決定するために使用されます |
アイテムを垂直方向に配置して一元化する場合は、次のコードを使用できます。
App.js
import React, { Component } from 'react'
import { View, StyleSheet } from 'react-native'

const Home = (props) => {
   return (
      <View style = {styles.container}>
         <View style = {styles.redbox} />
         <View style = {styles.bluebox} />
         <View style = {styles.blackbox} />
      </View>
   )
}

export default Home

const styles = StyleSheet.create ({
   container: {
      flexDirection: 'column',
      justifyContent: 'center',
      alignItems: 'center',
      backgroundColor: 'grey',
      height: 600
   },
   redbox: {
      width: 100,
      height: 100,
      backgroundColor: 'red'
   },
   bluebox: {
      width: 100,
      height: 100,
      backgroundColor: 'blue'
   },
   blackbox: {
      width: 100,
      height: 100,
      backgroundColor: 'black'
   },
})
Output

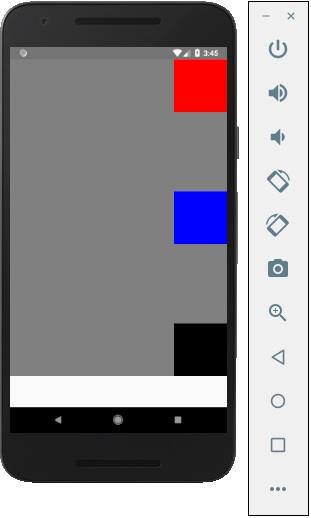
アイテムを右側に移動する必要があり、アイテムの間にスペースを追加する必要がある場合は、次のコードを使用できます。
App.js
import React, { Component } from 'react'
import { View, StyleSheet } from 'react-native'

const App = (props) => {
   return (
      <View style = {styles.container}>
         <View style = {styles.redbox} />
         <View style = {styles.bluebox} />
         <View style = {styles.blackbox} />
      </View>
   )
}

export default App

const styles = StyleSheet.create ({
   container: {
      flexDirection: 'column',
      justifyContent: 'space-between',
      alignItems: 'flex-end',
      backgroundColor: 'grey',
      height: 600
   },
   redbox: {
      width: 100,
      height: 100,
      backgroundColor: 'red'
   },
   bluebox: {
      width: 100,
      height: 100,
      backgroundColor: 'blue'
   },
   blackbox: {
      width: 100,
      height: 100,
      backgroundColor: 'black'
   },
})