TurboGears-MongoDBの使用
TurboGearsはMongoDBドキュメントデータベースもサポートしています。Object Document MapperAPIであるMingを使用します。Mingの使用法はSQLAlchemyと非常によく似ています。Mingクエリ言語を使用すると、SQLAlchemyベースのTurboGearsプロジェクトをMingに移植できます。
PyMongoとは
PyMongoは、MongoDBを操作するためのツールを含むPythonディストリビューションです。MingはPyMongoを拡張して提供します-
- 宣言型モデル
- スキーマの検証と変換
- スキーマの進化
- 純粋なInMemoryMongoDBの実装
- 作業単位
- アイデンティティマップ
- 1対多、多対1、および多対多の関係
まず、MongoDBをダウンロードしてインストールする必要があります。MongoDBの最新のディストリビューションは、からダウンロードできます。https://www.mongodb.org/downloads
Windowsでは、-dbpathオプションを指定してMongoDBサーバーを起動します-
C:\mongodb\bin>Mongod --dbpath d:\mongoD:\mongo folderMongoDBデータベースを格納するように指定されています。サーバーはでリッスンを開始しますhttp://localhost:27017. ここでMongoDBシェルを起動するには、次のコマンドを使用します-
C:\mongodb\bin>Mongoこれで、MongoDB環境の準備が整いました。
次に、-mingオプションを使用してTurboGearsプロジェクトを作成します-
gearbox quickstart --ming Helloこのクイックスタートプロジェクトは、SQLAlchemyバージョンで提供されているような認証および承認レイヤーを提供します。このアプリケーションは、ローカルマシンのポート27017でサーバーに接続しようとします。プロジェクトフォルダのdevelopment.iniファイルには次の設定が含まれています-
ming.url = mongodb://localhost:27017/
ming.db = hello
次のコマンドを使用してプロジェクトをセットアップします-
Python setup.py developプロジェクトフォルダには、次のファイルを含むモデルサブフォルダが含まれています-
__init__.py −これは databaseアクセスが設定されます。あなたのコレクションはimported into this module。たとえば、このパッケージに学生コレクションを追加します。
session.py −このファイルは session of your database connection。宣言する必要があるたびにこれをインポートする必要がありますMappedClass セッションを指定するには perform queries。
auth.py −このファイルは、お持ちの場合に作成されます enabled authentication and authorizationクイックスタートで。3つのコレクションを定義しますrepoze.who、さらに依存するのは、ユーザー、グループ、および権限です。
コレクションの定義
デフォルトでは、TurboGearsはMingを宣言モードで構成します。これはSQLAlchemy宣言型サポートに似ており、各モデルがMappedClassクラスから継承する必要があります。
MappedClassでは、内部で__mongometa__サブクラスが使用可能である必要があります。これにより、ドキュメントを格納するコレクションの名前と、ドキュメントの格納に使用されるセッションに関する詳細がさらに提供されます。
MappedClassには、ドキュメント内のフィールドの定義も含まれています。Mingのodmモジュールには、さまざまなタイプのフィールドプロパティの定義があります-
- FieldProperty
- ForeignIdProperty
- RelationProperty
ザ・ ming.schema module 次のデータ型を定義します-
- ming.schema.Anything
- ming.schema.Array
- ming.schema.Binary
- ming.schema.Bool
- ming.schema.Float
- ming.schema.Int
- ming.schema.ObjectId
- ming.schema.Scalar
- ming.schema.String
このモデルに学生コレクションを追加するには、次のコードをstudent.pyとしてhello / modelsフォルダーに保存します。
Hello \ models \ student.py
from ming import schema
from ming.odm import MappedClass
from ming.odm import FieldProperty, ForeignIdProperty
from hello.model import DBSession

Class student(MappedClass):
   class __mongometa__:
      session = DBSession
      name = 'student'

   _id = FieldProperty(schema.ObjectId)
   name = FieldProperty(schema.String(required = True))
   city = FieldProperty(schema.String(if_missing = ''))
   address = FieldProperty(schema.String(if_missing = ''))
   pincode = FieldProperty(schema.String(if_missing = ''))
最後に、このモデルをhello \ models \ __init__。pyに含めます
# Import your model modules here.
from hello.model.auth import User, Group, Permission
from hello.model.student import student
これらのモデルを設定するには、次のギアボックスコマンドを実行します-
Gearbox setup-app次のギアボックスコマンドでサーバーを起動します-
Gearbox serve –reload –debugこのアプリケーションのホームページを開く (http://localhost:8080/)マネージャーの資格情報を使用してログインします。このアプリケーションの管理ページには、設定されているモデルのリストが表示されます。(マネージャーとしてログイン、パスワードmanagepass)

コレクションの作成は、MongoDBWebインターフェイスおよびMongoDBシェルでも確認できます。
ODMSessionは、次の関数を使用していくつかのデータベース操作を実行するために使用されます-
- model.query.find()
- model.query.find_and_modify()
- model.remove()
- model.update()
- model.flush()
ToscoWidgetフォームの設計
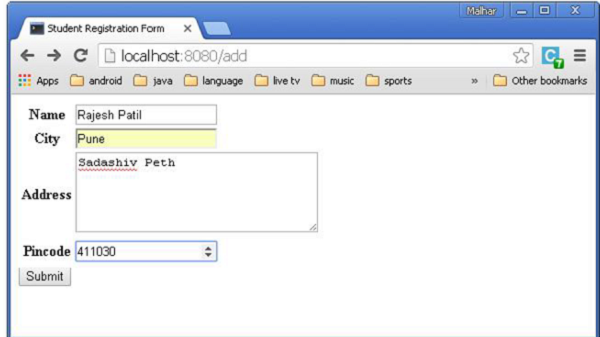
次に、学生データを入力して学生モデルの基礎となるテーブルに追加するToscoWidgetフォームを設計します。
以下は、studentform.pyを作成するためのコードです。
Hello \ controllers \ studentform.py
import tw2.core as twc
import tw2.forms as twf

class StudentForm(twf.Form):

   class child(twf.TableLayout):
      name = twf.TextField(size = 20)
      city = twf.TextField()
      address = twf.TextArea("",rows = 5, cols = 30)
      pincode = twf.NumberField()

   action = '/save_record'
   submit = twf.SubmitButton(value = 'Submit')
add()関数を呼び出すアプリケーションのRootcontroller '/ add' URLで、上記の設計されたフォームをブラウザーで開きます。次に、その送信ボタンはsave_record()関数を呼び出します。フォームデータを取得してstudentテーブルに保存し、アプリケーションを「/ listrec」URLにリダイレクトします。これにより、studentlistテンプレートが公開されます。
このアクティビティのroot.pyは次のとおりです-
Hello / controllers / root.py
from hello.lib.base import BaseController
from tg import expose, flash, redirect, request,url, lurl
from tg import redirect, validate
from hello import model
from hello.model import DBSession
from hello.model.student import student
from hello.controllers.studentform import StudentForm
class RootController(BaseController):
@expose()
def index(self):
return "<h1>Hello World</h1>"
@expose ("hello.templates.studentlist")
def listrec(self):
entries = student.query.find()
return dict(entries = entries)
@expose('hello.templates.studentform')
def add(self, *args, **kw):
return dict(page = 'studentform', form = StudentForm)
@expose()
def save_record(self, **kw):
newstudent = student(name = kw['name'],city = kw['city'],
address = kw['address'], pincode = kw['pincode'])
DBSession.flush()
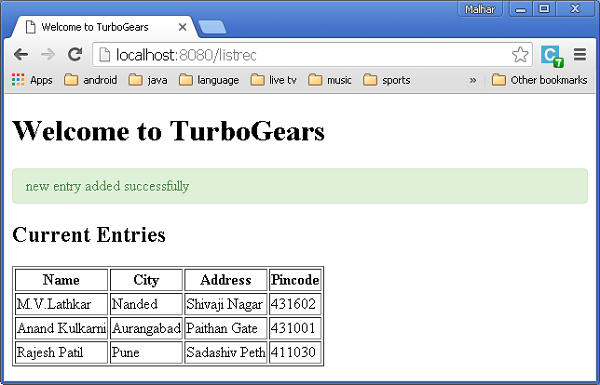
flash(message = "new entry added successfully")
redirect("/listrec")以下のテンプレートがテンプレートフォルダに作成されます-
Hello \ templates \ studentform.html
<!DOCTYPE html>
<html xmlns = "http://www.w3.org/1999/xhtml"
   xmlns:py = "http://genshi.edgewall.org/" lang = "en">

   <head>
      <title>Student Registration Form</title>
   </head>


   <body>
      <div id = "getting_started">
         ${form.display(value = dict(title = 'Enter data'))}
      </div>
   </body>

</html>
Hello \ templates \ studentlist.html
<html xmlns = "http://www.w3.org/1999/xhtml"
   xmlns:py = "http://genshi.edgewall.org/">

   <head>
      <link rel = "stylesheet" type = "text/css" media = "screen"
         href = ${tg.url('/css/style.css')}" />
      <title>Welcome to TurboGears</title>
   </head>

   <body>
      <h1>Welcome to TurboGears</h1>

      <py:with vars = "flash = tg.flash_obj.render('flash', use_js = False)">
         <div py:if = "flash" py:replace = "Markup(flash)" />
      </py:with>

      <h2>Current Entries</h2>

      <table border = '1'>
         <thead>
            <tr>
               <th>Name</th>
               <th>City</th>
               <th>Address</th>
               <th>Pincode</th>
            </tr>
         </thead>

         <tbody>
            <py:for each = "entry in entries">
               <tr>
                  <td>${entry.name}</td>
                  <td>${entry.city}</td>
                  <td>${entry.address}</td>
                  <td>${entry.pincode}</td>
               </tr>
            </py:for>
         </tbody>
      </table>

   </body>

</html>
サーバーを再起動して、 http://localhost:8080/add ブラウザで-
データが追加されて送信ボタンが押されるたびに、現在のエントリのリストが表示されます。