Ruby on Rails-레이아웃
레이아웃은 HTML 페이지의 주변을 정의합니다. 최종 출력의 공통적 인 모양과 느낌을 정의하는 곳입니다. 레이아웃 파일은 앱 / 뷰 / 레이아웃에 있습니다.
이 프로세스에는 레이아웃 템플릿을 정의한 다음 컨트롤러가 존재한다는 사실을 알리고이를 사용하는 것이 포함됩니다. 먼저 템플릿을 만들어 보겠습니다.
standard.html.erb라는 새 파일을 app / views / layouts에 추가합니다. 컨트롤러에 파일 이름으로 사용할 템플릿을 알려주므로 동일한 이름 지정 체계를 따르는 것이 좋습니다.
새 standard.html.erb 파일에 다음 코드를 추가하고 변경 사항을 저장합니다.
<!DOCTYPE html PUBLIC "-//W3C//DTD XHTML 1.0 Transitional//EN" "http://www.w3.org/TR/xhtml1/DTD/xhtml1-transitional.dtd">

<html xmlns = "http://www.w3.org/1999/xhtml">

   <head>
      <meta http-equiv = "Content-Type" content = "text/html; charset = iso-8859-1" />
      <meta http-equiv = "Content-Language" content = "en-us" />
      <title>Library Info System</title>
      <%= stylesheet_link_tag "style" %>
   </head>

   <body id = "library">
      <div id = "container">

         <div id = "header">
            <h1>Library Info System</h1>
            <h3>Library powered by Ruby on Rails</h3>
         </div>

         <div id = "content">
            <%= yield -%>
         </div>

         <div id = "sidebar"></div>

      </div>
   </body>

</html>
방금 추가 한 모든 것은 두 줄을 제외하고 표준 HTML 요소였습니다. 그만큼stylesheet_link_tag도우미 메서드는 스타일 시트 <link>를 출력합니다. 이 경우 style.css 스타일 시트를 연결합니다. 그만큼yield 명령은 Rails가 여기에서 호출 된 메소드에 대해 html.erb를 넣어야 함을 알려줍니다.
지금 열다 book_controller.rb 첫 번째 줄 바로 아래에 다음 줄을 추가하십시오.
class BookController < ApplicationController
layout 'standard'
def list
@books = Book.all
end
...................
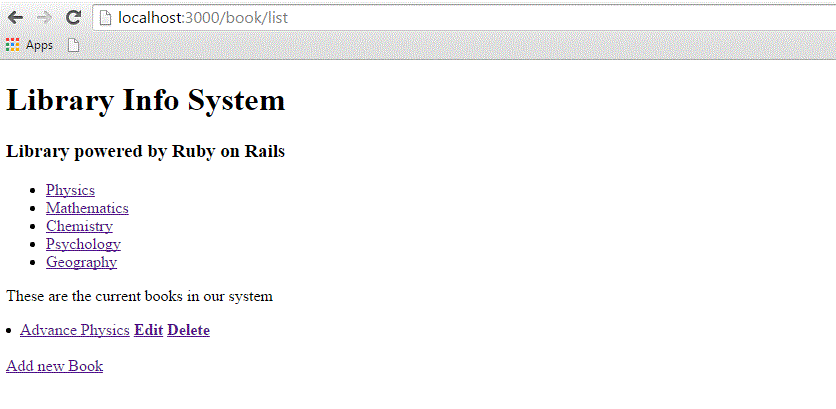
컨트롤러에게 standard.html.erb 파일에서 사용할 수있는 레이아웃을 사용하도록 지시합니다. 이제 다음 화면을 생성하는 책을 찾아보십시오.

스타일 시트 추가
지금까지 스타일 시트를 생성하지 않았으므로 Rails는 기본 스타일 시트를 사용하고 있습니다. 이제 style.css라는 새 파일을 만들고 / public / stylesheets에 저장하겠습니다. 이 파일에 다음 코드를 추가하십시오.
body {
   font-family: Helvetica, Geneva, Arial, sans-serif;
   font-size: small;
   font-color: #000;
   background-color: #fff;
}

a:link, a:active, a:visited {
   color: #CD0000;
}

input {
   margin-bottom: 5px;
}

p {
   line-height: 150%;
}

div#container {
   width: 760px;
   margin: 0 auto;
}

div#header {
   text-align: center;
   padding-bottom: 15px;
}

div#content {
   float: left;
   width: 450px;
   padding: 10px;
}

div#content h3 {
   margin-top: 15px;
}

ul#books {
   list-style-type: none;
}

ul#books li {
   line-height: 140%;
}

div#sidebar {
   width: 200px;
   margin-left: 480px;
}

ul#subjects {
   width: 700px;
   text-align: center;
   padding: 5px;
   background-color: #ececec;
   border: 1px solid #ccc;
   margin-bottom: 20px;
}

ul#subjects li {
   display: inline;
   padding-left: 5px;
}
이제 브라우저를 새로 고침하고 차이점을 확인하세요.

다음은 무엇입니까?
다음 장에서는 Rails Scaffolding을 사용하여 애플리케이션을 개발하여 사용자에게 모든 데이터베이스의 레코드를 추가, 삭제 및 수정할 수있는 액세스 권한을 부여하는 방법을 설명합니다.