อีเมลและ Surface Automation
เราจะพูดคุยเกี่ยวกับระบบอัตโนมัติทางอีเมลและหัวข้อการทำงานอัตโนมัติสำหรับพื้นผิวในบทนี้
อีเมลอัตโนมัติ
ก่อนที่จะดำเนินการส่งอีเมลอัตโนมัติเราจำเป็นต้องให้สิทธิ์กับบัญชี Gmail ของเราที่เรากำลังใช้งานอยู่
ทำตามขั้นตอนด้านล่างเพื่อให้สิทธิ์บัญชี Gmail -
ไปที่หน้าบัญชีของฉัน→คลิกที่ลงชื่อเข้าใช้และความปลอดภัย→เลื่อนไปที่จุดสิ้นสุดของหน้าแล้วเลือกตัวเลือกแอปที่ปลอดภัยน้อยกว่า→เปิดใช้งาน
Step 1 - เราจำเป็นต้องกำหนดการตั้งค่าอีเมลในการดำเนินการ
Step 2 - สร้างรายการข้อมูลสองรายการสำหรับชื่อผู้ใช้รหัสผ่านจากที่อยู่อีเมลและไปยังที่อยู่อีเมล
Step 3 - ระบุรายละเอียดเซิร์ฟเวอร์ POP3 และ SMTP
Step 4 - ระบุรายละเอียดพอร์ต POP3 และ SMTP
Step 5- ระบุจริงสำหรับ POP3 UseSSL และ SMTP UseSSL ภาพหน้าจอด้านล่างอธิบายขั้นตอนข้างต้นทั้งหมดอย่างชัดเจน

Step 6 - ให้เราตั้งชื่อเป็น "ส่งเมล"

Step 7 - ขั้นตอนต่อไปคือการเชื่อมโยงกระบวนการ

ระบบอัตโนมัติของพื้นผิว
Blue Prism มีเทคนิค Surface Automation ที่สามารถใช้เป็นทางเลือกอื่นเมื่อไม่มีตัวเชื่อมต่อเทคโนโลยี เทคนิคการทำงานอัตโนมัติของพื้นผิวเหล่านี้มีคำอธิบายสั้น ๆ ใน: ภูมิภาคการจับคู่อักขระการคลิกส่วนกลางและคีย์
ทำตามขั้นตอนด้านล่างเพื่อเรียกใช้ระบบอัตโนมัติบนพื้นผิวในอุปกรณ์ของคุณ ภาพหน้าจอจะรวมอยู่ในแต่ละขั้นตอนเพื่อให้เข้าใจง่าย
Step 1 - สร้างวัตถุทางธุรกิจและกำหนดค่า Application modeller ด้วย Surface Automation

Step 2 - ในขั้นตอนต่อไปเราต้องกำหนดชื่อรุ่นแอปพลิเคชันใหม่ตามที่ระบุด้านล่าง -

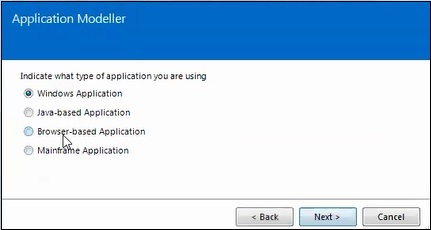
Step 3 - ขึ้นอยู่กับประเภทแอปพลิเคชันที่ใช้งานให้เลือกหนึ่งรายการตามที่แสดงด้านล่าง -
Step 4 - ระบุประเภทของแอปพลิเคชันที่ใช้

Step 5 - ในขั้นตอนนี้ให้ป้อนเส้นทางที่ .exe ไฟล์จะถูกบันทึกหรือเรียกดูตำแหน่งโดยใช้ปุ่มเรียกดูดังที่แสดงด้านล่าง -

Step 6 - ป้อนรายละเอียดองค์ประกอบและเปิดแอปพลิเคชัน

Step 7 - เราสามารถเปิดแอปพลิเคชันโดยใช้ปุ่มเปิดที่ด้านล่างตามที่ระบุด้านล่าง

Step 8 - ลงชื่อเข้าใช้แอปพลิเคชันโดยใช้ข้อมูลประจำตัว

Step 9 - ระบุองค์ประกอบสายลับตามที่แสดงด้านล่าง -

Step 10 - ในขั้นตอนนี้เราจำเป็นต้องระบุชื่อผู้ใช้และรหัสผ่าน

Step 11 - ระบุชื่อผู้ใช้

Step 12 - ระบุรหัสผ่าน

Step 13 - ระบุปุ่มเข้าสู่ระบบ


Step 14 - สร้างรายการข้อมูลสองรายการ: username และ password.

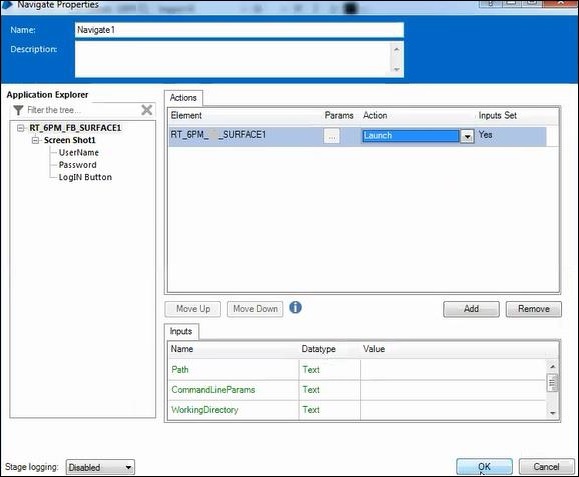
Step 15 - เปิดแอปพลิเคชั่นโดยใช้ขั้นตอนการนำทาง
Step 16 - กำหนดค่าชื่อผู้ใช้โดยใช้ขั้นตอนการนำทาง

Step 17 - กำหนดรหัสผ่านโดยใช้ขั้นตอนการนำทาง

Step 18 - ตอนนี้เรียกใช้กระบวนการ
