Spring MVC - Multi Action Controller Örneği
Aşağıdaki örnek, Spring Web MVC çerçevesi kullanılarak Çoklu Eylem Denetleyicisinin nasıl kullanılacağını gösterir. MultiActionController sınıfı, sırasıyla tek bir denetleyicideki yöntemleriyle birden çok URL'yi eşlemeye yardımcı olur.
package com.tutorialspoint;

import javax.servlet.http.HttpServletRequest;
import javax.servlet.http.HttpServletResponse;

import org.springframework.web.servlet.ModelAndView;
import org.springframework.web.servlet.mvc.multiaction.MultiActionController;

public class UserController extends MultiActionController{

   public ModelAndView home(HttpServletRequest request,
      HttpServletResponse response) throws Exception {
      ModelAndView model = new ModelAndView("home");
      model.addObject("message", "Home");
      return model;
   }

   public ModelAndView add(HttpServletRequest request,
      HttpServletResponse response) throws Exception {
      ModelAndView model = new ModelAndView("user");
      model.addObject("message", "Add");
      return model;
   }

   public ModelAndView remove(HttpServletRequest request,
      HttpServletResponse response) throws Exception {
      ModelAndView model = new ModelAndView("user");
      model.addObject("message", "Remove");
      return model;
   }
}
<bean class = "org.springframework.web.servlet.handler.BeanNameUrlHandlerMapping"/>
<bean name = "/home.htm" class = "com.tutorialspoint.UserController" />
<bean name = "/user/*.htm" class = "com.tutorialspoint.UserController" />Örneğin, yukarıdaki yapılandırmayı kullanarak URI -
/home.htm istenirse, DispatcherServlet isteği UserController'a iletir home() yöntem.
user / add.htm istenirse, DispatcherServlet isteği UserController'a iletir add() yöntem.
user / remove.htm istendiğinde, DispatcherServlet isteği UserController'a iletecektir remove() yöntem.
Başlangıç olarak, çalışan bir Eclipse IDE'ye sahip olalım ve Spring Web Framework'ü kullanarak Dinamik Form tabanlı bir Web Uygulaması geliştirmek için aşağıdaki adımlara sadık kalalım.
| Adım | Açıklama |
|---|---|
| 1 | Adı olan bir proje oluşturun TestWeb Bir paket com.tutorialspoint altında, Spring MVC - Hello World bölümünde açıklandığı gibi. |
| 2 | Com.tutorialspoint paketi altında bir Java sınıfı UserController oluşturun. |
| 3 | Jsp alt klasörü altında home.jsp ve user.jsp görünüm dosyalarını oluşturun. |
| 4 | Son adım, kaynak ve yapılandırma dosyalarının içeriğini oluşturmak ve uygulamayı aşağıda açıklandığı gibi dışa aktarmaktır. |
UserController.java
package com.tutorialspoint;
import javax.servlet.http.HttpServletRequest;
import javax.servlet.http.HttpServletResponse;
import org.springframework.web.servlet.ModelAndView;
import org.springframework.web.servlet.mvc.multiaction.MultiActionController;
public class UserController extends MultiActionController{
public ModelAndView home(HttpServletRequest request,
HttpServletResponse response) throws Exception {
ModelAndView model = new ModelAndView("home");
model.addObject("message", "Home");
return model;
}
public ModelAndView add(HttpServletRequest request,
HttpServletResponse response) throws Exception {
ModelAndView model = new ModelAndView("user");
model.addObject("message", "Add");
return model;
}
public ModelAndView remove(HttpServletRequest request,
HttpServletResponse response) throws Exception {
ModelAndView model = new ModelAndView("user");
model.addObject("message", "Remove");
return model;
}
}TestWeb-servlet.xml
<beans xmlns = "http://www.springframework.org/schema/beans"
xmlns:context = "http://www.springframework.org/schema/context"
xmlns:xsi = "http://www.w3.org/2001/XMLSchema-instance"
xsi:schemaLocation = "
http://www.springframework.org/schema/beans
http://www.springframework.org/schema/beans/spring-beans-3.0.xsd
http://www.springframework.org/schema/context
http://www.springframework.org/schema/context/spring-context-3.0.xsd">
<bean class = "org.springframework.web.servlet.view.InternalResourceViewResolver">
<property name = "prefix" value = "/WEB-INF/jsp/"/>
<property name = "suffix" value = ".jsp"/>
</bean>
<bean class = "org.springframework.web.servlet.handler.BeanNameUrlHandlerMapping"/>
<bean name = "/home.htm" class = "com.tutorialspoint.UserController" />
<bean name = "/user/*.htm" class = "com.tutorialspoint.UserController" />
</beans>home.jsp
<%@ page contentType = "text/html; charset = UTF-8" %>
<html>
   <head>
      <meta http-equiv = "Content-Type" content = "text/html; charset = ISO-8859-1">
      <title>Home</title>
   </head>

   <body>
      <a href = "user/add.htm" >Add</a> <br>
      <a href = "user/remove.htm" >Remove</a>
   </body>
</html>
user.jsp
<%@ page contentType = "text/html; charset = UTF-8" %>
<html>
   <head>
      <title>Hello World</title>
   </head>
   <body>
      <h2>${message}</h2>
   </body>
</html>
Kaynak ve yapılandırma dosyalarını oluşturmayı tamamladığınızda, uygulamanızı dışa aktarın. Uygulamanıza sağ tıklayın, kullanınExport → WAR File seçeneğini belirleyin ve kaydedin TestWeb.war Tomcat'in webapps klasöründeki dosya.
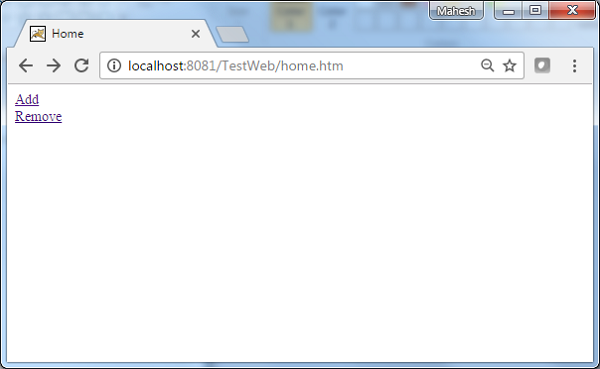
Şimdi, Tomcat sunucunuzu başlatın ve diğer web sayfalarına standart bir tarayıcı kullanarak webapps klasöründen erişebildiğinizden emin olun. Şimdi bir URL deneyin -http://localhost:8080/TestWeb/home.htm Spring Web Uygulaması ile her şey yolundaysa aşağıdaki ekranı göreceğiz.
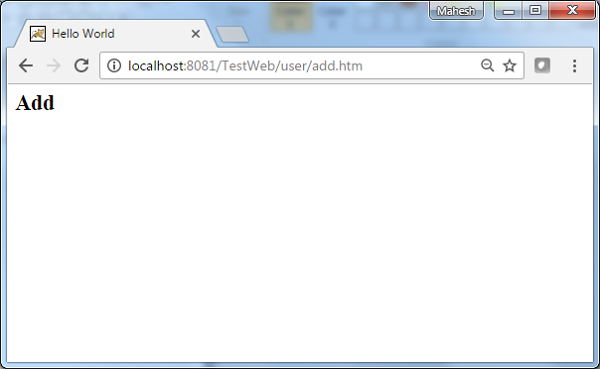
Bir URL deneyin http://localhost:8080/TestWeb/user/add.htm Spring Web Uygulaması ile her şey yolundaysa aşağıdaki ekranı göreceğiz.