JOGL - Khối lập phương 3D
Trong các chương trước, chúng ta đã xem cách vẽ tam giác 3d và xoay nó. Bây giờ trong chương này, bạn có thể học cách tạo hình khối 3d, cách xoay nó, cách đính kèm hình ảnh trên đó. Theo cách tương tự, Chương này cung cấp các ví dụ để vẽ một hình khối 3D và áp dụng màu sắc cho nó và đính kèm hình ảnh vào nó.
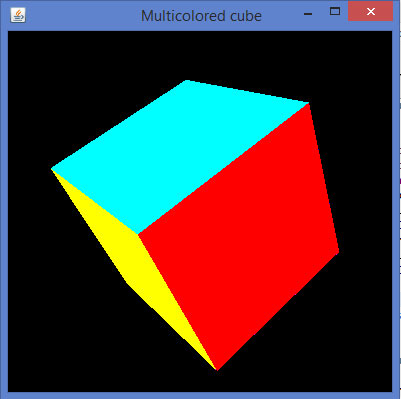
Dưới đây là chương trình để vẽ một khối lập phương 3d và áp dụng màu sắc cho nó.
import java.awt.DisplayMode;
import javax.media.opengl.GL2;
import javax.media.opengl.GLAutoDrawable;
import javax.media.opengl.GLCapabilities;
import javax.media.opengl.GLEventListener;
import javax.media.opengl.GLProfile;
import javax.media.opengl.awt.GLCanvas;
import javax.media.opengl.glu.GLU;

import javax.swing.JFrame;

import com.jogamp.opengl.util.FPSAnimator;

public class Cube implements GLEventListener {

   public static DisplayMode dm, dm_old;
   private GLU glu = new GLU();
   private float rquad = 0.0f;

   @Override
   public void display( GLAutoDrawable drawable ) {

      final GL2 gl = drawable.getGL().getGL2();
      gl.glClear(GL2.GL_COLOR_BUFFER_BIT | GL2.GL_DEPTH_BUFFER_BIT );
      gl.glLoadIdentity();
      gl.glTranslatef( 0f, 0f, -5.0f );

      // Rotate The Cube On X, Y & Z
      gl.glRotatef(rquad, 1.0f, 1.0f, 1.0f);

      //giving different colors to different sides
      gl.glBegin(GL2.GL_QUADS); // Start Drawing The Cube
      gl.glColor3f(1f,0f,0f); //red color
      gl.glVertex3f(1.0f, 1.0f, -1.0f); // Top Right Of The Quad (Top)
      gl.glVertex3f( -1.0f, 1.0f, -1.0f); // Top Left Of The Quad (Top)
      gl.glVertex3f( -1.0f, 1.0f, 1.0f ); // Bottom Left Of The Quad (Top)
      gl.glVertex3f( 1.0f, 1.0f, 1.0f ); // Bottom Right Of The Quad (Top)

      gl.glColor3f( 0f,1f,0f ); //green color
      gl.glVertex3f( 1.0f, -1.0f, 1.0f ); // Top Right Of The Quad
      gl.glVertex3f( -1.0f, -1.0f, 1.0f ); // Top Left Of The Quad
      gl.glVertex3f( -1.0f, -1.0f, -1.0f ); // Bottom Left Of The Quad
      gl.glVertex3f( 1.0f, -1.0f, -1.0f ); // Bottom Right Of The Quad

      gl.glColor3f( 0f,0f,1f ); //blue color
      gl.glVertex3f( 1.0f, 1.0f, 1.0f ); // Top Right Of The Quad (Front)
      gl.glVertex3f( -1.0f, 1.0f, 1.0f ); // Top Left Of The Quad (Front)
      gl.glVertex3f( -1.0f, -1.0f, 1.0f ); // Bottom Left Of The Quad
      gl.glVertex3f( 1.0f, -1.0f, 1.0f ); // Bottom Right Of The Quad

      gl.glColor3f( 1f,1f,0f ); //yellow (red + green)
      gl.glVertex3f( 1.0f, -1.0f, -1.0f ); // Bottom Left Of The Quad
      gl.glVertex3f( -1.0f, -1.0f, -1.0f ); // Bottom Right Of The Quad
      gl.glVertex3f( -1.0f, 1.0f, -1.0f ); // Top Right Of The Quad (Back)
      gl.glVertex3f( 1.0f, 1.0f, -1.0f ); // Top Left Of The Quad (Back)

      gl.glColor3f( 1f,0f,1f ); //purple (red + green)
      gl.glVertex3f( -1.0f, 1.0f, 1.0f ); // Top Right Of The Quad (Left)
      gl.glVertex3f( -1.0f, 1.0f, -1.0f ); // Top Left Of The Quad (Left)
      gl.glVertex3f( -1.0f, -1.0f, -1.0f ); // Bottom Left Of The Quad
      gl.glVertex3f( -1.0f, -1.0f, 1.0f ); // Bottom Right Of The Quad

      gl.glColor3f( 0f,1f, 1f ); //sky blue (blue +green)
      gl.glVertex3f( 1.0f, 1.0f, -1.0f ); // Top Right Of The Quad (Right)
      gl.glVertex3f( 1.0f, 1.0f, 1.0f ); // Top Left Of The Quad
      gl.glVertex3f( 1.0f, -1.0f, 1.0f ); // Bottom Left Of The Quad
      gl.glVertex3f( 1.0f, -1.0f, -1.0f ); // Bottom Right Of The Quad
      gl.glEnd(); // Done Drawing The Quad
      gl.glFlush();

      rquad -= 0.15f;
   }

   @Override
   public void dispose( GLAutoDrawable drawable ) {
      // TODO Auto-generated method stub
   }

   @Override
   public void init( GLAutoDrawable drawable ) {

      final GL2 gl = drawable.getGL().getGL2();
      gl.glShadeModel( GL2.GL_SMOOTH );
      gl.glClearColor( 0f, 0f, 0f, 0f );
      gl.glClearDepth( 1.0f );
      gl.glEnable( GL2.GL_DEPTH_TEST );
      gl.glDepthFunc( GL2.GL_LEQUAL );
      gl.glHint( GL2.GL_PERSPECTIVE_CORRECTION_HINT, GL2.GL_NICEST );
   }

   @Override
   public void reshape( GLAutoDrawable drawable, int x, int y, int width, int height ) {

      // TODO Auto-generated method stub
      final GL2 gl = drawable.getGL().getGL2();
      if( height lt;= 0 )
         height = 1;

      final float h = ( float ) width / ( float ) height;
      gl.glViewport( 0, 0, width, height );
      gl.glMatrixMode( GL2.GL_PROJECTION );
      gl.glLoadIdentity();

      glu.gluPerspective( 45.0f, h, 1.0, 20.0 );
      gl.glMatrixMode( GL2.GL_MODELVIEW );
      gl.glLoadIdentity();
   }

   public static void main( String[] args ) {

      final GLProfile profile = GLProfile.get( GLProfile.GL2 );
      GLCapabilities capabilities = new GLCapabilities( profile );

      // The canvas
      final GLCanvas glcanvas = new GLCanvas( capabilities );
      Cube cube = new Cube();

      glcanvas.addGLEventListener( cube );
      glcanvas.setSize( 400, 400 );

      final JFrame frame = new JFrame ( " Multicolored cube" );
      frame.getContentPane().add( glcanvas );
      frame.setSize( frame.getContentPane().getPreferredSize() );
      frame.setVisible( true );
      final FPSAnimator animator = new FPSAnimator(glcanvas, 300,true);

      animator.start();
   }

}
Khi bạn biên dịch và thực thi chương trình trên, kết quả sau sẽ được tạo. Nó cho thấy một khối 3D có màu.

Áp dụng kết cấu cho khối lập phương
Các bước sau được đưa ra để áp dụng kết cấu cho một khối lập phương:
Bạn có thể gắn kết cấu bắt buộc vào khối lập phương bằng cách sử dụng gl.glBindTexture(GL2.GL_TEXTURE_2D.texture) phương thức của giao diện Drawable.
Phương thức này yêu cầu đối số texture (int) cùng với GL2.GL_TEXTURE_2D(int).
Trước khi bạn thực hiện Display(), bạn cần tạo biến kết cấu
bên trong init() hoặc trong các dòng bắt đầu của glDisplay() phương pháp, kích hoạt kết cấu using gl.glEnable(GL2.GL_TEXTURE_2D) phương pháp.
Tạo đối tượng kết cấu, đối tượng này cần đối tượng tệp làm tham số, đối tượng này cần đường dẫn của hình ảnh được sử dụng làm kết cấu đến đối tượng.
File file = new File(“c:\\pictures\\boy.jpg”);
Texture t = textureIO.newTexture(file, true);
texture = t.getTextureObject(gl);- Xử lý ngoại lệ 'không tìm thấy tệp'
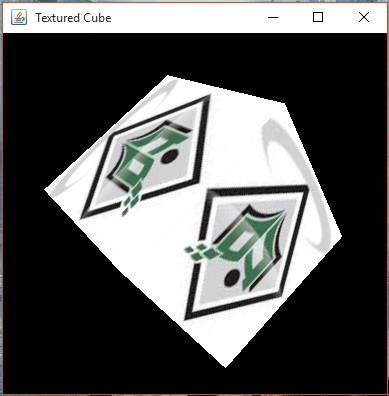
Dưới đây là chương trình để đính kèm hình ảnh trên một khối lập phương.
import java.awt.DisplayMode;

import java.io.File;
import java.io.IOException;

import javax.media.opengl.GL2;
import javax.media.opengl.GLAutoDrawable;
import javax.media.opengl.GLCapabilities;
import javax.media.opengl.GLEventListener;
import javax.media.opengl.GLProfile;
import javax.media.opengl.awt.GLCanvas;
import javax.media.opengl.glu.GLU;

import javax.swing.JFrame;

import com.jogamp.opengl.util.FPSAnimator;
import com.jogamp.opengl.util.texture.Texture;
import com.jogamp.opengl.util.texture.TextureIO;

public class CubeTexture implements GLEventListener {

   public static DisplayMode dm, dm_old;
   private GLU glu = new GLU();
   private float xrot,yrot,zrot;
   private int texture;

   @Override
   public void display(GLAutoDrawable drawable) {

      // TODO Auto-generated method stub
      final GL2 gl = drawable.getGL().getGL2();
      gl.glClear(GL2.GL_COLOR_BUFFER_BIT | GL2.GL_DEPTH_BUFFER_BIT);
      gl.glLoadIdentity(); // Reset The View
      gl.glTranslatef(0f, 0f, -5.0f);

      gl.glRotatef(xrot, 1.0f, 1.0f, 1.0f);
      gl.glRotatef(yrot, 0.0f, 1.0f, 0.0f);
      gl.glRotatef(zrot, 0.0f, 0.0f, 1.0f);

      gl.glBindTexture(GL2.GL_TEXTURE_2D, texture);
      gl.glBegin(GL2.GL_QUADS);

      // Front Face
      gl.glTexCoord2f(0.0f, 0.0f); gl.glVertex3f(-1.0f, -1.0f, 1.0f);
      gl.glTexCoord2f(1.0f, 0.0f); gl.glVertex3f( 1.0f, -1.0f, 1.0f);
      gl.glTexCoord2f(1.0f, 1.0f); gl.glVertex3f( 1.0f, 1.0f, 1.0f);
      gl.glTexCoord2f(0.0f, 1.0f); gl.glVertex3f(-1.0f, 1.0f, 1.0f);

      // Back Face
      gl.glTexCoord2f(1.0f, 0.0f); gl.glVertex3f(-1.0f, -1.0f, -1.0f);
      gl.glTexCoord2f(1.0f, 1.0f); gl.glVertex3f(-1.0f, 1.0f, -1.0f);
      gl.glTexCoord2f(0.0f, 1.0f); gl.glVertex3f( 1.0f, 1.0f, -1.0f);
      gl.glTexCoord2f(0.0f, 0.0f); gl.glVertex3f( 1.0f, -1.0f, -1.0f);

      // Top Face
      gl.glTexCoord2f(0.0f, 1.0f); gl.glVertex3f(-1.0f, 1.0f, -1.0f);
      gl.glTexCoord2f(0.0f, 0.0f); gl.glVertex3f(-1.0f, 1.0f, 1.0f);
      gl.glTexCoord2f(1.0f, 0.0f); gl.glVertex3f( 1.0f, 1.0f, 1.0f);
      gl.glTexCoord2f(1.0f, 1.0f); gl.glVertex3f( 1.0f, 1.0f, -1.0f);

      // Bottom Face
      gl.glTexCoord2f(1.0f, 1.0f); gl.glVertex3f(-1.0f, -1.0f, -1.0f);
      gl.glTexCoord2f(0.0f, 1.0f); gl.glVertex3f( 1.0f, -1.0f, -1.0f);
      gl.glTexCoord2f(0.0f, 0.0f); gl.glVertex3f( 1.0f, -1.0f, 1.0f);
      gl.glTexCoord2f(1.0f, 0.0f); gl.glVertex3f(-1.0f, -1.0f, 1.0f);

      // Right face
      gl.glTexCoord2f(1.0f, 0.0f); gl.glVertex3f( 1.0f, -1.0f, -1.0f);
      gl.glTexCoord2f(1.0f, 1.0f); gl.glVertex3f( 1.0f, 1.0f, -1.0f);
      gl.glTexCoord2f(0.0f, 1.0f); gl.glVertex3f( 1.0f, 1.0f, 1.0f);
      gl.glTexCoord2f(0.0f, 0.0f); gl.glVertex3f( 1.0f, -1.0f, 1.0f);

      // Left Face
      gl.glTexCoord2f(0.0f, 0.0f); gl.glVertex3f(-1.0f, -1.0f, -1.0f);
      gl.glTexCoord2f(1.0f, 0.0f); gl.glVertex3f(-1.0f, -1.0f, 1.0f);
      gl.glTexCoord2f(1.0f, 1.0f); gl.glVertex3f(-1.0f, 1.0f, 1.0f);
      gl.glTexCoord2f(0.0f, 1.0f); gl.glVertex3f(-1.0f, 1.0f, -1.0f);
      gl.glEnd();
      gl.glFlush();

      //change the speeds here
      xrot += .1f;
      yrot += .1f;
      zrot += .1f;
   }

   @Override
   public void dispose(GLAutoDrawable drawable) {
      // method body
   }

   @Override
   public void init(GLAutoDrawable drawable) {

      final GL2 gl = drawable.getGL().getGL2();

      gl.glShadeModel(GL2.GL_SMOOTH);
      gl.glClearColor(0f, 0f, 0f, 0f);
      gl.glClearDepth(1.0f);
      gl.glEnable(GL2.GL_DEPTH_TEST);
      gl.glDepthFunc(GL2.GL_LEQUAL);
      gl.glHint(GL2.GL_PERSPECTIVE_CORRECTION_HINT, GL2.GL_NICEST);

      //
      gl.glEnable(GL2.GL_TEXTURE_2D);
      try{

         File im = new File("E:\\office\\boy.jpg ");
         Texture t = TextureIO.newTexture(im, true);
         texture= t.getTextureObject(gl);

      }catch(IOException e){
         e.printStackTrace();
      }
   }

   @Override
   public void reshape(GLAutoDrawable drawable, int x, int y, int width, int height) {

      // TODO Auto-generated method stub
      final GL2 gl = drawable.getGL().getGL2();
      if(height lt;= 0)
         height = 1;

      final float h = (float) width / (float) height;
      gl.glViewport(0, 0, width, height);
      gl.glMatrixMode(GL2.GL_PROJECTION);
      gl.glLoadIdentity();

      glu.gluPerspective(45.0f, h, 1.0, 20.0);
      gl.glMatrixMode(GL2.GL_MODELVIEW);
      gl.glLoadIdentity();
   }

   public static void main(String[] args) {

      // TODO Auto-generated method stub
      final GLProfile profile = GLProfile.get(GLProfile.GL2);
      GLCapabilities capabilities = new GLCapabilities(profile);

      // The canvas
      final GLCanvas glcanvas = new GLCanvas(capabilities);
      CubeTexture r = new CubeTexture();

      glcanvas.addGLEventListener(r);
      glcanvas.setSize(400, 400);

      final JFrame frame = new JFrame (" Textured Cube");
      frame.getContentPane().add(glcanvas);
      frame.setSize(frame.getContentPane().getPreferredSize());
      frame.setVisible(true);
      final FPSAnimator animator = new FPSAnimator(glcanvas, 300, true);

      animator.start();
   }

}
Khi bạn biên dịch và thực thi chương trình trên, kết quả sau sẽ được tạo. Bạn có thể thấy một khối 3D với kết cấu mong muốn được áp dụng trên đó.
