Spring MVC - Ví dụ về trình xác thực Hibernate
Ví dụ sau đây cho thấy cách sử dụng Xử lý Lỗi và Trình xác thực trong các biểu mẫu sử dụng khuôn khổ Spring Web MVC. Để bắt đầu, hãy để chúng tôi có một IDE Eclipse đang hoạt động tại chỗ và tuân thủ các bước sau để phát triển Ứng dụng web dựa trên Biểu mẫu động bằng cách sử dụng Spring Web Framework.
| Bươc | Sự miêu tả |
|---|---|
| 1 | Tạo một dự án với tên TestWeb theo gói com.tutorialspoint như đã giải thích trong chương Spring MVC - Hello World. |
| 2 | Tạo các lớp Java Student, StudentController và StudentValidator theo gói com.tutorialspoint. |
| 3 | Tạo các tệp xem addStudent.jsp và result.jsp trong thư mục con jsp. |
| 4 | Tải xuống thư viện Hibernate Validator Hibernate Validator . Giải nén hibernate-validator-5.3.4.Final.jar và các phần phụ thuộc bắt buộc có trong thư mục bắt buộc của tệp zip đã tải xuống. Đặt chúng vào CLASSPATH của bạn. |
| 5 | Tạo một tệp thuộc tính messages.properties trong thư mục SRC. |
| 6 | Bước cuối cùng là tạo nội dung của tệp nguồn và cấu hình và xuất ứng dụng như được giải thích bên dưới. |
Student.java
package com.tutorialspoint;

import org.hibernate.validator.constraints.NotEmpty;
import org.hibernate.validator.constraints.Range;

public class Student {

   @Range(min = 1, max = 150)
   private Integer age;
   @NotEmpty
   private String name;
   private Integer id;

   public void setAge(Integer age) {
      this.age = age;
   }
   public Integer getAge() {
      return age;
   }

   public void setName(String name) {
      this.name = name;
   }
   public String getName() {
      return name;
   }

   public void setId(Integer id) {
      this.id = id;
   }
   public Integer getId() {
      return id;
   }
}
StudentController.java
package com.tutorialspoint;

import org.springframework.stereotype.Controller;
import org.springframework.ui.Model;
import org.springframework.validation.BindingResult;
import org.springframework.validation.annotation.Validated;
import org.springframework.web.bind.annotation.ModelAttribute;
import org.springframework.web.bind.annotation.RequestMapping;
import org.springframework.web.bind.annotation.RequestMethod;
import org.springframework.web.servlet.ModelAndView;

@Controller
public class StudentController {

   @RequestMapping(value = "/addStudent", method = RequestMethod.GET)
   public ModelAndView student() {
      return new ModelAndView("addStudent", "command", new Student());
   }

   @ModelAttribute("student")
   public Student createStudentModel() {
      return new Student();
   }

   @RequestMapping(value = "/addStudent", method = RequestMethod.POST)
   public String addStudent(@ModelAttribute("student") @Validated Student student,
      BindingResult bindingResult, Model model) {
      if (bindingResult.hasErrors()) {
         return "addStudent";
      }
      model.addAttribute("name", student.getName());
      model.addAttribute("age", student.getAge());
      model.addAttribute("id", student.getId());

      return "result";
   }
}
messages.properties
NotEmpty.student.name = Name is required!
Range.student.age = Age value must be between 1 and 150!
Ở đây, khóa là <Annotation>. <object-name>. <attribute>. Giá trị là thông báo được hiển thị.
TestWeb-servlet.xml
<beans xmlns = "http://www.springframework.org/schema/beans"
   xmlns:context = "http://www.springframework.org/schema/context"
   xmlns:mvc = "http://www.springframework.org/schema/mvc"
   xmlns:xsi = "http://www.w3.org/2001/XMLSchema-instance"
   xsi:schemaLocation = "
   http://www.springframework.org/schema/beans
   http://www.springframework.org/schema/beans/spring-beans-3.0.xsd
   http://www.springframework.org/schema/context
   http://www.springframework.org/schema/context/spring-context-3.0.xsd
   http://www.springframework.org/schema/mvc
   http://www.springframework.org/schema/mvc/spring-mvc-3.0.xsd">

   <context:component-scan base-package = "com.tutorialspoint" />
   <mvc:annotation-driven />
   <bean class = "org.springframework.context.support.ResourceBundleMessageSource"
      id = "messageSource">
      <property name = "basename" value = "messages" />
   </bean>
   <bean class = "org.springframework.web.servlet.view.InternalResourceViewResolver">
      <property name = "prefix" value = "/WEB-INF/jsp/" />
      <property name = "suffix" value = ".jsp" />
   </bean>
</beans>
Đây, cho phương thức dịch vụ đầu tiên student(), chúng tôi đã vượt qua một khoảng trống Studentobject>trong đối tượng ModelAndView có tên là "lệnh", bởi vì khuôn khổ mùa xuân mong đợi một đối tượng có tên "lệnh", nếu bạn đang sử dụng thẻ <form: form> trong tệp JSP của mình. Vì vậy, khistudent() phương thức được gọi, nó trả về addStudent.jsp lượt xem.
Phương thức dịch vụ thứ hai addStudent() sẽ được gọi đối với một phương thức POST trên HelloWeb/addStudentURL. Bạn sẽ chuẩn bị đối tượng mô hình của mình dựa trên thông tin đã gửi. Cuối cùng, một chế độ xem "kết quả" sẽ được trả về từ phương thức dịch vụ, điều này sẽ dẫn đến việc hiển thị result.jsp. Trong trường hợp có lỗi được tạo bằng trình xác thực thì trả về cùng một chế độ xem "addStudent", Spring sẽ tự động đưa ra các thông báo lỗi từBindingResult trong quan điểm.
addStudent.jsp
<%@taglib uri = "http://www.springframework.org/tags/form" prefix = "form"%>
<html>
   <head>
      <title>Spring MVC Form Handling</title>
   </head>
   <style>
      .error {
         color: #ff0000;
      }

      .errorblock {
         color: #000;
         background-color: #ffEEEE;
         border: 3px solid #ff0000;
         padding: 8px;
         margin: 16px;
      }
   </style>
   <body>

      <h2>Student Information</h2>
      <form:form method = "POST" action = "/TestWeb/addStudent" commandName = "student">
      <form:errors path = "*" cssClass = "errorblock" element = "div" />
         <table>
            <tr>
               <td><form:label path = "name">Name</form:label></td>
               <td><form:input path = "name" /></td>
               <td><form:errors path = "name" cssClass = "error" /></td>
            </tr>
            <tr>
               <td><form:label path = "age">Age</form:label></td>
               <td><form:input path = "age" /></td>
               <td><form:errors path = "age" cssClass = "error" /></td>
            </tr>
            <tr>
               <td><form:label path = "id">id</form:label></td>
               <td><form:input path = "id" /></td>
               </tr>
            <tr>
               <td colspan = "2">
               <input type = "submit" value = "Submit"/>
               </td>
            </tr>
         </table>
      </form:form>
   </body>
</html>
Ở đây, chúng tôi đang sử dụng thẻ <form: error /> với đường dẫn = "*" để hiển thị thông báo lỗi. Ví dụ -
<form:errors path = "*" cssClass = "errorblock" element = "div" />Nó sẽ hiển thị thông báo lỗi cho tất cả các xác nhận đầu vào. Chúng tôi đang sử dụng thẻ <form: error /> với đường dẫn = "name" để hiển thị thông báo lỗi cho trường tên.
Ví dụ -
<form:errors path = "name" cssClass = "error" />
<form:errors path = "age" cssClass = "error" />
Nó sẽ hiển thị thông báo lỗi để xác thực trường tên và tuổi.
result.jsp
<%@taglib uri = "http://www.springframework.org/tags/form" prefix = "form"%>
<html>
<head>
<title>Spring MVC Form Handling</title>
</head>
<body>
<h2>Submitted Student Information</h2>
<table>
<tr>
<td>Name</td>
<td>${name}</td>
</tr>
<tr>
<td>Age</td>
<td>${age}</td>
</tr>
<tr>
<td>ID</td>
<td>${id}</td>
</tr>
</table>
</body>
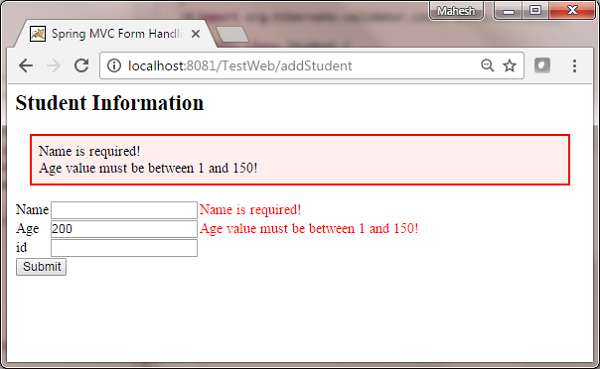
</html>Khi bạn đã hoàn tất việc tạo tệp nguồn và cấu hình, hãy xuất ứng dụng của bạn. Nhấp chuột phải vào ứng dụng của bạn, sử dụngExport → WAR File tùy chọn và lưu HelloWeb.war tệp trong thư mục ứng dụng web của Tomcat.
Bây giờ, khởi động máy chủ Tomcat và đảm bảo rằng bạn có thể truy cập các trang web khác từ thư mục ứng dụng web bằng trình duyệt tiêu chuẩn. Hãy thử một URL -http://localhost:8080/TestWeb/addStudent và chúng ta sẽ thấy màn hình sau, nếu bạn đã nhập các giá trị không hợp lệ.