Android - कैमरा
ये निम्नलिखित दो तरीके हैं, जिसमें आप अपने एप्लिकेशन में कैमरा का उपयोग कर सकते हैं
हमारे आवेदन में मौजूदा Android कैमरा एप्लिकेशन का उपयोग करना
सीधे हमारे आवेदन में Android द्वारा प्रदान की गई कैमरा एपीआई का उपयोग कर
हमारे आवेदन में मौजूदा Android कैमरा एप्लिकेशन का उपयोग करना
आप अपने फोन पर इंस्टॉल किए गए मौजूदा कैमरा एप्लिकेशन को लॉन्च करने के लिए MediaStore.ACTION_IMAGE_CAPTURE का उपयोग करेंगे। इसका सिंटैक्स नीचे दिया गया है
Intent intent = new Intent(android.provider.MediaStore.ACTION_IMAGE_CAPTURE);उपरोक्त के अलावा, MediaStore द्वारा उपलब्ध अन्य इंटेंट्स हैं। वे इस प्रकार सूचीबद्ध हैं
| अनु क्रमांक | आशय प्रकार और विवरण |
|---|---|
| 1 | ACTION_IMAGE_CAPTURE_SECURE यह कैमरे से कैप्चर की गई छवि को लौटाता है, जब डिवाइस सुरक्षित हो जाता है |
| 2 | ACTION_VIDEO_CAPTURE यह वीडियो पर कब्जा करने के लिए एंड्रॉइड में मौजूदा वीडियो एप्लिकेशन को कॉल करता है |
| 3 | EXTRA_SCREEN_ORIENTATION इसका उपयोग स्क्रीन के अभिविन्यास को ऊर्ध्वाधर या परिदृश्य में सेट करने के लिए किया जाता है |
| 4 | EXTRA_FULL_SCREEN इसका उपयोग ViewImage के यूजर इंटरफेस को नियंत्रित करने के लिए किया जाता है |
| 5 | INTENT_ACTION_VIDEO_CAMERA इस आशय का उपयोग वीडियो मोड में कैमरा लॉन्च करने के लिए किया जाता है |
| 6 | EXTRA_SIZE_LIMIT इसका उपयोग वीडियो या छवि कैप्चर आकार की आकार सीमा को निर्दिष्ट करने के लिए किया जाता है |
अब आप इस गतिविधि को शुरू करने और इसके परिणाम की प्रतीक्षा करने के लिए फ़ंक्शन startActivityForResult () का उपयोग करेंगे । इसका सिंटैक्स नीचे दिया गया है
startActivityForResult(intent,0)इस विधि में परिभाषित किया गया है activityकक्षा। हम इसे मुख्य गतिविधि से बुला रहे हैं। एक्टिविटी क्लास में परिभाषित तरीके हैं जो समान काम करते हैं, लेकिन इसका उपयोग तब किया जाता है जब आप गतिविधि से नहीं, बल्कि कहीं और से बुला रहे हों। वे नीचे सूचीबद्ध हैं
| अनु क्रमांक | गतिविधि समारोह विवरण |
|---|---|
| 1 | startActivityForResult(Intent intent, int requestCode, Bundle options) यह एक गतिविधि शुरू करता है, लेकिन इसके साथ विकल्पों का अतिरिक्त बंडल ले सकता है |
| 2 | startActivityFromChild(Activity child, Intent intent, int requestCode) यह गतिविधि तब लॉन्च करता है जब आपकी गतिविधि किसी अन्य गतिविधि का बच्चा हो |
| 3 | startActivityFromChild(Activity child, Intent intent, int requestCode, Bundle options) यह ऊपर की तरह ही काम करता है, लेकिन यह इसके साथ बंडल के आकार में अतिरिक्त मान ले सकता है |
| 4 | startActivityFromFragment(Fragment fragment, Intent intent, int requestCode) यह उस खंड से गतिविधि शुरू करता है जो आप वर्तमान में हैं |
| 5 | startActivityFromFragment(Fragment fragment, Intent intent, int requestCode, Bundle options) यह न केवल टुकड़े से गतिविधि को लॉन्च करता है, बल्कि इसके साथ अतिरिक्त मूल्य ले सकता है |
कोई फर्क नहीं पड़ता कि आप किस गतिविधि को लॉन्च करने के लिए कार्य करते थे, वे सभी परिणाम वापस करते हैं। परिणाम onActivityResult फ़ंक्शन को ओवरराइड करके प्राप्त किया जा सकता है ।
उदाहरण
यहां एक उदाहरण है जो दिखाता है कि छवि को पकड़ने और बिटमैप के रूप में परिणाम प्रदर्शित करने के लिए मौजूदा कैमरा एप्लिकेशन को कैसे लॉन्च किया जाए।
इस उदाहरण के साथ प्रयोग करने के लिए, आपको इसे एक वास्तविक डिवाइस पर चलाने की आवश्यकता है जिस पर कैमरा समर्थित है।
| कदम | विवरण |
|---|---|
| 1 | आप एंड्रॉइड स्टूडियो आईडीई का उपयोग एंड्रॉइड एप्लिकेशन बनाने और कैमरा के रूप में एक com.example.sairamkrishna.myapplication के तहत करेंगे। |
| 2 | कैमरा लॉन्च करने के इरादे कोड जोड़ने के लिए src / MainActivity.java फ़ाइल को संशोधित करें। |
| 3 | लेआउट एक्सएमएल फ़ाइल को संशोधित करें / लेआउट / activity_main.xml |
| 4 | कैमरा अनुमति जोड़ें और एप्लिकेशन को चलाएं और एक रनिंग एंड्रॉइड डिवाइस चुनें और उस पर एप्लिकेशन इंस्टॉल करें और परिणामों को सत्यापित करें। |
निम्नलिखित संशोधित मुख्य गतिविधि फ़ाइल की सामग्री है src/MainActivity.java.
package com.example.sairamkrishna.myapplication;

import android.Manifest;
import android.app.Activity;
import android.app.AlertDialog;

import android.content.Context;
import android.content.DialogInterface;
import android.content.Intent;
import android.content.SharedPreferences;
import android.content.pm.PackageManager;

import android.net.Uri;
import android.os.Bundle;
import android.provider.Settings;

import android.support.v4.app.ActivityCompat;
import android.support.v4.content.ContextCompat;
import android.support.v7.app.AppCompatActivity;
import android.support.v7.widget.Toolbar;

public class MainActivity extends AppCompatActivity {
   public static final int MY_PERMISSIONS_REQUEST_CAMERA = 100;
   public static final String ALLOW_KEY = "ALLOWED";
   public static final String CAMERA_PREF = "camera_pref";

   @Override
   protected void onCreate(Bundle savedInstanceState) {
      super.onCreate(savedInstanceState);
      setContentView(R.layout.activity_main);

      if (ContextCompat.checkSelfPermission(this, Manifest.permission.CAMERA) != PackageManager.PERMISSION_GRANTED) {
         if (getFromPref(this, ALLOW_KEY)) {
            showSettingsAlert();
         } else if (ContextCompat.checkSelfPermission(this,
            Manifest.permission.CAMERA)

            != PackageManager.PERMISSION_GRANTED) {

               // Should we show an explanation?
               if (ActivityCompat.shouldShowRequestPermissionRationale(this,
                  Manifest.permission.CAMERA)) {
                  showAlert();
               } else {
                  // No explanation needed, we can request the permission.
                  ActivityCompat.requestPermissions(this,
                     new String[]{Manifest.permission.CAMERA},
                     MY_PERMISSIONS_REQUEST_CAMERA);
               }
            }
      } else {
         openCamera();
      }

   }
   public static void saveToPreferences(Context context, String key, Boolean allowed) {
      SharedPreferences myPrefs = context.getSharedPreferences(CAMERA_PREF,
         Context.MODE_PRIVATE);
      SharedPreferences.Editor prefsEditor = myPrefs.edit();
      prefsEditor.putBoolean(key, allowed);
      prefsEditor.commit();
   }

   public static Boolean getFromPref(Context context, String key) {
      SharedPreferences myPrefs = context.getSharedPreferences(CAMERA_PREF,
         Context.MODE_PRIVATE);
      return (myPrefs.getBoolean(key, false));
   }

   private void showAlert() {
      AlertDialog alertDialog = new AlertDialog.Builder(MainActivity.this).create();
      alertDialog.setTitle("Alert");
      alertDialog.setMessage("App needs to access the Camera.");

      alertDialog.setButton(AlertDialog.BUTTON_NEGATIVE, "DONT ALLOW",
         new DialogInterface.OnClickListener() {
            public void onClick(DialogInterface dialog, int which) {
               dialog.dismiss();
               finish();
            }
      });

      alertDialog.setButton(AlertDialog.BUTTON_POSITIVE, "ALLOW",
         new DialogInterface.OnClickListener() {

            public void onClick(DialogInterface dialog, int which) {
               dialog.dismiss();
               ActivityCompat.requestPermissions(MainActivity.this,
               new String[]{Manifest.permission.CAMERA},
               MY_PERMISSIONS_REQUEST_CAMERA);
            }
      });
      alertDialog.show();
   }

   private void showSettingsAlert() {
      AlertDialog alertDialog = new AlertDialog.Builder(MainActivity.this).create();
      alertDialog.setTitle("Alert");
      alertDialog.setMessage("App needs to access the Camera.");

      alertDialog.setButton(AlertDialog.BUTTON_NEGATIVE, "DONT ALLOW",
         new DialogInterface.OnClickListener() {

            public void onClick(DialogInterface dialog, int which) {
               dialog.dismiss();
               //finish();
            }
      });

      alertDialog.setButton(AlertDialog.BUTTON_POSITIVE, "SETTINGS",
         new DialogInterface.OnClickListener() {

            public void onClick(DialogInterface dialog, int which) {
               dialog.dismiss();
               startInstalledAppDetailsActivity(MainActivity.this);
            }
      });

      alertDialog.show();
   }

   @Override
   public void onRequestPermissionsResult(int requestCode, String permissions[], int[] grantResults) {
      switch (requestCode) {
         case MY_PERMISSIONS_REQUEST_CAMERA: {
            for (int i = 0, len = permissions.length; i < len; i++) {
               String permission = permissions[i];

               if (grantResults[i] == PackageManager.PERMISSION_DENIED) {
                  boolean
                  showRationale =
                     ActivityCompat.shouldShowRequestPermissionRationale(
                     this, permission);

                  if (showRationale) {
                     showAlert();
                  } else if (!showRationale) {
                     // user denied flagging NEVER ASK AGAIN
                     // you can either enable some fall back,
                     // disable features of your app
                     // or open another dialog explaining
                     // again the permission and directing to
                     // the app setting
                     saveToPreferences(MainActivity.this, ALLOW_KEY, true);
                  }
               }
            }
         }

         // other 'case' lines to check for other
         // permissions this app might request
      }
   }

   @Override
   protected void onResume() {
      super.onResume();
   }

   public static void startInstalledAppDetailsActivity(final Activity context) {
      if (context == null) {
         return;
      }

      final Intent i = new Intent();
      i.setAction(Settings.ACTION_APPLICATION_DETAILS_SETTINGS);
      i.addCategory(Intent.CATEGORY_DEFAULT);
      i.setData(Uri.parse("package:" + context.getPackageName()));
      i.addFlags(Intent.FLAG_ACTIVITY_NEW_TASK);
      i.addFlags(Intent.FLAG_ACTIVITY_NO_HISTORY);
      i.addFlags(Intent.FLAG_ACTIVITY_EXCLUDE_FROM_RECENTS);
      context.startActivity(i);
   }

   private void openCamera() {
      Intent intent = new Intent("android.media.action.IMAGE_CAPTURE");
      startActivity(intent);
   }
}
निम्नलिखित की सामग्री होगी res/layout/activity_main.xml file-
<?xml version="1.0" encoding="utf-8"?>
<RelativeLayout xmlns:android="http://schemas.android.com/apk/res/android"
   xmlns:tools="http://schemas.android.com/tools"
      android:layout_width="match_parent"
   android:layout_height="match_parent"
   android:paddingLeft="@dimen/activity_horizontal_margin"
   android:paddingRight="@dimen/activity_horizontal_margin"
   android:paddingTop="@dimen/activity_vertical_margin"
   android:paddingBottom="@dimen/activity_vertical_margin" tools:context=".MainActivity">
</RelativeLayout>
निम्नलिखित की सामग्री होगी res/values/strings.xml एक नए स्थिरांक को परिभाषित करने के लिए
<resources>
   <string name="app_name">My Application</string>
</resources>
निम्नलिखित की डिफ़ॉल्ट सामग्री है AndroidManifest.xml -
<?xml version="1.0" encoding="utf-8"?>
<manifest xmlns:android="http://schemas.android.com/apk/res/android"
   package="com.example.sairamkrishna.myapplication" >
  <uses-permission android:name="android.permission.CAMERA" />
   <application
      android:allowBackup="true"
      android:icon="@drawable/ic_launcher"
      android:label="@string/app_name"
      android:theme="@style/AppTheme" >

      <activity
         android:name="com.example.sairamkrishna.myapplication.MainActivity"
         android:label="@string/app_name" >

         <intent-filter>
            <action android:name="android.intent.action.MAIN" />
            <category android:name="android.intent.category.LAUNCHER" />
         </intent-filter>

     </activity>

   </application>
</manifest>
आइए अपने एप्लिकेशन को चलाने का प्रयास करें। मुझे लगता है कि आपने अपने कंप्यूटर के साथ अपने वास्तविक एंड्रॉइड मोबाइल डिवाइस को कनेक्ट किया है। एंड्रॉइड स्टूडियो से ऐप को चलाने के लिए, अपने प्रोजेक्ट की गतिविधि फ़ाइलों में से एक खोलें और

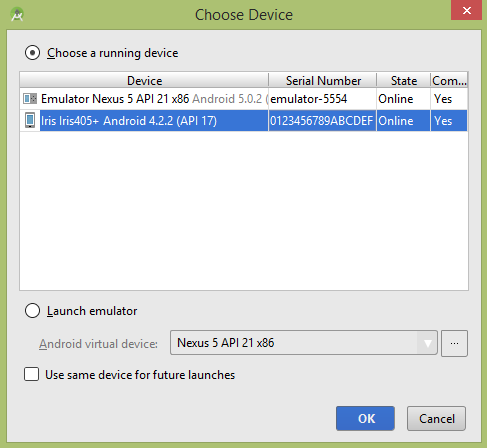
एक विकल्प के रूप में अपने मोबाइल डिवाइस का चयन करें और फिर अपने मोबाइल डिवाइस की जांच करें जो कैमरा खोल देगा और निम्न स्क्रीन प्रदर्शित करेगा -