Android - लॉगिन स्क्रीन
एक लॉगिन एप्लिकेशन स्क्रीन है जो आपके क्रेडेंशियल्स को किसी विशेष एप्लिकेशन में लॉगिन करने के लिए कह रही है। आपने इसे फेसबुक, ट्विटर आदि में लॉग इन करते हुए देखा होगा
यह अध्याय बताता है, कैसे एक लॉगिन स्क्रीन बनाने के लिए और कैसे झूठे प्रयास किए जाने पर सुरक्षा का प्रबंधन करें।
सबसे पहले आपको उपयोगकर्ता के उपयोगकर्ता नाम और पासवर्ड से दो टेक्स्ट व्यू को परिभाषित करना होगा। पासवर्ड TextView होना चाहिएinputTypeपासवर्ड सेट करें। इसका सिंटैक्स नीचे दिया गया है -
<EditText
   android:id = "@+id/editText2"
   android:layout_width = "wrap_content"
   android:layout_height = "wrap_content"
   android:inputType = "textPassword" />

<EditText
   android:id = "@+id/editText1"
   android:layout_width = "wrap_content"
   android:layout_height = "wrap_content"
/>
लॉगिन टेक्स्ट के साथ एक बटन को परिभाषित करें और इसे सेट करें onClickसंपत्ति। उसके बाद java फ़ाइल में onClick property में बताए गए फंक्शन को डिफाइन करें।
<Button
   android:id = "@+id/button1"
   android:layout_width = "wrap_content"
   android:layout_height = "wrap_content"
   android:onClick = "login"
   android:text = "@string/Login"
/>
जावा फ़ाइल में, onClick की विधि के अंदर उपयोगकर्ता नाम और पासवर्ड पाठ का उपयोग करें getText() तथा toString() विधि और पाठ का उपयोग कर के साथ मैच equals() समारोह।
EditText username = (EditText)findViewById(R.id.editText1);
EditText password = (EditText)findViewById(R.id.editText2);

public void login(View view){
   if(username.getText().toString().equals("admin") && password.getText().toString().equals("admin")){

   //correcct password
   }else{
   //wrong password
}
आखिरी चीज जो आपको करने की ज़रूरत है वह एक सुरक्षा तंत्र प्रदान करना है, ताकि अवांछित प्रयासों से बचा जाए। इसके लिए एक वैरिएबल को इनिशियलाइज़ करें और प्रत्येक झूठे प्रयास पर इसे घटाएं। और जब यह 0 तक पहुंच जाता है, तो लॉगिन बटन को अक्षम करें।
int counter = 3;
counter--;

if(counter==0){
   //disble the button, close the application e.t.c
}
उदाहरण
यहां एक लॉगिन एप्लिकेशन का प्रदर्शन करने वाला एक उदाहरण है। यह एक मूल एप्लिकेशन बनाता है जो आपको किसी एप्लिकेशन में लॉगिन करने के केवल तीन प्रयास देता है।
इस उदाहरण के साथ प्रयोग करने के लिए, आप इसे वास्तविक डिवाइस पर या एमुलेटर में चला सकते हैं।
| कदम | विवरण |
|---|---|
| 1 | आप एक पैकेज com.example.sairamkrishna.myapplication के तहत Android एप्लिकेशन बनाने के लिए Android स्टूडियो का उपयोग करेंगे। |
| 3 | आवश्यक कोड जोड़ने के लिए src / MainActivity.java फ़ाइल को संशोधित करें। |
| 4 | संबंधित XML घटकों को जोड़ने के लिए Res / layout / activity_main को संशोधित करें |
| 5 | एप्लिकेशन चलाएं और एक रनिंग एंड्रॉइड डिवाइस चुनें और उस पर एप्लिकेशन इंस्टॉल करें और परिणामों को सत्यापित करें |
निम्नलिखित संशोधित मुख्य गतिविधि फ़ाइल की सामग्री है src/MainActivity.java।
package com.example.sairamkrishna.myapplication;

import android.app.Activity;
import android.graphics.Color;
import android.os.Bundle;
import android.view.View;

import android.widget.Button;
import android.widget.EditText;
import android.widget.TextView;
import android.widget.Toast;


public class MainActivity extends Activity  {
   Button b1,b2;
   EditText ed1,ed2;

   TextView tx1;
   int counter = 3;

   @Override
   protected void onCreate(Bundle savedInstanceState) {
      super.onCreate(savedInstanceState);
      setContentView(R.layout.activity_main);

      b1 = (Button)findViewById(R.id.button);
      ed1 = (EditText)findViewById(R.id.editText);
      ed2 = (EditText)findViewById(R.id.editText2);

      b2 = (Button)findViewById(R.id.button2);
      tx1 = (TextView)findViewById(R.id.textView3);
      tx1.setVisibility(View.GONE);

      b1.setOnClickListener(new View.OnClickListener() {
         @Override
         public void onClick(View v) {
            if(ed1.getText().toString().equals("admin") &&
               ed2.getText().toString().equals("admin")) {
                  Toast.makeText(getApplicationContext(),
                     "Redirecting...",Toast.LENGTH_SHORT).show();
               }else{
                  Toast.makeText(getApplicationContext(), "Wrong
                     Credentials",Toast.LENGTH_SHORT).show();

                  tx1.setVisibility(View.VISIBLE);
                  tx1.setBackgroundColor(Color.RED);
                  counter--;
                  tx1.setText(Integer.toString(counter));

                  if (counter == 0) {
                     b1.setEnabled(false);
                  }
               }
         }
      });

      b2.setOnClickListener(new View.OnClickListener() {
         @Override
         public void onClick(View v) {
            finish();
         }
      });
   }
}
निम्नलिखित xml की संशोधित सामग्री है res/layout/activity_main.xml।
निम्नलिखित कोड में abc tutorialspoint.com के लोगो के बारे में बताता है
<?xml version = "1.0" encoding = "utf-8"?>
<RelativeLayout xmlns:android = "http://schemas.android.com/apk/res/android"
   xmlns:tools = "http://schemas.android.com/tools" android:layout_width="match_parent"
   android:layout_height = "match_parent" android:paddingLeft= "@dimen/activity_horizontal_margin"
   android:paddingRight = "@dimen/activity_horizontal_margin"
   android:paddingTop = "@dimen/activity_vertical_margin"
   android:paddingBottom = "@dimen/activity_vertical_margin" tools:context = ".MainActivity">

   <TextView android:text = "Login" android:layout_width="wrap_content"
      android:layout_height = "wrap_content"
      android:id = "@+id/textview"
      android:textSize = "35dp"
      android:layout_alignParentTop = "true"
      android:layout_centerHorizontal = "true" />

   <TextView
      android:layout_width = "wrap_content"
      android:layout_height = "wrap_content"
      android:text = "Tutorials point"
      android:id = "@+id/textView"
      android:layout_below = "@+id/textview"
      android:layout_centerHorizontal = "true"
      android:textColor = "#ff7aff24"
      android:textSize = "35dp" />

   <EditText
      android:layout_width = "wrap_content"
      android:layout_height = "wrap_content"
      android:id = "@+id/editText"
      android:hint = "Enter Name"
      android:focusable = "true"
      android:textColorHighlight = "#ff7eff15"
      android:textColorHint = "#ffff25e6"
      android:layout_marginTop = "46dp"
      android:layout_below = "@+id/imageView"
      android:layout_alignParentLeft = "true"
      android:layout_alignParentStart = "true"
      android:layout_alignParentRight = "true"
      android:layout_alignParentEnd = "true" />

   <ImageView
      android:layout_width="wrap_content"
      android:layout_height="wrap_content"
      android:id="@+id/imageView"
      android:src="@drawable/abc"
      android:layout_below="@+id/textView"
      android:layout_centerHorizontal="true" />

   <EditText
      android:layout_width="wrap_content"
      android:layout_height="wrap_content"
      android:inputType="textPassword"
      android:ems="10"
      android:id="@+id/editText2"
      android:layout_below="@+id/editText"
      android:layout_alignParentLeft="true"
      android:layout_alignParentStart="true"
      android:layout_alignRight="@+id/editText"
      android:layout_alignEnd="@+id/editText"
      android:textColorHint="#ffff299f"
      android:hint="Password" />

   <TextView
      android:layout_width="wrap_content"
      android:layout_height="wrap_content"
      android:text="Attempts Left:"
      android:id="@+id/textView2"
      android:layout_below="@+id/editText2"
      android:layout_alignParentLeft="true"
      android:layout_alignParentStart="true"
      android:textSize="25dp" />

   <TextView
      android:layout_width="wrap_content"
      android:layout_height="wrap_content"
      android:text="New Text"
      android:id="@+id/textView3"
      android:layout_alignTop="@+id/textView2"
      android:layout_alignParentRight="true"
      android:layout_alignParentEnd="true"
      android:layout_alignBottom="@+id/textView2"
      android:layout_toEndOf="@+id/textview"
      android:textSize="25dp"
      android:layout_toRightOf="@+id/textview" />

   <Button
      android:layout_width="wrap_content"
      android:layout_height="wrap_content"
      android:text="login"
      android:id="@+id/button"
      android:layout_alignParentBottom="true"
      android:layout_toLeftOf="@+id/textview"
      android:layout_toStartOf="@+id/textview" />

   <Button
      android:layout_width="wrap_content"
      android:layout_height="wrap_content"
      android:text="Cancel"
      android:id="@+id/button2"
      android:layout_alignParentBottom="true"
      android:layout_toRightOf="@+id/textview"
      android:layout_toEndOf="@+id/textview" />

</RelativeLayout>
निम्नलिखित की सामग्री है res/values/string.xml।
<resources>
   <string name="app_name">My Application</string>
</resources>
निम्नलिखित की सामग्री है AndroidManifest.xml फ़ाइल।
<?xml version="1.0" encoding="utf-8"?>
<manifest xmlns:android="http://schemas.android.com/apk/res/android"
   package="com.example.sairamkrishna.myapplication" >

   <application
      android:allowBackup="true"
      android:icon="@mipmap/ic_launcher"
      android:label="@string/app_name"
      android:theme="@style/AppTheme" >

      <activity
         android:name=".MainActivity"
         android:label="@string/app_name" >

         <intent-filter>
            <action android:name="android.intent.action.MAIN" />
            <category android:name="android.intent.category.LAUNCHER" />
         </intent-filter>

      </activity>

   </application>
</manifest>
आइए हम अपने एप्लिकेशन को संशोधित करने का प्रयास करें। मुझे लगता है कि आपने अपना बनाया थाAVDपर्यावरण सेटअप करते समय। एंड्रॉइड स्टूडियो से ऐप को चलाने के लिए, अपने प्रोजेक्ट की गतिविधि फ़ाइलों में से एक खोलें और


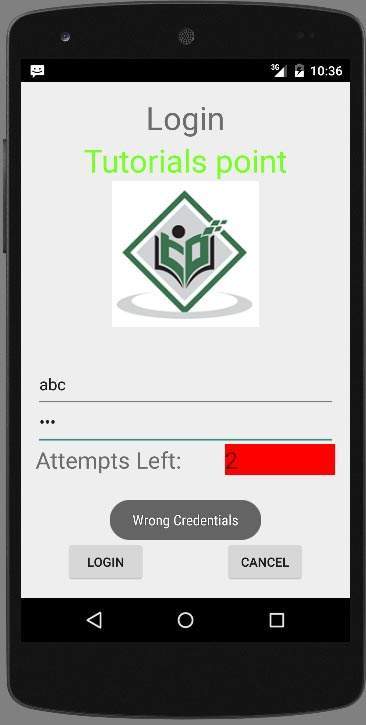
उपयोगकर्ता नाम और पासवर्ड फ़ील्ड में कुछ भी लिखें और फिर लॉगिन बटन दबाएं। मैंने उपयोगकर्ता नाम फ़ील्ड में abc और पासवर्ड फ़ील्ड में abc डाल दिया। मुझे असफल प्रयास मिला। यह नीचे दिखाया गया है -

ऐसा दो बार करें, और आप देखेंगे कि आपके पास 0 लॉगिन प्रयास बचे हैं और आपका लॉगिन बटन अक्षम है।
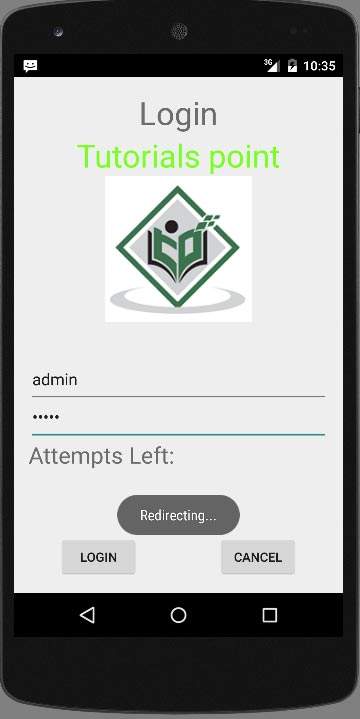
अब फिर से आवेदन खोलें, और इस बार व्यवस्थापक के रूप में सही उपयोगकर्ता नाम और पासवर्ड दर्ज करें और लॉगिन पर क्लिक करें। आप सफलतापूर्वक लॉगिन हो जाएंगे।

यदि उपयोगकर्ता रद्द बटन दबाता है, तो यह लॉगिन स्क्रीन के एक एप्लिकेशन को बंद कर देगा।