Android - स्थानीयकरण
एक Android एप्लिकेशन कई अलग-अलग क्षेत्रों में कई उपकरणों पर चल सकता है। आपके एप्लिकेशन को अधिक इंटरैक्टिव बनाने के लिए, आपके एप्लिकेशन को उन स्थानों के लिए उपयुक्त तरीके से पाठ, संख्याओं, फ़ाइलों आदि को संभालना चाहिए जहां आपके एप्लिकेशन का उपयोग किया जाएगा।
स्ट्रिंग को विभिन्न भाषाओं में बदलने के तरीके को स्थानीयकरण कहा जाता है
इस अध्याय में हम बताएंगे, कि कैसे आप विभिन्न क्षेत्रों के अनुसार अपने आवेदन को स्थानीय कर सकते हैं आदि। हम आवेदन में उपयोग किए गए तार को स्थानीय कर देंगे, और उसी तरह अन्य चीजों को स्थानीयकृत किया जा सकता है।
स्थानीयकरण स्ट्रिंग्स
अपने एप्लिकेशन में उपयोग किए गए स्ट्रिंग्स को स्थानीय बनाने के लिए, एक नया फ़ोल्डर बनाएं res के नाम के साथ values-local जहां स्थानीय क्षेत्र के साथ प्रतिस्थापित किया जाएगा।
उदाहरण के लिए, इटली के मामले में, values-itफ़ोल्डर को रेज के तहत बनाया जाएगा। यह नीचे दी गई छवि में दिखाया गया है -

एक बार जब वह फ़ोल्डर बन जाता है, तो कॉपी करें strings.xmlडिफ़ॉल्ट फ़ोल्डर से आपके द्वारा बनाए गए फ़ोल्डर में। और इसकी सामग्री को बदलें। उदाहरण के लिए, मैंने हेल्लो_वर्ल्ड स्ट्रिंग का मान बदल दिया है।
इटली, रेस / वैल्यूज़-इट / स्ट्रिंग्स.एक्सएमएल
<;?xml version="1.0" encoding="utf-8"?>
<resources>
   <string name="hello_world">Ciao mondo!</string>
</resources>
स्पैनिश, रेस / वैल्यूज़-इट / स्ट्रिंग्स.एक्सएमएल
<;?xml version="1.0" encoding="utf-8"?>
<resources>
   <string name="hello_world">Hola Mundo!</string>
</resources>
फ्रेंच, रेस / मान / इट्स / स्ट्रिंग्स.एक्सएमएल
<;?xml version="1.0" encoding="utf-8"?>
<resources>
   <string name="hello_world">Bonjour le monde !</string>
</resources>
इन भाषाओं के अलावा, अन्य भाषाओं का क्षेत्र कोड नीचे दी गई तालिका में दिया गया है -
| अनु क्रमांक | भाषा और कोड |
|---|---|
| 1 | Afrikanns कोड: af फ़ोल्डर का नाम: मान-एफ |
| 2 | Arabic कोड: ar फ़ोल्डर का नाम: मान-ए.आर. |
| 3 | Bengali कोड: bn फ़ोल्डर का नाम: मान- bn |
| 4 | Czech कोड: सीएस। फ़ोल्डर का नाम: मान-सीएस |
| 5 | Chinese कोड: zh फ़ोल्डर का नाम: मान- zh |
| 6 | German कोड: डी। फ़ोल्डर का नाम: मान-डी |
| 7 | French कोड: fr फ़ोल्डर का नाम: मान-fr |
| 8 | Japanese कोड: ja फ़ोल्डर का नाम: मान-जा |
उदाहरण
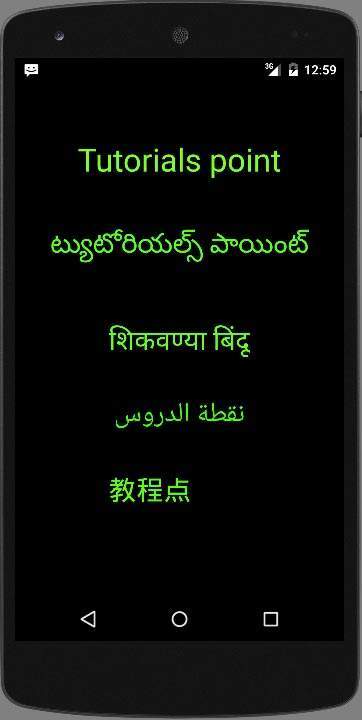
इस उदाहरण के साथ प्रयोग करने के लिए, आप इसे वास्तविक डिवाइस पर या एमुलेटर में चला सकते हैं।
| कदम | विवरण |
|---|---|
| 1 | आप एक पैकेज com.example.sairamkrishna.myapplication के तहत Android एप्लिकेशन बनाने के लिए Android स्टूडियो का उपयोग करेंगे। |
| 2 | संबंधित XML घटकों को जोड़ने के लिए Res / layout / activity_main को संशोधित करें |
| 3 | आवश्यक स्ट्रिंग घटकों को जोड़ने के लिए Res / मान / string.xml संशोधित करें |
| 4 | एप्लिकेशन चलाएं और एक रनिंग एंड्रॉइड डिवाइस चुनें और उस पर एप्लिकेशन इंस्टॉल करें और परिणामों को सत्यापित करें |
निम्नलिखित xml की संशोधित सामग्री है res/layout/activity_main.xml।
<?xml version="1.0" encoding="utf-8"?>
<RelativeLayout
   xmlns:android="http://schemas.android.com/apk/res/android"
   xmlns:tools="http://schemas.android.com/tools"
   android:layout_width="match_parent"
   android:layout_height="match_parent" android:paddingLeft="@dimen/activity_horizontal_margin"
   android:paddingRight="@dimen/activity_horizontal_margin"
   android:paddingTop="@dimen/activity_vertical_margin"
   android:paddingBottom="@dimen/activity_vertical_margin"
   tools:context=".MainActivity">

   <TextView android:text="Wifi"
      android:layout_width="wrap_content"
      android:layout_height="wrap_content"
      android:id="@+id/textview"
      android:textSize="35dp"
      android:layout_alignParentTop="true"
      android:layout_centerHorizontal="true" />

   <TextView
      android:layout_width="wrap_content"
      android:layout_height="wrap_content"
      android:text="Tutorials point"
      android:id="@+id/textView"
      android:layout_below="@+id/textview"
      android:layout_centerHorizontal="true"
      android:textColor="#ff7aff24"
      android:textSize="35dp" />

   <TextView
      android:layout_width="wrap_content"
      android:layout_height="wrap_content"
      android:text="@string/hindi"
      android:id="@+id/textView2"
      android:layout_below="@+id/textView"
      android:layout_centerHorizontal="true"
      android:layout_marginTop="50dp"
      android:textColor="#ff59ff1a"
      android:textSize="30dp" />

   <TextView
      android:layout_width="wrap_content"
      android:layout_height="wrap_content"
      android:text="@string/marathi"
      android:id="@+id/textView3"
      android:textSize="30dp"
      android:textColor="#ff67ff1e"
      android:layout_centerVertical="true"
      android:layout_centerHorizontal="true" />

   <TextView
      android:layout_width="wrap_content"
      android:layout_height="wrap_content"
      android:text="@string/arabic"
      android:id="@+id/textView4"
      android:layout_below="@+id/textView3"
      android:layout_centerHorizontal="true"
      android:layout_marginTop="42dp"
      android:textColor="#ff40ff08"
      android:textSize="30dp" />

   <TextView
      android:layout_width="wrap_content"
      android:layout_height="wrap_content"
      android:text="@string/chinese"
      android:id="@+id/textView5"
      android:layout_below="@+id/textView4"
      android:layout_alignLeft="@+id/textView3"
      android:layout_alignStart="@+id/textView3"
      android:layout_marginTop="42dp"
      android:textSize="30dp"
      android:textColor="#ff56ff12"
      android:layout_alignRight="@+id/textView3"
      android:layout_alignEnd="@+id/textView3" />

</RelativeLayout>
निम्नलिखित की सामग्री है res/values/string.xml।
<resources>
   <string name="app_name">My Application</string>
   <string name="hello_world">Hello world!</string>
   <string name="action_settings">Settings</string>
   <string name="hindi">ట్యుటోరియల్స్ పాయింట్</string>
   <string name="marathi">शिकवण्या बिंदू</string>
   <string name="arabic">نقطة الدروس7</string>
   <string name="chinese">教程点</string>
</resources>
आइए हम अपने एप्लिकेशन को संशोधित करने का प्रयास करें। मुझे लगता है कि आपने अपना बनाया थाAVDपर्यावरण सेटअप करते समय। एंड्रॉइड स्टूडियो से ऐप को चलाने के लिए, अपने प्रोजेक्ट की गतिविधि फ़ाइलों में से एक खोलें और

