आयनिक - रेडियो बटन
Radio buttonsएक तत्व का दूसरा रूप है, जिसे हम इस अध्याय में शामिल करेंगे। टॉगल और चेकबॉक्स रूपों से रेडियो बटन के बीच का अंतर यह है कि पूर्व का उपयोग करते समय, आप सूची से केवल एक रेडियो बटन चुनते हैं। जैसा कि उत्तरार्द्ध आपको एक से अधिक चुनने की अनुमति देता है।
रेडियो बटन जोड़ना
चूंकि चुनने के लिए हमेशा एक से अधिक रेडियो बटन होंगे, इसलिए सूची बनाने का सबसे अच्छा तरीका है। जब भी हम कई तत्व चाहते थे, हमने ऐसा किया। सूची आइटम वर्ग होगाitem-radio। फिर, हम उपयोग करेंगेlabelइसके लिए जैसा कि हमने अन्य सभी रूपों के साथ उपयोग किया है। इनपुट होगाnameविशेषता। यह विशेषता उन सभी बटनों को समूहित करेगी जिन्हें आप संभावित विकल्प के रूप में उपयोग करना चाहते हैं। item-contentक्लास का उपयोग विकल्पों को स्पष्ट रूप से प्रदर्शित करने के लिए किया जाता है। अंत में, हम उपयोग करेंगेradio-icon उपयोगकर्ता द्वारा चुने गए विकल्प को चिह्नित करने के लिए उपयोग किए जाने वाले चेकमार्क आइकन को जोड़ने के लिए वर्ग।
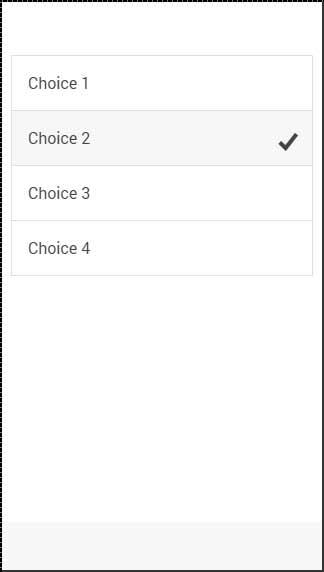
निम्नलिखित उदाहरण में, चार रेडियो बटन हैं और दूसरे को चुना गया है।
<div class = "list">
   <label class = "item item-radio">
      <input type = "radio" name = "group1" />
      <div class = "item-content">
         Choice 1
      </div>
      <i class = "radio-icon ion-checkmark"></i>
   </label>

   <label class = "item item-radio">
      <input type = "radio" name = "group1" />
      <div class = "item-content">
         Choice 2
      </div>
      <i class = "radio-icon ion-checkmark"></i>
   </label>

   <label class = "item item-radio">
      <input type = "radio" name = "group1" />
      <div class = "item-content">
         Choice 3
      </div>
      <i class = "radio-icon ion-checkmark"></i>
   </label>

   <label class = "item item-radio">
      <input type = "radio" name = "group1" />
      <div class = "item-content">
         Choice 4
      </div>
      <i class = "radio-icon ion-checkmark"></i>
   </label>
</div>
उपरोक्त कोड निम्नलिखित स्क्रीन का उत्पादन करेगा -

एकाधिक रेडियो बटन समूह
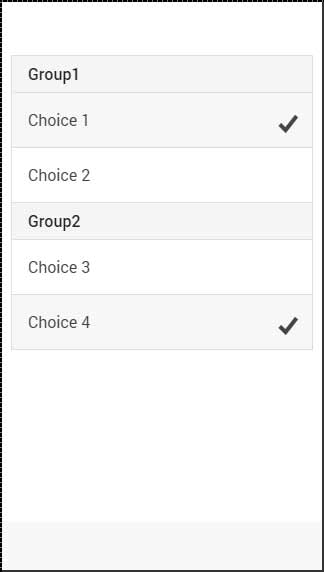
कभी-कभी आप एक से अधिक समूह बनाना चाहते हैं। यह क्या हैnameविशेषता के लिए बनाया गया है; निम्नलिखित उदाहरण पहले दो और अंतिम दो बटन को दो विकल्प समूहों के रूप में समूहित करेगा।
हम उपयोग करेंगे item-dividerदो समूहों को अलग करने के लिए कक्षा। ध्यान दें कि पहले समूह में हैname के बराबर विशेषता group1 और दूसरा उपयोग करता है group2।
<div class = "list">
   <div class = " item item-divider">
      Group1
   </div>

   <label class = "item item-radio">
      <input type = "radio" name = "group1" />
      <div class = "item-content">
         Choice 1
      </div>
      <i class = "radio-icon ion-checkmark"></i>
   </label>

   <label class = "item item-radio">
      <input type = "radio" name = "group1" />
      <div class = "item-content">
         Choice 2
      </div>
      <i class = "radio-icon ion-checkmark"></i>
   </label>

   <div class = "item item-divider">
      Group2
   </div>

   <label class = "item item-radio">
      <input type = "radio" name = "group2" />
      <div class = "item-content">
         Choice 3
      </div>
      <i class = "radio-icon ion-checkmark"></i>
   </label>

   <label class = "item item-radio">
      <input type = "radio" name = "group2" />
      <div class = "item-content">
         Choice 4
      </div>
      <i class = "radio-icon ion-checkmark"></i>
   </label>
</div>
उपरोक्त कोड निम्नलिखित स्क्रीन का उत्पादन करेगा -
